finisher_en.book Page 1 Wednesday, January 27, 2010 2:35 PM Copyright Copyright © 2010 Samsung Electronics Co., Ltd. All rights reserved. This guide is provided for information purposes only. All information included herein is subject to change without notice. Samsung Electronics is not responsible for any direct or indirect damages, arising from or related to use of this guide. • • Samsung and Samsung logo are trademarks of Samsung Electronics Co., Ltd.
finisher_en.book Page 2 Wednesday, January 27, 2010 2:35 PM Contents ABOUT THIS GUIDE 3,250-SHEET BOOKLET FINISHER (CLX-FIN40L) Installing the booklet finisher . . . . . . . . . . . . . . . . . . . . . . . . . . . . . . . . . . . . . . . . 5 Screws for assembling the booklet finisher . . . . . . . . . . . . . . . . . . . . . . . . . . . . . 6 Removing the exit tray, duplex tray and flappers . . . . . . . . . . . . . . . . . . . . . . . . . 7 Installing the bridge unit (CLX-BRG200) . . . . . . . . . . . . .
finisher_en.book Page 3 Wednesday, January 27, 2010 2:35 PM Regulatory information This machine is designed for your sound environment and certified with several regulatory statements. Correct Disposal of This Product (Waste Electrical & Electronic Equipment) (Applicable in the European Union and other European countries with separate collection systems) This marking on the product, accessories or literature indicates that the product and its electronic accessories (e.g.
finisher_en.book Page 4 Wednesday, January 27, 2010 2:35 PM About this guide 2. Thank you for purchasing Samsung’s finisher. This installation guide will guide you in how to prepare and setup the finisher. To prevent machine failure, follow the setup procedure and installation order precisely. The illustrations in this installation guide may differ from your machine. However, the setup is the same for all models. Follow the steps in this guide.
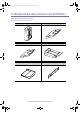
finisher_en.book Page 5 Wednesday, January 27, 2010 2:35 PM 3,250-Sheet Booklet Finisher (CLX-FIN40L) 1. Installing the booklet finisher Make sure you have all of the following items.
finisher_en.book Page 6 Wednesday, January 27, 2010 2:35 PM STAPLER CARTRIDGE SPACER STEEL GUIDE FINISHER LEG Screws for assembling the booklet finisher This table shows the screws to be used for assembling the booklet finisher.
finisher_en.book Page 7 Wednesday, January 27, 2010 2:35 PM Removing the exit tray, duplex tray and flappers You need to remove the exit tray and duplex tray before installing the booklet finisher. 1. If the machine is turned on, press the Power button for more than two seconds on the right side of the control panel. When the confirmation window appears, press Yes from the display screen, then wait until power is turned off automatically.
finisher_en.book Page 8 Wednesday, January 27, 2010 2:35 PM 4. Lift up the exit tray and pull it slightly to the direction of the arrow as shown below. 5. Hold the exit tray and pull it out to the direction of the arrow as shown below.
finisher_en.book Page 9 Wednesday, January 27, 2010 2:35 PM 6. Remove the duplex tray in the exit area, pushing both sides of it as the small arrows shown below. For SCX-8040_8030 Series, skip this step and go to step 8. 7. Remove the two flappers in the exit area, pushing both sides of each flapper as the small arrows shown below. For CLX-9250 Series, skip this step and go to step 8.
finisher_en.book Page 10 Wednesday, January 27, 2010 2:35 PM 8. Make sure the bin full sensor is unfolded. Otherwise, it may cause paper jams.
finisher_en.book Page 11 Wednesday, January 27, 2010 2:35 PM Installing the bridge unit (CLX-BRG200) 1. Unpack the bridge unit. Make sure you have all of the following items. BRIDGE BASE TWO BRIDGE COVERS 2. Insert the bridge base into the corresponding position where exit tray was placed.
finisher_en.book Page 12 Wednesday, January 27, 2010 2:35 PM After inserting the bridge base, make sure the location of bin full sensor is in the right position as shown below. 3. Tighten the two screws (Screw-Taptite [M3x8]).
finisher_en.book Page 13 Wednesday, January 27, 2010 2:35 PM 4. Insert the curved bridge cover until it clicks into the place. 5. Insert the location pin of the flat bridge cover to the hole of curved bridge cover until it clicks into place.
finisher_en.book Page 14 Wednesday, January 27, 2010 2:35 PM 6. The bridge cable should be connected to the finisher after installing the finisher (See "Connect the bridge cable to the upper connector." on page 26).
finisher_en.book Page 15 Wednesday, January 27, 2010 2:35 PM Assembling the spacer 1. Unpack the spacer. Ensure the following items are included in the box: For SCX-8040_8030 Series, skip this step and go to step 8. SPACER FINISHER LEGa a. The finisher leg prevents the finisher from leaning when the booklet maker is opened (See page 20). 2. Lay the booklet finisher down carefully on the flat floor. 3. Loosen the knobs counterclockwise to remove them.
finisher_en.book Page 16 Wednesday, January 27, 2010 2:35 PM 4. Remove the wheels. 5. Assemble the spacer to the booklet finisher as shown below.
finisher_en.book Page 17 Wednesday, January 27, 2010 2:35 PM 6. Tighten the four screws (Screw-Machine [M4x12]). 7. Replace the wheels and knobs.
finisher_en.book Page 18 Wednesday, January 27, 2010 2:35 PM 8. Stand the booklet finisher up, and remove the two steel brackets with ribbons. 9. Open the front door.
finisher_en.book Page 19 Wednesday, January 27, 2010 2:35 PM 10. Remove the three screws with ribbons. 11. Then pull out the booklet maker.
finisher_en.book Page 20 Wednesday, January 27, 2010 2:35 PM 12. Remove the tapes on the booklet stapler. 13. See the bottom of the booklet maker. Then put in the finisher leg as shown below. For SCX-8040_8030 Series, skip this step and go to step 16.
finisher_en.book Page 21 Wednesday, January 27, 2010 2:35 PM 14. Insert the pin into the hole of the guide as shown below. 15. Put the ring into the pin as shown below.
finisher_en.book Page 22 Wednesday, January 27, 2010 2:35 PM 16. Insert the two tabs on the booklet tray’s output support into the slots on both sides of the booklet tray as shown below. 17. Insert the booklet tray, making sure the locating pins are correctly inserted in the locating holes.
finisher_en.book Page 23 Wednesday, January 27, 2010 2:35 PM 18. To securely fasten the booklet tray to the finisher, use the two screws (Screw-Tapping [M4x10]) to fix the booklet tray securely to the finisher. 19. Insert the booklet maker and then close the front door.
finisher_en.book Page 24 Wednesday, January 27, 2010 2:35 PM 20. Insert the steel guide and tighten the two screws (Screw-Machine [M4x12]). For SCX-8040_8030 Series, skip this step. Installing the finisher 1. Attach the mounting bracket using the four screws (Screw-Machine [M4x12]).
finisher_en.book Page 25 Wednesday, January 27, 2010 2:35 PM 2. Adjust the location of mounting bracket’s docking pin and the finisher hole, and push the finisher to the machine. If the machine and the finisher do not lineup correctly, adjust the height of the finisher by turning the knobs underneath the finisher.
finisher_en.book Page 26 Wednesday, January 27, 2010 2:35 PM 3. Loosen the two screws from the finisher cover, and open the finisher cover. 4. Connect the bridge cable to the upper connector. Do not force the bridge cable to the lower connector. It can cause damage to the machine. The lower connector is used for connecting the punch kit and the finisher.
finisher_en.book Page 27 Wednesday, January 27, 2010 2:35 PM 5. Check the cable tie on the bridge cable, and put in the bridge cable to the hook as shown below. 6. Then close the finisher cover and tighten the two screws.
finisher_en.book Page 28 Wednesday, January 27, 2010 2:35 PM 7. Connect the finisher cable to the connector on the machine. 8. Insert the finisher tray and the tighten two screws (Screw-Machine [M4x12]) under the finisher tray.
finisher_en.book Page 29 Wednesday, January 27, 2010 2:35 PM 9. Insert the two tabs on the top tray into the slots on both sides of the finisher. 10. Open the front door of the booklet finisher.
finisher_en.book Page 30 Wednesday, January 27, 2010 2:35 PM 11. Insert the staple cartridge. 12. Close the front door. • • For details on how to use the finisher, refer to the printing or copying chapter in the User’s Guide included on the user’s guide CD. If you have problems using the finisher, refer to the troubleshooting chapter in the User’s Guide.
finisher_en.book Page 31 Wednesday, January 27, 2010 2:35 PM Separating the finisher 1. Open the front door of the booklet finisher. 2. Insert a screw driver in the hole and push it. The finisher is separated from the machine.