DW60H3010FW D146STS D146W D141STS D141W Dishwasher user manual imagine the possibilities Thank you for purchasing this Samsung product. DD81-01651E-02_EN (Iran).
Safety information Please read this User Information carefully and keep it to refer to at a later date. Pass it on to any subsequent owner of the appliance. This manual contains sections of Safety Instructions, Part and Features, Installation your dishwasher and Troubleshooting etc. Carefully reading it before using the dishwasher will help you to use and maintain the dishwasher properly.
DISPOSAL Dispose of the dishwasher packaging material correctly. All packaging materials can be recycled. Plastic parts are marked with the standard international abbreviations: PE PS POM PP ABS for polyethylene, e.g. sheet wrapping material for polystyrene, e.g. padding material polyoxymethylene, e.g. plastic clips polypropylene, e.g. Salt filler Acrylonitrile Butadiene Styrene, e.g. Control Panel.
Contents PART AND FEATURES 5 INSTALLING YOUR DISHWASHER 12 USING THE DETERGENT AND WATER SOFTENER 15 LOADING THE DISHWASHER RACKS 22 WASHING PROGRAMMES 28 CLEANING AND CARE 32 TROUBLESHOOTING 35 APPENDIX 39 5 8 10 Dishwasher features Control panel Displays 12 14 14 14 Water supply and drain Connection of drain hoses Position the appliance Start of dishwasher 15 16 17 19 21 Water softener Loading the salt into the softener Fill the rinse aid dispenser Function of detergent How to use the Multi
Part and features DISHWASHER FEATURES Front & Rear view (D146) 01 PART AND FEATURES 1 7 2 4 8 3 9 5 6 4 8 9 1 3rd Rack 2 Upper Basket 3 Lower Basket 4 Duct Nozzle 5 Salt Container 6 Dispenser 7 Cup Shelf 8 Spray arms 9 Filter assembly 10 Inlet hose 11 Drain hose 5 10 11 Accessory parts - User manual, Salt funnel, cutlery basket. Part and features _5 DD81-01651E-02_EN (Iran).
Part and features Front & Rear view (D141) 6 1 3 7 2 8 4 5 3 1 Upper Basket 2 Lower Basket 3 Duct Nozzle 4 Salt Container 5 Dispenser 6 Cup Shelf 7 Spray arms 8 Filter assembly 9 Drain hose 7 8 9 Accessory parts - User manual, Salt funnel, cutlery basket. 6_ Part and features DD81-01651E-02_EN (Iran).
Front & Rear view (DW60H3010) 01 PART AND FEATURES 6 1 3 7 2 8 1 Upper Basket 2 Lower Basket 3 Duct Nozzle 4 Salt Container 5 Dispenser 6 Cup Shelf 7 Spray arms 8 Filter assembly 9 Drain hose 4 5 3 7 4 8 9 Accessory parts - User manual, Salt funnel, cutlery basket. Part and features _7 DD81-01651E-02_EN (Iran).
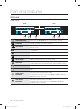
Part and features CONTROL PANEL D146 / D141 2 7 1 6 4 9 3 5 D146 8 2 7 1 6 4 9 D141 1 POWER BUTTON Press this button to turn on your dishwasher: the screen lights up. 2 PROGRAM BUTTON To select washing program press this button. 3 HALF LOAD BUTTON For small amount of loading items, use either the upper or lower basket only to save energy. Press the Half load button to select the upper or lower basket.
• • When the door is open only the Power button will operate. You can select options (Multi in 1, Delay start and/or Half load) before starting a cycle. IMPORTANT: To get the best performance from your dishwasher, read all the operating instructions before using it for the first time. 01 PART AND FEATURES DW60H3010 1 2 3 4 5 6 1 POWER BUTTON Press this button to turn on your dishwasher: the screen lights up. 2 CYCLE BUTTON To select washing program press this button.
Part and features DISPLAYS D146 / D141 D146 2 1 D141 3 1 2 3 PROGRAM ICONS When press the Program button, each program is selected. INTENSIVE Heavily soiled items include pots and pans AUTO WASH Lightly to heavily soiled daily using items, automatic detection of the amount of soils. ECONOMY Normally soiled daily using items, with reduced energy and water consumptions. EXPRESS Normally soiled daily using items, with short cycle time. DELICATE Lightly soiled delicate items.
DW60H3010 1 2 01 PART AND FEATURES 1 2 CYCLE When press the Cycle button, each program is selected. INTENSIVE Heavily soiled items include pots and pans ECONOMY Normally soiled daily using items, with reduced energy and water consumptions. EXPRESS Normally soiled daily using items, with short cycle time. REFILL INDICATORS If Rinse or Salt Refill indicator is lit, it means rinse or salt is needed to refill.
Installing your dishwasher WARNING : Electrical shock hazard Disconnect electrical power before installing dishwasher. Failure to do so could result in death or electrical shock. ATTENTION: The installation of the pipes and electrical equipments should be done by professionals. About electricity connecting CAUTION, for personal safety: DO NOT USE AN EXTENSION CORD OR AN ADAPTER PLUG WITH THIS APPLIANCE. DO NOT, UNDER ANY CIRCUMSTANCES, CUT OR REMOVE THE THIRD GROUNDING PRONG FROM THE POWER CORD.
Hot water connection Positioning the appliance Position the appliance in the desired location. The back should rest against the wall behind it, and the sides, along the adjacent cabinets or wall. The dishwasher is equipped with water supply and drain hoses that can be positioned to the right or the left to facilitate proper installation. How to drain excess water from hoses If the sink is 1000 mm higher from the floor, the excess water in hoses cannot be drained directly into the sink.
Installing your dishwasher CONNECTION OF DRAIN HOSES Insert the drain hose into a drain pipe with a minimum diameter of 4 cm, or let it run into the sink, making sure to avoid bending or crimping it. The top of the hose must be at a height between 40 and 100 cm. The free end of the hose must not be immersed in water to avoid the back flow of it. Max 1000 mm Drain pipe Min. 400 mm Counter NOTE The top of the hose must be at a height between 40 and 100cm.
Using the detergent and water softener WATER SOFTENER Adjusting salt consumption The dishwasher is designed to allow for adjusting the amount of salt consumed based on the hardness of the water used. This is intended to Spelling - optimise - customise the level of salt consumption so that the salt consumption could be set proceed as follows: 1. Switch on the appliance; 2.
Using the detergent and water softener LOADING THE SALT INTO THE SOFTENER Always use salt intended for use with dishwasher. The salt container is located beneath the lower rack and should be filled as follows: ATTENTION • • • Only use salt specifically designed for use in dishwashers! All other types of salt not specifically designed for use in a dishwasher, especially table salt, will damage the water softener.
FILL THE RINSE AID DISPENSER Function of rinse aid ATTENTION: Only use branded rinse aid for dishwasher. Never fill the rinse aid dispenser with any other substances (e.g. dishwasher cleaning agent, liquid detergent). This would damage the appliance. When to refill the rinse aid dispenser If there is no rinse-aid warning light in the control panel, you can judge the amount of rinse-aid by the Colour of the optical level indicator “D” located next to the cap.
Using the detergent and water softener Rinse Aid dispenser 1. To open the dispenser, turn the cap to the “open” (left) arrow and lift it out. 2. Pour the rinse aid into the dispenser, being careful not to overfill. 3. Replace the cap by inserting it aligned with “open” arrow and turning it to the closed (right) arrow. The rinse aid is released during the final rinse to prevent water from forming droplets on your dishes that can leave spots and streaks.
FUNCTION OF DETERGENT Detergents with its chemical ingredients are necessary to remove dirt, crush dirt and transport it out of the dishwasher. Most of commercial quality detergents are suitable for this purpose. WARNING: Dishwasher detergent is corrosive! Take care to keep it out of reach of children.
Using the detergent and water softener Amount of detergent to use 1. Fill the detergent dispenser with detergent. The marking indicates the dosing levels, as illustrated on right: A. This section is for main wash detergent, approximately 25 g B. This section is for the pre wash detergent, approximately 5 g If the dishes are heavily soiled, place an additional detergent dose in the pre-wash detergent chamber. This detergent will take effect during the pre-wash phase.
HOW TO USE THE MULTI IN 1 OPTION Your dishwasher has a Multi in 1 option which does not need salt and rinse aid but a 3 In1 tablet. This option can select on Intensive, Eco program only. 1. Put the Multi in 1 tablet into the container then start the Multi in 1 option. 2. Close the lid and press until it locks in place. When using Multi in 1 compact combination detergents ensure that the lid can be closed correctly. ATTENTION: Keep all detergents in a safe place out of children’s reach.
Loading the dishwasher racks For best performance of the dishwasher, follow these loading guidelines. Features and appearance of racks and silverware baskets may vary from your model. Attention before or after loading the dishwasher racks Scrape off any large amounts of leftover food. It is not necessary to rinse the dishes under running water. Place objects in the dishwasher in the following order: 1. Items such as cups, glasses, pots/pans, etc. are stood upside down. 2.
Adjusting the Upper Basket The height of the upper basket can be adjusted in order to create more space for large utensils both for the upper/lower basket. D146 / D141 04 LOADING THE RACKS 1. To lower the upper rack, press the “A” levers located at the left and right sides of the upper basket and push the upper basket downwards slightly at the same time. 2. To raise the upper rack, just pull the upper basket upwards without operating any levers.
Loading the dishwasher racks LOADING THE LOWER BASKET We recommend that you place large items which are most difficult to clean in to the lower rack: pots, pans, lids, serving dishes and bowls, as shown in the figure to the right. It is preferable to place serving dishes and lids on the side of the racks in order to avoid blocking the rotation of the top spray arm. Pots, serving bowls, etc. must always be placed top down. Deep pots should be slanted to allow water to flow out.
CUTLERY(SILVERWARE) BASKET Silverware should be placed in the cutlery basket with handles at the bottom: The spoon should be loaded individually into the appropriate slots, especially long utensils should be placed in the horizontal position at the front of the upper basket.
Loading the dishwasher racks D141 / DW60H3010 D141 8 1 2 5 3 2 4 DW60H3010 5 4 4 5 3 1 4 1 5 4 1 1 5 4 8 1 1 1 4 4 1 1 2 3 5 2 3 5 2 3 4 1 4 5 4 1 5 1 4 1 1 5 4 4 5 5 4 1 1 5 5 1 4 4 1 5 5 4 1 1 5 7 5 4 4 1 5 5 5 4 1 5 1 4 5 5 4 1 7 5 1 Soup spoons 5 Dessert spoons 2 Forks 6 Serving spoons 3 Knives 7 Serving forks 4 Teaspoons 8 Gravy ladles 4 4 WARNING • • Do not let any item extend through the bottom.
FOR WASHING IN THE DISHWASHER THE FOLLOWING CUTLERY/ DISHES Are of limited suitability Cutlery with wooden, horn china or mother-of-pearl handles. Plastic items that are not heat resistant Older cutlery with glued parts that is not temperature resistant Bonded cutlery items or dishes Pewter or cooper items Lead crystal glass Steel items subject to rusting Wooden platters Items made from synthetic fibres. Some types of glasses can become dull after a large number of washes.
Washing programmes TURNING ON THE APPLIANCE Starting a cycle wash 1. Draw out the lower and upper basket, load the dishes and push them back.. It is recommended to load the lower basket first, then the upper one (see the section entitled “Loading the dishwasher racks”). 2. Pour in the detergent (see the section entitled “Using the detergent and water softener”). 3. Insert the plug into the socket. The power supply is 220-240 VAC / 50 HZ, the specification of the socket is 15A 250 VAC.
AT THE END OF THE WASH CYCLE Open the door carefully. Hot steam may escape when the door is opened! • • • Hot dishes are sensitive to knocks. The dishes should be allowed to cool down around 15 minutes before removing from the appliance. Open the dishwasher’s door, leave it and wait a few minutes before removing the dishes. In this way they will be cooler and the drying will be improved. Unloading the dishwasher. It is normal that the dishwasher is wet inside.
Washing programmes Program Description of Cycle Express + Hygiene Quick Wash (D146) Quick Wash + Hygiene (D146) Auto Auto + Hygiene Detergent (Prewash/Main wash) (g) Running time (min) Energy (kWh) Water (ℓ) 5/30 70 1.25 10.5 30 35 0.6 11.5 30 55 1.15 11.5 5/30 120~180 0.9~1.3 8.5~12.5 5/30 120~180 0.9~1.3 8.5~12.
DW60H3010 Program Intensive + Half load ECO ECO + Half load Express Express + Half load Pre Wash (50 °C) Wash (65 °C) Rinse Rinse Rinse (65 °C) Drying Pre Wash (50 °C) Wash (65 °C) Rinse Rinse (55 °C) Drying Pre Wash Wash (50 °C) Rinse Rinse (65 °C) Drying Pre Wash Wash (50 °C) Rinse Rinse (60 °C) Drying Pre Wash (50 °C) Wash (60 °C) Rinse (60 °C) Drying Pre Wash (50 °C) Wash (60 °C) Rinse (55 °C) Drying Detergent (Prewash/Main wash) (g) Running time (min) Energy (kWh) Water (ℓ) 5/25 (1 or 2 piec
Cleaning and care CLEANING THE FILTERS Filtering system For your convenience, we have placed the drain pump and filtering system within easy reach inside the tub. There are three components of the filtering system: the main filter, the coarse filter, and the fine filter. 1. Main filter: Food and soil particles trapped by this filter are pulverized by a special jet on the lower spray arm and washed down the drain. 2.
CLEANING THE SPRAY ARMS 06 CLEANING AND CARE It is necessary to clean the spray arms regularly as hard water chemicals may clog the spray arm jets and bearings. To remove the middle spray arm, hold the nut, rotate the arm clockwise to remove it. To remove the lower spray arm, pull out the spray arm upward. Wash the arms in soapy and warm water and use a soft brush to clean the jets. Replace them after rinsing them thoroughly.
Cleaning and care HOW TO KEEP YOUR DISHWASHER IN SHAPE • • • • • • After Every Wash After every wash, turn off the water supply to the appliance and leave the door slightly ajar so that moisture and odours not trapped inside. Remove the Plug Before cleaning or performing maintenance, always remove the plug from the socket. No Solvents or Abrasive cleaning To clean the exterior and rubber parts of the dishwasher, do not use solvents or abrasive cleaning products. use only a cloth and warm soapy water.
Troubleshooting The manufacturer, following a policy of constant development and up-dating of the product, may make modifications without giving prior notice. BEFORE CALLING FOR SERVICE POSSIBLE CAUSE WHAT TO DO • Fuse blown or the circuit breaker acted. • Replace fuse or reset circuit breaker. Remove any other appliances sharing the same circuit with the dishwasher. • Power supply is not turned on. • Make sure the dishwasher is turned on and the door is closed securely.
Troubleshooting PROBLEM POSSIBLE CAUSE WHAT TO DO Spots and filming on glasses and flatware 1. Extremely hard water. 2. Low inlet temperature. 3. Overloading the dishwasher. 4. Improper loading. 5. Old or damp powder detergent. 6. Empty rinse agent dispenser. 7. Incorrect dosage of detergent. To remove spots from glassware: 1. Take out all metal utensils out of the dishwasher. 2. Do not add detergent. 3. Choose the longest cycle. 4.
PROBLEM Dishwasher leaks WHAT TO DO Overfill dispenser or rinse aid spills. • Be careful not to overfill the rinse aid dispenser. Spilled rinse aid could cause overusing and lead to overflowing. Wipe away any spills with a damp cloth. • Dishwasher isn’t level. • Make sure the dishwasher is level. • Door is open. • When door is opened, buttons are not working except Power button. Close the door and press the button. • Child lock function is selected.
Troubleshooting ERROR CODES If an error occurs an error code may be displayed to inform you: CODES D146 D141 DW60H3010 MEANING POSSIBLE CAUSES NOTE Water supply error D146 Inlet water continually for 4 minutes in any case or no water in normal water D141 inlet step. DW60H3010 Over 2L inletting except water inlet step. • If water inletting below low level quantity at step when heater work, heater is not work by safety device.
Appendix SPECIFICATIONS DW60H3010FW / D141STS / D141W / D146STS / D146W Type Freestanding Dishwasher Power 220 - 240 V / 50 Hz AC only Water pressure 0.04 ~ 1.0 MPa Rated power usage 1760-2100 W Hot water connection Max 60 °C Dry type Condensed dry system Wash type Rotating nozzle spray Dimensions 598 x 600 x 845 mm (Width×Depth×Height) Wash capacity Weight 08 APPENDIX Model D146 14 place setting D141 13 place setting DW60H3010 12 place setting D146 Unpacked 57.
For standard test (DW60H3010) The information for comparability test in accordance with EN 50242, as follows: The diagrams below show the proper way to load the baskets based on the European Standards(EN50242).
For standard test (D141) The information for comparability test in accordance with EN 50242, as follows: The diagrams below show the proper way to load the baskets based on the European Standards(EN50242). • • • • • • • • • Washing capacity: 13 place settings Test standard: EN50242/ IEC60436 Position of upper basket: to lower position Wash cycle: Eco Additional options: None Rinse aid setting: 3 Water softener setting: H4 Dosage of the standard detergent: pre/wash 5 g + main/wash 27.
For standard test (D146) The information for comparability test in accordance with EN 50242, as follows: The diagrams below show the proper way to load the baskets based on the European Standards(EN50242).
Product fiche REGULATION (EU) NO 1059/2010 Supplier Model name SAMSUNG SAMSUNG SAMSUNG DW60H3010FW D141STS D141W D146STS D146W Rated Capacity (place setting) 12 13 14 Energy efficiency class A+ A+ A+ Annual energy consumption, (AE c) (kWh/year) 1) 289 295 298 Standard cycle energy consumption, (E t) (kWh) 1.02 1.04 1.05 Power consumption in off mode, P o (W) 0.45 0.45 0.45 Power consumption in left-on mode, P l (W) 0.49 0.49 0.
Terminology for dishwasher 1. Circulation Motor A motor that sucks the water remaining on the floor of the dishwater and infects water using high pressure through the internal water passages to the top Middle and lower nozzles. 2. Drain Pump The pump that drains the polluted water from the dishwater generated while the dishwater is running. 3. Heater The healer is located on the water passages inside the dishwasher. It heats the flowing water to increase wash efficiency. 4.
Note DD81-01651E-02_EN (Iran).
Note DD81-01651E-02_EN (Iran).
Note DD81-01651E-02_EN (Iran).
QUESTIONS OR COMMENTS COUNTRY CALL OR VISIT US ONLINE AT IRAN 021-8255 [CE] 021-42132 [HHP] www.samsung.com/iran/support DD81-01651E-02 DD81-01651E-02_EN (Iran).
DW60H3010FW D146STS D146W D141STS D141W ﻣﺎﺷﯿﻦ ﻇﺮﻓﺸﻮﯾﯽ ﺩﻓﺘﺮﭼﻪ ﺭﺍﻫﻨﻤﺎی ﮐﺎﺭﺑﺮ ﺍﻣﮑﺎﻧﺎﺕ ﺭﺍ ﺗﺼﻮﺭ ﮐﻨﯿﺪ ﺑﺎﺑﺖ ﺧﺮﯾﺪ ﺍﯾﻦ ﻣﺤﺼﻮﻝ ﺳﺎﻣﺴﻮﻧﮓ ﺍﺯ ﺷﻤﺎ ﺗﺸﮑﺮ ﻣﯽ ﮐﻨﯿﻢ. 11:52:50 2015-02-02 DD81-01651E-02_FA (Iran).
ﺍﻃﻼﻋﺎﺕ ﺍﯾﻤﻨﯽ ﻟﻄﻔﺎ ﹰ ﺍﯾﻦ ﺍﻃﻼﻋﺎﺕ ﻣﺮﺑﻮﻁ ﺑﻪ ﮐﺎﺭﺑﺮ ﺭﺍ ﺑﺎ ﺩﻗﺖ ﻣﻄﺎﻟﻌﻪ ﮐﺮﺩﻩ ﻭ ﺑﺮﺍی ﻣﺮﺍﺟﻌﻪ ﺑﻌﺪی ﻧﮕﻪ ﺩﺍﺭﯾﺪ .ﺁﻧﺮﺍ ﺑﻪ ﻫﺮ ﺩﺍﺭﻧﺪﻩ ﺑﻌﺪی ﺩﺳﺘﮕﺎﻩ ﺑﺪﻫﯿﺪ. ﺍﯾﻦ ﺩﻓﺘﺮﭼﻪ ﺭﺍﻫﻨﻤﺎ ﺣﺎﻭی ﺑﺨﺶ ﻫﺎی ﺩﺳﺘﻮﺭﺍﻟﻌﻤﻞ ﻫﺎی ﺍﯾﻤﻨﯽ ،ﻗﻄﻌﺎﺕ ﻭ ﻭﯾﮋﮔﯽ ﻫﺎ ،ﻧﺼﺐ ﻣﺎﺷﯿﻦ ﻇﺮﻓﺸﻮﯾﯽ ﺷﻤﺎ ﻭ ﺭﻓﻊ ﺍﺷﮑﺎﻻﺕ ﻭ ﻏﯿﺮﻩ ﻣﯽ ﺑﺎﺷﺪ. ﻣﻄﺎﻟﻌﻪ ﺑﺎ ﺩﻗﺖ ﺁﻥ ﻗﺒﻞ ﺍﺯ ﺍﺳﺘﻔﺎﺩﻩ ﺍﺯ ﻣﺎﺷﯿﻦ ﻇﺮﻓﺸﻮﯾﯽ ﺑﻪ ﺷﻤﺎ ﮐﻤﮏ ﺧﻮﺍﻫﺪ ﮐﺮﺩ ﺗﺎ ﺑﻪ ﻃﻮﺭ ﺻﺤﯿﺢ ﺍﺯ ﻣﺎﺷﯿﻦ ﻇﺮﻓﺸﻮﯾﯽ ﺍﺳﺘﻔﺎﺩﻩ ﻭ ﻧﮕﻬﺪﺍﺭی ﮐﻨﯿﺪ. ﺳﺎﺯﻧﺪﻩ ﺩﺭ ﭘﯿﺮﻭی ﺍﺯ ﺳﯿﺎﺳﺖ ﺑﻬﺒﻮﺩ ﻭ ﺑﺮﻭﺯﺁﻭﺭی ﺩﺍﺋﻢ ﻣﺤﺼﻮﻝ ،ﳑﮑﻦ ﺍﺳﺖ ﺗﻐﯿﯿﺮﺍﺗﯽ ﺭﺍ ﺑﺪﻭﻥ ﺍﻃﻼﻉ ﻗﺒﻠﯽ ﺍﯾﺠﺎﺩ ﮐﻨﺪ.
ﺩﻭﺭ ﺍﻧﺪﺍﺯی ﻣﻮﺍﺩ ﺑﺴﺘﻪ ﺑﻨﺪی ﻣﺎﺷﯿﻦ ﻇﺮﻓﺸﻮﯾﯽ ﺭﺍ ﺑﻪ ﻃﻮﺭ ﺻﺤﯿﺢ ﺑﻪ ﺩﻭﺭ ﺑﺮﯾﺰﯾﺪ. ﻫﻤﻪ ﻣﻮﺍﺩ ﺑﺴﺘﻪ ﺑﻨﺪی ﻗﺎﺑﻞ ﺑﺎﺯﯾﺎﻓﺖ ﻫﺴﺘﻨﺪ. ﻗﻄﻌﺎﺕ ﭘﻼﺳﺘﯿﮑﯽ ﺑﺎ ﺣﺮﻭﻑ ﺍﺧﺘﺼﺎﺭی ﺍﺳﺘﺎﻧﺪﺍﺭﺩ ﺑﯿﻦ ﺍﳌﻠﻠﯽ ﻋﻼﻣﺖ ﮔﺬﺍﺭی ﺷﺪﻩ ﺍﻧﺪ: PE PS POM PP ABS ﺑﺮﺍی ﭘﻠﯽ ﺍﺗﯿﻠﻦ ،ﺑﺮﺍی ﻣﺜﺎﻝ ﻻﯾﻪ ﻫﺎی ﭘﻮﺷﺸﯽ ﺑﺮﺍی ﭘﻠﯽ ﺍﺳﺘﯿﺮﻥ ،ﺑﺮﺍی ﻣﺜﺎﻝ ﻣﻮﺍﺩ ﻧﺮﻡ ﻭ ﺑﺎﻟﺸﺘﮑﯽ ﭘﻠﯽ ﺁﮐﺴﯽ ﻣﺘﯿﻠﻦ ،ﺑﺮﺍی ﻣﺜﺎﻝ ﮔﯿﺮﻩ ﻫﺎی ﭘﻼﺳﺘﯿﮑﯽ ﭘﻠﯽ ﭘﺮﻭﭘﯿﻠﻦ ،ﺑﺮﺍی ﻣﺜﺎﻝ ﭘﺮﮐﻨﻨﺪﻩ ﳕﮏ ﺍﮐﺮﯾﻠﻮﻧﯿﺘﺮﯾﻞ ﺑﻮﺗﺎﺩﯾﻦ ﺳﺘﯿﺮﯾﻦ ،ﺑﺮﺍی ﻣﺜﺎﻝ ﭘﺎﻧﻞ ﮐﻨﺘﺮﻝ.
ﻓﻬﺮﺳﺖ ﻣﻄﺎﻟﺐ ﻗﻄﻌﺎﺕ ﻭ ﻭﯾﮋﮔﯽ ﻫﺎ ۵ ٨ ١٠ ﻭﯾﮋﮔﯽ ﻫﺎی ﻣﺎﺷﯿﻦ ﻇﺮﻓﺸﻮﯾﯽ ﺻﻔﺤﻪ ﮐﻨﺘﺮﻝ ﳕﺎﯾﺸﮕﺮﻫﺎ ﻧﺼﺐ ﻣﺎﺷﯿﻦ ﻇﺮﻓﺸﻮﯾﯽ ١٢ ١۴ ١۴ ١۴ ﺗﻐﺬﯾﻪ ﻭ ﺗﺨﻠﯿﻪ ﺁﺏ ﺍﺗﺼﺎﻝ ﺷﯿﻠﻨﮓ ﻫﺎی ﺗﺨﻠﯿﻪ ﻗﺮﺍﺭ ﺩﺍﺩﻥ ﺩﺳﺘﮕﺎﻩ ﺭﺍﻩ ﺍﻧﺪﺍﺯی ﻣﺎﺷﯿﻦ ﻇﺮﻓﺸﻮﯾﯽ ﺍﺳﺘﻔﺎﺩﻩ ﺍﺯ ﺷﻮﯾﻨﺪﻩ ﻭ ﮐﺎﻫﻨﺪﻩ ﺳﺨﺘﯽ ﺁﺏ ١۵ ١۶ ١٧ ١٩ ٢١ ﮐﺎﻫﻨﺪﻩ ﺳﺨﺘﯽ ﺁﺏ ﭘﺮ ﮐﺮﺩﻥ ﳕﮏ ﺩﺭ ﻣﺨﺰﻥ ﳕﮏ ﭘﺨﺸﮕﺮ ﻣﺎﺩﻩ ﺁﺑﮑﺸﯽ ﺭﺍ ﭘﺮ ﮐﻨﯿﺪ ﻋﻤﻠﮑﺮﺩ ﺷﻮﯾﻨﺪﻩ ﻧﺤﻮﻩ ﺍﺳﺘﻔﺎﺩﻩ ﺍﺯ ﮔﺰﯾﻨﻪ ﭼﻨﺪﮐﺎﺭ ﺑﺎ ﻫﻢ ﭘﺮ ﮐﺮﺩﻥ ﻗﻔﺴﻪ ﻫﺎی ﻣﺎﺷﯿﻦ ﻇﺮﻓﺸﻮﯾﯽ ٢٢ ٢۴ ٢۴ ٢۵ ٢٧
ﻗﻄﻌﺎﺕ ﻭ ﻭﯾﮋﮔﯽ ﻫﺎ ﻭﯾﮋﮔﯽ ﻫﺎی ﻣﺎﺷﯿﻦ ﻇﺮﻓﺸﻮﯾﯽ ﳕﺎی ﺟﻠﻮ ﻭ ﻋﻘﺐ )(D146 ٠١ﻗﻄﻌﺎﺕ ﻭ ﻭﯾﮋﮔﯽ ﻫﺎ ١ ٧ ٢ ۴ ٨ ٣ ٩ ۵ ۶ ۴ ٨ ٩ ١ ﻗﻔﺴﻪ ﺳﻮﻡ ٢ ﺳﺒﺪ ﻓﻮﻗﺎﻧﯽ ٣ ﺳﺒﺪ ﲢﺘﺎﻧﯽ ۴ ﻧﺎﺯﻝ ﻣﺠﺮﺍ ۵ ﻣﺤﻔﻈﻪ ﳕﮏ ۶ ﭘﺨﺸﮕﺮ ٧ ﻗﻔﺴﻪ ﻓﻨﺠﺎﻥ ٨ ﺁﺑﭙﺎﺵ ﭘﺎﯾﯿﻦ ٩ ﻣﺠﻤﻮﻋﻪ ﻓﯿﻠﺘﺮ ١٠ ﺷﯿﻠﻨﮓ ﺗﻐﺬﯾﻪ ١١ ﺷﯿﻠﻨﮓ ﺗﺨﻠﯿﻪ ۵ ١١ ١٠ ﻗﻄﻌﺎﺕ ﺍﳊﺎﻗﯽ -ﺭﺍﻫﻨﻤﺎی ﮐﺎﺭﺑﺮ ،ﻗﯿﻒ ﳕﮏ ،ﺳﺒﺪ ﻗﺎﺷﻖ ﻭ ﭼﻨﮕﺎﻝ.
ﻗﻄﻌﺎﺕ ﻭ ﻭﯾﮋﮔﯽ ﻫﺎ ﳕﺎی ﺟﻠﻮ ﻭ ﻋﻘﺐ )(D141 ۶ ١ ٣ ٧ ٢ ٨ ۴ ۵ ٣ ١ ﺳﺒﺪ ﻓﻮﻗﺎﻧﯽ ٢ ﺳﺒﺪ ﲢﺘﺎﻧﯽ ٣ ﻧﺎﺯﻝ ﻣﺠﺮﺍ ۴ ﻣﺤﻔﻈﻪ ﳕﮏ ۵ ﭘﺨﺸﮕﺮ ۶ ﻗﻔﺴﻪ ﻓﻨﺠﺎﻥ ٧ ﺁﺑﭙﺎﺵ ﭘﺎﯾﯿﻦ ٨ ﻣﺠﻤﻮﻋﻪ ﻓﯿﻠﺘﺮ ٩ ﺷﯿﻠﻨﮓ ﺗﺨﻠﯿﻪ ٧ ٨ ٩ ﻗﻄﻌﺎﺕ ﺍﳊﺎﻗﯽ -ﺭﺍﻫﻨﻤﺎی ﮐﺎﺭﺑﺮ ،ﻗﯿﻒ ﳕﮏ ،ﺳﺒﺪ ﻗﺎﺷﻖ ﻭ ﭼﻨﮕﺎﻝ. _۶ﻗﻄﻌﺎﺕ ﻭ ﻭﯾﮋﮔﯽ ﻫﺎ 11:52:53 2015-02-02 DD81-01651E-02_FA (Iran).
ﳕﺎی ﺟﻠﻮ ﻭ ﻋﻘﺐ )(DW60H3010 ٠١ﻗﻄﻌﺎﺕ ﻭ ﻭﯾﮋﮔﯽ ﻫﺎ ۶ ١ ٣ ٧ ٨ ٢ ۴ ۵ ٣ ٧ ٨ ١ ﺳﺒﺪ ﻓﻮﻗﺎﻧﯽ ٢ ﺳﺒﺪ ﲢﺘﺎﻧﯽ ٣ ﻧﺎﺯﻝ ﻣﺠﺮﺍ ۴ ﻣﺤﻔﻈﻪ ﳕﮏ ۵ ﭘﺨﺸﮕﺮ ۶ ﻗﻔﺴﻪ ﻓﻨﺠﺎﻥ ٧ ﺑﺎﺯﻭﻫﺎی ﺍﺳﭙﺮی ٨ ﻣﺠﻤﻮﻋﻪ ﻓﯿﻠﺘﺮ ٩ ﺷﯿﻠﻨﮓ ﺗﺨﻠﯿﻪ ۴ ٩ ﻗﻄﻌﺎﺕ ﺍﳊﺎﻗﯽ -ﺭﺍﻫﻨﻤﺎی ﮐﺎﺭﺑﺮ ،ﻗﯿﻒ ﳕﮏ ،ﺳﺒﺪ ﻗﺎﺷﻖ ﻭ ﭼﻨﮕﺎﻝ. ﻗﻄﻌﺎﺕ ﻭ ﻭﯾﮋﮔﯽ ﻫﺎ _٧ 11:52:54 2015-02-02 DD81-01651E-02_FA (Iran).
ﻗﻄﻌﺎﺕ ﻭ ﻭﯾﮋﮔﯽ ﻫﺎ ﺻﻔﺤﻪ ﮐﻨﺘﺮﻝ D146 / D141 D146 ٧ ٢ ۶ ١ ٩ ۴ ٨ D141 ۵ ٣ ٧ ٢ ۶ ١ ٩ ۴ ١ ﺩﮐﻤﻪ ) Powerﻧﯿﺮﻭ( ﺍﯾﻦ ﺩﮐﻤﻪ ﺭﺍ ﺑﺮﺍی ﺭﻭﺷﻦ ﮐﺮﺩﻥ ﻣﺎﺷﯿﻦ ﻇﺮﻓﺸﻮﯾﯽ ﻓﺸﺎﺭ ﺩﻫﯿﺪ؛ ﳕﺎﯾﺸﮕﺮ ﺭﻭﺷﻦ ﻣﯽ ﺷﻮﺩ. ٢ ﺩﮐﻤﻪ ﺑﺮﻧﺎﻣﻪ ﺍﯾﻦ ﺩﮐﻤﻪ ﺭﺍ ﺑﺮﺍی ﺍﻧﺘﺨﺎﺏ ﺑﺮﻧﺎﻣﻪ ﺷﺴﺘﺸﻮ ﺍﻧﺘﺨﺎﺏ ﮐﻨﯿﺪ. ٣ ﺩﮐﻤﻪ ﻇﺮﻓﯿﺖ ﻧﯿﻤﻪ ﺍﮔﺮ ﺗﻌﺪﺍﺩ ﺍﻗﻼﻣﯽ ﮐﻪ ﻣﯽ ﺧﻮﺍﻫﯿﺪ ﺑﺸﻮﯾﯿﺪ ﮐﻢ ﺍﺳﺖ ،ﻓﻘﻂ ﺍﺯ ﺳﺒﺪ ﻓﻮﻗﺎﻧﯽ ﯾﺎ ﲢﺘﺎﻧﯽ ﺍﺳﺘﻔﺎﺩﻩ ﮐﻨﯿﺪ ﺗﺎ ﺩﺭ ﻣﺼﺮﻑ ﺍﻧﺮژی ﺻﺮﻓﻪ ﺟﻮﯾﯽ ﺷﻮﺩ.
• • ﻫﻨﮕﺎﻣﯿﮑﻪ ﺩﺭﺏ ﺑﺎﺯ ﺑﺎﺷﺪ ﺗﻨﻬﺎ ﺩﮐﻤﻪ ) Powerﻧﯿﺮﻭ( ﮐﺎﺭ ﺧﻮﺍﻫﺪ ﮐﺮﺩ. ﻣﯽ ﺗﻮﺍﻧﯿﺪ ﮔﺰﯾﻨﻪ ﻫﺎی )ﻗﺮﺹ ﭼﻨﺪﮐﺎﺭﻩ ،ﻭ/ﯾﺎ ) Half Loadﻧﯿﻤﻪ ﭘﺮ(( ﺭﺍ ﻗﺒﻞ ﺍﺯ ﺷﺮﻭﻉ ﺳﯿﮑﻞ ﺍﻧﺘﺨﺎﺏ ﮐﻨﯿﺪ. ﻧﮑﺘﻪ ﻣﻬﻢ :ﺑﺮﺍی ﺩﺳﺘﯿﺎﺑﯽ ﺑﻪ ﺑﻬﺘﺮﯾﻦ ﻋﻤﻠﮑﺮﺩ ﻣﺎﺷﯿﻦ ﻇﺮﻓﺸﻮﯾﯽ ،ﻫﻤﻪ ﺩﺳﺘﻮﺭﺍﻟﻌﻤﻞ ﻫﺎی ﺍﺳﺘﻔﺎﺩﻩ ﺭﺍ ﻗﺒﻞ ﺍﺯ ﺍﺳﺘﻔﺎﺩﻩ ﺑﺮﺍی ﺍﻭﻟﯿﻦ ﺑﺎﺭ ﻣﻄﺎﻟﻌﻪ ﮐﻨﯿﺪ. ٠١ﻗﻄﻌﺎﺕ ﻭ ﻭﯾﮋﮔﯽ ﻫﺎ DW60H3010 ۶ ۵ ۴ ٣ ٢ ١ ١ ﺩﮐﻤﻪ ) Powerﻧﯿﺮﻭ( ﺍﯾﻦ ﺩﮐﻤﻪ ﺭﺍ ﺑﺮﺍی ﺭﻭﺷﻦ ﮐﺮﺩﻥ ﻣﺎﺷﯿﻦ ﻇﺮﻓﺸﻮﯾﯽ ﻓﺸﺎﺭ ﺩﻫﯿﺪ؛ ﳕﺎﯾﺸﮕﺮ ﺭﻭﺷﻦ ﻣﯽ ﺷﻮﺩ.
ﻗﻄﻌﺎﺕ ﻭ ﻭﯾﮋﮔﯽ ﻫﺎ ﳕﺎﯾﺸﮕﺮﻫﺎ D146 / D141 D141 ٣ ١ D146 ١ ٢ ٣ ٢ ﳕﺎﺩﻫﺎی ﺑﺮﻧﺎﻣﻪ ﻫﻨﮕﺎﻣﯿﮑﻪ ﺩﮐﻤﻪ ﺑﺮﻧﺎﻣﻪ ﻓﺸﺮﺩﻩ ﺷﻮﺩ ،ﻫﺮ ﺑﺮﻧﺎﻣﻪ ﺍﻧﺘﺨﺎﺏ ﻣﯽ ﺷﻮﺩ. ﺷﺪﯾﺪ ﺍﻗﻼﻡ ﺧﯿﻠﯽ ﮐﺜﯿﻒ ﺷﺎﻣﻞ ﻗﺎﺑﻠﻤﻪ ﻭ ﻣﺎﻫﯽ ﺗﺎﺑﻪ ﻫﺎ ﺷﺴﺘﺸﻮی ﺧﻮﺩﮐﺎﺭ ﺍﻗﻼﻡ ﻋﺎﺩی ﺑﺮﺍی ﻣﺼﺮﻑ ﺭﻭﺯﺍﻧﻪ ﺑﺎ ﮐﺜﯿﻔﯽ ﮐﻢ ﺗﺎ ﺯﯾﺎﺩ ،ﺗﺸﺨﯿﺺ ﺧﻮﺩﮐﺎﺭ ﻣﯿﺰﺍﻥ ﮐﺜﯿﻔﯽ. ﻣﻘﺮﻭﻥ ﺑﻪ ﺻﺮﻓﻪ ﺍﻗﻼﻡ ﻋﺎﺩی ﺑﺮﺍی ﻣﺼﺮﻑ ﺭﻭﺯﻣﺮﻩ ﺑﺎ ﮐﺜﯿﻔﯽ ﻣﻌﻤﻮﻟﯽ ،ﻫﻤﺮﺍﻩ ﺑﺎ ﮐﺎﻫﺶ ﻣﺼﺮﻑ ﺍﻧﺮژی ﻭ ﺁﺏ ﺍﮐﺴﭙﺮﺱ ﺍﻗﻼﻡ ﻋﺎﺩی ﺑﺮﺍی ﻣﺼﺮﻑ ﺭﻭﺯﻣﺮﻩ ﺑﺎ ﮐﺜﯿﻔﯽ ﻋﺎﺩی ،ﺩﺭ ﻣﺪﺕ ﺯﻣﺎﻥ ﮐﻮﺗﺎﻩ.
DW60H3010 ٢ ١ ٠١ﻗﻄﻌﺎﺕ ﻭ ﻭﯾﮋﮔﯽ ﻫﺎ ١ ٢ ﺳﯿﮑﻞ ﻫﻨﮕﺎﻣﯿﮑﻪ ﺩﮐﻤﻪ ) Cycleﺳﯿﮑﻞ( ﻓﺸﺮﺩﻩ ﺷﻮﺩ ،ﻫﺮ ﺑﺮﻧﺎﻣﻪ ﺍﻧﺘﺨﺎﺏ ﻣﯽ ﺷﻮﺩ. ﺷﺪﯾﺪ ﺍﻗﻼﻡ ﺧﯿﻠﯽ ﮐﺜﯿﻒ ﺷﺎﻣﻞ ﻗﺎﺑﻠﻤﻪ ﻭ ﻣﺎﻫﯽ ﺗﺎﺑﻪ ﻫﺎ ﻣﻘﺮﻭﻥ ﺑﻪ ﺻﺮﻓﻪ ﺍﻗﻼﻡ ﻋﺎﺩی ﺑﺮﺍی ﻣﺼﺮﻑ ﺭﻭﺯﻣﺮﻩ ﺑﺎ ﮐﺜﯿﻔﯽ ﻣﻌﻤﻮﻟﯽ ،ﻫﻤﺮﺍﻩ ﺑﺎ ﮐﺎﻫﺶ ﻣﺼﺮﻑ ﺍﻧﺮژی ﻭ ﺁﺏ ﺍﮐﺴﭙﺮﺱ ﺍﻗﻼﻡ ﻋﺎﺩی ﺑﺮﺍی ﻣﺼﺮﻑ ﺭﻭﺯﻣﺮﻩ ﺑﺎ ﮐﺜﯿﻔﯽ ﻋﺎﺩی ،ﺩﺭ ﻣﺪﺕ ﺯﻣﺎﻥ ﮐﻮﺗﺎﻩ. ﻧﺸﺎﻧﮕﺮﻫﺎی ﭘﺮﮐﺮﺩﻥ ﺍﮔﺮ ﻧﺸﺎﻧﮕﺮ ﺁﺑﮑﺸﯽ ﯾﺎ ﳕﮏ ﺭﻭﺷﻦ ﺑﺎﺷﺪ ،ﺑﺪﯾﻦ ﻣﻌﻨﯽ ﺍﺳﺖ ﮐﻪ ﻻﺯﻡ ﺍﺳﺖ ﺁﺑﮑﺸﯽ ﯾﺎ ﳕﮏ ﺭﺍ ﭘﺮ ﮐﺮﺩ.
ﻧﺼﺐ ﻣﺎﺷﯿﻦ ﻇﺮﻓﺸﻮﯾﯽ ﻫﺸﺪﺍﺭ :ﺧﻄﺮ ﺑﺮﻕ ﮔﺮﻓﺘﮕﯽ ﺟﺮﯾﺎﻥ ﺑﺮﻕ ﺭﺍ ﻗﺒﻞ ﺍﺯ ﻧﺼﺐ ﻣﺎﺷﯿﻦ ﻇﺮﻓﺸﻮﯾﯽ ﻗﻄﻊ ﮐﻨﯿﺪ. ﻗﺼﻮﺭ ﺩﺭ ﺍﳒﺎﻡ ﺍﯾﻨﮑﺎﺭ ﳑﮑﻦ ﺍﺳﺖ ﻣﻨﺠﺮ ﺑﻪ ﻣﺮگ ﯾﺎ ﺑﺮﻕ ﮔﺮﻓﺘﮕﯽ ﺷﻮﺩ. ﺗﻮﺟﻪ :ﻧﺼﺐ ﻟﻮﻟﻪ ﻫﺎ ﻭ ﻭﺳﺎﺋﻞ ﺑﺮﻗﯽ ﺑﺎﯾﺪ ﺗﻮﺳﻂ ﺍﺷﺨﺎﺹ ﻣﺘﺨﺼﺺ ﺍﳒﺎﻡ ﺷﻮﺩ. ﺩﺭﺑﺎﺭﻩ ﺍﺗﺼﺎﻝ ﺑﺮﻕ ﺍﺣﺘﯿﺎﻁ ،ﺑﺮﺍی ﺍﯾﻤﻨﯽ ﺷﺨﺼﯽ: ﺍﺯ ﺳﯿﻢ ﺭﺍﺑﻂ ﯾﺎ ﺩﻭﺷﺎﺧﻪ ﺁﺩﺍﭘﺘﻮﺭ ﺑﺎ ﺍﯾﻦ ﺩﺳﺘﮕﺎﻩ ﺍﺳﺘﻔﺎﺩﻩ ﻧﮑﻨﯿﺪ. ﲢﺖ ﻫﯿﭽﮕﻮﻧﻪ ﺷﺮﺍﯾﻄﯽ ،ﺯﺑﺎﻧﻪ ﺳﻮﻡ ﺯﻣﯿﻨﯽ ﮐﺮﺩﻥ ﺭﺍ ﺍﺯ ﺳﯿﻢ ﺑﺮﻕ ﻧﺒﺮﯾﺪ ﯾﺎ ﺟﺪﺍ ﻧﮑﻨﯿﺪ. ﺷﺮﺍﯾﻂ ﺑﺮﻗﯽ • • ﯾﮏ ﻓﯿﻮﺯ ﯾﺎ ﻣﺪﺍﺭﺷﮑﻦ ٢٢٠-٢۴٠ﻭﻟﺖ ﻣﺘﻨﺎﻭﺏ ۵٠/ﻫﺮﺗﺰ.
ﺍﺗﺼﺎﻝ ﺁﺏ ﮔﺮﻡ ﺗﻐﺬﯾﻪ ﺁﺏ ﺑﻪ ﺩﺳﺘﮕﺎﻩ ﺭﺍ ﻧﯿﺰ ﻣﯽ ﺗﻮﺍﻥ ﺑﻪ ﻟﻮﻟﻪ ﺁﺏ ﮔﺮﻡ ﺧﺎﻧﮕﯽ )ﺳﯿﺴﺘﻢ ﻣﺮﮐﺰی ،ﺳﯿﺴﺘﻢ ﮔﺮﻡ ﮐﻨﻨﺪﻩ( ﻭﺻﻞ ﮐﺮﺩ ،ﺗﺎ ﺯﻣﺎﻧﯿﮑﻪ ﺍﺯ ﺩﻣﺎی ۶٠ﺩﺭﺟﻪ ﺳﺎﻧﺘﯽ ﮔﺮﺍﺩ ﲡﺎﻭﺯ ﻧﮑﻨﺪ .ﺩﺭ ﺍﯾﻦ ﺻﻮﺭﺕ ﺯﻣﺎﻥ ﺳﯿﮑﻞ ﺷﺴﺘﺸﻮ ﺗﺎ ﺣﺪﻭﺩ ١۵ﺩﻗﯿﻘﻪ ﮐﺎﻫﺶ ﯾﺎﻓﺘﻪ ﻭ ﮐﺎﺭﺁﯾﯽ ﺷﺴﺘﺸﻮ ﻗﺪﺭی ﺍﻓﺖ ﻣﯽ ﮐﻨﺪ .ﺍﯾﻦ ﺍﺗﺼﺎﻝ ﺑﺎﯾﺪ ﺑﺎ ﭘﯿﺮﻭی ﺍﺯ ﻫﻤﺎﻥ ﺭﻭﺍﻟﯽ ﮐﻪ ﺑﺮﺍی ﺍﺗﺼﺎﻝ ﻟﻮﻟﻪ ﺁﺏ ﺳﺮﺩ ﺍﺳﺘﻔﺎﺩﻩ ﺷﺪﻩ ﺑﻪ ﻟﻮﻟﻪ ﺁﺏ ﮔﺮﻡ ﻭﺻﻞ ﺷﻮﺩ. ٠٢ﻧﺼﺐ ﮐﺮﺩﻥ ﻗﺮﺍﺭﺩﺍﺩﻥ ﺩﺳﺘﮕﺎﻩ ﺩﺳﺘﮕﺎﻩ ﺭﺍ ﺩﺭ ﻣﺤﻞ ﻣﻨﺎﺳﺐ ﻗﺮﺍﺭ ﺩﻫﯿﺪ .
ﻧﺼﺐ ﻣﺎﺷﯿﻦ ﻇﺮﻓﺸﻮﯾﯽ ﺍﺗﺼﺎﻝ ﺷﯿﻠﻨﮓ ﻫﺎی ﺗﺨﻠﯿﻪ ﺷﯿﻠﻨﮓ ﺗﺨﻠﯿﻪ ﺭﺍ ﺑﻪ ﻟﻮﻟﻪ ﺗﺨﻠﯿﻪ ﺑﺎ ﺣﺪﺍﮐﺜﺮ ﻗﻄﺮ ۴ﺳﺎﻧﺘﯽ ﻣﺘﺮ ﻭﺍﺭﺩ ﮐﻨﯿﺪ ﯾﺎ ﺁﻧﺮﺍ ﺩﺭ ﺳﯿﻨﮏ ﻗﺮﺍﺭ ﺩﺍﺩﻩ ﻣﻄﻤﺌﻦ ﺷﻮﯾﺪ ﮐﻪ ﺗﺎ ﻧﺨﻮﺭﺩ ﯾﺎ ﭼﯿﻦ ﺩﺍﺭ ﻧﺸﻮﺩ. ﺑﺎﻻی ﺷﯿﻨﻠﮓ ﺑﺎﯾﺪ ﺩﺭ ﺍﺭﺗﻔﺎﻉ ﺑﯿﻦ ۴٠ﻭ ١٠٠ﺳﺎﻧﺘﯽ ﻣﺘﺮ ﻗﺮﺍﺭ ﮔﯿﺮﺩ .ﺍﻧﺘﻬﺎی ﺁﺯﺍﺩ ﺷﯿﻠﻨﮓ ﻧﺒﺎﯾﺪ ﺩﺭ ﺁﺏ ﻭﺍﺭﺩ ﺷﻮﺩ ﺗﺎ ﺍﺯ ﺍﯾﺠﺎﺩ ﺟﺮﯾﺎﻥ ﻣﻌﮑﻮﺱ ﺩﺭ ﺁﻥ ﺟﻠﻮﮔﯿﺮی ﺷﻮﺩ. ﭘﯿﺸﺨﻮﺍﻥ ﺣﺪﺍﻗﻞ ۴٠٠ﻣﯿﻠﯽ ﻣﺘﺮ ﺣﺪﺍﮐﺜﺮ ١٠٠٠ﻣﯿﻠﯽ ﻣﺘﺮ ﯾﺎﺩﺩﺍﺷﺖ ﺑﺎﻻی ﺷﯿﻠﻨﮓ ﺑﺎﯾﺪ ﺑﻪ ﺍﺭﺗﻔﺎﻉ ﺑﯿﻦ ۴٠ﻭ ١٠٠ﺳﺎﻧﺘﯽ ﻣﺘﺮ ﺑﺎﺷﺪ.
ﺍﺳﺘﻔﺎﺩﻩ ﺍﺯ ﺷﻮﯾﻨﺪﻩ ﻭ ﮐﺎﻫﻨﺪﻩ ﺳﺨﺘﯽ ﺁﺏ ﮐﺎﻫﻨﺪﻩ ﺳﺨﺘﯽ ﺁﺏ ﺗﻨﻈﯿﻢ ﻣﺼﺮﻑ ﳕﮏ ﺍﯾﻦ ﻣﺎﺷﯿﻦ ﻇﺮﻓﺸﻮﯾﯽ ﻃﻮﺭی ﻃﺮﺍﺣﯽ ﺷﺪﻩ ﺗﺎ ﻣﻘﺪﺍﺭ ﳕﮏ ﻣﺼﺮﻑ ﺷﺪﻩ ﺭﺍ ﺑﺮﺍﺳﺎﺱ ﺳﺨﺘﯽ ﺁﺏ ﺍﺳﺘﻔﺎﺩﻩ ﺷﺪﻩ ﺗﻨﻈﯿﻢ ﮐﻨﺪ. ﻣﯿﺰﺍﻥ ﻣﺼﺮﻑ ﳕﮏ ﺭﺍ ﻣﯽ ﺗﻮﺍﻥ ﺗﻮﺳﻂ ﺗﻨﻈﯿﻢ ﮐﺮﺩﻥ ﺁﻥ ﺳﻔﺎﺭﺷﯽ ﮐﺮﺩ ﻭ ﺍﯾﻦ ﻣﻮﺿﻮﻉ ﺭﺍ ﻣﯽ ﺗﻮﺍﻥ ﺑﻪ ﺭﻭﺵ ﺯﯾﺮ ﺍﳒﺎﻡ ﺩﺍﺩ: .١ﺩﺳﺘﮕﺎﻩ ﺭﺍ ﺭﻭﺷﻦ ﮐﻨﯿﺪ؛ .٢ﺩﮐﻤﻪ ) Startﺷﺮﻭﻉ( ﺭﺍ ﺑﺮﺍی ﺑﯿﺶ ﺍﺯ ٣ﺛﺎﻧﯿﻪ ﻭ ﺩﺭ ﻇﺮﻑ ۶٠ﺛﺎﻧﯿﻪ ﺑﻌﺪ ﺍﺯ ﺍﯾﻨﮑﻪ ﺩﺳﺘﮕﺎﻩ ﺭﻭﺷﻦ ﺷﺪ ﻓﺸﺎﺭ ﺩﻫﯿﺪ ﺗﺎ ﺗﻨﻈﯿﻤﺎﺕ ﻧﺮﻡ ﮐﻨﻨﺪﻩ ﺁﺏ ﺗﻨﻈﯿﻢ ﺷﻮﻧﺪ؛ .
ﺍﺳﺘﻔﺎﺩﻩ ﺍﺯ ﺷﻮﯾﻨﺪﻩ ﻭ ﮐﺎﻫﻨﺪﻩ ﺳﺨﺘﯽ ﺁﺏ ﭘﺮ ﮐﺮﺩﻥ ﳕﮏ ﺩﺭ ﻣﺨﺰﻥ ﳕﮏ ﻫﻤﯿﺸﻪ ﺍﺯ ﳕﮑﯽ ﺍﺳﺘﻔﺎﺩﻩ ﮐﻨﯿﺪ ﮐﻪ ﺑﻪ ﻣﻨﻈﻮﺭ ﺍﺳﺘﻔﺎﺩﻩ ﺑﺎ ﻣﺎﺷﯿﻦ ﻇﺮﻓﺸﻮﯾﯽ ﺑﺎﺷﺪ. ﻣﺤﻔﻈﻪ ﳕﮏ ﺩﺭ ﺯﯾﺮ ﻗﻔﺴﻪ ﲢﺘﺎﻧﯽ ﻗﺮﺍﺭ ﺩﺍﺭﺩ ﻭ ﺑﺎﯾﺴﺘﯽ ﺑﻪ ﺗﺮﺗﯿﺐ ﺯﯾﺮ ﭘﺮ ﺷﻮﺩ: ﺗﻮﺟﻪ • • • ﺗﻨﻬﺎ ﺍﺯ ﳕﮑﯽ ﺍﺳﺘﻔﺎﺩﻩ ﮐﻨﯿﺪ ﮐﻪ ﻣﺨﺼﻮﺹ ﺍﺳﺘﻔﺎﺩﻩ ﺩﺭ ﻣﺎﺷﯿﻦ ﻫﺎی ﻇﺮﻓﺸﻮﯾﯽ ﻃﺮﺍﺣﯽ ﺷﺪﻩ ﺑﺎﺷﺪ .ﻫﻤﻪ ﺍﻧﻮﺍﻉ ﺩﯾﮕﺮ ﳕﮏ ﮐﻪ ﻣﺨﺼﻮﺹ ﺍﺳﺘﻔﺎﺩﻩ ﺩﺭ ﻣﺎﺷﯿﻦ ﻇﺮﻓﺸﻮﯾﯽ ﻃﺮﺍﺣﯽ ﻧﺸﺪﻩ ﺍﻧﺪ ،ﻣﺨﺼﻮﺻﺎ ﹰ ﳕﮏ ﺧﻮﺭﺍﮐﯽ ﺑﻪ ﻧﺮﻡ ﮐﻨﻨﺪﻩ ﺁﺏ ﺁﺳﯿﺐ ﻭﺍﺭﺩ ﺧﻮﺍﻫﻨﺪ ﮐﺮﺩ .
ﭘﺨﺸﮕﺮ ﻣﺎﺩﻩ ﺁﺑﮑﺸﯽ ﺭﺍ ﭘﺮ ﮐﻨﯿﺪ ﻋﻤﻠﮑﺮﺩ ﻣﺎﺩﻩ ﺁﺑﮑﺸﯽ ﺗﻮﺟﻪ :ﺗﻨﻬﺎ ﺍﺯ ﻣﺎﺩﻩ ﺁﺑﮑﺸﯽ ﺑﺎ ﻣﺎﺭک ﲡﺎﺭی ﺑﺮﺍی ﻣﺎﺷﯿﻦ ﻇﺮﻓﺸﻮﯾﯽ ﺍﺳﺘﻔﺎﺩﻩ ﮐﻨﯿﺪ .ﻫﺮﮔﺰ ﭘﺨﺸﮕﺮ ﻣﺎﺩﻩ ﺁﺑﮑﺸﯽ ﺭﺍ ﺑﺎ ﻫﺮﮔﻮﻧﻪ ﻣﻮﺍﺩ ﺩﯾﮕﺮ )ﺑﺮﺍی ﻣﺜﺎﻝ ،ﻋﺎﻣﻞ ﲤﯿﺰ ﮐﻨﻨﺪﻩ ﻣﺎﺷﯿﻦ ﻇﺮﻓﺸﻮﯾﯽ ،ﺷﻮﯾﻨﺪﻩ ﻣﺎﯾﻊ( ﭘﺮ ﻧﮑﻨﯿﺪ .ﺍﯾﻨﮑﺎﺭ ﳑﮑﻦ ﺍﺳﺖ ﺑﻪ ﺩﺳﺘﮕﺎﻩ ﺻﺪﻣﻪ ﺑﺰﻧﺪ. ﻫﻨﮕﺎﻡ ﭘﺮ ﮐﺮﺩﻥ ﭘﺨﺸﮕﺮ ﻣﺎﺩﻩ ﺁﺑﮑﺸﯽ ﺍﮔﺮ ﭼﺮﺍﻍ ﻫﺸﺪﺍﺭ ﺩﺭ ﭘﺎﻧﻞ ﮐﻨﺘﺮﻝ ﻭﺟﻮﺩ ﻧﺪﺍﺭﺩ ،ﻣﯽ ﺗﻮﺍﻧﯿﺪ ﺗﻮﺳﻂ ﺭﻧﮓ ﻧﺸﺎﻧﮕﺮ ﻋﯿﻨﯽ ﺳﻄﺢ " "Dﮐﻪ ﺩﺭ ﮐﻨﺎﺭ ﺩﺭﭘﻮﺵ ﻗﺮﺍﺭ ﺩﺍﺭﺩ ﺩﺭ ﻣﻮﺭﺩ ﻣﻘﺪﺍﺭ ﻣﺎﺩﻩ ﺁﺑﮑﺸﯽ ﻗﻀﺎﻭﺕ ﮐﻨﯿﺪ .
ﺍﺳﺘﻔﺎﺩﻩ ﺍﺯ ﺷﻮﯾﻨﺪﻩ ﻭ ﻧﺮﻡ ﮐﻨﻨﺪﻩ ﺁﺏ ﭘﺨﺸﮕﺮ ﻣﺎﺩﻩ ﺁﺑﮑﺸﯽ .١ﺑﺮﺍی ﺑﺎﺯ ﮐﺮﺩﻥ ﭘﺨﺸﮕﺮ ،ﺩﺭﭘﻮﺵ ﺭﺍ ﺩﺭ ﺟﻬﺖ "ﺑﺎﺯ" )ﭼﭗ( ﮔﺮﺩﺍﻧﺪﻩ ﻭ ﺁﻧﺮﺍ ﺑﺮﺩﺍﺭﯾﺪ. .٢ﻣﺎﺩﻩ ﺁﺑﮑﺸﯽ ﺭﺍ ﺩﺭ ﺣﺎﻟﯿﮑﻪ ﻣﺮﺍﻗﺐ ﻫﺴﺘﯿﺪ ﺯﯾﺎﺩی ﭘﺮ ﻧﺸﻮﺩ ﺩﺭ ﭘﺨﺸﮕﺮ ﺑﺮﯾﺰﯾﺪ. .٣ﺩﺭﭘﻮﺵ ﺭﺍ ﺑﺎ ﮔﺬﺍﺷﱳ ﺁﻥ ﺩﺭ ﺩﺭ ﺟﻬﺖ ﻫﻢ ﺗﺮﺍﺯ ﺑﺎ "ﺑﺎﺯ" ﻭ ﮔﺮﺩﺍﻧﺪﻥ ﺁﻥ ﺩﺭ ﺟﻬﺖ ﺑﺴﺘﻪ )ﺭﺍﺳﺖ( ﺳﺮﺟﺎﯾﺶ ﻗﺮﺍﺭ ﺩﻫﯿﺪ. ﻣﺎﺩﻩ ﺁﺑﮑﺸﯽ ﺩﺭ ﻃﻮﻝ ﺁﺑﮑﺸﯽ ﻧﻬﺎﯾﯽ ﺧﺎﺭﺝ ﺷﺪﻩ ﺗﺎ ﺍﺯ ﺍﯾﺠﺎﺩ ﻗﻄﺮﺍﺕ ﺁﺏ ﮐﻪ ﳑﮑﻦ ﺍﺳﺖ ﻟﮑﻪ ﻭ ﺧﻂ ﺍﻓﺘﺎﺩﮔﯽ ﺑﺮ ﺭﻭی ﻇﺮﻭﻑ ﺍﯾﺠﺎﺩ ﮐﻨﺪ ﺟﻠﻮﮔﯿﺮی ﺷﻮﺩ .
ﻋﻤﻠﮑﺮﺩ ﺷﻮﯾﻨﺪﻩ ﺷﻮﯾﻨﺪﻩ ﻫﺎﯾﯽ ﮐﻪ ﺗﺮﮐﯿﺒﺎﺕ ﺷﯿﻤﯿﺎﯾﯽ ﺩﺍﺭﻧﺪ ﺑﺮﺍی ﭘﺎک ﮐﺮﺩﻥ ﮐﺜﺎﻓﺎﺕ ،ﺧﺮﺩﮐﺮﺩﻥ ﮐﺜﺎﻓﺎﺕ ﻭ ﺍﻧﺘﻘﺎﻝ ﺁﻧﻬﺎ ﺑﻪ ﺧﺎﺭﺝ ﻣﺎﺷﯿﻦ ﻇﺮﻓﺸﻮﯾﯽ ﻻﺯﻡ ﻫﺴﺘﻨﺪ. ﺑﯿﺸﺘﺮ ﺷﻮﯾﻨﺪﻩ ﻫﺎی ﺑﺎ ﮐﯿﻔﯿﺖ ﲡﺎﺭی ﺑﺮﺍی ﺍﯾﻦ ﻣﻨﻈﻮﺭ ﻣﻨﺎﺳﺐ ﻫﺴﺘﻨﺪ. ﺍﺳﺘﻔﺎﺩﻩ ﻣﻨﺎﺳﺐ ﺍﺯ ﺷﻮﯾﻨﺪﻩ ﺗﻨﻬﺎ ﺍﺯ ﺷﻮﯾﻨﺪﻩ ﺍی ﺍﺳﺘﻔﺎﺩﻩ ﮐﻨﯿﺪ ﮐﻪ ﻣﺨﺼﻮﺹ ﺍﺳﺘﻔﺎﺩﻩ ﺩﺭ ﻣﺎﺷﯿﻦ ﻫﺎی ﻇﺮﻓﺸﻮﯾﯽ ﺳﺎﺧﺘﻪ ﺷﺪﻩ ﺑﺎﺷﺪ .ﺷﻮﯾﻨﺪﻩ ﺭﺍ ﺗﺎﺯﻩ ﻭ ﺧﺸﮏ ﻧﮕﻪ ﺩﺍﺭﯾﺪ. ﭘﻮﺩﺭ ﺷﻮﯾﻨﺪﻩ ﺭﺍ ﺗﺎ ﺯﻣﺎﻧﯿﮑﻪ ﺑﺮﺍی ﺷﺴﺘﺸﻮی ﻇﺮﻭﻑ ﺁﻣﺎﺩﻩ ﻧﺸﺪﻩ ﺍﯾﺪ ﺩﺭ ﭘﺨﺸﮕﺮ ﻗﺮﺍﺭ ﻧﺪﻫﯿﺪ.
ﺍﺳﺘﻔﺎﺩﻩ ﺍﺯ ﺷﻮﯾﻨﺪﻩ ﻭ ﻧﺮﻡ ﮐﻨﻨﺪﻩ ﺁﺏ ﻣﻘﺪﺍﺭ ﺷﻮﯾﻨﺪﻩ ﺑﺮﺍی ﺍﺳﺘﻔﺎﺩﻩ .١ﭘﺨﺸﮕﺮ ﺷﻮﯾﻨﺪﻩ ﺭﺍ ﺑﺎ ﺷﻮﯾﻨﺪﻩ ﭘﺮ ﮐﻨﯿﺪ. ﻋﻼﻣﺖ ،ﻣﯿﺰﺍﻥ ﺍﺳﺘﻔﺎﺩﻩ ﺭﺍ ﻧﺸﺎﻥ ﻣﯽ ﺩﻫﺪ ،ﺑﻪ ﻃﻮﺭﯾﮑﻪ ﺩﺭ ﺳﻤﺖ ﺭﺍﺳﺖ ﻧﺸﺎﻥ ﺩﺍﺩﻩ ﺷﺪﻩ ﺍﺳﺖ: .Aﺍﯾﻦ ﺑﺨﺶ ﺑﺮﺍی ﺷﻮﯾﻨﺪﻩ ﺷﺴﺘﺸﻮی ﺍﺻﻠﯽ ﺍﺳﺖ ،ﺗﻘﺮﯾﺒﺎ ﹰ ٢۵ﮔﺮﻡ .Bﺍﯾﻦ ﺑﺨﺶ ﺑﺮﺍی ﺷﻮﯾﻨﺪﻩ ﭘﯿﺶ ﺷﺴﺘﺸﻮ ﺍﺳﺖ ،ﺗﻘﺮﯾﺒﺎ ﹰ ۵ﮔﺮﻡ ﺍﮔﺮ ﻇﺮﻭﻑ ﺑﺴﯿﺎﺭ ﮐﺜﯿﻒ ﻫﺴﺘﻨﺪ ،ﻣﻘﺪﺍﺭ ﺑﯿﺸﺘﺮی ﺍﺯ ﺷﻮﯾﻨﺪﻩ ﺭﺍ ﺩﺭ ﻣﺤﻔﻈﻪ ﺷﻮﯾﻨﺪﻩ ﭘﯿﺶ ﺷﺴﺘﺸﻮ ﻗﺮﺍﺭ ﺩﻫﯿﺪ .ﺍﯾﻦ ﺷﻮﯾﻨﺪﻩ ﺩﺭ ﻃﻮﻝ ﻣﺮﺣﻠﻪ ﭘﯿﺶ ﺷﺴﺘﺸﻮ ﻓﻌﺎﻝ ﺧﻮﺍﻫﺪ ﺷﺪ.
ﻧﺤﻮﻩ ﺍﺳﺘﻔﺎﺩﻩ ﺍﺯ ﮔﺰﯾﻨﻪ ﭼﻨﺪﮐﺎﺭ ﺑﺎ ﻫﻢ ﺍﺯ ﺍﯾﻦ ﮔﺰﯾﻨﻪ ﺗﻨﻬﺎ ﻣﯽ ﺗﻮﺍﻥ ﺩﺭ ﺑﺮﻧﺎﻣﻪ ﺷﺪﯾﺪ ﯾﺎ ﺻﺮﻓﻪ ﺟﻮﯾﯽ ﺩﺭ ﺍﻧﺮژی ﺍﺳﺘﻔﺎﺩﻩ ﮐﺮﺩ. .١ﻗﺮﺹ ﭼﻨﺪﮐﺎﺭ ﺑﺎ ﻫﻢ ﺭﺍ ﺩﺭ ﻣﺤﻔﻈﻪ ﻗﺮﺍﺭ ﺩﺍﺩﻩ ﻭ ﺳﭙﺲ ﮔﺰﯾﻨﻪ ﭼﻨﺪﮐﺎﺭ ﺑﺎ ﻫﻢ ﺭﺍ ﺷﺮﻭﻉ ﮐﻨﯿﺪ. .٢ﺩﺭﭘﻮﺵ ﺭﺍ ﺑﺴﺘﻪ ﻭ ﺁﻧﻘﺪﺭ ﻓﺸﺎﺭ ﺩﻫﯿﺪ ﮐﻪ ﺳﺮﺟﺎﯾﺶ ﻗﻔﻞ ﺷﻮﺩ. ﻫﻨﮕﺎﻡ ﺍﺳﺘﻔﺎﺩﻩ ﺍﺯ ﺷﻮﯾﻨﺪﻩ ﻫﺎی ﺗﺮﮐﯿﺒﯽ ﻓﺸﺮﺩﻩ ﭼﻨﺪﮐﺎﺭ ﺑﺎ ﻫﻢ ﻣﻄﻤﺌﻦ ﺷﻮﯾﺪ ﮐﻪ ﻣﯽ ﺗﻮﺍﻥ ﺩﺭﯾﭽﻪ ﺭﺍ ﺑﻪ ﻃﻮﺭ ﺻﺤﯿﺢ ﺑﺴﺖ. ﺗﻮﺟﻪ :ﻫﻤﻪ ﺷﻮﯾﻨﺪﻩ ﻫﺎ ﺭﺍ ﺩﺭ ﯾﮏ ﻣﺤﻞ ﺍﻣﻦ ﻭ ﺑﻪ ﺩﻭﺭ ﺍﺯ ﺩﺳﺘﺮﺱ ﮐﻮﺩﮐﺎﻥ ﻧﮕﻪ ﺩﺍﺭﯾﺪ .
ﭘﺮ ﮐﺮﺩﻥ ﻗﻔﺴﻪ ﻫﺎی ﻣﺎﺷﯿﻦ ﻇﺮﻓﺸﻮﯾﯽ ﺑﺮﺍی ﺑﻬﺘﺮﯾﻦ ﻋﻤﻠﮑﺮﺩ ﻣﺎﺷﯿﻦ ﻇﺮﻓﺸﻮﯾﯽ ،ﺍﺯ ﺍﯾﻦ ﺭﻫﻨﻤﻮﺩﻫﺎی ﻗﺮﺍﺭ ﺩﺍﺩﻥ ﻇﺮﻭﻑ ﭘﯿﺮﻭی ﮐﻨﯿﺪ .ﻭﯾﮋﮔﯽ ﻫﺎ ﻭ ﻇﺎﻫﺮ ﻗﻔﺴﻪ ﻫﺎ ﻭ ﺳﺒﺪﻫﺎی ﻗﺎﺷﻖ ﻭ ﭼﻨﮕﺎﻝ ﳑﮑﻦ ﺍﺳﺖ ﺑﺎ ﻣﺪﻝ ﺷﻤﺎ ﺗﻔﺎﻭﺕ ﺩﺍﺷﺘﻪ ﺑﺎﺷﻨﺪ. ﻗﺒﻞ ﯾﺎ ﺑﻌﺪ ﺍﺯ ﻗﺮﺍﺭﺩﺍﺩﻥ ﻗﻔﺴﻪ ﻫﺎی ﻣﺎﺷﯿﻦ ﻇﺮﻓﺸﻮﯾﯽ ﺗﻮﺟﻪ ﮐﻨﯿﺪ ﻫﺮ ﻣﻘﺪﺍﺭ ﺯﯾﺎﺩ ﺍﺯ ﻏﺬﺍی ﺑﺎﻗﯿﻤﺎﻧﺪﻩ ﺭﺍ ﺍﺯ ﻇﺮﻭﻑ ﺑﺘﺮﺍﺷﯿﺪ .ﻟﺰﻭﻣﯽ ﻧﺪﺍﺭﺩ ﮐﻪ ﻇﺮﻭﻑ ﺭﺍ ﺯﯾﺮ ﺁﺏ ﺟﺎﺭی ﺁﺑﮑﺸﯽ ﮐﻨﯿﺪ .ﺍﻗﻼﻡ ﺭﺍ ﺑﻪ ﺗﺮﺗﯿﺐ ﺯﯾﺮ ﺩﺭ ﻣﺎﺷﯿﻦ ﻇﺮﻓﺸﻮﯾﯽ ﻗﺮﺍﺭ ﺩﻫﯿﺪ: .١ﺍﻗﻼﻣﯽ ﺍﺯ ﻗﺒﯿﻞ ﻓﻨﺠﺎﻥ ،ﻟﯿﻮﺍﻥ ،ﻗﺎﺑﻠﻤﻪ/ﺗﺎﺑﻪ ﻭ ﻏﯿﺮﻩ ﺭﺍ ﻭﺍﺭﻭﻧﻪ ﻗﺮﺍﺭ ﺩﻫﯿﺪ. .
ﺗﻨﻈﯿﻢ ﺳﺒﺪ ﻓﻮﻗﺎﻧﯽ ﺍﺭﺗﻔﺎﻉ ﺳﺒﺪ ﻓﻮﻗﺎﻧﯽ ﺭﺍ ﻣﯽ ﺗﻮﺍﻥ ﻃﻮﺭی ﺗﻨﻈﯿﻢ ﮐﺮﺩ ﮐﻪ ﻓﻀﺎی ﺑﯿﺸﺘﺮی ﺑﺮﺍی ﻟﻮﺍﺯﻡ ﺁﺷﭙﺰی ﺑﺰﺭگ ﺑﺮﺍی ﺳﺒﺪ ﻓﻮﻗﺎﻧﯽ /ﲢﺘﺎﻧﯽ ﺍﯾﺠﺎﺩ ﺷﻮﺩ. D146 / D141 ٠۴ﻗﺮﺍﺭ ﺩﺍﺩﻥ ﻗﻔﺴﻪ ﻫﺎ .١ﺑﺮﺍی ﭘﺎﯾﯿﻦ ﺁﻭﺭﺩﻥ ﻗﻔﺴﻪ ﻓﻮﻗﺎﻧﯽ ،ﺍﻫﺮﻡ ﻫﺎی " "Aﺭﺍ ﮐﻪ ﺩﺭ ﺳﻤﺖ ﭼﭗ ﻭ ﺭﺍﺳﺖ ﺳﺒﺪ ﻓﻮﻗﺎﻧﯽ ﻗﺮﺍﺭ ﺩﺍﺭﻧﺪ ﻓﺸﺮﺩﻩ ﻭ ﺳﺒﺪ ﻓﻮﻗﺎﻧﯽ ﺭﺍ ﺩﺭ ﻫﻤﺎﻥ ﺯﻣﺎﻥ ﻗﺪﺭی ﺑﻪ ﺳﻤﺖ ﭘﺎﯾﯿﻦ ﻓﺸﺎﺭ ﺩﻫﯿﺪ. .٢ﺑﺮﺍی ﺑﺎﻻ ﺑﺮﺩﻥ ﻗﻔﺴﻪ ﻓﻮﻗﺎﻧﯽ ،ﮐﺎﻓﯿﺴﺖ ﮐﻪ ﺳﺒﺪ ﻓﻮﻗﺎﻧﯽ ﺭﺍ ﺑﺪﻭﻥ ﺍﺳﺘﻔﺎﺩﻩ ﺍﺯ ﻫﺮﮔﻮﻧﻪ ﺍﻫﺮﻣﯽ ﺑﻪ ﺳﻤﺖ ﺑﺎﻻ ﻓﺸﺎﺭ ﺩﻫﯿﺪ.
ﭘﺮ ﮐﺮﺩﻥ ﻗﻔﺴﻪ ﻫﺎی ﻣﺎﺷﯿﻦ ﻇﺮﻓﺸﻮﯾﯽ ﭘﺮ ﮐﺮﺩﻥ ﺳﺒﺪ ﲢﺘﺎﻧﯽ ﺗﻮﺻﯿﻪ ﻣﯽ ﮐﻨﯿﻢ ﮐﻪ ﺍﻗﻼﻡ ﺑﺰﺭگ ﮐﻪ ﻣﺸﮑﻞ ﺗﺮ ﲤﯿﺰ ﻣﯽ ﺷﻮﻧﺪ ﺭﺍ ﺩﺭ ﻗﻔﺴﻪ ﲢﺘﺎﻧﯽ ﻗﺮﺍﺭ ﺩﻫﯿﺪ .ﻗﺎﺑﻠﻤﻪ ،ﺗﺎﺑﻪ ،ﺩﺭ ﻗﺎﺑﻠﻤﻪ ،ﻇﺮﻭﻑ ﻭ ﮐﺎﺳﻪ ﻫﺎی ﺳﺮﻭ ﻏﺬﺍ ﺑﻪ ﻃﻮﺭﯾﮑﻪ ﺩﺭ ﺷﮑﻞ ﺳﻤﺖ ﺭﺍﺳﺖ ﻧﺸﺎﻥ ﺩﺍﺩﻩ ﺷﺪﻩ ﺍﺳﺖ. ﺑﻬﺘﺮ ﺍﺳﺖ ﮐﻪ ﻇﺮﻭﻑ ﺳﺮﻭ ﻏﺬﺍ ﻭ ﺩﺭ ﻗﺎﺑﻠﻤﻪ ﺭﺍ ﺩﺭ ﮐﻨﺎﺭ ﻗﻔﺴﻪ ﻗﺮﺍﺭ ﺩﻫﯿﺪ ﺗﺎ ﺟﻠﻮی ﮔﺮﺩﺵ ﺑﺎﺯﻭی ﺍﺳﭙﺮی ﻓﻮﻗﺎﻧﯽ ﺭﺍ ﻧﮕﯿﺮﺩ .ﻗﺎﺑﻠﻤﻪ ،ﮐﺎﺳﻪ ﺳﺮﻭ ﻏﺬﺍ ﻭ ﻏﯿﺮﻩ ﺑﺎﯾﺪ ﻫﻤﯿﺸﻪ ﺑﻪ ﺻﻮﺭﺕ ﻭﺍﺭﻭﻧﻪ ﻗﺮﺍﺭ ﺩﺍﺩﻩ ﺷﻮﻧﺪ. ﻗﺎﺑﻠﻤﻪ ﻫﺎی ﻋﻤﯿﻖ ﺑﺎﯾﺪ ﺑﻪ ﺻﻮﺭﺕ ﺍﺭﯾﺒﯽ ﻗﺮﺍﺭ ﺩﺍﺩﻩ ﺷﻮﻧﺪ ﺗﺎ ﺁﺏ ﺑﺘﻮﺍﻧﺪ ﺧﺎﺭﺝ ﺷﻮﺩ.
ﺳﺒﺪ ﻗﺎﺷﻖ ﻭ ﭼﻨﮕﺎﻝ ﻗﺎﺷﻖ ﻭ ﭼﻨﮕﺎﻝ ﻫﺎ ﺭﺍ ﺑﺎﯾﺪ ﺑﺎ ﺩﺳﺘﻪ ﻫﺎی ﺑﻪ ﺳﻤﺖ ﭘﺎﯾﯿﻦ ﺩﺭ ﺳﺒﺪ ﻗﺎﺷﻖ ﻭ ﭼﻨﮕﺎﻝ ﻗﺮﺍﺭ ﺩﺍﺩ .ﻗﺎﺷﻖ ﺑﺎﯾﺪ ﺑﻪ ﻃﻮﺭ ﺟﺪﺍﮔﺎﻧﻪ ﺩﺭ ﺷﮑﺎﻑ ﻫﺎی ﻣﻨﺎﺳﺐ ﻗﺮﺍﺭ ﺩﺍﺩﻩ ﺷﻮﺩ ،ﻣﺨﺼﻮﺻﺂ ﹼ ﺍﺑﺰﺍﺭ ﺑﻠﻨﺪ ﺑﺎﯾﺪ ﺑﻪ ﺻﻮﺭﺕ ﺍﻓﻘﯽ ﺩﺭ ﺟﻠﻮی ﺳﺒﺪ ﻓﻮﻗﺎﻧﯽ ﻗﺮﺍﺭ ﺩﺍﺩﻩ ﺷﻮﺩ.
ﭘﺮ ﮐﺮﺩﻥ ﻗﻔﺴﻪ ﻫﺎی ﻣﺎﺷﯿﻦ ﻇﺮﻓﺸﻮﯾﯽ D141 / DW60H3010 D141 ١ ۴ ۵ ١ ۴ ۵ DW60H3010 ٣ ٢ ٨ ٢ ١ ۴ ۴ ۴ ۵ ٣ ۵ ١ ١ ۴ ۵ ۵ ۴ ١ ۵ ١ ۴ ۵ ۵ ۵ ٧ ۴ ۵ ٣ ٢ ٢ ١ ١ ۴ ۵ ۴ ۴ ١ ۵ ٣ ١ ١ ۴ ۴ ۵ ١ ۵ ١ ۴ ۵ ٣ ٢ ٨ ١ ۴ ١ ١ ١
ﻗﺎﺷﻖ ﻭ ﭼﻨﮕﺎﻝ/ﻇﺮﻭﻑ ﺯﯾﺮ ﺑﺮﺍی ﺷﺴﺘﺸﻮ ﺩﺭ ﻣﺎﺷﯿﻦ ﻇﺮﻓﺸﻮﯾﯽ ﻗﺎﺷﻖ ﻭ ﭼﻨﮕﺎﻝ ﺑﺎ ﺩﺳﺘﻪ ﭼﻮﺑﯽ ،ﭼﯿﻨﯽ ،ﺻﺪﻑ ﻣﺮﻭﺍﺭﯾﺪ. ﺍﻗﻼﻡ ﭘﻼﺳﺘﯿﮑﯽ ﮐﻪ ﺩﺭ ﺑﺮﺍﺑﺮ ﺣﺮﺍﺭﺕ ﻣﻘﺎﻭﻡ ﻧﯿﺴﺘﻨﺪ .ﻗﺎﺷﻖ ﻭ ﭼﻨﮕﺎﻝ ﻗﺪﯾﻤﯽ ﺗﺮ ﺑﺎ ﻗﻄﻌﺎﺕ ﭼﺴﺒﯿﺪﻩ ﺷﺪﻩ ﮐﻪ ﺩﺭ ﺑﺮﺍﺑﺮ ﺣﺮﺍﺭﺕ ﻣﻘﺎﻭﻡ ﻧﯿﺴﺘﻨﺪ. ﻗﺎﺷﻖ ﻭ ﭼﻨﮕﺎﻝ ﯾﺎ ﻇﺮﻭﻑ ﺳﺮﻫﻢ ﺷﺪﻩ .ﺍﻗﻼﻡ ﻣﻔﺮﻏﯽ ﯾﺎ ﻣﺴﯽ .ﻟﯿﻮﺍﻥ ﻭ ﺷﯿﺸﻪ ﺁﻻﺕ ﮐﺮﯾﺴﺘﺎﻝ .ﺍﻗﻼﻡ ﻓﻮﻻﺩی ﻏﯿﺮﻣﻘﺎﻭﻡ ﺩﺭ ﺑﺮﺍﺑﺮ ﺯﻧﮓ ﺧﻮﺭﺩﮔﯽ. ﻇﺮﻭﻑ ﭼﻮﺑﯽ .ﺍﻗﻼﻡ ﺳﺎﺧﺘﻪ ﺷﺪﻩ ﺍﺯ ﺍﻟﯿﺎﻑ ﻣﺼﻨﻮﻋﯽ.
ﺑﺮﻧﺎﻣﻪ ﻫﺎی ﺷﺴﺘﺸﻮ ﺭﻭﺷﻦ ﮐﺮﺩﻥ ﺩﺳﺘﮕﺎﻩ ﺷﺮﻭﻉ ﺳﯿﮑﻞ ﺷﺴﺘﺸﻮ .١ﺳﺒﺪ ﲢﺘﺎﻧﯽ ﻭ ﻓﻮﻗﺎﻧﯽ ﺭﺍ ﺑﯿﺮﻭﻥ ﺑﮑﺸﯿﺪ ،ﻇﺮﻭﻑ ﺭﺍ ﻗﺮﺍﺭ ﺩﺍﺩﻩ ﻭ ﺁﻧﻬﺎ ﺭﺍ ﺑﻪ ﺩﺍﺧﻞ ﻓﺸﺎﺭ ﺩﻫﯿﺪ. ﺗﻮﺻﯿﻪ ﻣﯽ ﺷﻮﺩ ﮐﻪ ﺍﺑﺘﺪﺍ ﺳﺒﺪ ﲢﺘﺎﻧﯽ ﻭ ﺳﭙﺲ ﺳﺒﺪ ﻓﻮﻗﺎﻧﯽ ﺭﺍ ﭘﺮ ﮐﻨﯿﺪ )ﺑﻪ ﺑﺨﺶ ﲢﺖ ﻋﻨﻮﺍﻥ "ﭘﺮ ﮐﺮﺩﻥ ﻗﻔﺴﻪ ﻫﺎی ﻣﺎﺷﯿﻦ ﻇﺮﻓﺸﻮﯾﯽ" ﻣﺮﺍﺟﻌﻪ ﮐﻨﯿﺪ(. .٢ﺷﻮﯾﻨﺪﻩ ﺭﺍ ﺑﺮﯾﺰﯾﺪ )ﺑﻪ ﺑﺨﺶ ﲢﺖ ﻋﻨﻮﺍﻥ "ﺍﺳﺘﻔﺎﺩﻩ ﺍﺯ ﺷﻮﯾﻨﺪﻩ ﻭ ﮐﺎﻫﻨﺪﻩ ﺳﺨﺘﯽ ﺁﺏ" ﻣﺮﺍﺟﻌﻪ ﮐﻨﯿﺪ(. .٣ﺩﻭﺷﺎﺧﻪ ﺭﺍ ﺑﻪ ﭘﺮﯾﺰ ﺑﺰﻧﯿﺪ .ﺟﺮﯾﺎﻥ ﺑﺮﻕ ۵٠ / VAC ٢۴٠-٢٢٠ﻫﺮﺗﺰ ﻣﯽ ﺑﺎﺷﺪ ،ﻣﺸﺨﺼﺎﺕ ﺳﻮﮐﺖ VAC ٢۵٠ A ١۵ﻣﯽ ﺑﺎﺷﺪ .
ﺩﺭ ﺧﺎﲤﻪ ﺳﯿﮑﻞ ﺷﺴﺘﺸﻮ ﺩﺭﺏ ﺭﺍ ﺑﺎ ﺍﺣﺘﯿﺎﻁ ﺑﺎﺯ ﮐﻨﯿﺪ .ﺑﺨﺎﺭ ﺩﺍﻍ ﳑﮑﻦ ﺍﺳﺖ ﻫﻨﮕﺎﻡ ﺑﺎﺯ ﮐﺮﺩﻥ ﺩﺭﯾﭽﻪ ﺧﺎﺭﺝ ﺷﻮﺩ! • • • ﻇﺮﻭﻑ ﺩﺍﻍ ﺩﺭ ﻣﻘﺎﺑﻞ ﺿﺮﺑﺎﺕ ﺣﺴﺎﺱ ﻫﺴﺘﻨﺪ .ﺑﺎﯾﺪ ﺑﻪ ﻇﺮﻭﻑ ﺍﺟﺎﺯﻩ ﺩﺍﺩ ﮐﻪ ﻗﺒﻞ ﺍﺯ ﺧﺎﺭﺝ ﮐﺮﺩﻥ ﺍﺯ ﺩﺳﺘﮕﺎﻩ ﺑﺮﺍی ﺣﺪﻭﺩ ١۵ﺩﻗﯿﻘﻪ ﺧﻨﮏ ﺷﻮﻧﺪ. ﺩﺭﺏ ﻣﺎﺷﯿﻦ ﻇﺮﻓﺸﻮﯾﯽ ﺭﺍ ﺑﺎﺯ ﮐﻨﯿﺪ ،ﺁﻧﺮﺍ ﺭﻫﺎ ﮐﺮﺩﻩ ﻭ ﻗﺒﻞ ﺍﺯ ﺑﺮﺩﺍﺷﱳ ﻇﺮﻭﻑ ﭼﻨﺪ ﺩﻗﯿﻘﻪ ﺍی ﻣﻨﺘﻈﺮ ﺷﻮﯾﺪ .ﺑﻪ ﺍﯾﻦ ﺗﺮﺗﯿﺐ ﺧﻨﮏ ﺗﺮ ﺑﻮﺩﻩ ﻭ ﺧﺸﮏ ﮐﺮﺩﻥ ﺑﻬﺒﻮﺩ ﺧﻮﺍﻫﺪ ﮐﺮﺩ.
ﺑﺮﻧﺎﻣﻪ ﻫﺎی ﺷﺴﺘﺸﻮ ﺗﻮﺻﯿﻒ ﺳﯿﮑﻞ ﺑﺮﻧﺎﻣﻪ ﺷﻮﯾﻨﺪﻩ )ﭘﯿﺶ ﺷﺴﺘﺸﻮ / ﺷﺴﺘﺸﻮی ﺍﺻﻠﯽ( )ﮔﺮﻡ( ﻣﺪﺕ ﺍﳒﺎﻡ ﺷﺴﺘﺸﻮ )ﺩﻗﯿﻘﻪ( ﺍﻧﺮژی )ﮐﯿﻠﻮﻭﺍﺕ ﺩﺭ ﺳﺎﻋﺖ( ﺁﺏ )ﻟﯿﺘﺮ( ﭘﯿﺶ ﺷﺴﺘﺸﻮ ﺷﺴﺘﺸﻮ ) ۴٠ﺩﺭﺟﻪ ﺳﺎﻧﺘﯽ ﮔﺮﺍﺩ( ﺁﺑﮑﺸﯽ ﻇﺮﯾﻒ ٣٠ / ۵ ١١۵ ١۴ ٠/٩ ﺁﺑﮑﺸﯽ ) ۶٠ﺩﺭﺟﻪ ﺳﺎﻧﺘﯽ ﮔﺮﺍﺩ( ﺧﺸﮏ ﮐﺮﺩﻥ ﭘﯿﺶ ﺷﺴﺘﺸﻮ ﺷﺴﺘﺸﻮ ) ۶٠ﺩﺭﺟﻪ ﺳﺎﻧﺘﯽ ﮔﺮﺍﺩ( ﺍﮐﺴﭙﺮﺱ ﺁﺑﮑﺸﯽ ) ۶٠ﺩﺭﺟﻪ ﺳﺎﻧﺘﯽ ﮔﺮﺍﺩ( ٣٠ / ۵ ۶٠ ١٠/۵ ١ ﺧﺸﮏ ﮐﺮﺩﻥ ﭘﯿﺶ ﺷﺴﺘﺸﻮ ﺷﺴﺘﺸﻮ ) ۶٠ﺩﺭﺟﻪ ﺳﺎﻧﺘﯽ ﮔﺮﺍﺩ( ﺍﮐﺴﭙﺮﺱ +ﺑﻬﺪﺍﺷﺘﯽ ﺁﺑﮑﺸﯽ ) ٧
DW60H3010 ﺑﺮﻧﺎﻣﻪ ﺗﻮﺻﯿﻒ ﺳﯿﮑﻞ ﺷﻮﯾﻨﺪﻩ )ﭘﯿﺶ ﺷﺴﺘﺸﻮ/ ﺷﺴﺘﺸﻮی ﺍﺻﻠﯽ( )ﮔﺮﻡ( ﺍﻧﺮژی ﻣﺪﺕ ﺍﳒﺎﻡ ﺷﺴﺘﺸﻮ )ﮐﯿﻠﻮﻭﺍﺕ ﺩﺭ ﺳﺎﻋﺖ( )ﺩﻗﯿﻘﻪ( ﺁﺏ )ﻟﯿﺘﺮ( ﺷﺴﺘﺸﻮ ) ۶۵ﺩﺭﺟﻪ ﺳﺎﻧﺘﯽ ﮔﺮﺍﺩ( ﺷﺪﯾﺪ ﺁﺑﮑﺸﯽ ﺁﺑﮑﺸﯽ ٢۵ / ۵ ) ١ﯾﺎ ٢ﻗﻄﻌﻪ( ١۴۵ ١/۶ ١٩/۵ ﺁﺑﮑﺸﯽ ) ۶۵ﺩﺭﺟﻪ ﺳﺎﻧﺘﯽ ﮔﺮﺍﺩ( ﺧﺸﮏ ﮐﺮﺩﻥ ٠۵ﺑﺮﻧﺎﻣﻪ ﻫﺎی ﺷﺴﺘﺸﻮ ﭘﯿﺶ ﺷﺴﺘﺸﻮ ) ۵٠ﺩﺭﺟﻪ ﺳﺎﻧﺘﯽ ﮔﺮﺍﺩ( ﭘﯿﺶ ﺷﺴﺘﺸﻮ ) ۵٠ﺩﺭﺟﻪ ﺳﺎﻧﺘﯽ ﮔﺮﺍﺩ( ﺷﺴﺘﺸﻮ ) ۶۵ﺩﺭﺟﻪ ﺳﺎﻧﺘﯽ ﮔﺮﺍﺩ( ﺷﺪﯾﺪ ) Half Load +ﻧﯿﻤﻪ ﭘﺮ( ﺁﺑﮑﺸﯽ ١۵ )ﯾﺎ ١ﻗﻄﻌﻪ( ١٣٠
ﲤﯿﺰی ﻭ ﻣﺮﺍﻗﺒﺖ ﲤﯿﺰ ﮐﺮﺩﻥ ﻓﯿﻠﺘﺮﻫﺎ ﺳﯿﺴﺘﻢ ﻓﯿﻠﺘﺮ ﺑﺮﺍی ﺁﺳﺎﯾﺶ ﺷﻤﺎ ،ﭘﻤﭗ ﺗﺨﻠﯿﻪ ﻭ ﺳﯿﺴﺘﻢ ﻓﯿﻠﺘﺮ ﺭﺍ ﺑﺮﺍی ﺩﺳﺘﺮﺳﯽ ﺁﺳﺎﻥ ﺩﺭ ﺩﺍﺧﻞ ﺗﺸﺖ ﻗﺮﺍﺭ ﺩﺍﺩﻩ ﺍﯾﻢ .ﺳﯿﺴﺘﻢ ﻓﯿﻠﺘﺮ ﺳﻪ ﺟﺰﺀ ﺩﺍﺭﺩ :ﻓﯿﻠﺘﺮ ﺍﺻﻠﯽ ،ﻓﯿﻠﺘﺮ ﺩﺭﺷﺖ ﻭ ﻓﯿﻠﺘﺮ ﺭﯾﺰ. .١ﻓﯿﻠﺘﺮ ﺍﺻﻠﯽ :ﺫﺭﺍﺕ ﻏﺬﺍ ﻭ ﮐﺜﺎﻓﺎﺗﯽ ﮐﻪ ﺗﻮﺳﻂ ﺍﯾﻦ ﻓﯿﻠﺘﺮ ﺟﻤﻊ ﻣﯽ ﺷﻮﻧﺪ ﺗﻮﺳﻂ ﯾﮏ ﺍﻓﺸﺎﻧﻪ ﻭﯾﮋﻩ ﺩﺭ ﺑﺎﺯﻭی ﺍﺳﭙﺮی ﲢﺘﺎﻧﯽ ﺳﺎﯾﯿﺪﻩ ﺷﺪﻩ ﻭ ﺗﺨﻠﯿﻪ ﻣﯽ ﺷﻮﻧﺪ. .٢ﻓﯿﻠﺘﺮ ﺩﺭﺷﺖ :ﺍﻗﻼﻡ ﺩﺭﺷﺖ ،ﺍﺯ ﻗﺒﯿﻞ ﻗﻄﻌﺎﺕ ﺍﺳﺘﺨﻮﺍﻥ ﯾﺎ ﺷﯿﺸﻪ ﮐﻪ ﳑﮑﻦ ﺍﺳﺖ ﺩﺭ ﺗﺨﻠﯿﻪ ﮔﯿﺮ ﮐﻨﻨﺪ ﺩﺭ ﻓﯿﻠﺘﺮ ﺩﺭﺷﺖ ﺟﻤﻊ ﻣﯽ ﺷﻮﻧﺪ .
ﲤﯿﺰ ﮐﺮﺩﻥ ﺑﺎﺯﻭﻫﺎی ﺍﺳﭙﺮی ٠۶ﲤﯿﺰ ﮐﺮﺩﻥ ﻭ ﻣﺮﺍﻗﺒﺖ ﻻﺯﻡ ﺍﺳﺖ ﮐﻪ ﺑﺎﺯﻭﻫﺎی ﺍﺳﭙﺮی ﺑﻪ ﻃﻮﺭ ﻣﺮﺗﺐ ﲤﯿﺰ ﺷﻮﻧﺪ ﭼﻮﻥ ﻣﻮﺍﺩ ﺷﯿﻤﯿﺎﯾﯽ ﺁﺏ ﳑﮑﻦ ﺍﺳﺖ ﺍﻓﺸﺎﻧﻪ ﻫﺎ ﻭ ﻣﻮﻗﻌﯿﺖ ﺑﺎﺯﻭﻫﺎی ﺍﺳﭙﺮی ﺭﺍ ﻣﺴﺪﻭﺩ ﮐﻨﺪ .ﺑﺮﺍی ﺟﺪﺍ ﮐﺮﺩﻥ ﺑﺎﺯﻭی ﺍﺳﭙﺮی ﻣﯿﺎﻧﯽ ،ﻣﻬﺮﻩ ﺭﺍ ﻧﮕﻪ ﺩﺍﺷﺘﻪ ،ﺑﺎﺯﻭ ﺭﺍ ﺑﺮﺍی ﺑﺮﺩﺍﺷﱳ ﺁﻥ ﺩﺭ ﺟﻬﺖ ﻋﻘﺮﺑﻪ ﺳﺎﻋﺖ ﺑﮕﺮﺩﺍﻧﯿﺪ .ﺑﺮﺍی ﺑﺮﺩﺍﺷﱳ ﺑﺎﺯﻭی ﺍﺳﭙﺮی ﲢﺘﺎﻧﯽ ،ﺑﺎﺯﻭی ﺍﺳﭙﺮی ﺭﺍ ﺑﻪ ﺳﻤﺖ ﺑﺎﻻ ﺑﯿﺮﻭﻥ ﺑﮑﺸﯿﺪ. ﺑﺎﺯﻭﻫﺎ ﺭﺍ ﺩﺭ ﺁﺏ ﻭ ﺻﺎﺑﻮﻥ ﮔﺮﻡ ﺷﺪﻩ ﻭ ﺍﺯ ﯾﮏ ﺑﺮﺱ ﻧﺮﻡ ﺑﺮﺍی ﲤﯿﺰﮐﺮﺩﻥ ﺍﻓﺸﺎﻧﻪ ﻫﺎ ﺍﺳﺘﻔﺎﺩﻩ ﮐﻨﯿﺪ .ﺁﻧﻬﺎ ﺭﺍ ﭘﺲ ﺍﺯ ﺁﺑﮑﺸﯽ ﮐﺎﻣﻞ ﺳﺮﺟﺎﯾﺸﺎﻥ ﻗﺮﺍﺭ ﺩﻫﯿﺪ.
ﲤﯿﺰی ﻭ ﻣﺮﺍﻗﺒﺖ ﻧﺤﻮﻩ ﺣﻔﻆ ﮐﺎﺭﺍﺋﯽ ﻣﺎﺷﯿﻦ ﻇﺮﻓﺸﻮﯾﯽ • • • • • • ﺑﻌﺪ ﺍﺯ ﻫﺮ ﺷﺴﺘﺸﻮ ﺑﻌﺪ ﺍﺯ ﻫﺮ ﺷﺴﺘﺸﻮ ،ﺗﻐﺬﯾﻪ ﺁﺏ ﺩﺳﺘﮕﺎﻩ ﺭﺍ ﻗﻄﻊ ﮐﺮﺩﻩ ﻭ ﺩﺭﺏ ﺭﺍ ﻗﺪﺭی ﺑﺎﺯ ﺑﮕﺬﺍﺭﯾﺪ ﺗﺎ ﺭﻃﻮﺑﺖ ﻭ ﺑﻮ ﺩﺭ ﺩﺍﺧﻞ ﺁﻥ ﺣﺒﺲ ﻧﺸﻮﺩ. ﺩﻭﺷﺎﺧﻪ ﺭﺍ ﺑﮑﺸﯿﺪ ﻗﺒﻞ ﺍﺯ ﲤﯿﺰ ﮐﺮﺩﻥ ﯾﺎ ﻋﻤﻠﯿﺎﺕ ﺣﻔﻆ ﻭ ﻧﮕﻬﺪﺍﺭی ،ﻫﻤﯿﺸﻪ ﺩﻭﺷﺎﺧﻪ ﺭﺍ ﺍﺯ ﭘﺮﯾﺰ ﺑﮑﺸﯿﺪ. ﻋﺪﻡ ﺍﺳﺘﻔﺎﺩﻩ ﺍﺯ ﻣﺤﻠﻮﻝ ﻫﺎ ﯾﺎ ﲤﯿﺰ ﮐﻨﻨﺪﻩ ﺳﺎﯾﻨﺪﻩ ﺑﺮﺍی ﲤﯿﺰ ﮐﺮﺩﻥ ﻗﻄﻌﺎﺕ ﺧﺎﺭﺟﯽ ﻭ ﻻﺳﺘﯿﮑﯽ ﻣﺎﺷﯿﻦ ﻇﺮﻓﺸﻮﯾﯽ ،ﺍﺯ ﻣﺤﻠﻮﻝ ﻫﺎ ﯾﺎ ﻣﺤﺼﻮﻻﺕ ﲤﯿﺰﮐﻨﻨﺪﻩ ﺳﺎﯾﻨﺪﻩ ﺍﺳﺘﻔﺎﺩﻩ ﻧﮑﻨﯿﺪ ،ﻓﻘﻂ ﺍﺯ ﯾﮏ ﭘﺎﺭﭼﻪ ﻭ ﺁﺏ ﮔﺮﻡ ﺑﺎ ﺻﺎﺑﻮﻥ ﺍﺳﺘﻔﺎﺩﻩ ﮐﻨﯿﺪ .
ﺭﻓﻊ ﻣﺸﮑﻼﺕ ﺳﺎﺯﻧﺪﻩ ﺩﺭ ﭘﯿﺮﻭی ﺍﺯ ﺳﯿﺎﺳﺖ ﺑﻬﺒﻮﺩ ﻭ ﺑﺮﻭﺯﺁﻭﺭی ﺩﺍﺋﻢ ﻣﺤﺼﻮﻝ ،ﳑﮑﻦ ﺍﺳﺖ ﺗﻐﯿﯿﺮﺍﺗﯽ ﺭﺍ ﺑﺪﻭﻥ ﺍﻃﻼﻉ ﻗﺒﻠﯽ ﺍﯾﺠﺎﺩ ﮐﻨﺪ. ﻗﺒﻞ ﺍﺯ ﲤﺎﺱ ﺑﺮﺍی ﺗﻌﻤﯿﺮﺍﺕ ﺩﻟﯿﻞ ﺍﺣﺘﻤﺎﻟﯽ • ﻓﯿﻮﺯ ﺳﻮﺧﺘﻪ ﯾﺎ ﻣﺪﺍﺭﺷﮑﻦ ﻓﻌﺎﻝ ﺷﺪﻩ ﺍﺳﺖ. • • ﺟﺮﯾﺎﻥ ﺑﺮﻕ ﺭﻭﺷﻦ ﻧﺸﺪﻩ ﺍﺳﺖ. • ﻣﻄﻤﺌﻦ ﺷﻮﯾﺪ ﮐﻪ ﻣﺎﺷﯿﻦ ﻇﺮﻓﺸﻮﯾﯽ ﺭﻭﺷﻦ ﺷﺪﻩ ﺑﺎﺷﺪ ﻭ ﺩﺭﺏ ﺑﺎ ﺍﯾﻤﻨﯽ ﺑﺴﺘﻪ ﺑﺎﺷﺪ. ﻣﻄﻤﺌﻦ ﺷﻮﯾﺪ ﮐﻪ ﺳﯿﻢ ﺑﺮﻕ ﺑﻪ ﻃﻮﺭ ﺻﺤﯿﺢ ﺑﻪ ﭘﺮﯾﺰ ﺯﺩﻩ ﺷﺪﻩ ﺑﺎﺷﺪ. • ﻓﺸﺎﺭ ﺁﺏ ﭘﺎﯾﯿﻦ ﺍﺳﺖ. • ﮐﻨﺘﺮﻝ ﮐﻨﯿﺪ ﮐﻪ ﺗﻐﺬﯾﻪ ﺁﺏ ﺑﻪ ﻃﻮﺭ ﺻﺤﯿﺢ ﻭﺻﻞ ﺷﺪﻩ ﻭ ﺁﺏ ﺑﺎﺯ ﺷﺪﻩ ﺑﺎﺷﺪ.
ﺭﻓﻊ ﻣﺸﮑﻼﺕ ﺩﻟﯿﻞ ﺍﺣﺘﻤﺎﻟﯽ ﻣﺸﮑﻞ ﻟﮑﻪ ﻭ ﻗﺸﺮ ﺑﺮ ﺭﻭی ﻟﯿﻮﺍﻥ ﻫﺎ ﻭ ﺑﺸﻘﺎﺏ ﻫﺎ .١ .٢ .٣ .۴ .۵ .۶ .٧ ﺁﺏ ﺷﺪﯾﺪﺍ ﹰ ﺳﺨﺖ ﺩﻣﺎی ﭘﺎﯾﯿﻦ ﺗﻐﺬﯾﻪ ﺯﯾﺎﺩی ﭘﺮ ﮐﺮﺩﻥ ﻣﺎﺷﯿﻦ ﻇﺮﻓﺸﻮﯾﯽ ﭘﺮ ﮐﺮﺩﻥ ﻧﺎﻣﻨﺎﺳﺐ. ﭘﻮﺩﺭ ﺷﻮﯾﻨﺪﻩ ﻗﺪﯾﻤﯽ ﯾﺎ ﳕﺪﺍﺭ ﭘﺨﺸﮕﺮ ﻋﺎﻣﻞ ﺁﺑﮑﺸﯽ ﺭﺍ ﺧﺎﻟﯽ ﮐﻨﯿﺪ. ﻣﻘﺪﺍﺭ ﻧﺎﻣﻨﺎﺳﺐ ﺷﻮﯾﻨﺪﻩ ﭼﻪ ﺑﺎﯾﺪ ﮐﺮﺩ ﺑﺮﺍی ﺑﺮﻃﺮﻑ ﮐﺮﺩﻥ ﻟﮑﻪ ﺍﺯ ﺷﯿﺸﻪ ﺁﻻﺕ: .١ﻫﻤﻪ ﻗﺎﺷﻖ ﻭ ﭼﻨﮕﺎﻝ ﻫﺎی ﻓﻠﺰی ﺭﺍ ﺍﺯ ﻣﺎﺷﯿﻦ ﻇﺮﻓﺸﻮﯾﯽ ﺧﺎﺭﺝ ﮐﻨﯿﺪ. .٢ﺷﻮﯾﻨﺪﻩ ﺭﺍ ﺍﺿﺎﻓﻪ ﻧﮑﻨﯿﺪ. .٣ﻃﻮﻻﻧﯽ ﺗﺮﯾﻦ ﺳﯿﮑﻞ ﺭﺍ ﺍﻧﺘﺨﺎﺏ ﮐﻨﯿﺪ. .
ﻣﺸﮑﻞ ﺩﮐﻤﻪ ﻫﺎ ﻫﻨﮕﺎﻣﯿﮑﻪ ﻣﺎﺷﯿﻦ ﺭﻭﺷﻦ ﺍﺳﺖ ﮐﺎﺭ ﳕﯽ ﮐﻨﻨﺪ ﭼﻪ ﺑﺎﯾﺪ ﮐﺮﺩ ﺩﻟﯿﻞ ﺍﺣﺘﻤﺎﻟﯽ • ﻋﻤﻠﮑﺮﺩ ﻗﻔﻞ ﮐﻮﺩک ﺍﻧﺘﺨﺎﺏ ﺷﺪﻩ ﺍﺳﺖ. • ﻫﻨﮕﺎﻣﯿﮑﻪ ﻋﻤﻠﮑﺮﺩ ﻗﻔﻞ ﮐﻮﺩک ﺍﻧﺘﺨﺎﺏ ﺷﻮﺩ ،ﺩﮐﻤﻪ ﻫﺎ ﻭﺍﮐﻨﺶ ﻧﺸﺎﻥ ﳕﯽ ﺩﻫﻨﺪ .ﺑﺮﺍی ﺑﺎﺯ ﮐﺮﺩﻥ ﻗﻔﻞ ﺍﯾﻦ ﻋﻤﻠﮑﺮﺩ، ﺩﮐﻤﻪ ﻫﺎی ﭼﻨﺪﮐﺎﺭ ﺑﺎ ﻫﻢ ﻭ ﺭﺍ ﺑﺮﺍی ﺳﻪ ) (٣ﺛﺎﻧﯿﻪ ﻓﺸﺮﺩﻩ ﻭ ﻧﮕﻪ ﺩﺍﺭﯾﺪ. ﻫﻤﭽﻨﯿﻦ ﻋﻤﻠﮑﺮﺩ ﻗﻔﻞ ﮐﻮﺩک ﻫﻨﮕﺎﻣﯿﮑﻪ ﺳﯿﻢ ﺑﺮﻕ ﺩﻭﺑﺎﺭﻩ ﻭﺻﻞ ﺷﻮﺩ ﺭﻫﺎ ﻣﯽ ﺷﻮﺩ. ٠٧ﺭﻓﻊ ﺍﺷﮑﺎﻻﺕ • ﺩﺭﯾﭽﻪ ﺑﺎﺯ ﺍﺳﺖ.
ﺭﻓﻊ ﻣﺸﮑﻼﺕ ﮐﺪﻫﺎی ﺧﻄﺎ ﺍﮔﺮ ﺧﻄﺎﯾﯽ ﭘﯿﺶ ﺑﯿﺎﯾﺪ ،ﳑﮑﻦ ﺍﺳﺖ ﮐﺪ ﺧﻄﺎ ﺑﺮﺍی ﺁﮔﺎﻫﯽ ﺩﺍﺩﻥ ﺑﻪ ﺷﻤﺎ ﳕﺎﯾﺶ ﺩﺍﺩﻩ ﺷﻮﺩ: ﮐﺪﻫﺎ D146 D141 DW60H3010 ﺩﻻﯾﻞ ﺍﺣﺘﻤﺎﻟﯽ ﯾﺎﺩﺩﺍﺷﺖ ﻣﻌﻨﯽ ﺧﻄﺎی ﺗﻐﺬﯾﻪ ﺁﺏ ﺍﮔﺮ ﺁﺏ ﺑﺮﺍی ۴ﺩﻗﯿﻘﻪ ﺑﻪ ﻃﻮﺭ ﻣﺘﺪﺍﻭﻡ ﺗﻐﺬﯾﻪ ﻣﯽ ﺷﻮﺩ ﯾﺎ ﺍﺻﻼ ﹰ ﺁﺑﯽ ﺩﺭ ﻃﻮﻝ ﻣﺮﺣﻠﻪ ﺗﻐﺬﯾﻪ ﺁﺏ ﻭﺟﻮﺩ ﻧﺪﺍﺭﺩ ﺑﯿﺶ ﺍﺯ ٢ﻟﯿﺘﺮ ﺁﺏ ﻫﻨﮕﺎﻣﯿﮑﻪ ﺩﺭ ﻣﺮﺣﻠﻪ ﺗﻐﺬﯾﻪ ﺁﺏ ﻧﯿﺴﺖ ﺗﻐﺬﯾﻪ ﻣﯽ ﺷﻮﺩ. • ﺍﮔﺮ ﻣﻘﺪﺍﺭ ﺁﺏ ﮐﻤﺘﺮ ﺍﺯ ﻣﻘﺪﺍﺭ ﻻﺯﻡ ﺁﺏ ﺑﺮﺍی ﺍﺳﺘﻔﺎﺩﻩ ﺍﺯ ﮔﺮﻡ ﮐﻨﻨﺪﻩ ﺑﺎﺷﺪ ،ﺩﺳﺘﮕﺎﻩ ﺍﯾﻤﻨﯽ ﺍﺟﺎﺯﻩ ﺍﺳﺘﻔﺎﺩﻩ ﺍﺯ ﮔﺮﻡ ﮐﻨﻨﺪﻩ ﺭﺍ ﳕﯽ ﺩﻫﺪ.
ﺿﻤﯿﻤﻪ ﻣﺸﺨﺼﺎﺕ ﻓﻨﯽ ﻧﻮﻉ ﻣﺎﺷﯿﻦ ﻇﺮﻓﺸﻮﯾﯽ ﺧﻮﺩﺍﯾﺴﺘﺎ ﻧﯿﺮﻭ ﻓﻘﻂ ٢٢٠ﺗﺎ ٢۴٠ﻭﻟﺖ ۵٠ /ﻫﺮﺗﺰ ﺑﺮﻕ ﻣﺘﻨﺎﻭﺏ ﻓﺸﺎﺭ ﺁﺏ ٠/٠۴ﺗﺎ ١/٠ﻣﮕﺎﭘﺎﺳﮑﺎﻝ ﺍﺳﺘﻔﺎﺩﻩ ﻣﺠﺎﺯ ﺍﺯ ﻧﯿﺮﻭ ١٧۶٠ﺗﺎ ٢١٠٠ﻭﺍﺕ ﺍﺗﺼﺎﻝ ﺁﺏ ﮔﺮﻡ ﺣﺪﺍﮐﺜﺮ ۶٠ﺩﺭﺟﻪ ﺳﺎﻧﺘﯽ ﮔﺮﺍﺩ ﻧﻮﻉ ﺧﺸﮏ ﺳﯿﺴﺘﻢ ﺧﺸﮏ ﺷﺪﻥ ﭼﮕﺎﻟﯽ ﻧﻮﻉ ﺷﺴﺘﺸﻮ ﻧﺎﺯﻝ ﺍﺳﭙﺮی ﮔﺮﺩﺍﻥ ﺍﺑﻌﺎﺩ ٨۴۵ x ۶٠٠ x ۵٩٨ﻣﯿﻠﯽ ﻣﺘﺮ )ﻋﺮﺽ×ﻋﻤﻖ×ﺍﺭﺗﻔﺎﻉ( D146 ﻇﺮﻓﯿﺖ ﺷﺴﺘﺸﻮ ﻭﺯﻥ ٠٨ﺿﻤﯿﻤﻪ ﻣﺪﻝ DW60H3010FW / D141STS / D141W / D146STS / D146W ﺳﺮﻭﯾﺲ ١۴ﻧﻔﺮﻩ D141 ﺳﺮﻭﯾﺲ
ﺑﺮﺍی ﺁﺯﻣﺎﯾﺶ ﺍﺳﺘﺎﻧﺪﺍﺭﺩ )(DW60H3010 ﺍﻃﻼﻋﺎﺕ ﺑﺮﺍی ﺁﺯﻣﺎﯾﺶ ﻣﻘﺎﯾﺴﻪ ﭘﺬﯾﺮی ﺑﺮ ﺍﺳﺎﺱ EN 50242ﺑﺪﯾﻦ ﺗﺮﺗﯿﺐ ﺍﺳﺖ: ﺷﯿﻮﻩ ﺻﺤﯿﺢ ﭘﺮ ﮐﺮﺩﻥ ﺳﺒﺪﻫﺎ ﺑﺮ ﺍﺳﺎﺱ ﺍﺳﺘﺎﻧﺪﺍﺭﺩﻫﺎی ﺍﺭﻭﭘﺎﯾﯽ ) (EN 50242ﺩﺭ ﺗﺼﺎﻭﯾﺮ ﺯﯾﺮ ﻧﺸﺎﻥ ﺩﺍﺩﻩ ﺷﺪﻩ ﺍﺳﺖ.
ﺑﺮﺍی ﺁﺯﻣﺎﯾﺶ ﺍﺳﺘﺎﻧﺪﺍﺭﺩ )(D141 ﺍﻃﻼﻋﺎﺕ ﺑﺮﺍی ﺁﺯﻣﺎﯾﺶ ﻣﻘﺎﯾﺴﻪ ﭘﺬﯾﺮی ﺑﺮ ﺍﺳﺎﺱ EN 50242ﺑﺪﯾﻦ ﺗﺮﺗﯿﺐ ﺍﺳﺖ: ﺷﯿﻮﻩ ﺻﺤﯿﺢ ﭘﺮ ﮐﺮﺩﻥ ﺳﺒﺪﻫﺎ ﺑﺮ ﺍﺳﺎﺱ ﺍﺳﺘﺎﻧﺪﺍﺭﺩﻫﺎی ﺍﺭﻭﭘﺎﯾﯽ ) (EN 50242ﺩﺭ ﺗﺼﺎﻭﯾﺮ ﺯﯾﺮ ﻧﺸﺎﻥ ﺩﺍﺩﻩ ﺷﺪﻩ ﺍﺳﺖ.
ﺑﺮﺍی ﺁﺯﻣﺎﯾﺶ ﺍﺳﺘﺎﻧﺪﺍﺭﺩ )(D146 ﺍﻃﻼﻋﺎﺕ ﺑﺮﺍی ﺁﺯﻣﺎﯾﺶ ﻣﻘﺎﯾﺴﻪ ﭘﺬﯾﺮی ﺑﺮ ﺍﺳﺎﺱ EN 50242ﺑﺪﯾﻦ ﺗﺮﺗﯿﺐ ﺍﺳﺖ: ﺷﯿﻮﻩ ﺻﺤﯿﺢ ﭘﺮ ﮐﺮﺩﻥ ﺳﺒﺪﻫﺎ ﺑﺮ ﺍﺳﺎﺱ ﺍﺳﺘﺎﻧﺪﺍﺭﺩﻫﺎی ﺍﺭﻭﭘﺎﯾﯽ ) (EN 50242ﺩﺭ ﺗﺼﺎﻭﯾﺮ ﺯﯾﺮ ﻧﺸﺎﻥ ﺩﺍﺩﻩ ﺷﺪﻩ ﺍﺳﺖ.
ﻣﺸﺨﺼﺎﺕ ﻣﺤﺼﻮﻝ ﻣﻘﺮﺭﺍﺕ ﺷﻤﺎﺭﻩ )1059/2010 (EU ﺗﺎﻣﯿﻦ ﮐﻨﻨﺪﻩ ﺳﺎﻣﺴﻮﻧﮓ ﺳﺎﻣﺴﻮﻧﮓ ﺳﺎﻣﺴﻮﻧﮓ DW60H3010FW D141STS D141W D146STS D146W ١٢ ١٣ ١۴ A+ A+ A+ ٢٨٩ ٢٩۵ ٢٩٨ ﻣﺼﺮﻑ ﺍﻧﺮژی ﺳﯿﮑﻞ ﺍﺳﺘﺎﻧﺪﺍﺭﺩ) (E t) ،ﮐﯿﻠﻮﻭﺍﺕ ﺩﺭ ﺳﺎﻋﺖ( ١٢/٠ ١۴/٠ ١۵/٠ ﻣﺼﺮﻑ ﺗﻮﺍﻥ ﺩﺭ ﺣﺎﻟﺖ ﺧﺎﻣﻮﺵ) P o ،ﻭﺍﺕ( ٠/۴۵ ٠/۴۵ ٠/۴۵ ﻣﺼﺮﻑ ﺗﻮﺍﻥ ﺩﺭ ﺣﺎﻟﺖ ﺭﻭﺷﻦ ﻣﺎﻧﺪﻩ) P l ،ﻭﺍﺕ( ٠/۴٩ ٠/۴٩ ٠/۴٩ ٣٩٢٠ ٣٣۶٠ ٣٣۶٠ A A A
ﺍﺻﻄﻼﺣﺎﺕ ﻣﺮﺑﻮﻁ ﺑﻪ ﻣﺎﺷﯿﻦ ﻇﺮﻓﺸﻮﯾﯽ .١ﻣﻮﺗﻮﺭ ﮔﺮﺩﻧﺪﻩ ﻣﻮﺗﻮﺭی ﮐﻪ ﺁﺏ ﺑﺎﻗﯿﻤﺎﻧﺪﻩ ﺩﺭ ﭘﺎﯾﯿﻦ ﻣﺎﺷﯿﻦ ﻇﺮﻓﺸﻮﯾﯽ ﺭﺍ ﻣﮑﺶ ﮐﺮﺩﻩ ﻭ ﺁﺏ ﺭﺍ ﺑﺎ ﺍﺳﺘﻔﺎﺩﻩ ﺍﺯ ﻓﺸﺎﺭ ﺯﯾﺎﺩ ﺍﺯ ﻃﺮﯾﻖ ﮔﺬﺭﮔﺎﻩ ﻫﺎی ﺁﺏ ﺩﺍﺧﻠﯽ ﺑﻪ ﻧﺎﺯﻝ ﻫﺎی ﺑﺎﻻ ﺩﺭ ﻣﯿﺎﻥ ﻭ ﲢﺘﺎﻧﯽ ﺳﺮﺍﯾﺖ ﻣﯽ ﺩﻫﺪ. .٢ﭘﻤﭗ ﺗﺨﻠﯿﻪ ﭘﻤﭙﯽ ﮐﻪ ﺁﺏ ﺁﻟﻮﺩﻩ ﻣﺎﺷﯿﻦ ﻇﺮﻓﺸﻮﯾﯽ ﺭﺍ ﮐﻪ ﺩﺭ ﺣﯿﻦ ﺍﺳﺘﻔﺎﺩﻩ ﺍﺯ ﻣﺎﺷﯿﻦ ﻇﺮﻓﺸﻮﯾﯽ ﺗﻮﻟﯿﺪ ﺷﺪﻩ ﺗﺨﻠﯿﻪ ﻣﯽ ﮐﻨﺪ. .٣ﮔﺮﻡ ﮐﻨﻨﺪﻩ ﮔﺮﻡ ﮐﻨﻨﺪﻩ ﺩﺭ ﻣﻌﺎﺑﺮ ﺁﺏ ﺩﺭ ﺩﺍﺧﻞ ﻣﺎﺷﯿﻦ ﻇﺮﻓﺸﻮﯾﯽ ﻗﺮﺍﺭ ﺩﺍﺭﺩ .ﺍﯾﻦ ﻭﺳﯿﻠﻪ ﺁﺏ ﺟﺎﺭی ﺭﺍ ﮔﺮﻡ ﮐﺮﺩﻩ ﺗﺎ ﮐﺎﺭﺁﯾﯽ ﺷﺴﺘﺸﻮ ﺭﺍ ﺍﻓﺰﺍﯾﺶ ﺩﻫﺪ. .
ﯾﺎﺩﺩﺍﺷﺖ DD81-01651E-02_FA (Iran).
ﯾﺎﺩﺩﺍﺷﺖ DD81-01651E-02_FA (Iran).
ﯾﺎﺩﺩﺍﺷﺖ DD81-01651E-02_FA (Iran).
ﺳﺆﺍﻻﺕ ﯾﺎ ﻧﻈﺮﺍﺕ ﻧﺸﺎﻧﯽ ﺍﯾﻨﺘﺮﻧﺘﯽ ﺷﻤﺎﺭﻩ ﲤﺎﺱ ﮐﺸﻮﺭ www.samsung.com/iran/support 021-8255 [CE] 021-42132 [HHP] IRAN DD81-01651E-02 DD81-01651E-02_FA (Iran).