BP68-00554A-00Eng_0901 9/1/05 10:33 AM Page 1 DLP TV SP42L6HX SP46L6HX SP50L6HX SP56L6HX SP61L6HX SP67L6HX Owner’s Instructions Before operating the unit, please read this manual thoroughly, and retain it for future reference. Picture In Picture (PIP) Colour Weakness Enhancement Mode My Colour Control SRS TruSurroundXT Digital Natural Image engine This device is a Class B digital apparatus. Register your product at www.samsung.
BP68-00476A-01Eng_0506 5/6/05 6:39 PM Page 2
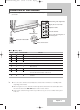
BP68-00476A-01Eng_0506 5/6/05 6:39 PM Page 3 Contents ◆ CONNECTING AND PREPARING YOUR TELEVISION ■ ■ ■ ■ ■ ■ ■ ■ ■ ■ ■ Control Panel of Your Television ................................................................... Connection Panel of Your Television ............................................................ Connecting to an Aerial or Cable Television Network ................................... Connecting a Satellite Receiver or Decoder..................................................
BP68-00476A-01Eng_0506 5/6/05 6:39 PM Page 4 ➢ Contents (continued) ◆ USING YOUR TELEVISION (continued) ■ ■ ■ ■ ■ ■ ■ ■ ■ ■ ■ ■ ■ ■ ■ ■ ■ Setting the Film Mode.................................................................................... Viewing the Picture In Picture (PIP) .............................................................. Changing the Sound Standard ...................................................................... Adjusting the Sound Settings ..................................
BP68-00476A-01Eng_0506 5/6/05 6:39 PM Page 5 Control Panel of Your Television ➢ The actual configuration on your TV may be different, depending on your model. Switch among video input modes Display the on-screen menu Adjust the volume Select the channels LED Indicators Access to the selected option on the menu system Picture On/Off Switch the TV On and Off Remote Control Sensor ( :On, :Blinking, TIMER LAMP :Off) STAND BY/TEMP Indication Standby mode.
BP68-00476A-01Eng_0506 5/6/05 6:39 PM Page 6 Connection Panel of Your Television ➢ The actual configuration on your TV may be different, depending on your model.
n BP68-00476A-01Eng_0506 5/6/05 6:39 PM Page 7 Connection Panel of Your Television (continued) ➢ The actual configuration on your TV may be different, depending on your model. Rear of the TV Œ ANT IN Coaxial connector for aerial or cable network. ´ EXT 1, EXT 2, EXT 3 Inputs or outputs for external devices, such as VCR, DVD, video game device or video disc players. ˇ AUDIO OUT Connect to the external audio amplifier. ¨ COMPONENT IN Connect to the audio and video outputs of DVD or DTV Set-Top Box.
BP68-00476A-01Eng_0506 5/6/05 6:39 PM Page 8 Connecting to an Aerial or Cable Television Network ➢ To view television channels correctly, a signal must be received by the set from one of the following sources: ◆ An outdoor aerial ◆ A cable television network ◆ A satellite network 1 In the first three cases, connect the aerial or network input cable to the ANT IN jack on the rear of the television.
BP68-00476A-01Eng_0506 5/6/05 6:39 PM Page 9 Infrared Remote Control ➢ The performance of the remote control may be affected by bright light.
BP68-00476A-01Eng_0506 5/6/05 6:39 PM Page 10 Inserting the Batteries in the Remote Control You must insert or replace the batteries in the remote control when you: T ◆ Purchase the television ◆ Find that the remote control is no longer operating correctly 1 Remove the cover on the rear of the remote control by pressing the symbol ( ) downwards and then pulling firmly to remove it. 2 Insert two R03, UM4, “AAA” 1.
n BP68-00476A-01Eng_0506 5/6/05 6:39 PM Page 11 Switching Your Television On and Off The mains lead is attached to the rear of your television. 1 Plug the mains lead into an appropriate socket. ➢ The main voltage is indicated on the rear of the television and the frequency is 50 or 60Hz. 2 Press the power switch on the side of the television toward “ON” (I). 3 Press the POWER ( ) button on the remote control (or the “ ” button on the front of the television).
BP68-00476A-01Eng_0506 5/6/05 6:39 PM Page 12 Becoming Familiar with the Remote Control The remote control is used mainly to: ◆ Change channels and adjust the volume ◆ Display the on-screen menu system The following table presents the most frequently used buttons and their functions. Button to Viewing Function Menu Function Used to display the next stored channel. - Used to display the previous stored channel. - Used to display the corresponding channels.
BP68-00476A-01Eng_0506 5/6/05 6:39 PM Page 13 Plug & Play Feature When the television is initially powered ON, several basic customer settings proceed automatically and subsequently. The following settings are available. Plug & Play Start Plug & Play Start 1 If the television is in Standby mode, press the POWER ( on the remote control. 2 To start the Plug & Play, select the Start and press the ENTER button. Result: 3 5 The available languages are listed.
BP68-00476A-01Eng_0506 5/6/05 6:39 PM Page 14 Plug & Play Feature (continued) If you want to reset this feature... 1 Press the MENU button. Result: 2 Press the … or † button to select Setup. Result: 3 The main menu is displayed. The options available in the Setup group are displayed. Press the ENTER button. Result: The Plug & Play is selected. 4 Press the ENTER button again. 5 To start the Plug & Play, select the Start and press the ENTER button.
d. d. BP68-00476A-01Eng_0506 5/6/05 6:39 PM Page 15 Storing Channels Automatically You can scan for the frequency ranges available to you (and availability depends on your country). Automatically allocated programme numbers may not correspond to actual or desired programme numbers. However you can sort numbers manually and clear any channels you do not wish to watch. 1 √ √ √ √ √ √ √ Auto Store Manual Store Add/Delete Sort Child Lock Name Fine Tune † More Press the MENU button.
BP68-00476A-01Eng_0506 5/6/05 6:39 PM Page 16 Storing Channels Manually You can store the television channels, including those received via cable networks. Channel TV √ √ √ √ √ √ √ Auto Store Manual Store Add/Delete Sort Child Lock Name Fine Tune † More Move Enter When storing channels manually, you can choose: ◆ Whether or not to store each of the channels found ◆ The programme number of each stored channel which you wish to identify Return 1 Press the MENU button.
BP68-00476A-01Eng_0506 5/6/05 6:39 PM Page 17 Storing Channels Manually (continued) 8 If you know the number of the channel to be stored, see the following steps. ◆ Press the œ or √ button to select Channel. ◆ Press the … or † button to select C (Air channel) or S (Cable channel). ◆ Press the √ button. Manual Store Prog. AUTO BG Channel Search Store C -- 887MHz ? œ √ Move ◆ Press the numeric buttons (0~9), … or † button to select indicate the required number.
BP68-00476A-01Eng_0506 5/6/05 6:39 PM Page 18 Skipping Unwanted Channels Channel TV √ √ √ √ √ √ √ Auto Store Manual Store Add/Delete Sort Child Lock Name Fine Tune † More You can exclude the channels of your choice from the channel scan operation. When you scan through the stored channels, those that you have chosen to skip are thus not displayed. All channels that you do not specifically choose to skip are displayed during scanning. 1 Result: Move Enter The main menu is displayed.
n BP68-00476A-01Eng_0506 5/6/05 6:39 PM Page 19 Sorting the Stored Channels This operation allows you to change the programme numbers of stored channels. This operation may be necessary after using the auto store. You can delete those channels you do not want to keep. 1 2 The main menu is displayed. Press the … or † button to select Channel. Result: Press the ENTER button. 4 Press the … or † button to select Sort. Press the ENTER button.
BP68-00476A-01Eng_0506 5/6/05 6:39 PM Page 20 Activating the Child Lock Channel TV √ √ √ √ √ √ √ Auto Store Manual Store Add/Delete Sort Child Lock Name Fine Tune † More This feature allows you to prevent unauthorized users, such as children, from watching unsuitable programmes by muting out video and audio. Child Lock cannot be released using front panel buttons. Only remote control can release the Child Lock setting, so keep the remote control away from children. 1 Result: Move Enter Prog.
BP68-00476A-01Eng_0506 5/6/05 6:39 PM Page 21 Assigning Names to Channels Channel names will be assigned automatically when channel information is broadcast. These names can be changed, allowing you to assign new names. Press the MENU button. Result: 2 The main menu is displayed. Press the … or † button to select Channel. Result: Press the ENTER button. 4 Press the … or † button to select Name. Press the ENTER button. Result: 5 Enter Prog. Ch.
BP68-00476A-01Eng_0506 5/6/05 6:39 PM Page 22 Fine Tuning Channel Reception Channel TV √ √ √ √ √ √ √ Auto Store Manual Store Add/Delete Sort Child Lock Name Fine Tune † More Move Enter Return If the reception is clear, you do not have to fine tune the channel, as this is done automatically during the search and store operation. If the signal is weak or distorted, you may have to fine tune the channel manually.
. s BP68-00476A-01Eng_0506 5/6/05 6:39 PM Page 23 Using the LNA (Low Noise Amplifier) Feature This function is very useful in the situation that the TV is used in weak signal. LNA amplifies the TV signal in the weak signal area, but not noise. Channel TV … More LNA Scan This feature is working only in a weak signal condition, and that is memorized on relevant channel’s additional information. 1 The main menu is displayed. Move Enter Return Press the … or † button to select Channel.
BP68-00476A-01Eng_0506 5/6/05 6:39 PM Page 24 Displaying Information You can view the channel information and setting status you select by pressing the “INFO ” button on the remote control. The information displayed varies according to the selected source. P1 ✽ Mono Picture Sound SRS TSXT Sleep Timer Clock Standard Custom Off Off -- : -TV Freezing the Current Picture You can freeze the picture when watching a television programme simply by pressing the “STILL” button.
t BP68-00476A-01Eng_0506 5/6/05 6:39 PM Page 25 Changing the Picture Standard You can select the type of picture which best corresponds to your viewing requirements. 1 Mode : Standard Colour Tone : Warm1 Size : 16 : 9 Digital NR : Off DNIe : On My Colour Control Film Mode : Off PIP Press the MENU button. Result: The main menu is displayed. Press the … or † button to select Picture. 2 Result: 3 Picture TV The options available in the Picture group are displayed.
BP68-00476A-01Eng_0506 5/6/05 6:39 PM Page 26 Adjusting the Picture Settings Your television has several settings which allow you to control picture quality.
BP68-00476A-01Eng_0506 5/6/05 6:39 PM Page 27 Selecting the Picture Size You can select the picture size which best corresponds to your viewing requirements. 1 Mode : Standard Colour Tone : Warm1 Size : 16 : 9 Digital NR : Off DNIe : On My Colour Control Film Mode : Off PIP Press the MENU button. Result: The main menu is displayed. Press the … or † button to select Picture. 2 Result: The options available in the Picture group are displayed. 3 Press the ENTER button.
BP68-00476A-01Eng_0506 5/6/05 6:39 PM Page 28 Using the Digital NR (Noise Reduction) Feature If the signal received by your television is weak, you can activate this feature to help reduce any static and ghosting that may appear on the screen. Picture TV Mode : Standard Colour Tone : Warm1 Size : 16 : 9 Digital NR : Off Off DNIe : On On My Colour Control Film Mode : Off PIP Move Enter 1 Press the MENU button. The main menu is displayed.
r . BP68-00476A-01Eng_0506 5/6/05 6:39 PM Page 29 Setting the My Colour Control (Easy Control) This feature allows you to adjust colours according to their preferences, by adjusting skin, sky and grass tones using the predefined settings (“Blue”, “Green”, “Pink”, “Standard”, “Custom”) without affecting other colours on the screen. 1 2 The main menu is displayed. Press the … or † button to select Picture. Result: The options available in the Picture group are displayed. 3 Press the ENTER button.
BP68-00476A-01Eng_0506 5/6/05 6:40 PM Page 30 Setting the My Colour Control (Detail Control) This settings can be adjusted to suit your personal preferences. Picture TV √ √ √ √ √ √ √ √ Mode : Standard Colour Tone : Warm1 Size : 16 : 9 Digital NR : Off DNIe : On My Colour Control Film Mode : Off PIP Move Enter Easy Control Detail Control Press the MENU button. Result: 2 Press the … or † button to select Picture. Result: TV Press the ENTER button.
d BP68-00476A-01Eng_0506 5/6/05 6:40 PM Page 31 Setting the Film Mode You can automatically sense and process film signals from all sources and adjust the picture for optimum quality. 1 Press the MENU button. Result: The main menu is displayed. Press the … or † button to select Picture. 2 Result: The options available in the Picture group are displayed. 3 Press the ENTER button. 4 Press the … or † button to select Film Mode. Press the ENTER button.
BP68-00476A-01Eng_0506 5/6/05 6:40 PM Page 32 Viewing the Picture In Picture (PIP) Picture TV √ √ √ √ √ √ √ √ Mode : Standard Colour Tone : Warm1 Size : 16 : 9 Digital NR : Off DNIe : On My Colour Control Film Mode : Off PIP Move Enter Return You can display a sub picture within the main picture of TV program or external A/V devices. In this way you can watch TV program or monitor the video input from any connected devices while watching TV or other video input. 1 Press the MENU button.
BP68-00476A-01Eng_0506 5/6/05 6:40 PM Page 33 Viewing the Picture In Picture (PIP) (continued) m y Press the … or † button to select Position. Press the ENTER button. Select a position of the sub picture by pressing the … or † button. 11 Result: ➢ PIP TV PIP Source Swap Size Position Prog. The available positions are displayed: Move Position can not be selected in the “ (Double2) picture size mode. ” (Double1) or “ Press the ENTER button. 13 Press the … or † button to select Prog..
BP68-00476A-01Eng_0506 5/6/05 6:40 PM Page 34 Changing the Sound Standard You can select the type of special sound effect to be used when watching a given broadcast. Sound TV Mode √ : Custom √ Equalizer SRS TSXT : Off √ Auto Volume : Off √ Internal Mute : Off √ 1 Press the MENU button.
d. m BP68-00476A-01Eng_0506 5/6/05 6:40 PM Page 35 Adjusting the Sound Settings The sound settings can be adjusted to suit your personal preferences. Sound TV 1 Press the MENU button. Result: Mode Press the … or † button to select Sound. 2 Result: √ SRS TSXT : Off √ Auto Volume : Off √ Internal Mute : Off √ The options available in the Sound group are displayed. 3 Press the ENTER button. 4 Press the … or † button to select Equalizer. Press the ENTER button.
BP68-00476A-01Eng_0506 5/6/05 6:40 PM Page 36 Adjusting the Volume Automatically Each broadcasting station has its own signal conditions, and so it is not easy for you to adjust the volume every time the channel is changed. This feature lets you automatically adjust the volume of the desired channel by decreasing the sound output when the modulation signal is high or by increasing the sound output when the modulation signal is decrease.
d. BP68-00476A-01Eng_0506 5/6/05 6:40 PM Page 37 Enjoying the Sound of External Speakers When using a device such as Home Theater or Amplifier with external speakers, you can set “Internal Mute” to “On” to cutoff sound from the TV’s internal speakers. Sound TV Mode : Custom Equalizer 1 Press the MENU button. Result: The main menu is displayed. SRS TSXT : Off Auto Volume : Off Internal Mute : Off Off On Press the … or † button until the Sound is selected.
BP68-00476A-01Eng_0506 5/6/05 6:40 PM Page 38 Selecting the Sound Mode (depending on the model) The “DUAL I-II” button displays/controls the processing and output of the audio signal. When power is switched on, the mode is automatically preset to either “Dual I ” or “Stereo”, depending on the current transmission.
BP68-00476A-01Eng_0506 5/6/05 6:40 PM Page 39 Setting and Displaying the Current Time You can set the television’s clock so that the current time is displayed by pressing the “INFO “ button. You must also set the time if you wish to use the automatic on or off timers. ➢ 1 2 Plug & Play Language Time Blue Screen Melody Colour Weakness PC AV Setup When pressing the power switch toward “OFF” (O) on the side of the television, the clock setting will be reset. Press the MENU button.
BP68-00476A-01Eng_0506 5/6/05 6:40 PM Page 40 Setting the Sleep Timer You can select a time period of between 30 and 180 minutes after which the television automatically switches to standby mode. Setup TV Plug & Play Language Time Blue Screen Melody Colour Weakness PC AV Setup Move : English : Off : On : Off Enter √ √ √ √ √ √ √ √ Clock Set Sleep Timer On Timer Off Timer Move Press the MENU button. Result: The main menu is displayed. Press the … or † button to select Setup.
BP68-00476A-01Eng_0506 5/6/05 6:40 PM Page 41 Switching the Television On and Off Automatically You can set the On or Off timers so that the television will: ◆ Switch on automatically and tune to the channel of your choice at the time you select Plug & Play Language Time Blue Screen Melody Colour Weakness PC AV Setup ◆ Switch off automatically at the time you select ➢ d. Setup TV The first step is to set the television’s clock (refer to “Setting and Displaying the Current Time” on page 39).
BP68-00476A-01Eng_0506 5/6/05 6:40 PM Page 42 Setting the Blue Screen If no signal is being received or the signal is very weak, a blue screen automatically replaces the noisy picture background. If you wish to continue viewing the poor picture, you must set the “Blue Screen“ mode to “Off“. Setup TV Plug & Play Language Time Blue Screen Melody Colour Weakness PC AV Setup Move : English : Off : Off : Off Off On 1 Press the MENU button. Result: Enter Return 2 The main menu is displayed.
d. BP68-00476A-01Eng_0506 5/6/05 6:40 PM Page 43 Using the Colour Weakness Enhancement Feature This feature adjusts the Red, Green or Blue colour to enhance the picture according to the user's particular colour weakness. This option is designed for use by people with weakened colour perception. While using this option, some fluctuations of color can be invisible to people with normal sight. 1 Press the MENU button. The main menu is displayed. Result: 2 Press the … or † button to select Setup.
BP68-00476A-01Eng_0506 5/6/05 6:40 PM Page 44 Setting the Picture in PC Mode ➢ 1 Setup TV Plug & Play Language Time Blue Screen Melody Colour Weakness PC AV Setup √ √ √ √ √ √ √ √ : English : Off : On : Off Move Enter Return Preset to the PC mode by using the SOURCE button. Press the MENU button. Result: 2 Press the … or † button to select Setup. Result: PC Coarse Fine Press the ENTER button. 4 Press the … or † button to select PC. Press the ENTER button.
BP68-00476A-01Eng_0506 5/6/05 6:40 PM Page 45 Viewing an External Signal Source Use the remote control to switch between viewing signals from connected equipment, such as VCR, DVD, Set-Top box and the TV source (broadcast or cable). Input TV Source List : TV 1 √ √ Edit Name Press the MENU button. d. Result: The main menu is displayed. Press the … or † button to select Input . 2 Result: 3 Press the ENTER button. Result: The options available in the Source List group are displayed.
BP68-00476A-01Eng_0506 5/6/05 6:40 PM Page 46 Assigning Names to External Sources This feature enables you to name the input source you have connected. Input TV Source List √ : TV √ Edit Name 1 Press the MENU button. Result: 2 Move Enter Ext.1 Ext.2 Ext.3 AV S-Video Component PC HDMI Move : - - - -- - - : - - - -VCR : - - - -DVD Cable STB :---HD STB : - -Satellite -STB : - -AV - -Receiver :---:---Enter English - 46 The main menu is displayed. Press the … or † button to select Input .
d. ) BP68-00476A-01Eng_0506 5/6/05 6:40 PM Page 47 Teletext Feature Most television channels provide written information services via teletext. Information provided includes: ◆ Television programme times ◆ News bulletins and weather forecasts ◆ Sports results ◆ Travel information This information is divided into numbered pages (see diagram). Part A B C D E F ➢ Contents Selected page number. Broadcasting channel identity. Current page number or search indications. Date and time. Text.
BP68-00476A-01Eng_0506 5/6/05 6:40 PM Page 48 Displaying the Teletext Information You can display Teletext information at any time on your television. Teletext information to be displayed correctly, ☛ For channel reception must be stable; otherwise: ◆ Information may be missing ◆ Some pages may not be displayed 1 Select the channel providing the Teletext service by pressing the P or P button. 2 Press the TTX/MIX ( ) button to activate the teletext mode. Result: The contents page is displayed.
n. BP68-00476A-01Eng_0506 5/6/05 6:40 PM Page 49 Selecting a Teletext Page You can enter the page number directly by pressing the numeric buttons on the remote control. 1 Enter the three-digit page number given in the content by pressing the corresponding numeric buttons. Result: The current page counter is incremented and the page is then displayed. If the selected page is linked with several secondary pages, the secondary pages are displayed in sequence.
BP68-00476A-01Eng_0506 5/6/05 6:40 PM Page 50 Connecting to the External Input/Output The “EXT1” and “EXT3” are used for the equipment with an RGB output, such as video game devices or video disc players.
BP68-00476A-01Eng_0506 5/6/05 6:40 PM Page 51 Connecting to the Audio Output ➢ The RCA (AUDIO OUT-L and R) connectors are used for equipment, such as an audio system. Rear of the TV Audio system Connecting to the S-Video Input The “S-VIDEO” and “AUDIO-L/R” connectors are used for equipment with an S-Video output, such as a camcorder or VCR. Camcorder Side of the TV and VCR ➢ To play picture and sound, both the S-VIDEO and AUDIO-L/R connectors must be used.
BP68-00476A-01Eng_0506 5/6/05 6:40 PM Page 52 Connecting to the Digital Input The “HDMI/DVI IN” and “AUDIO-L/R” connectors are used for equipment with a digital output. By inputting a high-bandwidth digital content protection high-definition picture source to these jacks, high-definition pictures can be displayed on the screen in their digital forms.
BP68-00476A-01Eng_0506 5/6/05 6:40 PM Page 53 Connecting to the Component Input Rear of the TV DVD DTV receiver ➢ The COMPONENT IN connectors are used for equipment with a DVD or DTV receiver output. (480i, 480p, 576i, 576p, 720p, 1080i) Connecting to the PC Input The “PC” (video) and “AUDIO-L/R” connectors are used for interfacing with your PC.
BP68-00476A-01Eng_0506 5/6/05 6:40 PM Page 54 Setting up Your PC Software (Windows only) The Windows display-settings for a typical computer are shown below. But the actual screens on your PC will probably be different, depending upon your particular version of Windows and your particular video card. But even if your actual screens look different, the same, basic set-up information will apply in almost all cases. (If not, contact your computer manufacturer or Samsung Dealer.
BP68-00476A-01Eng_0506 k 6:40 PM Page 55 PC/HDMI(DVI) Input Mode Both screen position and size will vary depending on the type of PC monitor and its resolution. The table below shows all of the display modes that are supported: Standard Resolution VGA 720 x 400 640 x 480 SVGA 800 x 600 XGA 832 x 624 1024 x 768 DTV (EIA/CEA861-B) 720 x 576 720 x 480 1280 x 720p x n 5/6/05 1920 x 1080i ◆ ◆ ◆ ◆ Horizontal frequency (kHz) Vertical frequency (Hz) Pixel Clock (MHz) Sync Polarity (H/V) 31.
BP68-00476A-01Eng_0506 5/6/05 6:40 PM Page 56 Redirecting an Input to the External Output Your television enables you to choose which audio/video signals are output to the external connector. Setup TV Plug & Play Language Time Blue Screen Melody Colour Weakness PC AV Setup √ √ √ √ √ √ √ √ : English : Off : On : Off Move Enter Ext.1 : TV √ Ext.2 : TV √ Ext.3 : TV √ Press the MENU button. Result: 2 Enter Return Press the ENTER button.
BP68-00476A-01Eng_0506 5/6/05 6:40 PM Page 57 Setting Up Your Remote Control This TV’s remote control can operate VCR, CATV , DVD, or Set-top box (STB), in addition to controlling the TV. ➢ The remote control might not be compatible with all DVD Players, VCRs and Cable boxes. 1 Turn off your VCR, Cable box, DVD or STB. 2 Press the SELECT button. Mode is changed whenever SELECT button is pressed. 3 Press the POWER ( ) button on the remote control. The component you select should turn on.
BP68-00476A-01Eng_0506 5/6/05 6:40 PM Page 58 Programming the Remote Control for Other Components VCR Remote Control Codes Admiral 020 Marantz Aiwa 025 Marta 006 Akai 004, 027, 032 MEI 021 Audio Dynamics Bell&Howell Broksonic Candle 007, 026 MGA 022 Midland 005 002, 003, 006, 008, 015, 055 Minolta 019, 041 021, 056 Citizen 002, 003, 006, 008, 015, 055 Craig Curtis Mathes 007 002, 024 002, 007, 008, 017, 021, 025, 056, 064, 066 Daewoo DBX 006, 021, 024, 025 018 Canon Colorty
6 4 BP68-00476A-01Eng_0506 5/6/05 6:40 PM Page 59 Programming the Remote Control for Other Components VCR Remote Control Codes (continued) Sylvania Symphonic Tandy 021, 025, 036, 056, 059 025 018, 025 Totevision 006 Victor Tatung 037 Video Concepts Technics 6 Teknika 0 TMK Toshiba 025, 037, 068 021 002 007, 026 Vector Research Tashika Teac 002, 006 Unitech 026 007, 026 002 Videosonic Wards 002, 003, 006, 019, 020, 021, 024, 025, 006, 021, 025, 031 066 003, 019, 029, 051, 052 0
BP68-00476A-01Eng_0506 5/6/05 6:40 PM Page 60 Replacing the Lamp 1 Unplug TV, then use a screwdriver to remove the screw. B 2 Remove the Lamp cover. 3 If te Remove the screws securing the Lamp by using a screwdriver. 4 Separate the Lamp from the engine by holding the handle and pulling it out 5 To reinstall the Lamp, follow these steps in reverse order. ◆ Why do I need to replace the lamp? The lamp used in a projection TV has a limited lifespan.
BP68-00476A-01Eng_0506 5/6/05 6:40 PM Page 61 Troubleshooting: Before Contacting Service Personnel Before contacting Samsung after-sales service, perform the following simple checks. If you cannot solve the problem using the instructions below, note the model and serial number of the television and contact your local dealer. No sound or picture ◆ Check that the mains lead has been connected to a wall socket.
m BP68-00554A-00Eng_0901 9/1/05 10:34 AM Page 62 Technical Specifications The descriptions and characteristics in this booklet are given for information purposes only and are subject to modification without notice. Model name SP42L6HX SP46L6HX Colour systems SP50L6HX SP56L6HX BG, DK, I, L Audio output power 15 W + 15 W Weight SP67L6HX PAL, SECAM, NTSC4.43 TV standards Demensions (W x D x H) SP61L6HX 999 x 331.3 x 755.5 mm 1088 x 342.5 x 814.2 mm 1182 x 354 x 869.7 mm 1330 x 388.
BP68-00554A-00Eng_0901 9/1/05 10:34 AM Page 63 Memo m English - 63
BP68-00554A-00Eng_0901 9/1/05 10:34 AM Page 64 - AFTER SALES SERVICE - Do not hesitate to contact your retailer or service agent if a change in the performance of your product indicates that a faulty condition may be present.