DMT800 Series Dishwasher user manual imagine the possibilities Thank you for purchasing this Samsung product. To receive more complete service, please register your product at www.samsung.com/register DMT800_DD68-00050A.
features of your new samsung dishwasher Your new Samsung Dishwasher will change the way you feel about doing dishes. From its extra large capacity to its energy efficiency, your new Samsung dishwasher has all the features to make your chores much less mundane. 1. Extra large capacity The upper rack is slanted for larger dishes. The space has been maximized to accommodate a variety of dish sizes. 2.
safety information Throughout this manual, you’ll see Warning and Caution notes. These important safety instructions do not cover all possible situations that might occur. It is your responsibility to use caution when installing, maintaining, and operating your dishwasher. Samsung will not be liable for damages resulting from improper use.
safety information Do not operate the dishwasher unless all ENCLOSURE panels are properly in place. Do not tamper with the controls. Do not abuse, sit on, or stand on the door, lid, or dish racks of the dishwasher. To reduce the risk of injury, do not allow children to play in or on the dishwasher. To reduce the risk of fire or explosion: - Under certain conditions, hydrogen gas may be produced in a hot water system that has not been used for two weeks or more. HYDROGEN GAS IS EXPLOSIVE.
Do not repair, replace, or service any part of your dishwasher yourself. Disassembly, repairs and modifications are permitted by authorized service technicians only. Work done by an unauthorized person may void your warranty. Before disposing of your dishwasher, remove the door of the washing compartment or the door latch so that children or small animals do not get trapped inside. If the dishwasher is left unused for an extended period of time, turn off the water supply.
contents SETTING UP YOUR DISHWASHER 7 USING YOUR DISHWASHER 12 CLEANING AND MAINTAINING YOUR DISHWASHER 20 CYCLES 7 7 8 10 10 11 Unpacking your dishwasher Checking parts Control panel Cycle selector Progress lights Meeting installation requirements 12 14 15 15 16 16 17 18 Basic guidelines Adjusting the angle of the plate supports Adjusting the height of the upper rack Removing the upper rack Loading the lower rack Loading the upper rack Using the cutlery basket Using the dispenser 20 20 20 21 Clean
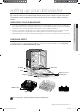
setting up your dishwasher Be sure to have your installer follow these instructions closely so that your new dishwasher works properly and that you’re not at risk of injury when washing dishes. UNPACKING YOUR DISHWASHER CHECKING PARTS When your dishwasher has been unpacked, make sure you’ve received all the parts shown below.
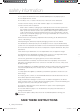
setting up your dishwasher CONTROL PANEL DMT800 Series 1 7 2 8 3 4 5 6 9 1 DISPLAY Displays wash information (Delay start hours, Child lock/unlock, Low rinse), and error messages. When Low rinse remains illuminated, there is no rinse agent in the dispenser. Refill the rinse aid dispenser. If an error occurs during an operation, an error message is displayed with a warning sound. Refer to the Information codes page.
4 CHILD LOCK/ UNLOCK Select this option to wash a small load of dishes. We recommend that you place dishes in the lower rack when you use this feature. 5 HALF LOAD When you select Half Load, the dishwasher will not wash dishes placed in the upper rack. If you select the Half Load option, both water and electricity consumption are reduced. 6 STORM WASH Use this option when you want to wash pots and pans, durable serving bowls, and other large, very dirty, hard to clean dishes.
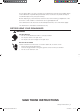
setting up your dishwasher CYCLE SELECTOR DMT800 Series 1 2 3 4 5 6 1 NORMAL Use this cycle for regular dinner dishes. 2 HEAVY Use this cycle for heavily soiled dishes, and dishes with heavy oil. 3 DELICATE Use this cycle for normally soiled dishes or fragile items such as glasses. 4 POT & PANS Use this cycle for hard-to-clean, heavily soiled dishes, pot & pans, and dishes with heavy oil. 5 QUICK + Use this cycle for lightly soiled dishes.
MEETING INSTALLATION REQUIREMENTS Electrical supply and grounding CAUTION Never use an extension cord. When preparing for installation, ensure that your power supply offers: Ř A 120 Volt 60 Hz 15 AMP fuse or circuit breaker Ř An individual branch circuit serving only your dishwasher Your dishwasher must be grounded. If your dishwasher malfunctions or breaks down, grounding will reduce the risk of electric shock by providing a path of least resistance for the electric current.
using your dishwasher BASIC GUIDELINES 1. Open the door and load your dishes (see page 16). - Place dishes into the upper and lower racks, unless you have selected half load. - Remove any food remains from the dishes before placing them in the rack(s). - After placing the dishes into the racks, rotate the nozzles by hand to check whether any of the dishes will interfere with them. - Check the dishes location not to block the detergent dispenser opening. 2. Add detergent to the dispenser (see page 18).
Touch controls WARNING Do not wash the following items Ř Acrylic, Aluminum: Dishes with printed gold rim decoration may become discolored. Ř Dishes treated with adhesive: Treated plastics, wood, ivory, copper and tin may come loose. Ř Plastics with a temperature tolerance less than 194 ˚F (90 ˚C) : Thin plastics wash and dry poorly, and may be damaged due to elevated wash temperatures. Ř Tin: Tin should be washed by hand and dried immediately as it may rust. Ř Wooden utensils: Wooden items may crack.
using your dishwasher ADJUSTING THE ANGLE OF THE PLATE SUPPORTS You can adjust the angle of the tines in the upper rack to three different positions to match the size and shape of your dishes. To adjust the tines, grasp the handle at the back of the rack and push it left or right. See the illustration below. In the lower rack, you can easily remove the plate support to make room for large items such as pots and pans. To remove the plate support, lift up the handles (A).
ADJUSTING THE HEIGHT OF THE UPPER RACK DMT800 Series 1. To lower the upper rack by 2 in. (5 cm), press the ‘A’ levers located at the left and right sides of the upper rack and push the upper rack downwards slightly at the same time. 2. To raise the upper rack, just pull the upper rack upwards without operating any levers. The levers will latch and the upper rack will move to the high position.
using your dishwasher LOADING THE LOWER RACK Load cookware (pots, pans, etc.), up to 14 in. (36 cm) in diameter into the lower rack. The lower rack has been especially designed for dinner dishes, soup bowls, plates, pots, lids, casserole dishes, and plates. Load your plates into the center column of the rack so their open sides face towards the right. Load large items such as pans and pots into the dishwasher so their open sides face downwards.
Loading the large items into the Storm zone 02 using your dishwasher You can load large items such as pots and pans into the Storm Zone - identified by red guide lines - In the lower rack for more effective cleaning. When you select the Storm Wash option, an additional, powerful jet is activated and directed at items in the Storm Zone. Make sure pot handles and other items do not interfere with rotation of the nozzles. USING THE CUTLERY BASKET The cutlery basket consists of two compartments.
using your dishwasher USING THE DISPENSER Filling the detergent dispenser 1. Open the cover by pushing the cover latch downwards. Cover latch 2. Add the recommended amount of detergent to the main wash dispenser using the table below. 3. Close the dispenser cover. You will hear a ‘click’ when it is closed correctly. ‘Click’ 4. When you select the Heavy cycle, add the recommended amount of detergent to the pre-wash dispenser using the table below.
Filling the rinse aid dispenser Your dishwasher has been designed to use liquid rinse aid. The use of a rinse aid greatly improves the drying performance after the final rinse. 2. Pour rinse aid into the opening until the indicator points to “MAX.” Avoid overfilling the dispenser. Avoid overfilling the dispenser 02 using your dishwasher 1. Turn the dispenser knob counterclockwise to open the cover. 3. Adjust the amount of rinse aid released during the rinse operation.
cleaning and maintaining your dishwasher Keeping your dishwasher clean improves its performance, reduces unnecessary repairs, and lengthens its life. CLEANING THE EXTERIOR It’s best to clean spills on the outside of your dishwasher as they occur. Use a soft damp cloth on the control panel to gently wipe away spills and dust. Do not use benzene, wax, thinner, chlorine bleach, or alcohol. These materials may discolor the inner walls and cause stains.
Middle nozzle 03 cleaning and maintaining 1. Pull the upper rack towards the front and remove it. 2. Check whether the nozzle holes are clogged by food particles. 3. If cleaning is needed, remove the nozzle. 4. To remove the nozzle, unfasten and remove the nut, and then remove the nozzle. 5. Clean the nozzle, re-insert it, and fasten the nut. 6. When fastening the nut, turn it firmly by hand. 7. Check whether the nozzle is engaged correctly by rotating it by hand. Upper nozzle 1.
cycles CYCLE CHART ( : Basic, : Flexible step) Cycle Prewash1 Prewash2 Normal Heavy Main wash 120 ~ 138 ˚F (49 ~ 59 ˚C) Rinse1 Rinse2 Rinse3 136 ˚F (58 ˚C) [162 ˚F (72 ˚C)] 140 ˚F (60 ˚C) Delicate Quick + 149 ˚F (65 ˚C) 122 ˚F~138 ˚F (50~59 ˚C) Water [gal(ℓ)] Time (min) 3.6~6.7 (13.6~25) 110~132 8.1 (30.6) 152 4.7 (17.7) 107 8.1 (30.6) 157 4.7 (17.7) 59 4.7~6.7 (17.
troubleshooting CHECK THESE POINTS IF YOUR DISHWASHER… PROBLEM It’s taking too long with an operation or cycle. There are food particles remaining on dishes. (Not cleaning properly.) SOLUTION The door is not closed completely. Check that the door is latched and closed completely. No cycle is selected. Select a proper cycle. The power cable is not connected. Connect the power cable properly. The water supply does not work. Check that the water supply valve is open. The Control Panel is locked.
troubleshooting PROBLEM Leaves glasses with a dim polish. Leaves a yellow or brown film on the inside of the dishwasher. Does not dry dishes well. POSSIBLE CAUSE SOLUTION The water supplied is soft and too much detergent was used. Underload the dishwasher and use a rinse aid to minimize this. Aluminum dishes were included in the wash load. Remove the marks on the dishes using a low sensitivity cleaner. This is caused by coffee and tea soils. Remove the soils using a spot cleaner.
troubleshooting PROBLEM SOLUTION The nozzle hole is clogged with food particles. Clean the nozzle hole. The nozzle is blocked by a dish or pot and cannot rotate. After placing the dishes into the racks, rotate the nozzles by hand to check whether any of the dishes will interfere with them. Water won’t pump out of the dishwasher. Drain is clogged. Contact a qualified service technician to remove any obstruction from the drain hose and check the drain pump operation.
INFORMATION CODES The Control Panel displays information codes to help you understand what is occurring with your dishwasher. If you see any of the codes listed below, you should select the Cancel and Drain option, and then follow the instructions in the Solution column. CODE SYMBOL MEANING SOLUTION Temperature Sensor error Heater error High temperature Heating error Low water level error Functional error. With the dishwasher empty, add detergent, and then run a cycle.
appendix HELPING THE ENVIRONMENT SPECIFICATIONS Model DMT800RHS, DMT800RHB, DMT800RHW Type Built-in Dishwasher Wash capacity 14 place setting Power 120 V/60 Hz AC only, 15 A circuit breaker Used water pressure 20 ~ 120 psi (140 ~ 830 kPa) Rated power uasge 06 appendix Ř Your dishwasher is manufactured from recyclable materials. If you decide to dispose of it, please observe local waste disposal regulations. Cut off the power cable so that the appliance cannot be connected to a power source.
warranty SAMSUNG DISHWASHER LIMITED WARRANTY TO ORIGINAL PURCHASER This SAMSUNG brand product, as supplied and distributed by USA: SAMSUNG ELECTRONICS AMERICA, INC./CANADA: SAMSUNG ELECTRONICS CANADA, INC.
warranty EXCEPT AS SET FORTH HEREIN, THERE ARE NO WARRANTIES ON THIS PRODUCT EITHER EXPRESS OR IMPLIED, AND SAMSUNG DISCLAIMS ALL WARRANTIES INCLUDING, BUT NOT LIMITED TO, ANY IMPLIED WARRANTIES OF MERCHANTABILITY, INFRINGEMENT OR FITNESS FOR A PARTICULAR PURPOSE. NO WARRANTY OR GUARANTEE GIVEN BY ANY PERSON, FIRM, OR CORPORATION WITH RESPECT TO THIS PRODUCT SHALL BE BINDING ON SAMSUNG.
memo DMT800_DD68-00050A.
memo DMT800_DD68-00050A.
Questions or Comments? Country CALL OR VISIT US ONLINE AT USA 1-800-SAMSUNG(726-7864) www.samsung.com CANADA 1-800-SAMSUNG(726-7864) www.samsung.com Code No. DD68-00050A-02_EN DMT800_DD68-00050A.
Modèle DMT800 Manuel d'utilisation du lave-vaisselle Un monde de possibilités Merci d'avoir choisi ce produit Samsung. Afin de bénéficier du meilleur du service après-vente, enregistrez votre appareil sur le site suivant : www.samsung.com/register DMT800_DD68-00050A.
fonctions de votre nouveau lave-vaisselle samsung votre nouveau lave-vaisselle Samsung va changer votre manière de faire la vaisselle. Grâce à une très grande capacité et une faible consommation d'énergie, votre nouveau lave-vaisselle Samsung dispose de toutes les fonctions qui rendront vos corvées beaucoup plus agréables. 1. Très grande capacité Le panier supérieur est incliné pour recevoir la vaisselle volumineuse. L'espace a été optimisé afin d'accueillir toutes les tailles de vaisselle. 2.
consignes de sécurité Dans ce manuel, vous trouverez des remarques « Avertissement » et « Attention » . Ces importantes consignes de sécurité ne couvrent pas toutes les situations possibles. Il est de votre responsabilité d'user de prudence lors de l'installation, de l'entretien et de l'utilisation de votre lave-vaisselle. Samsung ne saurait être tenu pour responsable en cas de dommage résultant d'une utilisation non conforme.
consignes de sécurité Utilisez le lave-vaisselle uniquement pour l'utilisation prévue. Utilisez uniquement des produits nettoyants et agents de rinçage spécialement conçus pour lave-vaisselle, et maintenez-les hors de portée des enfants. Après déballage du lave-vaisselle, maintenez les emballages hors de portée des enfants. Lors du chargement d'articles à laver : - Positionnez les objets tranchants de manière à ce qu'ils ne risquent pas d'endommager le joint de la porte.
Le lave-vaisselle est très lourd. N'essayez pas de le déplacer ou de le soulever seul. Au minimum deux personnes sont nécessaires pour déplacer le lave-vaisselle et ainsi éviter tout risque de blessures. Une fois le lave-vaisselle installé, vérifiez que le tuyau de vidange est correctement raccordé et que les raccords du tuyau ne présentent aucune fuite. Si le tuyau de vidange est mal fixé, cela risque d'entraîner des dégâts matériels. Le tuyau d'alimentation en eau est sensible à l'usure.
sommaire 7 7 8 10 10 11 Déballage du lave-vaisselle Contrôle du contenu Tableau de commande Voyants de progression Sélecteur de programme Conditions indispensables à l'installation 12 14 15 15 16 16 17 18 Instructions de base Retrait du porte-assiettes Réglage de la hauteur du panier supérieur Retrait du panier supérieur Chargement du panier inférieur Chargement du panier supérieur Utilisation du panier à couverts Utilisation du réservoir 20 20 20 21 Nettoyage de la partie extérieure Nettoyage de la pa
installation du lave-vaisselle Veillez à ce que votre installateur respectent soigneusement ces consignes afin de garantir le bon fonctionnement de votre lave-vaisselle et d'éviter tout risque de blessures lors de son utilisation. DÉBALLAGE DU LAVE-VAISSELLE CONTRÔLE DU CONTENU Une fois votre lave-vaisselle déballé, assurez-vous que vous avez reçu toutes les pièces illustrées cidessous.
installation du lave-vaisselle TABLEAU DE COMMANDE Modèle DMT800 1 7 1 2 2 8 3 4 5 6 9 ÉCRAN Affiche les informations de lavage (Delay start hours (Heures de démarrage retardées), Child lock/unlock (Sécurité enfants activée/désactivée), Low rinse (Rinçage faible)), et les messages d’erreur. Lorsque le voyant Low rinse (Rinçage faible) reste allumé, cela signifie que le réservoir de produit de rinçage est vide. Remplissez le réservoir de produit de rinçage.
4 - Lorsque l’appareil est sous tension : Appuyez sur le bouton Sanitize (Désinfection) pendant trois (3) secondes. - Lorsque l’appareil n’est pas sous tension : Appuyez d’abord sur le bouton de mise en marche, puis appuyez sur le bouton Sanitize (Désinfection) pendant trois (3) secondes. Cette option permet de laver une petite quantité de vaisselle. Nous vous conseillons de placer la vaisselle dans le panier inférieur lorsque vous utilisez cette fonction.
installation du lave-vaisselle VOYANTS DE PROGRESSION Modèle DMT800 1 2 3 4 5 6 1 NORMAL (NORMAL) Utilisez ce programme pour la vaisselle normalement sale. 2 HEAVY (INTENSE) Utilisez ce programme pour la vaisselle très sale et comportant des traces de graisse incrustées. 3 DELICATE (DÉLICAT) Utilisez ce programme pour la vaisselle normalement sale ou fragile, comme les verres.
CONDITIONS INDISPENSABLES À L'INSTALLATION Mise à la terre et alimentation électrique ATTENTION AVERTISSEMENT N'utilisez jamais de rallonge. Pendant la phase de préparation de l'installation, assurez-vous que l'alimentation électrique comporte : Ř Un fusible ou disjoncteur de 120 V, 60 Hz, 15 A Ř Un circuit terminal individuel relié uniquement au lave-vaisselle Votre lave-vaisselle doit être mis à la terre.
utilisation du lave-vaisselle INSTRUCTIONS DE BASE 1. Ouvrez la porte de l’appareil et chargez la vaisselle (voir page 16). - Répartissez la vaisselle dans les paniers supérieur et inférieur, sauf si vous avez sélectionné l’option demi-charge. - Éliminez tout reste de nourriture avant de placer la vaisselle dans le ou les paniers. - Une fois la vaisselle en place dans les paniers, faites tourner les gicleurs manuellement pour vérifier qu’aucun obstacle ne se trouve dans leur axe de rotation.
Commandes tactiles - Si la machine est hors tension, seule la touche Marche peut être actionnée. Les éléments suivants ne sont pas résistants au lave-vaisselle : AVERTISSEMENT AVERTISSEMENT Ř Éléments en matière acrylique ou en aluminium : les ornements dorés de certains plats risquent de se décolorer. Ř Éléments assemblés par collage : les éléments en plastique traité, en bois, en ivoire, en cuivre ou en étain risquent de se détacher.
utilisation du lave-vaisselle RETRAIT DU PORTE-ASSIETTES Vous pouvez régler l’angle des tiges du panier supérieur sur trois positions différentes pour l’adapter à la taille et à la forme de votre vaisselle. Pour régler la position des tiges, poussez le levier situé à l’arrière du panier vers la gauche ou vers la droite. Voir l’illustration ci-dessous. Dans le panier inférieur, le porte-assiettes peut être facilement retiré afin de pouvoir installer des objets volumineux, comme des casseroles ou des poêles.
RÉGLAGE DE LA HAUTEUR DU PANIER SUPÉRIEUR Modèle DMT800 1. Pour abaisser le panier supérieur de 5 cm (2 po), appuyez sur les poignées « A » situées de part et d’autre de celui-ci, tout en exerçant une légère pression sur le panier. 2. Pour remonter le panier supérieur, poussezle simplement vers le haut sans toucher aux poignées. Les poignées se bloquent, fixant le panier supérieur en position haute. ATTENTION A Nous vous conseillons de régler la hauteur du panier supérieur avant d’y charger la vaisselle.
utilisation du lave-vaisselle CHARGEMENT DU PANIER INFÉRIEUR Placez la batterie de cuisine (casseroles, poêles, etc.) d'un diamètre de 36 cm maximum dans le panier inférieur. Il a été spécialement conçu pour accueillir la vaisselle de table, les bols, les assiettes, les casseroles, les couvercles et les plats. Chargez vos assiettes dans la colonne centrale du panier, face intérieure vers la droite. Chargez les objets volumineux (poêles, casseroles) face intérieure tournée vers le bas.
Chargement d’éléments volumineux dans la zone de lavage intensif 02 utilisation du lave-vaisselle Pour un lavage plus efficace, vous pouvez charger des éléments de grande taille, tels que des casseroles et des poêles, dans la zone de lavage intensif – signalée par des lignes repère rouges – située dans le panier inférieur. Lorsque vous sélectionnez l’option Storm Wash (Lavage intensif), un puissant jet est activé et dirigé vers les articles de la zone de lavage intensif.
utilisation du lave-vaisselle UTILISATION DU RÉSERVOIR Remplissage du réservoir de produit de lavage 1. Ouvrez le couvercle en exerçant une pression au niveau du loquet. Loquet du couvercle 2. Ajoutez la quantité de produit de lavage recommandée dans le réservoir de lavage principal en vous référant au tableau ci-dessous. 3. Refermez le couvercle du réservoir. Vous entendrez un « clic » indiquant qu'il est correctement fermé. « Clic » 4.
Remplissage du réservoir de liquide de rinçage Votre lave-vaisselle est conçu pour être utilisé avec du liquide de rinçage. L'utilisation de liquide de rinçage permet d'optimiser le séchage après le dernier rinçage. 2. Versez du liquide de rinçage dans l'ouverture jusqu'à atteindre le niveau « MAX. ». Évitez de trop remplir le réservoir. Éviter de trop remplir le réservoir 02 utilisation du lave-vaisselle 1.
nettoyage et entretien du lavevaisselle Garder votre lave-vaisselle propre permet d'améliorer ses performances, de limiter les réparations et d'allonger sa durée de vie. NETTOYAGE DE LA PARTIE EXTÉRIEURE Nettoyez immédiatement les parois extérieures de votre lave-vaisselle en cas de projections. Pour retirer délicatement les taches et la poussière du panneau de commande, utilisez un chiffon doux légèrement humide. N'utilisez jamais de benzène, de cire, de diluant, d'agent de blanchiment chloré ou d'alcool.
Gicleur central Gicleur supérieur 1. Vérifiez que le gicleur n'est pas obstrué par des particules d'aliments. 2. Si un nettoyage s'avère nécessaire, retirez le gicleur. 3. Pour retirer le gicleur, retirez d’abord le panier supérieur, desserrez le cache du gicleur en le tournant dans le sens antihoraire puis retirez le gicleur supérieur. 4. Nettoyez le gicleur, remettez-le en place, puis resserrez le cache du gicleur sur le gicleur en le tournant dans le sens horaire. 5. Insérez le tuyau dans le support. 6.
programmes TABLEAU DES PROGRAMMES ( : standard, : optionnel ) Programme Prélavage1 Prélavage2 Normal (Normal) Heavy (Intense) Delicate (Délicat) Pot & Pans (Casseroles) Quick + (Lavage Rapide +) Smart Auto (Auto-Lavage Intelligent) Lavage principal 120 ˚F ~ 138 ˚F (49 ~ 59 ˚C) 149 ˚F (65 ˚C) 122 ˚F (50 ˚C) 131 ˚F (55 ˚C) 149 ˚F (65 ˚C) Rinçage1 Rinçage2 Rinçage3 140 ˚F (60 ˚C) 122 ˚F ~138 ˚F (50~59 ˚C) Dernier
dépannage CONSULTEZ CETTE RUBRIQUE SI VOUS RENCONTREZ L’UN DES PROBLEMES SUIVANTS… PROBLÈME La durée d'une fonction ou d'un programme est trop longue. SOLUTION Vérifiez que le loquet de la porte est bien enclenché et que la porte est correctement fermée. Aucun cycle n'est sélectionné. Sélectionnez un cycle adapté. Le câble d'alimentation n'est pas branché. Branchez correctement le câble d'alimentation. L'arrivée d'eau ne fonctionne pas. Vérifiez que la vanne d'alimentation en eau est ouverte.
dépannage PROBLÈME CAUSE POSSIBLE SOLUTION Aucun produit de rinçage n’a été ajouté. Vérifiez le réservoir et ajoutez du produit de rinçage au besoin. Utilisez un produit de rinçage sous forme liquide. Il reste des particules Un gicleur est bouché. d’aliments sur la vaisselle. La vaisselle n’est pas correctement (Le lavage ne s’effectue pas répartie. L’appareil est surchargé. correctement.) La vaisselle n’est pas sèche.
PROBLÈME Le gicleur ne tourne pas librement. SOLUTION Du bruit se produit lorsque le couvercle du réservoir est ouvert et lorsque la pompe de vidange fonctionne au début du cycle. Ce phénomène est normal. Le lave-vaisselle n'est pas parfaitement stable. Assurez-vous que le lave-vaisselle a été installé à niveau. Un corps étranger (vis, pièce en plastique, etc.) est coincé dans la cavité de la pompe.
dépannage CODES D'ERREUR Le panneau de commande affiche des codes d’erreur pour vous aider à comprendre l’état dans lequel se trouve votre lave-vaisselle. Si l’un des codes suivants s’affiche, sélectionnez l’option Cancel & Drain (Annuler et vidanger) puis suivez les instructions indiquées dans la colonne Solution.
annexe PROTECTION DE L'ENVIRONNEMENT 06 annexe Ř Votre lave-vaisselle est fabriqué à partir de matériaux recyclables. Si vous décidez de vous en débarrasser, veuillez respecter la réglementation locale relative à l'élimination des déchets. Coupez le câble d'alimentation de manière à ce que l'appareil ne puisse plus être branché sur une source d'alimentation. Ř Retirez la porte afin d'éviter que des enfants ou de petits animaux ne se fassent piéger à l'intérieur de la machine.
garantie LAVE-VAISSELLE SAMSUNG GARANTIE LIMITÉE À L'ACHETEUR INITIAL Ce produit de la marque SAMSUNG, fourni et distribué par USA: SAMSUNG ELECTRONICS AMERICA, INC./CANADA: SAMSUNG ELECTRONICS CANADA, INC.
À L'EXCEPTION DE CELLES EXPOSÉES PAR LA PRÉSENTE, IL N'EXISTE AUCUNE AUTRE GARANTIE SUR CE PRODUIT, QU'ELLE SOIT EXPRESSE OU IMPLICITE, ET SAMSUNG REJETTE TOUTE AUTRE GARANTIE Y COMPRIS, MAIS SANS S'Y LIMITER, TOUTE GARANTIE IMPLICITE RELATIVE À LA QUALITÉ MARCHANDE, À L'ABSENCE DE CONTREFAÇON OU À L'ADAPTATION À UN USAGE PARTICULIER. SAMSUNG NE SERA TENU D’HONORER AUCUNE AUTRE GARANTIE DONNÉE PAR UNE PERSONNE, UNE FIRME OU UNE SOCIÉTÉ QUELCONQUE EN REGARD DE CE PRODUIT.
notes DMT800_DD68-00050A.
notes DMT800_DD68-00050A.
Des questions ou des commentaires ? PAYS N ° DE TÉLÉPHONE SITE INTERNET USA 1-800-SAMSUNG(726-7864) www.samsung.com CANADA 1-800-SAMSUNG(726-7864) www.samsung.com Code n °DD68-00050A-02_CFR DMT800_DD68-00050A.
Serie DMT800 Lavavajillas manual del usuario imagina las posibilidades Gracias por haber escogido este producto Samsung. Para que le podamos brindar un servicio más completo, sírvase registrar su producto en www.samsung.com/register DMT800_DD68-00050A.
características de su nuevo lavavajillas samsung Su nuevo lavavajillas Samsung cambiará su sensación respecto del lavado de vajilla. Desde su capacidad extra grande hasta su eficiencia de energía, su nuevo lavavajillas Samsung cuenta con todas las características para hacer que sus tareas domésticas resulten mucho menos rutinarias. 1. Capacidad extra grande La rejilla superior está inclinada para los platos más grandes. Se maximizó el espacio para poder ubicar diversos tamaños de platos. 2.
información sobre seguridad A lo largo de todo el manual, verá notas de Advertencia y Precaución . Estas instrucciones de seguridad importantes no cubren todas las posibles situaciones que podrían ocurrir. Es su responsabilidad tener precaución al instalar, mantener y operar su lavavajillas. Samsung no será responsable por daños provocados a causa de un uso inadecuado.
información sobre seguridad Use sólo detergentes o agentes de enjuague recomendados para lavavajillas y manténgalos lejos del alcance de los niños. Después de desembalar el lavavajillas, mantenga el embalaje fuera del alcance de los niños. Al cargar artículos que se deben lavar: - Ubique los elementos filosos de forma tal que no dañen la junta de la puerta. Cargue los cuchillos filosos con los mangos hacia arriba para reducir el riesgo de sufrir lesiones por cortes.
El lavavajillas es sumamente pesado. No intente moverlo ni transportarlo solo. Se necesitan dos o más personas para mover un lavavajillas y evitar posibles lesiones. Una vez instalado el lavavajillas, verifique que la manguera de drenaje esté bien conectada y que no existan pérdidas en los conectores de las mangueras. Si la manguera de drenaje está suelta, puede causar daños materiales. La línea de suministro de agua puede romperse. A medida que pasa el tiempo, se vuelve menos flexible.
contenido INSTALAR SU LAVAVAJILLAS 7 USAR SU LAVAVAJILLAS 12 LIMPIAR Y MANTENER SU LAVAVAJILLAS 20 CICLOS 7 7 8 10 10 11 Desembalar su lavavajillas Verificar las piezas Panel de control Luces de progreso Selector de ciclos Cumplir los requerimientos de instalación.
instalar su lavavajillas Asegúrese de que su instalador siga estrictamente estas instrucciones de modo que su nuevo lavavajillas funcione correctamente y usted no corra riesgo de sufrir lesiones cuando lava la vajilla. DESEMBALAR SU LAVAVAJILLAS 01 instalar su lavavajillas Ř Una vez que recibió su nuevo lavavajillas, desembálelo con cuidado y verifique que no esté dañado. Si el lavavajillas presenta daños, regístrelo en el conocimiento de embarque y conserve una copia.
instalar su lavavajillas PANEL DE CONTROL Serie DMT800 1 7 1 2 2 8 3 4 5 6 9 DISPLAY (MOSTRAR) Muestra información del lavado (horas para demorar inicio, bloqueo/ desbloqueo para niños, producto para enjuague bajo) y mensajes de error. Cuando Low rinse (Producto para enjuague bajo) permanece iluminada, no hay agente de enjuague en el dosificador. Rellene el dispensador de agente de enjuague. DELAY START (INICIO RETARDADO) Demora un ciclo por hasta 24 horas en incrementos de una hora.
4 Seleccione esta opción para lavar pequeñas cargas de platos. Le recomendamos que coloque los platos en el bastidor inferior cuando utilice esta función. 5 HALF LOAD (MEDIA CARGA) 01 instalar su lavavajillas CHILD LOCK/ UNLOCK (BLOQUEO/ DESBLOQUEO NIÑOS) Esta opción le permite bloquear los botones en el panel de control para que los niños no puedan poner en funcionamiento el lavaplatos por accidente presionando los botones.
instalar su lavavajillas LUCES DE PROGRESO Serie DMT800 1 2 3 4 5 6 1 NORMAL Utilice este ciclo para platos usados en comidas normales. 2 HEAVY (PESADO) 3 DELICATE (DELICADO) 4 POT & PANS (OLLAS Y SARTENES) Utilice este ciclo para platos muy sucios y platos con mucho aceite. Utilice este ciclo para platos con suciedad normal o elementos frágiles, como los anteojos. Utilice este ciclo para platos muy sucios, ollas y sartenes y platos con mucho aceite que sean difíciles de lavar.
CUMPLIR LOS REQUERIMIENTOS DE INSTALACIÓN. Suministro eléctrico y conexión a tierra PRECAUCIÓN ADVERTENCIA Nunca utilice un cable prolongador. Al prepararse para la instalación, asegúrese de que su alimentación eléctrica ofrezca: Ř Un fusible o disyuntor de 120 Volt 60 Hz 15 AMP Ř Un circuito individual que preste servicio sólo a su lavavajillas. Su lavavajillas debe estar conectado a tierra.
usar su lavavajillas PAUTAS BÁSICAS 1. Abra la puerta y cargue los platos (consulte la página 16). - Coloque los platos en los bastidores superior e inferior, a menos que haya seleccionado media carga. - Retire cualquier resto de comida de los platos antes de colocarlos en los bastidores. - Tras colocar los platos en los bastidores, gire las boquillas a mano para verificar si alguno de los platos las obstruyen. - Verifique que la ubicación de los platos no bloquee la abertura dispensadora de detergente. 2.
Controles táctiles - Cuando se haya seleccionado esta opción, los niños no podrán encender el lavavajillas en forma accidental al tocar los controles. Si el ciclo se está ejecutando, los botones no responderán. Si la máquina está apagada, sólo responderá el botón Power (Encendido). 02 usar su lavavajillas Le permiten operar fácilmente el lavavajillas. Ř Se operan de manera conveniente con un suave toque. Ř Cuentan con un diseño sencillo y elegante Ř Son fáciles de limpiar.
usar su lavavajillas RETIRAR EL SOPORTE PARA PLATOS Es posible ajustar el ángulo de las horquillas en el bastidor superior en tres posiciones diferentes para que se adapten al tamaño y forma de sus platos. Para ajustar las horquillas, tome la manija en la parte posterior del bastidor y presiónela hacia la derecha o la izquierda. Observe la ilustración que aparece a continuación.
AJUSTAR LA ALTURA DE LA REJILLA SUPERIOR Serie DMT800 1. Para bajar el estante superior 2 pulgadas (5 cm), presione la palancas ‘A’ que están situadas a la izquierda y a la derecha del estante superior y al mismo tiempo presiónelo suavemente hacia abajo. 2. Para subir el estante superior, simplemente empújelo hacia arriba sin presionar ninguna palanca. Las palancas se trabarán y el estante superior quedará en posición alta.
usar su lavavajillas CARGAR LA REJILLA INFERIOR Cargue utensilios de cocina (ollas, sartenes, etc.), de hasta 14 pulg. (36 cm) de diámetro en la rejilla inferior. La rejilla inferior ha sido especialmente diseñada para los platos de la cena, bols para sopa, platos, ollas, tapas, cazuelas y fuentes para horno. Cargue sus platos en la columna central de la rejilla de modo que los lados abiertos miren hacia la derecha.
Carga de artículos grandes en la zona de tormenta 02 usar su lavavajillas Es posible cargar elementos grandes como ollas y sartenes en la zona de tormenta (identificada con líneas rojas) en el bastidor inferior para una limpieza más efectiva. Cuando seleccione la opción Storm Wash (Lavado de tormenta), se activará un poderoso chorro adicional dirigido a los artículos en esa zona. Asegúrese de que las manijas de las ollas y otros elementos no interfieran con la rotación de las boquillas.
usar su lavavajillas USAR EL DOSIFICADOR Llenar el dosificador de detergente 1. Abra la tapa presionando la traba hacia abajo. Traba de la tapa 2. Agregue la cantidad recomendada de detergente al dosificador de lavado principal usando la tabla a continuación. 3. Cierre la tapa del dosificador. Escuchará un "clic" cuando se cierre correctamente. ‘Click’ 4.
Llenar el dosificador de producto para enjuague Su lavavajillas fue diseñado para utilizar producto para enjuague líquido. El uso de un producto para enjuague mejora significativamente el desempeño de secado después del enjuague final. 02 usar su lavavajillas 1. Gire la perilla del dosificador en el sentido contrario al de las agujas del reloj para abrir la tapa. 2. Vierta el producto para enjuague en la abertura hasta que el indicador señale “MAX.” Evite llenar en exceso el dosificador.
limpiar y mantener su lavavajillas Mantener limpio su lavavajillas mejora su desempeño, reduce reparaciones innecesarias y prolonga su vida útil. LIMPIEZA DEL EXTERIOR Lo mejor es limpiar los derrames en la parte externa de su lavavajillas ni bien ocurren. Use un paño húmedo suave sobre el panel de control para limpiar suavemente derrames y polvo. No utilice benceno, cera, diluyente, lavandina clorada ni alcohol. Estos materiales pueden decolorar las paredes interiores y provocar manchas.
Boquilla media Boquilla superior 1. Verifique si los orificios de la boquilla están tapados por partículas de alimentos. 2. Si es necesario limpiarla, retírela. 3. Para quitar la boquilla, primero tire del bastidor superior hacia afuera, afloje la tapa de la boquilla girándola en sentido contrario a las agujas del reloj, y luego quite la boquilla superior. 4. Limpie la boquilla, vuelva a insertarla y luego ajuste la tapa de la boquilla a la boquilla girándola en el sentido de las agujas del reloj. 5.
ciclos TABLA DE CICLOS ( : Básico, : Paso flexible) Ciclo Prelavado1 Prelavado2 Normal Heavy (Pesado) Lavado principal 120 ˚F ~138 ˚F (49~59 ˚C) Enjuague1 Enjuague2 Enjuague3 136 ˚F (58 ˚C) [162 ˚F (72 ˚C)] 140 ˚F (60 ˚C) Delicate (Delicado) Pot & Pans (Ollas Y Sartenes) Quick + (Rápido +) Smart Auto (Automático Inteligente) 149 ˚F (65 ˚C) 140 ˚F (60 ˚C) 122 ˚F~ 38˚F (50~59 ˚C) 158 ˚F (70 ˚C) [162 ˚F (72
solución de problemas VERIFIQUE ESTOS PUNTOS SI SU LAVAVAJILLAS... PROBLEMA SOLUCIÓN Compruebe que la puerta esté completamente cerrada y trabada. Seleccione un ciclo apropiado. Conecte correctamente el cable de alimentación. Compruebe que la válvula de suministro de agua esté abierta. Destrabe el bloqueo/desbloqueo para niños. (Consulte la página 9.) Restablezca el disyuntor. Compruebe que la línea de suministro de agua esté conectada a un suministro de agua caliente.
solución de problemas PROBLEMA POSIBLE CAUSA SOLUCIÓN No hay agente de enjuague. Verifique el dispensador y agregue el agente de enjuague. Utilice un agente de enjuague líquido. Una boquilla está bloqueada. Limpie la boquilla. Los platos no están cargados Cambie la distribución de los platos Tiene mal olor. correctamente. Se han cargado para no interfieran con la rotación de demasiados platos. la boquilla y el funcionamiento del dispensador de detergente. Cargue sólo la cantidad apropiada de platos.
PROBLEMA POSIBLE CAUSA SOLUCIÓN El sonido se genera cuando la tapa del dispensador está abierta y la bomba del drenaje está funcionando en una etapa temprana. El lavaplatos no está nivelado Esto es normal. 05 solución de problemas Asegúrese de que el lavaplatos esté nivelado. Es demasiado ruidoso. Hay materiales extraños (tornillos, Comuníquese con un técnico de pedazos de plástico) en la cámara de servicio calificado para quitar el la bomba. material extraño de la cámara de la bomba.
solución de problemas CÓDIGOS DE INFORMACIÓN El panel de control muestra códigos de información para ayudarlo a comprender que está ocurriendo con su lavadora. Si ve alguno de los códigos mencionados a continuación, debe seleccionar la opción Cancel and Drain (Cancelar y drenar), y luego seguir las instrucciones en la comuna Solución. SÍMBOLO DEL CÓDIGO SIGNIFICADO SOLUCIÓN Error del sensor de temperatura Error del calentador Error de calentamiento a temperatura elevada. Error funcional.
apéndice AYUDAR AL MEDIOAMBIENTE ESPECIFICACIONES Modelo DMT800RFS, DMT800RFB, DMT800RFW Tipo Lavavajillas Capacidad de lavado 14 cubiertos Potencia 120 V/60 Hz CA solamente, disyuntor de 15 A Presión de agua usada 20 ~ 120 psi (140 ~ 830 kPa) Dimensiones (Ancho x Profundidad x Altura) 23 ⅞ x 24 ¾ x 33 ⅞ pulg. (605 x 627 x 860 mm) Consumo de potencia nominal Motor de lavado 150 ~ 190 W Calentador 1100 W Peso Desembalado 109 lb (49.
garantía LAVAVAJILLAS SAMSUNG GARANTÍA LIMITADA PARA EL COMPRADOR ORIGINAL El presente producto de la marca SAMSUNG, tal como lo provee y distribuye Estados Unidos: SAMSUNG ELECTRONICS AMERICA, INC./CANADA: SAMSUNG ELECTRONICS CANADA, INC.
SALVO LO ESTABLECIDO EN ESTE DOCUMENTO, NO EXISTEN GARANTÍAS RESPECTO DE ESTE PRODUCTO NI EXPRESAS NI TÁCITAS Y SAMSUNG DESCONOCE Y RECHAZA TODA GARANTÍA INCLUIDA, AUNQUE NO TAXATIVAMENTE ENUMERADA, TODA GARANTÍA TÁCITA DE COMERCIABILIDAD, INFRACCIÓN O APTITUD PARA UN PROPÓSITO ESPECIAL. NINGUNA OTRA GARANTÍA OTORGADA POR PERSONA, COMPAÑÍA O CORPORACIÓN ALGUNA CON RESPECTO AL PRESENTE PRODUCTO REVESTIRÁ CARÁCTER VINCULANTE PARA SAMSUNG.
notas DMT800_DD68-00050A.
notas DMT800_DD68-00050A.
¿Tiene preguntas o comentarios? PAÍS LLAME AL O VISÍTENOS EN LÍNEA EN USA 1-800-SAMSUNG(726-7864) www.samsung.com CANADÁ 1-800-SAMSUNG(726-7864) www.samsung.com Código Nro. DD68-00050A-02_Mes DMT800_DD68-00050A.