DMT800 Series Dishwasher user manual imagine the possibilities Thank you for purchasing this Samsung product. To receive more complete service, please register your product at www.samsung.com/register DMT800_DD68-00036A.
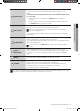
features of your new samsung dishwasher Your new Samsung Dishwasher will change the way you feel about doing dishes. From its extra large capacity to its energy efficiency, your new Samsung dishwasher has all the features to make your chores much less mundane. 1. Extra large capacity The upper rack is slanted for larger dishes. The space has been maximized to accommodate a variety of dish sizes. 2.
safety information Throughout this manual, you’ll see Warning and Caution notes. These important safety instructions do not cover all possible situations that might occur. It is your responsibility to use caution when installing, maintaining, and operating your dishwasher. Samsung will not be liable for damages resulting from improper use.
safety information Do not operate the dishwasher unless all ENCLOSURE panels are properly in place. Do not tamper with the controls. Do not abuse, sit on, or stand on the door, lid, or dish racks of the dishwasher. To reduce the risk of injury, do not allow children to play in or on the dishwasher. To reduce the risk of fire or explosion: - Under certain conditions, hydrogen gas may be produced in a hot water system that has not been used for two weeks or more. HYDROGEN GAS IS EXPLOSIVE.
Do not repair, replace, or service any part of your dishwasher yourself. Disassembly, repairs and modifications are permitted by authorized service technicians only. Work done by an unauthorized person may void your warranty. Before disposing of your dishwasher, remove the door of the washing compartment or the door latch so that children or small animals do not get trapped inside. If the dishwasher is left unused for an extended period of time, turn off the water supply.
contents setting up your dishwasher 7 using your dishwasher 12 cleaning and maintaining your dishwasher 20 cycles 22 troubleshooting 23 appendix 27 7 Unpacking your dishwasher 7 Checking parts 8 Control panel 10 Cycle selector 10 Progress lights 11 Meeting installation requirements 12 Basic guidelines 14 Adjusting the angle of the plate supports 15 Adjusting the height of the upper rack 15 Removing the upper rack 16 Loading the lower rack 16 Loading the upper rack 17 Using the cutle
setting up your dishwasher Be sure to have your installer follow these instructions closely so that your new dishwasher works properly and that you’re not at risk of injury when washing dishes. Unpacking your dishwasher • • Once your new dishwasher has been delivered to you, carefully unpack it and check for any damage. If the dishwasher has been damaged, make note of it on the waybill and keep a copy. Do not install the dishwasher, and contact Samsung Customer Service at the number listed below.
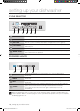
setting up your dishwasher Control panel DMT800 Series 1 7 2 8 3 4 5 6 9 1 DISPLAY Displays wash information (Delay start hours, Child lock, Rinse refill), and error messages. When Rinse Refill remains illuminated, there is no rinse agent in the dispenser. Refill the rinse aid dispenser. If an error occurs during an operation, an error message is displayed with a warning sound. Refer to the Information codes page.
4 CHILD LOCK This option allows you to lock the buttons on the control panel so children cannot accidently start the dishwasher by pressing the buttons on the panel. To activate and deactivate Child Lock, hold the Sanitize button down for 3 seconds. - When Power is On : Hold down the Sanitize button for three (3) seconds. - When Power is Off : Push the Power button first, and then hold down the Sanitize button for three (3) seconds.
setting up your dishwasher Cycle selector DMT800 Series 1 2 3 4 5 6 1 NORMAL Use this cycle for regular dinner dishes. 2 HEAVY Use this cycle for heavily soiled dishes, and dishes with heavy oil. 3 DELICATE Use this cycle for normally soiled dishes or fragile items such as glasses. 4 POT & PANS Use this cycle for hard-to-clean, heavily soiled dishes, pot & pans, and dishes with heavy oil. 5 QUICK + Use this cycle for lightly soiled dishes.
Meeting installation requirements Electrical supply and grounding CAUTION Never use an extension cord. When preparing for installation, ensure that your power supply offers: • A 120 Volt 60 Hz 15 AMP fuse or circuit breaker • An individual branch circuit serving only your dishwasher Your dishwasher must be grounded. If your dishwasher malfunctions or breaks down, grounding will reduce the risk of electric shock by providing a path of least resistance for the electric current.
using your dishwasher Basic guidelines 1. Open the door and load your dishes (see page 16). - Place dishes into the upper and lower racks, unless you have selected half load. - Remove any food remains from the dishes before placing them in the rack(s). - After placing the dishes into the racks, rotate the nozzles by hand to check whether any of the dishes will interfere with them. - Check the dishes location not to block the detergent dispenser opening. 2. Add detergent to the dispenser (see page 18).
Touch controls WARNING Do not wash the following items • • • • • WARNING Acrylic, Aluminum: Dishes with printed gold rim decoration may become discolored. Dishes treated with adhesive: Treated plastics, wood, ivory, copper and tin may come loose. Plastics with a temperature tolerance less than 194 ˚F (90 ˚C) : Thin plastics wash and dry poorly, and may be damaged due to elevated wash temperatures. Tin: Tin should be washed by hand and dried immediately as it may rust.
using your dishwasher Adjusting the angle of the plate supports You can adjust the angle of the tines in the upper rack to three different positions to match the size and shape of your dishes. To adjust the tines, grasp the handle at the back of the rack and push it left or right. See the illustration below. In the lower rack, you can easily remove the plate support to make room for large items such as pots and pans. To remove the plate support, lift up the handles (A).
Adjusting the height of the upper rack DMT800 Series 1. To lower the upper rack by 2 in. (5 cm), press the ‘A’ levers located at the left and right sides of the upper rack and push the upper rack downwards slightly at the same time. 2. To raise the upper rack, just pull the upper rack upwards without operating any levers. The levers will latch and the upper rack will move to the high position.
using your dishwasher Loading the lower rack Load cookware (pots, pans, etc.), up to 14 in. (36 cm) in diameter into the lower rack. The lower rack has been especially designed for dinner dishes, soup bowls, plates, pots, lids, casserole dishes, and plates. Load your plates into the center column of the rack so their open sides face towards the right. Load large items such as pans and pots into the dishwasher so their open sides face downwards.
Loading the large items into the Storm zone 02 using your dishwasher You can load large items such as pots and pans into the Storm Zone - identified by red guide lines - In the lower rack for more effective cleaning. When you select the Storm Wash option, an additional, powerful jet is activated and directed at items in the Storm Zone. Make sure pot handles and other items do not interfere with rotation of the nozzles. Using the cutlery basket The cutlery basket consists of two compartments.
using your dishwasher Using the dispenser Filling the detergent dispenser 1. Open the cover by pushing the cover latch downwards. Cover latch 2. Add the recommended amount of detergent to the main wash dispenser using the table below. 3. Close the dispenser cover. You will hear a ‘click’ when it is closed correctly. ‘Click’ 4. When you select the Heavy cycle, add the recommended amount of detergent to the pre-wash dispenser using the table below.
Filling the rinse aid dispenser Your dishwasher has been designed to use liquid rinse aid. The use of a rinse aid greatly improves the drying performance after the final rinse. 2. Pour rinse aid into the opening until the indicator points to “MAX.” Avoid overfilling the dispenser. Avoid overfilling the dispenser 02 using your dishwasher 1. Turn the dispenser knob counterclockwise to open the cover. 3. Adjust the amount of rinse aid released during the rinse operation.
cleaning and maintaining your dishwasher Keeping your dishwasher clean improves its performance, reduces unnecessary repairs, and lengthens its life. Cleaning the exterior It’s best to clean spills on the outside of your dishwasher as they occur. Use a soft damp cloth on the control panel to gently wipe away spills and dust. Do not use benzene, wax, thinner, chlorine bleach, or alcohol. These materials may discolor the inner walls and cause stains.
Middle nozzle 03 cleaning and maintaining 1. Pull the upper rack towards the front and remove it. 2. Check whether the nozzle holes are clogged by food particles. 3. If cleaning is needed, remove the nozzle. 4. To remove the nozzle, unfasten and remove the nut, and then remove the nozzle. 5. Clean the nozzle, re-insert it, and fasten the nut. 6. When fastening the nut, turn it firmly by hand. 7. Check whether the nozzle is engaged correctly by rotating it by hand. Upper nozzle 1.
cycles Cycle chart ( : Basic, : Flexible step) Cycle Prewash1 Prewash2 Normal Heavy Delicate Quick + Smart Auto • • • • 131 ˚F (55 ˚C) 140 ˚F (60 ˚C) 122 ˚F (50 ˚C) 120 ~ 138 ˚F (49 ~ 59 ˚C) Pot & Pans Main wash Rinse1 Rinse2 158 ˚F (70 ˚C) [162 ˚F (72 ˚C)] 140 ˚F (60 ˚C) Dry Water [gal(ℓ)] Time (min) 3.6~6.7 (13.6~25) 110~132 8.1 (30.6) 152 4.7 (17.7) 107 8.1 (30.6) 157 4.7 (17.
troubleshooting Check these points if your dishwasher… PROBLEM It’s taking too long with an operation or cycle. There are food particles remaining on dishes. (Not cleaning properly.) SOLUTION The door is not closed completely. Check that the door is latched and closed completely. No cycle is selected. Select a proper cycle. The power cable is not connected. Connect the power cable properly. The water supply does not work. Check that the water supply valve is open. The Control Panel is locked.
troubleshooting PROBLEM Leaves glasses with a dim polish. Leaves a yellow or brown film on the inside of the dishwasher. Does not dry dishes well. POSSIBLE CAUSE SOLUTION The water supplied is soft and too much detergent was used. Underload the dishwasher and use a rinse aid to minimize this. Aluminum dishes were included in the wash load. Remove the marks on the dishes using a low sensitivity cleaner. This is caused by coffee and tea soils. Remove the soils using a spot cleaner.
troubleshooting PROBLEM SOLUTION The nozzle hole is clogged with food particles. Clean the nozzle hole. The nozzle is blocked by a dish or pot and cannot rotate. After placing the dishes into the racks, rotate the nozzles by hand to check whether any of the dishes will interfere with them. Water won’t pump out of the dishwasher. Drain is clogged. Contact a qualified service technician to remove any obstruction from the drain hose and check the drain pump operation.
Information codes The Control Panel displays information codes to help you understand what is occurring with your dishwasher. If you see any of the codes listed below, you should select the Cancel and Drain option, and then follow the instructions in the Solution column. CODE SYMBOL MEANING SOLUTION Temperature Sensor error Heater error High temperature Heating error Low water level error Functional error. With the dishwasher empty, add detergent, and then run a cycle.
appendix Helping the environment • Specifications Model DMT800RHS, DMT800RHB, DMT800RHW Type Built-in Dishwasher Wash capacity 14 place setting Power 120 V/60 Hz AC only, 15 A circuit breaker Used water pressure 20 ~ 120 psi (140 ~ 830 kPa) Rated power uasge 06 appendix • • Your dishwasher is manufactured from recyclable materials. If you decide to dispose of it, please observe local waste disposal regulations.
warranty SAMSUNG DISHWASHER LIMITED WARRANTY TO ORIGINAL PURCHASER This SAMSUNG brand product, as supplied and distributed by USA: SAMSUNG ELECTRONICS AMERICA, INC./CANADA: SAMSUNG ELECTRONICS CANADA, INC.
warranty EXCEPT AS SET FORTH HEREIN, THERE ARE NO WARRANTIES ON THIS PRODUCT EITHER EXPRESS OR IMPLIED, AND SAMSUNG DISCLAIMS ALL WARRANTIES INCLUDING, BUT NOT LIMITED TO, ANY IMPLIED WARRANTIES OF MERCHANTABILITY, INFRINGEMENT OR FITNESS FOR A PARTICULAR PURPOSE. NO WARRANTY OR GUARANTEE GIVEN BY ANY PERSON, FIRM, OR CORPORATION WITH RESPECT TO THIS PRODUCT SHALL BE BINDING ON SAMSUNG.
memo DMT800_DD68-00036A.
memo DMT800_DD68-00036A.
Questions or Comments? Country CALL OR VISIT US ONLINE AT USA 1-800-SAMSUNG(726-7864) www.samsung.com CANADA 1-800-SAMSUNG(726-7864) www.samsung.com Code No. DD68-00050A_EN DMT800_DD68-00036A.