0401 DTB-H550F_GB 4/1/05 1:38 PM Page II DTB-H550F Instructions for use ENG MF68-00356A DIGITAL TERRESTRIAL HDTV RECEIVER REV. 1.
0401 DTB-H550F_ENG 4/1/05 3:18 PM Page 2 This STB has been manufactured to satisfy international safety standards. Please read the following recommended safety precautions carefully. DTB-H550F DTB-H550F SAFETY INSTRUCTIONS SAFETY INSTRUCTIONS WARNING! 1. Follow these directions in order not to damage the power cord or plug. MAINS SUPPLY: AC 110-240V~, 50/60Hz OVERLOADING: Do not overload wall outlets, extension cords or adapters as this can result in fire or electrical shock.
0401 DTB-H550F_ENG 4/1/05 3:18 PM Page 4 What are SDTV and HDTV? Aspect ratio SDTV In addition to resolution, HDTV is also defined by the aspect ratio of its broadcasts. Aspect ratio means the shape of the screen as defined by the ratio of the screen’s width to its height. For analog TV and SDTV, the aspect ratio is 4 units wide by 3 units high (usually written 4:3). This is the familiar shape of conventional TVs — slightly wider than they are tall.
0401 DTB-H550F_ENG 4/1/05 3:18 PM Page 6 GENERAL FEATURES 1. USER SECTION Safety Instructions . . . . . . . . . . . . . . . . . . . . . . . . . . . . . . . . . . . . . 2 DIGITAL HD/SDTV BROADCASTING RECEPTION ADVANCED ELECTRONIC PROGRAM GUIDE SUBTITLE & TELETEXT SUPPORTED FULL FUNCTION INFRARED REMOTE CONTROL UNIT AUTO AND MANUAL SCAN FACILITY CHANNEL ORGANIZING (PROGRAMMABLE) RESERVED PROGRAM LIST AC SWITCH FOR CUTTING OFF POWER SUPPLY Technical overview . . . . . . . . . . . . . . . . . . . . . . .
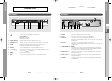
0401 DTB-H550F_ENG 4/1/05 3:18 PM Page 8 Front Panel 1. Rear Panel 2 /I 3 4 5 6 7 8 1 7 8 Power Indicator Operating mode : Blue Standby mode : Off 2. TO TV Connects a TV or other receiver via a coaxial cable. 3. RGB OUT Connect to a TV or monitor through the RGB IN port. At this time, the DTV OUTPUT switch of the receiver has to be switched to RGB mode. 4. DVI OUT Connect to a TV or monitor through the DVI IN port.
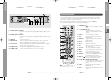
0401 DTB-H550F_ENG 4/1/05 3:18 PM Page 10 DTB-H550F DTB-H550F DESCRIPTION DESCRIPTION Remote Control Unit The Set-Top Box remote control and on-screen menu system work together to operate the Set-Top Box as simply as possible. Understanding the remote control keys and the menus allows you to operate the Set-Top Box with ease. ● ● 9 10 11 13 14 15 1. STANDBY/ON ( ) Turns the receiver operating or standby mode. 2.
0401 DTB-H550F_ENG 4/1/05 3:18 PM Page 12 DTB-H550F DTB-H550F DESCRIPTION DESCRIPTION Checking Accessories 17. TV STANDBY/ON ( ) (for TV exclusive use) Turns the TV operating or standby mode. 18. TV IN SEL (for TV exclusive use) Press to select the input source in the TV. 19. TV (for TV exclusive use) Switches the remote control mode to TV mode. 20. CH / Remote Control/ AAA Batteries Owner’s Instructions Press to change channels.
0401 DTB-H550F_ENG 4/1/05 3:18 PM Page 14 CONNECTING YOUR STB Setting Up TV Operations with the Remote Control Location of the receiver Enter the manufacturer number into the remote control to control the TV with the remote control (see “Available TV Manufacturer Numbers” on pages 40~45). Your STB should be placed under proper ventilation. Don’t put in completely enclosed cabinet that will restrict the flow of air, resulting in overheating.
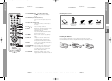
0401 DTB-H550F_ENG 4/1/05 3:18 PM Page 16 DTB-H550F DTB-H550F CONNECTING YOUR STB CONNECTING YOUR STB Connecting the Set-Top Box to a TV Set Digital TV or Normal TV 1. Connect an antenna cable to the ANT.IN jack on the Set-Top Box. 1. Connect an antenna cable to the ANT.IN jack on the Set-Top Box. 2. Connect the Video Cables. 2. Connect the Video Cables.
0401 DTB-H550F_ENG 4/1/05 3:18 PM Page 18 CONNECTING YOUR STB Connecting the Set-Top Box to a TV/Monitor with a DVI jack Connecting the Set-Top Box to a Computer Monitor 1. Connect an antenna cable to the ANT.IN jack on the Set-Top Box. 1. Connect an antenna cable to the ANT.IN jack on the Set-Top Box. 2. Connect a DVI cable between the DVI OUT jack on the Set-Top Box and the DVI IN jack on the DVI device (TV, monitor). 2.
0401 DTB-H550F_ENG 4/1/05 3:18 PM Page 20 BASIC FUNCTIONS 1. Display Screen Selecting the Resolution and the DTV Output Signal Before you can view the television program, you must perform the installation. Therefore you will see only menu images at first. After the television channels have been programmed, you will see the following picture (banner) each time you switch channels: You can select the video output appropriate to the connected TV or monitor mode.
0401 DTB-H550F_ENG 4/1/05 3:18 PM Page 22 BASIC FUNCTIONS 3. Select Soundtrack 6. Subtitle ● When the current broadcasting program provides subtitle, press the SUBTITLE key to see the current subtitle language. If SUBTITLE is available on current program, is displayed on the banner after changing channel or pressing the INFO key. Press the ALT key to see the soundtrack list. Press the / and SELECT ( ) key to select one.
0401 DTB-H550F_ENG 4/1/05 3:18 PM Page 24 OPERATING THE RECEIVER 8. Select Audio Mode Guide (EPG) Menu You can choose an audio mode between Dolby and MPEG audio using the AUDIO key. EPG-Electronic Program Guide The electronic program guide gives you a program information for the channels. To change the audio mode: ● ● Press the AUDIO key to select the Dolby or MPEG audio. Whenever you press the AUDIO key, available audio mode is toggled. Note : 1. This service depends on service provider. 2.
0401 DTB-H550F_ENG 4/1/05 3:18 PM Page 26 OPERATING THE RECEIVER DTB-H550F DTB-H550F OPERATING THE RECEIVER Main Menu Genre: ● Press the GREEN key to select the EPG information according to the genre. A total of 11 genres are available. ● Press the / or / keys to select a genre and press the SELECT ( ) key for confirmation. After installing your antenna system and STB with appropriate connectors.
0401 DTB-H550F_ENG 4/1/05 3:18 PM Page 28 OPERATING THE RECEIVER 2. Channel 2.2 Channel Auto Scan This menu consists of 5 sub-menus : Favorite Channel, Channel Auto Scan, Channel Manual Scan, Channel Delete, and Channel Block. The sub menu Auto Scan will enable download of the channels automatically from the preprogrammed load. To download channels automatically: ● Select “Channel” in the main menu to select the sub menu. ● Select the sub menu from the channel menu by pressing ) key.
0401 DTB-H550F_ENG 4/1/05 3:18 PM Page 30 OPERATING THE RECEIVER 2.3 Channel Manual Scan 2.4 Channel Delete To tune-in new channels and weak signals, the STB has been provided with the option “Channel Manual Scan” where the frequency channel can be entered by the user. You can delete channel searched. ● ● ● Select “Channel Manual Scan” in Channel menu. Select the channel number of frequency you want to find by pressing the / keys. ● Press the SELECT ( ) key to start the scanning process.
0401 DTB-H550F_ENG 4/1/05 3:18 PM Page 32 OPERATING THE RECEIVER 3. Preference Audio Balance ● This menu consists of 4 sub-menus : A/V Setting, Parental Rating, Banner Duration, and Channel Change Mode. Select the Audio Balance: Mixed, Right +1 to Right +7 and Left +1 to Left +7. Dolby Digital ● Select “Preference” in the main menu to select the sub menu. ● Select the sub menu from the Preference menu by pressing the or key, then press the SELECT ( ) key.
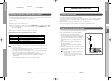
0401 DTB-H550F_ENG 4/1/05 3:18 PM Page 34 OPERATING THE RECEIVER DTB-H550F DTB-H550F OPERATING THE RECEIVER 3.2 Parental Rating Video output mode using “Hot Key” as called P.SIZE in RCU TV Aspect Source 16:9 4:3 This “Parental Rating” feature sets viewing restrictions and prevents unauthorized access to your STB through the PIN (Personal Identification Number), which is a 4 digit number.
0401 DTB-H550F_ENG 4/1/05 3:18 PM Page 36 OPERATING THE RECEIVER 3.3 Banner Duration 4. System When you switch channels, an information banner will be shown for a few seconds. You can select for how long the banner will be shown. This menu consists of 5 sub-menus : Change PIN Code, Region Selection, Status, Signal Detection, and Factory Reset. ● Select “Banner Duration” in the Preference menu. Select the banner time you want by using or key. Time ranges: 0, 3, 5, 10 and 15 seconds.
0401 DTB-H550F_ENG 4/1/05 3:18 PM Page 38 OPERATING THE RECEIVER 4.2 Region Selection 4.4 Signal Detection You can set your region according to your location. You can obtain the signal strength and reception quality of an incoming RF channel. ● ● Select “Region Selection” in the System menu. Select the region you want by using or key. ● ● Region: New South Wales, Northern Territory, Queens land, South Australia, Tasmania, Victoria, and Western Australia.
0401 DTB-H550F_ENG 4/1/05 3:18 PM Page 40 DTB-H550F DTB-H550F AVAILABLE TV MANUFACTURER NUMBERS Available TV Manufacturer Numbers 1. TV key + 3-Digit User Code 2. TV Operating keys: TV STANDBY/ON, 0~9, CH TV / TV Maker (BRAND) NAME SAMSUNG A.R.
0401 DTB-H550F_ENG 4/1/05 3:18 PM Page 42 AVAILABLE TV MANUFACTURER NUMBERS TV Maker (BRAND) NAME HIGASHI HIGHLINE HIKONA HINARI HISAWA HIT HITACHI INDIANA INGELEN INGERSOLL INNO HIT INNOVATION INTERACTIVE INTERBUY INTERFUNK INTERNAL INTERVISION IR IRRADIO ISUKAI ITC ITS ITT ITT-NOKIA ITV JEAN JEC JET POINT JVC KAISUI KAMOSONIC KAMP KAPSCH KARCHER KATHREIN KAWASHO KB ARISTOCRAT TV CODE NUMBER (3DIGIT) LIST 50 049 076 152 123 012 018 042 049 066 094 107 123 134 139 195 209 232 307 123 378 380 425 3
0401 DTB-H550F_ENG 4/1/05 3:18 PM Page 44 AVAILABLE TV MANUFACTURER NUMBERS TV Maker (BRAND) NAME PROTECH PROVISION PYE PYMI QUADRA VISION QUASAR QUELLE QUESTA RADIALVA RADIOLA RADIOMARELLI REDIFFUSION(UK) REDSTAR REFLEX REOC REVOX REX RFT RHAPSODY R-LINE ROADSTAR ROBOTRON RODEX ROWA ROWSONIC ROYAL LUX RTF SABA SACCS SAGEM SAISHO SALORA SAMBERS SANDRA SANELA SANSUI SANTON SANYO SAVE SBR SCHAUB LORENZ SCHNEIDER TV CODE NUMBER (3DIGIT) LIST 045 049 076 125 139 152 163 195 379 413 457 470 477 480 049
0401 DTB-H550F_ENG 4/1/05 3:18 PM Page 46 Problem Possible cause TECHNICAL SPECIFICATIONS Solution of the problem General Item Power supply Power cord plug in correctly Back switch in correctly Specification Input Voltage AC110-240V~, 50/60Hz No display LED on the front panel; No power supply Power cord not plugged in correctly No pictures on the screen Receiver in Standby mode; Video Cable not connected tightly to video input of television; incorrect channel or video input selected on tel