5 Disc DVD Changer DVD-C647P AU Downloaded From Disc-Player.
Precautions 1. Setting up * Refer to the identification label located on the back panel of your player for its proper operating voltage. * Install your player in a cabinet with adequate ventilation holes. (7~10cm) Do not block ventilation holes on any of the components for circulation of air. * Do not push the disc tray by the hand. * Do not stack components. * Be sure to turn all components off before moving the player. * Before connecting other components to this player, be sure to turn them off.
General Features Disc Type and Characteristics DVD Changer Note The DVD Changer holds 5 discs and provides full random play with fast disc changes when press and hold NUMBER button. * Discs which cannot be played with this player. • DVD-ROM • DVD-RAM • CD-ROM • CDV • CDI • HD layer of super Audio CD • CDGs play audio only, not graphics. Excellent Sound Dolby Digital, a technology developed by Dolby Laboratories, provides crystal clear sound reproduction.
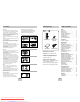
Description-Front Panel Display Indicators 1 5 2 6 7 8 9 DISC SKIP 3 DISC EXCHANGE STANDBY/ON 1 2 3 4 5 3 2 4 1 Front Panel Controls 1. STANDBY / ON ( ) • Use to turn your player on and off (standby). 6. PLAY/PAUSE ( ) • Begin or pause disc play. 2. DVD CHANGER (TRAY) • Press OPEN/CLOSE to open and close the disc changer. 7. STOP ( ) • Stops disc play. 3. FRONT DISPLAY • Operation indicators are displayed here. 4. REMOCON RECEIVER 5. OPEN/CLOSE ( ) • Press to open and close the disc tray.
Description-Rear Panel Tour of the Remote Control 6. STOP Button ( ) 7. MENU Button DIGITAL AUDIO OUT A U COAXIAL D I O OPTICAL 1 V I D E O R - AUDIO - L VIDEO • Brings up the DVD player’s setup menu. 11 8. RETURN Button 2 • Returns to a previous menu. 9. DISC SKIP Button S-VIDEO • Use to skip a disc in order. 12 13 14 3 4 1 2 3 4 5 6 Rear Panel 1. DIGITAL AUDIO OUT JACKS • Use an optical digital cable to connect to a compatible Dolby Digital receiver.
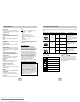
Choosing a Connection Choosing a Connection The following shows examples of connections commonly used to connect the DVD player with a TV and other components. Connection to a TV (For Video) TV (Normal, Widescreen, Projection, etc..) Before Connecting the DVD Player • Always turn off the DVD player, TV, and other components before you connect or disconnect any cables. • Refer to the owner’s manual of the additional components you are connecting for more information on those particular components.
Playing a Disc 7. Step Motion Play (Except CD) Before Play Press the STEP button on the remote during play. - Each time the button is pressed, a new frame will appear. - No sound is heard during STEP mode. - Press the PLAY/PAUSE ( ) to resume normal play. (You can only perform step motion play in the forward direction.) • Turn on your TV and press the TV/VIDEO button to select the video mode. • Turn on your Audio System and select AUX, CD or DVD.
Using the Display Function Using the Disc and Title Menu To access the desired title when there is When Playing a DVD/VCD/CD Title more than one in the disc. 1. During play, press the INFO button on the remote. For example, if there is more than one movie on a DVD, each movie will be identified. 2. Use the UP/DOWN buttons to select the desired item. Using the Disc Menu Using the Function Menu 1. During the playback of a DVD disc, press the MENU button on the remote. 1.
Repeat Play Program Play & Random Play Repeat the current track, chapter, title, a chosen section (A-B), or all of the disc. Program Play (CD) When playing a DVD/VCD/CD 2. Use the LEFT/RIGHT buttons to select PROGRAM. Press the ENTER button. 1. Press the REPEAT button on the remote. Repeat screen appears. 2. Select Chapter, Title or A-B using the LEFT/RIGHT buttons. • Chapter ( ) : repeats the chapter that is playing. • Title ( T ) : repeats the title that is playing.
Adjusting the Aspect Ratio (EZ View) If you are using a 4:3 TV 1. For 16:9 aspect ratio discs • 4:3 Letter Box Displays the content of the DVD title in 16:9 aspect ratio. The black bars will appear at the top and bottom of the screen. • 4:3 Pan Scan The left and right of the screen are cut off and displays the central portion of the 16:9 screen. • Screen Fit The top and bottom of the screen are cut off and the full screen appears. The picture will look vertically stretched.
Using the Instant Replay/Skip Function Using the Instant Replay function (DVD) If you miss a scene, you can see it again using this function. If you press the INSTANT REPLAY button, the current scene moves backward about 10 seconds, and plays back. * Depending on the disc, the Instant Replay function may not work. Using the Bookmark Function This feature lets you bookmark sections of a DVD or VCD (Menu Off mode) so you can quickly find them at a later time. Using the Bookmark Function (DVD/VCD) 1.
Clips Menu for MP3/WMA/JPEG 1. Open the disc tray. 2. Place the disc on the tray. - Place the disc with the labeled side up. 3. Close the tray. - The tray closes and you should get a screen that looks like the one below. 1_mp3 Cactus Sad Day RETURN The folder can only be selected in the Stop mode. • To select the Parent Folder Press the RETURN button to go to parent folder, or use the UP/DOWN buttons to select “..” and press ENTER to go to the parent folder.
Picture CD Playback Using the Setup Menu 1. Select the desired folder. (See page 22 to select the folder) 2. Use the UP/DOWN buttons to select a Picture file in clips menu and then press the ENTER button. You should get a screen that looks like the one below. ENTER RETURN • Use the INFO button on the remote control to select the menu you want to view and then press the ENTER button. • : Returns to the Album Screen.
Setting Up the Language Features Setting Up the Language Features Setting Up the Language Features Setting Up the Audio Options Using the Disc Menu Language Using the Audio Language Using the Subtitle Language 1. With the unit in Stop mode, press the MENU button. This function changes the text language only on the disc menu screens. 1. With the unit in Stop mode, press the MENU button. 1. With the unit in Stop mode, press the MENU button. 2.
Setting Up the Audio Options Setting Up the Display Options DTS 1. Off : Doesn’t output digital signal. 2. On : Outputs DTS Bitstream via digital output only. Select DTS when connecting to a DTS Decoder. 1. With the unit in Stop mode, press the MENU button. Dynamic Compression 1. On : To select dynamic compression. 2. Off : To select the standard range. 3. Select Display Setup using UP/DOWN buttons, then press the RIGHT or ENTER button. 2.
Setting Up the Parental Control The Parental Control function works in conjunction with DVDs that have been assigned a rating - which helps you control the types of DVDs that your family watches. There are up to 8 rating levels on a disc. Setting Up the Parental Control 5. Enter your password. The Re-enter Password screen appears to confirm the password. Enter your password again. The player is locked ( ). 1. With the unit in Stop mode, press the MENU button. Setting Up the Rating Level 1.
Troubleshooting Specifications Before requesting service (troubleshooting), please check the following. Problem Action Page General • Check the batteries in the remote. They may need replacing. • Operate the remote control at a distance of no more than 20 feet. • Remove batteries and hold down one or more buttons for several minutes to drain the microprocessor inside the remote to reset it. Reinstall batteries and try to operate the remote again. P3 Disc does not play.