
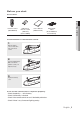
User's Manual


English _9
● GETTING STARTED
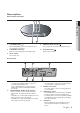
Description
Front Panel Controls
1. STANDBY/ON ( )
When STANDBY/ON is pressed on, the indicator goes
out and the player is turned on.
2. STANDBY Indicator
When the unit is first plugged in, the indicator lights.
3. DISC TRAY
Place the disc here.
4. OPEN/CLOSE /STOP ( )
Press to open and close the disc tray/ Stops disc play.
5. PLAY/PAUSE ( )
Begin or pause disc play.
Rear Panel
1. DIGITAL AUDIO OUT JACKS
- Use either an coaxial digital cable to connect to a
compatible Dolby Digital receiver.
- Use a coaxial digital cable to connect to an A/V
Amplifier that contains a Dolby Digital, MPEG2 or
DTS decoder.
2. COMPONENT VIDEO OUT JACKS
- Use these jacks if you have a TV with Component
Video in jacks. These jacks provide P
R
, P
B
and Y
video.
- If
P-SCAN
is set to “ON” in Video Output of the Setup
Menu, progressive scan mode will work.
- If
I-SCAN
is set to “ON” in Video Output of the Setup
Menu, interlaced scan mode will work.
3. AUDIO OUT JACKS
- Use audio cables to connect to the Audio input jacks
of your television or audio/video receiver.
4. VIDEO OUT JACK
- Use a video cable to connect to the Video input jack
on your television.
5. HDMI OUT JACK
- Use an HDMI cable to connect this jack to the HDMI
jack on your television for the best quality picture.
- If an HDMI cable is connected to an HDMI-compatible
TV, HDMI will be output automatically from the player
about 10 seconds later.
6. USB Host
- Connect a digital still camera, MP3 player, memory
stick, Card reader and other removable storage
devices.