KDC-X995 KDC-BT948HD CD-RECEIVER INSTRUCTION MANUAL Before reading this manual, click the button below to check the latest edition and the modified pages. Check the latest edition Take the time to read through this instruction manual. Familiarity with installation and operation procedures will help you obtain the best performance from your new CD-receiver.
Contents Before use 4 Component names and functions 6 General operation 7 Before Using Common Operation Menu List Operation iPod/iPhone Operation 8 Basic Operation Selecting a song by browsing iPod Play Mode iPod Setting Selecting the Search mode Direct Search Related Search Alphabet Search Skip Search My Playlist PANDORA® Operation 14 Basic Operation Station Search Bookmark Registration Search and New Station Registration Deletion of Station USB device Operation 16 Basic Operation Music Sear
Audio Adjustments 40 Audio Control Preset Equalizer curve Select Manual Equalizer Control Listening Position Selection Listening Position Fine Adjustments Dual Zone System DSP Setup 44 Car Type Selection Speaker Setting Car Type Fine Adjustments X’Over Setting Audio Preset Memory Audio Preset Recall Bluetooth Setup 48 Easy pairing function Bluetooth Setting Registering Bluetooth device Registering PIN Code Selecting the Bluetooth device You Wish to Connect Deleting a Registered Bluetooth device Down
Before use 2WARNING To prevent injury or fire, take the following precautions: To prevent a short circuit, never put or leave any metallic objects (such as coins or metal tools) inside the unit. Do not use this unit before canceling Demonstration mode! This unit is initially set on the Demonstration mode. When using this unit for the first time, cancel the Demonstration mode. Refer to (page 7). How to reset your unit If this unit or the connected unit (auto disc changer, etc.
Handling CDs • Do not touch the recording surface of the CD. • Do not stick tape etc. on the CD, or use a CD with tape stuck on it. • Do not use disc type accessories. • Clean from the center of the disc and move outward. • When removing CDs from this unit, pull them out horizontally. • If the CD center hole or outside rim has burrs, use the CD only after removing the burrs with a ballpoint pen etc. CDs that cannot be used • CDs that are not round cannot be used.
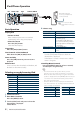
Component names and functions 1 2 3 10 11 5 4 6 AUX 7 8 9 1 Release button To drop the faceplate down to open and CD can be inserted or ejected (press the button). 2 [MENU] button To select a song or set functions. See
General operation Exit of the Demonstration Mode Turn off the demonstration mode when you use it for the first time after installation. 1 Press the [VOL] knob to quit the demonstration mode when the messages “To cancel Demo press the volume knob” are displayed (approx. 15 seconds). 2 Turn the [VOL] knob to select “YES” and press the [VOL] knob. ⁄ Menu List Operation The basic operating procedure for using this function is described below.
iPod/iPhone Operation SRC MENU VOL 4 38 ¢ DISP SEARCH MODE Playing iPod • Connect an iPod When connected, the source is switched automatically and a song starts playing. • Select iPod source Press the [SRC] button. Select the “iPod” display. Song Select Press the [4] or [¢] button. Fast Forwards or Fast Backwards Hold down the [4] or [¢] button. Pause and Play Press the [38] button to pause or resume playback.
Play Mode iPod Setting You can select a Play Mode, such as Random play and Repeat play. You can select following iPod Setting items. 1 2 3 Select iPod source Enter Play Mode Menu Press the [VOL] knob for at least 1 second. ✍✍You can also select from “Play Mode” in Menu List mode. Select the Play Mode Turn the [VOL] knob. Display “iPod by Hand” “Folder Random” “All Random” “File Repeat” Overview When set to “ON”, allows you to operate iPod with the control on the iPod.
iPod/iPhone Operation Selecting the Search mode Direct Search You can select the most suited search method for the desired song from 4 types of the Search mode. You can quickly search the desired song by specifying its Search item (artist, album, etc.) and character. Normal playing Display “Direct Search” “Related Search” “Recall My Playlist” “Delete My Playlist” “Register My P-list” Overview You can quickly search the desired song by specifying its Search item (artist, album, etc.) and character.
Related Search Alphabet Search Searches for music of the same artist or genre as the one being played. You can select a song by alphabet. This function searches songs whose name contain the specified character(s) in the list of the selected Search item (artist, album, etc). 1 2 3 Play the music in iPod 4 Select the Search item Turn the [VOL] knob and press it when the desired Search item is selected. Press the [SEARCH MODE] button.
iPod/iPhone Operation Skip Search My Playlist You can scroll up or down according to the number of the selected Search items so that you can quickly switch the display position. Allows you to register your favorite songs in the Playlist of this unit. You can register up to 10 songs in the Playlist. 1 2 Select iPod source Registering Songs in the Playlist Enter browsing mode Press the [MENU] button. Turn the [VOL] knob and press it when the desired item is displayed. Select “Music” > item.
2 Enter Delete Playlist mode Turn the [VOL] knob and press it when the desired item is displayed. Select “Delete My Playlist”. 3 Turn the [VOL] knob and press it when the desired item is displayed. Select ”Delete One” or ”Delete All”. Selecting “Delete All” moves to step 5 and all songs are deleted. 4 Turn the [VOL] knob and press it when the desired item is displayed. Select the song you want to delete. 5 Turn the [VOL] knob and press it when the desired item is displayed. Select ”Yes”.
PANDORA® Operation SRC MENU VOL 4 38 ¢ DISP KCA-iP102 (optional accessory) is required to connect an iPhone. not use the KCA⁄ Do iP102 with an extension SCRL cord. Basic Operation Station Search Listening to PANDORA® You can select the station you want to listen to from your station list. • Connect an iPhone Connecting the iPod with the Pandora application running will switch the source automatically to start broadcasting from the registered station.
4 Exit Menu List mode Press the [MENU] button for at least 1 second, and then press it again briefly. ⁄ • This unit allows you to bookmark songs and/or artists in your personalized PANDORA® account. The bookmarks will not be available for review on the unit but will be available in your PANDORA® account. Search and New Station Registration You can search for the desired station by specifying its character. You can register the displayed station as a new station.
USB device Operation SRC MENU VOL DISP 4 38 ¢ SCRL SEARCH MODE When connecting the USB device, usage of the CA-U1EX (MAX : 500 mA) (option) is recommended. Basic Operation File Search Playing USB device Selecting the file you want to listen to from the device being played now. • Connect a USB device When connected, the source is switched automatically and a song starts playing. USB device Display “Music” • Select USB source Press the [SRC] button. Select the “USB” display.
1 ¡! USB Setting 2 You can select following USB Setting items. ¡" ¡# Cancelling Menu List mode Press the [MENU] button for at least 1 second, and then press it again briefly. ⁄ • When you search a song in the File Search mode, the unit memorizes the position of the song being played after the search. To set a different Menu item after searching a song, press the [MENU] button for at least 1 second to move to the first hierarchy.
USB device Operation Skip Search Function of remote control You can scroll up or down according to the number of the selected Search items so that you can quickly switch the display position. Searching the music by entering the file number. 1 2 Select USB source 3 Enter Skip Search mode Press the [SEARCH MODE] button. 4 Search for music Enter File Search mode Press the [MENU] button. Turn the [VOL] knob and press it when the desired item is displayed. Select “Music” > item.
Music CD/ Audio file Operation Release MENU VOL DISP SEARCH MODE Fast Forwards or Fast Backwards Hold down the [4] or [¢] button. ⁄ • No sound is output while playing audio file. SRC 4 38 ¢ SCRL Pause and Play Press the [38] button to pause or resume playback. Basic Operation Function of Internal CD source Drop open the faceplate Press the Release button. Selecting the music you want to listen to from the disc being played now.
Music CD/ Audio file Operation Play Mode “Track Repeat” You can select a Play Mode, such as Random play and Repeat play. “Disc Repeat” 1 2 Select CD source 3 Select the Play Mode Turn the [VOL] knob. Enter Play Mode Press the [VOL] knob for at least 1 second. ✍✍You can also select from “Play Mode” in Menu List mode. Music CD source Display “Track Scan” “Disc Random” “Track Repeat” Overview When set to “ON”, plays the intro of the music on the disc successively.
Function of remote control Direct Music Search Searching the music by entering the track number. 1 Enter Direct Music Search mode Press the [DIRECT] button on the remote control. 2 Enter the music number Press the number buttons on the remote control. 3 Search the music Press the [4] or [¢] button. Cancelling Direct Music Search Press the [DIRECT] button. ⁄ • Direct Music Search cannot be performed during playing of Random play or scan play.
HD Radio™ Tuner Operation SRC MENU VOL 4 SEARCH MODE 3 Enter Preset Memory mode Turn the [VOL] knob and press it when the desired item is displayed. Select “List & Memory”. 4 Select the number to put in the memory Turn the [VOL] knob and press [VOL] knob for at least 2 seconds when the desired item is displayed. Select a preset number. ¢ Display “List & Memory” “-1” “-2” Overview Preset number 1. (FM/ AM/ Mixed) Preset number 2. (FM/ AM/ Mixed) … This HD Radio receiver enables: Preset number 6.
⁄ 5 • This setting can be made when “Type Normal” is selected for the “Tuner Preset Type” of (page 38). Make a setting Press the [4] or [¢] button. 6 Exit Menu List mode Press the [MENU] button for at least 1 second, and then press it again briefly. Preset Tuning Recalling the stations in the memory. Function of remote control 1 2 Select the radio band 3 Select a desired station in the memory Turn the [VOL] knob and press it when the desired item is displayed.
HD Radio™ Tuner Operation iTunes Tagging Using an iTunes Tagging enabled HD Radio receiver you can tag your music. When you hear a song you enjoy on your local HD Radio station, you only have to press the [SEARCH MODE] button. The song’s information will then be saved on this unit. The saved songs will then show up in a playlist called “Tagged” in iTunes the every next time you sync your iPod to your computer.
English | 25
Operation of hands-free phoning SRC MENU VOL DISP SEARCH MODE Receiving a Call Answering a Phone Call Press the [VOL] knob. ⁄ 4 38 ¢ Getting Started Before use the cell-phone, you need to connect cellphone to this unit. ⁄ • For details on the Bluetooth cell-phone with the handsfree function, see (page 61). 1 Enter easy pairing mode Press the [ ] button for at least 1 second. 2 “Searching” is displayed. Search for the Bluetooth device.
Answering the Waiting Call after Terminating the Current Call Press the [ ] or [SRC] button. Switching between the Current Call and Waiting Call Press the [VOL] knob. Each pressing of this knob switches the calling party. Speed Dialing (Preset Dial) 1 Enter Bluetooth mode Press the [ ] button. 2 Select the preset dial mode Turn the [VOL] knob and press it when the desired item is displayed. Select “Preset call”.
Operation of hands-free phoning Calling a Number in the Phone Book 4 Make a call Press the [VOL] knob. 1 Enter Bluetooth mode Press the [ ] button. 2 Select the Phone Book mode Turn the [VOL] knob and press it when the desired item is displayed. Select “Phonebook”. 3 Select the character to be searched for Dial a Number Operation type Move to the next character. Move to the next row. Determine the selected character. 1 Enter Bluetooth mode Press the [ ] button.
Make a Voice Dialing Call 1 Enter Bluetooth mode Press the [ ] button. 2 Select voice recognition mode Turn the [VOL] knob and press it when the desired item is displayed. Select “Voice Recognize”. 3 “PB Name?” is displayed. When a beep is heard, say the name within 2 seconds. 4 “PN Type” is displayed. When a beep is heard, say the category name within 2 seconds. 5 Make a call Press the [VOL] knob. ✍✍This step is the same as step 4 of the procedure in (page 28).
Display Settings SRC MENU VOL DISP Display Setting You can select following Display Setting items. 4 ¢ SCRL Basic Operation Switching display Press the [DISP] button. Mode 5-line display mode 3-line display mode iPod-like display mode Spectrum analyzer display mode Clock display mode Display off mode Display Type Displays 4 to 5 lines of text. Displays 2 to 3 lines of text. Displays like iPod. (iPod source only) Displays a line of text and the spectrum analyzer. Displays the clock.
“ILLUMI Effect” Sets whether the key illumination brightness is changed in conjunction with the key operation. “OFF”/ “ON” “ILLUMI MSC Sets whether the key illumination color is SYNC” changed in conjunction with the sound volume. “OFF”/ “ON” ( : Factory setting) 5 Make a setting • When the “ PUSH ” icon is displayed (at the right edge of the display) Turn the [VOL] knob to select a setting value, and then press the [VOL] knob.
Display Settings Customization of 5-line Display Mode & 3-line Display Mode & iPod-like Display Mode You can customize the display of the 5-line display mode, 3-line display mode, and iPod-like display mode. 1 Select the source Pressing the [SRC] button repeatedly switches source. 2 Enter Menu List mode Press the [MENU] button. 3 Enter Display Setting mode and Select the 5-line display mode, 3-line display mode or iPod-like display mode.
In Music CD source Disc title (“Disc title”) Track title (“Track title”) Play time (“P-Time”) Spectrum analyzer & Clock (“Speana/Clock”) Date (“Date”) Blank (“Blank”) • If all characters cannot be displayed while playing with iPod, the file number in the list is displayed.
Display Settings Customization of Clock Display Mode Illumination Color Selection You can customize the display of the Clock Display mode. Selecting the Illumination Color of the panel. 1 Select the source Pressing the [SRC] button repeatedly switches source. 2 Enter Menu List mode Press the [MENU] button. 3 Enter Display Setting mode and Select the Clock Display Turn the [VOL] knob and press it when the desired item is displayed.
Auxiliary Input Display Setting Selecting the display when changing to Auxiliary input source. 1 Select the AUX source Pressing the [SRC] button repeatedly switches source. Select the “AUX” display. 2 Enter Menu List mode Press the [MENU] button. 3 Enter Auxiliary input display setting mode Turn the [VOL] knob and press it when the desired item is displayed. Select “Settings” > “AUX Name Set”. 4 Select the Auxiliary input display Turn the [VOL] knob.
Clock and Other Functions Release MENU VOL SRC 4 ¢ 4 Set the Clock & Date setting items Turn the [VOL] knob and press it when the desired item is displayed. 5 Exit Menu List mode Press the [MENU] button for at least 1 second, and then press it again briefly. Clock Adjustment Clock & Date display type setting You can adjust the clock. Sets the display type of the clock and calendar. 1 Enter Menu List mode Press the [MENU] button.
Date Adjustment Dual clock city setting You can adjust the date. You can select cities for two clocks. 1 Enter Menu List mode Press the [MENU] button. 1 Enter Menu List mode Press the [MENU] button. 2 Enter Clock adjustment mode Turn the [VOL] knob and press it when the desired item is displayed. Select “Settings” > “Clock & Date” > “Date Adjust”. 2 Enter City Select mode Turn the [VOL] knob and press it when the desired item is displayed. Select “Settings” > “Clock & Date” > “City Select”.
Clock and Other Functions Initial Settings “Built in AMP” You can select following Initial Setting items. 1 Select the Standby Pressing the [SRC] button repeatedly switches source. Select the “STANDBY” display. 2 Enter Menu List mode Press the [MENU] button. 3 Enter Initial Setting mode Turn the [VOL] knob and press it when the desired item is displayed. Select “Initial Settings”.
Theft Deterrent Faceplate The faceplate of the unit can be detached and taken with you, helping to deter theft. Removing the Faceplate 1 Press the Release button. Drop open the faceplate. 2 Drawing the faceplate to left side pull it to forward and remove it. ¤ • The faceplate is a precision piece of equipment and can be damaged by shocks or jolts. • Keep the faceplate in its faceplate case while detached.
Audio Adjustments “2Zone” “2Zone Select” “Preset” SRC MENU VOL Sets the Dual Zone System. - Dual Zone System (page 42). Sets the audio preset. - Audio Preset Memory (page 46). - Audio Preset Recall (page 47). ( 4 ¢ Audio Control You can adjust following Audio Setting items.
Preset Equalizer curve Select Manual Equalizer Control You can select following Equalizer curve. You can adjust following Equalizer Control items. Display “Natural” “User” “Rock” “Pops” “Easy” “Top 40” “Jazz” “Game” “iPod” KDC-X995 Band “BAND1” (62.5 Hz) Equalizer curve Natural User* Rock Pops Easy Top 40 Jazz Game iPod (During iPod source only) “BAND2” (250 Hz) “BAND3” (1 kHz) “BAND4” (4 kHz) “BAND5” (16 kHz) ( Select the source Pressing the [SRC] button repeatedly switches source.
Audio Adjustments Listening Position Selection Item “FRONT” / “L” “FRONT” / “R” “REAR” / “L” “REAR” / “R” “SUBWOOFER” / “L” “SUBWOOFER” / “R” “INITIAL” The sound environment can be compensated in accordance with the selected position. According to the listening position, select the position from the following settings. Display “ALL” “Front-Left” “Front-Right” “Front” Compensation seat Not compensating.
• The Audio Control has no effect on sub source. • There are following limitations when Dual Zone System is enabled. - There is no output from the subwoofer. - “Fader”, “Subwoofer Level” of
DSP Setup Speaker Setting SRC MENU VOL The speaker X’Over is automatically set when the position and size of each speaker are selected from the following items. Speaker “FRONT” 4 ¢ Car Type Selection You can compensate the delay of the sound arrival time by selecting your environment from the following car types. Display “OFF” “Compact” “Full size car” “Wagon” “Minivan” “SUV” “Minivan (Long)” Overview Not compensating.
Car Type Fine Adjustments Reference point Adjusting fine tuning of the speaker position compensation value specified at (page 44). Display “Front” “Rear” “SW” Item Front speaker Rear speaker Subwoofer Range 0 – 14.44 feet 0 – 14.44 feet 0 – 14.44 feet ( 1 +3.2 feet FRONT 3 Enter Car Type Adjustment mode Turn the [VOL] knob and press it when the desired item is displayed. Select “Detailed Setup” > “Car Type Adjust”.
DSP Setup X’Over Setting 7 Fine adjusting the following setting values corresponding to the X’Over values set in the section (page 44). Audio Preset Memory Display “X’Over” “Front” Registering the value setup by Sound Control.
Audio Preset Recall Recalling the sound setup registered by
Bluetooth Setup When a cell-phone has already been registered, or maximum of five cell-phones have already been registered/ selecting a cell-phone MENU VOL 4 2 “(cell-phone name)” or “Device Full” is displayed. 3 Select a cell-phone name Turn the [VOL] knob. ✍✍To register a new cell-phone, select “Device Search”, then go to “When registering a cellphone for the first time.” 4 Set up the cell-phone name Press the [VOL] knob. “✱(name)” or “-(name)” is displayed.
Display “SMS Inbox” “Mic Gain” Adjust the sensitivity of the microphone for a telephone call. Adjust the voice of caller. Setting to “+” increases the voice volume. “–3” – “0” – “+3” “NR Level” Reduce the noises generated by surrounding environment without changing the microphone volume. Adjust the voice of caller when it is not clear. Setting to “+” increases the noise reduction. “–3” – “0” – “+3” “Echo Cancel LV“ Adjust the level of echo cancellation. Setting to “+” increases the echo cancel reduction.
Bluetooth Setup Registering Bluetooth device To make your Bluetooth device (cell-phone) usable with this unit, you need to register it (pairing). You can register up to 5 Bluetooth devices to this unit. Registering from this unit 1 Enter Bluetooth mode Press the [ ] button. ✍✍You can also select from “Settings” in Menu List mode. 2 Enter Bluetooth device registration mode Turn the [VOL] knob and press it when the desired item is displayed. Select “BT Settings” > “Pairing” > “Device Regist.”.
Registering PIN Code By operating the Bluetooth device, specify the PIN code necessary for registering this unit. 1 2 3 Enter Bluetooth mode Press the [ ] button. ✍✍You can also select from “Settings” in Menu List mode. Enter PIN code edit mode Turn the [VOL] knob and press it when the desired item is displayed. Select “BT Settings” > “Detailed Setup” > “PIN Code Edit”. The current setting of PIN code is displayed.
Bluetooth Setup Deleting a Registered Bluetooth device 2 By operating the cell-phone, send the phone book data to this unit By operating the cell-phone, download the phone book data to this unit. • During downloading: “Downloading” is displayed. • After completion of downloading: “Completed” is displayed. 3 By operating the cell-phone, start the handsfree connection. You can delete a registered Bluetooth device. 1 Enter Bluetooth mode Press the [ ] button.
Select “PB Name Regist” (Regist) 5 6 7 8 Select the category (type) you wish to set Turn the [VOL] knob and press it when the desired item is displayed. Select “General”, “Home”, “Office”, “Mobile”, or “Other” 4 Select a mode Turn the [VOL] knob. Press the [VOL] knob. Register a voice tag (first) “Enter Voice 1” is displayed. When a beep is heard, say a voice tag within 2 seconds. Confirm the voice tag (second) “Enter Voice 2” is displayed.
SMS (Short Message Service) MENU VOL SMS (Short Message Service) DISP The SMS arrived at the cell-phone is displayed on the receiver. A newly arrived message is displayed. ¤ TEL Downloading the SMS Download the short message (SMS) arrived at the cell-phone so that it can be read on this unit. • To prevent car accidents, the driver should not read the SMS while driving. When a new message arrives “SMS Received” is displayed. The display disappears with any operations.
English | 55
Satellite Radio Tuner Control (Optional) SRC MENU VOL Satellite Radio Setting You can select following Satellite Radio Setting items. 4 ¢ 1 2 Select Satellite Radio source 3 Turn the [VOL] knob and press it when the desired item is displayed. Select “Settings”. 4 Select the setting item to adjust Turn the [VOL] knob and press it when the desired item is displayed. Basic Operation Selecting Satellite Radio source Pressing the [SRC] button repeatedly switches source.
Cancelling Category and Channel Search mode Press the [MENU] button for at least 1 second, and then press it again briefly. ⁄ • You cannot Channel search until the category information is acquired. Preset Memory Channel Scan Every receivable Channel is checked for 10 seconds. 1 2 Select Satellite Radio source 3 Enter Channel Scan Turn the [VOL] knob and press it when the desired item is displayed. Select “Channel Scan”.
Basic Operations of remote control In HD Radio source VOL SRC ATT ENT 5/∞ EXIT AUD AM FM 0—9 • Band select: [FM]/[AM] • Station select: [4]/[¢] • Recall preset stations: [1] — [0] and [ENT] Example: Desired preset number 1 6 10 18 Press button [1], [ENT] [6], [ENT] [1], [0], [ENT] [1], [8], [ENT] In USB/Music CD/Audio file source DIRECT (page 18, 21, 23, 28, 57) General control • Volume control: [VOL] • Source select: [SRC] • Volume reduce: [ATT] When the button is pressed again, the volume return
Hands-free phone control Preparing the remote control unit Making a call • Enter Bluetooth mode: [ ] • Select a dialing method: [5]/[∞] ➜ [ENT] • Number dial input: Input a digit: [0] – [9] Input “+”: [¢] Input “#”: [FM] Input “*”: [AM] Clear the entered phone number: [4] • Make a call: [DIRECT] Pull the battery sheet out from the remote control unit to the direction of the arrow.
Appendix About Audio file • Playable Audio file AAC-LC (.m4a), MP3 (.mp3), WMA (.wma) • Playable disc media CD-R/RW/ROM • Playable disc file format ISO 9660 Level 1/2, Joliet, Romeo, Long file name. • Playable USB device USB mass storage class • Playable USB device file system FAT16, FAT32 Although the audio files are complied with the standards listed above, the play maybe impossible depending on the types or conditions of media or device.
About PANDORA® internet radio The requirements for listening to PANDORA® internet radio are as follows: • Use an Apple iPhone or iPod touch running under iOS3 or later. • Install the latest version of the PANDORA® application on your iPhone. (Search for “PANDORA” in the Apple iTunes App Store to find and install the most current version.) • Create an account with PANDORA®. (If you are not already a registered user, an account can be established at www.pandora.com.
Appendix Menu List Common function items Display “Settings” “Clock & Date” “Clock Adjust” “City Select” “Time Syncronized” “Summer Time” “Sub Clock Adjust” “Date Adjust” “Date Mode Select” “DISP & ILLUMI” “Display Select” “Type Select” “Side Select” “Graphic Select” “Text Select” “Status” “Color Select” “DISP & ILLUMI OFF” “Display Dimmer” “Contrast” “DISP N/P” “TEXT Scroll” “ILLUMI Dimmer” “ILLUMI Effect” “ILLUMI MSC SYNC” “DEMO Mode” Page – 36 – – 32, 33 32 33 32 34 30 38 Function items appearing duri
Function items appearing when the Music CD/ Audio file source is selected Display Page “Music” 19 “Play Mode” 20 “File Scan” “Track Scan” “Folder Random” “Disc Random” “Magazine Random” “All Random” “File Repeat” “Folder Repeat” “Track Repeat” “Disc Repeat” “Settings” – “Clock & Date” – “DISP & ILLUMI” – Function items appearing when the HD Radio™ tuner source is selected Display Page “List & Memory” 22, 23 “FM” 22 “AM” “Settings” – “Seek Mode” 23 “Auto Memory” 22 “Receive Mode” 23 “TAG Memory” “Tagging” “C
Appendix City list Continent Area City 64 | Continent City Hawaii Alaska Pacific Time Arizona Mountain Time Central Time Eastern time Indiana Atlantic Time Mid-Atlantic W.Central Africa Abu Dhabi Adelaide Amman Amsterdam Anchorage Ankara Athens Atlanta Auckland Baghdad Baku Bangkok Beijing Beirut Berlin Bogotá Brasilia Brussels Bucharest Budapest Buenos Aires Cairo Cape Verde Is.
English | 65
Appendix 2CAUTION IC (Industry Canada) Notice Use of controls or adjustments or performance of procedures other than those specified herein may result in hazardous radiation exposure. In compliance with Federal Regulations, following are reproductions of labels on, or inside the product relating to laser product safety.
Accessories/ Installation Procedure Accessories 2 1 ..........2 ..........1 3 4 ..........4 ..........4 5 3 m (9.5 ft) ..........1 Installation Procedure 1 To prevent a short circuit, remove the key from the 2 3 4 5 6 7 8 ignition and disconnect the - battery. Make the proper input and output wire connections for each unit. Connect the speaker wires of the wiring harness. Connect the wiring harness wires in the following order: ground, battery, ignition.
Connecting Wires to Terminals not remove the cap ⁄ Do when you do not use the To USB device USB connector (0.8 m (2.7 ft)) R USB cable. The connector will cause the unit to malfunction if it gets in touch with any metallic part of the vehicle. Microphone input L Rear output Front output Sub Woofer output Antenna Cord Microphone (Accessory5) FM/AM antenna input L R AUX input (Stereo) Use the mini-plug which is stereo type and does not have any resistance. (3.
Installation/Removing the Unit non-Japanese cars Removing the hard rubber frame 1 Engage the catch pins on the removal tool and remove the two locks on the upper level. Upper the frame and pull it forward as shown in the figure. Lock Bend the tabs of the mounting sleeve with a screwdriver or similar utensil and attach it in place. Accessory2 Removal tool ⁄ • Make sure that the unit is installed securely in place. If the unit is unstable, it may malfunction (for example, the sound may skip).
Installation/Removing the Unit Installation the Microphone Unit 1 Check the installation position of the microphone 2 3 4 (accessory 5). Remove oil and other dirt from the installation surface. Install the microphone. Wire the cable up to the unit with it secured at several positions using tape or the like. Accessory 5 Fix a cable with a commercial item of tape. Peel the release coated paper of double-face adhesive tape to fix on the place shown above.
Troubleshooting Guide Some functions of this unit may be disabled by some settings made on this unit. ! ! • Cannot set up the subwoofer. • No output from the subwoofer. • Cannot set up the subwoofer position of Manual position setting. ▲ • The Dual zone function is enabled. (page 42) • In the speaker select option, None is selected for the subwoofer. (page 44) • Cannot set up the equalizer. • Cannot set up the Bass Boost. • Cannot set up the Highway sound.
Troubleshooting Guide Hands-free ? The hands-free talk volume is low. The hands-free talk volume is set at a low level. The hands-free talk volume can be adjusted independently. Adjust it during hands-free talk. “Mic Gain” and “NR Level” (page 48). ? No sound is heard from the rear speakers. You are talking in the hand-free talk mode. No sound is heard from the rear speakers in the hands-free talk mode. ? No beep is heard at reception of an incoming call.
No Access: The procedure preset with mixed preset memory function cannot be available. The preset content may not be recalled depending on the selected band or source. SIRIUS/ XM/ HD Radio Reception Memory Full: The TAG Memory of HD Radio receiver is full. iPod Memory: The iPod Memory is full. No Tag Function: iPod which does not support the tag Memory is connected. Tag Error: The unit is unable to complete transferring the tagged information to the iPod.
Specifications FM tuner section Frequency range (200 kHz space) : 87.9 MHz – 107.9 MHz Usable sensitivity (S/N = 30dB) : 9.3dBf (0.8 μV/75 Ω) Quieting Sensitivity (S/N = 50dB) : 15.2dBf (1.6 μV/75 Ω) Frequency response (±3 dB) : 30 Hz – 15 kHz Signal to Noise ratio (MONO) : 70 dB Selectivity (±400 kHz) : ≥ 80 dB Stereo separation (1 kHz) : 40 dB Digital FM tuner section Frequency range (200 kHz space) : 87.9 MHz – 107.
Audio section Maximum output power : 50 W x 4 Full Bandwidth Power (at less than 1% THD) : 22 W x 4 Speaker Impedance : 4 – 8 Ω Tone action (KDC-X995) BAND1 (62.5 Hz): ±9 dB BAND2 (250 Hz): ±9 dB BAND3 (1 kHz): ±9 dB BAND4 (4 kHz): ±9 dB BAND5 (16 kHz): ±9 dB Tone action (KDC-BT948HD) BAND1 : 60 Hz - 400 Hz ±9 dB BAND2 : 630 Hz - 2.5 kHz ±9 dB BAND3 : 4.
This symbol mark indicates that Kenwood manufactured this product so as to decrease harmful influence on the environment.