User’s Manual DVD-V5500 DVD-V6000 DVD-V6500 STANDBY/ON OPEN/CLOSE OK PAL www.samsungvcr.
Getting Started Safety Instructions The following illustrations represent precautions. The lightning bolt is a warning sign alerting you to dangerous voltage inside the product. DO NOT OPEN THE DVD-VCR. Refer to service personnel. 10% 75% 40¡C H H 5¡C DO NOT expose the DVD-VCR to extreme temperature conditions (below 5°C and above 40°C) or to extreme humidity conditions (less than 10% and more than 75%). DO NOT expose the DVD-VCR to direct sunlight. DO NOT expose the DVD-VCR to any liquids.
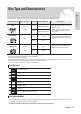
Disc Type and Characteristics Recording Types Disc Types (Logos) DVD Audio + Video AUDIO-CD Disc Size Max. Playing Time Characteristics 12 Cm Single-sided 240 min. Double-sided 480 min. 8 Cm Single-sided 80 min. Double-sided 160 min. - DVD contains excellent sound and video due to Dolby Digital, DTS and MPEG-2 system. - Various screen and audio functions can be easily selected through the onscreen menu. 12 Cm 74 min. 8 Cm 20 min. 12Cm 74 min. 8 Cm 20 min.
Settings Getting Started Contents Tuning Your Television for the DVD-VCR . 17 Setting the Date and Time . . . . . . . . . . . . 18 Setting the Menu Language . . . . . . . . . . . 19 Getting Started Presetting the Stations Automatically . . . . 19 Presetting the Stations Manually . . . . . . . 20 Safety Instructions . . . . . . . . . . . . . . . . . . 2 Clearing a Preset Station . . . . . . . . . . . . . 22 Disc Type and Characteristics . . . . . . . . . 3 Changing the Preset Station Table . . . . .
Playing Back Reference Technical Specifications . . . . . . . . . . . . . . 64 Adjusting Picture Alignment Manually . . . 37 Troubleshooting Guide (VCR) . . . . . . . . . 65 Selecting the Audio Output Mode . . . . . . . 38 Troubleshooting Guide (DVD) . . . . . . . . . 66 Playing a Cassette in Slow Motion . . . . . . 38 Playing a Sequence Frame by Frame . . . 38 Playing a Sequence at Variable Speeds . 38 Searching for a Specific Sequence . . . . . 39 Using the Tape Counter . . . . . . . . . . . . . .
Getting Started Overviews Front View of the DVD-VCR (DVD-V5500/DVD-V6000) 1 5 6 7 2 8 9 10 11 3 12 4 13 14 15 16 17 Front View of the DVD-VCR (DVD-V6500) 1 5 1. 2. 3. 4. 5. 6. 7. 8. 6 7 8 9 10 11 DVD DECK OPEN/CLOSE BUTTON VIDEO CASSETE COMPARTMENT EJECT BUTTON STANDBY/ON BUTTON REWIND/SKIP BACK BUTTON STOP BUTTON PLAY/STILL BUTTON 6 - English 2 3 12 4 13 9. 10. 11. 12. 13. 14. 15. 16. 17.
Rear View of the DVD-VCR (DVD-V5500/DVD-V6000) 1 2 1. 2. 3. 4. 5. AUDIO L/R OUT JACKS AERIAL IN CONNECTOR AUDIO L/R OUT JACKS (DVD ONLY) VIDEO OUT JACK OUT TO TV CONNECTOR 5 6. 6 7 8 Getting Started 4 3 9 AV1 (EURO AV) IN/OUT SCART (EURO-21) JACK DIGITAL AUDIO OUT JACK (COAXIAL) COMPONENT VIDEO OUT JACKS S-VIDEO OUT JACK 7. 8. 9. Rear View of the DVD-VCR (DVD-V6500) 1 5 1. 2. 3. 4. 5. 6. AUDIO L, R OUT JACKS AERIAL IN CONNECTOR AV2 (DEC./EXT.
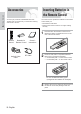
Getting Started Accessories Inserting Batteries in the Remote Control You have just purchased a SAMSUNG DVD-VCR. Together with your DVD-VCR, you will find the following accessories in the box. STANDBY/ON You must insert or replace the batteries in the remote control when you: • Purchase the DVD-VCR • Find that the remote control is no longer working correctly OPEN/CLOSE 1 Push the tab in the direction of the arrow to release the battery compartment cover on the rear of the remote control.
Tour of the Remote Control OPEN/CLOSE OK Used to advance a sequence frame by frame. 1. STANDBY/ON Used to turn the power on or off. 2. Number Buttons 3. CLEAR Used to clear a preset TV station. Used to cancel a preset recording. Used to cancel a preset mark. Used to set the tape counter to zero. Used to resume normal play during repeat play. 4. VCR Used to operate VCR. 5. DVD Used to operate DVD. 6. TRK … / † Used to adjust picture alignment manually to obtain the best possible picture during playback.
Connections Quick Overview Connections A Quick overview presented in this guide will give you enough information to start using the DVD-VCR. Connecting DVD-VCR to the TV using the RF Cable Connecting DVD-VCR to the TV using the SCART Cable Connecting DVD-VCR to a Satellite Receiver or Other Equipment Connecting DVD-VCR to the TV using the Audio/Video Cable Connecting DVD-VCR to the TV using the S-Video Cable (DVD Only) •Quick Overview . . . . . . . . . . . . . . . . . . . . .
Connecting DVD-VCR to the TV using the RF Cable Connecting DVD-VCR to the TV using the SCART Cable To receive television programmes a signal must be received from one of the following sources: You can connect your DVD-VCR to the television using the SCART cable if the appropriate input is available on the television.
Connections Connecting DVD-VCR to a Satellite Receiver or Other Equipment You can connect your DVD-VCR to a Satellite receiver or other DVD-VCR using the SCART cable if the appropriate outputs are available on the equipment chosen. The following illustrations give a few examples of the connection possibilities.
Connecting DVD-VCR to the TV using the Audio/Video Cable You can connect your DVD-VCR to the television using the audio/video cable if the appropriate input is available on the television. Connect one end of the video cable into the VIDEO output jack on the rear of the DVD-VCR. 2 Plug the other end of the video cable into the appropriate input connector on the television. 3 Connect one end of the audio cable supplied into the AUDIO output jacks on the rear of the DVDVCR.
Démarrer Connecting DVD-VCR to the TV using the Component Video Cable (DVD Only) Your TV must support progressive scan input to allow you to watch component video output. You will enjoy high quality accurate colour reproduction images. Component video seperates the picture element into black and white(Y), blue(Pb), red(Pr) signals to present most clear and clean images.
AV Receiver Connections 1 Connect a Digital Audio coaxial cable from the Digital Audio Out jacks on the panel of the DVDVCR to their corresponding Digital Audio Input jacks on your A/V Receiver: Digital Audio out Jack You can connect other audio/video equipment to your DVD-VCR using audio/video cables if the appropriate outputs are available on the equipment chosen. Examples : • You wish to copy a video cassette with the help of a second VCR.
Plug & Auto Setup 5 Start the auto scanning. The number of stations automatically stored by the DVD-VCR depends on the number of stations that it has found. Auto Setup Démarrer Your DVD-VCR will automatically set itself up when it is plugged into the mains for the first time. TV stations will be stored in memory. The process takes a few minutes. Your DVD-VCR will then be ready for use. Please Wait 10% √√ RETURN 1 Connect the RF Cable as indicated on page 11.
Settings Tuning Your Television for the DVD-VCR You must tune your television for the DVD-VCR only if you are using the RF cable. To view pictures from your DVD-VCR when a Scart cable is used, the television must be set to the audio/video mode (AV). Switch on the television. 2 Switch on the DVD-VCR by pressing the /I STANDBY/ON on the front of the DVD-VCR or STANDBY/ON on the remote control. 3 Select a programme position on the television to be reserved for use with your DVD-VCR.
Setting the Date and Time 3 Press the œ or √ button to select the hour, minutes, day, month, and year. The selected option is highlighted. Press the … or † button to set them. The day of the week is displayed automatically. Press the OK button.
Setting the Menu Language 1 Presetting the Stations Automatically Press the MENU button, then press the OK or √ button. Setup SETUP DVD VCR Language : English √ Install √ √ User Set : Off √ Screen Messages : On √ Auto Power Off PROG √ Clock FUNC RETURN MENU Your DVD-VCR contains a built-in tuner used to receive television broadcasts. You must preset the stations received through the tuner.
3 Press the … or † button to select Auto Setup, Press the OK button. A message is displayed, indicating that any channels already preset on your DVD-VCR will be deleted. Presetting the Stations Manually Auto Setup You do not need to preset the stations manually if you have already set them automatically. Your data will be lost Press OK to continue MENU to exit OK 1 RETURN Press the MENU button, then press the OK or √ button. MENU Setup SETUP DVD 4 Press the OK button to start the auto scanning.
4 Press the … or † button to select the required programme number. Press the √ button to preset the station. The MANUAL TUNING menu will be displayed. 5 Press the œ or √ button to start scanning the channels. The frequency band is scanned and the first station found is displayed. ❉ ❉ : : : : 1 021 ---- …† œ √ Then... Wish to store the station displayed • Press OK to store the station. Do not wish to store the station displayed • Press the … or † button until the CH is selected.
Clearing a Preset Station Changing the Preset Station Table If you have stored a TV station: • That you do not require • At the wrong programme position, you can cancel it. 1 Press the MENU button, then press the OK or √ button. 2 Press the … or † button to select Install, then press the OK or √ button. The Install menu is displayed. You can rearrange the station table and give different programme numbers to the stations listed according to your own preferences.
4 Press the … or † button to select required preset TV station. The selected station is displayed at the same time on the television screen. 5 Press the OK button to change the programme number assigned to a station. ❉ ❉ TV STATION TABLE ❉ ❉ PR 1 2 3 4 5 CH 021 …† SWAPPING : OK RETURN Your DVD-VCR output channel may need to be changed if the pictures suffer from interference or if your TV cannot find the pictures. 1 2 Press the MENU button, then press the OK or √ button.
VCR Functions Selecting the Colour Mode Before recording or playing back a cassette, you can select the required system standard. Otherwise, the system automatically selects the reception standard when you select AUTO. • When playing back a cassette, the standard is automatically selected by the DVD-VCR. • When you playback an NTSC-recorded tape on this DVD-VCR make a setting on the colour system according to your TV. If your TV is a PAL system only TV, set NTPB. If your TV is multi system TV (NTSC 4.
NICAM Intelligent Picture Control NICAM programmes are divided into 3 types. NICAM Stereo, NICAM Mono and Bilingual (transmission in another language). NICAM programmes are always accompanied by a standard mono sound broadcast and you can select the desired sound. Please refer to page 38. 1 Press the MENU button, then press the OK or √ button. This feature allows you to adjust the sharpness of the image automatically, according to your own preferences.
VideoPlus Extend (DVD-V6000/DVD-V6500) To prevent delays or over-runs the VCR has a function called VideoPlus Extend allowing you to extend the recording time by up to 60 minutes. Auto Power off This feature automatically turns off your DVD-VCR if no signal is received and you do not press any button for the selected time. • Only use if PDC is not available or set to Off. • The View settings have been configured before running the Videoplus feature. 1 1 Press the MENU button, press the OK or √ button.
Selecting the Cassette Type Screen Messages Your DVD-VCR displays most information both the DVD-VCR and the television. You can choose to display or hide this information on the television screen (If you configure the Screen Message to Off, the Fast Forward and Rewind messages will not be displayed on the screen. However, the Search message will not be displayed on the screen regardless of the Screen Message configuration).
Repeat Play Selecting the Recording Speed You can set repeat play to repeat the tape continuously from beginning to end. 1 Press the MENU button, then press the … or † button to select VCR. VCR Setup SETUP DVD Tape Select : E180 √ Repeat Play : Off √ You can record a cassette at two different speeds: • SP (Standard Play) • LP (Long Play) In Long Play modes: • Each cassette lasts twice as long • The recording is of a slightly lower quality 1 Press the SPEED button to select SP or LP.
Recording a Programme Immediately Recording a Programme with Automatic Stop Before recording a programme, you must have preset the corresponding station (unless you are recording via an external video source). If you have not done so, refer to pages 18~19. This function enables you to record up to nine hours (LP) of programmes. Your DVD-VCR stops automatically after the requested length of time. 1 2 3 Switch on the television.
Recording from Another VCR or Camcorder You can copy a cassette to your DVD-VCR from another video source, such as another VCR or a Camcorder etc. VCR Functions • It is an infringement of copyright laws to copy prerecorded cassettes or to re-record them in any form without the permission of the owners of the corresponding copyright. Using the Assemble Edit Function This function allows you to start a new recording at a specific position on the cassette while maintaining a very smooth scene change.
Using the VideoPlus Feature (DVD-V6000/DVD-V6500) 3 A message is displayed to allow you to enter the VideoPlus code. VideoPlus SETUP DVD Before presetting your DVD-VCR: • Switch on both the television and your DVD-VCR • Check that the date and time are correct • Insert the cassette on which the programme is to be recorded (safety tab intact) Up to six programmes can be preset. 1 Press the MENU button, then press the … or † button to select PROG, then press the OK or √ button.
6 If the programme and times are correct, press the OK button. 7 Press the STANDBY/ON button to activate the timer. Modifying VideoPlus Programming (DVD-V6500) If you wish to correct the programme displayed or modify certain elements, such as the recording speed, you can do so before you press the RETURN button. If you wish to... • The numbers next to each TV programme listing are VideoPlus code numbers, which allow you to programme your DVD-VCR instantly with the remote control.
Using the Timer Programming Feature 2 Press the OK or √ button again. The timer programming menu is displayed. PR Day The Timer Programming feature allows you to preset the DVD-VCR to record a programme up to one month before that programme is to be broadcast. Up to six programmes can be preset. • Before presetting a recording, check that the date and time are correct. • You must check that the cassette tape is loaded.
5 Press the √ button to select Start (recording start time). PR Day Start 01 SA 01 13 :: 25 Stop Speed 8 Press the √ button to select V/P (recording VPS/PDC). V/P PR Day : : : : : : : : : : : OK Start 01 SA 01 13 :: 25 RETURN Press the √ button to select Stop (recording stop time).
Checking a Preset Recording 2 The list of preset recodings is displayed with the corresponding information. PR Day Start Stop Speed V/P SP Off -- -- 01 WE 01 13 : 25 19 :: 57 : : -- -- -- -- : -- -- :: -- You can check your preset recordings: • When you have finished presetting the DVD-VCR • If you have forgotten which programmes will be recorded Press the MENU button, then press the … or † button to select PROG, then press the OK or √ button. The Timer Method menu is displayed.
Cancelling a Preset Recording 2 The list of preset recodings is displayed with the corresponding information. PR Day Start Stop SP -- -- -- -- : -- -- : -- -- You can cancel any programmes that are: • Incorrect • No longer required : : : : : : : : RETURN OK * DVD-V5500 1 Press the MENU button, then press the … or † button to select PROG , then press the OK or √ button. The Timer Method menu is displayed.
Playing Back Playing a Cassette This function allows you to play back any pre-recorded cassette. 1 Switch on both the television and your DVD-VCR. 2 Insert the video cassette. If the safety tab on the cassette is intact, press the √ll (play/pause) button. Otherwise, the cassette is played automatically. • When a cassette is loaded, the tape position is optimized automatically to reduce disturbance (Digital Auto Tracking).
Selecting the Audio Output Mode You can select the mode in which the sound is reproduced on the loudspeakers and AV outputs. The following options are available. Press the AUDIO button on the remote control until the required option is displayed. Option You can • Stop the cassette at a given frame (image) • Advance one frame at a time No sound is heard when playing back frame by frame. Description L Used to listen to the sound on the left Hi-Fi channel.
2 Searching for a Specific Sequence Press the … or † button to select VCR Function, then press the OK or √ button. The VCR Function menu is displayed with the Go To [0:00:00] selected. VCR Function SETUP Each time you record a cassette on this DVD-VCR, an “index” is automatically marked on the tape when recording starts. The Search function allows you to fast-forward or rewind to a specific index and start playback from that point.
❚ 1 ❚ Intro Scan Press the SEARCH button. The VCR Function menu is displayed. Press the … or † button to select Intro Scan. VCR Function SETUP DVD Index Skip Search This feature will enable you to fast forward/rewind to a specific point on a tape: e.g. if you have recorded 3 different programmes on a tape and you have rewound the tape to the beginning, by using this feature you can go directly to the start of programme 2 simply by pressing the SEARCH button.
Using the Tape Counter The tape counter: • Indicates the elapsed time in the play and record modes (hours, minutes and seconds) • Is reset when a cassette is inserted in the DVD-VCR • Allows you to find the beginning of a sequence easily • If the remaining time is to be calculated correctly, you must indicate the type of cassette being used. 1 Insert a cassette in your DVD-VCR. To set the tape counter to zero at the beginning of a sequence: 0:00:00 2 Playing Back • Press the INFO.
DVD Functions Setting Up the Language Features If you set disc menu, audio and subtitle language in advance, it will come up automatically every time you watch a movie. ❚ 1 Using the Disc Menu Language Press the MENU button in the stop mode. Press the … or † button to select DVD, then press the OK or √ button. DVD Setup SETUP DVD VCR Language Setup √ Audio Setup √ Display Setup √ Parental Setup : √ PROG FUNC OK • Setting Up the Language Features . . . . . . . .
❚ 1 ❚ Using the Audio Language Press the MENU button in the stop mode. Press the … or † button to select DVD, then press the OK or √ button. Using the Subtitle Language 1 Press the MENU button in the stop mode. Press the … or † button to select DVD, then press the OK or √ button.
Setting Up the Audio Options ❚ Dolby Digital Out • PCM : Converts to PCM (2CH) audio. Select PCM when using the Analog Audio Outputs. • Bitstream : Converts to Dolby Digital Bitstream (5.1CH). Select Bitstream when using the Digital Audio Output. 1 Press the MENU button in the stop mode. Press the … or † button to select DVD, then press the OK or √ button.
Setting Up the Display Options 1 ❚ Depending on the type of television you have, you may want to adjust the screen setting (aspect ratio). • 4:3 Letter Box : Select when you want to see the total 16:9 ratio screen DVD supplies, even though you have a TV with a 4:3 ratio screen. Black bars will appear at the top and bottom of the screen. • 4:3 Pan Scan : Select this for conventional size TVs when you want to see the central portion of the 16:9 screen.
Setting Up the Parental Control 3 Press the OK or √ button again if you want to use a password. The Enter Password menu is displayed. Enter your password by pressing the number buttons. Create Password The Parental Control function works in conjunction with DVDs that have been assigned a rating - which helps you control the types of DVDs that your family watches. There are up to 8 rating levels on a disc. 1 Enter Passaword – – – – Press the MENU button in the stop mode.
❚ 5 Setting up the Rating Level Press the … or † button to select Rating Level, then press the OK or √ button. ❚ 5 Changing the Password Press the … or † button to select Change password, then press the OK or √ button.
DivX(R) Registration (DVD-V6500) DivX, DivX Certified, and associated logos are trademarks of DivXNetworks, Inc and are used under license. Please use your registration code to register this player with the DivX(R) Video On Demand service. This will allow you to rent and purchase videos using the DivX(R) Video On Demand format. To learn more go to www.divx.com/vod. 1 Press the MENU button in the stop mode. Press the … or † button to select DVD. The DVD Setup menu is displayed.
3 Write the downloaded file onto a blank CD-R disc, using the following settings. 1 Download the software update file from the Samsung Internet Site. (http://www.samsung.com/ Support/ProductSupport/Download/index.aspx) After checking your DVD-VCR Model name on the rear, download a file using the Search Your Model/Name window. 2 Write the file to disc using CD-R driver of your computer. Software update file name: sam98-b.rom Please do not change the file name.
Special Playback Features ❚ Slow Motion During playback, press the √ll button to still the image. Then press the √√ button to play in slow motion at variable speeds. • Each press increases the slow motion speed playback to 1/8, 1/4 or 1/2 normal speed. During DVD/CD playback you can select from the following special playback options. To resume normal playback, press the √ll button. ❚ Note Still Press the √ll button during playback. • The picture will still and the audio will mute.
Using the Display Function To access the desired title when there is more than one in the disc. For example, if there is more than one movie on a DVD, each movie will be identified. A DVD may contain several different titles. For example, if a disc contains four different movies, each might be considered a title. To view the current Title, Chapter/Track, and counter position, press the INFO. button during DVD playback.
Adjusting the Aspect Ratio (EZ View) This function may behave differently depending on the type of disc. ❚ If you are using a 4:3 TV For 16:9 aspect ratio discs - 4:3 Letter Box Displays the content of the DVD title in 16:9 aspect ratio. The black bars will appear at the top and bottom of the screen. - 4:3 Pan Scan The left and right portions of the screen are cut off an the central portion of the 16:9 screen is displayed. ❚ 1 ❚ To play back using aspect ratio (DVD) Press the EZ VIEW button.
Selecting the Subtitle Language Some DVDs provide subtitles in one or more languages. You can use the SUBTITLE button to quickly view and change settings. 1 3 Multiple language/audio setup options, such as Dolby Digital 5.1, Dolby Pro Logic or LPCM 2 Channel audio are available on some DVDs. You can use the AUDIO button to quickly view and select the options available on a disc. During playback, press the SUBTITLE button.
Changing the Camera Angle Some DVD Movies provide you with various camera angle views on the same scene while they are showing. To activate the feature press the ANGLE button. 1 Zoom 1 You’ll see the angle icon while watching a DVD with multi angles available. During playback, press the MENU button. Press the … or † button to select FUNC, then press the OK or √ button. The Function menu is displayed.
Marks Repeat Chapter/Title Up to three Bookmarks can be inserted for a given DVD/ VCD (DVD-V6500), allowing you to quickly jump to your favorite scene or song. 1 During playback, press the MARK button. You can repeat a single chapter or a complete title. 1 Press the REPEAT button while in playback mode to open the repeat menu. The current repeat mode is displayed. 2 Press the œ or √ button to select Chapter/Title. Press the OK button to repeat the current chapter/Title.
3 A to B Repeat A to B Repeat feature enables you to repeat the designated section on a DVD or VCD(DVD-V6500)/CD. To activate, mark where to start (A) and where to end (B) of the section you want to watch. 1 Press the REPEAT button while in playback mode, then press the œ or √ button to select A-. ❚ Press the OK button again at the end of the segment you want to repeat (Point B). The segment will begin repeating in a continuous loop.
MP3/WMA Play If you insert an MP3/WMA Disc into the DVD player, you can see the folder directory. ❚ 1 MP3/WMA Play Function Press the … or † button to select the desired music folder, then press the OK button. Total : 3/4 ROOT ROOT AVI JPEG MP3 WMA ❚ CD-R MP3/WMA discs When playing CD-R/MP3 or WMA discs, please follow all the recommendations for CD-R above, plus the comments below: Your MP3 or WMA files should be ISO 9660 or JOLIET format.
Program & Random Play (CD/MP3/WMA) You can listen to songs randomly or in the desired sequence. ❚ 1 2 Press the œ or √ button to select RANDOM. Press the OK button. The disc will be played in random order. RANDOM RANDOM OK ROOT AVI JPEG MP3 WMA RETURN Press the …/†,œ/√ buttons to select the first track to add to the program. Press the OK button. The selection numbers are displayed in the Program Order box. PROGRAM 01 DVD Functions Press the MODE button in the stop mode.
Picture CD Playback ❚ Album Mode Press the œ or √ button to select Press the OK button. The album mode is displayed. Album . Photo : 1/215 If you insert a Picture (JPEG) CD Disc into the DVDVCR, you can see the folder directory. 1 Press the … or † button to select the picture you want to view, then press the OK button. The selected picture is displayed.
❚ ❚ Slide show Press the œ or √ button to select . Press the OK button. The 3 icons are displayed for time interval. CD-R JPEG Discs • Only files with the “.jpg” and “.JPG” extensions can be played. • If the disc is not closed, it will take longer to start playing and not all of the recorded files may be played. Photo : 1/215 OK RETURN • Only CD-R discs with JPEG files in ISO 9660 or Joliet format can be played.
DivX/MPEG4 Playback (DVD-V6500) 1 When the disc is inserted, the file structure of the disc will be shown. Depending on the file format, a different icon will appear next to each file. The and files will have been highlighted. Use … or † button to select the movie file, and then press OK or √ll. Result : When the 'Reading Index......' message is displayed, wait for a second or two. The movie will be played back.
5 Zoom During play, press the MENU button on the remote control. Then press the … or † button to select the FUNC , then press the OK or √ button. The Function menu is displayed. Press the … or † button to select DVD Function. Press the OK or √ button. Function SETUP DVD DVD Function √ VCR Function √ VCR PROG FUNC OK RETURN MENU Press the … or † button to select ZOOM, then press the OK button.
Reference Technical Specifications Troubleshooting Guide (VCR) Troubleshooting Guide (DVD) • Technical Specifications . . . . . . . . . . . . . . . 64 • Troubleshooting Guide (VCR) . . . . . . . . . . . 65 • Troubleshooting Guide (DVD) . . . . . . . . . . .
Technical Specifications General Rated voltage AC 220 - 240V, 50Hz Power consumption 19Watts Weight 3.9 Kg Size 430mm X 282mm X 82mm Operating ambient temperature +5°C ~ +40°C Installation conditions Operation position : Horizontal, Relative humidity : Below 75% Input Output VCR Reference DVD 64 - English Video input (Rear) Euro Scart socket : 1.
Troubleshooting Guide (VCR) Before contacting the Samsung after-sales service, perform the following simple checks. If you are unable to solve the problem after reading the above instructions, note: • The model and serial number on the rear of your DVD-VCR • The warranty information • A clear description of the problem Then contact your nearest SAMSUNG after-sales service. Solution No power ◆ Check that the power plug is connected to a wall outlet.
Troubleshooting Guide (DVD) Problem Solution Page Disc does not play. ◆ Ensure that the disc is installed with the label side facing up. ◆ Check the region number of the DVD. ◆ This player cannot play CD-ROMs, DVD-ROMs, etc. Insert a DVD, or a CD. P3 5.1 channel sound is not being reproduced. ◆ 5.1 channel sound is reproduced only when the following conditions are met. : 1) The DVD-VCR player is connected with the proper amplifier 2) The disc is recorded with 5.1 channel sound.
UNITED KINGDOM This Samsung product is warranted for the period of twelve (12) months from the original date of purchase, against defective materials and workmanship. In the event that warranty service is required, you should return the product to the retailer from whom it was purchased. However, Samsung Authorised Dealers and Authorised Service Centres in other EC Countries will comply with the warranty on the terms issued to purchasers in the country concerned.
THIS APPLIANCE IS DISTRIBUTED BY ELECTRONICS www.samsungvcr.