DVD-VCR DVD-V 70 DVD-V 80 DVD-V 85 Instruction Manual STANDBY/ON OPEN/CLOSE EJECT STANDBY/ON PROG DVD VCR LINE2 OK www.samsungvcr.
Contents Contents ◆ RECORDING TELEVISION BROADCASTS ◆ FOREWORD ■ ■ Safety Instructions................................................................................................................ Disc Type and Characteristics ............................................................................................. 5 6 ■ ■ ■ ◆ DVD-VCR OVERVIEWS ■ ■ ■ ■ ■ Front View of the DVD-VCR.................................................................................................
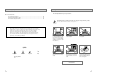
Contents (cont.) Safety Instructions The following illustrations represent precautions. ◆ SOLVING PROBLEMS ■ ■ ■ Technical Specifications...................................................................................................... 66 Problems and Solutions (VCR) ........................................................................................... 67 Troubleshooting Guide (DVD) .............................................................................................
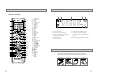
Disc Type and Characteristics Front View of the DVD-VCR ( DVD -V70 ) This DVD player is capable of playing the following types of discs with the corresponding logos : Disc Types (Logos) Recording Disc Size Types DVD 12 Cm Audio + Video 8 Cm Max. Playing Time Single-sided 240 min. Double-sided 480 min. Single-sided 80 min. Double-sided 160 min.
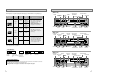
Rear View of the DVD-VCR Infrared Remote Control ( DVD -V70 ) ( DVD -V70 ) DIGITAL AUDIO OUT SOCKET (COAXIAL) LINE IN 1 RF ANTENNA INPUT COMPONENT VIDEO OUT STANDBY/ON OPEN/CLOSE 1 18 1 2 3 4 5 6 7 2 19 20 3 S-VIDEO OUT JACK LINE OUT TO TV (COMPOSITE) 21 RF OUT TO TV 4 AUDIO LINE OUT TO TV (S-VIDEO OR COMPONENT) ( DVD -V80 / DVD -V85) 5 22 6 23 7 24 25 8 9 DIGITAL AUDIO OUT SOCKET (COAXIAL) LINE IN 1 COMPONENT VIDEO OUT RF ANTENNA INPUT 11 12 13 14 15 16 17 S-VIDEO OUT JACK 2
Display Indicators Infrared Remote Control ( DVD -V80 / DVD -V85) 1 STANDBY/ON OPEN/CLOSE 1 18 1 2 3 4 5 6 7 2 19 20 3 4 21 5 22 6 23 7 24 25 8 9 13 14 15 16 17 18 19 20 21 22 23 26 24 10 11 12 8 9 10 11 12 13 14 15 16 17 OK 27 28 29 30 31 32 33 25 26 27 28 29 30 31 32 33 STANDBY/ON SHUTTLE << / >> CLEAR DVD TV MUTE. AUDIO VOLUME +/– REWIND SKIP BACK STOP SUBTITLE MENU UP LEFT DOWN SPEED SP/LP RECORD TIMER ANGLE IPC OPEN/CLOSE 0-9 TV/VCR VCR, TV SELECT INPUT SEL. F.
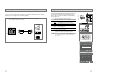
Deciding How to Connect DVD-VCR Connecting DVD-VCR to the TV using the Coaxial Cable To receive television programmes a signal must be received from one of the following sources: ◆ ◆ ◆ ◆ You must take into account various factors when connecting audio or video systems: ◆ Types of connectors available on your systems ◆ Systems connected permanently to the DVD-VCR (satellite receiver for example) or temporarily (camcorder for example) ☛ Your DVD-VCR is equipped with the following connectors.
Connecting DVD-VCR to a Satellite Receiver or Other Equipment You can connect other audio and/or video equipment to your DVD-VCR in different ways. The following illustrations give a few examples of the connection possibilities. ➢ The RCA input/output connectors on the rear of the DVD-VCR are used for equipment, such as camcorders, VCRs or sound systems. Camcorder VCR Plug & Auto Set up Your DVD-VCR will automatically set itself up when it is plugged into the mains for the first time.
Tuning Your Television for the DVD-VCR You must tune your television for the DVD-VCR only if you are not using a RCA cable STANDBY/ON ➢ OPEN/CLOSE 2 4 1 Switch on the television. 2 Switch on the DVD-VCR by pressing STANDBY/ON on the front of the DVD-VCR or STANDBY/ON on the remote control. 3 Select a programme position on the television to be reserved for use with your DVD-VCR. 4 Insert the video cassette in the DVD-VCR.
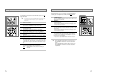
Basic TV Tuner Operations Inserting Batteries in the Remote Control You must insert or replace the batteries in the remote control when you: The following buttons are used when watching television via the DVD-VCR’s built-in TV tuner. ◆ Find that the remote control is no longer working correctly 1 TV/VCR Button Press to switch between your TV’s tuner and the VCR’s internal tuner. 1 2 Push the tab in the direction of the arrow to release the battery compartment cover on the rear of the remote control.
Setting the Menu Language 1 Open “MENU” After pressing the MENU, press the OK or ❿ . 1 OK 2 Select “Language” Use the or ❷ buttons to highlight “Language,” then press the OK or ❿ . 3 Set menu Language Place the selection arrow next to your desired Language, then press the OK button. Language : English 4 Install User Set Auto Power Off Screen Messages : Off : On 5 Press the or ❷ buttons to select language you want.
VCR Presetting the Stations Manually ☛ Language 1 : English Install User Set Auto Power Off Screen Messages : Off : On Install Manual Setup TV System VCR Output CH :G : CH 36 CH NAME After pressing the MENU, press the OK or ❿ . Result: The Setup menu is displayed. 4 Press the corresponding Setup option is selected. 2 Press the corresponding option. 5 Press the OK or ❿ to select a Manual Setup option. Result: The TV STATION TABLE menu is displayed.
VCR Language You can rearrange the Station Table and give different programme numbers to the stations listed according to your own preferences. : English 1 After pressing the MENU, press the OK or ❿ . Result: The Setup menu is displayed. 2 Press the corresponding option. 3 Press the OK or ❿ buttons to select this option. Result: The Install menu is displayed. 4 Press the corresponding Setup option is selected.
VCR Selecting the Colour Mode Before recording or playing back a cassette, you can select the required system standard. Language ➢ : English Install User Set Auto Power Off Screen Messages : Off : On User Set Colour System : Auto NICAM IPC : On : On Auto PAL MESECAM B/W ◆ When you playback an NTSC-recorded tape on this DVDVCR make a setting on the colour system according to your TV. If your TV is a PAL system only TV, set NTPB. If your TV is Multi System TV (NTSC 4.43 compatible), set NT4.
VCR Intelligent Picture Control Language The Intelligent Picture Control Feature allows you to adjust the sharpness of the image automatically, according to your own preferences. : English Install User Set Auto Power Off Screen Messages : Off : On User Set Colour System : Auto NICAM IPC : On : On On Off 1 2 Press the OK or ❿ . Result: The Setup menu is displayed. After pressing the MENU, press the OK or ❿ . Result: The Setup menu is displayed. 2 3 Press the corresponding User Set option.
VCR Language Your DVD-VCR displays most information both on the DVD-VCR and the television. You can choose to display or hide this information on the television screen (except for the SEARCH, Programming MENU and Timer functions, which cannot be hidden). : English Install User Set Auto Power Off Screen Messages : Off : On On Off VCR 1 After pressing the MENU, press the corresponding to select the VCR option. Press the OK or ❿ buttons to select this option. Result: The VCR Setup menu is displayed.
VCR Selecting the Recording Speed VCR Protecting a Recorded Cassette Video cassettes have a safety tab to prevent accidental erasure. When this tab has been removed, you cannot record on the tape. You can record a cassette at two different speeds: Type Recording Time (in SP) E-180 180 mins. or 3 hours E-240 240 mins. or 4 hours E-260 260 mins. or 4 hours and 20 mins. E-300 300 mins.
VCR Recording a Programme with Automatic Stop This function enables you to record up to nine hours (LP) of programmes. Your DVD-VCR stops automatically after the requested length of time. EJECT PROG STANDBY/ON DVD LINE2 VCR 1 Switch on the television. 2 To monitor the programme being recorded, select the television channel reserved for use with your DVD-VCR (or the AV input if used).
VCR Checking a Preset Recording This function allows you to play back any pre-recorded cassette. You can check your preset recordings: PR Date WE 1 Start Stop Speed 19 : 00 19 : 30 SP : : : : : : : : : : : : VCR Playing a Cassette ◆ When you have finished presetting the DVD-VCR ◆ If you have forgotten which programmes will be recorded 1 Press TIMER on the remote control. Result: The TIMER PROGRAMMING menu is displayed.
VCR Selecting the Audio Output Mode You can select the mode in which the sound is reproduced on the loudspeakers and AV outputs. The following options are available. Option You can: ◆ Stop the cassette at a given frame (image) ◆ Advance one frame at a time ➢ Description L Used to listen to the sound on the left Hi-Fi channel. R Used to listen to the sound on the right Hi-Fi channel. 1 MIX L LR R MIX MONO Used to listen to the sound on the normal mono channel.
VCR Searching for a Specific Sequence Intro Scan Each time you record a cassette on this DVD-VCR, an “index” is automatically marked on the tape when recording starts. OK The Search function allows you to fast-forward or rewind to a specific index and start playback from that point. Depending on the direction selected, the indexes are numbered as follows: ➞ 1 etc. Prev Seq. being Next Seq. played Seq.
VCR Using the Tape Counter The tape counter: ◆ Indicates the elapsed time in the play and record modes (hours, minutes and seconds) ◆ Is reset when a cassette is inserted in the DVD-VCR ◆ Allows you to find the beginning of a sequence easily ☛ 0:00:00 2 If the remaining time is to be calculated correctly, you must indicate the type of cassette being used. 1 Insert a cassette in your DVD-VCR. 2 To set the tape counter to zero at the beginning of a sequence: ◆ Press INFO.
VCR This function allows you to start a new recording at a specific position on the cassette while maintaining a very smooth scene change. 4 2 1 Insert the cassette to be edited in your DVD-VCR. 2 Press the ❿ll button to start playback. 3 4 Your DVD-VCR remote control will work with Samsung televisions and compatible brands. 5 5 1 Switch your television on. When you reach the position from which you wish to start the new recording, press the ❿ll button.
DVD Choosing a Connection The following show examples of connections commonly used to connect the DVD -VCR player with a TV and other components. It is only available for DVD. The VCR out can not watch by this connection.
DVD Setting Up the Language Features If you set the player menu, disc menu, audio and subtitle language in advance, they will come up automatically every time you watch a movie. Setup Setup Display Setup Setup : Using the Disc Menu Language This function changes the text language only on the disc menu screens. 1 With the unit in Stop mode, press the MENU button. 2 Select DVD using 3 Select Language Setup using OK or ❿ button. 4 Select Disc Menu using button.
DVD Using the Audio Language Language Setup Disc Menu Audio Subtitle : English : English : Automatic DVD Setting Up the Audio Options Setting Up the Language Features 1 1 With the unit in Stop mode, press the MENU button. , ❷ buttons, then OK or ❿ button. 2 Select DVD using 3 Select Language Setup using ❿ button. 4 Select Audio using 5 Press the , ❷ buttons to select ‘English’ .
DVD Setting Up the Display Options 1 Setup Setup Display Setup Setup : Display Setup TV Aspect Black Level NTSC Disc Output DVD Out : 4:3 L-Box : PAL 60Hz : Component With the unit in Stop mode, press the MENU button. , ❷ buttons, then OK or ❿ button. 2 Select DVD using 3 Select Display Setup using button. 4 Use the , ❷ buttons to select the desired item. Then press the OK or ❿ button.
DVD A/V Receiver Connections To take full advantage of the movie theater experience that DVD offers, you may want to connect your DVD-VCR to a complete Surround Sound system, including an A/V Receiver and six Surround Sound speakers. Before You Begin... OR To Digital Audio Input of an A/V Receiver with a Dolby Digital Decoder During DVD/CD playback you can select from the following special playback options. To resume normal playback, press the ❿ll (Play/Still) button.
DVD Adjusting the Aspect Ratio (EZ View) Adjusting the Aspect Ratio (EZ View) DVD To play back using aspect ratio (DVD) If you are using a 4:3 TV 1 Press the EZ VIEW button. • The screen size changes when the button is pressed repeatedly. • The screen zoom mode operates differently depending on the screen setting in the initial DVD menu. • To ensure correct operation of the EZ VIEW button, you should set the correct aspect ratio in the initial setup (See page 50).
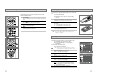
DVD Using the Display Function DVD Changing the Camera Angle When Playing a DVD/VCD/CD Using the ANGLE button OK 1 OK 1 During play, press the INFO. button on the remote. 2 Use the 3 Use the ➛, ❿ buttons to make the desired setup. • You may use the number buttons of the remote control to directly access a title, chapter or to start the playback from the desired time. 4 To make the screen disappear, press the INFO. button again. ➢ , ❷ buttons to select the desired item.
DVD OK DVD Selecting the Audio Language Repeat Play Repeat the current track, chapter, title, a chosen section (A-B), or all of the disc. You can select a desired language quickly and easily with the AUDIO button. When playing a DVD DVD Using the AUDIO button 1 1 Press the REPEAT button on the remote. Repeat screen appears. 1 Press the AUDIO button. 2 Select Chapter, Title or A-B using the ➛, ❿ buttons. 2 Use the ➛, ❿ buttons to select the desired language on a DVD.
DVD Using the Mark Function This feature lets you mark sections of a DVD or VCD (MENU OFF mode) so you can quickly find them at a later time. OK Using the Mark Function (DVD/VCD) 1 1 During play, press the MARK button on the remote. The Mark icons will be displayed. 2 Use the ➛, ❿ buttons to move to the desired Mark icon. 3 When you reach the scene you want to mark, press the OK button. The icon will change to a number (1, 2, or 3). 4 Press the MARK button to turn off the display.
MP3/WMA Play Program Play & Random Play CD-R MP3/WMA discs When playing CD-R/MP3 or WMA discs, please follow all the recommendations for CD-R above, plus the comments below: • Your MP3 or WMA files should be ISO 9660 or JOLIET format. ISO 9660 format and Joliet MP3 or WMA files are compatible with Microsoft's DOS and Windows, and with Apple's Mac. These two formats are the most widely used. • When naming your MP3 or WMA files do not exceed 8 characters, and place ".mp3, .wma" as the file extension.
Picture CD Playback Picture CD Playback • Select JPEG in the menu to view a Photo CD. • To change the currently playing media, press the STOP ( ■ ) button twice and then press the DISC MENU button. • If no button on the remote controller is pressed for 60 seconds, the menu will disappear and the selected item will be played. Album Photo : 1 /215 1. Open the disc tray. 2. Load the disc on the tray. Load the disc with the labeled side up. 3. Close the tray.
Technical Specifications General Problems and Solutions (VCR) Rated voltage 110 - 240V~, 50/60Hz Power consumption 23 Watts Weight 4.5 Kg Size 430mm X 265mm X 94mm Operating ambient temperature +5°C ~ +35°C Installation conditions Operation position : Horizontal, Relative humidity : Below 75% Input Output Video input (Rear) RCA jack : 1.
Troubleshooting Guide (DVD) Before requesting service (troubleshooting) Problem Disc does not play. 5.1 channel sound is not being reproduced. Action Page ◆ ◆ ◆ Ensure that the disc is installed with the label side facing up. Check the region number of the DVD. This player cannot play CD-ROMs, DVD-ROMs, etc. Insert a DVD, a VIDEO-CD or a CD. P6 ◆ 5.1 channel sound is reproduced only when the following conditions are met.