DW80M9* Series Dishwasher installation guide These installation instructions are intended for use by qualified installers. If you are having problems installing this dishwasher STOP U.S.A Please call: 1-800-SAMSUNG (726-7864) 1-844-SAM-PAYS (726-7297) for assistance: www.samsung.com/us/support CANADA Please call: 1-800-SAMSUNG (726-7864) for assistance: www.samsung.com/ca/support (English) www.samsung.com/ca_fr/support (French) imagine the possibilities Thank you for purchasing this Samsung product.
safety instructions Throughout this manual, you will see Warning and Caution notes. The warnings, cautions, and the important safety instructions that follow do not cover all possible conditions and situations that may occur. It is your responsibility to use common sense, caution, and care when installing, maintaining, and operating the dishwasher. Samsung is not liable for damages resulting from improper use.
Prior to removal of original dishwasher and the installation of your new unit, make sure to switch off your circuit breaker. Do not connect the dishwasher until you have completed the installation. Connecting the power cable is the last step when installing the dishwasher. All wiring and grounding must be done in accordance with the electrical code applicable to the region.
contents PREPARING THE DISHWASHER ENCLOSURE 5 5 Product dimensions Enclosure dimensions 6 8 STEP 1 STEP 2 5 INSTALLING THE DISHWASHER 6 9 10 11 12 14 15 16 18 20 21 Check the parts and tools Select the best location for the dishwasher STEP 3 Check water supply requirements and cautions STEP 4 Check the electrical requirements and cautions STEP 5 Unpacking and inspecting the dishwasher STEP 6 Preparing the dishwasher STEP 7 Placing the dishwasher and connecting the hot water supply line STEP 8 Level
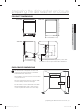
preparing the dishwasher enclosure PRODUCT DIMENSIONS Front view Rear view 01 PREPARING THE DISHWASHER 33⅞-35" (860-890 mm) Junction box 237⁄8" (605 mm) Side view 2½" (60 mm) 5¾" (140 mm) 2½" (60 mm) 20½" (520 mm) 25" (636 mm) You must arrange the water supply line, power cable and drain hose in the space behind the dishwasher. ENCLOSURE DIMENSIONS This dishwasher is designed to be enclosed on the top and on both sides by a standard residential kitchen cabinet unit.
installing the dishwasher Be sure that you or your installer follow these instructions closely so that the new dishwasher works properly and that you are not at risk of injury when washing dishes. STEP 1 CHECK THE PARTS AND TOOLS Before starting on the installation, prepare all the necessary tools and parts required to install the dishwasher. This will save installation time and simplify the installation process. Parts required Provided with the dishwasher. Check when you unbox the dishwasher in Step 5.
Tools required Safety glasses Gloves Flashlight Adjustable wrench Wire stripper Pliers Nipper Tape measure Pencil Phillips screwdriver Flat screwdriver Tubing cutter Cutting knife Hole saw Level Torx t20 Hex L-wrench installing the dishwasher _7 DW9900M-00183A-01_EN.
installing the dishwasher New installation If the dishwasher is a new installation, most of the installation work must be done before the dishwasher is moved into place. Replacement If the dishwasher is replacing an old dishwasher, you must check the exising dishwasher connections for compatibility with the new dishwasher. Repace the existing connections as necessary.
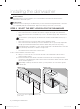
STEP 3 CHECK WATER SUPPLY REQUIREMENTS AND CAUTIONS • • The hot water supply line pressure must be between 20~120 psi (140~830 kPa). Adjust the water heater to deliver water between 120 ˚F (49 ˚C) ~ 149 ˚F (65 ˚C). - - Power cable Hot Water Supply Line 4¼-6¼ in. (110-160mm) Inlet valve Dishwasher bottom installing the dishwasher _9 DW9900M-00183A-01_EN.
installing the dishwasher STEP 4 CHECK THE ELECTRICAL REQUIREMENTS AND CAUTIONS The electrical requirements for the dishwasher are as follows: • In the United States, install in accordance with the National Electric Code/State and Municipal codes and/or local codes. • In Canada, install in accordance with the Canadian Electric Code C22.1-latest edition/Provincial and Municipal codes and/or local codes. • For cable direct connections.
STEP 5 UNPACKING AND INSPECTING THE DISHWASHER Unpack the dishwasher in an open area free of obstruction both around the packaging and overhead. We recommend that you retain all of the packing materials until the dishwasher is fully installed and operational to ensure you have removed all the product’s components from the packing materials prior to disposal. 02 INSTALLING THE DISHWASHER Unpacking 1. Position the carton right-side-up with top arrows pointing upwards. 2.
installing the dishwasher Plumbing 1. Check the hot water connection on the back left-side of the base of the dishwasher. The mounting plate should be secured to the back of the base, the threads inside the connection should be smooth and shiny, and the area should be clean and free of any debris. 2. Make sure the dishwasher and the accessories are all included in the package to ensure these assemblies are not cracked and that all connections are secure. 3.
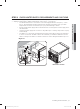
If the drain hose needs to go to the right of the dishwasher, secure the hose in the hose fixer mounted on the base. There are three positions the hose fixer can be installed at. To move the hose fixer, gently squeeze the fixer, the turn to the left. Make sure to secure on the arrow-marked area. A C B Junction box Strain relief 90 º fitting CAUTION Do not overtighten the 90˚ Fitting. (Below 280 lb·in (31.6 N·m)) Doing so may damage the water inlet valve and cause a water leak.
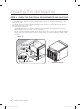
installing the dishwasher STEP 7 PLACING THE DISHWASHER AND CONNECTING THE HOT WATER SUPPLY LINE 1. Adjust the three leveling legs at the bottom of the dishwasher after measuring the height of the cabinet opening from under the countertop to the floor. (See Step 8, Leveling the Dishwasher.) 2. Locate the hot water supply line and the power cable. 3. Place the dishwasher so that the hot water supply line is in the left side and the power cable is in the right channel of the base of the dishwasher.
STEP 8 LEVELING THE DISHWASHER 02 INSTALLING THE DISHWASHER 1. Open the door and place the level against the top of the tub on the inside and check if the the dishwasher is level. If it is not level, rotate the leveling legs at the bottom front of the dishwasher until the dishwasher is level. See the first note below for instructions on adusting the height of the front legs. 2. Use the level to check if the dishwasher is level front to back, as shown in the figure to the right.
installing the dishwasher STEP 9 SECURING THE DISHWASHER You must fix the dishwasher to the countertop or cabinet side walls for additional stability and safety. 1. If the countertop is made of wood or the material will not be damaged by drilling, follow the instructions in 2-1 below. If the countertop is made of granite, marble, or any other material that can be damaged by drilling, follow the instructions in 2-2 below. 2-1.
02 INSTALLING THE DISHWASHER Screw to side wall Tub spacer cap CAUTION After installing the dishwasher inside the cabinet, check if the door opens and closes freely with no interruption with the cabinet. Good (A) Bad (B) 22" (560 mm) (A) (B) 22" (560 mm) Do not to exceed 22" (560 mm) distance between the Caps CAUTION Make sure the tub is not distorted by pressure from the screws. If the tub is distorted, loosen the screws a little. Replace the tub spacer caps.
installing the dishwasher STEP 10 CONNECTING THE DRAIN HOSE 1. Check the parts on the sink to which the drain hose will be connected. 2. There are several ways to insert the drain hose into the drain hose connector of the sink, as shown in the following figures. You must connect the drain hose in accordance with the water pipe installation regulations in your region. Case 1.
8. Do not cut the wrinkled area of the drain hose to fit the size. When arranging the drain hose, take caution not to contact on sharp edges of the cabinet or under-sink. • Be careful when cutting off the end of the drain hose as there is a risk of injury. Clean around the sink’s drain connection so that it does not damage the hose. Check for any foreign items in the drain hose and remove them. CAUTION 1 in. (25 mm) 5 /8 in. (16 mm) 7 /8 in.
installing the dishwasher STEP 11 WIRING CONNECTIONS 1. Before connecting the power cable to the dishwasher, make sure the circuit breaker is off. 2. In the junction box located at the front bottom right of the dishwasher, find the three power wires from the dishwasher including the grounding line. 3. Pass the power cable through the strain relief, and then into the junction box (Figure 14). 4. Connect the black wire of the dishwasher to the black wire of the power cable by insertng both into a wire nut.
STEP 12 COMPLETING THE INSTALLATION Open the door and remove all foam, paper packaging, and unnecessary parts. Turn on the circuit breaker you turned off before you began the installation. Open the water supply valve to supply water to the dishwasher. Turn on the dishwasher, and then select and run a cycle. CAUTION Make sure to check for water leakage on both ends of the water supply line and drain hose connector. 5. Check if the dishwasher turns on properly and check also if there is any leak.
specifications Power supply 120 V, 15 A, 60 Hz AC Water pressure 20 ~ 120 psi (140 ~ 830 kPa) Dimensions (Width×Depth×Height) 237⁄8 x 25 x 337⁄8 in. (605 x 636 x 860 mm) Minimum inlet water temperature 120 ˚F (49 ˚C) Specifications are subject to change without notice for quality improvement purposes. The actual appearance of the dishwasher may differ from the illustrations in this manual. 22_ specifications DW9900M-00183A-01_EN.
note DW9900M-00183A-01_EN.
DD68-00183A-01 DW9900M-00183A-01_EN.
Serie DW80M9* Lavavajillas guía de instalación Estas instrucciones de instalación están dirigidas a instaladores calificados. Si tiene problemas al instalar esta lavavajillas ATENCIÓN U.S.A Llame al: 1-800-SAMSUNG (726-7864) 1-844-SAM-PAYS (726-7297) para recibir asistencia: www.samsung.com/us/support CANADA Llame al: 1-800-SAMSUNG (726-7864) para recibir asistencia: www.samsung.com/ca/support (English) www.samsung.
instrucciones de seguridad A lo largo de este manual, encontrará notas de Advertencia y Precaución. Las siguientes advertencias, precauciones e instrucciones de seguridad importantes no cubren todas las posibles condiciones y situaciones que pueden ocurrir. Es su responsabilidad actuar con sentido común, precaución y cuidado cuando instale, realice el mantenimiento y ponga en funcionamiento la lavavajillas. Samsung no se responsabiliza por los daños ocasionados por un uso inadecuado.
Antes de quitar la lavavajillas original e instalar la nueva unidad, asegúrese de desactivar su disyuntor. No conecte la lavavajillas hasta haber completado la instalación. El último paso de la instalación de la lavavajillas es la conexión del cable de alimentación. Todo el cableado y la conexión a tierra deben realizarse en conformidad con el código eléctrico vigente en la región.
contenidos PREPARACIÓN DEL ESPACIO PARA LA LAVAVAJILLAS 5 5 Dimensiones del producto Dimensiones del espacio INSTALACIÓN DE LA LAVAVAJILLAS 6 PASO 1 6 8 PASO 2 9 PASO 3 10 PASO 4 11 PASO 5 12 14 PASO 6 PASO 7 15 16 18 20 21 PASO 8 PASO 9 PASO 10 PASO 11 PASO 12 5 Verificación de las piezas y las herramientas Elección de la mejor ubicación para la lavavajillas Verificación de los requisitos para el suministro de agua y precauciones Verificación de los requisitos eléctricos y advertencias Dese
preparación del espacio para la lavavajillas DIMENSIONES DEL PRODUCTO Vista posterior 33⅞-35" (860-890 mm) 01 PREPARACIÓN DE LA LAVAVAJILLAS Vista frontal Caja de conexiones 237⁄8" (605 mm) Vista lateral 5¾" (140 mm) 2½" (60 mm) 2½" (60 mm) 20½" (520 mm) 25" (636 mm) Acomode el conducto, el cable de alimentación y la manguera de desagüe en el espacio detrás de la lavavajillas.
instalación de la lavavajillas Asegúrese de que usted o su instalador siga estas instrucciones minuciosamente para que su nueva lavavajillas funcione adecuadamente y no existan riesgos de sufrir lesiones al lavar la vajilla. PASO 1 VERIFICACIÓN DE LAS PIEZAS Y LAS HERRAMIENTAS Antes de comenzar la instalación, prepare todas las herramientas y piezas necesarias requeridas para instalar la lavavajillas. Esto ahorrará tiempo y simplificará el proceso de instalación.
Herramientas requeridas Lentes de seguridad Guantes Linterna Llave ajustable Alicate pelacable Pinza Alicate de corte Cinta métrica Lápiz Destornillador Phillips Destornillador plano Cortatubos Cúter Fresa para escariar Nivel Torx t20 Llave en forma de L para cabezas hexagonales instalación de la lavavajillas _7 DW9900M-00183A-01_MES.
instalación de la lavavajillas Instalación nueva Si la instalación de la lavavajillas es nueva, la mayor parte del trabajo debe realizarse antes de colocar la máquina en su lugar. Reemplazo Si esta lavavajillas reemplaza a otra, debe verificar que las conexiones existentes sean compatibles con la nueva lavavajillas. Reemplace las conexiones existentes si fuera necesario.
PASO 3 • • VERIFICACIÓN DE LOS REQUISITOS PARA EL SUMINISTRO DE AGUA Y PRECAUCIONES La presión del conducto de agua caliente debe estar entre 20 y 120 psi (140 y 830 kPa). Ajuste el calentador de agua para obtener una temperatura de agua entre 120 ˚F (49 ˚C) y 149 ˚F (65 ˚C). La lavavajillas debe estar conectada al suministro de agua caliente con una temperatura entre 120 ˚F (49 ˚C) y 149 ˚F (65 ˚C). Este rango de temperatura ofrece un mejor resultado en el lavado y un ciclo más corto.
instalación de la lavavajillas PASO 4 VERIFICACIÓN DE LOS REQUISITOS ELÉCTRICOS Y ADVERTENCIAS Los requisitos eléctricos para la lavavajillas son los siguientes: • En los Estados Unidos, instalar de conformidad con el Código Eléctrico Nacional/códigos estatales y municipales y/o códigos locales. • En Canadá, instalar de conformidad con el Código Eléctrico Canadiense C22.1-última edición/códigos provinciales y municipales y/o códigos locales. • Para conexiones directas de cable.
PASO 5 DESEMPAQUE E INSPECCIÓN DE LA LAVAVAJILLAS Desempaque la lavavajillas en una zona libre de obstrucciones ya sea alrededor de la caja como en la parte superior. Recomendamos que conserve todos los materiales del empaque hasta que la lavavajillas esté completamente instalada y en funcionamiento para asegurarse de que haya retirado todas las piezas del producto de la caja antes de desecharla. 02 INSTALACIÓN DE LA LAVAVAJILLAS Desempaque 1.
instalación de la lavavajillas Cañerías 1. Verifique la conexión de agua caliente en el lado izquierdo trasero de la base de la lavavajillas. La placa de montaje debe estar asegurada a la parte trasera de la base, las roscas de la conexión deben ser lisas y brillosas y la zona debe estar limpia y libre de fragmentos. 2. Revise que la lavavajillas y todos los accesorios estén incluidos en la caja para asegurarse de que estos montajes no estén dañados y que todas las conexiones estén aseguradas. 3.
Si la manguera de desagüe debe ir a la derecha de la lavavajillas, asegúrela en el fijador de la manguera montado en la base. El fijador de la manguera puede instalarse en tres posiciones. Para mover el fijador de la manguera, presiónelo suavemente para que gire hacia la izquierda. Asegúrelo en la zona marcada con la flecha. A C B Caja de conexiones Alivio de tensión Adaptador 90° PRECAUCIÓN No ajuste demasiado el adaptador de 90˚. (Menos de 280 lb·pulg. (31.
instalación de la lavavajillas PASO 7 COLOCACIÓN DE LA LAVAVAJILLAS Y CONEXIÓN DEL CONDUCTO DEL SUMINISTRO DE AGUA CALIENTE 1. Regule las tres patas niveladoras en la parte inferior de la lavavajillas después de medir la altura de la abertura del gabinete desde abajo de la encimera hasta el piso. (Ver el Paso 8, Nivelación de la lavavajillas.) 2. Ubique el conducto del agua caliente y el cable de alimentación. 3.
PASO 8 NIVELACIÓN DE LA LAVAVAJILLAS 02 INSTALACIÓN DE LA LAVAVAJILLAS 1. Abra la puerta y coloque el nivel contra la parte superior de la cuba desde adentro y verifique si la lavavajillas está nivelada. Si no lo está, gire las patas niveladoras en la parte inferior delantera de la lavavajillas hasta que quede nivelada. Vea la primera nota debajo de las instrucciones sobre el ajuste de la altura de las patas delanteras. 2.
instalación de la lavavajillas PASO 9 FIJACIÓN DE LA LAVAVAJILLAS La lavavajillas debe fijarse a la encimera o a las paredes laterales para mayor estabilidad y seguridad. 1. Si la encimera está hecha de madera de un material que no se daña por la perforación, siga las siguientes instrucciones en 2-1. Si la encimera es de granito, mármol o cualquier otro material que pueda dañarse al perforarlo, siga las siguientes instrucciones en 2-2. 2-1.
02 INSTALACIÓN DE LA LAVAVAJILLAS Atornillado a la pared lateral Tapa del separador de la cuba PRECAUCIÓN Luego de instalar la lavavajillas en el gabinete, asegúrese de que la puerta se abra y se cierre libremente sin que interfiera el gabinete. Correcto (A) Incorrecto (B) 22" (560 mm) (A) (B) 22" (560 mm) La distancia entre las tapas no debe superar las 22" (560 mm) PRECAUCIÓN Asegúrese de que la cuba no se deforme a causa de la presión de los tornillos.
instalación de la lavavajillas PASO 10 CONEXIÓN DE LA MANGUERA DE DESAGÜE 1. Verifique las piezas del fregadero a las cuales se conectará la manguera de desagüe. 2. Hay muchas maneras de insertar la manguera de desagüe en el conector de la manguera de desagüe del fregadero, como se muestra en las siguientes figuras. Debe conectar la salida del desagüe conforme a las reglamentaciones de instalación de tuberías de agua de su región. Caso 1.
8. No corte la zona retorcida de la manguera de desagüe para que se adapte al tamaño. Cuando acomode la manguera de desagüe, tenga cuidado de no tocar los bordes filosos del gabinete o bajo el fregadero. PRECAUCIÓN • Tenga cuidado al cortar el extremo de la manguera de desagüe ya que podría lastimarse. Limpie el área de conexión del desagüe del fregadero para evitar que la manguera se dañe. Verifique que no haya objetos extraños en la manguera de desagüe y quítelos.
instalación de la lavavajillas PASO 11 CONEXIONES DEL CABLEADO 1. Antes de conectar el cable de alimentación a la lavavajillas, asegúrese de desactivar el disyuntor. 2. En la caja de conexiones que se encuentra ubicada en la parte delantera derecha inferior de la lavavajillas, busque los tres cables de alimentación de la lavavajillas inclusive la conexión a tierra. 3. Pase el cable de alimentación al alivio de tensión, y luego dentro de la caja de conexiones (Figura 14). 4.
PASO 12 FINALIZACIÓN DE LA INSTALACIÓN Abra la puerta y quite todas las piezas innecesarias, goma espuma y empaque de papel. Active el disyuntor desactivado antes de comenzar la instalación. Abra la válvula del suministro de agua para suministrar agua a la lavavajillas. Encienda la lavavajillas y luego seleccione y ejecute un ciclo. PRECAUCIÓN Verifique las filtraciones de agua en ambos extremos del conducto de agua y en el conector de la manguera de desagüe. 5.
especificaciones Suministro eléctrico 120 V, 15 A, 60 Hz CA Presión de agua 20 - 120 psi (140 - 830 kPa) Dimensiones (Ancho × Profundidad × Altura) 23⅞ x 25 x 33⅞ pulgadas (605 x 636 x 860 mm) Temperatura mínima del agua en la entrada 120 ˚F (49 ˚C) Las especificaciones están sujetas a cambios sin previo aviso a los efectos de las mejoras de calidad. La apariencia real de la lavavajillas puede diferir de las ilustraciones de este manual. 22_ especificaciones DW9900M-00183A-01_MES.
nota DW9900M-00183A-01_MES.
DD68-00183A-01 DW9900M-00183A-01_MES.