
User manual


Table Of Contents
- Galaxy Camera
- Table of Contents
- Section 1: Getting Started
- Section 2: Understanding Your Camera
- Section 3: Camera Operation
- Section 4: Entering Text
- Section 5: Contacts and Your Address Book
- Section 6: Multimedia
- Section 7: Messaging
- Section 8: Changing Your Settings
- Accessing Settings
- Wi-Fi Settings
- Bluetooth settings
- Data Usage
- More Settings
- Blocking Mode
- Sound Settings
- Display Settings
- Storage
- Power
- Battery
- Application Manager
- Location Services
- Lock Screen Settings
- Security
- Language and input
- Back up and reset
- Add Account
- Motion
- Accessory Settings
- Date and time
- Accessibility
- Developer options
- About Device
- Section 9: Connections
- Section 10: Applications
- AllShare Play
- AT&T Locker
- Calculator
- Calendar
- Camera
- ChatON
- Chrome
- Clock
- Connect To AT&T
- Contacts
- Downloads
- Gallery
- Gmail
- Google +
- Group Cast
- Internet
- Latitude
- Local
- Maps
- Messenger
- Music Player
- My Files
- Navigation
- Paper Artist
- Photo Wizard
- Play Books
- Play Magazines
- Play Movies & TV
- Play Music
- Play Store
- S Suggest
- S Voice
- Settings
- Talk
- Video Editor
- Video Player
- Voice Search
- YouTube
- Section 11: Health and Safety Information
- Exposure to Radio Frequency (RF) Signals
- Specific Absorption Rate (SAR) Certification Information
- FCC Part 15 Information to User
- Smart Practices While Driving
- Battery Use and Safety
- Samsung Mobile Products and Recycling
- UL Certified Travel Charger
- Display / Touch-Screen
- GPS
- Care and Maintenance
- Responsible Listening
- Operating Environment
- Restricting Children's Access to Your Mobile Device
- FCC Notice and Cautions
- Other Important Safety Information
- Section 12: Warranty Information
- Section 13: Samsung Product Registration
- Index
5
Section 1: Getting Started
This section explains how to start using your camera by first
configuring your hardware, activating your service, and then
setting up Google and Samsung accounts.
Setting Up Your Camera
Prior to use it is necessary to install both the battery and SIM
into their corresponding internal compartments. The
microSD™ card slot is also located in this same internal
area.
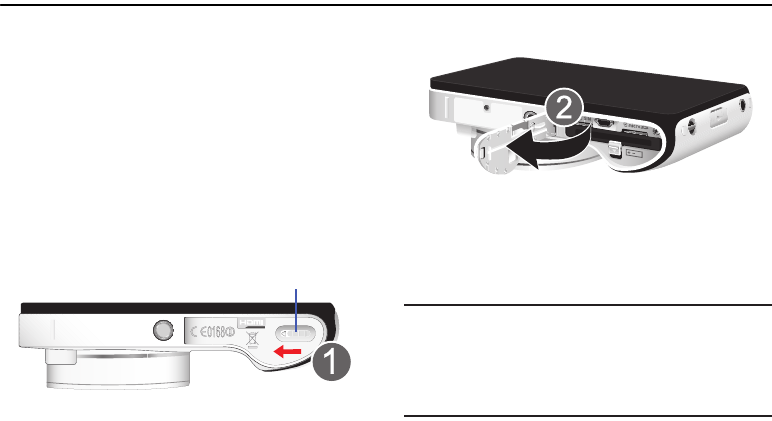
Opening the Battery Compartment
1. From the bottom of the camera, open the battery
compartment by sliding the cover lock to the left (1).
2. Swing the compartment cover open (2).
Installing the SIM Card
When you subscribe to a cellular network, you are provided
with a plug-in SIM card loaded with your subscription details,
such as your PIN, available optional services, and many
others features.
Important!
The plug-in SIM card information and its contacts
can be easily damaged by scratching or bending,
so be careful when handling, inserting, or
removing the card. Keep all SIM cards out of reach
of small children.
Cover Lock