
User Manual (ver.1.0)


Table Of Contents
- Important Warranty Information Regarding Television Format Viewing
- User Instructions
- Contents
- General Information
- Connections
- Connecting VHF and UHF Antennas
- Connecting Cable TV
- Connecting a VCR
- Connecting a Camcorder
- Connecting a DVD Player/Cable Box/Satellite receiver (Set-Top Box)
- Connecting a DVD Player/Cable Box/Satellite receiver (Set-Top Box) via HDMI
- Connecting a DVD Player/Cable Box/Satellite receiver (Set-Top Box) via DVI
- Connecting a Digital Audio System
- Connecting an Amplifier/DVD Home Theater
- Connecting a PC
- Operation
- Picture Control
- Sound Control
- Using Automatic Sound Settings
- Customizing the Sound
- Setting the TruSurround XT
- Choosing a Multi-Channel Sound (MTS) Track - Digital
- Choosing a Multi-Channel Sound (MTS) Track - Analog
- Automatic Volume Control
- Selecting the Internal Mute
- Adjusting the TV On/Off Melody Sound
- Listening to the Sound of the Sub (PIP) Picture
- Channel Control
- PC Display
- Time Setting
- Function Description
- Selecting a Menu Language
- Using the Game Mode
- Viewing Closed Captions (On-Screen Text Messages) - Digital
- Viewing Closed Captions (On-Screen Text Messages) - Analog
- Menu Transparency Level
- Setting the Light Effect
- Using the Energy Saving Feature
- Preventing Screen Burn-in
- Reducing the Effects of Screen Burn
- Setting the Function Help
- Using the V-Chip
- Upgrading the Software
- WISELINK
- About Anynet+
- Appendix
English - 10
ANT OUT
ANT IN
ANT 2 IN (CABLE)
ANT 2 IN (CABLE)
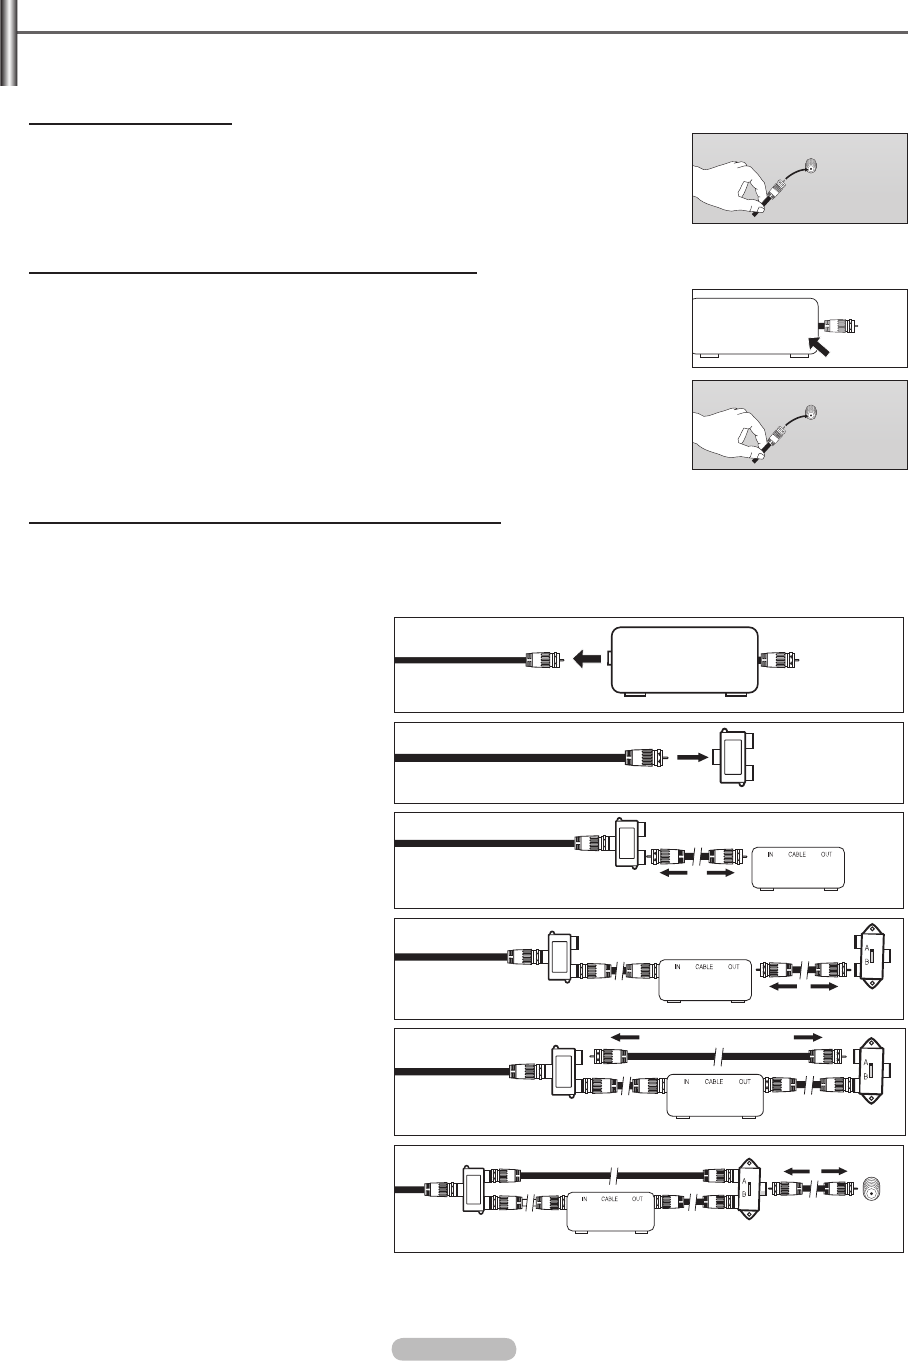
Connecting Cable TV
To connect to a cable TV system, follow the instructions below.
Cable without a Cable Box
1 Plug the incoming cable into the ANT 2 IN(CABLE) terminal on the back of the TV.
➢
Because this TV is cable-ready, you do not need a cable box to view
unscrambled cable channels.
1 Find the cable that is connected to the ANT OUT terminal on your cable box.
➢
This terminal might be labeled “ANT OUT”, “VHF OUT” or simply, “OUT”.
2 Connect the other end of this cable to the ANT 2 IN(CABLE) terminal on the back of
the TV.
Connecting to a Cable Box that Descrambles All Channels
Connecting to a Cable Box that Descrambles Some Channels
If your cable box descrambles only some channels (such as premium channels), follow the instructions below.
You will need a two-way splitter, an RF (A/B) switch, and four lengths of Antenna cable. (These items are available
at most electronics stores.)
1 Find and disconnect the cable that is
connected to the ANT IN terminal on your
cable box.
➢
This terminal might be labeled “ANT IN”,
“VHF IN” or simply, “IN”.
2 Connect this cable to a two-way splitter.
3 Connect an Antenna cable between an
OUTPUT terminal on the splitter and the IN
terminal on the cable box.
4 Connect an Antenna cable between the
ANT OUT terminal on the cable box and the
B–IN terminal on the RF(A/B) switch.
5 Connect another cable between the other
OUT terminal on the splitter and the A–IN
terminal on the RF (A/B) switch.
6 Connect the last Antenna cable between
the OUT terminal on the RF (A/B) switch
and the ANT 2 IN (CABLE) terminal on the
rear of the TV.
After you have made this connection, set the A/B switch to the “A” position for normal viewing. Set the A/B switch to the “B”
position to view scrambled channels. (When you set the A/B switch to “B”, you will need to tune your TV to the cable box’s
output channel, which is usually channel 3 or 4.)
Splitter
Cable Box
RF (A/B)
Switch
Incoming
cable
Splitter
Incoming
cable
Splitter
Cable Box
Incoming
cable
Splitter
Incoming
cable
TV Rear
RF (A/B)
Switch
ANT 2 IN (CABLE)
ANT IN
Splitter
Incoming
cable
RF (A/B)
Switch
Cable Box
BN68-01183Z-00Eng.indb 10 2007-07-02 ¿ÀÈÄ 4:27:46