SM-W720 SM-W723 SM-W727 SM-W727Y SM-W728 SM-W728Y User Manual English (EU). 06/2017. Rev.1.1 www.samsung.
Table of Contents Basics Applications 3 4 43 44 47 51 53 55 56 56 7 8 12 15 17 20 21 28 31 39 41 41 42 42 Read me first Device overheating situations and solutions Package contents Device layout Battery SIM or USIM card (mobile networkenabled models) Memory card (microSD card) Turning the device on and off Keyboard Cover Controlling the touchscreen Windows Entering text Screen capture Device and data management InstantGo (Modern standby) Connecting to an external display Installing or uninstalling app
Basics Read me first Please read this manual before using the device to ensure safe and proper use. • Descriptions are based on the device’s default settings. • Some content may differ from your device depending on the region, service provider, model specifications, or device’s software. • Content (high quality content) that requires high CPU and RAM usage will affect the overall performance of the device.
Basics Instructional icons Warning: situations that could cause injury to yourself or others Caution: situations that could cause damage to your device or other equipment Notice: notes, usage tips, or additional information Device overheating situations and solutions When the device heats up while charging the battery While charging, the device and the charger may become hot. During wireless charging or fast charging, the device may feel hotter to the touch.
Basics When the device heats up during use When you use features or apps that require more power or use them for extended periods, your device may temporarily heat up due to increased battery consumption. Close any running apps and do not use the device for a while. The following are examples of situations in which the device may overheat. Depending on the functions and apps you use, these examples may not apply to your model.
Basics Do the following when the device heats up: • Keep the device updated with the latest software. • Conflicts between running apps may cause the device to heat up. Restart the device. • Deactivate the Wi-Fi, GPS, and Bluetooth features when not using them. • Close apps that increase battery consumption or that run in the background when not in use. • Delete unnecessary files or unused apps. • Decrease the screen brightness.
Basics • Do not place the device in any areas that may overheat, such as on an electric heating mat. • Do not store your device near or in heaters, microwaves, hot cooking equipment, or high pressure containers. • Never use a damaged charger or battery. Package contents Check the product box for the following items: • Device • Keyboard Cover • S Pen • S Pen holder • Quick start guide • The items supplied with the device and any available accessories may vary depending on the region or service provider.
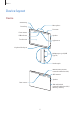
Basics Device layout Device Volume key Microphone Power key Fan vents Front camera Speaker LED indicator Touchscreen Light sensor Keyboard dock port Multipurpose jack (USB Type-C) Headset jack Main antenna (mobile network-enabled models) GPS antenna Speaker Rear camera SIM card (mobile network-enabled models) / Memory card tray 8
Basics The device and the Keyboard Cover contain magnets. The American Heart Association (US) and the Medicines and Healthcare Products Regulatory Agency (UK) both warn that magnets can affect the operation of implanted pacemakers, cardioverters, defibrillators, insulin pumps or other electro medical devices (collectively, “Medical Device”) within the range of 15 cm (6 inches).
Basics S Pen S Pen clip S Pen button S Pen nib Tweezers Name S Pen nib S Pen button Tweezers Functions • Use the S Pen to write, draw, or perform touch actions on the screen. • Hover the S Pen over items on the screen to access additional S Pen features. • Hover the S Pen over the screen and press the S Pen button to display the air command features. • Remove the S Pen nib with the tweezers when replacing the nib. The supplied S Pen is already calibrated.
Basics Replacing the S Pen nib If the nib is dull, replace it with a new one. 1 Firmly hold the nib with the tweezers and remove it. 2 Insert a new nib into the S Pen.
Basics Be careful not to pinch your fingers with the tweezers. • Do not reuse old nibs. Doing so may cause the S Pen to malfunction. • Do not press the nib excessively when inserting the nib into the S Pen. • Do not insert the round end of the nib into the S Pen. Doing so may cause damage to the S Pen or your device. • Do not bend or apply excessive pressure with the S Pen while using it. The S pen may be damaged or the nib may be deformed.
Basics 1 Connect the USB cable to the USB power adaptor, and plug the USB cable into the device’s multipurpose jack. 2 3 Plug the USB power adaptor into an electric socket. After fully charging, disconnect the device from the charger. First unplug the charger from the device, and then unplug it from the electric socket. Viewing the remaining charging time While charging, on the taskbar, tap → → System → Battery.
Basics Battery charging tips and precautions • Use the charger supplied with the device. It may take longer to charge the battery if you use other chargers. • When the battery power is low, the battery icon appears empty. • If the battery is completely discharged, the device cannot be turned on immediately when the charger is connected. Allow a depleted battery to charge for a few minutes before turning on the device.
Basics SIM or USIM card (mobile network-enabled models) Installing the SIM or USIM card Insert the SIM or USIM card provided by the mobile telephone service provider. • Use only a nano-SIM card. • Use caution not to lose or let others use the SIM or USIM card. Samsung is not responsible for any damages or inconveniences caused by lost or stolen cards. • It is only for data network. Calling and messaging features are not supported except for receiving messages.
Basics 1 2 Place the device with the bottom facing upwards. Insert the ejection pin into the hole on the tray to loosen the tray. Ensure that the ejection pin is perpendicular to the hole. Otherwise, the device may be damaged. 3 4 Pull out the tray gently from the tray slot. 5 Gently press the SIM or USIM card into the tray to secure it. Place the SIM or USIM card on the tray with the gold-coloured contacts facing upwards.
Basics 3 Remove the SIM or USIM card. 4 Insert the tray back into the tray slot. Memory card (microSD card) Installing a memory card Your device’s memory card capacity may vary from other models and some memory cards may not be compatible with your device depending on the memory card manufacturer and type. To view your device’s maximum memory card capacity, refer to the Samsung website. • Some memory cards may not be fully compatible with the device.
Basics 1 Insert the ejection pin into the hole on the tray to loosen the tray. Ensure that the ejection pin is perpendicular to the hole. Otherwise, the device may be damaged. 2 Pull out the tray gently from the tray slot. When you remove the tray from the device, the mobile data connection will be disabled. 3 Place a memory card on the tray with the gold-coloured contacts facing downwards. 4 Gently press the memory card into the tray to secure it.
Basics 5 Insert the tray back into the tray slot. • If you insert the tray into your device while the tray is wet, your device may be damaged. Always make sure the tray is dry. • Fully insert the tray into the tray slot to prevent liquid from entering your device. Removing the memory card Before removing the memory card, first unmount it for safe removal. On the taskbar, tap 1 2 3 4 → , and then select the ejection option. Insert the ejection pin into the hole on the tray to loosen the tray.
Basics Turning the device on and off Press and hold the Power key for a few seconds to turn on the device. Before turning on your device for the first time, you must connect the device to a power supply. When you turn on your device for the first time or after performing a data reset, follow the onscreen instructions to set up your device. To turn off the device, tap → → Shut down. In Tablet mode, tap → Shut down.
Basics Keyboard Cover Introduction Connect the device to the Keyboard Cover. The bottom of the touchpad acts as the left and right buttons of a mouse. When you close the Keyboard Cover, your device will enter sleep mode. When you open the cover, the touchscreen will turn on. To change the settings, tap → → System → Power & sleep → Additional power settings → Choose what closing the lid does, and then configure the When I close the lid: settings.
Basics Connecting the Keyboard Cover 1 Connect the keyboard dock port at the bottom of the device to the connector on the keyboard. Make sure that the Keyboard Cover is securely attached to your device. If not, check the location of the keyboard dock port and reconnect the Keyboard Cover to your device. 2 Attach the device to the stand. 2 1 You can attach the device to the stand in various angles.
Basics Attaching the S Pen holder Attach the S Pen holder to the S Pen holder slot. You can insert the S Pen into the S Pen holder. • Make sure that the S Pen holder is securely attached after 1 hour. • To avoid detaching the holder from the keyboard cover, do not apply excessive force. Hot keys Use hot keys to easily use features and change settings, such as brightness and volume. To use hot keys, simultaneously press and hold the Fn key and press a hot key.
Basics Hot key functions Key/Icon F1 F2 F3 Function • Launch Settings. • Adjust the brightness of the display. F5 • Change the display mode when an external display is connected to the device. • Lock or unlock the touchpad. F6 • Mute or unmute the audio. F4 F7 F8 • Adjust the volume. F9 • Turn the keyboard backlight on or off. F10 • Open the task view screen. F11 • Hide or show currently open windows. F12 • Activate or deactivate flight mode.
Basics Touchpad Use the touchpad to move the cursor or select items. The left and right buttons of the touchpad function the same as the left and right buttons of a mouse. Use only your fingers on the touchpad. The touchpad may not recognise the S Pen or the other tools. Basic touchpad functions Moving To move the cursor, move your finger on the touchpad. Clicking Tap the touchpad or press the left-click button.
Basics Double-clicking Double-tap the touchpad or press the left-click button twice. or Right-clicking Press the right-click button to perform the right-click function. Alternatively, tap the touchpad with two fingers. or Dragging To move an item, select and drag it to the target position while pressing and holding the leftclick button.
Basics Additional functions Swiping To scroll up, down, left, or right to a desired location, swipe with two fingers on the touchpad. or Spreading and pinching Spread two fingers apart on a webpage, map, or image to zoom in a part. Pinch to zoom out. Configuring touchpad settings Configure touchpad settings to use the touchpad more efficiently. Tap → → Devices → Mouse & touchpad, and configure the settings under Touchpad.
Basics Controlling the touchscreen • Do not allow the touchscreen to come into contact with other electrical devices. Electrostatic discharges can cause the touchscreen to malfunction. • To avoid damaging the touchscreen, do not tap it with anything sharp or apply excessive pressure to it with your fingertips. • The device may not recognise touch inputs close to the edges of the screen, which are outside of the touch input area.
Basics Tapping and holding Tap and hold an item or the screen for more than 2 seconds to access available options. Dragging To move an item, tap and hold it and drag it to the target position. Double-tapping Double-tap on a webpage or image to zoom in. Double-tap again to return.
Basics Swiping Swipe to the left or right on the screen to scroll left or right. Swipe upwards or downwards to scroll through a webpage or a list of items. Spreading and pinching Spread two fingers apart on a webpage, map, or image to zoom in a part. Pinch to zoom out.
Basics Windows Microsoft Windows is an operating system that is used to control a computer. • Images and available features may differ depending on the model and operating system. • This manual is designed for Windows 10 and content may differ depending on the OS version. • The image displayed on the desktop screen may differ between models and OS versions. Start screen Start screen The Start screen is the starting point for accessing all of the device’s features.
Basics Managing shortcuts To add a shortcut, on the taskbar, tap and then tap Pin to taskbar. , tap and hold an item, tap More or tap → More, To delete a shortcut, tap and hold a shortcut, and then tap Unpin from taskbar. To move a shortcut to another location, drag it to a new location. Managing notification icons On the taskbar, tap → → Personalisation → Taskbar → Select which icons appear on the taskbar, and then select items to display in the notification area.
Basics Start menu On the taskbar, tap to open the Start menu. From the Start menu, you can access your frequently used apps, shortcuts to other locations on your device, and more. Frequently used apps App tiles Apps list Your account Settings Power Managing app tiles You can pin your favourite apps on the app tile area. To add more apps, tap and hold an app from the apps list, and then drag it to the app tile area. To move a tile, tap and hold a tile, and then drag it to a new location.
Basics Switching to tablet mode You can switch between PC mode and tablet mode. In Tablet mode, the full Start menu screen will be the Start screen. Switching to tablet mode makes the device more touchfriendly. To switch to tablet mode, on the taskbar, tap → Tablet mode. Alternatively, Swipe from the right edge of the screen towards the centre of the screen, then tap Tablet mode. To return to PC mode, tap Tablet mode again.
Basics Password A password consists of characters or numbers. Enter a password, enter the password again to verify it, and then enter a password hint. If you have signed in to your Microsoft account, your account password will be set as the password automatically. PIN A PIN consists of numbers only. Enter at least four numbers, and then enter the password again to verify it. Picture password A password consists of circles, straight lines, and taps.
Basics You can use the following functions on the action centre panel. Clear all notifications. Tap a notification and perform various actions. Quick action buttons Using quick action buttons Tap quick action buttons to activate certain features. To view more detailed settings, tap and hold a button, and then tap Go to settings. You can change the top four buttons. On the taskbar, tap → → System → Notifications & actions, and then change quick action buttons under Quick actions.
Basics Currently open windows Multi desktop list Deleting desktops 1 2 On the taskbar, tap . On the multi desktop list, tap on the desktop to delete. Moving windows to another desktop 1 2 3 On the taskbar, tap to view the current desktop’s open windows. Tap and hold a window to move, and then tap Move to. Select a desktop to move the window. Split screen view In Tablet mode, you can open two windows at the same time in the split screen view by selecting windows from the task view screen.
Basics 2 Tap and hold a window and select Snap left or Snap right. Adjusting the window size Drag the handle between the windows left or right to adjust the size of the windows. Help To access help information, tap → Get Started.
Basics Using the control panel You can adjust basic system settings, such as hardware, software, or user account settings. Tap → Windows System → Control Panel. Alternatively, press the right-click button on and tap Control Panel. Then, select options you want to change. Entering text Using the on-screen keyboard In Tablet mode, the on-screen keyboard appears automatically when you enter text to send emails, create notes, and more. To use the on-screen keyboard in PC mode, on the taskbar, tap .
Basics Additional keyboard functions Tap • • • to use various functions. : Switch to the default keyboard. : Switch to the floating split keyboard. You can move the keyboard to another location by dragging the keyboard. : Switch to handwriting mode. This feature may not be available depending on the region or service provider. • : Switch to the standard keyboard.
Basics Screen capture Capture a screenshot while using the device. You can view captured images in the This PC → Pictures → Screenshots folder. It is not possible to capture a screenshot while using some apps and features. Capturing screenshots with the S Pen You can also use the Air command features to capture screenshots. Screen write allows you to write on captured screenshots. To select and capture a specific area, use Smart select. Refer to Screen write and Smart select for more information.
Basics InstantGo (Modern standby) InstantGo (Modern standby) is a low-power mode that allows the device to maintain network connectivity. When the screen turns off, the device will enter modern standby mode. While the device is in modern standby mode, the device can still sync content, such as emails, from the cloud and run background apps. It also allows the device to wake from sleep instantly, faster than the traditional sleep and hibernation states.
Applications Installing or uninstalling apps Store Purchase and download apps. On the taskbar, tap . Alternatively, on the taskbar, tap → Store. For service requests for apps provided by third-party providers, contact the provider. If you contact a Samsung Service Centre, troubleshooting actions in response to service requests may have limitations depending on the app. Installing apps Browse apps by category or tap the search field to search for a keyword. Select an app to view information about it.
Applications Air Command Introduction Air command is a menu that provides S Pen features. To open the Air command panel, hover the S Pen over the screen and press the S Pen button. Alternatively, tap → Samsung → Air Command. View all notes Create note Smart select Show Window Screen write • Create note: Launch Samsung Notes and create a new note. Refer to Samsung Notes for more information. • View all notes: Launch Samsung Notes and view all notes. • Smart select: Collect content quickly.
Applications Smart select Use the S Pen to select an area and perform actions, such as sharing or saving. 1 When there is content you want to capture, such as a part of an image, open the Air command panel and tap Smart select. 2 Select a desired shape icon on the toolbar and drag the S Pen across the content you want to select. 3 Edit the selected area using various editing options. Recognise and extract text from the selected area. Eraser mode Pen mode Save the selected area.
Applications Screen write Capture screenshots to write or draw on them. 1 When there is content you want to capture, open the Air command panel and tap Screen write. The current screen is automatically captured and the editing toolbar appears on the screen. 2 Write a memo on the screenshot. 3 Select an option to use with the screenshot. • : Recognise and extract text from the screenshot. • : Crop the screenshot. • : Share the screenshot with others. • : Save the screenshot.
Applications Samsung Notes Introduction Create notes by writing or drawing on the screen with the S Pen. You can also insert images into your notes. Creating notes 1 On the taskbar, tap → Samsung Notes → All notes → . You can also open the Air command panel and tap the Create note shortcut. 2 Select an input method from the toolbar at the top of the screen and compose a note. Tap Image to insert an image by selecting from File Explorer. Write or draw with pens. Paint with brushes. Insert an image.
Applications Composing notes in handwriting mode On the note composer screen, tap Pen to write or draw with the S Pen. Eraser mode Redo Undo Selection mode Changing the pen settings When writing or drawing on the screen, you can change the pen type, line thickness, or pen colour. Change the line thickness. Change the pen colour. Change the pen type. Select a new colour using the colour picker. Using the line eraser 1 2 When you want to erase handwriting from a note, tap Eraser.
Applications • You can also erase an area in pen mode by tapping it while pressing and holding the S Pen button. • Even with a smaller eraser, you may still not be able to precisely erase the intended part. Editing handwritten notes Edit handwritten notes using various editing options, such as cutting, moving, or resizing. 1 When there is handwriting on the note, tap Select. To change the shape of the selection, tap Select once more. 2 Tap or draw a line around the input to select.
Applications • Delete: Delete the input. • To front: Send the input to the front. • To back: Send the input to the back. Painting with brushes On the note composer screen, tap Brush to paint with various brushes. When you are finished, tap Done to insert your painting into the note. Undo Eraser mode Redo Insert the painting into the note. Change the brush’s radius or opacity. Select a new colour using the colour picker. Change the brush colour.
Applications Samsung Flow Introduction Samsung Flow allows you to easily connect your tablet to your smartphone and use them conveniently, such as unlocking your tablet screen or sharing contents. Samsung Flow must be installed on your tablet and smartphone that you want to connect. If Samsung Flow is not installed, download it from app stores. • This feature is only available on some Samsung Android smartphones.
Applications Unlocking your tablet screen with fingerprint You can unlock your tablet screen with registered fingerprint on your smartphone. 1 On the locked screen of your tablet, touch the NFC antenna area on the back of your smartphone to the nfc tag of your keyboard cover. Samsung Flow will launch automatically on your smartphone. 2 When a fingerprint lock pop-up window appears, on your smartphone, scan your registered fingerprint. You can unlock your tablet screen.
Applications Checking notifications on your tablet When you receive new notifications on your smartphone, check notifications from the virtual screen or in pop-up window on your tablet. Sharing contents You can share your smartphone’s contents with your tablet. Show Window Show Window allows you to select an area on the screen and show it in full screen mode on an external display. You can draw on the screen using tools.
Applications 5 Drag to select an area to show in full screen mode on the external display, and then tap Done. The selected area will be shown on the external display. To fix the ratio of the selected area to the ratio of the external screen, tap ratio switch to activate it. and tap the Fixed To stop displaying the screen, tap Stop. Using tools While showing the screen on the connected display, you can use the following tools.
Applications Camera Take photos and record videos using various modes and settings. On the taskbar, tap → Camera. When you launch Camera, the LED indicator turns on. The LED indicator will be automatically turned off after the camera is turned off. Taking photos or recording videos 1 Tap the image on the preview screen where the camera should focus. This feature is only available when using the rear camera. 2 Tap to take a photo or tap to record a video.
Applications Book Settings Samsung-integrated settings app offers various settings functions. 1 2 On the taskbar, tap → Book Settings. Select an option to configure the corresponding function. • Pen: Select an app to launch when you press the S Pen button while hovering the S Pen over the screen. • Battery Life Extender: Set the maximum battery charge level to 85% to prolong the battery lifetime. • AMOLED: Change the screen mode and the screen brightness timer.
Applications Restoring to factory default Restore the device to its factory default settings. Before performing a factory data reset, ensure you back up all important data stored on the device. Refer to Backing up the current system for more information. 1 On the taskbar, tap → Samsung → Samsung Recovery. If Windows does not start, turn on your device and press the F4 key several times immediately before the Samsung logo appears, to launch Samsung Recovery.
Applications Backing up the current system Back up important data to an external storage device regularly to prevent data loss. 1 2 3 4 5 Connect an external storage device. 6 7 When the backup start window appears, tap Yes. On the taskbar, tap → Samsung → Samsung Recovery. Tap Backup management → New backup. Enter backup information and select the external storage device. Tap Backup. When the backup complete window appears, tap OK.
Applications Restoring the system Select a backup point saved on an external storage device to restore the device to that point. 1 2 3 Connect the external storage device to your device. 4 Tap Recover. On the taskbar, tap → Samsung → Samsung Recovery. Tap Backup management, select a backup image, and then tap Recover.
Settings Windows Settings Customise settings for functions and apps. You can make your device more personalised by configuring various setting options. On the taskbar, tap → . To search for settings by entering keywords, tap the search field at the top of the screen. The available options may vary depending on the region or service provider. System Change the system settings.
Settings Network & Internet Change the network and Internet settings. • Your device uses a non-harmonised frequency and is intended for use in all European countries. The WLAN can be operated in the EU without restriction indoors, but cannot be operated outdoors. • Turn off Wi-Fi to save the battery when not in use. Personalisation Change the display settings, such as a wallpaper, colour, and theme. Accounts Change the account settings.
Settings BIOS (Setup utility) Introduction BIOS is the program that starts the operating system when you turn on your device. Access the BIOS setup screen to set a boot password, perform battery calibration, and more. Be careful when changing BIOS settings. Incorrect changes may cause the system to malfunction or crash. The BIOS setup screens, menus, and items may appear differently depending on the model and BIOS version.
Settings • Save: Save the changes and restart the device. • Exit: Restart the device without saving the changes. Setup menus • SysInfo: View the basic specifications of the device. • Advanced: Configure the advanced settings and perform the battery calibration. • Security: Configure security functions. • Boot: Configure boot-related settings. Setting the boot password Setting a password with the BIOS enhances protection against viruses and hacking attacks. On the BIOS screen, tap Security.
Settings Setting a boot password To set a user password or HDD password, you must set the supervisor password first. 1 2 Tap Set Supervisor Password, Set User Password, or Set HDD Password. Enter a password and tap Ok. The password can be up to 20 characters long. 3 4 Enter the password again and tap Ok. Tap Save to save the password and restart the device. Removing a password 1 2 3 Tap Set Supervisor Password, Set User Password, or Set HDD Password. Enter the password and tap Ok.
Settings Smart Battery Calibration If the battery is charged or discharged repeatedly over a short period, the actual battery power and the detected remaining battery power may be different. Performing a battery calibration will discharge the battery completely to ensure more accurate battery level detection. The battery calibration will take three to five hours. The time may differ depending on the remaining battery level. 1 2 3 4 Fully charge the battery. Disconnect the charger from the device.
Appendix Troubleshooting Before contacting a Samsung Service Centre, please attempt the following solutions. Some situations may not apply to your device. When you turn on your device or while you are using the device, it prompts you to enter one of the following codes: • Password: When the device lock feature is enabled, you must enter the password you set for the device.
Appendix The touchscreen responds slowly or improperly • If you attach a screen protector or optional accessories to the touchscreen, the touchscreen may not function properly. • If you are wearing gloves, if your hands are not clean while touching the touchscreen, or if you tap the screen with sharp objects or your fingertips, the touchscreen may malfunction. • The touchscreen may malfunction in humid conditions or when exposed to water. • Restart your device to clear any temporary software bugs.
Appendix Resetting the device If the methods above do not solve your problem, perform a factory data reset. On the taskbar, tap → Samsung → Samsung Recovery → Factory image → Recover → Recover → OK. Before performing the factory data reset, remember to make backup copies of all important data stored in the device. If Windows does not start, turn on your device and press the F4 key several times immediately before the Samsung logo appears, to launch Samsung Recovery.
Appendix Your device is hot to the touch When you use apps that require more power or use apps on your device for an extended period of time, your device may feel hot to the touch. This is normal and should not affect your device’s lifespan or performance. If the device overheats or feels hot for a prolonged period, do not use it for a while. If the device continues to overheat, contact a Samsung Service Centre.
Appendix • Your device supports photos and videos captured with the device. Photos and videos captured by other devices may not work properly. • Your device supports multimedia files that are authorised by your network service provider or providers of additional services. Some content circulated on the Internet, such as ringtones, videos, or wallpapers, may not work properly. Another Bluetooth device is not located • Ensure that the Bluetooth wireless feature is activated on your device.
Appendix Windows recovery function If the Samsung Recovery app is not supported, reinstall Windows using the Windows recovery function. Reinstalling Windows will erase all apps and data on the device. Back up important apps and data to an external storage device before reinstalling Windows. After Windows is reinstalled, you can install the required Samsung apps. 1 2 3 On the taskbar, tap → → Update & security → Recovery. Tap Get started. Tap Keep my files or Remove everything.
Copyright Copyright © 2017 Samsung Electronics This manual is protected under international copyright laws. No part of this manual may be reproduced, distributed, translated, or transmitted in any form or by any means, electronic or mechanical, including photocopying, recording, or storing in any information storage and retrieval system, without the prior written permission of Samsung Electronics. Trademarks • SAMSUNG and the SAMSUNG logo are registered trademarks of Samsung Electronics.