BP68-00383B_Quick Guide 2005/01/28 10:20 AM Page 1 HC-R4245W List of Parts Accessories Once you have unpacked your TV, check to make sure that you have all the parts shown here. If any piece is missing or broken, call your dealer.
BP68-00383B_Quick Guide 2005/01/28 10:20 AM Page 2 Connecting VHF and UHF Antennas If you do not have a cable system, you will need to connect an antenna to your TV. Antennas with 300-ohm Flat Twin Leads If your antenna looks like this: it has 300-ohm flat twin leads. 1 Place the wires from the twin leads under the screws on the 300-75 ohm adaptor (not supplied). Use a screwdriver to tighten the screws. 2 Plug the adaptor into the “ANT 1 IN (Air)” terminal on the rear panel.
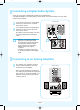
BP68-00383B_Quick Guide 2005/01/28 10:20 AM Page 3 Connecting Cable TV You can connect different cable systems to your TV, including cable without a cable box, and cable with a cable box that descrambles some or all channels. Cable without a Cable Box If you want to connect cable, and you do not need to use a cable box: 1 Plug the incoming cable into the “ANT 2 IN (Cable)” terminal on the rear panel.
BP68-00383B_Quick Guide 2005/01/28 10:21 AM Page 4 Connecting to a Cable Box that Descrambles Some Channels If your cable box descrambles only some channels (such as premium channels), follow the instructions below. You will need a two-way splitter, an RF (A/B) switch, and four lengths of coaxial cable. (These items are available at most electronics stores.) 1 Find and disconnect the cable that is connected to the ANTENNA IN terminal on your cable box.
BP68-00383B_Quick Guide 2005/01/28 10:21 AM Page 5 Connecting a VCR These instructions assume that you have already connected your TV to an antenna or a cable TV system (according to the instructions on pages 14~17). Skip step 1 if you have not yet connected to an antenna or a cable system. 1 Connect a coaxial cable between the “ANT 1 IN (Air)” (or “ANT 2 IN (Cable)”) terminal on the TV and the antenna out terminal on the VCR. A coaxial cable is usually included with a VCR.
BP68-00383B_Quick Guide 2005/01/28 10:21 AM Page 6 Connecting a Camcorder The side panel jacks on your TV make it easy to connect a camcorder to your TV. They allow you to view the camcorder tapes without using a VCR. 1 Locate the A/V output jacks on the camcorder. They are usually found on the side or rear of the camcorder. 2 Connect a set of audio cables between the “AV 3 (L, R)” jacks on the TV and the AUDIO OUT jacks on the camcorder.
BP68-00383B_Quick Guide 2005/01/28 10:21 AM Page 7 Connecting a DVD Player or DTV Set-Top Box(480i, 480p, 720p, 1080i) The rear panel jacks on your TV make it easy to connect a DVD player or DTV Set-Top Box to your TV. Connecting to Y, PB, PR 1 Connect a set of audio cables between the “COMPONENT IN 1 (L, R)” (or “COMPONENT IN 2 (L, R)”) jacks on the TV and the AUDIO OUT jacks on the DVD player (or DTV Set-Top Box).
BP68-00383B_Quick Guide 2005/01/28 10:21 AM Page 8 Connecting a Digital Audio System There are many types of digital audio systems on the market today. A simplified illustration of an audio system is shown below. For more information, see your audio system owner’s manual. 1 If your audio system has a coaxial digital audio input, connect to the “COAXIAL OUT” jack on the TV. 2 If your audio system has a optical digital audio input, connect to the “OPTICAL OUT” jack on the TV.
BP68-00383B_Quick Guide 2005/01/28 10:21 AM Page 9 Remote Control You can use the remote control up to about 23 feet from the TV. When using the remote, always point it directly at the TV. You can also use your remote control to operate your VCR, DVD, Cable box and Samsung Set-top boxes. Œ POWER Turns the TV on and off. ´ ANTENNA Press to select “Cable” or “Air”. ˇ GUIDE Press to display the on-screen Electronic Program Guide(EPG). ¨ NUMBER BUTTONS Press to select channels directly on the TV.
BP68-00383B_Quick Guide 2005/01/28 10:21 AM Page 10 Turning the TV On and Off Press the POWER button on the remote control. You can also use the POWER button on the front panel. Adjusting the Screen Automatically (Self Focus) The “Self Focus” feature automatically sets the optimum picture quality when blurring, overlapping colors or incorrect focus occurs. These conditions may be caused by moving your TV. Activating the Automatic Execution of the Self Focus 1 TV Press the MENU button.
BP68-00383B_Quick Guide 2005/01/28 10:21 AM Page 11 Deactivating the Automatic Execution of the Self Focus Once set, the “Self Focus” feature starts on default. It will automatically begin 10 minutes after switching on the power and the appearance of the screen image. To set the optimum picture quality, the “Self Focus” will automatically begin again after another 30 minutes, as the screen image is then fully stabilized. 1 TV Press the MENU button.
BP68-00383B_Quick Guide 2005/01/28 10:21 AM Page 12 Adjusting Convergence Manually If the color appears spread out or “smeared” on the screen, the convergence probably needs alignment. Be sure to use the remote control for the convergence adjustments. 1 TV Press the MENU button. Press the … or † button to select “Picture”, then press the ENTER button.
BP68-00383B_Quick Guide 4 5 2005/01/28 10:21 AM Page 13 If a horizontal line is visible, use the … or † button to move the line so that it is superimposed on the horizontal center-line (i.e., make a single horizontal line that is as white as possible.). Red Please Use Remote Control. If a vertical line is visible, use the œ or √ button to move the line so that it is superimposed on the verticalcenter line (i.e., make a single vertical line that is as white as possible.
BP68-00383B_Quick Guide 2005/01/28 10:21 AM Page 14 Viewing the Menus and On-Screen Displays Viewing the Menus 1 With the power on, press the MENU button. TV The “Input” menu appears on the screen. Its left side has six icons: Input, Picture, Sound, Channel, Setup and Guide. 2 Press the … or † button to move to items in the menu (the icons become animated when highlighted). Press the œ or √ button to display, change or use the selected items. Press the ENTER button to enter items in the menu.
BP68-00383B_Quick Guide 2005/01/28 10:21 AM Page 15 Memorizing the Channels Your TV can memorize and store all of the available channels for both “off-air” (antenna) and cable channels. After the available channels are memorized, use the CH and CH buttons to scan through the channels. This eliminates the need to change channels by entering the channel digits.
BP68-00383B_Quick Guide 4 2005/01/28 10:21 AM Page 16 Press the … or † button to select the antenna connection, then press the ENTER button. TV Air Cable Air + Cable • Air : “Air” antenna signal Cable : “Cable” antenna signal Air+Cable : “Air” and “Cable” antenna signals When selecting Cable TV system: Press the … or † button to select “Cable”, then press the ENTER button. TV Start Start Start Auto Program Select the antennas to memorize.
BP68-00383B_Quick Guide 2005/01/28 10:21 AM Page 17 Viewing an External Signal Source Use the remote control to switch between viewing signals from connected equipment, such as VCRs, DVD, Set-Top box and the TV source (broadcast or cable). Setting the Signal Source 1 Input TV Press the MENU button. Source List Edit Name Anynet Press the ENTER button to select “Input”. 2 Press the ENTER button to select “Source List”.
BP68-00383B_Quick Guide 2005/01/28 10:21 AM Page 18 Troubleshooting If the TV seems to have a problem, first try this list of possible problems and solutions. If none of these troubleshooting tips apply, then call your nearest Samsung authorized service center. Poor picture quality. Try another channel. Adjust the antenna. Check all wire connections. No color, wrong colors or tints. Make sure the program is broadcasted in color. Adjust the picture settings.
BP68-00383B_Quick Guide 2005/01/28 10:21 AM Page 19 Memo English-19
BP68-00383B_Quick Guide 2005/01/28 10:21 AM Page 20