450S 460S 470S/477S LED TV Installation manual Thank you for purchasing this Samsung product. To receive more complete service, please register your product at www.samsung.com/register Model Serial No.
Figures and illustrations in this User Manual are provided for reference only and may differ from actual product appearance. Product design and specifications may be changed without notice. Introduction This TV B2B (Business to Business) model is designed for hotels or the other hospitality businesses, supports a variety of special functions, and lets you limit some user (guest) controls. Operational Modes This TV has two modes : Interactive and Stand-alone mode.
Contents yy Operational Modes....................................................................................................................................... 2 yy Still image warning........................................................................................................................................ 2 yy Ensuring Proper Ventilation........................................................................................................................... 2 yy Additional Information...
Accessories ✎✎ Please make sure the following items are included with your LED TV. If any items are missing, contact your dealer. ✎✎ The items’ color and shape may vary, depending on the model. ✎✎ The parts for the stand are listed under Stand Components on the following page.
Installing the LED TV Stand Components When installing the stand, use the provided components and parts.
Using the TV's Controller The TV’s Controller on the bottom right side of the TV, lets you control the TV without the remote control. : Turns the TV on or off. Control Menu / : Changes channels. / : Adjusts the volume. : Switchs the available video sources. Remote control sensor/TV Controller ✎✎ If you press it first, the control menu appears. You can select the function by pressing and holding the TV’s controller. ✎✎ The product color and shape may vary depending on the model.
The Connection Panel HD450S 3 2 1 AUDIO OUT 4 HDMI IN 2 (DVI) HDMI IN 1 (STB) ANT IN 5 6 English 7
HD460S AV IN 1 2 7 AUDIO OUT EX-LINK 4 3 HDMI IN 5 ANT IN HD470S / HD477S 8 7 DATA AV IN 1 AUDIO OUT EX-LINK 2 4 8 English ANT IN 5 HDMI IN1 3 HDMI IN 2 (DVI) 3 HDMI IN 3 (ARC)
✎✎ connect an external device to your TV, make sure that the TV and the device are turned off. ✎✎ When connecting an external device, match the color of the connection terminal to the cable. 1 COMPONENT/AV IN –– Used to connect with DVD players, Blu-ray players, cable boxes, STB satellite receivers, VCRs. ✎✎ For better picture quality, we recommend the Component connection over the A/V connection.
Display Modes You can also select one of the standard resolutions listed in the Resolution column. The TV will automatically adjust to the resolution you choose. After connecting a computer to the TV, set the screen resolution for the TV on the computer. The optimal resolution is 1920 x 1080 @ 60 Hz. If it is set to any other than in the table below, the TV may display nothing. Set the resolution properly, referring to the user guide of the computer or its graphic card.
✎✎ Optimal resolution is 1920 X 1080 @ 60 Hz. Display Mode IBM MAC VESA DMT 720 x 400 Display Format 70Hz Horizontal Frequency Vertical Frequency Pixel Clock Sync Polarity (kHz) (Hz) (MHz) (H/V) 31.469 70.087 28.322 -/+ 640 x 480 67Hz 35.000 66.667 30.240 -/- 832 x 624 75Hz 49.726 74.551 57.284 -/- 1152 x 870 75Hz 68.681 75.062 100.000 -/- 640 x 480 60Hz 31.469 59.940 25.175 -/- 640 x 480 72Hz 37.861 72.809 31.500 -/- 640 x 480 75Hz 37.500 75.000 31.
Using the TV's remote Controller Turns the TV on and off. Display and select the available video sources. Press to access channels directly. Press to select additional digital channels being broadcast by the same station. For example, to select channel ‘54-3’, press ‘54’, then press '-' and ‘3’. Return to the previous channel. Cut off the sound temporarily. ¢ Adjust the volume. VOL CH CH LIST Display the channel list on the screen. Change channels. HOME: Swich to the HOME Screen.
Installing the batteries (Battery size: AAA) Rear of the Remote ✎✎ After you have installed the batteries, use a screwdriver to screw in the screw that holds the battery cover closed. Installing Batteries into the Remote (battery size: AAA) Match the polarity of the batteries to the symbol in the batter compartment. ✎✎ NOTE • Use the remote control within 23~33 feet of the TV. • Bright light may affect the performance of the remote control. Avoid using near fluorescent lights or neon signs.
Connecting the TV to the Lodgenet game controller or a STB of a SI vendor HD470S/HD477S TV Rear Panel ETH MODEM Data Cable 1. Connect the DATA jack of the TV to the ETH MODEM jack of the STB (SBB) with the Data cable. ✎✎ The "ETH MODEM" jack name that you connect the Data Cable to may differ depending on the SBB or STB type.
¦¦ List of SI Vendors and Compatible Data Cables Supplied with the TV • Confirm you are using the correct data cable for your SI vendor. Refer to the code label on the data cables. • Contact your nearest dealer or your SI Vendor to buy the data cable not included in the TV. Note the labeled end. SI Vendor Cable code Confirm the code on the Code Label Note the labeled end.
Connecting the Audio Output to an Audio Amplifier TV Rear Panel AUDIO IN AUDIO OUT Audio Amplifier 1S tereo cable 1. Connect the AUDIO OUT port of the TV to the Audio In port of an audio amplifier with a stereo cable.
Connecting the RJP (Remote Jack Pack) Connect the input jacks on the TV to the RJP. The RJP lets guests connect audio and video sources to the TV.
• RJP (Remote Jack Pack): The RJP is a hardware module that has different Audio Video inputs (A/V, Audio, PC and HDMI) and corresponding outputs. The corresponding outputs are connected from the RJP to the TV. The RJP communicates with the TV via RS232. The RJP communicates with the TV by sending messages regarding Active/ Inactive sources. –– A group of hotel menu items let you assign numbered priorities to the jacks of the RJP. (See page 21). 1 is the highest priority and 3 is the lowest.
Setting the Hotel Option Data To let you control how the TV functions when in Hotel mode, the TV has two Hotel mode menus, the Stand-alone mode menu and the Interactive mode menu. The menu items that differ between the menus are listed below. Menu items in the Stand-alone mode only: –– SI Vendor : OFF / Smoovie / SSCP –– REACH Server and its submenus. Menu items in the Interactive mode only: –– SI Vendor: Samsung and other vendors.
¦¦ Menu Items To Enter this menu: Press the MUTE → 1 → 1 → 9 → ENTER E buttons in order. To exit from this menu : Power Off (or Power Off and unplug if you have changed SI Vendor), and then turn on again. Any changes you made are saved. HD460S / HD470S / HD477S Menu Item initial Value Description Select the Hospitality mode.
Menu Item initial Value Picture Menu Lock OFF Menu Display ON Tools Display OFF Channel Menu Display OFF Panel Button Lock Unlock Home Menu Display ON Menu OSD Home Menu Editor Enable or disable the Picture Menu. • ON : The Main Menu is displayed. • OFF : The Main Menu is not displayed. • ON : The tools quick acess is displayed. • OFF : The tools quick acess is not displayed. • ON : The auto program is displayed. • OFF : The auto program is not displayed.
Menu Item initial Value Description Adjusts the brightness of the TV to reduce power consumption. • Off: Turns off the energy saving function. Eco Solution Energy Saving Off • Low: Sets the TV to low energy saving mode. • Medium: Sets the TV to medium energy saving mode. • High: Sets the TV to high energy saving mode. Welcome Message OFF Edit Welcome Message Hospitality Logo Displays a the Welcome Message for 5 seconds when the TV turns On. Edits the Welcome Message.
Menu Item initial Value Description Configures CAS support. OFF : Turns off CAS support. OFF DRM Mode 477S: Pro:Idiom LYNK DRM : Select to turn on S-LYNK DRM CAS support only. Pro:idiom : Select to turn on Pro:Idim CAS support only. (only for 477S and above models) LYNK DRM,PI : Select to have the TV support S-LYNK DRM CAS and Pro:Idiom CAS. (only for 477S and above models) DRM PI AES Data 0x0000 PI AES Log OFF View PI AES Log … Displays the current state of Pro:Idiom AES.
HD450S Menu Item initial Value Description Set the default values that will be applied when the TV is turned on. Power On Channel Last Saved • User Defied : Lets you set Power On Channel and Channel Type manually. See Power On Channel and Channel Type below. • Last Saved : If you select this item, when the TV is turned on, it displays the channel it was displaying when it was turned off. Power On Channel Num … When the TV is turned on, it switches automatically to this channel.
Menu Music Mode External Source Item initial Value Description Music Mode AV OFF Allows music output from an mp3/audio player connected to an AV Input Source on the TV. When on, you can hear sound from the player through the TV whether there is a video signal or not. Also mutes the video so the TV does not display a picture when a guest is playing music. The TV's backlight, however, remains on. … Allows music output from an mp3/audio player connected to an PC Input Source on the TV.
¦¦ Using the Sports(or Soccer) Mode Sports(or Soccer) Mode t ✎✎ MENU m → Applications → Sports(or Soccer) Mode → ENTER E This mode provides optimized condition for watching sports games. • a (Zoom): Pause playback and divide the picture into 9 parts. Select a part to zoom it in. Press this button again to resume. ✎✎ If you turn the TV off while watching Sports(or Soccer) Mode, the Sports(or Soccer) Mode will be disable.
¦¦ Hotel Logo (not available for 450S) The Hospitality Logo function displays the Hotel's picture image when the TV is powered on. –– Hospitality Logo settings are the Hotel mode menus. –– The Logo Download and Logo Display Menu items are enabled when you turn the Hospitality Logo option on. –– If there is a logo image stored in memory and the Hospitality Logo option is on, the Hospitality logo is displayed when the TV is turned on.
¦¦ USB Cloning The USB Cloning function lets you download user-configured settings (Picture, Sound, Input, Channel, Setup, and Hotel Setup) from one TV to a USB device, and then upload these settings from the USB device to other TV sets. This lets you create a standard array of settings and distribute that standard array to all the TVs in your facility. • Cloning from TV to USB: Copies stored menu settings from a TV to a USB device. 1. Insert a USB drive into the USB port on the rear or side of the TV 2.
• Settings Cloned in the Hotel Menu Menu Item Cloning Support Hospitality Mode Yes SI Vendor Yes Power On Channel Yes Power On Channel Num Yes Power On Channel Type Yes Power On Volume Yes Power On Volume Num Yes Min Volume Yes Max Volume Yes Power On Source Yes Power On Option Yes Channel Setup No Channel Editor No Mixed Channel Map No Dynamic SI No Picture Menu Lock Yes Menu Display Yes Tools Display Yes Channel Menu Display Yes Panel Button Lock Yes Home Menu Dis
Menu Item Cloning Support Edit Welcome Message Yes Hospitality Logo No Hospitality Logo DL Yes Logo Display Time Yes Clone TV to USB Yes Clone USB to TV Yes Setting Auto Intialize Yes REACH 3.
¦¦ Multi Code Remocon A Multi Code Remocon is a special remote which is designed to control multiple TVs. This function is useful where there is more than one TV in a location. You can control up to 10 TVs with a different ID code of each remote with no conflicts between the TVs. ID numbers are displayed on each TV's OSD. The Initial ID code for each TV is “0”. –– You can set and reset the ID code in Analog TV mode or PC mode. (Not available in DTV mode.) –– You can set the ID code to any digit from 0 to 9.
¦¦ Setting Auto Initialize When you clone settings from one TV to another, you clone both the guest side menu and hotel side menu settings: Picture, Sound, Input, Channel, Setup, and Hotel Setup. This lets you set nearly all of the menu values on your hospitality TVs to the same, standard settings. If you allow guests access to the guest side menus, for example the Picture menu, they can change the settings in those menus so they are no longer standard.
¦¦ Hotel Plug & Play The Hotel Plug & Play function, which automatically performs the Hotel mode selection, Country Setup, Clock Setup, and Picture mode Setup, runs once when power is first turned ON. Setup also runs automatically after you have executed a Service Reset.
HD460S / HD470S / HD477S Self Diagnosis for TV Self Diagnosis for HTV SW Update Service Pattern OFF ATV cable AGC Gain Default DTV OpenCable AGC Gain Default Sound Bar Out If you select TV Reset, the TV resets all values to their factory defaults and then displays the Hospital Plug & Play menu. Go to the first Hospital Plug & Play screen below.
HD450S yy Local Set OSD –– Initially highlighted: BRA_DTV(or ARG_DTV) –– If you press the Enter key after selecting Change, you can change the country.If the country is changed, the TV automatically turns off and on. –– If you select the incorrect country,execute Factory Reset again after entering the Factory menu. –– If you don`t want to change the country,select skip.
HD460S / HD470S / HD477S yy Local Set –– Initially highlighted: US –– If you press the Enter key after selecting Change, you can change the country. –– If the country is changed, the TV automatically turns off and on. –– If you select the incorrect country, execute TV Reset again after entering the Service section of the Hospital Menu.
¦¦ USB Software Upgrade Method Samsung may offer upgrades to the TV’s SW in the future. Please contact the Samsung Hospitality Hot line at the last page to receive information about downloading upgrades and using a USB drive to update the SW by connecting the USB drive containing the upgrade to the USB port located on the TV. When the software is upgraded, video and audio settings you have made will return to their default (factory) settings.
¦¦ Sound Bar (not available for HD450S/460S model) yy Samsung Sound-Bars and Hospitality TVs in 2015 –– Samsung Sound-Bars and hospitality TVs support the ARC feature in HDMI 1.4. If you connect a compatible Samsung Sound-Bar to a compatible Samsung hospitality TV using a single HDMI cable, guests can listen to the TV's sound through the Sound-Bar. –– The item of Sound bar Out in Hospitality Option Menu makes you control to where the TV sound is outputted when the TV is turned on.
¦¦ Channel Bank Editor (Smoovie TV Only) The Channel Bank Editor in conjunction with the SMOOVIE remote lets you control the channels guests have access to. The Channel Bank Editor provides three Banks of channels and lets you select which channels will be available from each bank. SMOOVIE remotes have instalable Bank Cards which correspond to the channel banks in the Channel Bank Editor. The remotes only allow access to channels in the channel bank that correspond to the installed card.
Information About SMOOVIE Remote Controls Channel Bank Editor Registered 3 ----- (Air) 4 ----- (Air) 6 ----- (Air) 9-1 ----- (Air) 11 ----- (Air) 13 ----- (Air) 14 ----- (Air) 15 ----- (Air) 28 ----- (Air) 63-1 Bank1 (0) Bank2 (0) Bank3 (0) SY5000 Select All Items On Column Deselect All Items On Column Select Return • If you select SMOOVIE as the SI vendor, you should also use SMOOVIE remotes in your facility.
¦¦ Channel Editor (not availiable for 450S model) The Channel Editor lets you edit the channels stored in the TV's memory. Using Channel Editor you can: –– Change the channel numbers and names, and sort the channels in your desired channel number order. –– Apply the video mute to channels you select. The video mute blanks out the video from a channel and outputs only the sound while displaying a speaker icon on the screen.
The picture below shows a sample Channel Editor screen. 20-2 22 ----- (Air) 27 ----- (Air) 30 ----- (Air) 50-1 CH 50.1 50-2 CH 50.2 50-3 CH 50.3 50-4 CH 50.4 51-1 KUSI-HD 72 ----- (Cable) 73 ----- (Cable) 81 ----- (Cable) HDMI1 HDMI2/DVI HDMI3 AV • a Indicates an analog channel. • Channels without an a are digital channels. ✎✎ If Dynamic SI in the Hospitality Option Menu is On, Channel Editor will display no digital channels.
When you press the TOOLS button, the following menu is available 20-2 27 ----- (Air) 50-1 CH 50.1 50-3 CH 50.3 51-1 KUSI-HD 73 ----- (Cable) HDMI1 HDMI3 • Edit Channel Number Edit Channel Number Use Edit Channel Number to change the channel number of a channel you select. To change a channel number, follow these steps: 4 1. Select a channel on the Channel Edit screen. Cancel 2. Press the TOOLS button on your remote. E Space Adjust Number Edit U Channel 3.
The external sources of this TV are displayed in the last page of the Channel Editor menu as shown in the example below. In the example, there are four external sources connected to the TV, HDMI1, HDMI2(DVI), HDMI3 and AV. –– You can assign a new analog channel to an external source by selecting the source on the last page, pressing the TOOLS button, selecting Edit Channel Number, and then using the up or down arrow button on the remote to select the channel number of the analog channel.
Installing the Wall Mount [ Wall or Ceiling Mounting If you mount this product on a wall, it should be mounted only as recommended by the manufacturer. Unless it is correctly mounted, the product may slide or fall, causing serious injury to a child or adult, and serious damage to the product. Preparing before installing Wall-Mount Before installing any other wall mounting kit,assemble the wall mount adapter provided separately with the TV. ✎✎ The product shape may differ depending on the model.
Securing the TV to the Wall [ Caution Pulling, pushing, or climbing onto the TV may cause the TV to fall. In particular, ensure that your children do not hang over or destabilize the TV; doing so may cause the TV to tip over, resulting in serious injuries or death. Follow all safety precautions provided on the included Safety Flyer. For added stability, install the anti-fall device for safety purposes, as follows. To Avoid the TV from Falling 1.
Anti-theft Kensington Lock The Kensington Lock is a device you can use to physically fix a TV to a location when you use it in a public place. The appearance and locking method may differ from the illustration at right, depending on the manufacturer. Refer to the manual provided with the Kensington Lock for additional information on proper use. 1 The Kensington Lock is not supplied by Samsung. ✎✎ Please find a “K” icon on the rear of the TV. A Kensington slot is beside the “K” icon.
Specifications Environmental Considerations Operating Temperature 50°F to 104°F (10°C to 40°C) Operating Humidity 10% to 80%, non-condensing Storage Temperature -4°F to 113°F (-20°C to 45°C) 5% to 95%, non-condensing Storage Humidity Model Name HG32ND450S HG32ND460S Display Resolution 1366 x 768 Screen Size 32” Class (31.5” measured diagonally) (Diagonal) Sound (Output) 5W x 2 Dimensions (WxDxH) Body 745.4 x 69.0 x 442.2 mm 745.4 x 69.0 x 442.2 mm With stand 745.4 x 150.5 x 466.6 mm 745.
Supported Video Formats File Extention Container Video Codec DivX 3.11/4.x/5.x/6.x *.avi / *.mkv *.asf / *.wmv *.mp4 / *.3gp *.vro / *.mpg *.mpeg / *.ts *.tp / *.trp *.mov / *.flv *.vob / *.svi *.divx AVI MKV ASF MP4 3GP MOV FLV VRO VOB PS TS *.webm WebM MPEG4 SP/ASP Resolution Frame rate(fps) Bit rate(Mbps) 1920 x 1080 30 640 x 480 8 H.
Supported Subtitle Formats • Internal • External Name File extension Name Container ormat MPEG-4 timed text .ttxt Xsub AVI Picture Format SAMI .smi SubStation Alpha MKV Text Format SubRip .srt SubViewer .sub Advanced SubStation Alpha MKV Text Format Micro DVD .sub or .txt SubRip MKV Text Format MPEG-4 timed text MP4 Text Format SubStation Alpha .ssa Advanced SubStation Alpha .ass Powerdivx .
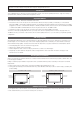
Dimensions yy Front view / Side view HG32ND450S 7 8 1 2 3 4 5 6 9 (unit: mm) HG32ND450S 1 745.4 2 699.7 3 394.3 4 433.9 5 442.2 6 466.6 7 37.3 8 69.0 9 150.5 HG32ND460S 7 8 1 2 3 4 5 6 9 (unit: mm) HG32ND460S 1 745.4 2 699.7 3 394.3 4 433.9 5 442.2 6 466.6 7 37.3 8 69.0 9 150.
HG32ND470S / HG32ND477S 7 8 1 2 3 4 5 6 9 (unit: mm) HG32ND470S HG32ND477S 52 English 1 2 3 4 5 6 7 8 9 745.4 699.7 394.3 433.9 442.2 466.6 37.3 69.0 150.
yy Rear view HD450S 1 5 4 2 6 3 (unit: mm) HG32ND450S 1 2 3 4 5 6 162.6 133.3 163.0 461.2 200.0 200.0 HD460S / HD470S / HD477S 1 5 4 2 6 3 (unit: mm) 1 2 3 4 5 6 144.6 133.3 163.0 459.5 200.0 200.
yy Stand base view 150.54 150.19 51.85 54 English 150.54 150.19 51.
✎✎ NOTE: All drawings are not necessarily to scale. Some dimensions are subject to change without prior notice. Refer to the dimensions prior to performing installation of your TV. Not responsible for typographical or printed errors.
Contact SAMSUNG WORLD WIDE If you have any questions or comments relating to Samsung products, please contact the SAMSUNG customer care center. Country Customer Care Center Web Site CANADA 1-800-SAMSUNG (726-7864) www.samsung.com/us/support MEXICO 1-800-SAMSUNG (726-7864) www.samsung.com/us/support U.S.A 1-866-894-0524 www.samsung.com/us/support BRAZIL 0800-124-421 or 4004-0000 www.samsung.com/br/support ARGENTINE 0800-555-SAMSUNG (0800-555-7267) www.samsung.