TV LED Hướng dẫn lắp đặt Cảm ơn bạn đã mua sản phẩm của Samsung. Để nhận thêm dịch vụ, xin vui lòng đăng ký sản phẩm của bạn tại www.samsung.
Các hình ảnh và hình minh họa trong Hướng dẫn Sử dụng này chỉ có tính chất tham khảo và có thể khác so với sản phẩm trong thực tế. Thiết kế và thông số kỹ thuật của sản phẩm có thể được thay đổi mà không báo trước. Hướng dẫn TV này có sẵn chức năng tương tác qua bộ giải mã (SBB/STB) được kết nối với TV và với các TV khác trong hệ thống điều khiển bằng máy tính dùng cho khách sạn và các công ty dịch vụ du lịch và khách sạn khác.
Nội dung •• Lắp đặt Chân đế TV LED............................................................................................................................................... 5 •• Lắp đế xoay..................................................................................................................................................................... 6 •• Xem Bảng điều khiển Kết nối........................................................................................................................
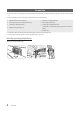
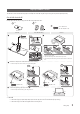
Các phụ kiện ✎✎ Hãy chắc chắn có những phụ kiện sau đây đi kèm với TV LED của bạn. Nếu thiếu bất kỳ phụ kiện nào, hãy liên hệ với đại lý. ✎✎ Màu và hình dạng của các phụ kiện có thể khác nhau tùy theo kiểu máy.
Lắp đặt Chân đế TV LED TV LED 32” trở lên có chân đế xoay. Bạn có thể đặt các chân đế này để xoay TV sang trái và phải 20 độ hoặc 90 độ. Các chi tiết của chân đế Khi lắp đặt chân đế, hãy sử dụng các chi tiết và bộ phận kèm theo. B 1 cái A 1 cái C 32"~55" 32" Chân đế 1 32" x7 (M4 x L12) 43"~55" x8 (M4 x L12) 43"~55" Chân đế dẫn hướng x41-1 C Đinh vít 2 x4 (M4 x L12) B 1-2 2-1 2-2 2-3 A 1-3 ✎✎ Đặt một khăn mềm lên mặt bàn để bảo vệ TV và sau đó đặt úp màn hình TV vào khăn.
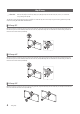
Lắp đế xoay [[ CẢNH BÁO: Nếu bạn lắp để TV có thể xoay được, bạn phải gắn chặt TV vào sàn nhà, bàn, nóc tủ, v.v như mô tả trong hướng dẫn lắp đặt. TV LED 32” trở lên có chân đế xoay. Bạn có thể lắp các chân đế này sao cho TV xoay sang trái và sang phải 20 độ, 60 độ hoặc 90 độ bằng ĐẾ XOAY BẮT VÀO CHÂN ĐỠ. ¦¦ Đế xoay 20° Để lắp TV sao cho có thể xoay TV sang trái và sang phải 20°, hãy lắp ngạnh nằm ở đáy của chân đế qua khe đường cong trên Đế xoay bắt vào chân đỡ được đánh dấu 20°.
¦¦ Bộ giá treo tường khách sạn Bu lông + Đai ốc Bu lông ngắn (2 cái) Bu lông dài (2 cái) Đai ốc (2 cái) Vòng đệm (2 cái) Mặt trên Mặt dưới [ Gắn chân đế vào một bề mặt phẳng như nóc tủ, mặt bàn hoặc kệ TV như minh họa. CẢNH BÁO: Để tránh gây thương tích, bạn phải gắn chặt TV này vào sàn nhà, bàn, nóc tủ, v.v bằng Bộ giá treo tường khách sạn như mô tả trong hướng dẫn này.
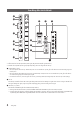
Xem Bảng điều khiển Kết nối 8 9 3 2 1 0 HDMI IN 2 HDMI IN 3 (ARC) 3 HDMI IN 1 LAN OUT ! LAN 4 @ RJP 5 # 6 CLOCK $ 7 6 ✎✎ Mỗi khi kết nối TV với một thiết bị bên ngoài, hãy đảm bảo đã tắt nguồn thiết bị. ✎✎ Khi kết nối một thiết bị bên ngoài, hãy khớp đúng màu của cổng kết nối với cáp. 1 COMPONENT / AV IN ‒‒ Kết nối cáp âm thanh với "[L-AUDIO-R]" trên TV và các đầu còn lại với giắc cắm đầu ra âm thanh tương ứng trên thiết bị A/V.
4 LAN OUT Cổng kết nối mạng LAN có dây được sử dụng để kết nối một thiết bị bên ngoài như máy tính xách tay để kết nối với Internet. (Tuy nhiên, TV phải được kết nối Internet qua mạng LAN có dây.) 5 DATA ‒‒ Được sử dụng để hỗ trợ giao tiếp dữ liệu giữa TV và SBB. ‒‒ Kết nối bằng các ổ cắm loại RJ-12 TV. 6 CLOCK Đặt giờ sau khi kết nối cáp của Đồng hồ bên ngoài với giắc cắm Đồng hồ. Bạn có thể sử dụng chức năng Hiển thị đồng hồ bên ngoài.
Các chế độ hiển thị Bạn cũng có thể chọn một trong những độ phân giải tiêu chuẩn được liệt kê trong cột Độ phân giải. TV sẽ tự động điều chỉnh đến độ phân giải mà bạn chọn. Sau khi kết nối máy tính với TV, hãy thiết lập độ phân giải màn hình cho TV trên máy tính. Độ phân giải tối đa là 1920 x 1080 @ 60 Hz. Nếu độ phân giải được thiết lập khác với bảng bên dưới, TV có thể sẽ không hiển thị gì cả. Hãy thiết lập đúng độ phân giải, vui lòng tham khảo hướng dẫn sử dụng hoặc thẻ đồ họa của máy tính.
Bộ điều khiển TV Nút điều khiển TV là một nút xoay được nhiều chiều, cho phép bạn điều hướng mà không cần dùng điều khiển từ xa. ✎✎ Một số chức năng đòi hỏi mã PIN có thể không khả dụng. ✎✎ Màu sắc và hình dạng của sản phẩm có thể khác nhau tùy theo kiểu máy. ✎✎ Thoát khỏi menu khi nhấn vào nút điều khiển lâu hơn 1 giây. ✎✎ Nút điều khiển của TV là một phím nhỏ giống như cần điều khiển nằm ở dưới cùng bên phải của TV, cho phép bạn điều khiển TV mà không cần điều khiển từ xa.
Xem Điều khiển Từ xa ✎✎ Điều khiển từ xa này có các điểm Chữ nổi trên các nút Nguồn, Kênh và Âm lượng để người khiếm thị có thể sử dụng. ✎✎ Một vài chức năng có thể không khả dụng tùy theo kiểu máy. Bật và tắt TV. Hiển thị và chọn các nguồn video khả dụng. Truy cập trực tiếp các kênh. Màn hình Hướng dẫn chương trình điện tử (EPG). Chọn lần lượt Teletext, Double hoặc Mix. Tắt âm thanh tạm thời. Điều chỉnh âm lượng. Hiển thị danh sách kênh trên màn hình. Hiển thị menu chính trên màn hình.
Lắp đặt pin (Kích cỡ pin: AAA) ✎✎ GHI CHÚ •• Sử dụng điều khiển từ xa cách TV trong khoảng 7m. •• Ánh sáng quá rực rỡ có thể làm ảnh hưởng tới hiệu năng của điều khiển từ xa. Tránh sử dụng gần đèn huỳnh quang hoặc tín hiệu neon đặc biệt. •• Màu sắc và hình dạng có thể khác nhau tùy theo kiểu máy. •• Không hỗ trợ nút điều khiển từ xa 'HOME' '3D'. Khi nhấn các nút này, TV sẽ không phản hồi.
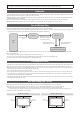
Kết nối TV với SBB hoặc STB Bảng điều khiển ở Mặt sau của TV ETH MODEM Cáp dữ liệu •• Kết nối giắc cắm DATA của TV với giắc cắm [ETH MODEM] của STB (SBB) bằng cáp Dữ liệu. ✎✎ Sử dụng giao tiếp dữ liệu. •• Tín hiệu hồng ngoại được gửi bởi điều khiển từ xa tới TV hoặc SBB / STB phải đáp ứng các thông số kỹ thuật sau để sử dụng chức năng truyền qua hồng ngoại. Đặc điểm kỹ thuật của đầu thu tín hiệu IR ‒‒ Tần số trung tâm lọc băng tần: 37.
Kết nối Loa phòng tắm Bạn có thể kết nối Loa phòng tắm theo các cách sau đây. ¦¦ Kết nối thông qua Đầu ra biến thiên (được cung cấp không có bộ khuếch đại âm thanh bên ngoài) Bảng điều khiển ở Mặt sau của TV 1 Loa 2 VOL+ VOL- Hộp điều khiển âm lượng 1. Kết nối cổng VARIABLE AUDIO OUT của TV với Loa treo tường phòng tắm của khách sạn. Loa + Loa - N/C 2. Kết nối giắc cắm VOL-CTRL của TV với cổng Công tắc hộp điều khiển âm lượng trên Tường phòng tắm của khách sạn. ✎✎ Công suất loa tối đa là 4 W, 8 Ω.
¦¦ Đầu vào mạch âm thanh Có thể lắp thêm Hộp tai nghe trên giường hoặc bàn làm việc để thêm thuận tiện. Các quy trình lắp đặt được nêu ở dưới đây. •• Bản vẽ chi tiết Hộp tai nghe.
Kết nối MediaHub HD Đầu ra tới nguồn ngoại vi được kết nối với MediaHub HD trên bàn của khách sạn. MediaHub HD ở mặt sau HDMI USB Bảng điều khiển ở Mặt sau của TV RS/232 HDMI IN 2 HDMI IN 1 HDMI IN 3 (ARC) LAN OUT 2 Cáp HDMI 1 Cáp dữ liệu RS-232 LAN RJP CLOCK 1. Kết nối cổng RJP của TV và cổng RS/232 của MediaHub HD. 2. Kết nối cổng HDMI IN 1, 2 hoặc 3(ARC) của TV và cổng HDMI của MediaHub HD.
Kết nối RJP (Bộ giắc cắm từ xa) Đầu ra tới nguồn ngoại vi được kết nối với RJP trên bàn của khách sạn. RJP ở mặt sau USB HDMI VIDEO Bảng điều khiển ở Mặt sau của TV AUDIO RS/232 HDMI IN 2 HDMI IN 1 3 Cáp HDMI 4 Cáp dữ liệu RS-232 HDMI IN 3 (ARC) LAN OUT LAN RJP 2 Cáp video 1 Cáp âm thanh CLOCK 1. Kết nối cổng AV IN [VIDEO]/[L-AUDIO-R] của TV với cổng VIDEO của RJP. 2. Kết nối cổng AV IN [VIDEO] của TV với cổng VIDEO của RJP. 3. Kết nối cổng HDMI IN 1, 2 hoặc 3(ARC) của TV và cổng HDMI của RJP.
•• Có thể chuyển RJP về thiết lập mặc định của nhà sản xuất bằng cách nhấn A/V và các nút HDMI cùng một lúc trong 10 giây. Tất cả các đèn LED sẽ nhấp nháy 5 lần để xác nhận đã hoàn tất. •• RJP sẽ tự động tắt mọi đèn LED sau 5 phút để tránh ánh sáng không cần thiết gây khó chịu trong phòng khách sạn. Các đèn LED đã tắt sẽ bật lại nếu khách chạm vào nút bất kỳ và hẹn giờ 5 phút sẽ khởi động lại. Nếu khách chạm vào một nút nguồn khác, TV sẽ chuyển sang nguồn được chọn và đèn LED tương ứng sẽ sáng lên.
Đặt Dữ liệu tùy chọn của khách sạn Để vào: Nhấn các nút MUTE → 1 → 1 → 9 → SelectE theo thứ tự. (Chế độ Độc lập được đặt từ chế độ Khách sạn). Để thoát menu này:tắt nguồn và bật lại. ✎✎ Một số menu không tồn tại ở TV này tùy theo Kiểu máy và Khu vực.
Chức năng TV khách sạn Danh mục Channel Setup Cung cấp cho bạn khả năng truy cập trực tiếp, tức thời vào một số chức năng menu Kênh trong menu Kênh người dùng như Chương trình Tự động, lựa chọn ăng-ten, v.v. Channel Editor Chỉnh sửa kênh cho phép bạn sửa các kênh đã lưu trong bộ nhớ của TV. Sử dụng Chỉnh sửa kênh, bạn có thể: •• Thay đổi số và tên kênh, quản lý nhóm thể loại và ngôn ngữ và xóa kênh. •• Áp dụng chức năng tắt video cho các kênh bạn chọn.
Chức năng TV khách sạn Danh mục Picture Menu Lock Menu Display Menu OSD Mô tả Mục Channel Menu Display Panel Button Lock Clock Type Clock Local Time Bật hoặc tắt Menu hình ảnh. •• ON: Menu chính được hiển thị. •• OFF: Menu chính không được hiển thị. •• OFF: Menu phát sóng phụ bị tắt đối với khách hàng. •• ON: Menu phát sóng phụ được bật cho khách hàng. Bật/tắt hoạt động của bảng điều khiển phía trước (phím trên TV). •• Unlock: Mở khóa tất cả các phím trên bảng điều khiển.
Chức năng TV khách sạn Danh mục Mục Priority AV Remote Jack Pack External Source Cho phép bạn thiết lập mức ưu tiên của đầu cắm 7610 RJP AV. Bạn có thể chọn 1, 2, với 1 là mức ưu tiên cao nhất và 2 là mức ưu tiên thấp nhất. TV tự động hiển thị nguồn với mức ưu tiên cao hơn. Ví dụ, thiết lập AV ở mức 1 và HDMI ở mức 2. Nếu khách hàng gắn một thiết bị vào đầu cắm HDMI, sau đó cắm một thiết bị khác vào đầu cắm AV, TV sẽ tự động chuyển thiết bị được cắm vào đầu cắm AV (đầu cắm với mức ưu tiên cao hơn).
Chức năng TV khách sạn Danh mục Sub AMP Mode Bathroom Speaker Sub AMP Volume Eco Solution Mô tả Mục Xác định chế độ hoạt động Sub AMP. •• 0: Tắt chức năng Sub AMP (tắt PWM). •• 1: Xác định âm lượng của loa Sub theo điều khiển âm lượng chính. •• Nghĩa là, âm lượng loa sub được xác định theo các giá trị Âm lượng khi bật nguồn, Âm lượng tối thiểu và Âm lượng tối đa •• 2: Xác định âm lượng theo cài đặt của bảng điều khiển phòng tắm. Mức âm lượng Sub AMP ở điều kiện ban đầu khi bật nguồn.
Chức năng TV khách sạn Danh mục Mô tả Mục Network Setup Nếu mục này được nhập vào, menu cài đặt mạng sẽ được hiển thị. Menu cài đặt mạng được sử dụng để thiết lập mạng như kết nối internet. Soft AP: Khi sử dụng chức năng này, bạn có thể kết nối TV trên thiết bị di động của bạn. Cài đặt tùy chọn để kết nối với thiết bị Wi-Fi. •• Soft AP: Bật hoặc tắt Soft AP. Khi Soft AP được Bật, thiết bị di động của bạn có thể tìm thấy tên TV trong danh sách kết nối Wi-Fi.
Chức năng TV khách sạn Danh mục Factory Lock Bật/tắt Cửa sổ bật mở nhập mật khẩu. Nếu tùy chọn này đặt là TẮT, TV sẽ không hiển thị cửa sổ bật mở nhập mật khẩu khi mở Menu mặc định của nhà sản xuất. Nếu được đặt là BẬT, cửa sổ bật mở nhập mật khẩu xuất hiện. Password Input Nếu tùy chọn này được bật, một cửa sổ nhập bật mở sẽ xuất hiện và yêu cầu nhập mật khẩu bảo mật gồm 8 ký tự. Người quản lý phải nhập mật khẩu trước khi áp dụng hoặc cập nhật các tùy chọn bảo mật.
Chức năng TV khách sạn Danh mục Mục Self Diagnosisfor TV Self Diagnosis for HTV System Software Update Sound Bar Out Contact Samsung Standby LED TV Reset Home Menu Mô tả Nhập Self Diagnosis Menu. •• Bắt đầu kiểm tra hình ảnh: Sử dụng quá trình kiểm tra này nếu bạn gặp vấn đề với hình ảnh của TV. •• Bắt đầu kiểm tra âm thanh: Sử dụng quá trình kiểm tra này nếu bạn gặp vấn đề với âm thanh của TV. •• Thông tin tín hiệu: Hiển thị thông tin tín hiệu phát sóng kỹ thuật số.
Chức năng TV khách sạn Danh mục Mục REACH RF Mode Bạn có thể bật hoặc tắt REACH RF Mode. Khi thiết lập On, TV có thể vận hành với REACH Server (Modulator) thông qua kênh RF (cáp DTV). REACH IP Mode Bạn có thể bật hoặc tắt REACH IP Mode. Khi thiết lập On, TV có thể vận hành với REACH IP Server thông qua mạng IP. Server URL Setting REACH Channel Group ID REACH Solution REACH Update Time REACH Update Immediate REACH Config Version H.Browser Mode H.
Chức năng TV khách sạn Danh mục HMS Mode HMS Server URL Setting HMS Mô tả Mục HMS Gateway Role Bạn có thể bật hoặc tắt HMS Mode. Khi thiết lập On, TV có thể vận hành với HMS Server thông qua mạng IP. Bạn có thể nhập địa chỉ của HMS Server. (Ví dụ: http://192.168.1.2:8080) Khi có một TV trong mỗi phòng, thiết lập thành 'Master'. Khi có nhiều hơn một TV trong mỗi phòng, thiết lập TV chính thành 'Master' và các TV khác thành 'Slave'. Thiết lập sang On nếu bạn muốn sử dụng HalfTicker UI.
¦¦ Thông báo Chào mừng Thông điệp chào mừng được sử dụng để hiển thị các thông điệp tùy chỉnh trên TV mỗi lần Khách bật TV trong phòng của Khách sạn. ‒‒ Thiết lập thông điệp chào mừng nằm trong menu Tùy chọn khách sạn. ‒‒ Thông điệp chào mừng phải là BẬT để có thể hiển thị thông điệp khi bật nguồn TV. Welcome Message ON Edit Welcome Message Hospitality Logo OFF Hospitality Logo DL ... Logo Display Time ...
¦¦ Logo của Khách sạn Chức năng Logo khách sạn hiển thị hình ảnh của Khách sạn khi mới bật nguồn TV. ‒‒ Thiết lập Logo khách sạn nằm trong các menu chế độ Khách sạn. ‒‒ Các mục Tải xuống logo và menu Hiển thị logo được kích hoạt khi bạn bật tùy chọn Logo khách sạn. ‒‒ Nếu có hình ảnh logo được lưu trên bộ nhớ và tùy chọn Logo khách sạn đang bật, Logo khách sạn sẽ được hiển thị khi bật TV.
¦¦ Sao chép USB Sao chép USB được sử dụng để tải về các cài đặt thiết lập cấu hình người dùng (Hình ảnh, Âm thanh, Đầu vào, Kênh, Cài đặt, và Cài đặt Khách sạn) từ một bộ TV và tải chúng lên các bộ TV khác. Có thể sao chép tất cả thiết lập do người dùng đặt ra từ TV (Thiết bị chính) sang thiết bị USB. ✎✎ Sau khi sao chép, các tính năng nhất định sẽ được áp dụng khi bật lại TV. •• Sao chép TV vào USB: Thao tác này sao chép dữ liệu được lưu từ TV này sang thiết bị USB. 1. Cắm ổ USB vào cổng USB ở mặt sau TV.
¦¦ Cài đặt Tự động Khởi tạo Khi sao chép thiết lập từ một TV sang TV khác, bạn sao chép cả thiết lập menu ở phía khách và menu ở phía khách sạn: Hình ảnh, Âm thanh, Đầu vào, Kênh, Cài đặt, và Cài đặt Khách sạn). Điều này cho phép bạn thiết lập hầu như tất cả các giá trị trong menu trên các TV của khách sạn về một thiết lập tiêu chuẩn và giống nhau.
Mục Menu Sound Output Sound Mode Balance Equalizer Sound HDMI Input Audio Format Expert Settings Digital Output Audio Format Audio Delay Auto Volume Sound Feedback Audio Options Preferred Language Digital Text (MHEG) Broadcasting Primary Teletext Language Expert Settings Teletext Language Settings Secondary Teletext Language Primary Audio Language Secondary Audio Language Clock Mode Time Zone Time Clock System Manager DST Time Zone GMT DST Language Auto Protection Time Anynet+(HDMI-CEC) General
¦¦ Plug & Play Plug & Play Khách sạn tự động thực hiện lựa chọn chế độ Khách sạn, cài đặt quốc gia, thiết lập đồng hồ và thiết lập chế độ hình ảnh. ‒‒ Plug & Play Khách sạn chỉ có sẵn một lần khi nguồn được bật lần đầu tiên. ‒‒ Có thể thực hiện được việc này sau khi thiết lập TV và truyền dữ liệu của TV sao chép sang một ổ USB. ‒‒ Để sử dụng cho TV tiếp theo, bạn chỉ cần thoát Plug & Play Khách sạn, kết nối với USB, sau đó Sao chép USB vào TV. ‒‒ Tùy theo kiểu máy và khu vực, một số menu có thể không có.
•• OSD Thiết lập Khu vực ‒‒ Nếu bạn nhấn nút điều hướng phải sau khi chọn Thay đổi, bạn có thể thay đổi quốc gia. ‒‒ Nếu quốc gia được thay đổi, TV tự động tắt và bật lại. ‒‒ Nếu bạn chọn quốc gia không đúng, hãy thực hiện TV Reset một lần nữa sau khi mở phần System của Menu khách sạn.
¦¦ Multi Code Remocon Multi Code Remocon là một bộ truyền phát đặc biệt được thiết kế để điều khiển từng TV bằng một điều khiển từ xa. Điều này rất hữu ích khi có nhiều TV ở cùng một địa điểm, ví dụ như trong bệnh viện. Số ID đã thiết lập được hiển thị trên menu trên màn hình nguồn. Có thể hỗ trợ tối đa 9 truyền phát phím khác nhau trên điều khiển từ xa khi có nhiều mã. Mỗi TV có một mã ban đầu là "0". ‒‒ Có thể thiết lập và đặt lại mã ID trong chế độ TV analog hoặc chế độ PC.
¦¦ Trình chỉnh sửa Băng Kênh (Chỉ dành riêng cho Smovie TV) Trình chỉnh sửa Băng Kênh chỉnh sửa các kênh, với 3 Tùy chọn Băng khác nhau. Tùy theo thẻ Ngân hàng, có các kênh riêng để khách lưu trú tại Khách sạn có thể thưởng thức. Cài đặt Trình chỉnh sửa Băng Kênh dưới Chế độ Độc lập 1. Vào menu Độc lập của Khách sạn bằng các phím “MUTE → 1 → 1 → 9 → ENTER” 2. Hãy chọn nhà cung cấp SI: “Smoovie” 3. tìm tùy chọn menu mới, “Channel Bank Editor” 4.
5. Chỉnh sửa ngân hàng kênh như ví dụ dưới đây. a. BANK1 (Kênh miễn phí): Chọn kênh sẽ được sử dụng khi điều khiển từ xa không có thẻ. b. BANK2 (Thẻ gia đình - Màu xanh lá): Chọn kênh sẽ được sử dụng khi điều khiển từ xa có THẺ MÀU XANH LÁ. c. BANK3 (Thẻ người lớn - Màu đỏ): Chọn kênh sẽ được sử dụng khi điều khiển từ xa có THẺ MÀU ĐỎ. Tham khảo sử dụng Điều khiển từ xa SMOOVIE 1. Nếu bạn chọn SMOOVIE làm Nhà cung cấp SI, bạn nên sử dụng Điều khiển từ xa SMOOVIE. 2.
¦¦ Trình chỉnh sửa Kênh Trình chỉnh sửa Kênh chỉnh sửa số kênh a và tên kênh. Sử dụng Trình chỉnh sửa Kênh để sắp xếp các kênh theo số kênh mà người dùng mong muốn. Hospitality Mode SI Vendor Standalone OFF System Manager Security Power On DRM Channel System Menu OSD Home Menu Clock REACH Solution Music Mode H.Browser Solution Remote Jack Pack HMS External Source Virtual Standby HP Management Room Number r Channel Editor ...
Trình tự bật Smovie Sử dụng TV Smovie (Vô tuyến / Cáp) Bật bản đồ kênh đã trộn (Sử dụng cả vô tuyến và cáp) Chỉ sử dụng vô tuyến hoặc cáp Chỉ sử dụng vô tuyến hoặc cáp Nếu TV khởi động với P&P Khách sạn Nếu P&P đã hoàn thành Nếu TV khởi động với P&P Khách sạn Nếu P&P đã hoàn thành 1 Thực hiện P&P, ngoại trừ kênh đã lưu (các kênh đã lưu) Vào menu Khách sạn Thực hiện P&P tất cả (Tự động dò Vô tuyến hoặc Cáp) Vào menu Khách sạn 2 Sau khi P&P, TV hiển thị menu khách sạn Thiết lập Bật bản đồ kênh đ
¦¦ Kênh của tôi Xác định quốc gia và thể loại cho các kênh do khách sạn cung cấp và nếu người dùng chọn một quốc gia và thể loại thì hiển thị các kênh tương ứng. •• Bạn phải chọn quốc gia trước, nếu không bạn sẽ không chọn được thể loại. •• Nếu bạn chọn thể loại mà không thêm kênh nào, danh sách kênh sẽ hiển thị tất cả các kênh hiện có. •• Kênh của tôi chỉ hoạt động ở chế độ Độc lập. •• Nhà cung cấp SI ở chế độ Độc lập: Mục này sẽ không hoạt động nếu bạn chọn Smoovie.
¦¦ Thanh Âm thanh •• Loa Sound-Bar và TV khách sạn của Samsung ‒‒ Sử dụng loa Sound-Bar và TV khách sạn của Samsung có hỗ trợ tính năng ARC với HDMI. Nếu bạn kết nối hai thiết bị tương thích của Samsung là loa Sound-Bar và TV khách sạn với nhau bằng một dây cáp HDMI thì khách có thể nghe được âm thanh của TV qua loa Sound-Bar.
¦¦ Chế độ bảo mật Thông số kỹ thuật thiết kế •• Chế độ này nhằm hạn chế một số chức năng như TTX và đầu vào nguồn ngoại vi (HDMI, USB) trong một số thiết bị nhất định như thiết bị hiệu chỉnh. •• Menu Bảo mật được bảo vệ bằng mật khẩu. Truy cập vào menu Bảo mật sẽ bị từ chối nếu không có mật khẩu. •• Thiết lập bảo mật ‒‒ Có thể đặt Thiết lập bảo mật là ON (BẬT) hoặc OFF (TẮT). ‒‒ Mặc định là TẮT. ‒‒ Thiết lập bảo mật: Nếu đặt là Bật, đầu vào nguồn ngoại vi (HDMI, USB) và chức năng TTX sẽ bị tắt.
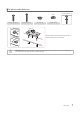
Lắp đặt Giá treo Tường Bộ giá treo tường (được bán riêng) cho phép bạn gắn TV lên tường. Để biết thông tin chi tiết về cách lắp đặt giá treo tường, hãy xem hướng dẫn được cung cấp cùng với giá treo tường. Liên hệ một kỹ thuật viên để hỗ trợ khi lắp đặt giá đỡ treo tường. Chúng tôi khuyên bạn không nên tự lắp đặt. Samsung Electronics không chịu trách nhiệm về bất kỳ hư hỏng nào của sản phẩm hoặc tổn thương của bạn hay người khác khi bạn tự ý lắp đặt TV.
Gắn chặt TV lên tường [ Lưu ý: Hành động kéo, đẩy, hoặc leo lên TV có thể làm TV bị rơi. Nhất là cần bảo đảm rằng trẻ em không đánh đu lên hoặc lay TV; bởi hành động này có thể khiến TV rơi xuống, gây chấn thương nghiêm trọng hoặc chết người. Hãy làm theo tất cả những hướng dẫn an toàn được cung cấp trong Tờ bướm An toàn. Để thêm chắc chắn và an toàn, hãy lắp đặt thiết bị chống rơi như sau. Để TV không rơi xuống 1. Đặt các đinh vít vào trong vòng và siết chặt các đinh vít vào tường.
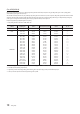
Thông số kỹ thuật Quy định về Môi trường Nhiệt độ Vận hành Độ ẩm Vận hành Nhiệt độ Bảo quản Độ ẩm Bảo quản 10°C tới 40°C (50°F tới 104°F) 10% tới 80%, không tụ hơi nước -20°C tới 45°C (-4°F tới 113°F) 5% tới 95%, không tụ hơi nước Tên Kiểu máy HG32AF690 HG43AF690 Độ phân giải Màn hình 1920 x 1080 1920 x 1080 20˚ / 60˚ / 90˚ 20˚ / 60˚ / 90˚ 80 cm 108 cm 20 W (L:10 W, R:10 W) 20 W (L:10 W, R:10 W) 730.4 x 433.8 x 54.6 mm 730.4 x 483.8 x 192.6 mm 972.9 x 570.1 x 54.0 mm 972.9 x 623.0 x 226.
4 8 Kích thước Mặt trước/Mặt bên 7 1 2 3 5 6 8 4 (Đơn vị: mm) HG32AF690 1 2 3 4 5 6 7 8 730.4 701.4 395.8 451.3 433.8 483.8 54.6 192.6 HG43AF690 972.9 943.9 532.1 559.6 570.1 623.0 54.0 226.5 HG49AF690 1105.8 1076.8 607.0 559.6 645.0 698.0 54.6 226.5 HG55AF690 1241.6 1212.6 683.4 559.6 721.4 774.3 54.5 226.5 Chi tiết bảng giắc cắm/Mặt sau ✎✎ Có thể kiểm tra kích thước chi tiết tại Displaysolutions.samsung.com.
Chi tiết Chân máy HG32AF690 (Đơn vị: mm) 55.9 135.0 R9.5 R3.75 152.0 451.3 192.6 159.8 HG43AF690 / HG49AF690 / HG55AF690 (Đơn vị: mm) 70.0 135.0 R9.5 R3.75 152.0 559.6 226.5 168.7 ✎✎ GHI CHÚ: Tất cả hình vẽ không chính xác theo tỷ lệ. Một số kích thước có thể thay đổi mà không thông báo trước. Hãy tham khảo các kích thước trước khi thực hiện lắp đặt TV. Chúng tôi không chịu trách nhiệm đối với các lỗi đánh máy hay lỗi in ấn.
Giấy phép The terms HDMI and HDMI High-Definition Multimedia Interface, and the HDMI Logo are trademarks or registered trademarks of HDMI Licensing LLC in the United States and other countries. Open Source License Notice Open Source used in this product can be found on the following webpage. (http://opensource.samsung.com) Open Source Licence Notice is written only English.
Liên hệ SAMSUNG WORLD WIDE (SAM SUNG TRÊN TOÀN THẾ GIỚI) Nếu bạn có thắc mắc hay góp ý về sản phẩm của Samsung, vui lòng liên hệ với trung tâm chăm sóc khách hàng SAMSUNG. Quốc gia Trung tâm Chăm sóc khách hàng Trang web SINGAPORE AUSTRALIA NEW ZEALAND VIETNAM www.samsung.com/sg/support www.samsung.com/au/support www.samsung.com/nz/support www.samsung.