DLPTV DLPTV Samsung Electronics of America, Inc. Service Division 400 Valley Road, Suite 201 Mt. Arlington, N.J. 07660 TEL: 1-800-SAMSUNG (1-800-726-7864) www.samsungusa.
Safety Instructions Warning! Important Safety Instructions CAUTION RISK OF ELECTRIC SHOCK DO NOT OPEN CAUTION: TO REDUCE THE RISK OF ELECTRIC SHOCK, DO NOT REMOVE COVER (OR BACK). THERE ARE NO USER SERVICEABLE PARTS INSIDE. REFER ALL SERVICING TO QUALIFIED SERVICE PERSONNEL. This symbol indicates high voltage is present. It is dangerous to make any kind of contact with any part inside this product.
Safety Instructions • Protect the power cord. Power supply cords should be routed so that they won’t be walked on or pinched by objects placed on or against them. Pay particular attention to cords at plugs, convenience receptacles, and the point where they exit from the unit. FCC Information • Unplug the TV from the wall outlet and disconnect the antenna or cable system during a lightning storm or when left unattended and unused for long periods of time.
Table of Contents Your New Wide TV ..........................................................................................10 Special Features ...............................................................................................48 List of Features .....................................................................................................10 Checking Parts.....................................................................................................
SAMSUNG Your New Wide TV
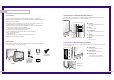
Your New Wide TV List of Features Side Panel Buttons : HLM437W/HLM507W/HLM617W Your TV was designed and engineered using the latest technology. It is a full-featured, high-performance unit that exceeds industry standards. In addition, it has these special features: • • • • • • • • • • • • The buttons on the side panel control your TV’s basic features, including the on-screen menu system. To use the more advanced features, you must use the remote control.
Your New Wide TV Side Panel Buttons : HLM4365W/HLM5065W Front Panel LED Indicators : HLM437W/HLM507W/HLM617W The buttons on the side panel control your TV’s basic features, including the on-screen menu system. To use the more advanced features, you must use the remote control. The three lights on the front panel indicate the status of your TV. Œ TV/VIDEO Press to switch between viewing TV programs and signals from connected components. ´ MENU Press to see the on-screen menu.
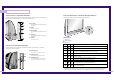
Your New Wide TV Front Panel LED Indicators : HLM4365W/HLM5065W Rear Panel Jacks The three lights on the front panel indicate the status of your TV. Use the rear panel jacks to connect components such as a VCR. You can connect two different components such as two VCRs, Set-Top Box and a DVD player etc., because there are two sets of video input jacks and one set of component video input jacks on the rear panel of your TV. For more information, please see “Connections”.
Your New Wide TV Remote Control Installing Batteries in the Remote Control You can use the remote control up to a distance of about 23 feet from the TV. When using the remote, always point it directly at the TV. The remote control can also operate your VCR, cable box, and DVD player. With normal use, the batteries in the remote control should last about a year. If you notice a performance degradation while using the remote, the batteries may need to be replaced.
SAMSUNG Connections
Connections Connecting VHF and UHF Antennas Separate VHF and UHF Antennas If you do not have a cable system, you will need to connect an antenna to your TV. If you have two separate antennas for your TV (one VHF and one UHF), you must combine the two antenna signals before connecting them to the TV. This requires a combiner attachment, which you can buy at an electronics store. Antennas with 300-ohm Flat Twin Leads If your antenna looks like this: 1 2 it has 300-ohm flat twin leads.
Connections Connecting Cable TV and VCR You can connect different cable systems to your TV, including cable without a cable box, and cable with a cable box that descrambles some or all channels. Connecting a Cable Converter Box This connection allows you to watch cable and premium channels. You should keep your TV selected to ANT-A so that you can use the TV features.
Connections Connecting a Camcorder Connecting a DVD Player The side panel jacks on your TV make it easy to connect a camcorder to your TV. You can use your camcorder to view tapes without using a VCR. The rear panel jacks on your TV make it easy to connect a DVD player to your TV. Connecting to Y,Pb,Pr 1 Locate the A/V output jacks on the camcorder. They are usually found on the side or back of the camcorder.
Connections Connecting a DTV Set Top Box Connecting to Y,Pb,Pr 1 2 Connect a set of audio cables between the Component2 or Component3 AUDIO IN jacks on the TV and the AUDIO OUT jacks on the Set Top Box. 2 Component1 (480i/480p) Connect a set of audio cables between the PC AUDIO IN jacks on the TV and the AUDIO OUT jacks on the Set Top Box.
SAMSUNG Operation
Operation Turning the TV On and Off Selecting the Menu Language Press the Power button on the remote control or on the side panel to turn your TV on and off. Choose a language for the on-screen menus: English, Spanish or French. Viewing the Menus and Displays The on-screen menu system allows you to control the settings of your TV. Access the on-screen menu system by pressing the Menu button on the remote control.
Operation Channel Memory Storing Channels in Memory Automatically Your TV can memorize and store all of the channels available. Once the channels are memorized, you can use the CH and CH buttons to scan through the available channels. 1 First, select the broadcast source as described on the previous page. With the Channel Setup menu on screen, move the joystick down to select “Auto Channel Memory.” 2 Press the joystick to enter. The TV will begin memorizing all of the available stations.
Operation Changing Channels Selecting Your Favorite Channels You can change channels on your TV by using the CH and CH buttons, or by direct selection using the number buttons. You can use the number buttons to tune to any channel (even one that has been erased or has not been memorized). You can store up to ten of your favorite channels for each available input source (such as TV and CATV). Then, when you press the Fav.
Operation Labeling the Channels Setting The On/Off Melody Use this feature to assign an easy-to-remember label to any channel (i.e., “CBS”, “ESPN”, “PBS2”, CNN1”, etc.) A label consists of four fields, where each field is a letter, a number, or a blank. When the DISPLAY button is pressed, the channel label will appear next to the channel number. You can hear clear melody sound when the TV is powered On or Off. 1 Press the Menu button.
Operation Picture Control Using Automatic (“Standard”) Picture Settings Using the remote, you can change the contrast, brightness, tint, color, and sharpness settings of the TV. 1 Press the P.Mode button on the remote control to change the picture settings. 2 Press P.Mode repeatedly to select the “Dynamic”, “Standard”, “Movie” or “Custom” picture setting. Customizing the Picture 1 Press the Menu button. Press the joystick to enter.
Operation Sound Control You can control and customize the sound levels and settings of the TV with the remote control. Using the on-screen menus, you can change the TV’s bass, treble, and balance settings. Adjusting the Volume 3 Move the joystick up or down to select the item you want to change. 4 Move the joystick right or left to raise or lower the value of the item, using the onscreen gauge as your guide. Press VOL + to raise the volume or VOL – to lower the volume.
Operation Setting the Clock Setting the Timers This TV has a built-in clock that will appear on screen when you press the Display button on the remote control. Setting this clock also allows you to use it to automatically turn the TV on or off. This TV can be set to turn on or off automatically at specific times that you choose. Before using the timers, you must set the TV’s clock, as described previously. Setting the On/Off Timer 42 1 Press the Menu button.
Operation 5 Move the joystick right to select off, then move the joystick up or down to select “on”. When any of the timers are set, the “Timer” LED will illuminate (front or side panel of TV.). 6 When you are finished, move the joystick right. 7 If you want to set the Off time, move the joystick down to select the “Off Time”. Set the “Off Time” just as you set the “On Time”. 8 If you want to set the volume level or channel when the TV turns on, move the joystick down to select “On Timer Vol.
SAMSUNG Special Features
Special Features Setting Up Your Remote Control Setting Up the Remote to Operate Your Cable Box This TV’s remote control can operate almost any VCR, cable box, or DVD. After it has been set up properly, your remote control can operate in four different modes: TV, VCR, Cable, or DVD. Pressing the corresponding button on the remote control allows you to switch between these modes, and control whichever piece of equipment you choose. 1 Turn off your cable box.
Special Features Setting Up the Remote to Operate Your DVD 1 Turn off your DVD. 2 Press the MODE button and make sure that the DVD LED is illuminated. 3 Press the SET button on your TV’s remote control. 4 Using the number buttons on your remote control, enter three digits of the DVD code listed on page 47 of this manual for your brand of DVD. Make sure you enter three digits of the code, even if the first digit is a “0.” If there is more than one code listed, try the first one.
Special Features Fine Tuning Channels Selecting the Color Tone Fine tuning lets you manually adjust the TV’s tuner if you have difficulty tuning in a channel. 1 2 3 Using the number buttons on the remote control, select the channel you want to fine tune. Press the Menu button on the remote control. Move the joystick down to select SETUP, then press the joystick to enter. Press the joystick to enter in the Channel setup menu. 1 Press the Menu button. Press the joystick to enter.
Special Features DNIeTM (Digital Natural Image engine) Digital Noise Reduction Samsung’s New Technology enables an improved image with detail, contrast and white enhancement and 3D noise reduction. If the broadcast signal received by your TV is weak, you can activate the Digital Noise Reduction feature to help reduce any static and ghosting that may appear on the screen. 1 Press the Menu button. Press the joystick to enter.
Special Features Setting the Blue Screen Mode Changing the Screen Size If no signal is being received or the signal is very weak, a blue screen automatically replaces the noisy picture background. If you wish to continue viewing the poor picture, you must set the “Blue screen” mode to “Off”. When you press the ASPECT button on the remote control, the TV’s screen mode choices appear in sequence. The screen displays in this order: Wide, Panorama, Zoom1, Zoom2, Normal.
Special Features NOTES • • • • • You can select only Wide, Normal(4:3) screen size in the Component Mode. Screen size can’t be changed in the DVI and PC (1080i) mode. You can select Wide(TV), Wide(PC) screen size in the DVI and PC (720p) Mode. You can select Wide(TV), Wide(PC), Normal(4:3) screen size in the DVI and PC (480p) Mode. If you set PIP ON in any mode (Normal, Panorama, Zoom1, Zoom2) except Wide, the mode will automatically change to Wide.
Special Features Dolby Virtual BBE This feature allows the TV’s L/R speakers to provide a home Theater-like Dolby effect. The center and surround sounds are mixed into the L/R speakers. BBE is a built-in effect that adds clarity, punch and dynamics to the sound. 1 Press the Menu button. Move the joystick down to select SOUND, then press the joystick to enter. 1 Press the Menu button. Move the joystick down to select SOUND, then press the joystick to enter.
Special Features Auto Volume Each broadcasting station has its own signal conditions, and it is inconvenient to adjust the volume every time the channel is changed. “Auto volume” automatically adjusts the volume of the desired channel by lowering the sound output when the modulation signal is high or by raising the sound output when the modulation signal is low. 1 Press the Menu button. Move the joystick down to select SOUND, then press the joystick to enter.
Special Features Viewing Picture-in-Picture Selecting an External Signal One of the most best features of your TV is the Picture-in-Picture (PIP) feature. The advanced PIP system allows you to watch two different pictures at once, even if you don’t have a VCR connected to your TV. You can use PIP to view a signal from an external source, such as a VCR. Selecting a PIP Screen 1 2 3 Press the Menu button. Move the joystick down to select PIP, then press the joystick to enter.
Special Features Selecting a Signal Source (Antenna or Cable) for PIP Swapping the Contents of the PIP and Main image If the PIP source is TV during PIP ON, you can select the broadcasting source of PIP picture separately from the main picture. (If the main picture is ANT-B and the broadcasting sources are different, making adjustments is necessary.) 1 2 3 4 Press the Menu button. Move the joystick down to select PIP, then press the joystick to enter. Move the joystick down to select “Air or CATV”.
Special Features Changing the Size of the PIP image Changing the Picture-in-Picture Channel After you set the PIP signal source (antenna or cable), it is easy to change channels. 1 Press the Menu button. Move the joystick down to select PIP, then press the joystick to enter. Quick way to access PIP Size: Just press “Size” on the remote control. 1 Press the Menu button. Move the joystick down to select PIP, then press the joystick to enter.
Special Features Selecting the Sound Source You can use this feature to hear sound from the Main or PIP screen. 1 2 Press the Menu button. Move the joystick down to select PIP, then press the joystick to enter. Using the V-Chip The V-Chip feature automatically locks out programming that is deemed inappropriate for children. The user must first enter a PIN (personal ID number) before any of the V-Chip restrictions can be set up or changed.
Special Features How to Enable/Disable the V-Chip 1 Press the Menu button. Move the joystick down to select SETUP, then press the joystick to enter. 3 TV-Y TV-Y7 TV-G TV-PG TV-14 TV-MA Move the joystick down to select V-chip, then press the joystick to enter. The “Enter PIN” screen will appear. Enter your 4-digit PIN number. 2 The “V-Chip” screen will appear, and “V-Chip Lock” will be selected. To enable the V-Chip feature, move the joystick right so that the “V-Chip Lock” field is On.
Special Features : 5 How to set the FV, D, L, S and V sub-ratings: First, select one of these TV-Ratings: TV-Y7, TV-PG, TV-14 or TV-MA (See Step 4, on previous page.) Next, while the TV-Rating is selected, repeatedly move the joystick right. This will cycle through the available sub-ratings (FV, L, S, D or V). A letter (“U” or “B”) will be displayed for each sub-rating. While the “U” or “B” is selected, move the joystick down or up to change the sub-rating.
SAMSUNG PC Display
PC Display Using Your TV as a Computer (PC) Display How to Set up Your PC Software (Windows only) How to connect Your PC to the TV Note: This figure shows the Standard Connector-jack panel. The actual configuration on your TV may be different, depending on the model. The Windows display-settings for a typical computer are shown below. The actual screens on your PC will probably be different, depending upon your particular version of Windows and your particular video card.
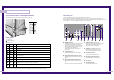
PC Display How to Set up Your TV as a PC display Display Modes Mode VGA Resolution 640x350 720x400 720x400 640x480 640x480 640x480 640x480 640x480 SVGA 800x600 800x600 800x600 800x600 800x600 832x624 XGA 1024x768 1024x768 1024x768 DTV 1920x1080i 1280x720p 720x483p Total 800x449 900x449 936x446 800x525 864x525 832x520 840x500 832x509 1024x625 1056x628 1040x666 1056x625 1048x6321 1152x667 1344x806 1328x806 1312x800 2200x1125 1650x750 858x525 Hor. Freq Polarity Ver. Freq Polarity Pixel Clock Sep 31.
PC Display Picture Quality Adjustment Changing the Position of the Image (Moving left, right, up and down) The purpose of picture quality adjustment is to remove or reduce picture noise. If the noise is not removed by fine tuning alone, then do the frequency adjustments to the utmost and fine tune again. After the noise has been reduced, re-adjust the picture so that it is aligned on the center of screen. After connecting the TV to your PC, adjust the position of screen if it is not well-aligned.
PC Display Changing the Screen Size (PC mode) When you press the ASPECT button on the remote control, the TV’s screen mode choices appear in sequence. The screen displays in this order: Wide(TV), Wide(PC),Expand, Normal. The name of the screen mode will be displayed at the bottom of the TV screen. Wide (TV) Scales the picture to the size of the TV screen regardless of the aspect ratio of the input source.
SAMSUNG Appendix
Appendix Troubleshooting Care and Maintenance Before you call a service technician, please scan this list of problems and possible solutions. It may save you time and money. With proper care, your TV will give you many years of service. Please follow these guidelines to get the maximum performance from your TV. Problem Possible Solution Placement Poor picture quality. Try another channel. Adjust the antenna. Check all wire connections. • • • • Poor sound quality or no sound. Try another channel.
Memo 90 91