HP-T4254 HP-T5054 PLASMA DISPLAY Owner’s Instructions Register your product at www.samsung.com/global/register Record your Model and Serial number here for future reference. ▪ Model _______________ ▪ Serial No. _______________ BN68-01192E-02Eng-1.
Important Warranty Information Regarding Television Format Viewing Wide screen format PDP Displays (16:9, the aspect ratio of the screen width to height) are primarily designed to view wide screen format full-motion video. The images displayed on them should primarily be in the wide screen 16:9 ratio format, or expanded to fill the screen if your model offers this feature and the images are constantly moving.
User Instructions Screen Image retention Do not display a still image (such as on a video game) on the plasma display panel for more than several minutes as it can cause screen image retention. This image retention is also known as “screen burn”. To avoid such image retention, refer to page 26 of this manual to reduce the degree of brightness and contrast of the screen when displaying a still image. Altitude The PDP can only operate normally at heights under 6500ft.
Contents GENERAL INFORMATION CHANNEL CONTROL ■ ■ ■ ■ ■ ■ ■ ■ ■ ■ ■ ■ ■ ■ ■ List of Features ..............................................................5 Accessories....................................................................5 Viewing the Control Panel .............................................6 Viewing the Connection Panel ....................................... 7 Remote Control..............................................................8 Installing Batteries in the Remote Control ......
General Information List of Features • • • • • Adjustable picture settings that can be stored in the TV’s memory. Automatic timer to turn the TV on and off. A special sleep timer. V-Chip function. Excellent Digital Interface & Networking : With a built-in HD digital tuner, non-subscription HD broadcasts can be viewed with no Set-Top Box needed. • Remote Control The supplied remote can be used to operate the TV as well as most DVD players, Set-top boxes, Cable Boxes and VCRs.
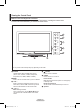
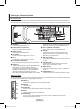
Viewing the Control Panel Buttons on the Lower-Right Part of the Panel The buttons on the lower-right panel control your TV’s basic features, including the on-screen menu. To use the more advanced features, you must use the remote control. ➢ The product color and shape may vary depending on the model. 1 SOURCE Toggles between all the available input sources (TV, AV1, AV2, S-Video1, S-Video2, Component1, Component2, PC, HDMI1, HDMI2, or HDMI3).
Viewing the Connection Panel Rear Panel Jacks Use the rear panel jacks to connect A/V components that will be connected continuously, such as VCR or DVD players. For more information on connecting equipment, see pages 9-14. The product color and shape may vary depending on the model. audio inputs on your TV allow you to receive left and right audio from your DVI device. (Not compatible with PC) 1 POWER IN Connect the supplied power cord. 2 DIGITAL AUDIO OUT (OPTICAL) Connect to a Digital Audio component.
Remote Control You can use the remote control up to a distance of about 23 feet from the TV. When using the remote, always point it directly at the TV. You can also use your remote control to operate your VCR, Cable box, DVD player, or Set-Top Box. 1 POWER Turns the TV on and off. ( 2 NUMERIC BUTTONS Press to directly select a channel. 3 – Press to select additional channels (digital and analog) being broadcast by the same station.
Installing Batteries in the Remote Control 1 2 3 ➢ Lift the cover at the back of the remote control upward as shown in the figure. Install two AAA size batteries. ➢ Make sure to match the “+” and “–” ends of the batteries with the diagram inside the compartment. ➢ Do not mix battery types, i.e. alkaline and manganese. Close the cover as shown in the figure. ➢ Remove the batteries and store them in a cool, dry place if you won’t be using the remote control for a long time.
Connecting Cable TV To connect to a cable TV system, follow the instructions below. Cable without a Cable Box 1 Plug the incoming cable into the ANT 2 IN(CABLE) terminal on the back of the TV. ➢ Because this TV is cable-ready, you do not need a cable box to view unscrambled cable channels. ANT 2 IN (CABLE) Connecting to a Cable Box that Descrambles All Channels 1 Find the cable that is connected to the ANT OUT terminal on your cable box.
Connecting a VCR Video Connection These instructions assume that you have already connected your TV to an antenna or a cable TV system (according to the instructions on pages 9~10). Skip step 1 if you have not yet connected to an antenna or a cable system. 1 Unplug the cable or antenna from the back of the TV. 2 Connect the cable or antenna to the ANT IN terminal on the back of the VCR.
Connecting a Camcorder The side panel jacks on your TV make it easy to connect a camcorder to your TV. They allow you to view the camcorder tapes without using a VCR 1 2 Connect a Video Cable (or S-Video Cable) between the AV IN 2 [VIDEO] (or S-VIDEO) jack on the TV and the VIDEO OUT jack on the Camcorder. Connect Audio Cables between the AV IN 2 [L-AUDIO-R] jacks on the TV and the AUDIO OUT jacks on the Camcorder.
Connecting a DVD Player/Set-Top Box via HDMI This connection can only be made if there is an HDMI Output jack on the external device. This connection will provide the highest quality picture. 1 Connect an HDMI Cable between the HDMI IN 2 on the TV and the HDMI OUT on the DVD Player/Set-Top Box.
Connecting a Digital Audio System The rear panel jacks on your TV make it easy to connect a Digital Audio System to your TV. 1 Connect an Optical Cable Digital Audio System between the DIGITAL AUDIO TV Rear Panel OUT (OPTICAL) jacks on the TV and the Digital Audio Input (OPTICAL) jacks on the Digital Audio System. When a Digital Audio System is connected to the “DIGITAL AUDIO OUT (OPTICAL)” terminal: Decrease the gain (volume) of the TV, and adjust the volume level with the system’s volume control.
Operation Turning the TV On and Off Press the POWER button on the remote control. You can also use the POWER button on the TV. ➢ It may take a while when your TV starts. Plug & Play Feature When the TV is initially powered On, basic settings proceed automatically and subsequently: 1 Press the POWER button on the remote control. The message Menu language, Shop Mode, Channels and Time will be set. is displayed. i Menu language, Shop Mode, Channels and Time will be set.
5 The TV will begin memorizing all of the available channels. After all the available channels are stored, the Auto program menu reappears. Press the ENTER button when channel memorization is complete. Clock Mode menu is automatically displayed. ➢ To stop the search before it has finished, press the ENTER button with Stop selected. Plug & Play Auto Program in progress. Cable Channel 67 68% Stop Skip Enter Plug & Play Auto Program is completed. 14 Channels were memorized. Air : 9 , Cable : 5.
If you want to reset this feature... 1 2 TV Setup Plug & Play Language Time Game Mode V-Chip Caption Menu Transparency ▼ More Move Press the MENU button to display the menu. Press the ▲ or ▼ button to select Setup, then press the ENTER button. Press the ENTER button to select Plug & Play. For further details on setting up options, refer to the page 15~16. ➢ The Plug & Play feature is only available in the TV and DTV mode.
Adjusting the Volume Using the Volume Buttons 1 Press the VOL + or VOL – button to increase or decrease the volume. Using the Mute Button At any time, you can cut off the sound using the MUTE button. 1 Press MUTE and the sound cuts off. The word “Mute” will appear in the lower-left corner of the screen. 2 To turn mute off, press the MUTE button again, or simply press the VOL + or VOL – button. RETURN FAV.
Memorizing the Channels Your TV can memorize and store all of the available channels for both “off-air” (air) and cable channels. After the available channels are memorized, use the CH or CH button to scan through the channels. This eliminates the need to change channels by entering the channel digits. There are three steps for memorizing channels: selecting a broadcast source, memorizing the channels (automatic) and adding and deleting channels (manual).
Setting Up Your Remote Control After your remote control has been properly set up, your remote control can operate in five different modes: TV, VCR, Cable, DVD, or Set-Top Box. Pressing the corresponding button on the remote control allows you to switch between these modes, and control whichever piece of equipment you choose. ➢ The remote control might not be compatible with all DVD Players, VCRs, Cable boxes, and Set-Top Boxes. Setting Up the Remote to Operate Your VCR 1 Turn off your VCR.
Setting Up the Remote to Operate Your DVD 1 Turn off your DVD. 2 Press the DVD button on your TV’s remote control. 3 Press the SET button on your TV’s remote control. 4 Using the number buttons on your remote control, enter three digits of the DVD code listed on page 24 of this manual for your brand of DVD. Make sure you enter three digits of the code, even if the first digit is a “0”. (If more than one code is listed, try the first one.) 5 Press the POWER button on the remote control.
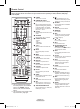
Remote Control Codes VCR Brand SAMSUNG ADMIRAL AIWA AKAI AUDIO DYNAMICS BELL&HOWELL BROKSONIC CANDLE CANON CITIZEN COLORTYME CRAIG CURTIS MATHES DAEWOO DB DIMENSIA DYNATECH ELECTROHOME EMERSON FISHER FUNAI GENERAL ELECTRIC GO VIDEO LG(Goldstar) HARMAN KARDON HITACHI INSTANT REPLAY JC PENNEY JCL KENWOOD KLH LIOYD LOGIK LXI JVC MAGNAVOX MARANTZ MARTA KONIA ORION MEI MEMOREX MGA MIDLAND MINOLTA Code 000 001 002 003 004 005 077 078 079 020 025 004 027 032 007 026 018 022 002 003 006 008 015 055 021 056 002 00
CABLE BOX Brand SAMSUNG GI HAMLIN HITACHI JERROLD MACOM MAGNAVOX OAK PANASONIC PHILIPS PIONEER RCA REGAL Code 000 001 002 003 004 005 006 007 041 003 024 031 025 030 038 039 025 030 019 023 028 026 003 022 027 037 044 019 021 023 028 004 018 020 044 014 022 040 003 Brand REGENCY SA SCIENTIFIC ATLAN SPRUCER STARGATE 2000 SYLVANIA TEXSCAN TOCOM UNIVERSAL VIEWSTAR WARNER AMEX ZENITH Code 015 023 042 043 042 043 022 036 016 016 032 033 034 019 021 023 028 046 017 029 035 037 045 SAMSUNG SET-TOP BOX Product
SAMSUNG DVD Product DVD DVDR BD Record VCR COMBO VCR Record DHR COMBO Code 000 001 002 003 004 005 006 007 008 009 010 011 012 013 Product Home Theater VCR COMBO HDD Record COMBO TWIN TRAY COMBO STB DVD COMBO DVD Receiver AV Receiver Code 014 015 016 017 018 019 020 021 DVD Brand ANAM AUDIOVOX AUDIOLOGIC ANABA APEX DIGITAL AIWA BROKSONIC BLAUPUNKT B&K CURTIS MATHES CYBER HOME CLARION CIRRUS CINEVISION DAEWOO DENON FARENHEIT FISHER GPX GO VIDEO GE GREENHILL HITACHI HITEKER HOYO HARMAN / KARDON IRT INTEGR
To Select the Source Use to select TV or other external input sources such as DVD players or Set-top/Cable boxes connected to the TV. Use to select the input source of your choice. 1 Press the MENU button to display the menu. Press the ▲ or ▼ button to select Input, then press the ENTER button. 2 Press the ENTER button to select Source List. Press the ▲ or ▼ button to select signal source, then press the ENTER button.
Picture Control Using Automatic Picture Settings Your TV has three automatic picture settings (“Dynamic”, “Standard”, and “Movie”) that are preset at the factory. You can activate either Dynamic, Standard, or Movie by making a selection from the menu. 1 Press the MENU button to display the menu. Press the ▲ or ▼ button to select Picture, then press the ENTER button. Picture TV Mode Contrast Brightness Sharpness Color Tint G 50 ▼ : Dynamic More Move 2 Press the ENTER button to select Mode.
TV 5 Press the ENTER button to return to Picture. 6 Press the ▲ or ▼ button to select Color Tone, then press the ENTER button. 7 Press the ▲ or ▼ button to select Cool2, Cool1, Normal, Warm1, or Warm2, then press the ENTER button. ➢ When the picture mode is set to Dynamic or Standard, Warm1 and Warm2 cannot be selected.
Changing the Screen Size Screen size selection depends on the type of video input. 1 Press the MENU button to display the menu. Press the ▲ or ▼ button to select Picture, then press the ENTER button. 2 Press the ▲ or ▼ button to select Size, then press the ENTER button. 3 Press the ▲ or ▼ button to select the screen format you want. Press the ENTER button. TV Press the EXIT button to exit. • 16:9 : Sets the picture to 16:9 wide mode. • Zoom1 : Magnifies the size of the picture on the screen.
Making Detailed Picture Settings You can set detailed picture settings. TV 1 Press the MENU button to display the menu. Press the ▲ or ▼ button to select Picture, then press the ENTER button. 2 Press the ▲ or ▼ button to select Detailed Settings, then press the ENTER button. 3 Select the desired Detailed Settings option by pressing the ▲ or ▼ button, then press the ENTER button. 4 TV When you are satisfied with your setting, press the ENTER button.
Active Color If you turn on this option, the colors of the sky and grass will be stronger and clearer for a more vivid on-screen picture. 1 Press the MENU button to display the menu. Press the ▲ or ▼ button to select Picture, then press the ENTER button. 2 Press the ▲ or ▼ button to select Active Color, then press the ENTER button. 3 Press the ▲ or ▼ button to select Off or On, then press the ENTER button. TV TV This function is not available in PC mode.
Selecting the Film Mode Automatically senses and processes film signals from all sources and adjusts the picture for optimum quality. 1 Press the MENU button to display the menu. Press the ▲ or ▼ button to select Setup, then press the ENTER button. 2 Press the ▲ or ▼ button to select Film Mode, then press the ENTER button. 3 Press the ▲ or ▼ button to select Off or On, then press the ENTER button.
Viewing Picture-in-Picture This product has one built-in tuner, which does not allow PIP to function in the same mode. For example, you cannot watch one TV channel in the main screen, and a different one in the PIP screen. Please see ‘PIP Settings’ below for details. You can use the PIP feature to simultaneously watch two video sources. (See page 37 to select the PIP picture sound.) ➢ While V-Chip is in operation, the PIP function cannot be used.
TV Changing the Position of the PIP Window 4 Press the ▲ or ▼ button to select Position, then press the ENTER button. Press the ▲ or ▼ button to select the desired PIP window position, then press the ENTER button. ➢ In Double Window ( ) and Double Wide ( ) modes, Position cannot be selected. ➢ If the PIP window is set to Double Window ( ) or Double Wide ( ) mode, the screen size or alignment may slightly differ depending on the signal type.
Sound Control Using Automatic Sound Settings Your TV has automatic sound settings (“Standard”, “Music”, “Movie”, “Speech”, and “Custom”) that are preset at the factory. Or, you can select “Custom”, which automatically recalls your personalized sound settings. 1 2 Press the MENU button to display the menu. Press the ▲ or ▼ button to select Sound, then press the ENTER button.
Setting the TruSurround XT TruSurround XT is a patented SRS technology that solves the problem of playing 5.1 multichannel content over two speakers. TruSurround delivers a compelling, virtual surround sound experience through any two-speaker playback system, including internal television speakers. It is fully compatible with all multi channel formats. 1 Press the MENU button to display the menu. Press the ▲ or ▼ button to select Sound, then press the ENTER button.
Choosing a Multi-Channel Sound (MTS) Track - Analog Depending on the particular program being broadcast, you can listen to Mono, Stereo or SAP. Multi-Track Sound TV 1 Press the MENU button to display the menu. Press the ▲ or ▼ button to select Sound, then press the ENTER button. 2 Press the ▲ or ▼ button to select Multi-Track Options, then press the ENTER button. 3 Press the ▲ or ▼ button to select Multi-Track Sound, then press the ENTER button.
3 Press the ▲ or ▼ button to select Off or On, then press the ENTER button. TV Press the EXIT button to exit. ➢ • When Internal Mute is set to On, Sound menus except Multi-track Options cannot be adjusted. • The left/right audio outputs and digital audio outputs (Optical) remain enabled. • The VOL +, VOL - and MUTE buttons do not operate when the Internal Mute is set to On.
Channel Control Selecting the Antenna 1 Press the MENU button to display the menu. Press the ▲ or ▼ button to select Channel, then press the ENTER button. 2 TV Channel Air Antenna : Air Cable Auto Program Clear Scrambled Channel Channel List Name Fine Tune Signal Strength LNA : On Move Enter Press the ENTER button to select Antenna. Press the ▲ or ▼ button to select Air or Cable, then press the ENTER button. Press the EXIT button to exit.
5 Press the ▲/▼/◄/► buttons to select a channel to delete, then press the ENTER button. Press the ▲ or ▼ button to select Delete, then press the ENTER button to delete the channel. Press the EXIT button to exit. • Red (P.MODE) button: Press repeatedly to select All, Added, or Favorite. • Green (S.MODE) button: Press to add all channels deleted. • Yellow (STILL) button: Press to delete all channels memorized.
Viewing the Channel Lists You can display a list of all channels, added channels or your favorite channels. 1 Press the MENU button to display the menu. Press the ▲ or ▼ button to select Channel, then press the ENTER button. 2 Press the ▲ or ▼ button to select Channel List, then press the ENTER button. 3 Press the ▲ or ▼ button to select All, Added or Favorite, then press the ENTER button.
Labeling Channels Channels can labeled so that their call letters appear whenever the channel is selected. 1 Press the MENU button to display the menu. Press the ▲ or ▼ button to select Channel, then press the ENTER button. Press the ▲ or ▼ button to select Name, then press the ENTER button. 2 Press the ▲ or ▼ button to select the channel to be assigned a new name, then press the ENTER button.
Checking the Digital-Signal Strength Unlike analog channels, which can vary in reception quality from “snowy” to clear, digital (HDTV) channels have either perfect reception quality or you will not receive them at all. So, unlike analog channels, you cannot fine tune a digital channel. You can, however, adjust your antenna to improve the reception of available digital channels. 1 2 Press the MENU button to display the menu. Press the ▲ or ▼ button to select Channel, then press the ENTER button.
PC Display Using Your TV as a Computer (PC) Display Setting Up Your PC Software (Based on Windows XP) The Windows display-settings for a typical computer are shown below. The actual screens on your PC will probably be different, depending upon your particular version of Windows and your particular video card. However, even if your actual screens look different, the same basic set-up information will apply in almost all cases. (If not, contact your computer or Video Card manufacturer.
Setting up the TV with your PC Use the Auto Adjust function to have the TV set automatically adjust the video signals it receives from the PC. The function also automatically fine-tunes the settings and adjusts the frequency values and positions. How to Auto Adjust 1 2 TV Press the MENU button to display the menu. Press the ▲ or ▼ button to select Setup, then press the ENTER button. Press the ▲ or ▼ button to select PC, then press the ENTER button.
Changing the Screen Position After connecting the TV to your PC, adjust the position of the screen if it is not well-aligned. ➢ Change to the PC mode first. 1 Press the MENU button to display the menu. Press the ▲ or ▼ button to select Setup, then press the ENTER button. Press the ▲ or ▼ button to select PC, then press the ENTER button. 2 Press the ▲ or ▼ button to select Position, then press the ENTER button. 3 Press the ▲ or ▼ button to adjust the V-Position.
Time Setting Setting the Time Setting the clock is necessary in order to use the various timer features of the TV. Also, you can check the time while watching the TV. (Just press the INFO button.) Option 1: Setting the Clock Manually 1 Press the MENU button to display the menu. Press the ▲ or ▼ button to select Setup, then press the ENTER button. Press the ▲ or ▼ button to select Time, then press the ENTER button. 2 Press the ENTER button to select Clock.
Option 2: Setting the Clock Automatically The Clock can be set automatically if you are receiving a digital signal. 1 2 TV Press the MENU button to display the menu. Press the ▲ or ▼ button to select Setup, then press the ENTER button. Press the ▲ or ▼ button to select Time, then press the ENTER button. Press the ENTER button to select Clock.
Setting the On/Off Timer Use this feature to set the TV to turn on or off at a desired time. You must set the clock first. 1 Press the MENU button to display the menu. Press the ▲ or ▼ button to select Setup, then press the ENTER button. Press the ▲ or ▼ button to select Time, then press the ENTER button. 2 Press the ▲ or ▼ button to select Timer1, Timer2,or Timer3, then press the ENTER button. The timer menu is displayed.
Function Description Selecting a Menu Language Setting the clock is necessary in order to use the various timer features of the TV. Also, you can check the time while watching the TV. (Just press the INFO button.) 1 2 Press the MENU button to display the menu. Press the ▲ or ▼ button to select Setup, then press the ENTER button. Press the ▲ or ▼ button to select Language, then press the ENTER button.
Viewing Closed Captions (On-Screen Text Messages) - Digital The Digital Captions function operates on digital channels. 1 Press the MENU button to display the menu. Press the ▲ or ▼ button to select Setup, then press the ENTER button. 2 Press the ▲ or ▼ button to select Caption, then press the ENTER button. 3 Press the ENTER button to select Caption. Press the ▲ or ▼ button to select On, then press the ENTER button. 4 Press the ▲ or ▼ button to select Caption Mode, then press the ENTER button.
Viewing Closed Captions (On-Screen Text Messages) - Analog The Analog Caption function operates in either analog TV channel mode or external signal mode. (Depending on the broadcasting signal, the Analog Caption function may operate on digital channels.) 1 2 Press the MENU button to display the menu. Press the ▲ or ▼ button to select Setup, then press the ENTER button.
Menu Transparency Level Adjusts the transparency of the menu screen. 1 2 3 Press the MENU button to display the menu. Press the ▲ or ▼ button to select Setup, then press the ENTER button. TV Press the ▲ or ▼ button to select Menu Transparency, then press the ENTER button. Press the ▲ or ▼ button to select level, then press the ENTER button.
Using the Energy Saving Feature This feature adjusts the power consumption of the unit in order to save energy. 1 2 Press the MENU button to display the menu. Press the ▲ or ▼ button to select Setup, then press the ENTER button. TV Setup More Blue Screen Melody PC Home Theater PC Light Effect Energy Saving ▼ More Move ▲ Press the ▲ or ▼ button to select Energy Saving, then press the ENTER button. Press the ▲ or ▼ button to select Off, Low, Medium, or High, then press the ENTER button.
Reducing the Effects of Screen Burn If screen burn has occurred, you can select a white screen or scroling to help remove screen burn artifacts. 1 Press the MENU button to display the menu. Press the ▲ or ▼ button to select Setup, then press the ENTER button. 2 Press the ▲ or ▼ button to select Screen Burn Protection, then press the ENTER button. 3 Press the ▲ or ▼ button to select White, Scroling, or Side Gray then press the ENTER button. Press the EXIT button to exit.
Wall- mount adjustment (Sold separately) Once the wall mount is installed, the position of your TV can be easily adjusted. Auto Wall-Mount TV Rear Panel EX-LINK Cable (Not supplied) Entering the menu 1 Press the MENU button to display the menu. Press the ▲ or ▼ button to select Setup, then press the ENTER button. 2 Press the ▲ or ▼ button to select Wall-Mount Adjustment, then press the ENTER button. 3 Adjust to the desired position using the ▲/▼/◄/► buttons.
Upgrading the Software Samsung may offer upgrades for your TV’s firmware in the future. Please contact the Samsung call center at 1-800-SAMSUNG to receive information about downloading upgrades and using a USB drive. Upgrades will be possible by connecting a USB drive to the USB port located on the side of your TV. 1 Insert a USB drive containing the firmware upgrade into the USB Upgrade Port on the side of the TV. 2 Press the MENU button to display the menu.
3 The V-Chip screen will appear. Press the ▲ or ▼ button to select Change PIN, then press the ENTER button. The Change PIN screen will appear. Choose any 4 digits for your PIN and enter them. Re-enter the same 4 digits. When the message PIN is changed successfully. is displayed, your PIN has been memorized. TV V-Chip V-Chip Lock : Off TV Parental Guidelines MPAA Rating Downloadable U.S. Rating Change PIN ► ► ► ► ► Press the EXIT button to exit.
3 The V-Chip screen will appear. Press the ▲ or ▼ button to select TV Parental Guidelines, then press the ENTER button. 4 The TV Parental Guidelines screen will appear. Press the ▲ or ▼ button to select one of the six aged based categories: • TV-Y: All children. The themes and elements in this program are specifically designed for a very young audience, including children from ages two to six. • TV-Y7: Directed to older children.
How to Set up Restrictions Using “MPAA Ratings” (G, PG, PG-13, R, NC-17, X, NR ) The MPAA rating system uses the Motion Picture Association of America (MPAA) system, and its main application is for movies. When the V-Chip lock is on, the TV will automatically block any programs that are coded with objectionable ratings (either MPAA or TV-Ratings). 1 Press the MENU button to display the menu. Press the ▲ or ▼ button to select Setup, then press the ENTER button.
3 The V-Chip screen will appear. Press the ▲ or ▼ button to select Canadian English, then press the ENTER button TV V-Chip V-Chip Lock : On TV Parental Guidelines MPAA Rating Canadian English Canadian French Downloadable U.S. Rating Change PIN Move 4 Press the ▲ or ▼ button to select an appropriate restriction. Press the ENTER button to activate the restriction selected. The “ indicated. ” symbol is ► ► ► ► ► ► ► Return Enter Canadian English TV Allow All Block All Press the EXIT button to exit.
Using the V-Chip for Digital channels Parental restriction information can be used while watching DTV channels. 1 Press the MENU button to display the menu. Press the ▲ or ▼ button to select Setup, then press the ENTER button. 2 Press the ▲ or ▼ button to select V-Chip, then press the ENTER button. The message Enter PIN will appear. Enter your 4 digit PIN number. 3 4 The V-Chip screen will appear. Press the ▲ or ▼ button to select Downloadable U.S. Rating, then press the ENTER button.
About Anynet+ What is Anynet+? Anynet+ is an AV network system that enables you to control all connected Samsung AV devices with your Samsung TV’s remote. Connecting Anynet+ Devices The Anynet+ system can be used only with Samsung AV devices that have the Anynet+ feature. To be sure your Samsung AV device has this feature, check if there is an Anynet+ mark on it.
Setting Up Anynet+ The following settings are to use Anynet+ functions. To use the Anynet+ Function, Anynet+ (HDMI-CEC) must be set to On 1 2 3 Press the Anynet+ button. Press the ▲ or ▼ button to select Setup, then press the ENTER button. Press the ENTER button to select Anynet+ (HDMI-CEC), then press the ENTER button. Press the ▲ or ▼ button to select On, then press the ENTER button. The Anynet+ (HDMI-CEC) function is enabled. If you select Off, Anynet+ (HDMI-CEC) is disabled.
Anynet+ Menu The Anynet+ menu changes depending on the type and status of the Anynet+ devices connected to the TV. Anynet+ Menu Description View TV Switches from Anynet+ to TV broadcast mode. Record Starts a recording. (This menu works only for a device supporting recording.) (Device_Name) Menu Shows the menu of the connected device. Example: When a DVD Recorder is connected, the DVD Recorder’s title menu appears. (Device_Name) Operation Shows the play control menu of the connected device.
Listening through a Receiver (Home theater) You can listen to sound through a receiver instead of the TV speaker. 1 Press the Anynet+ button. Press the ▲ or ▼ button to select Receiver, then press the ENTER button. TV Air 28 Recevier: On Connect Recorder 2 Press the ◄ or ► button to select to On, then press the ENTER button. Now you can listen to sound through the receiver. 3 Press the EXIT button to exit.
Appendix Troubleshooting If the TV seems to have a problem, first try this list of possible problems and solutions. If none of these troubleshooting tips apply, call your nearest Samsung service center. Problem Poor picture quality. Poor sound quality. No picture or sound. No sound or sound is too low at maximum volume. Picture rolls vertically. The TV operates erratically. The TV won’t turn on. Remote control malfunctions Digital broadcasting screen problem. Possible Solution Try another channel.
Installing the Wall Mount Kit This installation is to be used when attaching the wall mount to a wall. When attaching to other building materials, please contact your nearest dealer. Wall Mount Kit Specifications ( VESA ) Product Family LCD-TV PDP-TV inch VESA Spec.
How to assemble the Stand-Base (depending on the model) Using the 6 screws for securing the stand base and the monitor, firmly attach the monitor to the stand base. (The exterior of the set may be different than the picture.) When mounting your TV on a wall, install the cover (1) on the stand-base using two screws. Warning Firmly secure the stand to the TV before moving it, as the stand may fall and could cause serious injury. ➢ Two or more people should carry the TV.
Dimensions (HP-T4254) 41.5 12.6 21.1 27.5 30.0 12.8 37.0 26.0 TOP VIEW FRONT VIEW JACK PANEL DETAIL 2 1/4"H x 18 3/4"W @ 5 3/4" UP FROM BOTTOM 23.6 3.7 15.7 1.2 5.2 7.3 12.4 SIDE VIEW REAR VIEW English - 69 BN68-01192E-03Eng-2.
Dimensions (HP-T5054) 48.5 14.5 24.6 33.4 31.1 14.5 43.7 26.0 TOP VIEW FRONT VIEW JACK PANEL DETAIL 2 1/4"H x 18 3/4"W @ 5 3/4" UP FROM BOTTOM 23.6 3.7 15.7 1.2 5.2 7.3 12.4 SIDE VIEW REAR VIEW English - 70 BN68-01192E-03Eng-2.
This page is intentionally left blank. BN68-01192E-02Eng-2.
HP-T4254 HP-T5054 PANTALLA DE PLASMA Manual del usuario Registre el producto en www.samsung.com/global/register Apunte aquí los números de serie y modelo para consultas futuras. ▪ Modelo _______________ ▪ N.º de serie _______________ BN68-01192E-02Spa_1.
Información importante sobre la garantía relativa al formato de visualización del televisor Las pantallas PDP con formato de pantalla panorámica (16:9, la relación de aspecto ancho:alto de la pantalla) están diseñadas principalmente para visualizar vídeos de movimiento de formato panorámico. En estas pantallas debe ver las imágenes en el formato 16:9 de pantalla panorámica o ampliadas para llenar la pantalla si el modelo tiene esta opción, y en movimiento constante.
Instrucciones para el usuario Retención de imágenes en la pantalla No deje imágenes fijas visibles (como las de un videojuego) en el panel de la pantalla de plasma durante mucho tiempo, ya que se podría producir la retención de la imagen en la misma. Este fenómeno de retención de imágenes también se denomina “quemadura de pantalla”. Para evitar dicha retención de la imagen, consulte la página 26 de este manual para reducir el grado de brillo y contraste de la pantalla al mostrar una imagen fija.
Índice INFORMACIÓN GENERAL CONTROL DE LOS CANALES ■ ■ ■ ■ ■ ■ ■ ■ ■ ■ ■ ■ ■ ■ ■ Características ...............................................................5 Accesorios .....................................................................5 Aspecto general del panel de control............................. 6 Aspecto general del panel de conexiones ..................... 7 Mando a distancia..........................................................8 Instalación de las pilas en el mando a distancia........
Información general Características • • • • • Valores ajustables de la imagen que se pueden almacenar en la memoria del televisor. Temporizador automático para encender o apagar el televisor. Temporizador de desconexión especial. Función V-chip. Excelente interfaz digital y capacidad de trabajo en red: El sintonizador digital HD incorporado permite ver las emisiones HD que no exigen una suscripción sin que sea necesario disponer de un decodificador.
Aspecto general del panel de control Botones de la parte inferior derecha del panel Los botones del panel inferior derecho controlan las funciones básicas del televisor, incluido el menú en pantalla. Para utilizar las funciones más avanzadas debe usarse el mando a distancia. ➢ El color y la forma del producto pueden variar según el modelo.
Aspecto general del panel de conexiones Tomas del panel posterior Use las tomas del panel posterior para conectar componentes de A/V que estarán disponibles permanentemente, como un vídeo o un reproductor de DVD. Si desea más información sobre la conexión del equipo, consulte las páginas 9~14. El color y la forma del producto pueden variar, según el modelo. 1 Botón de encendido Conexión para el cable de alimentación suministrado. 2 DIGITAL AUDIO OUT (OPTICAL) Se conecta al componente de audio digital.
Mando a distancia Puede utilizar el mando a una distancia de hasta 7 metros del televisor. Al usarlo, apunte directamente al televisor. También puede utilizar el mando a distancia para hacer funcionar el aparato de vídeo, el decodificador de cable, el reproductor de DVD o el receptor de TV digital. 1 POWER Enciende y apaga el televisor. ( 2 BOTONES NUMÉRICOS Púlselos para seleccionar directamente un canal.
Instalación de las pilas en el mando a distancia 1 2 3 ➢ Levante la tapa de la parte posterior del mando a distancia, como se muestra en la ilustración. Instale dos baterías de tamaño AAA. ➢ Asegúrese de que los extremos “+” y “-“ de las pilas concuerdan con el diagrama del interior del compartimiento. ➢ No mezcle distintos tipos de pilas; por ejemplo, alcalinas y de manganeso. Cierre la tapa, como se muestra en la ilustración.
Conexión de TV por cable Para conectar a un sistema de TV por cable, siga estas instrucciones. Cable sin decodificador de cable 1 Enchufe el cable de entrada en el terminal ANT 2 IN (CABLE) en la parte posterior del televisor. ➢ Dado que el TV tiene previsto el uso de televisión por cable, no se necesita un decodificador para ver canales de cable no codificados. ANT 2 IN (CABLE) Conexión al decodificador que decodifica todos los canales 1 Busque el cable conectado al terminal ANT OUT del decodificador.
Conexión de un aparato de vídeo Conexión de vídeo Estas instrucciones presuponen que ya ha conectado el TV a una antena o sistema de TV por cable (siguiendo las instrucciones de las páginas 9 a 10). Ignore el paso 1 si aún no ha conectado una antena o un sistema de cable. 1 Desenchufe el cable o la antena de la parte posterior del TV. 2 Conecte el cable o la antena al terminal ANT IN de la parte posterior del aparato de vídeo.
Conexión a una cámara de vídeo Los conectores del panel lateral del TV facilitan la conexión a una cámara de vídeo. Así podrá ver las cintas de la cámara de vídeo sin usar un reproductor. 1 2 Conecte un cable de Vídeo (o S-Vídeo) entre los terminales AV IN 2 [VIDEO] (o S-VIDEO) del televisor y VIDEO OUT de la cámara de vídeo. Panel lateral del TV 1 Cable de S-Vídeo (no suministrado) Conecte cables de audio entre los terminales AV IN 2 [L-AUDIO-R] del televisor y AUDIO OUT de la filmadora.
Conexión a un reproductor de DVD/decodificador a través de HDMI Esta conexión sólo se puede realizar si hay una toma de salida de HDMI en el dispositivo externo. Esta conexión proporciona una imagen de la mayor calidad. 1 Conecte un cable de HDMI entre la toma de entrada HDMI IN 2 del televisor y la toma de salida HDMI OUT del reproductor DVD/ decodificador.
Conexión de un sistema de audio digital Las tomas del panel posterior del televisor facilitan la conexión de un sistema de audio digital al televisor. 1 Conecte un cable óptico Sistema de audio digital entre las tomas DIGITAL Panel posterior del TV AUDIO OUT (OPTICAL) del televisor y las tomas Digital Audio Input (OPTICAL) del sistema de audio digital.
Funcionamiento Encendido y apagado del televisor Pulse el botón POWER del mando a distancia. También puede usar el botón POWER del televisor. ➢ El televisor puede tardar unos segundos en encenderse. Función Plug & Play Cuando el televisor se enciende por primera vez, los ajustes básicos se inician correlativamente de forma automática: 1 2 Pulse el botón POWER en el mando a distancia. Aparece el mensaje Menu language, Shop Mode, Channels and Time will be set..
5 El televisor empezará a memorizar todos los canales disponibles. Una vez guardados todos los canales disponibles, reaparece el menú Prog. Auto. Pulse el botón ENTER cuando se complete la memorización de canales. Se visualiza automáticamente el menú Modo Reloj. ➢ Para detener la búsqueda antes de que finalice, pulse el botón ENTER con Detener seleccionado. Plug & Play La prog. automática está en progreso. Cable Canal 67 68% Detener Ingresar Omitir Plug & Play La progremación automática ha finalizado.
Si desea reiniciar esta función... 1 2 TV Configuración Plug & Play Idioma Tiempo Modo Juego V-Chip Subtítulo Transpar. del Menú ▼ Más Mover Pulse el botón MENU para ver el menú. Pulse los botones ▲ o ▼ para seleccionar Configuración y, a continuación, pulse el botón ENTER. Pulse el botón ENTER para seleccionar Plug & Play. Si desea más detalles sobre las opciones de configuración, consulte las páginas 15 y 16. ➢ La función Plug & Play está disponible sólo en los modos TV y DTV.
Ajuste del volumen Utilización de los botones de volumen 1 Pulse los botones VOL + o VOL - para subir o bajar el volumen. Uso del botón Mute Puede interrumpir el sonido en cualquier momento pulsando el botón MUTE. 1 Pulse MUTE para interrumpir el sonido. En la esquina inferior izquierda de la pantalla aparecerá la palabra “Mute” (Silencio). 2 Para recuperar el sonido, vuelva a pulsar el botón MUTE o pulse los botones VOL + o VOL –.
Memorización de los canales El TV puede memorizar y almacenar todos los canales disponibles, tanto “aéreos” (antena) como de cable. Una vez memorizados los canales disponibles, use los botones CH o CH para explorarlos. De este modo, no es necesario introducir dígitos para cambiar los canales. La memorización de canales implica tres pasos: seleccionar una emisora de origen, memorizar los canales (automático) y añadir o suprimir canales (manual).
Configuración del mando a distancia Una vez configurado correctamente el mando a distancia, éste puede funcionar en cinco modos diferentes: TV (TV), VCR (vídeo), Cable (Cable), DVD (DVD) o Set- Top Box (decodificador). Pulsando el botón correspondiente del mando a distancia podrá cambiar de un modo a otro y controlar cualquiera de estos equipos. ➢ El mando a distancia quizá no sea compatible con todos los reproductores de DVD, vídeos, decodificadores y receptores de TV digital.
Configuración del mando a distancia para controlar el DVD 1 Apague el DVD. 2 Pulse el botón DVD del mando a distancia del televisor. 3 Pulse el botónSET del mando a distancia del televisor. 4 Mediante los botones numéricos del mando a distancia, introduzca los tres dígitos del código del DVD correspondientes a la marca de su DVD, que aparece en la lista de la página 24 de este manual. Debe introducir los tres dígitos, aunque el primero sea un “0”.
Códigos del mando a distancia VCR Marca SAMSUNG ADMIRAL AIWA AKAI AUDIO DYNAMICS BELL&HOWELL BROKSONIC CANDLE CANON CITIZEN COLORTYME CRAIG CURTIS MATHES DAEWOO DB DIMENSIA DYNATECH ELECTROHOME EMERSON FISHER FUNAI GENERAL ELECTRIC GO VIDEO LG(Goldstar) HARMAN KARDON HITACHI INSTANT REPLAY JC PENNEY JCL KENWOOD KLH LIOYD LOGIK LXI JVC MAGNAVOX MARANTZ MARTA KONIA ORION MEI MEMOREX MGA MIDLAND MINOLTA Código 000 001 002 003 004 005 077 078 079 020 025 004 027 032 007 026 018 022 002 003 006 008 015 055 021
CABLE BOX Marca SAMSUNG GI HAMLIN HITACHI JERROLD MACOM MAGNAVOX OAK PANASONIC PHILIPS PIONEER RCA REGAL Código 000 001 002 003 004 005 006 007 041 003 024 031 025 030 038 039 025 030 019 023 028 026 003 022 027 037 044 019 021 023 028 004 018 020 044 014 022 040 003 Marca REGENCY SA SCIENTIFIC ATLAN SPRUCER STARGATE 2000 SYLVANIA TEXSCAN TOCOM UNIVERSAL VIEWSTAR WARNER AMEX ZENITH Código 015 023 042 043 042 043 022 036 016 016 032 033 034 019 021 023 028 046 017 029 035 037 045 SAMSUNG SET-TOP BOX Prod
SAMSUNG DVD Producto DVD DVDR BD Record VCR COMBO VCR Record DHR COMBO Código 000 001 002 003 004 005 006 007 008 009 010 011 012 013 Producto Home Theater VCR COMBO HDD Record COMBO TWIN TRAY COMBO STB DVD COMBO DVD Receiver AV Receiver Código 014 015 016 017 018 019 020 021 DVD Marca ANAM AUDIOVOX AUDIOLOGIC ANABA APEX DIGITAL AIWA BROKSONIC BLAUPUNKT B&K CURTIS MATHES CYBER HOME CLARION CIRRUS CINEVISION DAEWOO DENON FARENHEIT FISHER GPX GO VIDEO GE GREENHILL HITACHI HITEKER HOYO HARMAN / KARDON IRT
Para seleccionar la fuente Úselo para seleccionar TV u otras fuentes de entrada externas como reproductores de DVD o decodificadores de cable y digital, conectados al televisor. Permite seleccionar la fuente de entrada que se prefiera. 1 2 Pulse el botón MENU para ver el menú. Pulse los botones ▲ o ▼ para seleccionar Entrada y, a continuación, pulse el botón ENTER. Pulse el botón ENTER para seleccionar Lista de Origen.
Control de la imagen Utilización de los ajustes de imagen automáticos El televisor tiene tres ajustes de imagen automáticos (“Dinámico” (Dynamic), “Normal” (Standard) y “Cine” (Movie) preajustados en fábrica. Puede activar cada uno seleccionándolo en el menú. 1 Pulse el botón MENU para ver el menú. Pulse los botones ▲ o ▼ para seleccionar Imagen y, a continuación, pulse el botón ENTER. Imagen TV Modo Contraste Brillo Definición Color Tinte V 50 ▼ Pulse el botón ENTER para seleccionar Modo.
5 Pulse el botón ENTER para volver a Imagen. TV 6 Pulse los botones ▲ o ▼para seleccionar Tono Color y pulse el botón ENTER. 7 Pulse los botones ▲ o ▼para seleccionar Frío2, Frío1, Normal, Tibio1 o Tibio2 y pulse el botón ENTER. ➢ Cuando el modo de la imagen se ajusta en Dinámico o Normal, Tibio1 y Tibio2 no se pueden seleccionar. Reajuste de los valores de la imagen a los valores predefinidos de fábrica 8 Pulse los botones ▲ o ▼ para seleccionar Reiniciar y, a continuación, pulse el botón ENTER.
Cambio del tamaño de la pantalla La selección del tamaño de la pantalla depende del tipo de entrada de vídeo. 1 Pulse el botón MENU para ver el menú. Pulse los botones ▲ o ▼ para seleccionar Imagen y, a continuación, pulse el botón ENTER. 2 Pulse los botones ▲ o ▼ para seleccionar Tamaño y, a continuación, pulse el botón ENTER. 3 Pulse los botones ▲ o ▼ para seleccionar el formato de pantalla que desee. Pulse el botón ENTER. Pulse el botón EXIT para salir.
Configuración detallada de los valores de la imagen Puede realizar una configuración detallada de los valores de la imagen. 1 Pulse el botón MENU para ver el menú. Pulse los botones ▲ o ▼ para seleccionar Imagen (Picture) y, a continuación, pulse el botón ENTER. 2 Pulse los botones ▲ o ▼ para seleccionar Configuración detallada (Detailed Settings) y, a continuación, pulse el botón ENTER.
Color activo Si activa esta opción, los colores del cielo y del césped se ven más sólidos y claros y la imagen de la pantalla aparece más vívida. 1 Pulse el botón MENU para ver el menú. Pulse los botones ▲ o ▼ para seleccionar Imagen y, a continuación, pulse el botón ENTER. 2 Pulse los botones ▲ o ▼para seleccionar Color activo y pulse el botón ENTER. 3 Pulse los botones ▲ o ▼ para seleccionar Apag. o Enc. y, a continuación, pulse el botón ENTER.
Selección del Modo película Detecta y procesa automáticamente las señales de las películas procedentes de todas las fuentes y ajusta la imagen para conseguir una calidad óptima. 1 Pulse el botón MENU para ver el menú. Pulse los botones ▲ o ▼ para seleccionar Configuración y, a continuación, pulse el botón ENTER. 2 Pulse los botones ▲ o ▼ para seleccionar Modo película y, a continuación, pulse el botón ENTER. TV Configuración Más Protección de pantalla ► N. neg HDMI : Normal ► Modo película : Apag.
Visualización de imagen sobre imagen Este producto lleva un sintonizador incorporado que no permite la función PIP en el mismo modo. Por ejemplo, no es posible mirar un canal de televisión en la pantalla principal y otro en la pantalla PIP. En el apartado ‘Configuración de PIP’ encontrará más detalles. Para mirar dos fuentes simultáneamente, puede utilizar la función PIP. (Consulte la página 37 para seleccionar el sonido de la imagen PIP.
Cambio de la posición de la ventana PIP 4 TV PIP PIP Tamaño Posición Canal Pulse los botones ▲ o ▼ para seleccionar Posición y, a continuación, pulse el botón ENTER. Pulse los botones ▲ o ▼ para seleccionar la posición de la ventana PIP que desea y pulse el botón ENTER. ➢ En los modos Ventana doble ( ) y Ancho doble ( ), la opción Posición no se puede seleccionar.
Control del sonido Utilización de los parámetros de sonido automáticos El televisor tiene valores de sonido automáticos (“Normal”, “Música”, “Cine”, “Diálogo” y “Favorito”) preajustados de fábrica. También puede seleccionar “Favorito”, que recuperará automáticamente sus valores de sonido personalizados. 1 2 Pulse el botón MENU para ver el menú. Pulse los botones ▲ o ▼ para seleccionar Sonido y, a continuación, pulse el botón ENTER.
Ajuste de TruSurround XT TruSurround XT es una tecnología SRS patentada que solventa el problema de reproducir contenido multicanal 5.1 en dos altavoces. TruSurround proporciona una experiencia de sonido virtual convincente a través de cualquier sistema de reproducción con dos altavoces, incluso con los altavoces internos del televisor. Es totalmente compatible con todos los formatos multicanal 1 Pulse el botón MENU para ver el menú.
Selección de una pista de sonido multicanal (MTS) - Analógico En función del programa concreto emitido, puede escuchar en mono o estéreo o escuchar un programa de audio secundario (SAP). Sonido multipistas TV 1 Pulse el botón MENU para ver el menú. Pulse los botones ▲ o ▼ para seleccionar Sonido y, a continuación, pulse el botón ENTER. 2 Pulse los botones ▲ o ▼ para seleccionar Opc. Multi-track y, a continuación, pulse el botón ENTER.
3 Pulse los botones ▲ o ▼ para seleccionar Apag. o Enc. y, a continuación, pulse el botón ENTER. TV Pulse el botón EXIT para salir. • Cuando Silenc. Int se ajusta en Enc., ningún menú de Sonido excepto Opc. Multi-track se puede configurar. • Las salidas de audio izquierda y derecha y de audio digital (Optical) permanecen activadas. • Los botones VOL +, VOL - y MUTE no están operativos cuando Silenc. Int (Internal Mute) se ajusta en Enc. (On).
Control de los canales Selección de la antena 1 Pulse el botón MENU para ver el menú. Pulse los botones ▲ o ▼ para seleccionar Canal ; a continuación pulse el botón ENTER. 2 TV Pulse el botón ENTER para seleccionar Antena. Pulse los botones ▲ o ▼ para seleccionar Aire o Cable y, a continuación, pulse el botón ENTER. Pulse el botón EXIT para salir. Pulse el botón ANTENNA del mando a distancia para seleccionar Aire o Cable.
5 Pulse los botones ▲/▼/◄/► para seleccionar el canal que desee borrar y, a continuación, pulse el botón ENTER. Pulse los botones ▲ o ▼ para seleccionar Borrar y, a continuación, pulse el botón ENTER para suprimir el canal. Pulse el botón EXIT para salir. • Botón rojo : Púlselo varias veces para seleccionar Todos, Agregados o Favoritos. • Botón verde : Púlselo para añadir todos los canales borrados. • Botón amarillo : Púlselo para borrar todos los canales memorizados.
Visualización de las listas de canales Puede mostrar una lista de todos los canales, los agregados o de los favoritos. 1 Pulse el botón MENU para ver el menú. Pulse los botones ▲ o ▼ para seleccionar Canal ; a continuación pulse el botón ENTER. 2 Pulse los botones ▲ o ▼ para seleccionar Lista de canales ; a continuación pulse el botón ENTER. 3 Pulse los botones ▲ o ▼ para seleccionar Todos, Agregados o Favoritos ; a continuación pulse el botón ENTER.
Etiquetado de canales Los canales se pueden etiquetar con el propósito de que cuando éstos se seleccionan se pueda ver su nombre. 1 Pulse el botón MENU para ver el menú. Pulse los botones ▲ o ▼ para seleccionar Canal ; a continuación pulse el botón ENTER. Pulse los botones ▲ o ▼ para seleccionar Nombre y, a continuación, pulse el botón ENTER. 2 Pulse los botones ▲ o ▼ para seleccionar el canal al que se desea asignar un nombre y, a continuación, pulse el botón ENTER.
Comprobación de la potencia de la señal digital A diferencia de los canales analógicos, cuya calidad de recepción puede variar desde “nebuloso” a claro, los canales digitales (HDTV) tienen una calidad de recepción perfecta o no se reciben en absoluto. Por tanto, a diferencia de los canales analógicos, no puede sintonizar ningún canal digital. Puede, no obstante, ajustar la antena para mejorar la recepción de los canales digitales disponibles. 1 2 Pulse el botón MENU para ver el menú.
Pantalla de ordenador Uso del televisor como pantalla del PC Configuración del software del PC (basado en Windows XP) A continuación se muestra la configuración de visualización de Windows para un ordenador típico. Probablemente la pantalla real de su PC sea distinta; dependerá de la versión concreta de Windows y de la tarjeta de vídeo que tenga. Aunque las pantallas reales sean diferentes, la información de configuración básica que se aplica en casi todos los casos es la misma.
Ajuste del televisor con el ordenador Mediante la función de ajuste automático se puede establecer que el televisor se ajuste automáticamente de acuerdo con las señales de vídeo que recibe del ordenador. Esta función también ajusta automáticamente la configuración, los valores de frecuencia y la posición. Cómo realizar un ajuste automático 1 TV Configuración Más ► Pantalla Azul : Apag. Melodía : Medio ► PC ► PC para Home Cinema : Apag. ► Efecto de luz : Viendo la TV ► Ahorro energía : Apag.
Cambio de la posición de la pantalla Una vez conectado el televisor al PC, ajuste la posición de la pantalla si no está bien alineada. ➢ Debe cambiar al modo PC en primer lugar. 1 Pulse el botón MENU para ver el menú. Pulse los botones ▲ o ▼ para seleccionar Configuración y, a continuación, pulse el botón ENTER. Pulse los botones ▲ o ▼ para seleccionar PC y, a continuación, pulse el botón ENTER. 2 Pulse los botones ▲ o ▼ para seleccionar Posición y, a continuación, pulse el botón ENTER.
Ajuste de la hora Configuración de la hora El ajuste del reloj es necesario para utilizar las distintas funciones de temporización del televisor. Además, podrá ver la hora mientras ve la televisión. (Pulse el botón INFO.) Opción 1: Ajuste manual del reloj 1 Pulse el botón MENU para ver el menú. Pulse los botones ▲ o ▼ para seleccionar Configuración y, a continuación, pulse el botón ENTER. Pulse los botones ▲ o ▼ para seleccionar Tiempo y, a continuación, pulse el botón ENTER.
Opción 2: Ajuste automático del reloj El reloj puede ajustarse automáticamente cuando se recibe una señal digital. 1 Pulse el botón MENU para ver el menú. Pulse los botones ▲ o ▼ para seleccionar Configuración y, a continuación, pulse el botón ENTER. Pulse los botones ▲ o ▼ para seleccionar Tiempo y, a continuación, pulse el botón ENTER. 2 Pulse el botón ENTER para seleccionar Reloj. TV Configuración Plug & Play ► Idioma : Español ► Tiempo ► Modo Juego : Apag. ► V-Chip ► Subtítulo ► Transpar.
Activación y desactivación del temporizador Utilice esta función para que el televisor se encienda o apague a una hora concreta. Debe ajustar el reloj en primer lugar. 1 Pulse el botón MENU para ver el menú. Pulse los botones ▲ o ▼ para seleccionar Configuración y, a continuación, pulse el botón ENTER. Pulse los botones ▲ o ▼ para seleccionar Hora y, a continuación, pulse el botón ENTER.
Descripción de las funciones Selección del idioma de los menús El ajuste del reloj es necesario para utilizar las distintas funciones de temporización del televisor. Además, podrá ver la hora mientras ve la televisión. (Pulse el botón INFO.) 1 Pulse el botón MENU para ver el menú. Pulse los botones ▲ o ▼ para seleccionar Configuración y, a continuación, pulse el botón ENTER. Pulse los botones ▲ o ▼ para seleccionar Idioma y, a continuación, pulse el botón ENTER.
Visión de subtítulos (mensajes de texto en pantalla) - Digital La función digital Caption (Subtítulo) funciona en canales digitales. 1 Pulse el botón MENU para ver el menú. Pulse los botones ▲ o ▼ para seleccionar Configuración y, a continuación, pulse el botón ENTER. 2 Pulse los botones ▲ o ▼ para seleccionar Subtítulo y, a continuación, pulse el botón ENTER. 3 Pulse el botón ENTER para seleccionar Subtítulo. Pulse los botones ▲ o ▼ para seleccionar Enc. y, a continuación, pulse el botón ENTER.
Visión de subtítulos (mensajes de texto en pantalla) - Analógico La función de Analog Caption (Subtítulos analógicos) funciona en un modo de canal de TV analógico o en modo de señal externa. (Dependiendo de la señal de transmisión, puede funcionar en canales digitales.) 1 2 Pulse el botón MENU para ver el menú. Pulse los botones ▲ o ▼ para seleccionar Configuración y, a continuación, pulse el botón ENTER. TV Configuración Plug & Play ► Idioma : Español ► Tiempo ► Modo Juego : Apag.
Nivel de transparencia de los menús Ajusta la transparencia de la pantalla de menús. 1 Pulse el botón MENU para ver el menú. Pulse los botones ▲ o ▼ para seleccionar Configuración y, a continuación, pulse el botón ENTER. 2 Pulse los botones ▲ o ▼ para seleccionar Transpar. del Menú y, a continuación, pulse el botón ENTER. 3 Pulse los botones ▲ o ▼ para seleccionar el nivel y, a continuación, pulse el botón ENTER. TV Configuración Plug & Play ► Idioma : Español ► Tiempo ► Modo Juego : Apag.
Uso de la función de ahorro de energía Esta función ajusta el consumo de energía de la unidad para ahorrar energía.Esta función ajusta el consumo de energía de la unidad para ahorrar energía. 1 2 Pulse el botón MENU para ver el menú. Pulse los botones ▲ o ▼ para seleccionar Configuración y, a continuación, pulse el botón ENTER. TV Pulse los botones ▲ o ▼ para seleccionar Ahorro energía y, a continuación, pulse el botón ENTER. Pulse los botones ▲ o ▼ para seleccionar Apag.
Reducción de los efectos de una pantalla quemada Si la pantalla se ha quemado, puede seleccionar una pantalla blanca o un desplazamiento para que le ayude a retirar los elementos quemados. 1 Pulse el botón MENU para ver el menú. Pulse los botones ▲ o ▼ para seleccionar Configuración y, a continuación, pulse el botón ENTER. 2 Pulse los botones ▲ o ▼ para seleccionar Protección de pantalla y, a continuación, pulse el botón ENTER.
Ajuste de montaje en la pared (se vende por separado) Una vez instalado el montaje mural, la posición del televisor se puede ajustar fácilmente. Automatique Mur-Montez Panel posterior del TV Cable de EX-LINK (no suministrado) Acceso al menú TV 1 Pulse el botón MENU para ver el menú. Pulse los botones ▲ o ▼ para seleccionar Configuración y, a continuación, pulse el botón ENTER. 2 Pulse los botones ▲ o ▼ para seleccionar Ajuste del montaje mural y, a continuación, pulse el botón ENTER.
Actualización del software Samsung puede ofrecer actualizaciones del firmware del televisor en el futuro. Póngase en contacto con el centro de llamadas de Samsung en 1-800-SAMSUNG para recibir información acerca de la descarga de las actualizaciones y del uso de un controlador USB. Las actualizaciones se pueden realizar conectando una unidad USB al puerto USB situado en la parte posterior del televisor.
3 Aparecerá la pantalla V-Chip. Pulse los botones ▲ o ▼ para seleccionar Cambiar Código y, a continuación, pulse el botón ENTER. Aparecerá la pantalla para cambiar el código. Escriba un nuevo código PIN de 4 dígitos. Vuelva a escribir los 4 dígitos. Cuando se muestra el mensaje El PIN se ha cambiado satisfactoriamente., el PIN se ha memorizado. TV Pulse el botón EXIT para salir. ➢ V-Chip Bloqueo V-Chip : Apag. Guías pater. TV Clas. MPAA Clasificación U.S.
3 4 Aparecerá la pantalla V-Chip. Pulse los botones ▲ o ▼ para seleccionar Guías pater. y pulse el botón ENTER. V-Chip Bloqueo V-Chip : Enc. Guías pater. TV Clas. MPAA Inglés Canadiense Francés Canadiense Clasificación U.S. Descargable Cambiar Código Aparecerá la pantalla Guías pater. TV. Pulse los botones ▲ o ▼ para seleccionar una de las seis categorías basadas en la edad: • TV-Y: Todos los niños.
Cómo configurar las limitaciones utilizando Clas. MPAA (G, PG, PG-13, R, NC-17, X, NR) El sistema de clasificación MPAA utiliza el sistema de la Motion Picture Association of America (Asociación americana de cinematografía) y se aplica principalmente en las películas. Cuando el bloqueo V-Chip está activado, el televisor bloquea automáticamente cualquier programa que tenga una determinada clasificación (ya sea según la clasificación MPAA o según la guía de programas de TV).
3 4 Aparecerá la pantalla V-Chip. Pulse los botones ▲ o ▼ para seleccionar Inglés Canadiense y, a continuación, pulse el botón ENTER. Pulse los botones ▲ o ▼ para seleccionar la restricción apropiada: Pulse el botón ENTER para activar la restricción seleccionada. Se muestra el símbolo “ ”. TV V-Chip Bloqueo V-Chip : Enc. Guías pater. TV Clas. MPAA Inglés Canadiense Francés Canadiense Clasificación U.S. Descargable Cambiar Código Mover TV Ingresar Perm.Todo Bloq.
Uso de V-Chip (V-Chip) con los canales digitales La información de la restricción de bloqueo se puede usar mientras se ven los canales DTV. 1 2 3 4 Pulse el botón MENU para ver el menú. Pulse los botones ▲ o ▼ para seleccionar Configuración y, a continuación, pulse el botón ENTER. Pulse los botones ▲ o ▼ para seleccionar V-Chip y pulse el botón ENTER. Aparecerá el mensaje Ingresar código. Escriba su código PIN de 4 dígitos. Aparecerá la pantalla V-Chip.
Acerca de Anynet+ Qué es Anynet+? Anynet+ es un sistema de red de AV que permite controlar todos los dispositivos AV de Samsung conectados con el mando a distancia del televisor Samsung. Conexión de dispositivos Anynet+ El sistema Anynet+ sólo se puede usar con dispositivos AV de Samsung que tengan la función Anynet+. Para asegurarse de que el dispositivo AV de Samsung tenga dicha función, compruebe si lleva la marca Anynet+.
Configuración de Anynet+ Parámetros para usar las funciones Anynet+. Para usar la función Anynet+, Anynet+ (HDMI-CEC) debe estar configurado como Enc.. 1 Pulse el botón Anynet+. Pulse los botones ▲ o ▼ para seleccionar Configuración y, a continuación, pulse el botón ENTER. 2 Pulse el botón ENTER para seleccionar Anynet+ (HDMI-CEC) y, a continuación, pulse el botón ENTER. 3 Pulse los botones ▲ o ▼ para seleccionar Enc. y, a continuación, pulse el botón ENTER.
Menú Anynet+ El menú Anynet+ cambia según el tipo y el estado de los dispositivos Anynet+ conectados al televisor. Menú Anynet+ Ver TV Descripción + Cambia de Anynet al modo de emisión de TV. Grabar Comienza una grabación. (Este menú sólo funciona en un dispositivo que admita grabación.) Menú (Nombre_dispositivo) Muestra el menú del dispositivo conectado. Ejemplo: Cuando hay un grabador de DVD conectado, aparece el menú de títulos del grabador de DVD.
Escucha a través de un receptor (sistema Home Cinema) Se puede escuchar sonido a través de un receptor en lugar de hacerlo mediante el altavoz del TV. 1 Pulse el botón Anynet+. Pulse los botones ▲ o ▼ para seleccionar Receptor y, a continuación, pulse el botón ENTER. TV Aire 28 Receptor: Enc. Conectar Grabar Configuración 2 Pulse los botones ◄ o ► para seleccionar Enc. y, a continuación, pulse el botón ENTER. Ahora podrá escuchar el sonido a través del receptor. 3 Pulse el botón EXIT para salir.
Apéndice Identificación de problemas Si cree que el televisor tiene un problema, compruebe primero esta lista de posibles problemas y soluciones. Si no funciona ninguno de estos consejos, llame al centro de servicio técnico Samsung más cercano. Problema Mala calidad de imagen. Sonido de mala calidad. No hay imagen ni sonido. No hay sonido o se oye demasiado bajo con el volumen al máximo. La imagen se mueve verticalmente. El televisor funciona de forma inestable. El televisor no se enciende.
Instalación del equipo de montaje en la pared Esta instalación se debe usar al colocar el equipo de montaje en una pared. Al colocarlo en otros materiales de construcción, póngase en contacto con el distribuidor más cercano.
Cómo montar el soporte base (según el modelo) Utilizando los 6 tornillos para asegurar el soporte y el monitor, fije firmemente el monitor al soporte. Es posible que el exterior del EQUIPO sea diferente del que se muestra en la imagen. Cuando instale el televisor en una pared, fije la tapa (1) ) del soporte con dos tornillos. Advertencia Sujete firmemente el soporte al televisor antes de moverlo, ya que el soporte puede caer y podría causar lesiones graves.
Dimensiones (HP-T4254) 41.5 12.6 21.1 27.5 30.0 12.8 37.0 26.0 VISTA SUPERIOR VISTA FRONTAL DETALLE DE PANEL DE CONECTORES 5,7 Al x 47,6 An a 14,4 cm DESDE ABAJO 23.6 3.7 15.7 1.2 5.2 7.3 12.4 VISTA LATERAL VISTA POSTERIOR NOTA: No todos los dibujos están necesariamente a escala. Algunas dimensiones están sujetas a cambio sin previo aviso. Consulte las dimensiones de cada unidad antes adaptar el mueble para el televisor.
Dimensiones (HP-T5054) 48.5 14.5 24.6 33.4 31.1 14.5 43.7 26.0 VISTA SUPERIOR VISTA FRONTAL DETALLE DE PANEL DE CONECTORES 5,7 Al x 47,6 An a 14,4 cm DESDE ABAJO 23.6 3.7 15.7 1.2 5.2 7.3 12.4 VISTA LATERAL VISTA POSTERIOR NOTA: No todos los dibujos están necesariamente a escala. Algunas dimensiones están sujetas a cambio sin previo aviso. Consulte las dimensiones de cada unidad antes adaptar el mueble para el televisor.
Esta página se ha dejado en blanco expresamente. BN68-01192E-02Spa_4.
Esta página se ha dejado en blanco expresamente. BN68-01192E-02Spa_4.
Contact SAMSUNG WORLD-WIDE If you have any questions or comments relating to Samsung products, please contact the SAMSUNG customer care center. Contacte con SAMSUNG WORLD-WIDE Si tiene alguna pregunta o comentario referente a nuestros productos, por favor contacte con nuestro Servicio de Atención al Cliente. Country Customer Care Center Web Site CANADA 1-800-SAMSUNG (7267864) www.samsung.com/ca U.S.A 1-800-SAMSUNG (7267864) www.samsung.com Address Samsung Electronics Canada Inc.