Digital Surround AV Receiver System SAMSUNG ELECTRONICS CANADA, INC. HEADQUARTERS 7037 Financial Drive, Mississauga, Ontario, Canada L5N 6R3 TEL: 1-905-542-3535 HT-AS600 www.samsung.
Safety Warnings CAUTION: TO REDUCE THE RISK OF ELECTRIC SHOCK, DO NOT REMOVE REAR COVER. NO USER SERVICEABLE PARTS INSIDE. REFER SERVICING TO QUALIFIED SERVICE PERSONNEL.
Features Contents PREPARATION PREPARATION Safety Warnings ..............................................................................................................1 Precautions......................................................................................................................2 Features ..........................................................................................................................3 Description ................................................................
Description INPUT button HEADPHONE Jack POWER STANDBY Indicator SETUP button AM ANTENNA JACK SURROUND button POWER button VOLUME CONTROL REMOTE CONTROL Sensor ANALOG / DIGITAL BUTTON [ Display ] SELECTION button TUNER ( , ) button MPEG2 INDICATOR DTS INDICATOR DOLBY INDICATOR VCR/SAT VIDEO INPUT JACK VCR VIDEO OUTPUT JACK FM ANTENNA JACK CD COAXIAL DIGITAL AUDIO INPUT JACK DVD VIDEO INPUT JACK DVD OPTICAL DIGITAL AUDIO INPUT JACK FRONT SPEAKER TERMINALS PREPARATION [ Rear Panel ] [ Fron
Description POWER button TV VIDEO, FUNCTION button SLEEP button TUNER button SPEAKER DISTANCE button TEST TONE button MODE button PREPARATION [ Remote Control ] Insert Remote Batteries TV Indicator VCR Indicator AV RECEIVER Indicator DVD Indicator MODE button MO/ST button SUBWOOFER button SPEAKER SETUP button SFE MODE button EFFECT button 1 Remove the battery cover on the back of the remote by pressing down and sliding the cover in the direction of the arrow. 2 Insert two 1.
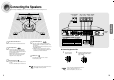
Connecting the Speakers Before moving or installing the product, be sure to turn off the power and disconnect the power cord. ACTIVE SUBWOOFER (not supplied) CONNECTIONS SL FRONT (R) FRONT (L) SURROUND (R) SURROUND (L) PS-AF600 PS-AF600 PS-AR600 PS-AR600 MAIN UNIT AV-R600 SR SYSTEM MODEL NAME : HT-AS600 Position of AV Receiver Surround Speakers • Place AV Receiver on a dedicated stand or rack. • Place these speakers behind your listening position.
Connecting External Components Connecting Video Component Before moving or installing the product, be sure to turn off the power and disconnect the power cord. SAT(Settop Box) Video Projector CONNECTIONS DVD Player • Since Analog Audio In and Video In jack of the main unit are used for both SAT and VCR, you cannot connect 2 devices at the same time. • If the external component has only one Audio Output jack, connect it to either the right or left Audio Input jack of the main unit.
Connecting External Component Connecting the FM and AM Antennas If AM reception is poor, connect an outdoor AM antenna(not supplied). Connecting Audio Component Before moving or installing the product, be sure to turn off the power and disconnect the power cord. CONNECTIONS AM Loop Antenna (supplied) FM Antenna (supplied) CD Player Snap the tabs on the loop into the slots of the base to assemble the AM loop antenna. FM antenna connection 1.
Before Using the AV Receiver To Select the Function Turning On/Off REMOTE CONTROL MAIN UNIT Method 1 1 Connect the power plug to the outlet. the POWER ( ) button of the main unit. 2 Press This unit will be turned on or off. Press the FUNCTION button. • Each time you press the this button, CD ➝ DVD ➝ VCR/SAT ➝ FM ➝ AM will be selected in turn. • Method 2 REMOTE CONTROL Press the POWER ( Selecting External Component Input Press DIRECT FUNCTION Select button.
Setting the Speaker Mode Before moving or installing the product, be sure to turn off the power and disconnect the power cord.Signal outputs and frequency response from the speaker will automatically be adjusted according to your speaker configuration and whether certain speakers are used or not. √ REMOTE CONTROL SPK SEL. button to select the speaker you want. 1 Press Each time you press this button, F.SPK ➝ C.SPK ➝ S.SPK ➝ SW SPK ➝ • CROVR ➝ SPK MODE OFF will be selected in turn.
Setting the Speaker Listening Distance √ REMOTE CONTROL 1 Press the SPEAKER DISTANCE button to select the speaker you want. MAIN UNIT • Each time you press this button, F.L ➝ CEN ➝ F.R ➝ S.R ➝ S.L ➝ S.W ➝ DISTANCE OFF will be selected in turn. SETUP button. 1 Press “SETUP MODE” appears on the display and enters into Setup Mode. 2 Press INPUT button 2 times. …† button to set the speaker distance. 2 Press For F.L, CEN, F.R, S.
Setting DRC (Dynamic Range Compression) Test Tone You can use this function to enjoy Dolby Digital sound when watching movies at low volume at night. Use test tone to check the speaker connection status or level. To Automatically Output Test Tone √ REMOTE CONTROL √ 1 Press TEST TONE button. • Test signal will be automatically output as follows; F.L ➝ CEN ➝ F.R ➝ S.R ➝ S.L ➝ S.W. MAIN UNIT • During test tone output, press …† button to adjust the speaker output level from -10 to +10 dB by 1 step.
Test Tone Use test tone to check speaker connection status or level. To Automatically Output Test Tone To Manually Output Test Tone √ MAIN UNIT MAIN UNIT SETUP button. 1 Press “SETUP MODE” appears on the display and enters into Setup Mode. 2 Press INPUT button 4 times. “TEST-T AUTO” appears in the display. 3 Press SURROUND button. SETUP button. 1 Press “SETUP MODE” appears on the display and enters into Setup Mode. 2 Press INPUT button 5 times. • • • “TEST-T MANU” appears in the display.
Setting Speaker Level You can set the balance and level of speakers √ Remote Control SPK LEVEL button to select the speaker you want. 1 Press Each time you press this button, F.L ➝ CEN ➝ F.R ➝ S.R ➝ S.L ➝ S.W ➝ • MAIN UNIT SPK LEVEL OFF will be selected in turn. …† button to set the speaker level you want. 2 Press You can adjust it from -10 to +10dB by 1 step. 1 Press SETUP button. • • “SETUP MODE” appears on the display and enters into Setup Mode.
Dolby Pro Logic ll Mode This mode provides 5.1 channel sound from 2 channel sources REMOTE CONTROL MODE button. 1 Press Each time you press this button, MUSIC ➝ CINEMA ➝ MATRIX ➝ PROLOGIC • will be selected in turn. MAIN UNIT 1 Press SURROUND button briefly to select “DPL ll” Mode. • Each time you press this button, DPL ll ➝ SFE ➝ STEREO will be selected in turn. , OPERATION 2 Press SELECT( ) button. ) button, MUSIC ➝ CINEMA ➝ MATRIX ➝ PROLOGIC will be selected in turn.
Dolby Pro Logic ll Effect This function works only in Dolby PRO LOGIC II MUSIC Mode. REMOTE CONTROL MODE button to select ‘MUSIC’ Mode. 1 Press EFFECT button. 2 Press Each time you press this button, C-WIDTH ➝ DIMENSION ➝ PANORAMA ➝ • DPL ll EFT OFF will be selected in turn. MAIN UNIT SETUP button. 1 Press “SETUP MODE” appears on the display and enters into Setup Mode. • • SURROUND button.
SFE Mode Refer to the unique sound existing at specific place and you can feel live sound as if you are listening at actual site. REMOTE CONTROL SFE MODE button. 1 Press Each time you press this button, HALL ➝ THEATER ➝ ARENA ➝ CLUB ➝ • DOME ➝ STADIUM ➝ CHURCH will be selected in turn. MAIN UNIT 1 Press SURROUND button briefly to select ‘SFE’ Mode. • Each time you press this button, DPL II ➝ SFE ➝ STEREO will be selected in turn. , ) button.
Stereo Mode You can select this mode when you listen to sound through the Front Left and Right speakers and subwoofer. For Surround Mode and Input Signal o = active, – = inactive Surround Mode Dolby D Surr. EX Dolby Digital 5.1 O O O O DIGITAL L, C, R, SL, SR, SW Dolby D (5.1ch) Dolby Digital 5.1 O O O O DIGITAL L, C, R, SL, SR, SW Dolby D (2ch) Pro Logic II x O O O O DIGITAL L, R Dolby D (2ch Surr) Pro Logic II x O O O O DIGITAL L.PCM (Audio) Pro Logic II x O O O O L.
Listening to Radio Presetting Radio Stations You can listen to the chosen band (FM, AM broadcast stations) by using either the automatic or manual tuning operation. You can preset up to 30 FM and AM stations. REMOTE CONTROL Ex) If you preset FM 89.1 station in 2ch TUNER button. 1 Press Each time you press this button, FM ➝ AM will be selected in turn. • 2 Press Select button and then TUNING/CH( , ) button to select 89.1. • Refer to step 2, page 35, to tune in automatically and manually.
Convenient Functions Sleep Timer Function Reset Function You can set the time that this unit will shut itself off. REMOTE CONTROL Press the SLEEP button. • SLEEP : OFF ➝ 15 ➝ 30 ➝ 45 ➝ 60 ➝ 90 ➝ 120MIN will be selected in turn. To Check Sleep Timer Press SLEEP button. • The remaining time before this unit will shut itself off is shown on the display. • Pressing the button again changes the sleep time from what you have set earlier.
Operating TV with Remote Control TV Brand Code List 1 2 3 4 Brand Press MODE button to make the TV indicator on the remote control flash. Press POWER( TV. ) button to turn on the Point the remote control toward the TV. While holding down POWER( ) button, enter the code corresponding to your brand of TV. • If the code matches the TV's code, the TV will be turned off. • If there is more than one code listed for your TV in the table, enter one at a time to determine which code works.
Operating your VCR (DVD) with Remote Control VCR Brand Code List Brand 1 Press MODE button to make VCR indicator on the remote control flash. • If you operate DVD, press Device Select button to make DVD ADMIRAL(M.WARDS) AWIA AKAI ANAM indicator on the remote control flash. 2 3 4 Press POWER( VCR (DVD). ) button to turn on the Point the remote control toward the VCR (DVD). While holding down POWER( ) button, enter the code corresponding to your brand of VCR (DVD).
Before Calling for Service Check Symptom Can't turn it on. • Is the power code plugged into the outlet? • Connect the power plug to the outlet. It does not work when the button is pressed. • Is there static electricity in the air? • Disconnect the power plug and connect it again. • Are the speaker and external Sound is not produced.
Specifications GENERAL FM TUNER AM TUNER AMPLIFIER FREQUENCY RESPONSE S P E A K E R S Speaker system Impedance Rated input Maximum input Dimensions (W x H x D) Weight Front / Surround 4Ω x 4 100W 200W 3.5 x 5.3 x 3.8 inches 1.3 Ibs 120V, 60 Hz 0.9W 95W 9.25 Ibs 16.9 x 2.6 x 13.7 inches 41°F ~ 95°F 10%~75% 87.5~108.0MHz 12dBf MONO/STEREO 55/55dB MONO/STEREO 0.3/0.
Contact SAMSUNG WORLD WIDE If you have any questions or comments relating to Samsung products, please contact the SAMSUNG customer care centre. Contactez SAMSUNG WORLD WIDE Si vous avez des commentaires our des questions concernant les produits Samsung, contactez le centre de service à la clientèle SAMSUNG. Region North America Latin America Europe CIS Country CANADA MEXICO U.S.A ARGENTINE BRAZIL CHILE COSTA RICA ECUADOR EL SALVADOR GUATEMALA JAMAICA PANAMA PUERTO RICO REP.