HT-C6600 5.1CH Blu-ray Home Theater System user manual imagine the possibilities Thank you for purchasing this Samsung product. To receive more complete service, please register your product at www.samsung.com/register HT-C6600_XAA_0504.
Safety Information Safety Warnings TO REDUCE THE RISK OF ELECTRIC SHOCK, DO NOT REMOVE THE COVER (OR BACK). NO USER-SERVICEABLE PARTS ARE INSIDE. REFER SERVICING TO QUALIFIED SERVICE PERSONNEL. CAUTION RISK OF ELECTRIC SHOCK DO NOT OPEN The lighting flash and Arrowhead within Triangle Is awarning sign alerting you of dangerous voltage Inside the product. CAUTION : TO REDUCE THE RISK OF ELECTRIC SHOCK, DO NOT REMOVE COVER (OR BACK) NO USER SERVICEABLE PARTS INSIDE.
This product satisfies FCC regulations when shielded cables and connectors are used to connect the unit to other equipment. To prevent electromagnetic interference with electric appliances, such as radios and televisions, use shielded cables and connectors for connections. FCC NOTE (for U.S.A) This equipment has been tested and found to comply with the limits for a Class B digital device, pursuant to Part 15 of the FCC Rules.
Important Safety Instructions Read these operating instructions carefully before using the unit. Follow all the safety instructions listed below. Keep these operating instructions handy for future reference. 1) Read these instructions. 2) Keep these Instructions. 3) Heed all warnings. 4) Follow all instructions. 5) Do not use this apparatus near water. 6) Clean only with dry cloth. 7) Do not block any ventilation openings. Install in accordance with the manufacturer's instructions.
Precautions • Ensure that the AC power supply in your house complies with the identification sticker located on the back of your product. • Install your product horizontally, on a suitable base (furniture), with enough space around it for ventilation (3~4 inches). • Do not place the product on amplifiers or other equipment which may become hot. Make sure the ventilation slots are not covered. • Do not stack anything on top of the product. • Before moving the product, ensure the Disc Insert Hole is empty.
Safety Information Cautions on Handling and Storing Discs Small scratches on the disc may reduce sound and picture quality or cause skipping. Be especially careful not to scratch discs when handling them. Holding discs • Do not touch the playback side of the disc. • Hold the disc by the edges so that fingerprints will not get on the surface. • Do not stick paper or tape on the disc. Disc Storage • Do not keep in direct sunlight • Keep in a cool ventilated area • Keep in a clean Protection jacket.
Contents Safety Warnings Important Safety Instructions Precautions Cautions on Handling and Storing Discs License Copyright GETTING STARTED 9 10 11 15 16 16 17 18 Key features of your new Blu-ray Home Theater Icons that will be used in manual Disc Types and Characteristics Accessories Description Front Panel Rear Panel Remote control CONNECTIONS 20 22 24 25 26 27 28 Connecting the Speakers Connecting the Optional Wireless Receiver Module Connecting External Devices/your TV via HDMI Connecting the FM A
Contents SETUP 45 45 45 45 46 46 46 General Background Front Display Power On/Off Sound Support Software Upgrade Contact Samsung BASIC FUNCTIONS 47 47 48 49 49 50 52 54 55 56 56 57 Playing a Disc Using the Disc menu / Title menu / Popup menu Using the Search and Skip Functions Slow Motion Play/Step Motion Play Repeat Playback Using the TOOLS button Listening to Music Sound Mode Playing back a Picture Playing Back a USB Storage Device Listening to Radio Using an iPod NETWORK SERVICES 59 63 63 63 Usin
01 Getting Started Getting Started Key features of your new Blu-ray Home Theater Product Features Playback of many disc types, plus an FM tuner This product allows you to play various discs, including BD-ROM/RE/R, DVD-VIDEO, DVD-RW/-R (V mode), DVD+RW/+R, MP3/WMA, JPEG, DivX/MKV/MP4, and CD-R/RW, and has a sophisticated FM tuner, all in a single player.
Getting Started Icons that will be used in manual Make sure to check the following terms before reading the user manual. Term Logo Icon h z Z BD-ROM BD-RE/-R DVD-VIDEO Definition This indicates a function available on a BD-ROM. This indicates a function available on a BD-RE/-R disc recorded in the BD-RE format. This indicates a function available on a DVD-VIDEO.
01 Logos of Discs that can be played Blu-ray Disc Compatibility Blu-ray is a new and evolving format. Accordingly, disc compatibility issues are possible. Not all discs are compatible and not every disc will play back. For additional information, refer to the Disc Types and Characteristics section of this Manual. If you encounter compatibility problems, please contact the SAMSUNG customer care center at 1-800 SAMSUNG. Blu-ray Disc 3D Blu-ray Disc Dolby Digital Plus NTSC broadcast system in U.S.
Getting Started Region code Disc Types Both this product and the discs are coded by region. These regional codes must match in order to play the disc. If the codes do not match, the disc will not play. BD-ROM Disc Type Blu-ray DVD-VIDEO Region Code Area A North America, Central America, South America, Korea, Japan, Taiwan, Hong Kong and South East Asia. B Europe, Greenland, French territories, Middle East, Africa, Australia and New Zealand. C India, China, Russia, Central and South Asia.
01 DivX (Digital Video Express) • An audio disc on which 44.1kHz PCM Audio is recorded. • This product can play back CD-DA format audio CD-R and CD-RW discs. • The product may not be able to play some CD-R or CD-RW discs due to the condition of the recording. DivX is a video file format developed by Microsoft and is based on MPEG4 compression technology to provide audio and video data over the Internet in real-time.
Getting Started Supported File Formats Video File Support File Extension Container *.avi Video Codec Audio Codec Resolution Divx 3.11/4.x/5.1/6.0 MP3 AC3 DTS WMA PCM 1920x1080 XviD AVI MP4v3 H.264 BP/MP/HP 1920x1080 1920x1080 1920x1080 1920x1080 VC-1 AP *.mkv *.wmv DivX 5.1/6.0 MKV XviD WMV (wmv9) *.mp4 MP4 *.mpg *.mpeg PS MP3 AC3 DTS 1920x1080 1920x1080 H.264 BP/MP/HP 1920x1080 VC-1 AP 1920x1080 WMA VC-1 SM MP4 (mp4v) H.264 BP/MP/HP MPEG1 MPEG2 H.
01 USB Host Specification • Supports USB 1.1 or USB 2.0 compliant devices. • Supports devices connected using the USB A type cable. • Supports UMS (USB Mass Storage Device) V1.0 compliant devices. • Supports FAT (FAT, FAT16, FAT32) file system formatting. • CBI (Control/Bulk/Interrupt) is not supported. • Digital Cameras that use PTP protocol or require additional program installation when connected to a PC are not supported. • A device using the NTFS file system is not supported.
Getting Started Description Front Panel 2 1 3 4 5 6 7 8 9 10 11 12 13 ASC IN 1 2 3 4 5 POWER BUTTON ( 6 FUNCTION BUTTON 7 TUNING DOWN & SKIP BUTTON 8 9 STOP BUTTON Stops disc playback. PLAY/PAUSE BUTTON Plays a disc or pauses playback. 10 TUNING UP & SKIP BUTTON Goes to the next title/chapter/track. Tunes up the FM frequency band. 11 VOLUME CONTROL Volume adjustment. 12 USB PORT A USB storage device can be connected here and used as storage when connected to BDLIVE.
01 Getting Started Rear Panel 1 2 3 4 5 6 7 8 9 10 11 FM ANT LAN WIRELESS DIGITAL AUDIO IN HDMI IN 12 13 COMPONENT OUT HDMI OUT iPod OPTICAL SPEAKER IMPEDANCE : 3 WIRELESS LAN AUX IN VIDEO OUT 1 5.1 CHANNEL SPEAKER OUTPUT CONNECTORS Connect the front, center, surround, subwoofer speakers. 2 COOLING FAN The cooling fan supplies cool air to the product to prevent overheating and always revolves when the power is on. 3 iPod JACK Connect the iPod dock connector here.
Getting Started Remote control Tour of the Remote Control POWER FUNCTION TV SOURCE BD RECEIVER/TV SLEEP Turn the product on and off. If you want to change to Home Theater or TV mode on the remote control, check this button's LED color. - Home Theater : Orange - TV: Green Press numeric buttons to operate options. 1 2 3 4 5 6 7 8 9 REPEAT 0 Press this to see the full screen on a TV. Allows you to repeat a title, chapter, track or disc. Press to search backwards or forwards.
01 * Battery size: AAA TV Brand Code List Brand Code Brand Code Admiral (M.Wards) 56, 57, 58 Mitsubishi/ MGA 18, 40, 59, 60, 75 A Mark 01, 15 MTC 18 NEC 18, 19, 20, 40, 59, 60 Anam 01, 02, 03, 04, 05, 06, 07, 08, 09, 10, 11, 12, 13, 14 Nikei 03 Onking 03 01, 18, 40, 48 Onwa 03 Panasonic 06, 07, 08, 09, 54, 66, 67, 73, 74 AOC ✎ NOTE Make sure to match the “+” and “–” ends of Bell & Howell (M.
Connections This section involves various methods of connecting the product to other external components. Before moving or installing the product, be sure to turn off the power and disconnect the power cord. Connecting the Speakers Position of the product Place it on a stand or cabinet shelf, or under the TV stand. SW Selecting the Listening Position The listening position should be located about 2.5 to 3 times the distance of the TV's screen size away from the TV. Example : For 32" TV's 2~2.
02 Connections Connecting The Speakers 1. Press down the terminal tab on the back of the speaker. 2. Insert the black wire into the black terminal (–) and the red wire into the red (+) terminal, and then release the tab. 3. Connect the connecting plugs to the back of the product by matching the colors of the speaker plugs to the speaker jacks.
Connections Connecting the Optional Wireless Receiver Module To connect the surround speakers wirelessly, you have to purchase the wireless receiver module and TX card from your Samsung retailer. • This product should be connected with the SWA-5000 only. Center Speaker Front Speaker (R) Front Speaker (L) SPEAKER IMPEDANCE : 3 Surround Speaker (L) Surround Speaker (R) Subwoofer FM ANT W iPod SPEAKER IMPEDANCE : 3 Wireless Receiver Module Wireless Receiver Module (SWA-5000) 1.
02 Place the wireless receiver module at the rear of the listening position. If the wireless receiver module is too close to the product, some sound interruption may be heard due to interference. If you use a device such as a microwave oven, wireless LAN Card or any other device that uses Connections ✎ NOTE the same frequency (2.4/5.8GHz) near the product, some sound interruption may be heard due to interference.
Connections Connecting External Devices/your TV via HDMI HDMI is the standard digital interface for connecting to devices such as a TV, projector, DVD player, Blu-ray player, set top box, and more. Because HDMI is all digital, you'll enjoy digital quality video and sound as it was originally created, without the distortions that can be caused when digital content is converted to analog.
02 HDMI IN : Connecting to an External Component with an HDMI Cable Connections Connecting External Devices/your TV via HDMI 1. Connect an HDMI cable (not supplied) from the HDMI IN jack on the back of the product to the HDMI OUT jack on your digital device. 2. Press the FUNCTION button to select HDMI. IN1 or HDMI. IN2 input. The mode switches as follows : BD/DVD D. IN AUX HDMI. IN1 HDMI.
Connections Connecting the Video Out to your TV Red LAN Blue Green METHOD 1 COMPONENT OUT METHOD 2 Yellow WIRELESS LAN AUX IN VIDEO OUT METHOD 1 : Component Video (BETTER QUALITY) If your television is equipped with Component Video inputs, connect a Component video cable (not supplied) from the Component Video Output (Pr, Pb and Y) jacks on the back of the product to the Component Video Input Jacks on your TV.
02 Connections Connecting Audio from External Components LAN S DIGITAL AUDIO IN HDMI IN COMPONENT OUT HDMI OUT OPTICAL AUX IN WIRELESS LAN Red Optical Cable (not supplied) Set-Top Box OPTICAL VIDEO OUT White Audio Cable (not supplied) If the external analog component has only one Audio Out, connect either left or right. VCR AUX OPTICAL : Connecting an External Digital Component Digital signal components such as a Cable Box/Satellite receiver (Set-Top Box). 1.
Connections Connecting to the Network This product enables you to view network based services (See pages 59~64) such as Internet@TV and BD-LIVE, as well as receive software upgrades when a network connection is made. We recommend using an AP (Access Point) or IP router for the connection. For more information on router connection, refer to the user manual of the router or contact the router manufacturer for technical assistance. Cable Network 1.
02 Connections Connecting to the Network Wireless Network You can connect to the network with a Wireless IP sharer. 1. Connect the included wireless LAN adapter to the Wireless LAN jack on the back panel of the product. - This unit is compatible with the supplied Wireless LAN Adapter. - You can also use the wireless network by connecting the Wireless LAN Gender Adapter to the Wireless LAN Adapter, and then attaching the Wireless LAN Adapter to the Gender Adapter. 2. Set the network options.
Setup Before Starting (Initial Settings) 1. Turn on your TV after connecting the product. (When the product is connected to TV for the first time, the product will turn on automatically and display the Initial Settings screen.) Initial Settings I On-Screen Language Select a language for the on-screen displays. English 7. Press the ◄► buttons to select the desired Network Settings : Wired, Wireless or PBC (WPS), and then press the ENTER button.
03 again to make changes, press the STOP () button on the front panel of the product for more than 5 seconds with no disc inserted. Use the HDMI cable to connect the product to an Anynet+ (HDMI-CEC)-compliant Samsung TV. If the TV uses a language supported by the product, that language will be set to a preferred language automatically. For this to work, the Anynet+ (HDMI-CEC) feature must be set to On in both TV and the product.
Setup Display You can configure various display options such as the TV Aspect, Resolution, 3D, etc. 3D Select whether to play a Blu-ray Disc with 3D contents in 3D Mode. Settings Display 3D 3D Audio System 3D Mode : Auto NetworkTV Screen Size : 55 inch Language Security General > Move s Select r Return Still Mode : Auto Support TV Screen Size Lets you enter the actual screen size of your TV so that the product can adjust the image according to the screen size and display an optimal 3D image.
03 BD Wise (Samsung Products only) Depending on the type of television you have, you may want to adjust the screen aspect ratio. BD Wise is Samsung's latest inter-connectivity feature. • 16:9 Normal Certain movies (4:3 source) are displayed in 4:3 Pillarbox (black bars on sides of picture) if 16:9 normal is selected. • 16:9 Wide You can view the full 16:9 picture on your widescreen TV.
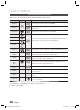
Setup Resolution according to the output mode • Blu-ray Disc playback HDMI / connected Output Setup HDMI / not connected HDMI Mode Component/VIDEO Mode Component Mode VIDEO Mode Auto Optimal Resolution 480i - - 1080p, Movie Frame (24Fs) off 1080p@60F 480i - - 1080p/1080i, Movie Frame (24Fs) on 1080p@24F 480i - - 1080i, Movie Frame (24Fs) off 1080i 480i 1080i 480i 720p 720p 480i 720p 480i 480p 480p 480i 480p 480i 480i - - 480i 480i • DVD playback HDMI / connected O
03 Setup HDMI Format Progressive Mode You can optimize the color setting from the HDMI output by selecting a connected device Type: Set to improve picture quality when you view DVDs. • TV : Select if connected to a TV via HDMI. • Monitor : Select if connected to a Monitor via HDMI. ✎ NOTE A TV or monitor has to be connected to the product before you select this option.
Setup Distance Audio If the speakers cannot be placed at equal distances from the listening position, you can adjust the delay time of the audio signals from the front, center, surround and subwoofer speakers. Speaker Setting Settings Display Audio System Network Language Security General Support Speaker Setting | Level Distance Test tone : • You can set the Speaker Distance between 1ft (0.3m) and 30ft (9.0m).
03 By setting the Musical Room Calibration (MRC) function just once when you relocate or install the product, you can have the product automatically recognize the distance between speakers, levels between channels, and frequency characteristics to create a 5.1-channel sound field optimized for your environment. ASC IN ✎ NOTE Setup Musical Room Calibration Setting the Musical Room Calibration function takes about 3 minutes.
Setup ✎ NOTE Digital Output Lets you set the audio output format according to the capabilities of your amplifier. (For more details, please refer to the digital output selection). • PCM • Bistream (Re-encode) • Bistream (Audiophile) Blu-ray Discs may include three audio streams. - Primary Audio : The audio soundtrack of the main feature. - Secondary Audio : Additional soundtrack such as director or actor's commentary. - Interactive Audio : Plays Interactive sounds when selected.
03 You can listen at low volumes but still hear dialog clearly. This is only active when a Dolby Digital signal is detected. • Off : Turn Dynamic Range Control off. • On : Choose to listen to a movie at a lower volume without losing clarity of dialog. • Auto : The Dynamic Range Control will be set automatically based on the information provided by the Dolby TrueHD Soundtrack.
Setup Description of Device (Storage) Information on the Product DivX(R) Registration • Total Size : Total size of the Device (Storage). • Available Size : Available size of the Device (Storage). View DivX(R) VOD Registration Code to purchase and play DivX(R) VOD content. ✎ NOTE In the external memory mode, disc playback will be stopped if you disconnect the USB device in the middle of the playback. Only those USB devices formatted in FAT file system (DOS 8.3 volume label) are supported.
03 Setup Network Setup Network Setting To begin setting up the network connection for your product, follow these steps: 1. In the Home menu, press the ◄► buttons to select the Settings, and then press the ENTER button. Internet Protocol Setup : Auto IP Address : 0 0 0 0 Subnet Mask : 0 0 0 0 Gateway : 0 0 0 0 DNS : Auto DNS Server : 0 0 0 0 > Move " Enter ' Return 2. Press the ▲▼ buttons to select Network, and then press the ENTER button. 3.
Setup 4. Use the number buttons on your remote to enter numbers. 5. When done with each field, use the ► button to move successively to the next field. You can also use the other arrow buttons to move up, down, and back. 4. After the network connection is set up, press the RETURN button to exit the Network Setting screen. Setting Up the Wireless Network Connection - Auto Network Search 10. Run a Network Test to ensure the product has connected to your network (See page 44).
03 In the list of networks, press the ▲▼ buttons to select a network, and then press the ENTER button. 10. When done, press the BLUE (D) button on your remote, and then press the ENTER button. 6. If the PIN/Security pop-up appears, go to Step 7. If the Network Connecting Screen appears, go to Step 11. 7. Press the ▲▼ buttons to select PIN or Security. For most home networks, you would select Security (for Security Key). 11.
Setup 5. When done with each field, use the ► button to move successively to the next field. You can also use the other arrow buttons to move up, down, and back. 6. Enter the IP Address, Subnet Mask, and Gateway values. 7. Press the ▼ to go to DNS. 8. Press the ▼ button to go to the first DNS entry field. Enter the numbers as above. 9. When done, press the ▲ button to return to Access Point Selection. Select the network, and then press the ENTER button. 10.
03 Setup Security General When you operate this menu for the first time, the password setup screen appears. Enter the desired 4-digit password using the number buttons. (Default password is set to 0000.) Background Change the background theme of the menu screen. Parental Rating The Parental Rating works in conjunction with Blu-ray Disc/DVDs that have been assigned a rating, which helps you control the types of Blu-ray Disc/ DVDs that your family can watch.
Setup Support Software Upgrade This menu allows you to upgrade software for performance improvements or additional services. You can check the current software version, upgrade on the Internet and set the Auto upgrade notification. If the product is properly connected to the network by cable or wirelessly, the product will automatically connect to our website each time it is turned on and download update files if any valid upgrade exists. You can also update software in two other ways: • USB : Visit www.
Disc Structure The contents of disc are usually divided as below. Playback • Blu-ray Disc, DVD-VIDEO 1. Press the OPEN/CLOSE ( ) button to open the disc tray. 2. Place a disc gently into the tray with the disc’s label facing up. 3. Press the PLAY (►) button or OPEN/ CLOSE ( ) button to close the disc tray.
Basic Functions Using the Title Menu Using the Search and Skip Functions Z 1. During playback, press the TITLE MENU button on the remote control. 2. Press the ▲▼◄ ► buttons to make the desired selection, then press the ENTER button. TITLE MENU POPUP Searching for a Desired Scene hzZyx ✎ NOTE Depending on the disc, the menu items may differ and this menu may not be available. The Title Menu will only be displayed if there are at least two titles on the disc. Playing the Title List z 1.
04 Basic Functions Slow Motion Play/Step Motion Play Repeat Off Slow Motion Play hzZyx • In pause mode, press the SEARCH () button. If you press the SEARCH () button, the playback speed is reduced to * 1/8 * 1/4 * 1/2 • To return to normal speed playback, press the PLAY (► ) button. ✎ NOTE 3. To return to normal play, press the REPEAT button again. 4. Press the ▲▼ buttons to select Off, then press the ENTER button. ✎ NOTE Depending on the disc, the Repeat function may not be available.
Basic Functions Information about the primary / secondary Using the TOOLS button During playback, you can operate the disc menu by pressing the TOOLS button. TOOLS • TOOLS Menu Screen Tools Title : 1/1 Chapter 4/21 Playing Time : 00:12:06 Repeat Audio : 1/7 ENG Multi CH Subtitle : 1/6 ENG Angle : 1/1 BONUSVIEW Video : Off BONUSVIEW Audio : 0/1 Off Picture Setting < Change " Select ✎ NOTE ▪ Depending on the disc, the TOOLS menu may differ.
04 x • You must have some experience with video extraction and editing in order to use this feature properly. • To use the caption function, save the caption file (*.smi) with the same file name as that of the DivX media file (*.avi) within the same folder. Example. Root Samsung_007CD1.avi Samsung_007CD1.smi • You can use up to 60 alphanumeric characters or 30 East Asian characters (2 byte characters such as Korean and Chinese) for the file name.
Basic Functions Listening to Music ow Buttons on the Remote Control used for Music Playback @ 1 2 3 4 5 6 7 8 9 FULL SCREEN ENTER button : Plays and pauses the selected track. 8 ◄► buttons : Fast Play. (except for Audio CD (CD-DA)) 9 STOP button : Stops a track. 0 SKIP ($) button : During playback, moves to the next page in the Music List or moves to the next track in the Playlist.
04 Repeat an Audio CD (CD-DA)/MP3 1. Insert an Audio CD (CD-DA) or an MP3 Disc into the disc tray. • Audio CDs (CD-DA) play automatically. • To start an MP3 disc, press the ◄► buttons to select Music, then press the ENTER button. 1. During the Playlist playback, press the REPEAT button. 2. Select the desired play mode by pressing the REPEAT button repeatedly. Off Tracks on a disc are played Audio CD in the order in which they (CD-DA)/MP3 were recorded on the disc.
Basic Functions 4. If there is an undesired track in the playlist, press the YELLOW (C) button again. The selected track will be deleted. 5. Press the ENTER button to play the selected tracks. The selected tracks play automatically. + TRACK 001 05:57 TRACK 002 04:27 TRACK 003 04:07 00:08 / 05:57 s Pause Tools DSP (Digital Signal Processor) Function DSP regulates the volume level and decreases drastic volume changes when you change channels or during a scene transitions.
04 Using the TOOLS button You can select the desired Dolby Pro Logic II audio mode. During the slide show playback, you can use various function by pressing the TOOLS button. Press the MUSIC MOVIE PL II button. When listening to music, you can experience sound effects as if you are listening to the actual performance. TOOLS Basic Functions Dolby Pro Logic II Mode Tools Stop Slide Show Slide Show Speed : Normal Slide Show Effect : Fade1 Background Music Adds realism to the movie soundtrack.
Basic Functions Playing Back a USB Storage Device F You can use the USB connection to play multimedia files (MP3, JPEG, DivX, etc.) downloaded from a USB storage device. 1. Move to the Home menu. 2. In Stop mode, connect the USB storage device to the USB port on the front panel of the product. The message “Do you want to access the device?” appears. 3. Press the ◄► button to select Yes, then press the ENTER button. 4. Press the RED (A) button or the BLUE (D) button.
04 MO/ST Press the MO/ST button. D • Each time the button is pressed, the sound switches between STEREO and MONO. • In a poor reception area, select MONO for a clear, interference-free reception. Using an iPod You can enjoy music and video files from an iPod through the product. FM ANT WIRELESS DIGITAL AUDIO IN HDMI IN Basic Functions Setting Mono/Stereo HDMI O iPod OPTICAL ANCE : 3 iPod Presetting Stations Example : Presetting FM 89.10 into memory 1. Press the FUNCTION button to select FM.
Basic Functions ✎ NOTE Adjust the volume to a moderate level before you connect your iPod and product. When the product is powered on and you connect an iPod, the product charges your iPod's battery. Make sure to connect the dock connector so that the label “SAMSUNG” faces upward. “Made for iPod” means that an electronic accessory has been designed to connect specifically to the iPod and has been certified by the developer to meet Apple performance standards.
05 Network Services Check the following instructions before using any network service. 4. After you have signed off on the service agreement, the Internet@TV service starts updating. It takes several minutes. When the update is complete, you will see the Internet@TV menu screen. 1. Connect the product to the network. (see pages 28~29) Internet@TV at a Glance 2. Configure the network settings.
Network Services Using the On-Screen Keypad 13. Press the ENTER button. Through your remote, you can use the OnScreen Keypad in several Internet@TV applications to enter text. 14. The map and address appear on the screen. Pressing the FULL SCREEN button on the remote while you are using the Screen Keypad lets you change the text fields to lower case, upper case, numbers, and icons.
05 System Setup For a more enjoyable application experience, register and log in to your account. Reset To do this, you must create an account first. (For instructions on creating an account, refer to Internet@TV ID on this page) 1. Press the ▲▼◄► buttons to select the desired application and press the RED (A) button. Resets Internet@TV settings to factory default settings.
Network Services Service Manager Delete and lock applications installed in Internet@ TV. Lock Lock the application. Accessing a locked application requires a password. Using the color buttons with the Samsung Apps • RED (A) (Login) : To log in to the Internet service. • GREEN (B) (Thumbnail View) : To change the view mode. • BLUE (D) (Sort By) : To sort the applications by Featured, Most Downloaded, Most Recent or Name. Delete Delete the application.
05 Once the product is connected to the network, you can enjoy various movie-related service contents using a BD-LIVE compliant disc. 1. Check the size of the remaining memory. The memory device must have at least 1GB of free space to accommodate the BD-LIVE services. 2. Insert a Blu-ray disc that supports BD-LIVE. 3. Select an item from various BD-LIVE service contents provided by the disc manufacturer.
Network Services To use Share Manager, follow these steps: AllShare does not support the following functions. 1. Select a folder to share from the My computer pane, and click the Share Folder Enabled icon ( ). (To remove a shared folder : Select a folder to remove from the shared folders, and click the Share Folder Disabled icon ( ).) 2. To apply the updated sharing state to the server, click the Set Change State icon ( ). 3. To enable the product to locate a PC server, click Share from the menu bar.
06 Other information Other information Troubleshooting Refer to the chart below when this product does not function properly. If the problem you are experiencing is not listed below or if the instructions below do not help, turn off the product, disconnect the power cord, and contact Samsung Electronics at 1-800-SAMSUNG. Symptom Check/Remedy I cannot eject the disc. • Is the power cord plugged securely into the outlet? • Turn off the power and then turn it back on. The iPod fails to connect.
Other information Symptom Check/Remedy Aspect ratio cannot be changed. • You can play 16:9 BD/DVDs in 16:9 Wide mode, 4:3 Letter Box mode, or 4:3 Pan - Scan mode, but 4:3 BD/DVDs can be seen in 4:3 ratio only. Refer to the Blu-ray Disc jacket and then select the appropriate function. • The product is not working. (Example: The power goes out or a strange noise is heard.) • Turn off the power, and press and hold the STOP ( ) button on the product for longer than 5 seconds.
06 Other information Symptom Check/Remedy PC Share Manager function I can see folders shared through the PC Share Manager, but I cannot see the files. • Since it shows only files corresponding to the Image, Music, and Movie categories, files that do not correspond to these categories may not be displayed. AllShare function Video is played intermittently. • Check if the network is stable. • Check if the network cable is properly connected and if the network is not overloaded.
Other information Index A D Accessories AllShare Angle Anynet+ (HDMI-CEC) Audio Audio Language AV Sync 15 63 51 39 36 50 39 B Background BD-Live BD-LIVE Internet Connection BD Data Management BD Wise Before Starting (Initial settings) BONUSVIEW 45 63 44 39 33 30 51 Digital Output Disc menu Display DivX(R) Deactivation DivX(R) Registration Dolby Pro Logic ll Mode DSP Dynamic Range Control E EQ Optimizer Change Password Clock Connections Speaker Wireless receiver module TV HDMI FM Antenna Component Co
06 Other information Specifications General FM Tuner Power Requirements AC 120V, 60Hz Power Consumption 75 W Weight 7.7 Ibs Dimensions 16.9 (W) x 2.5 (H) x 12.8 (D) inches Operating Temperature Range +41°F to +95°F Operating Humidity Range 10 % to 75 % Signal/noise ratio 70 dB Usable sensitivity 10 dB Total harmonic distortion 0.5 % BD (Blu-ray Disc) Reading Speed : 4.
Other information 5.1ch speaker system Speaker system Speaker Front Surround Center Subwoofer Impedance 3Ω 3Ω 3Ω 3Ω Frequency range 140Hz~20kHz 140Hz~20kHz 140Hz~20kHz 40Hz ~ 160Hz Output sound pressure level 87dB/W/M 87dB/W/M 87dB/W/M 88dB/W/M Rated input 165W 165W 170W 170W Maximum input 330W 330W 340W 340W Dimensions (W x H x D) Front : 3.54 x 8.17 x 2.7 inches Surround : 3.54 x 5.57 x 2.7 inches Center : 14.17 x 2.93 x 2.7 inches Subwoofer : 6.1 x 13.78 x 11.
LIMITED WARRANTY TO ORIGINAL PURCHASER This SAMSUNG brand product, as supplied and distributed by Samsung Electronics America, Inc.
Contact SAMSUNG WORLD WIDE If you have any questions or comments relating to Samsung products, please contact the SAMSUNG customer care center. Area Contact Centre ` North America Canada 1-800-SAMSUNG (726-7864) Mexico 01-800-SAMSUNG (726-7864) U.S.
QUESTIONS OR COMMENTS? COUNTRY CALL OR VISIT US ONLINE AT WRITE IN THE US 1-800-SAMSUNG (7267864) www.samsung.com/us Samsung Electronics America, Inc. 105 Challenger Road Ridgefield Park, NJ 07660-0511 Code No. AH68-02302R HT-C6600_XAA_0504.