HT-D350K HT-D353HK HT-D355K Digital Home Entertainment System user manual Imagine the possibilities Thank you for purchasing this Samsung product. To receive more complete service, please register your product at www.samsung.
Safety Information Safety Warnings TO REDUCE THE RISK OF ELECTRIC SHOCK, DO NOT REMOVE THE COVER(OR BACK). NO USER-SERVICEABLE PARTS ARE INSIDE. REFER SERVICING TO QUALIFIED SERVICE PERSONNEL. CAUTION RISK OF ELECTRIC SHOCK DO NOT OPEN This symbol indicates “dangerous voltage” inside the product that presents a risk of electric shock or personal injury. CAUTION : TO PREVENT ELECTRIC SHOCK, MATCH WIDE BLADE OF PLUG TO WIDE SLOT, FULLY INSERT.
Precautions ~ Ensure that the AC power supply in your house complies with the identification sticker located on the back of your product. ~ Install your product horizontally, on a suitable base (furniture), with enough space around it for ventilation (7.5~10cm). ~ Do not place the product on amplifiers or other equipment which may become hot. Make sure the ventilation slots are not covered. ~ Do not stack anything on top of the product. ~ Before moving the product, ensure the Disc Insert Hole is empty.
Safety Information Cautions on Handling and Storing Discs Small scratches on the disc may reduce sound and picture quality or cause skipping. Be especially careful not to scratch discs when handling them. Holding discs ~ Do not touch the playback side of the disc. ~ Hold the disc by the edges so that fingerprints will not get on the surface. ~ Do not stick paper or tape on the disc. Disc Storage ~ Do not keep in direct sunlight ~ Keep in a cool ventilated area ~ Keep in a clean Protection jacket.
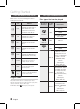
Contents Safety Information Basic Functions 2 3 3 4 4 4 4 23 24 24 25 28 29 Safety Warnings Precautions Accessories Cautions on Handling and Storing Discs License Copyright Copy Protection Getting Started 6 6 9 9 9 10 Icons that will be used in manual Disc Types and Characteristics Description Front Panel Rear Panel Remote control 11 15 17 17 18 Connecting the Speakers Connecting the Video Out to your TV Connecting the FM Antenna Connecting Microphone Connecting Audio from External Components Setu
Getting Started Icons that will be used in manual Make sure to check the following terms before reading the user manual. Icon Term Definition DVD This involves a function available with DVD-Video or DVD±R/±RW discs that have been recorded and Finalized in Video Mode. B CD This involves a function available with a data CD (CD DA, CD-R/-RW). A MP3 This involves a function available with CD-R/-RW discs. G JPEG This involves a function available with CD-R/-RW discs.
01 ~ L D, CD-G, CD-I, CD-ROM, DVD-ROM and DVD-RAM discs cannot be played on this product. If such discs are played, a message appears on the TV screen. ~ DVD discs purchased abroad may not play on this product. If such discs are played, a message appears on the TV screen. Disc Types And Disc Format This product does not support Secure (DRM) Media files.
Getting Started Notes on USB connection 14) Supported file formats Format Still Picture File name JPG MP3 WMA WMV DivX File extension JPG .JPEG .MP3 .WMA .WMV .AVI 2) A subtitle file bigger than 300KB may not be properly displayed. Bitrate – 80~320 kbps 56~128 kbps 4Mbps 4Mbps 3) A certain USB/digital camera device, USB card reader is not supported. Version – – V8 V1,V2, V3,V7 DivX3.11~ DivX5.1 Pixel 640x480 – – 720x480 Sampling Frequency – 44.1kHz 44.1kHz 44.
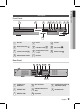
01 Front Panel 1 2 3 4 5 6 7 8 9 10 5V 500mA MIC 1 MIC 2 11 1 DISC TRAY 4 OPEN/CLOSE BUTTON ( 7 PLAY/PAUSE BUTTON ( 10 2 DISPLAY ) 5 FUNCTION BUTTON ( ) 8 11 REMOTE CONTROL SENSOR 3 USB PORT ) 6 STOP BUTTON ( VOLUME CONTROL BUTTON ( , ) 9 POWER BUTTON ( ) ) MIC JACKS Rear Panel 1 2 3 4 SPEAKERS OUT FRONT CENTER FRONT SUBWOOFER SURROUND 5 6 COMPONENT OUT FM ANT HDMI OUT SURROUND SPEAKER IMPEDANCE : 3 ONLY FOR SERVICE DIGITAL AUDIO IN AUX IN 8 VIDEO OUT
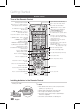
Getting Started Remote control Tour of the Remote Control To open and close the disc tray. Turn the product on and off. Allow access to common functions of the product such as the Photo List. A. TITLE button : Press to check the title menu. B. DISC MENU button : Press to check the disc menu. Press numeric button to operate options. or 5. USB REC button : Used to start USB recording. 6. DIMMER button : Adjust the brightness of Display. 7. INFO button :Display current disc(file) status.
02 Connections Connections This section involves various methods of connecting the product to other external components. Before moving or installing the product, be sure to turn off the power and disconnect the power cord. Connecting the Speakers Position of the product SW Place it on a stand or cabinet shelf, or under the TV stand. Selecting the Listening Position The listening position should be located about 2.5 to 3 times the distance of the TV's screen size away from the TV.
Connections Speaker Components HT-D350K (L) (R) (L) FRONT (R) SURROUND CENTER Speaker Components SUBWOOFER SPEAKER CABLE Assembled Speakers HT-D353HK HT-D353HK (R) (L) Stand Nut: 2EA Stand Screwdriver: 2EA STAND BASE FRONT (L) SURROUND SPEAKER SUBWOOFER FRONT SPEAKER (R) SPEAKER CABLE SURROUND Center SPEAKER CENTER HT-D355K SUBWOOFER HT-D355K SPEAKER CABLE (L) (R) SCREW (5×15): 4EA SCREW (4×20): 16EA FRONT (L) STAND (R) Center SPEAKER CENTER FRONT/SURROUND SPEAKER
02 Connections Installing the Speakers on the Half Tallboy Stand * HT-D353HK only - Front Speakers 1 2 1. Stretch out the speaker cable and arrange it through the hole of the stand base as shown. 2. Tighten the stand nut (C) as shown and use the stand screwdriver (D) to tighten it in the arrow direction. 3. This is after the speaker is installed completely. Tighten the other speakers in the same manner. 3 Installing the Speakers on the Tallboy Stand * HT-D355K only - Front/Surround Speakers 1.
Connections 3. Adjust the speaker height by fitting it up to any of the provided holes. See the following examples for the speaker height. Hole 1: 650mm for the speaker height. Hole 2: 635mm for the speaker height. (The default speaker height is 570mm) 4. Close the cover and tighten two screws as shown. 3 4 Hole 1 Hole 2 5 5. This is after the speaker height is adjusted. Follow the steps above to adjust the speaker height at any time. Connecting The Speakers 1.
02 Connections Connecting the video Out to your Tv Choose one of the three methods for connecting to a TV. METHOD 2 Red SPEAKERS OUT FRONT CENTER Blue COMPONENT OUT FRONT FM ANT HDMI OUT SURROUND SUBWOOFER SURROUND SPEAKER IMPEDANCE : 3 Green ONLY FOR SERVICE DIGITAL AUDIO IN AUX IN METHOD 3 (supplied) VIDEO OUT METHOD 1(supplied) METHOD 1 : HDMI Connect an HDMI cable (supplied) from the HDMI OUT jack on the back of the product to the HDMI IN jack on your TV.
Connections HDMI FUNCTION HDMI Auto Detection Function The product's video output will automatically change to HDMI mode when connecting an HDMI cable while power is on. ~ HDMI (High Definition Multimedia Interface) ~ HDMI is an interface that enables the digital transmission of video and audio data with just a single connector. Using HDMI, the product transmits a digital video and audio signal and displays a vivid picture on a TV having an HDMI input jack.
02 Connections Connecting the fm Antenna FM Antenna (supplied) SPEAKERS OUT FRONT CENTER COMPONENT OUT FRONT FM ANT HDMI OUT SURROUND SUBWOOFER SURROUND SPEAKER IMPEDANCE : 3 ONLY FOR SERVICE DIGITAL AUDIO IN AUX IN VIDEO OUT 1. Connect the FM antenna supplied to the FM Antenna jack. 2. Slowly move the antenna wire around until you find a location where reception is good, then fasten it to a wall or other rigid surface. ✎ NOTE ` This product does not receive AM broadcasts.
Connections Connecting Audio from External Components SPEAKERS OUT FRONT CENTER COMPONENT OUT FRONT FM ANT HDMI OUT SURROUND SUBWOOFER SURROUND SPEAKER IMPEDANCE : 3 ONLY FOR SERVICE DIGITAL AUDIO IN AUX IN Red VIDEO OUT White Optical Cable (not supplied) Audio Cable (not supplied) If the external Analog component has only one Audio Out, connect either left or right. Set-Top Box OPTICAL VCR AUX AUX : Connecting an External Analog Component Analog signal components such as a VCR. 1.
A B D S/W LEVEL 1 2 3 REPEAT USB REC DIMMER 6 4 5 INFO GIGA 7 8 9 03 Setup C DSP / EQ PL VOL 1. Press the POWER button when it is plugged in TV for the first time. Initial Setting screen will be displayed. Initial settings I On-Screen Language Setup 0 Before Starting (Initial Setting) Setting the Setup menu TV CH V MUTE The access step may differ depending on the selected menu. The GUI (Graphical User Interface) in this manual may differ, depending on the firmware version.
Setup Display You can configure various display options such as the TV Aspect, Resolution, etc. ✎ NOTE ` TV Aspect ` Depending on the type of television you have, you may want to adjust the screen setting. ` ~ 4:3 Pan-Scan Select when you want to see the 16:9 video supplied by the DVD without the black bars on top and bottom, even though you have a TV with a 4:3 ratio screen(extreme left and right portion of the movie picture will be cut off).
03 Speaker Setting Speaker Size ▶ Sound Edit Delay Time Test Tone Move : Off Select Return Select Return ~ For the Front, the mode is set to Small. ~ For the Subwoofer, the mode is set to Present. ~ For the Center and Surround, you can switch the mode to Small or None. - Small : Select this when using the speakers. - None : Select this when no speaker is connected.
Setup DRC (Dynamic Range Compression) This feature balances the range between the loudest and quietest sounds. You can use this function to enjoy Dolby Digital sound when watching movies at low volume at night. ~ You can select either Full, 6/8, 4/8, 2/8, off. AUDIO SYNC Video and audio sync may not match with digital TV. If this occurs, adjust the audio delay time to match the video ~ You can set the audio delay time between 0ms and 300ms. Set it to the optimal status.
The Parental Lock function works in conjunction with DVDs that have been assigned a rating, which helps you control the types of DVDs that your family watches. There are up to 8 rating levels on a disc. Parental Rating Select the rating level you want to set. A larger number indicates that the program is intended for adult use only. For example, if you select up to Level 6, discs that contain Level 7, 8 will not play. Enter the password and then press the ENTER button.
Basic Functions JPEG File Playback Audio CD(CD-DA)/MP3/WMA Playback BA Images captured with a digital camera or camcorder, or JPEG files on a PC can be stored on a CD and then played back with this product. 1. Insert a JPEG disc on the disc tray. Track01 2. Press the _+ buttons to select Photo, and then press the ENTER button. 1/17 3. Press the $% buttons to select the folder you want to play, and then press the ENTER button. 0:15 / 3:59 Function DVD/CD Repeat Play Mode 1.
04 Forward/Reverse Search BAD Press the () buttons for Search Function. D Press the PAUSE button repeatedly. ~ The picture moves forward one frame each time the button is pressed during playback. ✎ NOTE ( 1 ➞ ( 2 ➞ ( 3 ➞ ( 4 ) 1 ➞ ) 2 ➞ ) 3 ➞ ) 4 ` ✎ NOTE No sound is heard during step motion playback. 5 Minute Skip function ` ` No sound is played in search mode. ` This function is available only for the CD-DA. D The playback search produces sound only when searching at )1 and )2 speed.
Basic Functions Using the Title Menu CD/MP3 Repeat 1. During the CD/ MP3 playback, press the REPEAT button repeatedly to select the repeat mode you want. For DVDs containing multiple titles, you can view the title of each movie. 1. B During playback, press the TITLE button on the remote control. 2. Press the $%_+ buttons to make the desired selection, then press the ENTER button.
04 TOOLS menu ) : To access the desired title when there is more than one in the disc. For example, if there is more than one movie on a DVD, each movie will be identified as a Title. ) : Most DVD discs are ` Chapter( FUNCTION TV SOURCE recorded in chapters so that you can quickly find a specific chapter. TUNER MEMORY ` Playing time( ) : Allows playback of D the film from a desired time. You must MO / STenter the starting time as a reference. 3 The time search function does not DIMMERoperate on some discs.
Basic Functions ✎ NOTE Selecting the Subtitle Language D ` The Angle function works only with discs on which multiple angles have been recorded. DIMMER 1. Press the TOOLS button. 2. Press the $% buttons to select SUBTITLE ( display. ) 3. Press the _+ buttons to select the desired subtitle language. ~ Depending on the of languages on a DVD disc, a different audio language is selected each time the button is pressed. You can adjust the brightness of the display on the main unit.
04 ( ) button to tune in to a lower or higher frequency. ~ Automatic Tuning : Press the STOP (@) button to select MANUAL and then press and hold the TUNING ( ) button to automatically search the band. You can also press the S/W LEVEL button on the remote control and use the _ or + buttons to adjust the level of subwoofer. Press the S/W LEVEL button. Dolby Pro Logic II Mode Setting Mono/Stereo POWER DISC MENU You can select the desired Dolby Pro Logic II audio mode, P.Bass or MP3 Enhancement function.
Advanced Functions USB Recording USB function Playing Media Files using the USB Host Feature While playing CD-DA (Compact Disc Digital Audio) using the USB Recording function you can record the audio source in the USB memory. You can enjoy media files such as pictures, movies and music saved on an MP3 player, USB memory stick or digital camera in high quality video with 5.1 channel sound by connecting the storage device to the USB port of the product. 1. Connect the USB device to your product.
06 Other Information Refer to the chart below when this product does not function properly. If the problem you are experiencing is not listed below or if the instruction below does not help, turn off the product, disconnect the power cord, and contact the nearest authorized dealer or Samsung Electronics Service Center. Symptom Check/Remedy I cannot eject the disc. • Is the power cord plugged securely into the outlet? • Turn off the power and then turn it back on. Playback does not start.
Other Information Symptom Check/Remedy • The product is not working. (Example: The power goes out or the front panel key doesn't work or a strange noise is heard.) • The product is not working normally. The rating level password has been forgotten. Can't receive radio broadcast. • Press and hold the STOP (@) button on the remote control for longer than 5 seconds with no disc (reset function). Using the RESET function will erase all stored settings. Do not use this unless necessary.
06 Other Information Specifications General FM Tuner Weight Dimensions Operating Temperature Range Operating Humidity Range Signal/noise ratio Usable sensitivity Total harmonic distortion HDMI 2.2 Kg 430 (W) x 59 (H) x 249 (D) mm +5°C~+35°C 10 % to 75 % 70 dB 10 dB 0.5 % Reading Speed : 3.49 ~ 4.06 m/sec. Approx. Play Time (Single Sided, Single Layer Disc) : 135 min. Reading Speed : 4.8 ~ 5.6 m/sec. Maximum Play Time : 74 min. Reading Speed : 4.8 ~ 5.6 m/sec. Maximum Play Time : 20 min.
HT-D350K Speaker system Speaker Impedance Frequency range Output sound pressure level Rated input Maximum input Dimensions (W x H x D) Weights 5.1ch speaker system Front/ Surround 3Ω 140Hz~20KHz 86dB/W/M Center 3Ω 140Hz~20KHz 86dB/W/M 51W 51W 102W 102W Front/ Surround : 84 x 104.5 x 68.5 mm Center : 84 x 104.5 x 68.5 mm Subwoofer : 155 x 350 x 285 mm Subwoofer 3Ω 40Hz~160Hz 88dB/W/M 75W 150W Front/ Surround: 0.4 Kg, Center : 0.23 Kg Subwoofer : 3.
Contact SAMSUNG WORLD WIDE If you have any questions or comments relating to Samsung products, please contact the SAMSUNG customer care center. Area ` North America Contact Center Web Site Canada Mexico U.S.A 1-800-SAMSUNG (726-7864) 01-800-SAMSUNG (726-7864) 1-800-SAMSUNG (726-7864) www.samsung.com www.samsung.com www.samsung.
Code No.