p~44p(DS1000)-GB-NOR 8/27/04 4:46 PM Page 3 SLIM DIGITAL HOME CINEMA SYSTEM HT-DS1000 HT-DS1100 Instruction Manual COMPACT DIGITAL AUDIO COMPACT DIGITAL VIDEO
1p~44p(DS1000)-GB-NOR 8/27/04 4:46 PM Page 4 Safety Warnings CLASS 1 LASER PRODUCT KLASSE 1 LASER PRODUKT LUOKAN 1 LASER LAITE KLASS 1 LASER APPARAT PRODUCTO LASER CLASE 1 CAUTION RISK OF ELECTRIC SHOCK. DO NOT OPEN CAUTION: TO REDUCE THE RISK OF ELECTRIC SHOCK, DO NOT REMOVE REAR COVER. NO USER SERVICEABLE PARTS INSIDE. REFER SERVICING TO QUALIFIED SERVICE PERSONNEL. CLASS 1 LASER PRODUCT This Compact Disc player is classified as a CLASS 1 LASER product.
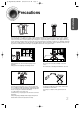
1p~44p(DS1000)-GB-NOR 8/27/04 4:46 PM Page 5 Precautions PREPARATION Ensure that the AC power supply in your house complies with the identification sticker located on the back of your player. Install your player horizontally, on a suitable base (furniture), with enough space around it for ventilation (3~4inches). Make sure the ventilation slots are not covered. Do not stack anything on top of the player. Do not place the player on amplifiers or other equipment which may become hot.
1p~44p(DS1000)-GB-NOR 8/27/04 4:46 PM Page 6 Features Multi-Disc Playback & FM Tuner The HT-DS1000/HT-DS1100 combines the convenience of multi-disc playback capability, including DVD-AUDIO, DVD-VIDEO, VCD, CD, MP3-CD, WMA-CD, DivX, CD-R/RW, and DVD-R/RW, with a sophisticated FM tuner, all in a single player. DVD-Audio compatible Experience the super high-quality audio performance of DVD-Audio.
1p~44p(DS1000)-GB-NOR 8/27/04 4:46 PM Page 7 Contents PREPARATION PREPARATION Safety Warnings..................................................................................................................................................................1 Precautions .........................................................................................................................................................................2 Features............................................................
1p~44p(DS1000)-GB-NOR 8/27/04 4:46 PM Page 8 Notes on Discs DVD (Digital Versatile Disc) offers fantastic audio and video, thanks to Dolby Digital VIDEO 1 ~ 6 surround sound and MPEG-2 video compression technology. Now you can enjoy these realistic effects in the home, as if you were in a movie theater or concert hall. DVD players and the discs are coded by region. These regional codes must match in order for the disc to play. If the codes do not match, the disc will not play.
1p~44p(DS1000)-GB-NOR 8/27/04 4:46 PM Page 9 PREPARATION Disc Recording Format CD-R/RW Discs • Depending on the disc recording device (CD-Recorder or PC ) and the condition of the disc, some CD-R discs may not be playable. • Use a 650MB/74 minute CD-R. Avoid CD-R media, as they may not be playable. • If possible, do not use CD-RW (Rewritable) media, as they may not be playable. • Only CD-Rs that are properly "closed" can be fully played.
1p~44p(DS1000)-GB-NOR 8/27/04 4:46 PM Page 10 Description —Front Panel— Play/Pause ( ) button Power ( ) button Volume control Stop ( ) button Open/Close ( ) button Function button Tuning UP & Skip ( ) button Tuning Down & Skip ( ) button Display DOLBY DIGITAL indicator DSP indicator PRO LOGIC II indicator DVD AUDIO indicator DTS Disc indicator 7
1p~44p(DS1000)-GB-NOR 8/27/04 4:46 PM Page 11 PREPARATION —Rear Panel— Resolution Switch ANYNET INPUT/OUTPUT Connectors External Digital in Optical 1,2 Input Connectors Cooling Fan Accessories Remote Control Auto Sound Calibration Microphone Video Cable FM Antenna HDMI Cable HDMI/DVI Cable DIN Audio Connection Cable Vertical Stand Screw Large : 3EA Screw Small : 4EA Anynet Cable Horizontal Stand Screw Large : 2EA User's Manual 8
1p~44p(DS1000)-GB-NOR 8/27/04 4:46 PM Page 12 Description Top Headphone Jack Auto Sound Calibration button FM Antenna Connector Bottom HDMI Video/Audio Output Connector COMPONENT VIDEO OUTPUT Connector External Audio Component Input Connectors DIN Audio Output Jack Video Output Connector 9
1p~44p(DS1000)-GB-NOR 8/27/04 4:46 PM Page 13 PREPARATION Subwoofer PSWS1000T (Subwoofer of HT-DS1000) Subwoofer Level control Crossover frequency control DIN Audio Input terminal Speaker Output Terminals Subwoofer Power button < Right > < Rear > PSWS1100T (Subwoofer of HT-DS1100) Subwoofer Level control Subwoofer Power button DIN Audio Input terminal Crossover frequency control Speaker Output Terminals < Front > < Rear > 10
1p~44p(DS1000)-GB-NOR 8/27/04 4:46 PM Page 14 Description —Remote Control— TV, DVD POWER button TV/VIDEO, DIMMER button OPEN/CLOSE button TV DVD RECEIVER OPEN/CLOSE TV/VIDEO DIMMER MODE DVD TUNER AUX ASC SLOW MO/ST SUB TITLE SUPER5.1 MUSIC Auto Sound Calibration button DVD button LSM SUPER 5.
1p~44p(DS1000)-GB-NOR 8/27/04 4:46 PM Page 15 PREPARATION Insert Remote Batteries 1 Remove the battery cover on the back of the remote by pressing down and sliding the cover in the direction of the arrow. Caution 2 Insert two 1.5V AAA batteries, paying attention to the correct polarities (+ and –). 3 Replace the battery cover. Follow these precautions to avoid leaking or cracking batteries: • Place batteries in the remote control so they match the polarity:(+) to (+)and (–)to (–).
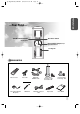
1p~44p(DS1000)-GB-NOR 8/27/04 4:46 PM Page 16 Installing DVD player You can select and install either the Vertical or Horizontal Stand, depending on your preference. Vertical Stand (supplied) Main unit 1 Fix the round support and Vertical Stand with screws 3EA. 2 Open the cover on the rear of Vertical Stand and connect the Audio/Video cable into the Vertical Stand. 3 Locate the two indentations on the bottom of the Main unit. Slide the Main unit onto the two matching dowels on Vertical Stand.
1p~44p(DS1000)-GB-NOR 8/27/04 4:46 PM Page 17 Connecting the Speakers Before moving or installing the product, be sure to turn off the power and disconnect the power cord. C SW R LS Position of the DVD Player • Place it on a stand or cabinet shelf, or under the TV stand. Front Speakers L R • Place these speakers in front of your listening • • position, facing inwards (about 45°) toward you. Place the speakers so that their tweeters will be at the same height as your ear.
1p~44p(DS1000)-GB-NOR 8/27/04 4:46 PM Page 18 Connecting the Speakers Connect the front, rear and center speakers to the speaker output jack on the side of subwoofer. HT-DS1000 Rear of Subwoofer (PSWS1000E) Bottom of Main unit (HT-DS1000) Center Speaker Green Rear Speaker (R) Rear Speaker (L) Gray Red Front Speaker (R) Connecting Main Unit to Subwoofer 1 Use the supplied DIN audio connection cable to connect DIN Audio Out on the main unit to DIN Audio Input on the subwoofer.
1p~44p(DS1000)-GB-NOR 8/27/04 4:46 PM Page 19 HT-DS1100 Rear of Subwoofer (PSWS1100E) Center Speaker Green Rear Speaker (R) Rear Speaker (L) Gray Blue Red White Front Speaker (R) Front Speaker (L) Connecting the Speakers 1 Press down the terminal tab on the back of the speaker. 2 Insert the black wire into the black terminal (–) and the gray wire into the gray (+) terminal, and then release the tab. Black Gray or Caution • Do not let children play with or near the speakers.
1p~44p(DS1000)-GB-NOR 8/27/04 4:46 PM Page 20 Connecting the Video Out to TV Method1 When you connect to Video Out 1 Connect the Video Out to the Video In on the TV. 2 Set the Video Input source on your TV to the corresponding Video output on your Home Theater. Method 2 Good Quality Video Cable (supplied) When you connect to Component Out Better Quality Connect if the TV component input supports the resolution of over 576p(480p).
1p~44p(DS1000)-GB-NOR Method 3 8/27/04 4:46 PM Page 21 When you connect to HDMI Out Best Quality Connect if the TV has an HDMI (or DVI) In jack. Connect the HDMI Out to the HDMI (or DVI) Input on the TV. 2 Set the Video Input source on your TV to the corresponding HDMI output on your Home Theater.
1p~44p(DS1000)-GB-NOR 8/27/04 4:46 PM Page 22 Connecting the Video Out to TV Selecting Resolution You can adjust the resolution switch to set the HDMI and component (PR, PB, Y) output resolution to 576p(480p)/720p/1080i. Example: If the TV supports resolution up to 576p(480p) 1 Set the resolution switch to 576p(480p). • A 576p(480p) video signal is output through the HDMI and component outputs (PR, PB, Y).
1p~44p(DS1000)-GB-NOR 8/27/04 4:46 PM Page 23 How to Connect to Anynet Using the Anynet function, the DVD Home Theater System can be conveniently controlled from your Samsung TV. By connecting the Anynet output terminal on the DVD Home Theater System to the input terminal of any Samsung Anynet-enabled device, both can be controlled from your TV. For detailed operation instructions and connection diagram, refer to the user's manual of your Anynet-enabled TV.
1p~44p(DS1000)-GB-NOR 8/27/04 4:46 PM Page 24 Connecting External Components Connecting an External Digital Component Example: Digital signal components such as a Settop Box or CD Recorder. Optical Cable (not supplied) 1 Connect the Digital In 1 or 2 (OPTICAL) on the main unit to the Digital Output on the external digital component. 2 Press AUX on the remote control to select ‘D.IN 1 or D.IN 2’. • Each time the button is pressed, the selection changes as follows: D.IN 1 ➝D.IN 2 ➝AUX.
1p~44p(DS1000)-GB-NOR 8/27/04 4:46 PM Page 25 Connecting an External Analog Component CONNECTIONS Example: Analog signal components such as a VCR or TV. Audio Cable (not supplied) If the external analog component has only one Audio Out, connect either left or right. L R 1 Connect Audio In on the main unit to Audio Out on the external analog component. 2 Press AUX on the remote control to select AUX. • Be sure to match connector colors.
1p~44p(DS1000)-GB-NOR 8/27/04 4:46 PM Page 26 Connecting the FM Antenna FM antenna connection 1 Connect the FM antenna supplied to the FM 75Ω COAXIAL terminal as a temporary measure. 2 Slowly move the antenna wire around until you find a location where reception is good, then fasten it to a wall or other rigid surface. Selecting the Video Format Press and hold NTSC/PAL button on the remote controller for over 5 seconds while the power is turned off. • "NTSC" or "PAL" will appear in the display.
1p~44p(DS1000)-GB-NOR 8/27/04 4:46 PM Page 27 Before Using Your DVD Player Your DVD player is capable of playing DVD, VCD, CD, MP3 and JPEG discs.Depending on the disc you are using, these instructions may vary slightly. Read the instructions carefully before using. 2 Press the MODE button so that the TV indicator on the remote control flashes. TV 4 Press TV/VIDEO button to select VIDEO mode. 5 3 Press the POWER button to turn on the TV. 6 Press DVD button to select DVD/CD mode.
1p~44p(DS1000)-GB-NOR 8/27/04 4:46 PM Page 28 Disc Playback 1 Press OPEN/CLOSE button to open the disc tray. 2 Insert the disc so that the printed side faces up. 3 Press OPEN/CLOSE button to close the disc window. • The disc plays automatically when the disc window is closed. • The disc menu may appear differently depending on the disc. DVD VCD CD • Playback starts automatically. Note • Depending on the content of the disc, the initial screen may appear different.
1p~44p(DS1000)-GB-NOR 8/27/04 4:46 PM Page 29 Disc terminology Groups and tracks (DVD-AUDIO) • DVD-audios is divided into several large sections called "groups" and smaller sections called "tracks". Numbers are allotted to these sections. These numbers are called "group numbers" and "track numbers".
1p~44p(DS1000)-GB-NOR 8/27/04 4:46 PM Page 30 MP3-CD Playback Data CDs (CD-R, CD-RW) encoded in MP3 format can be played. 1 Press the OPEN/CLOSE button to open the disc tray, and then load the MP3 disc. 2 In Stop mode, use to select the album, and then press the ENTER button. 4 Press the STOP button to stop playback. • The MP3 menu screen will appear and playback will start. • Depending on the MP3 disc, the appearance of the menu may be different.
1p~44p(DS1000)-GB-NOR 8/27/04 4:46 PM Page 31 JPEG Disc Playback Images captured with a digital camera or camcorder, or JPEG files on a PC can be stored on a CD and then played back with this unit. Press the OPEN/CLOSE button to open the disc windows, and then load the JPEG disc. • Playback will start automatically and each image will show for 5 seconds before moving to the next image. OPERATION To rotate the image During playback, press .
1p~44p(DS1000)-GB-NOR 8/27/04 4:46 PM Page 32 DivX Playback Skip Forward/Back During playback, press the button. • Go to the next file whenever you press button, if there are over 2 files in the disk. • Go to the previous file whenever you press button, if there are over 2 files in the disk. Fast playback Press and hold • button. Each time the button is held down during playback, the playback speed changes as follows: Zoom Function 1 Press ZOOM button.
1p~44p(DS1000)-GB-NOR 8/27/04 4:46 PM Page 33 5 Minute Skip function During playback, press the , button. • Go to the screen about 5 minutes after whenever you press • Go to the screen about 5 minutes earlier whenever you press button. button. Subtitle Display Press the SUBTITLE button. • Each time you press the button, your selection will toggle between “SUBTITLE ON” (1/1, 1/2 ...) and “SUBTITLE OFF”. OPERATION • If the disc has only one subtitle file, it will be played automatically.
1p~44p(DS1000)-GB-NOR 8/27/04 4:46 PM Page 34 Displaying Disc Information You can view disc playback information on the TV screen. Press INFO button.
1p~44p(DS1000)-GB-NOR 8/27/04 4:46 PM Page 35 Checking the Remaining Time Press the REMAIN button. • For checking the total and remaining time of a title or chapter being played.
1p~44p(DS1000)-GB-NOR 8/27/04 4:46 PM Page 36 Fast/Slow Playback Fast Playback Press and hold DVD VCD CD MP3 . • Each time the button is held down during playback, the playback speed changes as follows: Slow Playback Press SLOW button. • Each time the button is pressed during playback, the playback speed changes as follows: DVD VCD Note • Reverse slow playback does not work with VCD and DivX.
1p~44p(DS1000)-GB-NOR 8/27/04 4:46 PM Page 37 Skipping Scenes/Songs DVD VCD MP3 Briefly press . • Each time the button is pressed briefly during playback, the previous or next chapter, track, or directory (file) will be played.
1p~44p(DS1000)-GB-NOR 8/27/04 4:46 PM Page 38 Repeat Playback Repeat playback allows you to repeatedly play a chapter, title, track (song), or directory (MP3 file). DVD VCD CD MP3 JPEG Press REPEAT button.
1p~44p(DS1000)-GB-NOR 8/27/04 4:46 PM Page 39 To Select a Repeat Playback Mode in the Disc Information Screen Press INFO button twice. 2 Press Cursor button to move to REPEAT PLAYBACK( ) display. 3 Press Cursor button to select the desired Repeat Playback mode. 4 Press ENTER button. DVD OPERATION 1 VCD CD * For MP3 and JPEG discs, you cannot select Repeat Play from the information display screen. Repeat Playback Options • CHAPTER : Repeatedly plays the selected chapter.
1p~44p(DS1000)-GB-NOR 8/27/04 4:46 PM Page 40 A-B Repeat Playback DVD 1 VCD CD Press INFO button twice. 2 Press Cursor button to move to REPEAT PLAYBACK ( ) display. 4 Press ENTER button at the end of the desired segment. • For a VCD or CD, press INFO button once. 3 Press Cursor , buttons to select ‘A-’ and then press ENTER button at the beginning of the desired segment. • When ENTER button is pressed, the selected position will be stored in memory.
1p~44p(DS1000)-GB-NOR 8/27/04 4:46 PM Page 41 Angle Function This function allows you to view the same scene in different angles. DVD 1 Press INFO button. 2 Press Cursor button to move to ANGLE ( ) display. 1/3 1/3 OPERATION 3 Press Cursor , desired angle. or numeric buttons to select the • Each time the button is pressed, the angle changes as follows: 1/3 2/3 3/3 Note • The Angle function works only with discs on which multiple angles have been recorded.
1p~44p(DS1000)-GB-NOR 8/27/04 4:46 PM Page 42 Zoom Function This function allows you to enlarge a particular area of the displayed image. Zoom (Screen Enlarge) Function 1 Press ZOOM button. 2 Press Cursor , , , buttons to move to the area you want to enlarge. DVD 3 VCD Press ENTER button. • Each time the button is pressed, the zoom level changes as follows: SELECT ZOOM POSITION Aspect Ratio DVD Press EZ VIEW button.
1p~44p(DS1000)-GB-NOR 8/27/04 4:46 PM Page 43 Bonus Group / Navigating Pages Bonus Group DVDAUDIO Some DVD-Audio discs have an extra ‘bonus’ group that requires a 4-digit key number to access. See the disc packaging for details and the-key number. When you play a DVD-Audio disc that has a bonus group, the key number input screen appears automatically.
1p~44p(DS1000)-GB-NOR 8/27/04 4:46 PM Page 44 Selecting Audio/Subtitle Language Audio Language Selection Function 1 Press INFO button twice. 2 DVD Press Cursor , buttons or numeric buttons to select the desired audio language. • Depending on the number of languages on a DVD disc, a different audio language (ENGLISH, SPANISH, FRENCH, etc.) is selected each time the button is pressed. SP 2/3 FR 3/3 Subtitle Language Selection Function 1 Press INFO button twice.
1p~44p(DS1000)-GB-NOR 8/27/04 4:46 PM Page 45 Moving Directly to a Scene/Song DVD 1 VCD CD Press INFO button. 01/05 001/040 0:00:37 MP3 025/040 0:00:01 Press Cursor , buttons or numeric buttons to select the desired title/track and then press ENTER button. Press Cursor , buttons to move to Chapter ( ) display.
1p~44p(DS1000)-GB-NOR 8/27/04 4:46 PM Page 46 Using Disc Menu You can use the menus for the audio language, subtitle language, profile, etc. DVD menu contents differ from disc to disc. DVD 1 In Stop mode, press MENU button. • When playing a VCD (version 2.), this toggles between PBC ON and OFF. 3 Press Cursor , , buttons to select the desired item. 2 Press Cursor , buttons to move to ‘DISC MENU’ and then press ENTER button.
1p~44p(DS1000)-GB-NOR 8/27/04 4:46 PM Page 47 Using the Title Menu For DVDs containing multiple titles, you can view the title of each movie. Depending on the disc, this function may either not work at all or may work differently. DVD 1 In Stop mode, press MENU button. 2 Press Cursor , button to move to ‘Title Menu’. 3 Press ENTER button. • The title menu appears. OPERATION Press MENU button to exit the setup screen.
45P~82P(DS1000)-GB-NOR 8/27/04 4:47 PM Page 46 Setting the Language OSD language is set to English by default. 1 In Stop mode, press MENU button. 2 Press Cursor button to move to ‘Setup’ and then press ENTER button. Press RETURN button to return to the previous level. Press MENU button to exit the setup screen.
45P~82P(DS1000)-GB-NOR 3 8/27/04 4:47 PM Press ENTER button. 4 Page 47 Press Cursor , button to select the desired item and then press ENTER button. 5 Press Cursor , button to select the desired language and then press ENTER button. • Once the setup is complete, if the language was set to English, OSD will be displayed in English.
45P~82P(DS1000)-GB-NOR 8/27/04 4:47 PM Page 48 Setting TV Screen type Depending on your TV type (Wide Screen TV or conventional 4:3 TV), you can select the TV's aspect ratio. 1 In Stop mode, press MENU button. 3 Press Cursor button to move to ‘TV DISPLAY’ and then press ENTER button. 2 Press Cursor button to move to ‘Setup’ and then press ENTER button. 4 Press Cursor , button to select the desired item and then press ENTER button.
45P~82P(DS1000)-GB-NOR 8/27/04 4:47 PM Page 49 Adjusting the TV Aspect Ratio (Screen Size) The horizontal to vertical screen size ratio of conventional TVs is 4:3, while that of wide screen and high definition TVs is 16:9. This ratio is called the aspect ratio. When playing DVDs recorded in different screen sizes, you should adjust the aspect ratio to fit your TV or monitor. ✱ For a standard TV, select either "4:3LB" or "4:3PS" option according to personal preference.
45P~82P(DS1000)-GB-NOR 8/27/04 4:47 PM Page 50 Setting Parental Controls (Rating Level) Use this to restrict playback of adult or violent DVDs you do not want children to view. 1 49 In Stop mode, press MENU button. 2 Press Cursor button to move to ‘Setup’ and then press ENTER button.
45P~82P(DS1000)-GB-NOR 3 8/27/04 4:47 PM Press Cursor button to move to ‘PARENTAL’ and then press ENTER button. 4 Page 51 Press Cursor , button to select the desired rating level and then press ENTER button. • If you have selected Level 6, you • cannot view DVDs with Level 7 or higher. The higher the level, the closer the content is to violent or adult material. 5 Enter the password and then press ENTER button. • The password is set to "7890" by default.
45P~82P(DS1000)-GB-NOR 8/27/04 4:47 PM Page 52 Setting the Password You can set the password for the Parental (rating level) setting. 1 Note 51 Press MENU button. 2 • The password is set to "7890" by default. Press Cursor button to move to ‘Setup’ and then press ENTER button.
45P~82P(DS1000)-GB-NOR 3 8/27/04 4:47 PM Press Cursor button to move to ‘PASSWORD’ and then press ENTER button. 4 Page 53 Press ENTER button. 5 Enter the password and then press ENTER button. • Enter the old password, a new password, and confirm new password. • The setting is complete. SETUP Press RETURN button to return to the previous level. Press MENU button to exit the setup screen.
45P~82P(DS1000)-GB-NOR 8/27/04 4:47 PM Page 54 Setting the Wallpaper JPEG DVD VCD While watching a DVD, VCD or JPEG CD, you can set the image you like as background wallpaper. Setting the Wallpaper 1 During playback, press PLAY/PAUSE button when an image you like appears. 2 Press LOGO button. • “COPY LOGO DATA” will be displayed on the TV screen. COPY LOGO DATA PAUSE 3 The power will turn off and then back on and the disc tray will open automatically.
45P~82P(DS1000)-GB-NOR 8/27/04 4:47 PM Page 55 To Change the Wallpaper 4 Press to select the desired ‘USER’, and then press ENTER. 2 Press Cursor button to move to ‘Setup’ and then press ENTER button. 5 Press MENU button to exit the setup screen. 3 Press Cursor button to move to ‘LOGO’ and then press ENTER button. SETUP 1 In Stop mode, press MENU button. Press RETURN button to return to the previous level. Press MENU button to exit the setup screen.
45P~82P(DS1000)-GB-NOR 8/27/04 4:47 PM Page 56 DVD Playback Mode Some DVD-Audio discs contain DVD-Video as well as DVD-Audio. To play back the DVD-Video portion of the DVD-Audio disc, set the unit to DVD-Video mode. 1 Press the MENU button while the disc tray is open. 2 Press Cursor button to move to ‘Setup’ and then press ENTER button. Note • DVD Play mode is set to DVD Audio as factory default setting.
45P~82P(DS1000)-GB-NOR 3 8/27/04 4:47 PM Press Cursor button to move to ‘DVD TYPE’ and then press ENTER button. Page 57 4 Press Cursor , button to move to ‘DVD VIDEO’ and then press ENTER button. • Set steps 1 ~ 4 again if you want to switch to DVD AUDIO Play mode. When Selecting DVD Play Mode: • DVD VIDEO : set to play the DVD video SETUP • contents contained in DVD audio disc. DVD AUDIO : set to play the default DVD audio. Press RETURN button to return to the previous level.
45P~82P(DS1000)-GB-NOR 8/27/04 4:47 PM Page 58 Setting the Speaker Mode Signal outputs and frequency responses from the speakers will automatically be adjusted according to your speaker configuration and whether certain speakers are used or not. 1 3 In Stop mode, press MENU button. In the Speaker Setup, press the ENTER button again. 2 Press Cursor button to move to ‘Audio’ and then press ENTER button. 4 Press Cursor , , , buttons to move to the desired speaker and then press ENTER button.
45P~82P(DS1000)-GB-NOR 8/27/04 4:47 PM Page 59 Setting the Test Tone Use the Test Tone feature to check the speaker connections and to adjust the speaker levels. 1 In Stop mode, press MENU button. 2 Press Cursor button to move to ‘Audio’ and then press ENTER button. 3 Press Cursor button to move to ‘TEST TONE’ and then press ENTER button. • The test tone will be sent to L ➝ C ➝ R ➝ RS ➝ LS ➝ SW in that order. If the ENTER button is pressed again at this time, the test tone will stop.
45P~82P(DS1000)-GB-NOR 8/27/04 4:47 PM Page 60 Setting the Delay Time If the speakers cannot be placed at equal distances from the listening position, you can adjust the delay time of the audio signals from the center and rear speakers. 1 In Stop mode, press MENU button. 2 Press Cursor button to move to ‘Audio’ and then press ENTER button. Setting up the Speaker Delay Time When 5.1CH Surround Sound is played, you can enjoy the best sound if the distance between you and each speaker is the same.
45P~82P(DS1000)-GB-NOR 3 8/27/04 4:47 PM Press Cursor button to move to ‘DELAY TIME’ and then press ENTER button. 4 Page 61 Press Cursor , , , buttons to move to the desired speaker and then press ENTER button. 5 Press Cursor , to set the Delay time. • You can set the delay time for C between 00 and 05mSEC and for LS and RS between 00 and 15mSEC. SETUP • Setting CENTER SPEAKER If the distance of Dc is equal to or longer than the distance of Df in the figure, set the mode as 0ms.
45P~82P(DS1000)-GB-NOR 8/27/04 4:47 PM Page 62 Setting the Audio Quality You can adjust the balance and level for each speaker. Method 1 When adjusting the audio quality using the setup screen 1 In Stop mode, press MENU button. 3 Press Cursor button to move to ‘SOUND EDIT’ and then press ENTER button. 2 Press Cursor button to move to ‘Audio’ and then press ENTER button. 4 Press Cursor , buttons to select and adjust the desired item. Press the , buttons to adjust the settings.
45P~82P(DS1000)-GB-NOR Method 2 8/27/04 4:47 PM When manually adjusting with the SOUND EDIT button Adjusting Front Speaker Balance 1 Page 63 Press SOUND EDIT button and then press Cursor , . Adjusting Rear Speaker Balance Adjusting Center Speaker Level Press SOUND EDIT button and then press Cursor , . Press SOUND EDIT button and then press Cursor , . 2 3 Adjusting Rear Speaker Level Note SETUP 4 Press SOUND EDIT button and then press Cursor , .
45P~82P(DS1000)-GB-NOR 8/27/04 4:47 PM Page 64 Setting the DRC (Dynamic Range Compression) You can use this function to enjoy Dolby Digital sound when watching movies at low volume at night. 1 In Stop mode, press MENU button. 2 Press Cursor button to move to ‘Audio’ and then press ENTER button. 3 Press Cursor button to move to ‘DRC’ and then press ENTER button. 4 Press Cursor to adjust the ‘DRC’. , • Pressing the Cursor button increases the compression, and pressing the Cursor reduces it.
45P~82P(DS1000)-GB-NOR 8/27/04 4:48 PM Page 65 AV SYNC Setup Video may lag behind the audio if the unit is connected to a digital TV. If this occurs, adjust the audio delay time to sync up with the video. 1 Press the MENU button. • Setup menu appears. • AV-SYNC screen appears. • 'Audio' menu appears. 4 Press Cursor , buttons to select the Delay Time of AV-SYNC and then press the ENTER button. • You can set the audio delay time between 0 ms and 300 ms. Set it for the best sync up with audio.
45P~82P(DS1000)-GB-NOR 8/27/04 4:48 PM Page 66 Dolby Pro Logic II Mode You can select the desired Dolby Pro Logic II audio mode. Press PL II MODE button. • Each time the button is pressed, the mode changes as follows. PRO LOGIC II • MUSIC : When listening to music, you can experience sound effects as if you are • • • • listening to the actual performance. CINEMA : Adds realism to the movie soundtrack.
45P~82P(DS1000)-GB-NOR 8/27/04 4:48 PM Page 67 Dolby Pro Logic II Effect This function works only in Dolby Pro Logic MUSIC mode. 1 Press PL II MODE button to select ‘MUSIC’ mode. 2 Press PL II EFFECT button and then press Cursor , buttons to select the mode. • You can select either 0 or 1. CMX MPEG-2 AAC CMX MPEG-2 AAC MPEG • You can select between 0 and 7. 4 Press PL II EFFECT button and then press Cursor , buttons to select the mode. • You can select between 0 and 6.
45P~82P(DS1000)-GB-NOR 8/27/04 4:48 PM Page 68 Auto Sound Calibration Setup * This function is available only for DVD/CD playback. Auto Sound Calibration By setting the auto sound calibration function just once when you relocate or install the unit, you can have the unit automatically recognize the distance between speakers, levels between channels, and frequency characteristics to create 5.1-channel sound field optimized for the listener's environment.
45P~82P(DS1000)-GB-NOR 8/27/04 4:48 PM 1 2 3 Page 69 Plug the auto sound calibration microphone into the auto sound calibration input jack. Place the auto sound calibration microphone at the listener's position. Adjust the volume control on the main unit as follows: • If the distance between the listener and the speaker is over 5 m: Set the main unit's volume to over 25. • If the distance between the listener and the speaker is 3 to 5 m: Set the main unit's volume to 25.
45P~82P(DS1000)-GB-NOR 8/27/04 4:48 PM Page 70 Live Surround Mode SUPER 5.1 You can reproduce a 2-channel sound source, such as CD, and radio broadcast, in 5.1-channel surround sound. Press SUPER5.1 button. • Each time the button is pressed, the • selection alternates between SUPER 5.1 and SUPER OFF. Select "SUPER 5.1" to play 2-channel sound in 5.1 channels.
45P~82P(DS1000)-GB-NOR 8/27/04 4:48 PM Page 71 Virtual Headphone Function Use headphones (not supplied) for private listening pleasure. You can enjoy a dynamic sound effects similar to that of 5.1 channel surround sound using conventional stereo headphones. 1 Plug the headphones into the headphone jack. • You can purchase headphones from most Electronics stores. 2 Press V-H/P button. • Each time the button is pressed, the selection alternates between V-H/P ON and V-H/P OFF.
45P~82P(DS1000)-GB-NOR 8/27/04 4:48 PM Page 72 Listening to Radio You can listen to the chosen band (FM broadcast stations) by using either the automatic or manual tuning operation. Remote Control Unit 1 Press TUNER button. • The selection toggles back and forth between "FM" each time the TUNER button is pressed. 2 Tune in to the desired station. Automatic Tuning 1 Automatic Tuning 2 Manual Tuning When is pressed, a preset broadcast station is selected.
45P~82P(DS1000)-GB-NOR 8/27/04 4:48 PM Page 73 Presetting Stations You can store up to: 15 FM stations Example: Presetting FM 89.1 in the memory 1 Press the TUNER button and select the FM band. 2 3 Press to select "89.10". • Refer to Step 2 on page 71 to • “PRGM” flashes in the automatically or manually tune in to a station. 4 Press to select preset number. 15. Press the TUNER MEMORY button again. display. Tune in to a station. 6 To preset another station, repeat steps 2 to 5.
45P~82P(DS1000)-GB-NOR 8/27/04 4:48 PM Page 74 Convenient Functions Sleep Timer Function You can set the time that the DVD player will shut itself off. Press SLEEP button. • "SLEEP" will be displayed. Each time the button is pressed the preset time changes as follows: 10 ➝ 20 ➝ 30 ➝ 60 ➝ 90 ➝ 120 ➝ 150 ➝ OFF. To confirm the sleep timer setting, press SLEEP button. •The remaining time before the DVD player will shut itself off is displayed.
45P~82P(DS1000)-GB-NOR 8/27/04 4:48 PM Page 75 Adjusting Display Brightness Touch your hands to the front of main unit to automatically turn on the LED and Operation Buttons. Press DIMMER button. • Press the DIMMIER button to toggle between DIMMER AUTO ➝ DIMMER ON ➝ DIMMER OFF on the Display. DIMMER AUTO : Touch your hands to the operation buttons, and it will turn on for about 5 seconds and then turn off. DIMMER ON : Operation buttons are always turned on.
45P~82P(DS1000)-GB-NOR 8/27/04 4:48 PM Page 76 Operating a TV with the Remote Control When operating a TV with the remote control 1 Press the MODE button to make the TV indicator on the remote control flash. TV DVD RECEIVER 2 Press POWER button to turn on the TV. 3 Point the remote control toward the TV. 4 While holding down POWER, enter the code corresponding to your brand of TV. • If the code matches the TV's code, the TV will be turned off.
45P~82P(DS1000)-GB-NOR 8/27/04 4:48 PM Page 77 TV Brand Code List No. Brand Code No.
45P~82P(DS1000)-GB-NOR 8/27/04 4:48 PM Page 78 Before Calling for Service Refer to the chart below when this unit does not function properly. If the problem you are experiencing is not listed below or if the instruction below does not help, turn off the unit, disconnect the power cord, and contact the nearest authorized dealer or Samsung Electronics Service Center. Symptom Disc tray does not open. Playback does not start.
45P~82P(DS1000)-GB-NOR 8/27/04 4:48 PM Symptom • Disc is rotating but no picture is produced. • Picture quality is poor and picture is shaking. Page 79 Check/Remedy • Is the TV power on? • Are the video cables connected properly? • Is the disc dirty or damaged? • A poorly manufactured disc may not be playable. • Is the remote control being operated within its operation range of The remote control does not angle and distance? • Are the batteries exhausted? work.
45P~82P(DS1000)-GB-NOR 8/27/04 4:48 PM Page 80 Cautions on Handling and Storing Discs Small scratches on the disc may reduce sound and picture quality or cause skipping. Be especially careful not to scratch discs when handling them. Handling discs Do not touch the playback side of the disc. Hold the disc by the edges so that fingerprints will not get on the surface. Do not stick paper or tape on the disc.
45P~82P(DS1000)-GB-NOR 8/27/04 4:48 PM Page 81 Specifications Power Consumption G E N E R A L Weight T F U N M E R V I D E O O U T P U T A M P L I F I E R Dimensions (W x H x D) Operating Temperature Range Operating Humidity Range Usable Sensitivity S/N Ratio Distortion Composite Video Component Video HDMI Front speaker output Center speaker output Rear speaker output Subwoofer speaker output Frequency range S/N Ratio Channel separation Input sensitivity Speaker system (PSDS 1000E) Impedance Freq
45P~82P(DS1000)-GB-NOR 8/27/04 4:48 PM Page 82 Notes on Terminology ANGLE CHAPTER NUMBER Recorded onto some DVD discs are scenes which have been simultaneously shot from a number of different angles (the same scene is shot from the front, from the left , from the right , etc.). With such discs, the Angle button can be used to change the angle of view for specific scenes. These numbers are recorded on DVD discs.
45P~82P(DS1000)-GB-NOR 8/27/04 4:48 PM Page 83 Memo MISCELLANEOUS 82
1p~44p(DS1000)-GB-NOR 8/27/04 4:45 PM Page 2 THIS APPLIANCE IS MANUFACTURED BY: AH68-01544K