HT-H5500 HT-H5500W HT-H5530 HT-H5550 HT-H5550W 5.1CH Blu-ray™ Home Entertainment System user manual imagine the possibilities Thank you for purchasing this Samsung product. To receive more complete service, please register your product at www.samsung.com/register HT-H5500_00W_30_50_50W-ENG_0402.
Safety Information This symbol indicates that high voltage is present inside. It is dangerous to make any kind of contact with any internal part of this product. CAUTION RISK OF ELECTRIC SHOCK DO NOT OPEN CAUTION: TO REDUCE THE RISK OF ELECTRIC SHOCK, DO NOT REMOVE THE COVER (OR BACK). THERE ARE NO USER SERVICEABLE PARTS INSIDE. REFER ALL SERVICING TO QUALIFIED PERSONNEL. • The slots and openings in the cabinet and in the back or bottom are provided for necessary ventilation.
WARNING : • TO PREVENT THE SPREAD OF FIRE, KEEP CANDLES AND OTHER ITEMS WITH OPEN FLAMES AWAY FROM THIS PRODUCT AT ALL TIMES. CLASS 1 LASER PRODUCT This product is classified as a CLASS 1 LASER product. Use of controls, adjustments or performance of procedures other than those specified herein may result in hazardous radiation exposure. CAUTION : • INVISIBLE LASER RADIATION WHEN OPEN AND INTERLOCKS DEFEATED, AVOID EXPOSURE TO BEAM.
Contents GETTING STARTED PLAYING CONTENT 5 Accessories 26 Switching the Source Device 5 Speaker Components 26 Playing Commercial Discs 7 Front Panel 26 Playing a Disc with User Recorded Content 7 Rear Panel 27 Playing Files on a USB Device 8 Remote Control 28 Controlling Video Playback 29 Playing a Pre-Recorded Commercial Audio Disc CONNECTIONS 9 30 Controlling Music Playback Connecting the Speakers 12 Attaching the Toroidal Ferrite Core to the Power Cord of the Wireless Receiver Module
Getting Started Check the box for the accessories and speaker components listed or shown below. Accessories • Remote Control • User Manual Getting Started Figures and illustrations in this User Manual are provided for reference only and may differ from actual product appearance. An administration fee may be charged if either a. an engineer is called out at your request and there is no defect in the product (i.e. where you have failed to read this user manual) b.
Getting Started HT-H5530 Front x 2 Stand x 2 Screw (5x20) x 8 Centre Stand Base x 2 Surround x 2 Speaker Cable x 6 Subwoofer Screw (5x20) x 16 Centre Stand Base x 4 HT-H5550/HT-H5550W HT-H5550W only Front x 2 Surround x 2 Stand x 4 Subwoofer Speaker Cable x 6 Wireless Receiver Module (SWA-6000) 6 - English HT-H5500_00W_30_50_50W-ENG_0402.
Front Panel DISPLAY ICONS NFC FUNCTION STOP PLAY/PAUSE OPEN/ CLOSE VOLUME CONTROL POWER Getting Started DISPLAY 5V 0.5A DISC TRAY ✎ ✎ ✎ ✎ ✎ REMOTE CONTROL SENSOR USB When the product is on, do not let children touch the product's surface. It will be hot. To upgrade the product's software through the USB jack, you must use a USB flash drive. When the product displays the Blu-ray Disc menu, you cannot start the movie by pressing the /6 button on the product or the remote.
Getting Started Remote Control Tour of the Remote Control Turn the product on and off. FUNCTION VOLUME Adjust the volume. - MUTE TA 1 2 3 PTY - PTY SEARCH PTY + 4 5 6 7 8 9 TITLE MENU DISC MENU Press to view the disc menu. 0 POPUP Press to skip backwards or forwards. Press to play a disc or files. Press to stop a disc or files. SUBTITLE HOME TOOLS INFO EXIT RETURN TUNER MEMORY MO/ST These buttons are used both for menus on the product and also several Blu-ray Disc functions.
Connections This section describes various methods of connecting the product to other external components. Before moving or installing the product, be sure to turn off the power and disconnect the power cord.
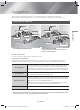
Connections Installing the Speakers on the Tallboy Stand * HT-H5530/HT-H5550/HT-H5550W only 1 1. Turn the Stand Base upside-down and connect it to the Stand. 2. Use the driver to combine the screws on the 3 marked holes. Stand Base 2 Stand 3. 4. Straighten a supplied speaker wire to the gravity direction and put in the hole on the centre of Stand Base. 3 4 Speaker Connect the upper Speaker to the assembled Stand. Stand 5. 6.
In case of HT-H5500 Centre Speaker Front Speaker (L) SURROUND Surround Speaker (L) Connections SURROUND Subwoofer Front Speaker (R) Surround Speaker (R) SURROUND SURROUND * Refer to page 6 for the speakers of HT-H5530/HT-H5550. In case of HT-H5500W Front Speaker (L) Centre Speaker Subwoofer Front Speaker (R) Surround Speaker (L) Surround Speaker (R) Wireless Receiver Module * HT-H5500W/HT-H5550W should be connected with the SWA-6000 only. * Refer to page 6 for the speakers of HT-H5550W.
Connections ✎ ✎ The maximum transmission distance from the product to the wireless receiver module is about 10m, but may vary depending on your operating environment. If a steel-concrete wall or metallic wall is between the product and the wireless receiver module, the system may not operate at all, because the radio waves cannot penetrate metal. If the product doesn't make a wireless connection, you need to run an ID Set between the product and wireless receiver module.
Connecting to a TV and External Devices Red W White Method 1 External Devices Connections R Method 2 AUDIO OUT OPTICAL OUT HDMI IN Connecting to a TV Connect an HDMI cable (not supplied) from the HDMI OUT jack on the back of the product to the HDMI IN jack on your TV. If the TV supports ARC, you can hear the audio from your TV through the home cinema with only this cable connected. See page 18 in this manual and the section on ARC in your TV's user's manual for details.
Connections Connecting to a Network Router Wireless Network You can connect your product to your network router using one of the methods illustrated below. Wired Network Wireless IP sharer Broadband modem (with integrated router) Broadband service Broadband service Or ✎ Router Broadband service ✎ ✎ Broadband modem ✎ ✎ ✎ ✎ Your router or your Internet Service Provider's policies may prevent the product from accessing Samsung's software update server.
Settings 4:3 Pan-Scan - For older, standard screen, analogue TVs. Displays 4:3 pictures in full screen and 16:9 pictures in Pan-Scan format that fills the screen, but cuts off the left and right sides of the picture and enlarges the middle vertically. The Initial Settings Procedure • The Home menu will not appear if you do not configure the initial settings. • The OSD (On Screen Display) may change in this product after you upgrade the software version.
Settings The Home Screen at a Glance 1 8 Function 2 Play disc Photos Videos Music Use for switching to an external device, and for radio and mode switching for a Bluetooth connection. You can use the remote control’s FUNCTION button and the main unit’s button for mode switching. 9 Settings Set various functions to suit your personal preferences.
Buttons on the Remote Control Used for the Settings Menu SUBTITLE 1 HOME Display REPEAT 3D Settings TOOLS INFO 3 2 Settings Menu Functions EXIT RETURN 4 TUNER HOME Button : Press to move to the Home screen. 2 RETURN Button : Press to return to the previous menu. 3 E (ENTER) / DIRECTION Button : • Press ▲▼◄► to move the cursor or select an item. • Press the E button to activate the currently selected item or confirm a setting.
Settings HDMI Colour Format Digital Output Lets you set the colour space format for the HDMI output to match the capabilities of the connected device (TV, monitor, etc). Lets you set the Digital Output to match the capabilities of the AV receiver you’ve connected to the product. For more details, please refer to the digital output selection table. (See page 45) HDMI Deep Colour Lets you set the product to output video from the HDMI OUT jack with Deep Colour.
Wi-Fi Direct BD Data Management Lets you connect a Wi-Fi Direct device to the product using a peer-to-peer network, without the need for a wireless router. Note that if the product is connected to a wireless network, it may be disconnected when you use Wi-Fi Direct. (See page 22) Lets you manage the contents you downloaded through a Blu-ray disc that supports the BD-Live service. You can view the information about the USB device you are using for BD Live data storage including the storage space.
Settings 2. Support Software Upgrade When it is done, highlight OK, and then press E button. For more information about this function see page 23. Contact Samsung Provides contact information for assistance with your product. Wired - Manual If you have a static IP address or the automatic procedure does not work, you'll need to set the Network Settings values manually. After following Steps 1 to 3 above: 1. In the Network Settings screen, change Network Type to Wired.
6. ✎ 7. Repeat Steps 4 and 5 until you have filled in all parameters. You can get the network parameter values from your Internet provider. When finished entering all the parameter values, select Return ('), and then press the E button. The home cinema verifies the network connection and then connects to the network. Wireless Network You should be able to find the security code or pass phrase on one of the set up screens you used to set up your router or modem.
Settings When finished, select Done, and then press the E button. The product searches for the network. 6. The Network connection fail screen appears. Use ◄► buttons to select IP Settings, and then press the E button. 7. Select the IP setting field, and then set it to Enter manually. 8. Select a network parameter to enter (IP Address, for example), and then press E button. Use the number keypad on your remote control to enter the numbers for the parameter.
4. Select Wi-Fi Direct, and then press the E button. The Wi-Fi Direct devices that you can connect to appear. 2. Settings Through the Product Using a PIN Display Wi-Fi Direct The Connecting pop-up appears, followed by the Connected pop-up. When it closes, you should see the device listed on the Wi-Fi Direct screen as connected. Select the Wi-Fi Direct device you want to connect to this product, and then press the E button. 2. The PIN pop-up appears. 3.
Settings 4. 5. ✎ Select one of the following methods: • By Online • By USB • Auto Upgrade Notification 10. Copy the folder to a USB flash drive. Press the E button. Directions for each method begin below. 12. In the product’s menu, go to Settings > Support > Software Upgrade. 11. Make sure no disc is inserted in the product, and then insert the USB flash drive into the USB port of the product. If you want to cancel the upgrade while the upgrade software is downloading, press the E button.
Setting Up DLNA DLNA enables you to play music, video, and photo files located in your PC using this product. To use DLNA, you must connect the product to your PC via the network (See page 14) and install the SAMSUNG PC Share Manager on the PC. To Download the DLNA Software To use DLNA with your PC, you must install DLNA software on your PC. You can download the PC software and get detailed instructions for using DLNA from the Samsung.com website. Go to www.samsung.com. 2.
Playing Content Your home cinema can play content located on Blu-ray/DVD/CD discs, USB devices, PCs, smart phones, tablets, and in Apps. To play content located on your PC or a mobile device, you must connect the PC or mobile device and the product to your network. To play content on your PC, you must also download and install DLNA network software or already have DLNA network software on your PC. ✎ PCs running Windows 7 and Windows 8 have DLNA software (Play To) built in.
3. A screen appears listing the contents of the disc. Depending on how the contents are arranged, you will see either folders, individual files, or both. 3. 4. If necessary, use the ▲▼◄► buttons to select a folder, and then press the E button. 5. 5. Use the ▲▼◄► buttons to select a file to view or play, and then press the E button. 6. 6. Press the RETURN button one or more times to exit a current screen, exit a folder, or to return to the Home screen.
Playing Content Controlling Video Playback 2 Using the disc menu, title menu, popup menu, and title list You can control the playback of video content located on a Blu-ray/DVD disc, USB device, mobile device, or PC. Depending on the disc or contents, some of the functions described in this manual may not be available. Buttons on the Remote Control used for Video Playback TITLE MENU DISC MENU 0 POPUP 2 1 DISC MENU During playback, press this button to display the Disc menu.
Using the TOOLS Menu Subtitle During playback, press the TOOLS button. Lets you set the desired subtitle language. Title Angle If there is more than one title on a disk or device, lets you move to or select a desired title. To view a scene from another angle. The Angle option displays the number of angles available to view (1/1, 1/2, 1/3, etc.). Playing Time Lets you go to a specific playback point. Use the numeric buttons to input the playback point.
Playing Content Pl li Playlist Repeat Mode 4 Fast Play (Audio CD [CD-DA] only) : During playback, press the 3 or button. Each time you press the 3 or button, the playback speed will change. 5 7 button : Pauses a track. 6 6 button : Plays the currently selected track. 0/16 Tools TRACK 001 Track Rip > Move < Adjust ' Return TRACK 003 04:41 TRACK 004 04:02 TRACK 005 03:43 TRACK 006 03:40 00:00/00:00 Repeating Tracks " Pause CD 2.
4. To remove a file from the Playlist, move to the file, and then press the YELLOW (C) button. ✎ 5. Press the E button to play the selected files. The Playlist screen appears. ✎ 6. To go to the Music List, press the 5 or RETURN button. 7. ✎ ✎ To go back to the Playlist, press the E button. You can create a playlist with up to 99 tracks on Audio CDs (CD-DA). If you go to the Music List from the Playlist, and then return to the Playlist, the Playlist will start playing again from the beginning.
Playing Content ✎ ✎ Depending on the disc or storage device, the Tools menu may differ. All options may not be displayed. To enable the background music function, the photo file must be in the same storage media as the music file. However, the sound quality can be affected by the bit rate of the MP3 file, the size of the photo, and the encoding method. Presetting Stations Example : Presetting FM 89.10 into memory. 1. Press the FUNCTION button to select FM. 2.
- When pressing the buttons on the primary remote control, make sure that you have selected the FM station using the primary remote control. To show the RDS signals You can see the RDS signals the station sends on the display. Press the RDS DISPLAY button while listening to an FM station.
Playing Content • The further the distance is between the Home Cinema and the Bluetooth device, the worse the quality is. If the distance exceeds the Bluetooth operational range, the connection is lost. • In poor reception-sensitivity areas, the Bluetooth connection may not work properly. • The Home Cinema has an effective reception range of up to 10 meters in all directions if there are no obstacles. The connection will be automatically cut off if the device is out of this range.
To Disconnect the Home Cinema from the Using NFC (Near Field Communication) Bluetooth Device Connect your NFC compatible device via Bluetooth to the Home Cinema using this simple set-up procedure. You can play music from the smart phone through the Home Cinema. Press the ( ) button on the front panel of the Home Cinema to switch from BT to another mode or turn off the Home Cinema.
Playing Content ✎ ✎ ✎ ✎ NFC connection works even when the Home Cinema is turned off, if Quick start is set to On. However, NFC connection will work only after the Home Cinema is turned on if the power cord had been disconnected and reconnected. The is a trademark or registered trademark of NFC Note2 Forum, Inc. in the United States and in other countries. S3/S4 NFC tagging for Bluetooth Note3 connection cannot be established while powering on and off.
Network Services Using BD-LIVE™ 3. On your home cinema, select Change Device. 4. Use the ▲% button to select your PC in the Device List. Connect the product to the network. (See page 14) 5. Select the kind of file you want to view or play, Photos, Videos, or Music and then press E. 2. Configure the network settings. (See pages 20~22) 6. Once the product is connected to your network, you can enjoy various movie-related service contents available on BD-LIVE compliant discs.
Network Services Using Apps Using Opera TV Store The first time you access any one of the apps, the home cinema displays two agreements. You must accept both agreements to download and use any apps. By default, the home cinema displays four popular apps on the Home screen. You can view more apps and change the apps the home cinema displays on the Home screen by selecting the More button. To start an app, highlight the app, double click it, and then follow the directions displayed on the screen.
4. Repeat this process to delete additional apps. 5. When finished, select DONE, and then press the E button. 6. Press the RETURN button to go back to the Main screen. • Bluetooth transmissions can interfere with the Screen Mirroring signal. Before using the Screen Mirroring function, we strongly recommend that you turn off the Bluetooth function on your smart phone or smart device. Searching for Apps 1. Select SEARCH at the top of the screen, and then press the E button. 2.
Appendix Additional Information Digital Output Notes Connections HDMI OUT • Certain HDMI output resolutions may not work, depending on your TV. • You must have an HDMI connection to enjoy videos with 3D technology. • A long HDMI cable may cause screen noise. If this occurs, set HDMI Deep Colour to Off in the menu. Settings 3D Settings • For some 3D discs, to stop a movie during 3D playback, press the 5 button once. The movie stops and the 3D mode option is de-activated.
Speaker Settings Playing JPEG files • When Speaker Selection is set to TV Speaker, audio is produced by the TV speakers. • You can’t enlarge the subtitle and PG graphics in the full screen mode. HDMI audio Playing Content • When HDMI audio is output to the TV speakers, it is automatically down-mixed to 2 channels. Audio Return Channel • When Anynet+ (HDMI-CEC) is Off, the Audio Return Channel function is not available.
Appendix ✎ ✎ ✎ ✎ ✎ If a DVD-RW/-R disc has not been recorded properly in DVD video format, it will not be playable. Your product will not play content that has been recorded on a DVD-R at a bit rate that exceeds 10 Mbps. Your product will not play content that has been recorded on a BD-R or USB device at a bit rate that exceeds 30 Mbps. Playback may not work for some types of discs, or when you use specific operations, such as angle change and aspect ratio adjustment.
1 The U.S., U.S. territories and Canada 2 Europe, Japan, the Middle East, Egypt, Africa, Greenland 3 Taiwan, Korea, the Philippines, Indonesia, Hong Kong 4 Mexico, South America, Central America, Australia, New Zealand, Pacific Islands, Caribbean 5 Russia, Eastern Europe, India, North Korea, Mongolia 6 China DVDVIDEO If the Region number of a Blu-ray Disc/DVD does not correspond to the Region number of this product, the product cannot play the disc.
Appendix Video File Support File Extension Container Video Codec Audio Codec *.avi AVI DivX 3.11/4/5/6 MP4v3 H.264 BP/MP/HP Resolution MP3, Dolby Digital, DTS, WMA, PCM *.mkv MKV VC-1 AP, DivX 5/6 H.264 BP/MP/HP MP3, Dolby Digital, DTS *.wmv WMV (wmv9) VC-1 AP, VC-1 SM WMA *.mp4 MP4 MP4 (mp4v) H.264 BP/MP/HP AAC *.mpg / *.mpeg PS MPEG1 MPEG2 H.
Digital Output Selections Setup Bitstream (Unprocessed) PCM Connection Audio Stream on Blu-ray Disc Definition for Blu-ray Disc HDMI supported AV receiver PCM Up to PCM 7.1ch PCM Dolby Digital Up to PCM 5.1ch Dolby Digital Dolby Digital Plus Up to PCM 5.1ch Dolby Digital Plus Dolby TrueHD Up to PCM 5.1ch Dolby TrueHD DTS Up to PCM 5.1ch DTS DTS-HD High Resolution Audio Up to PCM 5.1ch DTS-HD High Resolution Audio DTS-HD Master Audio Up to PCM 5.
Appendix Resolution according to the output mode Blu-ray Disc/E-contents/Digital Contents playback DVD playback HDMI Mode Output E-contents/ Digital contents HDMI Mode Blu-ray Disc Resolution of Blu-ray Disc 1080p@60F 480i Setup BD Wise Auto Max. Resolution of TV input 1080p@60F 1080p@60F Max.
Symptom Check/Remedy Dolby Digital 5.1 CH Surround Sound is not produced. • Is there "Dolby Digital 5.1 CH" mark on the disc? Dolby Digital 5.1 CH Surround Sound is produced only if the disc is recorded with 5.1 channel sound. • Is the audio language correctly set to Dolby Digital 5.1-CH in the information display? The remote control does not work.
Appendix Symptom Check/Remedy If the HDMI output is set to a resolution your TV cannot support (for example, 1080p), you may not see a picture on your TV. • Press and hold the 5 button on front panel for more than 5 seconds with no disc in the product. All settings will revert to their factory settings. No HDMI output. • Check the connection between the TV and the HDMI jack of the product. • Check if your TV supports 576p/480p/720p/1080i/1080p HDMI input resolution.
HT-H5500W/HT-H5550W Hereby, Samsung Electronics, declares that this Home Cinema System is in compliance with the essential requirements and other relevant provisions of Directive 1999/5/EC. The official Declaration of Conformity may be found at http://www.samsung.com, go to Support > Search Product Support and enter the model name. This equipment may be operated in all EU countries. This equipment may only be used indoors. Specifications General 1.90 kg Dimensions 430.0 (W) x 55.0 (H) x 224.
Appendix HT-H5500/HT-H5500W 95.0 x 146.0 x 74.0 95.0 x 116.0 x 74.0 227.0 x 95.0 x 74.0 168.1 x 349.8 x 289.8 HT-H5530 Dimensions (W x H x D) (Unit : mm) 95.0 x 1113.0 x 74.0 (Stand base: 95.0 x 116.0 x 276.0 x 23.0 x 74.0 189.0) 227.0 x 95.0 x 74.0 168.1 x 349.8 x 289.8 HT-H5550/HT-H5550W 95.0 x 1113.0 x 74.0 (Stand base: 276.0 x 23.0 x 189.0) Speaker 95.0 x 1113.0 x 74.0 (Stand base: 227.0 x 95.0 x 276.0 x 23.0 x 74.0 189.0) 168.1 x 349.8 x 289.8 HT-H5500/HT-H5500W 0.44 0.40 0.56 3.
Licences Manufactured under license from Dolby Laboratories. Dolby and the double-D symbol are trademarks of Dolby Laboratories. For DTS patents, see http://patents.dts.com. Manufactured under license from DTS Licensing Limited. DTS, DTSHD, the Symbol, & DTS and the Symbol together are registered trademarks, and DTS-HD Master Audio | Essential is a trademark of DTS, Inc. © DTS, Inc. All Rights Reserved.
Contact SAMSUNG WORLD WIDE If you have any questions or comments relating to Samsung products, please contact the SAMSUNG customer care centre. Area ` Europe AUSTRIA Contact Centre 0800 - SAMSUNG (0800 - 7267864) Web Site www.samsung.com/at/support www.samsung.com/be/support (Dutch) BELGIUM 02-201-24-18 www.samsung.com/be_fr/support (French) BOSNIA 051 331 999 www.samsung.com/support BULGARIA 07001 33 11 , sharing cost www.samsung.com/bg/support CROATIA 062 726 786 www.samsung.
HT-H5500 HT-H5500W HT-H5530 HT-H5550 HT-H5550W 5.1CH Blu-ray™ Système audiovisuel manuel d'utilisation imaginez les possibilités Merci d'avoir choisi cet appareil Samsung. Pour recevoir une assistance plus complète, veuillez enregistrer votre produit sur www.samsung.com/register HT-H5500_00W_30_50_50W-FRA_0402.
Consignes de Sécurité Ce symbole indique la présence d'une tension dangereuse dans l'appareil. Ne touchez jamais les composants internes du produit. ATTENTION RISQUES D'ÉLECTROCUTION. NE PAS OUVRIR. ATTENTION : POUR LIMITER LES RISQUES DE DÉCHARGE ÉLECTRIQUE, NE RETIREZ JAMAIS LE CACHE (NI L'ARRIÈRE DE L'APPAREIL). CERTAINES PIÈCES QU'IL CONTIENT NE SONT PAS RÉPARABLES PAR L'UTILISATEUR. VEUILLEZ CONTACTER UN TECHNICIEN QUALIFIÉ POUR TOUTE RÉPARATION.
AVERTISSEMENT : • AFIN D'ÉVITER TOUT RISQUE DE PROPAGATION D'INCENDIE, ÉLOIGNEZ LES BOUGIES OU LES AUTRES DISPOSITIFS À FEU NU DE L'APPAREIL. Produit LASER DE CLASSE 1 Ce produit est classé comme PRODUIT LASER DE CLASSE 1. L'utilisation de commandes, de réglages ou de procédés différents de ceux spécifiés dans le présent document peut entraîner une exposition à un rayonnement dangereux. ATTENTION : • RAYONNEMENT LASER INVISIBLE LORSQUE L'APPAREIL EST OUVERT ET VERROUILLAGES DÉSACTIVÉS.
Sommaire MISE EN ROUTE LIRE UN CONTENU 5 Accessoires 26 Changement du dispositif source 5 Accessoires des enceintes 7 Façade 26 Lecture de disques disponibles dans le commerce 7 Face arrière 8 Télécommande 26 Lecture d’un disque dont le contenu est enregistré par l’utilisateur 27 Lecture de fichiers sur un périphérique USB BRANCHEMENTS 9 28 Contrôle de la lecture Vidéo Connexion des enceintes 12 Fixation du noyau torique en ferrite au cordon d'alimentation du module de réception sans fil (
Mise en Route Vérifiez que tous les accessoires et tous les composants des enceintes figurant ci-dessous sont inclus. Accessoires • Télécommande • Manuel d’utilisation Mise en Route Les figures et les illustrations du présent Manuel d'utilisation sont fournies à titre de référence uniquement et peuvent différer de l'apparence du produit réel. Des frais supplémentaires pourront vous être facturés dans les cas suivants : a.
Mise en Route HT-H5530 Enceinte avant X 2 Pied x 2 Vis (5 x 20) x 8 Enceinte centrale Socle x 2 Enceinte d'ambiance X 2 Câble de l'enceinte X 6 Caisson de basse HT-H5550/HT-H5550W Enceinte centrale Vis (5 x 20) x 16 Socle x 4 HT-H5550W uniquement Enceinte avant x 2 Enceinte d'ambiance x 2 Pied x 4 Caisson de basse Câble de l'enceinte X 6 Module de réception sans fil Module (SWA-6000) 6 - Français HT-H5500_00W_30_50_50W-FRA_0402.
Façade ICÔNES D'AFFICHAGE NFC ARRÊT LECTURE/ PAUSE OUVRIR/ FERMER RÉGLAGE DU VOLUME MARCHE/ ARRÊT AFFICHAGE Mise en Route FONCTION 5V 0.5A TIROIR DISQUE ✎ ✎ ✎ ✎ ✎ CAPTEUR DE LA TÉLÉCOMMANDE USB Tenez l'appareil hors de portée des enfants lorsqu'il est sous tension afin d'éviter tout risque de brûlure. Pour mettre à niveau le logiciel de l'appareil via la prise USB, vous devez utiliser une clé USB à mémoire flash.
Mise en Route Télécommande Boîtier de la télécommande Permet d'allumer et d'éteindre l'appareil. FUNCTION VOLUME Permet de régler le volume. - MUTE + RDS DISPLAY Appuyez sur les boutons numériques pour commander les options. Appuyez sur ce bouton pour visualiser le menu du disque. Appuyez sur ces boutons pour effectuer un saut vers l'arrière ou l'avant. Appuyez sur ce bouton pour lire un disque ou des fichiers. Appuyez sur ce bouton pour arrêter la lecture d'un disque ou de fichiers.
Branchements Dans ce chapitre, vous trouverez plusieurs méthodes vous expliquant comment connecter votre appareil à d’autres composants externes. Avant de déplacer ou d'installer l’appareil, mettez-le hors tension et débranchez le cordon d’alimentation.
Branchements Installation des enceintes sur le pied type Tallboy * HT-H5530/HT-H5550/HT-H5550W uniquement 1. Retournez le socle et emboîtez-le sur le pied. 2. Utilisez un tournevis pour insérer les vis dans les 3 orifices marqués. 1 Socle 2 Pied 3. Redressez le câble pour enceinte fourni et insérez-le dans l’orifice au centre du socle. 4. Branchez l'enceinte supérieure au pied ainsi monté. 3 4 Enceinte Pied 5.
Pour le modèle HT-H5500 Enceinte centrale Enceinte avant (G) SURROUND Enceinte d'ambiance (G) Branchements SURROUND Caisson de basse Enceinte avant (D) Enceinte d'ambiance (D) SURROUND SURROUND * Reportez-vous à la page 6 pour les enceintes des modèles HT-H5530/HT-H5550.
Branchements ✎ ✎ La distance maximale de transmission entre l'appareil et le module de réception sans fil est d'environ 10 m, mais elle peut varier en fonction de l'environnement de fonctionnement. Si l'appareil et le module de réception sans fil sont séparés par un mur en béton armé ou en métal, le système est susceptible de ne pas fonctionner du tout, car les ondes radio ne traversent pas le métal.
Connexion à un téléviseur et des périphériques externes Rouge W Blanche Méthode 1 Périphériques externes Branchements R Méthode 2 AUDIO OUT OPTICAL OUT HDMI IN Connexion de l'appareil à un téléviseur À l'aide d'un câble HDMI (non fourni), connectez la prise SORTIE HDMI située à l'arrière de l'appareil à la prise ENTRÉE HDMI de votre téléviseur. Si le téléviseur prend en charge la fonction ARC, vous pouvez écouter le son de votre téléviseur depuis votre Home cinéma juste en connectant ce câble.
Branchements Réseau sans fil Connexion à un routeur réseau Vous pouvez connecter votre appareil à votre routeur réseau en utilisant l'une des méthodes illustrées cidessous.
Paramètres 4:3 Pan-Scan - Pour les téléviseurs analogiques à écran standard. Permet d'afficher les images 4:3 en plein écran et les images 16.9 au format Pan-Scan qui remplit l'écran, mais coupe les côtés droit et gauche de l'image et agrandit le milieu verticalement. Procédure de réglage des paramètres initiaux • Le menu d'accueil n'apparaîtra pas si vous ne configurez pas les paramètres initiaux.
Paramètres Présentation de l'écran d'accueil 1 2 Lire disq. Photos Vidéos Musique 8 Fonction Permet de sélectionner un périphérique externe, d'activer la radio et de changer de mode pour passer en Bluetooth. Utilisez le bouton FUNCTION de l'appareil de la télécommande et le bouton pour changer de mode. 9 Paramètres Permet de régler diverses fonctions selon vos préférences. Blu-ray App 1 App 2 App 3 ✎ App 4 Opera TV Plus Store 3 Screen Changer Fonction Paramètres Mirroring périph.
Boutons de la télécommande utilisés pour le menu Settings SUBTITLE HOME Paramètres Fonctions du menu Affichage REPEAT Paramètres 3D 1 TOOLS INFO RETURN EXIT 3 2 4 TUNER Bouton HOME : permet de passer à l'écran d'accueil. 2 Bouton RETURN : Permet de revenir au menu précédent. 3 Bouton E (ENTRÉE) / DIRECTION • Appuyez sur ▲▼◄► pour déplacer le curseur ou sélectionner un élément. • Appuyez sur le bouton E pour activer l'élément sélectionné actuellement ou confirmer un réglage.
Paramètres Format couleur HDMI Sortie numérique Vous pouvez régler le format de l'espace chromatique pour la sortie HDMI afin qu'il corresponde aux capacités de l'appareil branché (télévision, moniteur, etc.). Couleur intense HDMI Cette option vous permet de régler l'appareil pour émettre des données vidéo en sortie avec Deep Colour via la prise HDMI OUT. L'option Deep Colour permet une reproduction plus fidèle des couleurs, notamment en termes de profondeur.
Wi-Fi Direct Gestion données BD Permet de connecter un périphérique Wi-Fi Direct à l'appareil via un réseau peer-to-peer, sans qu'il soit nécessaire de recourir à un routeur sans fil. Notez que si l'appareil est connecté à un réseau sans fil, il peut être déconnecté si vous utilisez WiFi Direct. (Reportez-vous à la page 22). Vous permet de gérer les contenus que vous avez téléchargés via un disque Blu-ray prenant en charge le service BD-Live.
Paramètres 2. Assistance Mise à niveau du logiciel Une fois terminé, sélectionnez OK, puis appuyez sur le bouton E. ❏ Câble - Manuel Pour obtenir plus d'informations sur la fonction, reportez-vous en page 23. Contacter Samsung Permet d'obtenir les informations de contact pour les demandes d'assistance relatives à votre appareil. Si vous disposez d'une adresse IP fixe ou si la procédure automatique est inopérante, vous devrez définir les valeurs Paramètres réseau manuellement.
6. Répétez les étapes 4 et 5 jusqu'à ce que vous ayez renseigné tous les paramètres. ✎ Vous pouvez obtenir les valeurs du réseau auprès de votre fournisseur d'accès Internet. 7. Après avoir terminé la saisie de toutes les valeurs, sélectionnez Retour ('), puis appuyez sur le bouton E. Le Home cinéma vérifie la connexion réseau, puis il se connecte au réseau. 4. Lorsque vous avez terminé, sélectionnez Terminé, puis appuyez sur le bouton E.
Paramètres ❏ WPS(PBC) Lorsque vous avez terminé, sélectionnez Terminé, puis appuyez sur le bouton E. L'appareil recherche le réseau. 6. L'écran d'échec de la connexion réseau apparaît. Utilisez les boutons ◄► pour sélectionner Param. IP, puis appuyez sur le bouton E. 7. Sélectionnez le champ Param. IP, puis choisissez Entrer manuellement. 8. Sélectionnez un paramètre réseau à saisir (ex. : Adresse IP), puis appuyez sur le bouton E button.
4. Sélectionnez Wi-Fi Direct, puis appuyez sur le bouton E. La fonction Wi-Fi Direct que vous pouvez connecter s'affichent. 2. Paramètres Affichage Wi-Fi Direct Via l'appareil en utilisant un code PIN AudioNom périph : HT-H5500 Sélect. le périph. Wi-Fi Direct pour la connexion. Réseau AndroidXXXXXXX Système Sélectionnez le périphérique Wi-Fi Direct que vous souhaitez connecter à ce produit, et appuyez sur le bouton E. 2. La fenêtre contextuelle PIN s'affiche. 3.
Paramètres 4. 5. ✎ Sélectionnez l'une des méthodes suivantes : • En ligne • USB • Notif. mise à jour auto Appuyez sur le bouton E. Les instructions concernant chaque méthode commencent cidessous. Si vous souhaitez annuler la mise à niveau en cours de téléchargement, appuyez sur le bouton E. En ligne Votre appareil doit être connecté à Internet pour exploiter la fonction En ligne. Retirez tous les disques avant de démarrer. 1. 2. 3. 4. Sélectionnez En ligne, puis appuyez sur le bouton E.
Configuration de la fonction DLNA DLNA vous permet de lire des fichiers musicaux, vidéos et photos sur votre ordinateur à l'aide de cet appareil. Pour utiliser DLNA, vous devez connecter l’appareil à votre ordinateur via le réseau (reportezvous à la page 14) et installer le SAMSUNG PC Share Manager (Gestionnaire de partage PC SAMSUNG) sur votre ordinateur. Pour télécharger le logiciel DLNA 1. Allez sur www.samsung.com. 2. Cliquez sur SUPPORT en haut de la page. 3.
Lire un Contenu Votre Home cinéma peut lire le contenu situé sur des disques Blu-ray/DVD/CD, des périphériques USB, des ordinateurs, des smartphones, des tablettes et dans des applications. Pour lire le contenu situé sur votre ordinateur ou un périphérique mobile, vous devez connecter l’ordinateur ou le périphérique mobile et l’appareil à votre réseau.
3. Un écran listant le contenu du disque apparaît. En fonction de la manière dont le contenu est classé vous allez voir soit des documents, soit des fichiers individuels, ou les deux. 4. Si nécessaire, servez-vous des boutons ▲▼◄► pour sélectionner un dossier, puis appuyez sur le bouton E. 5. Utilisez les boutons ▲▼◄► pour sélectionner un fichier à visionner ou à lire, puis appuyez sur le bouton E. 6.
Lire un Contenu Contrôle de la lecture Vidéo 2 Utilisation du menu du disque, du menu des titres, du menu contextuel et de la liste des titres Vous pouvez commander la lecture du contenu vidéo stocké sur un disque Blu-ray/DVD, un périphérique USB, un périphérique mobile, ou un ordinateur. En fonction du disque ou du contenu, certaines fonctions décrites dans ce manuel peuvent ne pas être disponibles.
Utilisation du menu TOOLS Sous-titres Durant la lecture, appuyez sur le bouton TOOLS. Titre S'il y a plusieurs titres sur un disque ou un appareil, passez au titre souhaité ou sélectionnez-le. Durée de lecture Allez jusqu'à un point de lecture particulier. Utilisez les boutons numériques pour entrer le point de lecture. Mode Répétition Sélectionnez cette option pour régler la langue de sous-titres souhaitée. Angle Utilisé pour regarder une scène sous un autre angle.
Lire un Contenu Pl li Playlist Mode Répétition Piste Extract. > Déplacer < Régler 4 Lecture rapide (CD audio [CD-DA] uniquement) : Durant la lecture, appuyez sur le bouton 3 ou . Chaque fois que appuyez sur le bouton 3 ou , la vitesse de lecture change. 5 7 bouton : permet de mettre en pause une piste. 6 6 bouton : permet de lire la plage sélectionnée. 0/16 Outils TRACK 001 ' Retour TRACK 003 04:41 TRACK 004 04:02 TRACK 005 03:43 TRACK 006 03:40 00:00/00:00 " Pause CD 2.
4. Pour retirer un fichier de la Liste lect, placezvous sur le fichier puis appuyez sur le bouton JAUNE (C). 5. Appuyez sur le bouton E pour lire les fichiers sélectionnés. L'écran Liste lect apparaît. 6. Pour accéder à la liste des musiques, appuyez sur le bouton 5 ou RETURN. 7. Pour revenir à la Liste lect appuyez sur le bouton E. ✎ ✎ Vous pouvez créer une liste de lecture comportant jusqu'à 99 pistes sur un CD audio (CD-DA).
Lire un Contenu ✎ ✎ Le menu Outils peut varier en fonction du disque ou du périphérique de stockage. Toutes les options peuvent ne pas s'afficher. Pour activer la fonction de fond musical, le fichier photo et le fichier de musique doivent être contenus sur le même support de stockage. Cependant, la qualité sonore peut être affectée par le débit binaire du fichier MP3, la taille de la photo et la méthode d'encodage utilisée.
- Lorsque vous appuyez sur les boutons de la télécommande principale, assurez-vous d'avoir sélectionné la station FM à l'aide de cette télécommande principale. Pour afficher les signaux RDS Vous pouvez visualiser les signaux RDS envoyés par la station sur l'écran. Appuyez sur le bouton RDS DISPLAY lorsque que vous écoutez une station FM.
Lire un Contenu • Plus la distance est grande entre l'Ensemble Home cinéma et le périphérique Bluetooth, plus la qualité de transmission se dégrade. Si la distance excède la portée du périphérique Bluetooth, la connexion est perdue. • Dans les zones où la réception est faible, la connexion Bluetooth peut ne pas fonctionner correctement. • La port10 m dans toutes les directions, si aucun obstacle ne se trouve sur le chemin parcouru par le signal.
Pour déconnecter le Home cinéma du Utilisation de la fonction NFC (Near Field Communication) périphérique Bluetooth Appuyez sur le bouton en façade du Home cinéma pour passer du mode BT à un autre mode ou éteindre le Home cinéma. • Le périphérique Bluetooth connecté attend un certain temps la réponse du Home cinéma avant de terminer la connexion, hormis si vous déconnectez le Home Cinéma via le changement des fonctions. (Le temps de déconnexion peut varier en fonction du périphérique Bluetooth.) ✎ 1.
Lire un Contenu ✎ ✎ ✎ ✎ La connexion NFC fonctionne si la fonction Démarr. rapide est Activé même si le Home cinéma est éteint. Cependant, la connexion NFC fonctionnera uniquement après avoir allumé le Home cinéma si le cordon d'alimentation a été déconnecté et reconnecté. Le est une marque déposée ou une marque de commerce de NFC Forum, Inc. aux États-Unis Note2 et dans d’autres pays.
Services Réseau 3. Utilisation de BD-LIVE™ 4. 1. Connectez l'appareil au réseau (reportez-vous à la page 14). 2. Configurez les paramètres réseau (reportez-vous aux pages 20 à 22). 5. 6. Une fois que l'appareil est connecté au réseau, vous pouvez profiter de différents contenus de services liés aux films en utilisant des disques compatibles BD-LIVE. 1.
Services Réseau Utilisation de Applications Utilisation d'Opera TV Store Lorsque vous accédez pour la première fois à l'une de ces applications, le Home cinéma affiche deux contrats d'utilisation. Vous devez acceptez ces deux contrats d'utilisation pour télécharger et utiliser une application, quelle qu'elle soit. Par défaut, le Home cinéma affiche quatre applications populaires sur l'écran d'accueil.
4. 5. 6. Réglez le processus pour supprimer d'autres applications. Lorsque vous avez terminé, sélectionnez TERMINÉ, puis appuyez sur le bouton E. Appuyez sur le bouton RETURN pour revenir sur l'écran principal. Recherche d'applications 1. 2. 3. • Les transmissions par Bluetooth peuvent créer des interférences avec le signal Screen Mirroring.
Annexes Sortie numérique Informations complémentaires Remarques Branchements SORTIE HDMI • Selon votre téléviseur, il est possible que certaines résolutions de sortie HDMI ne fonctionnent pas. • Vous devez disposer d'une connexion HDMI pour visionner les vidéos en 3D. • Un câble HDMI trop long peut provoquer du bruit à l'écran. Si tel est le cas, réglez Couleur intense HDMI sur Arrêt dans le menu.
Paramètre haut-parleur Lecture des fichiers JPEG • Lorsque l'option Sélect. haut-parleur est définie sur Haut-parleur TV, le son est émis depuis les enceintes du téléviseur. • Vous ne pouvez pas agrandir les sous-titres et les graphiques PG pour les afficher en mode plein écran. Lire un Contenu Son HDMI • Lorsque le son HDMI sort vers les haut-parleurs du téléviseur, il subit automatiquement un mixage final en deux canaux. Fonct.
Annexes ✎ ✎ ✎ ✎ ✎ Si un disque DVD-RW/-R n'a pas été enregistré correctement au format vidéo DVD, il ne pourra pas être lu. Votre appareil ne lit pas les contenus ayant été enregistrés sur un disque DVD-R selon un débit binaire dépassant les 10 Mbps. Il ne lit pas les contenus ayant été enregistrés sur un disque BD-R ou un périphérique USB selon un débit binaire dépassant les 30 Mbps.
1 États-Unis, Territoires organisés des États-Unis et Canada 2 Europe, Japon, Moyen-Orient, Égypte, Afrique du Sud, Groenland 3 Taïwan, Corée, Philippines, Indonésie, Hong Kong 4 Mexique, Amérique du Sud, Amérique centrale, Australie, Nouvelle-Zélande, Îles du Pacifique, Caraïbes 5 Russie, Europe de l'Est, Inde, Corée du Nord, Mongolie 6 Chine DVD VIDÉO Si le code régional d'un disque Blu-ray/DVD ne correspond pas à celui de l'appareil, ce dernier ne peut pas lire le disque.
Annexes Prise en charge des fichiers vidéo Extension de fichier Conteneur Codec vidéo Codec audio Résolution *.avi AVI DivX 3.11/4/5/6 MP4v3 H.264 BP/MP/HP MP3, Dolby Digital, DTS, WMA, PCM *.mkv MKV VC-1 AP, DivX 5/6 H.264 BP/MP/HP MP3, Dolby Digital, DTS, *.wmv WMV (wmv9) VC-1 AP, VC-1 SM WMA *.mp4 MP4 MP4 (mp4v) H.264 BP/MP/HP AAC *.mpg / *.mpeg PS MPEG1 MPEG2 H.
Sélections des sorties numériques Configuration Connexion Flux de données audio sur disque Bluray Résolution pour disque Blu-ray Train de bits (DTS Réencodé) Train de bits (Dolby D.
Annexes Résolution selon le mode de sortie Lecture du disque Blu-ray/des e-contenus/des contenus numériques Puissance Configuration BD Wise Lecture DVD Mode HDMI E-content/Contenus numériques Mode HDMI Disque Blu-ray Résolution du disque Blu-ray 1080p@60F 480i Résolution optimale de l'entrée du téléviseur Auto Résolution optimale de l'entrée du téléviseur 1080p@60F 1080p@60F - 1080p - 1080p Trame vidéo : Auto (24Fs) 1080p/24F - 1080i 1080i 1080i 720p 720p 720p 576p/480p 576p/480p
Problème Vérification/Solution Le son ambiophonique Dolby Digital 5.1 CH n’est pas produit. • Le disque porte-t-il l’indication « Dolby Digital 5.1 CH » ? Le son ambiophonique Dolby Digital 5.1 CH est produit uniquement si le disque est enregistré au format 5.1. • La langue audio est-elle correctement réglée sur Dolby Digital 5.1-CH dans l'affichage des informations ? La télécommande ne fonctionne pas.
Annexes Problème Vérification/Solution Il est possible que l'écran du téléviseur n'affiche pas d'image lorsque la résolution de la sortie HDMI n'est pas prise en charge par le téléviseur (par exemple 1080p). • Appuyez et maintenez le bouton 5 du panneau avant pendant plus de 5 secondes en l'absence de disque inséré dans l'appareil. Tous les paramètres seront réinitialisés sur leur valeur d'origine. Aucune sortie HDMI. • Vérifiez la connexion entre le téléviseur et la prise HDMI de l'appareil.
HT-H5500W/HT-H5550W Par la présente, Samsung Electronics déclare que ce système Home Cinéma est conforme avec les exigences essentielles et autres dispositions relatives de la Directive 1999/5/EC. Vous pouvez visualiser la Déclaration de Conformité via le site Web http://www.samsung.com, allez sur Support (Assistance) > Search Product Support (Recherche de l'assistance de l'appareil) puis entrez le nom de modèle. Cet équipement peut être utilisé dans tous les pays de l'Union Européenne.
Annexes HT-H5500/HT-H5500W 95,0 x 146,0 x 74,0 95,0 x 116,0 x 74,0 227,0 x 95,0 x 74,0 168,1 x 349,8 x 289,8 227,0 x 95,0 x 74,0 168,1 x 349,8 x 289,8 HT-H5530 Dimensions (L x H x P) (Unité : mm) 95,0 x 1113,0 x 74,0 (base du support: 95,0 x 116,0 x 74,0 276,0 x 23,0 x 189,0) HT-H5550/HT-H5550W 95,0 x 1113,0 x 74,0 95,0 x 1113,0 x 74,0 227,0 x 95,0 x (base du support: (base du support: 74,0 276,0 x 23,0 x 189,0) 276,0 x 23,0 x 189,0) Enceinte 168,1 x 349,8 x 289,8 HT-H5500/HT-H5500W 0,44 0,40 2
Licences Fabriqué sous licence par Dolby Laboratories. Dolby et le symbole représentant deux D sont des marques de commerce de Dolby Laboratories. Pour consulter les brevets DTS, rendez-vous sur http://patents.dts.com. Fabriqué sous licence par DTS Licensing Limited. DTS, DTS-HD, le symbole, et DTS-HD et le symbole qui lui est associé sont des marques déposées, et DTS-HD Master Audio | Essential est une marque déposée de DTS, Inc. © DTS, Inc. Tous droits réservés.
Comment contacter Samsung dans le monde Si vous avez des suggestions ou des questions concernant les produits Samsung, veuillez contacter le Service Consommateurs Samsung. Area ` Europe AUSTRIA Contact Centre 0800 - SAMSUNG (0800 - 7267864) Web Site www.samsung.com/at/support www.samsung.com/be/support (Dutch) BELGIUM 02-201-24-18 www.samsung.com/be_fr/support (French) BOSNIA 051 331 999 www.samsung.com/support BULGARIA 07001 33 11 , sharing cost www.samsung.com/bg/support CROATIA 062 726 786 www.
HT-H5500 HT-H5500W HT-H5530 HT-H5550 HT-H5550W 5.1-kanaals Blu-ray™ Thuisbioscoopsysteem gebruiksaanwijzing ongekende mogelijkheden Hartelijk dank voor de aanschaf van dit Samsung-product. Voor een meer volledige service, registreert u het product op www.samsung.com/register HT-H5500_00W_30_50_50W-NL_0402.
Veiligheidsinformatie LET OP Dit symbool geeft aan dat hoge spanning binnenin het product aanwezig is. Het is gevaarlijk contact te maken met onderdelen binnenin het product. GEVAAR VAN ELEKTRISCHE SCHOKKEN, NIET OPEN MAKEN LET OP: OM HET RISICO OP ELEKTRISCHE SCHOKKEN TE BEPERKEN, DIENT U DE BEHUIZING (OF DE ACHTERZIJDE) NIET TE VERWIJDEREN. DIT APPARAAT BEVAT GEEN ONDERDELEN DIE DE GEBRUIKER ZELF KAN REPAREREN. LAAT ONDERHOUD OVER AAN GEKWALIFICEERD PERSONEEL.
WAARSCHUWING: • HOUD KAARSEN EN ANDERE VOORWERPEN MET OPEN VUUR TE ALLEN TIJDE UIT DE BUURT VAN HET PRODUCT OM HET VERSPREIDEN VAN VUUR TE VOORKOMEN. LASERPRODUCT VAN KLASSE 1 Dit product is geclassificeerd als een LASERPRODUCT van KLASSE 1. Indien er mechanismen of aanpassingen worden gebruikt of procedures worden uitgevoerd die niet in deze gebruiksaanwijzing worden vermeld, kan dit resulteren in blootstelling aan schadelijke straling.
Inhoud AAN DE SLAG INHOUD AFSPELEN 5 Toebehoren 26 Overschakelen naar een ander bronapparaat 5 Luidsprekercomponenten 26 Commerciële schijven afspelen 7 Voorpaneel 7 Achterpaneel 26 Een schijf met door de gebruiker opgenomen inhoud afspelen 8 Afstandsbediening 27 Bestanden op een USB-apparaat afspelen 28 Bedieningselementen voor het afspelen van video AANSLUITINGEN 9 29 Commerciële audiodiscs afspelen De luidsprekers aansluiten 12 De toroïdale ferrietkern op het netsnoer van de draadloze
Aan de Slag Controleer de verpakking op de aanwezigheid van de toebehoren en luidsprekeronderdelen die hieronder worden vermeld of weergegeven. Aan de Slag De afbeeldingen en illustraties in deze gebruiksaanwijzing dienen slechts te referentie en kunnen afwijken van hoe het apparaat er in werkelijkheid uitziet. In de volgende gevallen kunnen administratiekosten in rekening worden gebracht: a.
Aan de Slag HT-H5530 Voor x 2 Standaard x 2 Schroef (5x20) x 8 Midden Standaardvoet x 2 Surround x 2 Luidsprekerkabel x 6 Subwoofer Schroef (5x20) x 16 Midden Standaardvoet x 4 HT-H5550/HT-H5550W Alleen HT-H5550W Voor x 2 Surround x 2 Standaard x 4 Subwoofer Luidsprekerkabel x 6 Draadloze ontvanger Module (SWA-6000) 6 - Nederlands HT-H5500_00W_30_50_50W-NL_0402.
Voorpaneel PICTOGRAMMEN OP HET DISPLAY NFC STOP AFSPELEN/ PAUZE OPENEN/ SLUITEN VOLUMEREGELING AAN/UIT BEELDSCHERM Aan de Slag FUNCTIE 5V 0.5A SENSOR VOOR AFSTANDSBEDIENING DISCLADE ✎ ✎ ✎ ✎ ✎ USB Zie erop toe dat kinderen het oppervlak van het apparaat niet aanraken wanneer het apparaat aan staat. Het apparaat wordt heet. Voor het bijwerken van de software van het apparaat via de USB-aansluiting hebt u een USB-flashdrive nodig.
Aan de Slag Afstandsbediening Uitleg over de afstandsbediening Het product in- en uitschakelen. FUNCTION VOLUME Het volume regelen. - MUTE De disclade openen en sluiten. + RDS DISPLAY Druk op de cijfertoetsen om de opties te bedienen. Het discmenu weergeven. De modus van de thuisbioscoop selecteren (BD/DVD, D. IN, AUX, enzovoort). TA 1 2 3 PTY - PTY SEARCH PTY + 4 5 6 7 8 9 TITLE MENU DISC MENU 0 POPUP Achteruit of vooruit springen. Het geluid tijdelijk uitschakelen.
Aansluitingen In dit gedeelte worden verschillende methoden beschreven om het product aan te sluiten op andere externe componenten. Schakel het product uit en haal de stekker uit het stopcontact voordat u het product gaat verplaatsen of installeren.
Aansluitingen De luidsprekers op de Tallboy-standaard installeren * Alleen HT-H5530/HT-H5550/HT-H5550W 1. Zet de voet van de standaard ondersteboven en koppel deze aan de standaard. 2. Gebruik de schroevendraaier om de schroeven in de 3 gemarkeerde openingen te bevestigen. 1 Standaardvoet 2 Standaard 3. 4. Trek de meegeleverde luidsprekerkabel in de richting van de zwaartekracht en plaats deze in de opening in het midden van de voet.
Voor de HT-H5500 Middenluidspreker Voorste luidspreker (L) SURROUND Surroundluidspreker (L) Aansluitingen SURROUND Subwoofer Voorste luidspreker (R) Surroundluidspreker (R) SURROUND SURROUND * Zie pagina 6 voor de luidsprekers van HT-H5530/HT-H5550. Voor de HT-H5500W Voorste luidspreker (L) Middenluidspreker Subwoofer Voorste luidspreker (R) Surroundluidspreker (L) Surroundluidspreker (R) Draadloze ontvangstmodule * HT-H5500W/HT-H5550W mogen alleen worden aangesloten op de SWA-6000.
Aansluitingen ✎ ✎ Het maximale zendbereik tussen het product en de draadloze ontvanger is ongeveer 10 m, maar kan variëren, afhankelijk van uw werkomgeving. Als zich een muur van gewapend beton of een muur met metalen onderdelen tussen het product en de draadloze ontvanger bevindt, werkt het systeem mogelijk niet goed, omdat radiogolven niet goed doordringen door metaal.
Een televisie verbinden met externe apparaten Rood W Wit Methode 1 Externe apparaten Aansluitingen R Methode 2 AUDIO OUT OPTICAL OUT HDMI IN Aansluiten op een tv Sluit de HDMI-kabel (niet meegeleverd) aan op de HDMI-uitgang aan de achterzijde van de speler en op de HDMI-ingang van uw tv. Als de tv ARC ondersteunt, kunt u geluid van uw tv met alleen deze kabel via uw thuisbioscoop laten afspelen.
Aansluitingen Aansluiten op een netwerkrouter Draadloos netwerk U kunt uw apparaat op uw netwerkrouter aansluiten via een van de methodes die hieronder geïllustreerd staan. Bedraad netwerk Draadloze IPverdeler Breedbandmodem (met ingebouwde router) Breedbandservice Breedbandservice Of ✎ Router ✎ Breedbandservice ✎ Breedband modem ✎ ✎ ✎ Uw router en het beleid van uw internetprovider kunnen toegang tot de softwareupdateserver van Samsung verhinderen.
Instellingen 4:3 Pan-Scan - Bij oudere, analoge televisies met standaardscherm. Beelden met een verhouding van 4:3 worden schermvullend weergegeven, Beelden met een verhouding van 16:9 worden weergegeven in een schermvullend Pan-Scanformaat, maar de linker- en rechterkant van het beeld worden afgesneden en het midden wordt verticaal groter weergegeven. De procedure voor de begininstellingen • Het startmenu wordt niet weergegeven als u de begininstellingen niet configureert.
Instellingen Het beginscherm in vogelvlucht 1 2 Afspelen Foto's Video's Muziek 8 Functie Wordt gebruikt om over te schakelen naar een extern apparaat, en voor schakelen van zender of modus bij een Bluetooth-aansluiting. U kunt de toets FUNCTION op de afstandsbediening en de op de hoofdunit gebruiken om over te toets schakelen naar een andere modus. 9 Instellingen hier kunt u verschillende functies instellen volgens uw persoonlijke voorkeuren.
Toetsen op de afstandsbediening voor het menu Instellingen SUBTITLE 1 HOME Weergave REPEAT 3D-instell. TOOLS INFO 3 2 Instellingen Menufuncties EXIT RETURN 4 TUNER HOME: Naar het startscherm gaan. 2 RETURN: Druk op de toets om naar het vorige menu te gaan. 3 E (INVOEREN) / RICHTING-toets: • Druk op ▲▼◄► om de cursor te verplaatsen of een item te selecteren. • Druk op E om het geselecteerde item te activeren of om een instelling te bevestigen.
Instellingen HDMI-kleurformaat Digitaal UIT audio Hiermee kunt u het kleurbereikformaat voor de HDMI-uitgang instellen zodat dit overeenkomt met de mogelijkheden van het verbonden apparaat (tv, monitor enzovoort). Hiermee kunt u de Digitaal UIT audio afstemmen op de mogelijkheden van de AV-ontvanger die u op het product hebt aangesloten. Meer informatie vindt u in de tabel voor selectie van digitale uitvoer (zie pagina 45).
Wi-Fi Direct BD-gegevensbeheer Hiermee kunt u een Wi-Fi Direct-apparaat op het product aansluiten via een peer-to-peer-netwerk, zonder dat een draadloze router nodig is. Als het apparaat is verbonden met een draadloos netwerk, kan de verbinding worden verbroken als u Wi-Fi Direct gebruikt (zie pagina 22). Hiermee kunt u de inhoud die u hebt gedownload met een Blu-ray-disc die de BD-Live-service ondersteunt beheren.
Instellingen 2. Ondersteuning Software-upgrade Selecteer OK wanneer dit voltooid is, en druk vervolgens op de toets E. ❏ Bedraad - Handmatig Zie pagina 23 voor meer informatie over deze functie. Contact opnemen met Samsung Biedt contactgegevens voor ondersteuning voor uw apparaat. Als u een statisch IP-adres hebt of de automatische procedure niet werkt, moet u de waarden voor Netwerkinstellingen handmatig instellen. Nadat u stap 1 tot 3 hierboven hebt gevolgd: 1.
6. Herhaal de stappen 4 en 5 totdat u alle parameters hebt ingevuld. 4. ✎ U kunt de netwerkparameterwaarden opvragen bij uw internetprovider. 7. Selecteer Terug (') nadat u alle parameterwaarden hebt ingevoerd en druk vervolgens op de toets E. De thuisbioscoop controleert de netwerkverbinding en maakt vervolgens verbinding met het netwerk.
Instellingen Wanneer u klaar bent, selecteert u Gereed en drukt u op de toets E. Het apparaat zoekt naar het netwerk. 6. Het scherm Netwerkverbinding mislukt verschijnt. Gebruik de toetsen ◄► om IP-inst. te selecteren en druk op de toets E. 7. Selecteer het veld IP-instell. en stel het in op Handmatig invoeren. 8. Selecteer de in te voeren netwerkparameter (bijvoorbeeld IP-adres) en druk vervolgens op de toets E.
4. Selecteer Wi-Fi Direct en druk vervolgens op de toets E. De Wi-Fi Direct-apparaten die een verbinding kunnen maken, worden vermeld. 2. Instellingen Weergave Wi-Fi Direct Via het apparaat met behulp van een pincode Apparaatnaam: HT-H5500 Geluid Sel. Wi-Fi Direct-app. waarmee u verb. wilt maken. Netwerk AndroidXXXXXXX Systeem Selecteer het Wi-Fi Direct-apparaat dat u met dit product wilt verbinden en druk vervolgens op de toets E. 2. De pop-up Pincode verschijnt. 3.
Instellingen 4. 5. ✎ Kies een van de volgende methoden: • Online • Via USB • Autom. upgrademelding 10. Kopieer de map naar een USB-flashstation. Druk op de toets E. De aanwijzingen voor beide methoden vindt u hieronder. 12. Ga in het menu van het product naar Instellingen > Ondersteuning > Softwareupgrade. 11. Controleer of de schijflade leeg is en steek vervolgens de USB-pendrive op de USB-poort van het apparaat.
DLNA instellen Met DLNA kunt u muziek-, video- en fotobestanden die zich uw pc bevinden, weergeven op dit apparaat. Om DLNA te kunnen gebruiken moet u het apparaat via het netwerk verbinden met uw pc (zie pagina 14) en SAMSUNG PC Share Manager installeren op de pc. De DLNA-software downloaden 1. Ga naar www.samsung.com. 2. Klik boven aan de pagina op SUPPORT. 3. Geef in het zoekveld het modelnummer van het apparaat op.
Inhoud Afspelen Uw thuisbioscoop kan inhoud afspelen vanaf Blu-ray/ dvd/cd-schijven, USB-apparaten, pc's, smartphones, tablets en in Apps. Voordat u inhoud op een pc of mobiel apparaat kunt afspelen, moet u de pc of het mobiele apparaat en het apparaat op uw netwerk aansluiten. Als u inhoud van uw pc wilt afspelen, moet u ook de DLNAnetwerksoftware downloaden of installeren of moet zich al DLNA-netwerksoftware op uw pc bevinden. ✎ In pc’s met Windows 7 en Windows 8 is al DLNAsoftware (Play To) ingebouwd.
3. Er wordt een scherm met de inhoud van de schijf weergegeven. Afhankelijk van hoe de inhoud is geordend, worden er mappen, afzonderlijke bestanden of mappen en bestanden weergegeven. 3. 4. Indien nodig gebruikt u de toetsen ▲▼◄► om een map te selecteren en drukt u vervolgens E. 5. 5. Gebruik de toetsen ▲▼◄► om een bestand te selecteren dat u wilt weergeven of afspelen en druk vervolgens op E. 6. 7.
Inhoud Afspelen Bedieningselementen voor het afspelen van video U kunt het afspelen van video's beheren die op een Blu-ray-/dvd-schijf, USB-apparaat, mobiel apparaat of pc staan. Afhankelijk van de schijf of de inhoud is het mogelijk dat bepaalde functies die in deze handleiding worden beschreven, niet beschikbaar zijn. Toetsen op de afstandsbediening voor het afspelen van video's TITLE MENU DISC MENU 0 POPUP 2 DISC MENU Tijdens het afspelen drukt u op deze toets om het schijfmenu weer te geven.
Het menu TOOLS gebruiken Ondertiteling Druk tijdens het afspelen op de toets TOOLS. Hiermee kunt u de gewenste taal voor ondertiteling instellen. Titel Als een schijf of apparaat meerdere titels bevat, kunt u hiermee naar de gewenste titel gaan. Afspeeltijd Hiermee kunt u naar een specifiek afspeelpunt gaan. U kunt het afspeelpunt invoeren met de cijfertoetsen. Beeldhoek Selecteer deze optie om een scène vanuit een andere hoek te bekijken.
Inhoud Afspelen Pl li Playlist Herhalingsmodus 4 versneld afspelen (alleen audio-cd (CD-DA)): Tijdens het afspelen drukt u op de toets 3 of . Telkens wanneer u op de toets 3 of drukt, wordt de afspeelsnelheid gewijzigd. 5 7-toets: Het afspelen wordt onderbroken. 6 6-toets: Het huidige geselecteerde nummer afspelen. 0/16 Tools TRACK 001 Nummer Rip > Verpl. < Instellen ' Terug TRACK 003 04:41 TRACK 004 04:02 TRACK 005 03:43 TRACK 006 03:40 00:00/00:00 Nummers herhalen CD 2.
4. U kunt een bestand uit de Afspeellst verwijderen door naar het bestand te gaan en op de GELE (C) toets te drukken. 5. Druk op de toets E om de geselecteerde bestanden af te spelen. Het scherm Afspeellst verschijnt. 6. Als u naar de muzieklijst wilt gaan, drukt u op de toets 5 of RETURN. 7. U kunt teruggaan naar de Afspeellst door te drukken op de toets E. ✎ ✎ U kunt een afspeellijst met maximaal 99 nummers maken op een audio-cd (CD-DA).
Inhoud Afspelen ✎ ✎ Afhankelijk van de disc of het opslagapparaat kan het menu Tools verschillen. Mogelijk worden niet alle opties weergegeven. Als u de functie Achtergrondmuziek wilt gebruiken, moet het fotobestand zich op hetzelfde opslagmedium bevinden als het muziekbestand. De geluidskwaliteit kan echter nadelig worden beïnvloed door de bitsnelheid van het MP3-bestand, de grootte van de foto en de coderingsmethode. Een fotoafspeellijst maken Stations voorprogrammeren Voorbeeld: de frequentie 89.
- Wanneer u op de knoppen van de primaire afstandsbediening drukt, dient u ervoor te zorgen dat u het FM-station hebt geselecteerd met de primaire afstandsbediening. De RDS-signalen weergeven U kunt de RDS-signalen die het station uitzendt zien op het scherm. Druk op de toets RDS DISPLAY terwijl u naar een FM-station luistert.
Inhoud Afspelen • Hoe groter de afstand tussen de thuisbioscoop en het Bluetooth-apparaat, des te lager de kwaliteit. Als de afstand groter is dan het maximale bereik van het Bluetooth-apparaat, wordt de verbinding verbroken. • In gebieden met slechte ontvangst werkt de Bluetooth-verbinding mogelijk niet naar behoren. • Het effectieve ontvangstbereik van de thuisbioscoop is maximaal 10 meter in alle richtingen, mits er geen obstakels zijn.
De verbinding tussen de thuisbioscoop en het NFC (Near Field Communication) gebruiken Bluetooth-apparaat verbreken Sluit uw NFC-compatibele apparaat via Bluetooth aan op de thuisbioscoop met deze eenvoudige installatieprocedure. U kunt muziek van uw smartphone afspelen via de thuisbioscoop. Druk op de toets ( ) op het voorpaneel van de thuisbioscoop om van BT over te schakelen naar een andere modus of om de thuisbioscoop uit te schakelen.
Inhoud Afspelen ✎ ✎ ✎ ✎ Als Snel starten is Aan, werkt de NFC-verbinding zelfs wanneer het Home Cinema-systeem is uitgeschakeld. De NFC-verbinding werkt echter alleen nadat het Home Cinema-systeem wordt ingeschakeld wanneer de voedingskabel losgekoppeld en opnieuw aangesloten is. De is een handelsmerk of gedeponeerd handelsmerk van Note2 NFC Forum, Inc. in de Verenigde Staten en in andere landen.
Netwerkservices 3. BD-LIVE™ gebruiken 4. 1. Breng een verbinding tot stand tussen het product en het netwerk (zie pagina 14). 2. De netwerkinstellingen configureren (zie pagina's 20-22). 5. Selecteer Inrichting veranderen op uw thuisbioscoop. Gebruik de toetsen ▲% om uw pc te selecteren in de apparatenlijst. Selecteer het type bestand dat u wilt weergeven of afspelen, Foto's, Video's of Muziek, en druk vervolgens op E.
Netwerkservices Apps gebruiken De Opera TV Store gebruiken De eerste keer dat u een van de apps gebruikt, toont de thuisbioscoop twee overeenkomsten. U moet instemmen met beide overeenkomsten voordat u apps moet downloaden en gebruiken. Standaard geeft de thuisbioscoop voer populaire apps weer op het beginscherm. U kunt meer apps bekijken en de apps die de thuisbioscoop weergeeft op het startscherm wijzigen door de toets Meer te selecteren.
4. 5. 6. Herhaal dit proces als u nog meer apps wilt verwijderen. Wanneer u klaar bent, selecteert u GEREED en drukt u op de toets E. Druk op de toets RETURN om terug te keren naar het hoofdscherm. • Bluetooth-transmissies kunnen het Screen Mirroring-signaal verstoren. Voordat u de functie Screen Mirroring gebruikt, raden we u ten sterkste aan de Bluetooth-functie op uw smartphone of smartphone of smart-apparaat uit te schakelen.
Bijlage Aanvullende informatie Digitaal UIT audio Opmerkingen Aansluitingen HDMI-UITGANG • Afhankelijk van uw televisie werken bepaalde HDMIuitvoerresoluties mogelijk niet. • U moet over een HDMI-aansluiting beschikken om video's met 3D-technologie te kunnen bekijken. • Als u een lange HDMI-kabel gebruikt, kan zich beeldruis voordoen. Als dit gebeurt, stelt u HDMI diepe kleur in op Uit in het menu. Instellingen 3D-instell.
Luidsprekerinst. JPEG-bestanden afspelen • Als Luidsprekerselectie is ingesteld op TVluidspreker, wordt het geluid weergegeven via de luidsprekers van de televisie. • U kunt de ondertiteling en presentatie-afbeelding niet vergroten in de modus voor volledig scherm. Inhoud Afspelen HDMI-audio • Wanneer het HDMI-geluid wordt uitgevoerd naar de luidsprekers van de tv, wordt het geluid automatisch teruggemengd naar 2 kanalen.
Bijlage ✎ ✎ ✎ ✎ ✎ Als een DVD-RW/-R-disc niet naar behoren is opgenomen in DVD-videoformaat, kan deze niet worden afgespeeld. Uw product speelt geen inhoud af die op een DVD-R is opgenomen met een bitsnelheid van meer dan 10 Mbps. Uw product speelt geen inhoud af die op een BD-R of USB-medium is opgenomen met een bitsnelheid van meer dan 30 Mbps.
1 De V.S., Amerikaanse territoria en Canada 2 Europa, Japan, het MiddenOosten, Egypte, Afrika, Groenland 3 Taiwan, Korea, de Filippijnen, Indonesië, Hongkong 4 Mexico, Zuid-Amerika, Centraal-Amerika, Australië, Nieuw-Zeeland, Eilanden in de Stille Zuidzee, Caraïbisch gebied 5 Rusland, Oost-Europa, India, Noord-Korea, Mongolië 6 China DVDVIDEO Als de regiocode van een Blu-ray-disc/DVD niet overeenkomt met de regiocode op dit product, kan de disc niet worden afgespeeld.
Bijlage Ondersteunde videobestanden Bestandsextensie Houder Videocodec Audiocodec *.avi AVI DivX 3.11/4/5/6 MP4v3 H.264 BP/MP/HP Resolutie MP3, Dolby Digital, DTS, WMA, PCM *.mkv MKV VC-1 AP, DivX 5/6 H.264 BP/MP/HP MP3, Dolby Digital, DTS *.wmv WMV (wmv9) VC-1 AP, VC-1 SM WMA *.mp4 MP4 MP4 (mp4v) H.264 BP/MP/HP AAC *.mpg / *.mpeg PS MPEG1 MPEG2 H.
Selectie van digitale uitvoer Instellingen Bitstream (zonder omzetting) PCM Aansluiting Audiostream op Blu-raydisc Definitie voor Blu-ray-disc Bitstream (Dolby D opnieuw gecodeerd) AV-ontvanger met HDMI-ondersteuning PCM Maximaal 7.1 PCMkanalen PCM Dolby Digital Maximaal 5.1 PCMkanalen Dolby Digital Dolby Digital Plus Maximaal 5.1 PCMkanalen Dolby Digital Plus Dolby TrueHD Maximaal 5.1 PCMkanalen Dolby TrueHD DTS Maximaal 5.
Bijlage Resolutie in overeenstemming met de uitgangsmodus Afspelen van Blu-ray-discs/E-inhoud/digitale inhoud DVD afspelen HDMI-modus Uitvoer E-inhoud/digitale inhoud HDMI-modus Blu-ray-disc Resolutie van Blu-raydisc 1080p bij 60 beelden 480i Instellingen BD Wise Auto Max. resolutie van tv-invoer 1080p bij 60 beelden 1080p bij 60 beelden Max.
Symptoom Controle/oplossing Er wordt geen Dolby Digital 5.1-kanaals-surroundgeluid geproduceerd. • Staat er een markering "Dolby Digital 5.1 CH" op de disc? Dolby Digital 5.1-kanaals-surroundgeluid wordt alleen geproduceerd als de schijf is opgenomen met 5.1-geluid. • Is de audiotaal juist ingesteld op Dolby Digital 5.1-kanaals in de informatieweergave? De afstandsbediening werkt niet.
Bijlage Symptoom Controle/oplossing Als de HDMI-uitvoer is ingesteld op een resolutie die niet door de tv wordt ondersteund (bijvoorbeeld 1080p), wordt er mogelijk geen beeld weergegeven. • Houdt de knop 5 op het voorpaneel ten minste 5 seconden ingedrukt zonder schijf in het apparaat. Alle instellingen worden teruggezet naar de fabrieksinstellingen. Geen HDMI-uitvoer. • Controleer de aansluiting tussen de tv en de HDMI-aansluiting van het apparaat.
HT-H5500W/HT-H5550W Hierbij verklaart Samsung Electronics dat dit home cinema-systeem compatibel is met de essentiële vereisten en andere relevante bepalingen van Richtlijn 1999/5/EG. U kunt de officiële conformiteitsverklaring vinden op http://www.samsung.com. Ga naar Support (Ondersteuning)> Search Product Support (Productondersteuning zoeken) en voer de modelnaam in. Deze apparatuur mag worden gebruikt in alle EU-landen. Deze apparatuur mag uitsluitend binnenshuis worden gebruikt.
Bijlage HT-H5500/HT-H5500W 95,0 x 146,0 x 74,0 95,0 x 116,0 x 74,0 227,0 x 95,0 x 74,0 168,1 x 349,8 x 289,8 HT-H5530 Afmetingen (B x H x D) (Apparaat: mm) 95,0 x 1113,0 x 74,0 (Voetstuk: 276,0 x 23,0 x 189,0) 95,0 x 116,0 x 74,0 95,0 x 1113,0 x 74,0 (Voetstuk: 276,0 x 23,0 x 189,0) 95,0 x 1113,0 x 74,0 (Voetstuk: 276,0 x 23,0 x 189,0) 227,0 x 95,0 x 74,0 168,1 x 349,8 x 289,8 HT-H5550/HT-H5550W Luidspreker 227,0 x 95,0 x 74,0 168,1 x 349,8 x 289,8 HT-H5500/HT-H5500W 0,44 Gewicht (Apparaat : k
Licenties Vervaardigd onder licentie van Dolby Laboratories. Dolby en de dubbele D zijn handelsmerken van Dolby Laboratories. Raadpleeg http://patents.dts.com voor DTS-patenten. Vervaardigd onder licentie van DTS Licensing Limited. DTS, DTSHD, het symbool en DTS en het symbool samen zijn gedeponeerde handelsmerken, en DTS-HD Master Audio | Essential is een handelsmerk van DTS, Inc. © DTS, Inc. Alle rechten voorbehouden.
Contact Samsung wereldwijd Wanneer u suggesties of vragen heeft met betrekking tot Samsung producten, verzoeken wij u contact op te nemen met de consumenten service- en informatie dienst van Samsung. Area ` Europe AUSTRIA Contact Centre 0800 - SAMSUNG (0800 - 7267864) Web Site www.samsung.com/at/support www.samsung.com/be/support (Dutch) BELGIUM 02-201-24-18 www.samsung.com/be_fr/support (French) BOSNIA 051 331 999 www.samsung.com/support BULGARIA 07001 33 11 , sharing cost www.samsung.
HT-H5500 HT-H5500W HT-H5530 HT-H5550 HT-H5550W 5.1CH Blu-ray™ Heimkino-System Bedienungsanleitung Erleben Sie die Möglichkeiten Vielen Dank, dass Sie sich für dieses Produkt von Samsung entschieden haben. Wenn Sie einen umfassenderen Service nutzen möchten, registrieren Sie bitte Ihr Produkt unter www.samsung.com/global/register. HT-H5500_00W_30_50_50W-GER_0402.
Sicherheitsinformationen Dieses Symbol weist auf eine hohe Spannung im Inneren des Geräts hin. Das Berühren von Teilen im Geräteinneren ist gefährlich. ACHTUNG STROMSCHLAGGEFAHR! NICHT ÖFFNEN! ACHTUNG: ZUR VERMEIDUNG VON STROMSCHLÄGEN DARF DIESES GERÄT NICHT GEÖFFNET WERDEN. IM GERÄTEINNEREN BEFINDEN SICH KEINE VOM BENUTZER ZU WARTENDEN TEILE. LASSEN SIE REPARATUREN NUR VON QUALIFIZIERTEM KUNDENDIENSTPERSONAL DURCHFÜHREN.
WARNUNG: • UM DAS AUSBRECHEN EINES BRANDES ZU VERHINDERN, DÜRFEN SICH KEINE KERZEN UND ANDERE GEGENSTÄNDE MIT OFFENEM FEUER IN DER NÄHE DES GERÄTS BEFINDEN. CLASS 1 LASER PRODUKT Dieses Gerät ist als CLASS 1 LASER Produkt eingestuft. Die Verwendung von anderen Bedienelementen, Einstellungen oder die Durchführung von Prozeduren die von denen hier angegebenen abweichen, können zu einer zu einer gefährlichen Strahlenbelastung führen.
Inhalt ERSTE SCHRITTE WIEDERGABE VON INHALTEN 5 Zubehör 26 Umschalten des Wiedergabegeräts 5 Lautsprecherkomponenten 26 Wiedergabe von kommerziellen Disks 7 Vorderseite 26 Wiedergabe von selbst aufgenommenen Disks 7 Rückseite 27 Wiedergabe von Dateien auf einem USB-Gerät 8 Fernbedienung 28 Steuern der Videowiedergabe 29 Wiedergabe von kommerziellen Audio Disks ANSCHLÜSSE 9 30 Steuern der Musikwiedergabe Anschließen der Lautsprecher 12 Anbringen des Ferrit-Ringkerns am Netzkabel des Kabel
Erste Schritte Prüfen Sie, ob die im Folgenden aufgeführten Zubehör- und Lautsprecherkomponenten dem Karton beiliegen. Erste Schritte Die Abbildungen in dieser Anleitung dienen nur als Referenz und können sich vom aktuellen Produkt unterscheiden. Es kann eine Gebühr erhoben werden, wenn: a. Ein Techniker auf Ihre Anfrage bestellt wird und am Gerät kein Defekt vorliegt (z. B. weil Sie diese Bedienungsanleitung nicht gelesen haben) b.
Erste Schritte HT-H5530 Frontlautsprecher 2x Ständer 2x Schrauben (5x20) 8x Center Ständerfuß 2x Surround Lautsprecher 2x Lautsprecherkabel 6x Subwoofer HT-H5550/HT-H5550W Schrauben (5x20) 16x Center Ständerfuß 4x Nur HT-H5550W Frontlautsprecher 2x Surround Lautsprecher 2x Ständer 4x Subwoofer Lautsprecherkabel 6x Funkempfänger Modul (SWA-6000) 6 - Deutsch HT-H5500_00W_30_50_50W-GER_0402.
Vorderseite DISPLAY SYMBOLE NFC STOPP WIEDERGABE/ PAUSE ÖFFNEN/ SCHLIESSEN LAUTSTÄRKEREGLER NETZSCHALTER ANZEIGE Erste Schritte FUNKTION 5V 0.5A DISK-LADE ✎ ✎ ✎ ✎ ✎ FERNBEDIENUNGSSENSOR USB Wenn das Gerät eingeschaltet ist, darauf achten, das Kinder die Oberfläche des Geräts nicht berühren. Das Gerät ist heiß. Um die Software des Geräts über den USB-Anschluss zu aktualisieren, benötigen Sie einen USB-Speicherstick.
Erste Schritte Fernbedienung Übersicht der Fernbedienung Schaltet das Gerät ein und aus. FUNCTION VOLUME Lautstärke regeln. - MUTE + RDS DISPLAY Drücken Sie die Nummerntasten, um die Optionen zu bedienen. Zum ansehen des Diskmenüs diese Taste drücken. Zum Vorwärts- oder Rückwärtsspringen diese Taste drücken. Zur Wiedergabe einer Disk oder Datei diese Taste drücken. Zum Beenden der Wiedergabe einer Disk oder Datei diese Taste drücken.
Anschlüsse In diesem Kapitel werden verschiedene Methoden erläutert, mit denen dieses Gerät an andere externe Komponenten angeschlossen werden kann. Bevor Sie das Hauptgerät installieren oder an einer anderen Stelle aufstellen, müssen Sie es ausschalten und den Netzstecker ziehen.
Anschlüsse Zum Installieren der Lautsprecher auf dem Tallboy-Stand * Nur HT-H5530/HT-H5550/HT-H5550W 1. Stellen Sie die Bodenplatte auf den Kopf, und befestigen Sie den Ständer. 2. Befestigen Sie die Schrauben mithilfe eines Schraubenziehers in den 3 markierten Öffnungen. 1 Ständerfuß 2 Ständer 3. 4. Biegen Sie das mitgelieferte Lautsprecherkabel gerade und führen Sie es in die Öffnung im Standfuß ein. 3 4 Lautsprecher Befestigen Sie den zusammengesetzten Stand am oberen Lautsprecher.
Bei HT-H5500 Center-Lautsprecher Front-Lautsprecher (L) SURROUND Surround-Lautsprecher (L) Anschlüsse SURROUND Subwoofer Front-Lautsprecher (R) Surround-Lautsprecher (R) SURROUND SURROUND * Weitere Informationen zu den Lautsprechern der Modelle HT-H5530/HT-H5550 finden Sie auf Seite 6.
Anschlüsse ✎ ✎ Die maximale Übertragungsreichweite zwischen dem Hauptgerät und dem Funkempfänger beträgt etwa 10 m, ist jedoch ebenfalls von der Betriebsumgebung abhängig. Befindet sich zwischen Hauptgerät und drahtlosem Funkempfänger eine Wand aus Stahlbeton oder Metall, so funktioniert das System evtl. gar nicht, da die Funkwellen Metall nicht durchdringen können. Wenn das Gerät keine Funkverbindung aufbaut, müssen Sie eine ID-Einstellung zwischen dem Gerät und dem drahtlosen Funkempfänger durchführen.
Anschließen an ein Fernsehgerät und Externes Gerät Rot W Weiß Methode 1 Externe Geräte Anschlüsse R Methode 2 AUDIO OUT OPTICAL OUT HDMI IN Anschluss an ein Fernsehgerät Verbinden Sie ein HDMI-Kabel (nicht mitgeliefert) über die HDMI OUT (HDMI AUSGANGS) -Buchse an der Rückseite des Geräts mit der HDMI Eingangsbuchse des Fernsehgeräts. Wenn das Fernsehgerät ARC unterstützt, können Sie den Ton von Ihrem Fernsehgerät über das Heimkino wiedergeben, indem Sie nur einfach nur dieses Kabel anschließen.
Anschlüsse Wireless-Netzwerk Anschließen an einen Netzwerk Router Sie können das Gerät mit Hilfe einer der im Folgenden beschriebenen Methoden mit Ihrem Netzwerk Router verbinden. Kabelnetzwerk Kabelloser IPSharer Breitbandmodem (mit integriertem Router) BreitbandDienste BreitbandDienste Oder ✎ Router ✎ BreitbandDienste ✎ Breitband Modem ✎ ✎ ✎ ✎ Die Richtlinien Ihres Router oder Internetanbieters lassen eventuell den Zugriff auf den Samsung Software-Aktualisierungsserver nicht zu.
Einstellungen 4:3 Passend - Für ältere analog Fernsehgeräte mit Standardbildschirm. Zeigt Bilder im 4:3 Format im Vollbildmodus und Bilder im 16:9 Forma im Pan-Scan Format an, bei dem der linke und rechte Rand des Bildes abgeschnitten und die Mitte des Bildes vertikal vergrößert wird. Ersteinstellungen konfigurieren • Das Home Menü wird nicht angezeigt, wenn die Ersteinstellungen nicht konfiguriert wurden.
Einstellungen Der Home Bildschirm im Überblick 1 2 Disk wdg. Fotos Videos Musik 8 Funktion Dient zum Umschalten auf ein externes Gerät oder Radio und zum Umschalten des Modus für eine Bluetooth Verbindung. Sie können die FUNCTION Taste auf der Fernbedienung oder die Taste am Hauptgerät zum Umschalten des Modus verwenden. 9 Einstellungen Passt verschiedene Funktionen an Ihre persönlichen Vorlieben an.
Im Einstellungen Menü verwendete Fernbedienungstasten SUBTITLE 1 HOME Einstellungen Menüfunktionen Anzeige REPEAT 3D-Einstellungen TOOLS INFO RETURN EXIT 3 2 4 TUNER HOME Taste : Drücken, um den Home Bildschirm aufzurufen. 2 RETURN Taste : Zum vorherigen Menü zurückkehren 3 E (ENTER) / RICHTUNGSTASTEN Taste : • Mit Hilfe der ▲▼◄► Tasten können Sie den Cursor bewegen oder eine Position auswählen.
Einstellungen HDMI-Farbformat Digital-Ausgang Hier kann das Farbraumformat für die HDMIWiedergabe an die Möglichkeiten des angeschlossenen Geräts (Fernsehgerät, Bildschirm, usw.) angepasst werden. Mit dieser Funktion können Sie den DigitalAusgang an die Möglichkeiten des an das Gerät angeschlossenen AV-Receivers anpassen. Für weitere Einzelheiten, schlagen Sie bitte in der Auswahltabelle für den Digitalausgang nach. (Siehe Seite 45.
Wi-Fi-Direkt BD-Datenmanagement Mit dieser Funktion können Sie ein Wi-Fi-Direkt Gerät an Ihr Gerät über ein Peer-to-Peer Netzwerk anschließen, ohne das Sie einen Wi-Fi-Router benötigen. Beachten Sie, dass wenn das Gerät an ein Wireless-Netzwerk angeschlossen ist die Verbindung unterbrochen werden kann, wenn Sie Wi-Fi-Direkt benutzen. (Siehe Seite 22.) Mit dieser Funktion können Sie Inhalte verwalten, die Sie über eine Blu-ray Disk heruntergeladen haben, die den BD-LIVE Dienst unterstützt.
Einstellungen 2. Unterstützung Software-Update Wenn dies erfolgt ist, OK markieren und anschließend die E Taste drücken. ❏ Kabel Manuell Für weitere Informationen über diese Funktion finden Sie auf Seite 23. Samsung kontaktieren Hier erhalten Sie Kontaktinformationen, wenn Sie Hilfe für Ihr Gerät benötigen. Wenn Sie über eine statische IP-Adresse verfügen oder die automatische Einstellung nicht funktioniert, müssen Sie die Werte für die Netzwerkeinstellungen manuell eingeben.
6. ✎ 7. Wiederholen Sie die Schritte 4 und 5, bis Sie die Parameter in alle Felder eingetragen haben. 4. Wenn die Einstellungen abgeschlossen sind, Fertig auswählen und anschließend die E Taste drücken. Das Gerät überprüft die Netzwerkverbindung und stellt anschließend eine Verbindung zum Netzwerk her. ✎ Der Sicherheitscode oder das Passwort können Sie einem der Setup-Bildschirme entnehmen, die Sie bei der Konfiguration Ihres Modems oder Routers benutzt haben.
Einstellungen Wenn die Einstellungen abgeschlossen sind, Fertig auswählen und anschließend die E Taste drücken. Das Gerät sucht nach dem Netzwerk. 6. Der Netzwerkverbindung fehlgeschlagen Bildschirm erscheint. Mithilfe der ◄► Tasten IPEinst. auswählen und die E Taste drücken. 7. Wählen Sie das Feld IP-Einstell. und setzen Sie es auf Manuell eingeben. 8. Wählen Sie einen einzugebenden Netzwerkparameter aus (z. B. IP-Adresse) und drücken Sie die E Taste.
4. Wählen Sie Wi-Fi-Direkt und drücken Sie die E Taste. Die Wi-Fi-Direkt Geräte, mit denen Sie eine Verbindung herstellen können, werden angezeigt. 2. Das Popup-Fenster für den Verbindungsaufbau gefolgt vom Popup-Fenster für die hergestellte Verbindung erscheinen. Wenn das Fenster geschlossen wird, sollte das Gerät auf dem Wi-FiDirekt Bildschirm als verbunden aufgelistet werden.
Einstellungen 4. Wählen Sie eine der folgenden Methoden: • Online • Per USB • Automatische Update-Meldung 10. Den Ordner auf ein USB-Flash-Laufwerk kopieren. 5. Drücken Sie die E Taste. Die Anweisungen für jede Methode finden Sie im Folgenden. ✎ Wenn Sie das Upgrade während des Herunterladens der Software abbrechen möchten, müssen Sie die E Taste drücken. Online Ihr Gerät muss mit dem Internet verbunden sein, um die Online Funktion nutzen zu können.
DLNA einrichten DLNA ermöglicht die Wiedergabe von auf Ihrem PC gespeicherten Musiktiteln, Videos und Fotodateien mithilfe dieses Geräts. Um DLNA zu verwenden, müssen Sie eine Verbindung zum PC über das Netzwerk (Siehe Seite 14) erstellen und SAMSUNG PC-Share-Manager auf dem PC Installieren. Herunterladen der DLNA Software 1. Besuchen Sie www.samsung.com. 2. Klicken Sie am oberen Rand der Seite auf SUPPORT. 3. Geben Sie die Modellnummer in das Suchfeld ein.
Wiedergabe von Inhalten Ihr Heimkino kann Inhalte von Blu-ray/DVD/CD Disks, USB-Geräten, PCs, Smartphones, Tablets und in Anwendungen wiedergeben. Um auf Ihrem PC oder Mobilgeräten gespeicherte Inhalte wiederzugeben, müssen Sie den PC oder das mobile Gerät und dieses Gerät an Ihr Netzwerk anschließen. Um Inhalte auf Ihrem PC wiederzugeben, müssen Sie die DLNA Netzwerk Software herunterladen und installieren oder die bereits auf Ihrem Computer vorhandene DLNA Netzwerk Software verwenden.
3. Es wird ein Bildschirm mit dem Inhalt der Disk angezeigt. Je nachdem, wie der Inhalt angeordnet ist, sehen Sie entweder Ordner, einzelne Dateien oder beides. 4. Falls erforderlich mithilfe der ▲▼◄► Tasten einen Ordner auswählen und anschließend die E Taste drücken. 5. Verwenden Sie die ▲▼◄► Tasten, um eine Datei für die Wiedergabe auszuwählen und drücken Sie die E Taste. 6.
Wiedergabe von Inhalten 2 Bedienen des Disk Menüs, Titel Menüs, Popup Menüs und der Titelliste Steuern der Videowiedergabe Sie können die Wiedergabe von Videoinhalten auf Blu-ray-Disks/DVDs, USB-Geräten, mobilen Geräten oder dem PC steuern. Je nach Disk oder Inhalt können einige in dieser Anleitung beschriebenen Funktionen nicht zur Verfügung stehen.
EXTRAS Menü verwenden Untertitel Drücken Sie während der Wiedergabe die TOOLS Taste. Mit dieser Option können Sie die gewünschte Untertitelsprache einstellen. Titel Winkel Wenn sich mehr als ein Titel auf der Disk oder dem Gerät befindet, können Sie so dem gewünschten Titel gehen und ihn auswählen. Wählen Sie diese Option, um eine Szene unter einem anderen Blickwinkel aus zu betrachten. Die Winkel Option zeigt die Anzahl der verfügbaren Blickwinkel an (1/1, 1/2, 1/3 usw.).
Wiedergabe von Inhalten Pl li Playlist Wiederholmod. Track Ripp. > Beweg. < Einstellen " Pause TRACK 003 04:41 TRACK 004 04:02 TRACK 005 03:43 TRACK 006 03:40 Wählen Extras 5 7 Taste : Unterbrechen eines Titels. 6 6 Taste : Wiedergabe des ausgewählten Musiktitels. ' Zurück 00:00/00:00 CD 4 Schnelle Wiedergabe (nur bei Audio CDs (CD-DA)) : Drücken Sie während der Wiedergabe die Taste 3 oder Taste.
4. Um eine Datei aus der W.-Liste zu entfernen, zu der Datei gehen und die GELBE (C) Taste drücken. 5. Drücken Sie die E Taste, um die ausgewählten Dateien abzuspielen. Der Bildschirm W.-Liste wird angezeigt. 6. Um zur Musikliste zu wechseln, die 5 oder RETURN Taste drücken. 7. Um zur W.-Liste zurückzukehren, die E Taste drücken. ✎ Sie können auf Audio CDs (CD-DA) eine Wiedergabeliste mit maximal 99 Titeln erstellen. Wenn Sie von der W.-Liste zur Titelliste wechseln und wieder zur W.
Wiedergabe von Inhalten ✎ ✎ Abhängig von der Disk oder dem Speichergerät kann das Extras Menü abweichen. Eventuell werden nicht alle Optionen angezeigt. Um die Hintergrundmusik Funktion aktivieren zu können, muss sich die Bilddatei im gleichen Ordner befinden, wie die Musikdatei. Die Audioqualität kann durch die Bitrate der MP3-Datei, die Bildgröße und die Kodierungsmethode beeinträchtigt werden.
- Wenn Sie eine Taste auf der Hauptfernbedienung drücken. Achten Sie darauf dass Sie für die Auswahl des UKW Senders die Hauptfernbedienung benutzen. Anzeigen der RDS-Signale Sie können die von der Station gesendeten RDSSignale auf dem display ablesen. Betätigen Sie die Taste RDS DISPLAY während Sie eine Radiostation hören.
Wiedergabe von Inhalten • Mit zunehmender Entfernung zwischen Heimkino-System und Bluetooth-Gerät nimmt die Empfangsqualität ab. Wenn die Distanz den Bluetooth-Betriebsbereich übersteigt, geht die Verbindung verloren. • In Gebieten mit geringer Empfangssensibilität ist die Funktion der Bluetooth-Verbindung möglicherweise eingeschränkt. • In einer hindernisfreien Umgebung hat das Heimkino einen Empfangsradius von 10 m.
Trennen des Heimkinos vom Bluetooth-Gerät Drücken Sie die ( ) Taste auf der Vorderseite des Heimkinos, um von BT auf einen anderen Modus umzuschalten oder das Heimkino auszuschalten. • Das angeschlossene Bluetooth-Gerät wartet eine gewisse Zeit auf eine Antwort vom Heimkino, bevor es die Verbindung unterbricht, es sei denn, dass es durch Umschalten der Funktion abgetrennt wird. (Je nach Bluetooth-Gerät kann der Zeitraum bis zur Trennung der Verbindung variieren.
Wiedergabe von Inhalten ✎ ✎ ✎ ✎ Wenn Schnellstart auf Ein gesetzt ist, funktioniert die NFC-Verbindung auch dann, wenn das Heimkino ausgeschaltet ist. Die NFV-Verbindung funktioniert jedoch nur, wenn das Heimkino eingeschaltet wird, nachdem das Netzkabel von der Stechdose getrennt und wieder angeschlossen wurde. Das Symbol ist in den Vereinigten Staaten und anderen Note2 Ländern ein Warenzeichen oder eingetragenes Warenzeichen der NFC Forum, Inc..
Netzwerkdienste 3. Verwenden von BD-LIVE™ 4. 1. 2. Schließen Sie das Gerät an das Netzwerk an. (Siehe Seite 14) Konfigurieren Sie die Netzwerkeinstellungen. (Siehe Seiten 20-22) Sobald das Gerät mit dem Netzwerk verbunden ist, können sie verschiedene filmbezogene Serviceinhalte, unter Benutzung einer BD-Live konformen Disk, genießen. 1.
Netzwerkdienste Anwendungen verwenden Den Opera TV Store nutzen Wenn Sie das Erste Mal eine dieser Anwendungen aufrufen, werden vom Heimkinosystem zwei Zustimmungsaufforderungen angezeigt. Sie müssen beiden Zustimmungsaufforderungen zustimmen, um die Anwendungen herunterladen und nutzen zu können. Das Heimkinosystem zeigt vier voreingestellte populäre Anwendungen auf dem Home Bildschirm an.
4. 5. 6. Wiederholen Sie diesen Vorgang, um weitere Anwendungen zu löschen. Anschließend FERTIG auswählen und dann die E Taste drücken. Drücken Sie die RETURN Taste, um zum Hauptbildschirm zurückzukehren. • Bluetooth Übertragungen können das Screen Mirroring Signal stören. Wir empfehlen dringend, dass Sie die Bluetooth Funktion an Ihrem Smartphone oder Smart Gerät ausschalten, bevor Sie die Screen Mirroring Funktion verwenden. Nach Anwendungen suchen 1. 2. 3.
Anhang Zusätzliche Informationen Digital-Ausgang Hinweise Aufstellungsarten HDMI-AUSGANG • Je nach Fernsehgerät stehen für den HDMIAusgang bestimmte Auflösungen möglicherweise nicht zur Verfügung. • Sie müssen über einen HDMI-Anschluss verfügen, um Videos in 3D-Technologie genießen zu können. • Ein langes HDMI-Kabel kann Bildrauschen verursachen. Wenn dieser Fall eintritt, im Menü HDMI-Deep Color auf Aus setzen.
Lautsprechereinstellung Wiedergabe von JPEG-Dateien • Wenn Lautsprecher auswählen auf TVLautsprecher eingestellt ist, wird der Ton über die Lautsprecher des Fernsehgeräts wiedergegeben. • Sie können den Untertitel und die PG-Grafik im Vollbildschirmmodus nicht vergrößern. Wiedergabe von Inhalten HDMI Audio • Wenn der HDMI/Ton über den Fernsehlautsprecher wiedergegeben wird, wird er automatisch auf 2 Kanäle heruntergemischt.
Anhang ✎ ✎ ✎ ✎ ✎ Wenn eine DVD-RW/-R-Disk nicht korrekt im DVDVideoformat aufgenommen wurde, kann sie nicht wiedergegeben werden. Das Gerät gibt keine Inhalte wieder, die auf DVD-Rs mit einer Bitrate von mehr als 10 Mbps aufgezeichnet wurden. Das Gerät kann keine Inhalte auf BD-R Disks oder USB-Geräten wiedergeben, die bei einer Bitrate von mehr als 30 Mbps aufgenommen wurden.
1 USA, US-Territorien und Kanada 2 Europa, Japan, Naher Osten, Ägypten, Afrika, Grönland 3 Taiwan, Korea, Philippinen, Indonesien, Hongkong 4 Mexiko, Südamerika, Mittelamerika, Australien, Neuseeland, Pazifische Inseln, Karibik 5 Russland, Osteuropa, Indien, Nordkorea, Mongolei 6 China DVDVIDEO Wenn der Regionalcode einer Blu-ray Disk/DVD nicht dem Regionalcode dieses Geräts entspricht, kann die Disk nicht vom Gerät wiedergegeben werden.
Anhang Unterstützte Videodatei Dateierweiterung Container Video Codec Audio Codec Auflösung *.avi AVI DivX 3.11/4/5/6 MP4v3 H.264 BP/MP/HP MP3, Dolby Digital, DTS, WMA, PCM *.mkv MKV VC-1 AP, DivX 5/6 H.264 BP/MP/HP MP3, Dolby Digital, DTS *.wmv WMV (wmv9) VC-1 AP, VC-1 SM WMA *.mp4 MP4 MP4 (mp4v) H.264 BP/MP/HP AAC *.mpg / *.mpeg PS MPEG1 MPEG2 H.
Auswahl des Digitalausgangs Setup PCM Verbindung Audiostream auf der Blu-ray Disc Blu-ray Disk Definition Bitstream (DTS Re-encoded) Bitstream (Dolby D Re-encoded) HDMI-fähiger AV Receiver PCM Bis zu PCM 7.1ch PCM Dolby Digital Bis zu PCM 5.1ch Dolby Digital Dolby-DigitalPlus Bis zu PCM 5.1ch Dolby-Digital-Plus Dolby TrueHD Bis zu PCM 5.1ch Dolby TrueHD DTS Bis zu PCM 5.1ch DTS DTS-HD (Hochauflösender Audio) Bis zu PCM 5.
Anhang Auflösung je nach Wiedergabemodus Bei der Wiedergabe von Blu-ray Disk/E-content/Digital Content HDMI-Modus Ausgang Setup BD Wise DVD-Wiedergabe Blu-ray-Disc E-contents/Digital contents HDMI-Modus Auflösung der Blu-rayDisk 1080p@60F 480i Max. Auflösung des TVEingangs Automatisch Max.
Symptom Überprüfen/Beheben Dolby Digital 5.1-KanalRaumklang wird nicht ausgegeben. • Ist die Disk mit Dolby Digital 5.1 CH" gekennzeichnet? Dolby Digital 5.1 CH Surround Sound wird nur wiedergegeben, wenn die Disk mit 5.1 Kanal Surround Sound aufgenommen wurde. • Wird die Audio-Sprache auf der Informationsanzeige richtig als Dolby Digital 5.1-CH angezeigt? Die Fernbedienung funktioniert nicht.
Anhang Symptom Überprüfen/Beheben Wenn der HDMI-Ausgang mit einer Auflösung eingestellt ist, die Ihr Fernsehgerät nicht unterstützt (z. B. 1080p), wird möglicherweise kein Bild wiedergegeben. • Drücken Sie ohne eine Disk im Gerät die 5 Taste auf dem vorderen Bedienfeld für mindestens 5 Sekunden. Alle Einstellungen werden auf die Werkseinstellungen zurückgesetzt. Keine HDMI-Wiedergabe • Prüfen Sie die Verbindung zwischen dem Fernsehgerät und dem HDMI-Anschluss des DVD-Recorders.
HT-H5500W/HT-H5550W Samsung Electronics erklärt hiermit, dass dieses Heimkino System mit den grundlegenden Anforderungen und anderen maßgeblichen Bestimmungen der Richtlinie 1999/5/EG übereinstimmt. Die offizielle Übereinstimmungserklärung finden Sie auf der Webseite http://www.samsung.com. Öffnen Sie Support und geben Sie bei Produktsuche den Modellnamen ein. Dieses Gerät darf in allen EG-Staaten betrieben werden. Darf das Gerät nur in Räumen verwendet werden.
Anhang HT-H5500/HT-H5500W 95,0 x 146,0 x 74,0 95,0 x 116,0 x 74,0 227,0 x 95,0 x 74,0 168,1 x 349,8 x 289,8 HT-H5530 Abmessungen (B x H x T) (Maßeinheit: mm) 95,0 x 1113,0 x 74,0 (Ständerfuß: 276,0 x 23,0 x 189,0) 95,0 x 116,0 x 74,0 95,0 x 1113,0 x 74,0 (Ständerfuß: 276,0 x 23,0 x 189,0) 95,0 x 1113,0 x 74,0 (Ständerfuß: 276,0 x 23,0 x 189,0) 227,0 x 95,0 x 74,0 168,1 x 349,8 x 289,8 HT-H5550/HT-H5550W Lautsprecher 227,0 x 95,0 x 74,0 168,1 x 349,8 x 289,8 HT-H5500/HT-H5500W 0,44 Gewicht (Maß
Lizenzen Hergestellt unter Lizenz von Dolby Laboratories. Dolby sowie das Doppel-D-Symbol sind Warenzeichen der Dolby® Laboratories. Informationen zu DTS-Patenten finden Sie unter http://patents.dts.com. Hergestellt unter Lizenz von DTS Licensing Limited. DTS, DTSHD, das Symbol, & DTS-HD und das Symbol zusammen sind registrierte Warenzeichen und DTS-HD Master Audio | Essential ist ein Warenzeichen der DTS, Inc. © DTS, Inc. Alle Rechte vorbehalten.
Kontakt zu Samsung Falls Sie Fragen oder Anregungen zu Samsung-Produkten haben, freuen wir uns über Ihre Kontaktaufnahme mit der Samsung-Kundenbetreuung. Area ` Europe AUSTRIA Contact Centre 0800 - SAMSUNG (0800 - 7267864) Web Site www.samsung.com/at/support www.samsung.com/be/support (Dutch) BELGIUM 02-201-24-18 www.samsung.com/be_fr/support (French) BOSNIA 051 331 999 www.samsung.com/support BULGARIA 07001 33 11 , sharing cost www.samsung.com/bg/support CROATIA 062 726 786 www.samsung.