HT-J7500W HT-J7750W User manual Blu-ray™ Home Entertainment System imagine the possibilities Thank you for purchasing this Samsung product. To receive more complete service, please register your product at www.samsung.com/register This Nanum Gothic Eco font is provided by NAVER.
Safety Information ✎✎ The following also applies to the Wireless Receiver Module (SWA-7000). This symbol indicates that high voltage is present inside. It is dangerous to make any kind of contact with any internal part of this product. CAUTION RISK OF ELECTRIC SHOCK. DO NOT OPEN CAUTION: TO REDUCE THE RISK OF ELECTRIC SHOCK, DO NOT REMOVE THE COVER (OR BACK). THERE ARE NO USER SERVICEABLE PARTS INSIDE. REFER ALL SERVICING TO QUALIFIED PERSONNEL.
●● ●● ●● ●● ●● ●● ●● ●● ●● WARNING : ●● TO PREVENT THE SPREAD OF FIRE, KEEP CANDLES AND OTHER ITEMS WITH OPEN FLAMES AWAY FROM THIS PRODUCT AT ALL TIMES. ●● To reduce the risk of fire or electric shock, do not expose this appliance to rain or moisture. CLASS 1 LASER product This product is classified as a CLASS 1 LASER product. Use of controls, adjustments or performance of procedures other than those specified herein may result in hazardous radiation exposure.
Contents Getting Started Playing Content 5 Accessories 28 Playing Commercial Discs 5 Speaker Components 28 Playing Multimedia Files 6 Front Panel 30 Controlling Video Playback 7 Rear Panel 33 Controlling Music Playback 8 Remote Control 38 Using Bluetooth 40 Playing Photo Content Connections 9 42 Using the Special Effects Remote Control Buttons Connecting the Speakers 13 Connecting to a TV and External Devices Network Services 14 Connecting to a Network Router 43 Logging In to Your Sam
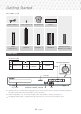
Getting Started ■■ ■■ Getting Started ■■ Figures and illustrations in this User Manual are provided for reference only and may differ from actual product appearance. An administration fee may be charged if either a. an engineer is called out at your request and there is no defect in the product (i.e. where you have failed to read this user manual) b. you bring the unit to a repair centre and there is no defect in the product (i.e. where you have failed to read this user manual).
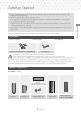
Getting Started HT-J7750W - 7.
✎✎ When the product displays a Blu-ray Disc menu, you cannot start the movie by pressing the button on the product or the remote. To play the movie, you must select Play Movie or Start in the disc menu, and then press the OK button. 5V 0.5A the home ✎✎ If you are using the Internet or are playing content from a USB device on your TV through cinema, you cannot select the BD/DVD mode with the SOURCE button.
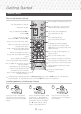
Getting Started Remote Control Tour of the Remote Control Press to open and close the disc tray. Turn the product on and off. Press to select the Home Cinema's mode (HDMI, AUX, BD/DVD, etc.). Adjust the volume. Cut off the sound temporarily. Press to skip backwards([) or forwards(]) or Press and hold to search backwards(() or forwards()). Press to play disc or files. or Press to pause playing. Press to use the Tools menu.
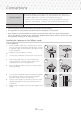
Connections This section describes various methods of connecting the product to other external components. Before moving or installing the product, be sure to turn off the power and disconnect the power cord. Connecting the Speakers Centre Product Front/ Front Top (R) Surround (R) Front/ Front Top (L) Surround (L) Wireless Receiver Module * The Front Top speaker applies to HT-J7750W only.
Connections Surround Speakers Place these speakers to the side of your listening position. If there isn't enough room, place these speakers so they face each other. Position them about 60 to 90cm above your ear, facing slightly downward. * Unlike the front and centre speakers, the surround speakers are used mainly for sound effects. Sound will not come from them all the time. Subwoofer The position of the subwoofer is not so critical. Place it anywhere you like.
Speaker Cable Connections 1. Match each speaker cable bundle to the correct speaker by matching the coloured band on each bundle to the coloured sticker on the bottom or back of each speaker. 2. Connect the speaker wire plugs from each speaker to the back of the product by matching the coloured band on each cable to the colours of the speaker jacks. When connecting, make sure to match label colour on the back of speaker.
Connections ✎✎ If you place a speaker near your TV set, the screen colour may be distorted because of the magnetic field. ✎✎ Place the wireless receiver module at the rear of the listening position. If the wireless receiver module is too close to the product, sound from the speakers may be disrupted because of interference. ✎✎ If you use a device such as a microwave oven, wireless LAN Card, Bluetooth device, or any other device that uses the 2.4/5.
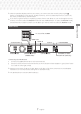
Connecting to a TV and External Devices AUX IN FRONT TOP FRONT R R SUBWOOFER FRONT TOP FRONT L L IMPEDANCE : 3Ω AUX IN POWER LAN CENTER SPEAKERS OUT HDMI OUT 1 HDMI IN 2 OPTICAL DIGITAL AUDIO IN LAN HDMI OUT W White 1 HDMI IN Method 1 HDMI IN (ARC) External Devices L R 2 Method 2 HDMI OUT OPTICAL DIGITAL AUDIO IN Method 3 AUDIO OUT OPTICAL OUT Connecting to a TV Connect an HDMI cable (not supplied) from the HDMI OUT jack on the back of the product to the HDMI IN jack o
Connections Connecting to a Network Router Wireless Network You can connect your product to your network router using one of the methods illustrated below.
Settings The Initial Settings Procedure ●● ●● ●● 1 PLAY DISC The Home menu will not appear if you do not configure the initial settings. The OSD (On Screen Display) may change in this product after you upgrade the software version. The access steps may differ depending on the menu you selected. Displays information about the disc currently in the disc tray. Press OK to start playing the disc. 2 MULTIMEDIA Play photos, videos, or music content from Discs, USB devices, PCs, mobile devices.
Settings Selecting an Option on the Home Screen ■■ To select an option on the Home screen, move the cursor using the 78:; buttons until it highlights the option of your choice, and then press the OK button. 1. 3 OK / DIRECTION Button : Press 78:; to move the cursor or select an item. ●● Press the OK button to activate the currently selected item or confirm a setting. 4 e (EXIT) Button : Press to exit the current menu.
TV Aspect Ratio HDMI Deep Colour Lets you adjust the output of the product to the screen size of your TV. (See page 51) Lets you set the product to output video from the HDMI OUT jack with Deep Colour. Deep Colour provides more accurate colour reproduction with greater colour depth. BD Wise BD Wise is Samsung’s latest inter-connectivity feature.
Settings ✎✎ Speaker Test Order HT-J7500W : Front Left ; Front Right ; Centre ; Surround Left ; Surround Right ; Subwoofer HT-J7750W : Front Left ; Front Right ; Centre ; Surround Left ; Surround Right ; Front Top Left ; Front Top Right ; Subwoofer Speaker Settings (Multiroom Link) : You can enjoy sound through a remote speaker that is connected to the home cinema through your home network. To use the network speaker, select Multiroom.
Smart Volume Audio Sync Lets you set the product so that the volume remains stable when a scene change occurs or when you change the channel. When the product is attached to a digital TV, lets you adjust the audio delay so that the audio syncs with the video. You can set the delay between 0 and 300 milliseconds. Audio Return Channel ✎✎ The Auto function in Audio Sync is Digital Output Lets you set the Digital Output to match the capabilities of the AV receiver you’ve connected to the product.
Settings BD-Live Settings System Lets you set various BD-Live functions. BD-Live allows you to access extra features available on some Blu-ray Discs if you are connected to the Internet. BD-Live Internet Connection : Lets you fully allow, partly allow, or prohibit a BD-Live Internet connection. BD Data Management : Manage BD data downloaded from a BD-Live service or Blu-ray Disc. Setup Lets you re-run the Initial Settings procedure. Refer to the descriptions displayed on the screen.
✎✎ If a wireless HID Keyboard does not operate because of interference, move the keyboard closer to the product. Security 1. Remove any disc or USB storage device. 2. Press and hold the @ button on the front panel for 5 seconds or more. All settings will revert to the factory default settings. ✎✎ When the factory default settings are restored, all the user stored BD data is deleted. 1) Connect the product to an Anynet+ (HDMI-CEC)-compliant Samsung TV using HDMI Cable.
Settings Radio Setup ●● ●● To listen to the radio, you must connect the supplied FM antenna. 1. Press the SOURCE button to select FM. 2. Tune to the desired station. ●● Preset Tuning 1 : Press the PRESET button to select PRESET, and then press the 78 buttons to select a preset station. -- Before you can tune to preset stations, you must add preset stations to the product's memory.
Network Setup ĞĞ When you connect this product to a network, you can use network based applications and functions such as Smart Hub and BD-LIVE, and upgrade the product's software through the network connection. For more information about accessing and using Internet services, see the Network Services chapter of this manual on pages 43~50. Instructions for configuring the network connection start below. Configuring Your Network Connection 1.
Settings 6. Repeat Steps 4 and 5 until you have filled in all parameters. 4. ✎✎ You can get the network parameter values from your Internet provider. 7. When finished entering all the parameter values, select OK, and then press the OK button. The home cinema verifies the network connection and then connects to the network.
✎✎ You can get the Network parameter values from your Internet provider. 11. When finished, select OK, and then press the OK button. The Security screen appears. 12. On the Security screen, enter your network's security code or pass phrase. Enter letters by selecting a letter with the 78:; buttons, and then pressing the OK button. 13. When finished, select Done at the right of the screen, and then press the OK button. The product verifies the network connection and then connects to the network. 14.
Settings 2. 3. Settings Wi-Fi Direct Device Name : [HTS]J7500W Select your Wi-Fi Direct device to connect to. AndroidXXXXXXX 4. Disconnected Refresh Close The PIN pop-up appears. Note the PIN code in the pop-up, and then enter it into the appropriate field in the Wi-Fi Direct device you want to connect. The Connecting pop-up appears, followed by the Connected pop-up. When it closes, you should see the device listed as connected on the Wi-Fi Direct screen. ✎✎ The current wired or wireless network 5.
Update by USB You can use Update now to update the software through your network connection or by using a USB flash drive. The network instructions are below. The USB flash drive instructions are on this page. 1. Visit www.samsung.com. 2. Click OWNERS & SUPPORT on the top right of the page, and then select Manuals & Downloads from the drop down that appears. 3. On the next screen, enter the product's model number into the search field.
Playing Content Your home cinema can play content located on Blu-ray/DVD/CD discs, USB devices, PCs, smart phones, tablets, and on the Web. To play content located on your PC or a mobile device, you must connect the PC or mobile device and the product to your network. To play content on your PC, you must also download and install DLNA network software or already have DLNA network software on your PC. ✎✎ PCs running Windows 7 and Windows 8 have DLNA software (Play To) built in.
✎✎ In the Filter( ) drop down, select Photos, Videos, or Music. ✎✎ Even though the product will display folders that contain all content types, it will only display files of the content type you selected For example, if you selected Music, you will only be able to see music files. Playing Files on a Storage Device Method 1 : If the product is turned on after you connect a storage device Turn the product on. 2. Follow the directions in “Playing Multimedia Files” on page 28. In Step 2, select Storage.
Playing Content 1. In the Home screen, select MULTIMEDIA, and then press the OK button. 2. Select Network Device at the bottom of the screen, and then press the OK button. Storages devices connected to the same network as the Home cinema are listed. 3. Select a storage device, and then press the OK button. The folders and files shared by the selected storage device are listed. 4. If necessary, use the 78:; buttons to select a folder, and then press the OK button. 5.
p e (EXIT) Select Scene Starts/Pauses playback. Stops playback. Fast Motion Play During playback, press and hold the [ or ] button. Each time you press and hold the [ or ] button, the playback speed will change. Slow Motion Play In pause mode, press and hold the ] button. Each time you press and hold the ] button, the playback speed will change. During playback, press the [ or ] button. Each time you press the [ or ] button, the disc moves to the previous or next chapter or file.
Playing Content Repeat Mode Equaliser Settings Lets you repeat a title, chapter, or specific section. -- Off : Select to return to normal playback. -- Title : Choose to repeat a selected title. -- Chapter : Choose to repeat a specific chapter. -- Repeat A-B : Choose to repeat a specific section. Lets you set the equaliser. 1. Press the OK button at the point where you want repeat play to start (A). 2. Press the OK button at the point where you want repeat play to stop (B).
✎✎ The Sort By and Options menus are usually Using the Sort By & Options Menus Select the Filter( ) function, and then Videos to display videos only. ✎✎ Even though the product will display folders that contain all content types, it will only display files of the content type you selected For example, if you selected Videos, you will only be able to see video files.
Playing Content Music Screen Controls Rewind the track. TRACK 001 TRACK 001 00:00/00:00 00:43 TRACK 002 03:56 TRACK 003 04:41 TRACK 004 04:02 TRACK 005 03:43 TRACK 006 03:40 1 TRACK 007 04:06 TRACK 008 03:52 TRACK 009 03:04 TRACK 010 04:02 The Track List screen appears initially, and the first track begins to play. If you are playing a commercially recorded disk and don't press a button on the remote momentarily, the Playback screen appears.
On the screen that lists the music files, use the 78:; buttons to select Sort By or Options in the upper right, and then press the OK button. Music Sort By ■■ ■■ ■■ ■■ Options menu may differ. All options may not be displayed. ✎✎ Rename Playlist and Delete Playlist appear only if a playlist exists. Repeating Tracks on an Audio CD Track Displays all the music tracks on the media or storage device. Album Displays all the music on the media or storage device by album.
Playing Content - Use Clear All to deselect all selected tracks at once. Then, select individual tracks or use Select All to select all the tracks, and then press the ' (RETURN) button on your remote or select Play and then press the OK button. If you do not use Select All or select individual tracks, the Play Selected list will not change. Shuffling Tracks on an Audio CD You can set the product to play tracks on an audio CD (CD-DA/MP3) at random. 1. 2. During playback, use the ,.
✎✎ If you want to use Play Selected to watch 8. videos, use the Filter( ) function to select Videos instead of Music. Using Play Selected Starting from the Home Screen ✎✎ Select PLAY DISC or MULTIMEDIA depending 9. 10. on the media you are using. - If you selected PLAY DISC, the Track List screen appears. Use the Filter( ) function to select Music, and then follow the directions starting at Step 3 above. Creating and Editing a Playlist Stored in a Storage Device 12. 13. Playing a playlist 1.
Playing Content 4. When finished, select Delete at the bottom left of the screen, and then press the OK button. A confirmation pop-up appears. 5. Select Yes, and then press the OK button. ✎✎ Deleting all files included in a playlist will 10. If you want to cancel ripping after ripping has begun, press the OK button and then select Yes. Select No to continue ripping. 11. When ripping is complete, the "Successfully ripped." message appears. Press the OK button. The Track List screen reappears.
●● ●● The Home Cinema has an effective reception range of up to 10 meters in all directions if there are no obstacles. The connection will be automatically cut off if the device is out of this range. Even within this range, the sound quality may be degraded by obstacles such as walls or doors. This wireless device may cause electrical interference. during its operation. To connect the Home Cinema to a Bluetooth device ✎✎ The AVRCP feature is supported.
Playing Content ✎✎ In Bluetooth connection mode, the Bluetooth connection will be lost if the distance between the Home Cinema System and the Bluetooth device exceeds 10 meters. When the Bluetooth device comes back into effective range or you restart the Bluetooth device, you will have to pair the device and home cinema again to reconnect. ✎✎ In Bluetooth mode, the screen saver will start if the Bluetooth device stays in the Ready state for 5 minutes.
Send Photos Select Send to upload selected files to on-line sites (Picasa, Facebook, etc.) or devices. To use Send with an on-line site, you need to establish an account with the on-line site, and then log in using the Log In function. Send works essentially the same way for music, photos, and videos. For general instructions, see "Using the Send Function" on page 41. Information Sort By ■■ ■■ ■■ Displays the picture information.
Playing Content When done, press the 78 button to select Send, and then press the OK button. The Send pop-up appears listing the on-line sites (Picasa, Facebook, etc.) or devices that you can send the photos to. 5. 6. Select a destination, and then press the OK button. 7. If you are sending the photos to an on-line site, the site starts. Log in and follow the directions on the screen. ✎✎ To send photos to an on-line site, you must have an account with that site.
Network Services You can enjoy various network services such as streaming video or on-line apps by connecting the product to your network. To use network services, you must first: 1. Connect the product to a network. (See page 14) 2. Configure the network settings. (See pages 23~25) ✎✎ If you selected Sign me in automatically, the next time you log in, the product will automatically enter your e-mail and password. All you need to do is select Sign In.
Network Services Using SAMSUNG APPS Through the SAMSUNG APPS screen, you can download applications from the Internet, and launch and run downloaded applications on your TV. To access some applications, you need to have a Samsung account. ✎✎ While playing multimedia content in SAMSUNG APPS, press and hold 5 button on the remote to pause playback. To stop playback, press and hold e (EXIT) button on the remote.
Starting an Application View Details 1. Select SAMSUNG APPS on the Home screen, and then press the OK button. 2. On the SAMSUNG APPS screen, use the 78:; buttons to select an app, and then press the OK button. The app starts. The Option Menu The Option menu lets you add apps to and delete apps from MY APPS. It also lets you change the position of an app in MY APPS and update apps. Move 1.
Network Services 5. Repeat Step 4 to select other apps. Use Select All or Deselect All on the bottom of the screen to select or deselect all apps at once. To deselect individual apps, select the app again, and then press the OK button. The check mark disappears. 6. When you have finished marking your selections, move to Save on the bottom of the screen, and then press the OK button. 7. A lock mark appears on the selected app’s icon.
Link Browsing and Pointer Browsing The Control Panel at a Glance The Web Browser provides two types of browsing, Pointer Browsing and Link Browsing. When you launch the browser for the first time, Pointer Browsing is active. If you are using a mouse to navigate in the Web Browser, we recommend leaving Pointer Browsing active. With Pointer Browsing, you move the pointer using the directional arrow keys on your remote.
Network Services Using the Keyboard Pop-up Options on the Keyboard Pop-Up http://www.samsung.com When you click the , the or 100% access a data or text entry 100% field, and then press the OK button, the keyboard pop-up appears. //www.samsung.com http://www.samsung.com To access the keyboard pop-up options, highlight 100% the button on the bottom left of the keyboard, and then press the OK button. Language 100% Select the language for the keyboard. You can select English, French, Russian, etc.
Using the Settings Menu 100% ■■ The Settings menu contains functions that control how the Browser operates and Browser security functions. To open the Settings menu, highlight the icon in the Control Panel, and then press the OK button. To select an option in the Settings menu, highlight the option, and then press the OK button. http://www.samsung.
Network Services ✎✎ Depending on the web site, some of the Web Browser Settings functions may not be activated. Functions that are not activated are greyed out and cannot be used. Linking your Internet Service Accounts to the Product The Link Accounts function lets you link your product to your accounts with Internet services such as Pandora so that the product can log you in to the service automatically when you start the app for that service. To create a service account link, follow these steps: 1.
Appendix Additional Information Digital Output ●● Notes ●● Connections HDMI OUT ●● ●● ●● ●● Certain HDMI output resolutions may not work, depending on your TV. You must have an HDMI connection to enjoy videos with 3D technology. A long HDMI cable may cause screen noise. If this occurs, set HDMI Deep Colour to Off in the menu.
Appendix Front Display ●● Playing JPEG files ●● You cannot change the brightness of the button and the VOL +, - button. You can’t enlarge the subtitle and PG graphics in the full screen mode. Playing Content Speaker Settings ●● 5V 0.5A When Sound Output is set to TV Speaker, audio is produced by the TV speakers. ●● HDMI audio ●● When HDMI audio is output to the TV speakers, it is automatically down-mixed to 2 channels.
✎✎ The product may not play certain CD-RW/-R and DVD-R because of the disc type or recording conditions. ✎✎ If a DVD-RW/-R disc has not been recorded properly in DVD video format, it will not be playable. ✎✎ Your product will not play content that has been recorded on a DVD-R at a bitrate that exceeds 10 Mbps. ✎✎ Your product will not play content that has been recorded on a BD-R or USB device at a bitrate that exceeds 30 Mbps.
Appendix 1 The U.S., U.S. territories and Canada 2 Europe, Japan, the Middle East, Egypt, Africa, Greenland 3 Taiwan, Korea, the Philippines, Indonesia, Hong Kong 4 Mexico, South America, Central America, Australia, New Zealand, Pacific Islands, Caribbean 5 Russia, Eastern Europe, India, North Korea, Mongolia 6 China DVDVIDEO ✎✎ Some DivX, MKV and MP4 format discs may not play, depending on their video resolution and frame rate.
Video File Support File Extension Container Video Codec Resolution Frame rate (fps) Bitrate (Mbps) 24/25/30 60 Audio Codec *.avi *.mkv *.asf *.wmv *.mp4 *.mov *.3gp *.vro *.mpg *.mpeg *.ts *.tp *.trp *.mov *.flv *.vob *.svi *.m2ts *.mts *.divx *.ps AVI MKV ASF MP4 3GP MOV FLV VRO VOB PS TS SVAF *.webm WebM VP8 1920x1080 6~30 20 Vorbis *.rmvb RMVB RV8/9/10 (RV30/40) 1920x1080 6~30 20 RealAudio 6 MVC Motion JPEG H.264 BP/MP/HP Divx 3.
Appendix Music File Support File Extension Type Codec Comments *.mp3 MPEG MPEG1 Audio Layer 3 - *.m4a *.mpa *.aac MPEG4 AAC - *.flac FLAC FLAC Supports up to 2ch *.ogg OGG Vorbis Supports up to 2ch *.wma WMA WMA Supports WMA 10 Pro (Up to 5.1) Does not support WMA lossless audio Supports up to M2 profile *.wav wav wav - *.mid *.midi midi midi type 0 and type 1 Seek not supported Supported on USB only *.ape ape ape NonSmart not supported *.aif *.aiff AIFF AIFF - *.
Digital Output Selections Setup PCM Connection Audio Stream on Blu-ray Disc Bitstream (Unprocessed) Up to PCM 7.1ch PCM Dolby Digital Up to PCM 5.1ch Dolby Digital Dolby Digital Plus Dolby Digital Plus Dolby TrueHD Dolby TrueHD DTSHD High Resolution Audio HT-J7500W : Up to PCM 5.1ch HT-J7750W : Up to PCM 7.
Appendix Resolution according to the content type Content Type Setup BD Wise Auto Movie Frame : Auto Blu-ray Disc E-contents/ Digital contents Resolution of Blu-ray Disc 1080p@60F UHD Output : Auto 2160p@24F 2160p@24F UHD Output : Off 1080p@24F 1080p@24F Movie Frame : Off Max. Resolution of TV input Max.
Troubleshooting Refer to the table below when this product does not function properly. If the problem you are experiencing is not listed below or if the instructions below do not help, turn off the product, disconnect the power cord and contact the nearest authorized dealer or Samsung Electronics Service Centre. Symptom You cannot eject the disc. Check/Remedy ●● ●● Playback does not start. ●● ●● ●● Playback does not start immediately when you press the p button. ●● No sound.
Appendix Symptom Check/Remedy The menu screen does not appear even when you select the menu function. ●● The aspect ratio cannot be changed. ●● The product is not working. (Example: The power goes off or you hear a strange noise.) The Product is not working normally. ●● ●● ●● You have forgotten the rating level password. ●● Can't receive radio broadcasts. ●● While listening to TV audio through the product, there is no sound. ●● "Not Available" appears on screen.
Symptom Check/Remedy BD-LIVE The home cinema cannot connect to the BD-LIVE server. ●● ●● ●● ●● ●● When using the BD-LIVE service, an error occurs. ●● Test whether the network connection is active by using the Network Status function. Check whether a USB memory device is connected to the product. The memory device must have at least 1GB of free space to accommodate the BD-LIVE service. You can check the available size in BD Data Management.
Appendix Specifications General Weight 2.7 kg Dimensions 430.0 (W) x 55.0 (H) x 312.0 (D) mm Operating Temperature Range +5°C to +35°C Operating Humidity Range 10 % to 75 % Signal/noise ratio 55 dB FM Tuner Usable sensitivity 12 dB HDMI Total harmonic distortion 0.
HT-J7500W Speaker system Impedance Frequency Output sound range pressure level Front Surround 3Ω Centre 140Hz~ 20kHz 20Hz ~ 200Hz Subwoofer 87dB/W/M 88dB/W/M Rated Maximum input input 165W 330W 170W 340W Dimensions (W x H x D) (Unit : mm) Weights (Unit : kg) 95.0 x 280.0 x 101.0 1.75 95.0 x 150.0 x 101.0 0.64 320.0 x 80.5 x 101.0 1.02 200.0 x 390.0 x 350.0 5.70 Dimensions (W x H x D) (Unit : mm) Weights (Unit : kg) 95.0 x 1215.0 x 101.0 (Stand base: 276.0 x 23.0 x 264.0) 5.01 95.
Appendix Licences Manufactured under license from Dolby Laboratories. Dolby and the double-D symbol are trademarks of Dolby Laboratories. For DTS patents, see http://patents.dts.com. Manufactured under license from DTS Licencing Limited. DTS, DTS-HD, the Symbol, DTS and the Symbol together, & DTS-HD and the Symbol together are registered trademarks of DTS, Inc. DTS-HD Master Audio | Essential and DTS Neo:Fusion II are trademarks of DTS, Inc. © DTS, Inc. All Rights Reserved.
UNITED UNITED UNITED KINGDOM KINGDOM KINGDOM EIRE EIRE EIR beyond beyondthe thecontrol control beyond ofofSamsung. the Samsung.
© 2015 Samsung Electronics Co., Ltd. All rights reserved. Area ` Europe AUSTRIA Contact SAMSUNG WORLD WIDE If you have any questions or comments relating to Samsung products, please contact the SAMSUNG customer care centre. Contact Centre 0800 - SAMSUNG (0800 - 7267864) Web Site www.samsung.com/at/support www.samsung.com/be/support (Dutch) BELGIUM 02-201-24-18 www.samsung.com/be_fr/support (French) BOSNIA 051 331 999 www.samsung.com/support BULGARIA 07001 33 11 , sharing cost www.samsung.