HT-H7500WM HT-H7750WM Blu-ray™ Home Entertainment System user manual imagine the possibilities Thank you for purchasing this Samsung product. To receive more complete service, please register your product at www.samsung.com/register HT-H7500WM_7750WM-XU-0515.
Safety Information This symbol indicates that high voltage is present inside. It is dangerous to make any kind of contact with any internal part of this product. CAUTION RISK OF ELECTRIC SHOCK DO NOT OPEN CAUTION: TO REDUCE THE RISK OF ELECTRIC SHOCK, DO NOT REMOVE THE COVER (OR BACK). THERE ARE NO USER SERVICEABLE PARTS INSIDE. REFER ALL SERVICING TO QUALIFIED PERSONNEL. • The slots and openings in the cabinet and in the back or bottom are provided for necessary ventilation.
WARNING : • TO PREVENT THE SPREAD OF FIRE, KEEP CANDLES AND OTHER ITEMS WITH OPEN FLAMES AWAY FROM THIS PRODUCT AT ALL TIMES. CLASS 1 LASER PRODUCT This product is classified as a CLASS 1 LASER product. Use of controls, adjustments or performance of procedures other than those specified herein may result in hazardous radiation exposure. CAUTION : • INVISIBLE LASER RADIATION WHEN OPEN AND INTERLOCKS DEFEATED, AVOID EXPOSURE TO BEAM.
Contents GETTING STARTED 5 Accessories 5 Speaker Components 6 Front Panel 7 Rear Panel 8 Remote Control 9 Connecting the Speakers PLAYING CONTENT 27 27 29 32 37 40 41 42 CONNECTIONS 12 Attaching the Toroidal Ferrite Core to the Power Cord of the Wireless Receiver Module (SWA6000) 13 Connecting to a TV and External Devices 14 Connecting to a Network Router SETTINGS 15 The Initial Settings Procedure 15 The Home Screen at a Glance 16 Accessing the Settings Screen 16 Settings Menu Functions 22 Net
Getting Started Check the box for the accessories and speaker components listed or shown below. Accessories • Remote Control • Lithium Battery Getting Started Figures and illustrations in this User Manual are provided for reference only and may differ from actual product appearance. An administration fee may be charged if either a. an engineer is called out at your request and there is no defect in the product (i.e. where you have failed to read this user manual) b.
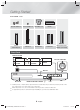
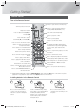
Getting Started HT-H7750WM - 7.1CH Speaker Cable x 2 Screw (5x20) x 16 Stand Base x 4 Centre Front/ Front Top x 2 Stand x 4 Surround x 2 Subwoofer Wireless Receiver Module (SWA-6000) Front Panel DISPLAY ICONS FUNCTION STOP PLAY/PAUSE OPEN/ CLOSE VOLUME CONTROL POWER VACUUM TUBE AMP D H-EN HIG VACUUM TUBE SO UND NFC DISPLAY 5V 0.
✎ ✎ ✎ Rear Panel FRONT R SUBWOOFER FRONT IMPEDANCE : 3 SPEAKERS OUT L CENTER * In case of HT-H7500WM Getting Started When the product displays a Blu-ray Disc menu, you cannot start the movie by pressing the button on the product or the remote. To play the movie, you must select Play Movie or Start in the disc menu, and then press the OK button.
Getting Started Remote Control Tour of the Remote Control Press to open and close the disc tray. Turn the product on and off. Press to select the Home Cinema's mode (HDMI, AUX, BD/DVD, etc.). Adjust the volume. Cut off the sound temporarily. Press to skip backwards([) or forwards(]) or Press and hold to search backwards(() or forwards()). Press to play disc or files. or Press to pause playing. Press to use the Tools menu.
Connections This section describes various methods of connecting the product to other external components. Before moving or installing the product, be sure to turn off the power and disconnect the power cord.
Connections Surround Speakers Subwoofer Place these speakers to the side of your listening position. If there isn't enough room, place these speakers so they face each other. Position them about 60 to 90cm above your ear, facing slightly downward. * Unlike the front and centre speakers, the surround speakers are used mainly for sound effects. Sound will not come from them all the time. The position of the subwoofer is not so critical. Place it anywhere you like.
Speaker Cable Connections 1. Match each speaker cable bundle to the correct speaker by matching the colour coded plug on each bundle to the coloured sticker on the bottom or back of each speaker. 2. Connect the speaker wire plugs from each speaker to the back of the product by matching the colours of the speaker plugs to the colours of the speaker jacks.
Connections ✎ ✎ ✎ ✎ ✎ If you place a speaker near your TV set, the screen colour may be distorted because of the magnetic field. Place the wireless receiver module at the rear of the listening position. If the wireless receiver module is too close to the product, sound from the speakers may be disrupted because of interference. If you use a device such as a microwave oven, wireless LAN Card, Bluetooth device, or any other device that uses the 2.4/5.
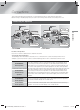
Connecting to a TV and External Devices AUX IN FRONT TOP FRONT R R SUBWOOFER FRONT TOP FRONT L L IMPEDANCE : 3 AUX IN POWER FM ANT FM ANT LAN L CENTER SPEAKERS OUT R HDMI OUT 1 HDMI IN OPTICAL DIGITAL AUDIO IN 2 LAN L R HDMI OUT Red W White HDMI IN Method 1 HDMI IN External Devices Method 2 HDMI OUT OPTICAL DIGITAL AUDIO IN 2 Connections R 1 Method 3 AUDIO OUT OPTICAL OUT Connecting to a TV Connect an HDMI cable (not supplied) from the HDMI OUT jack on the back o
Connections Connecting to a Network Router Wireless Network You can connect your product to your network router using one of the methods illustrated below.
Settings The Initial Settings Procedure 1 PLAY DISC • The Home menu will not appear if you do not configure the initial settings. • The OSD (On Screen Display) may change in this product after you upgrade the software version. • The access steps may differ depending on the menu you selected. If you are not ready to set up the network configuration or it is problematic, you can select Skip and set it up later.
Settings Selecting an Option on the Home Screen To select an option on the Home screen, move the cursor using the 78:; buttons until it highlights the option of your choice, and then press the OK button. 3 If you leave the product in the stop mode for more than 5 minutes without using it, a screen saver will appear on your TV. If the product is left in the screen saver mode for more than 20 minutes, the power will automatically turn off.
TV Aspect Ratio HDMI Deep Colour Lets you adjust the output of the product to the screen size of your TV. (See page 51) Lets you set the product to output video from the HDMI OUT jack with Deep Colour. Deep Colour provides more accurate colour reproduction with greater colour depth. BD Wise BD Wise is Samsung’s latest inter-connectivity feature.
Settings Settings (Multiroom Link) : You can enjoy sound through a remote speaker that is connected to the home cinema through your home network. To use the network speaker, select Multiroom. If there is a network speaker available, it will appear on the screen. - Don't Use : The network speaker is not used. - Multiroom : The network speaker outputs audio. All network speakers output the same audio regardless of channel using the PCM format only.
Network Settings Lets you set the Digital Output to match the capabilities of the AV receiver you’ve connected to the product. For more details, please refer to the digital output selection table. (See page 57) Lets you configure the network connection so you can enjoy various features such as Internet services or AllShare Wi-Fi functionality, and perform software upgrades.
Settings System Smart Hub VOD Rating Lock Setup Lets you lock access to Video on Demand (VOD) content based on its rating. To use, you must enter the security PIN. Press and hold the 123 button until the Num pad appears on the screen. When the Num pad appears, select a number using the 78:; button and then press the OK button. Lets you re-run the Initial Settings procedure. Refer to the descriptions displayed on the screen. ✎ ✎ The default security PIN is 0000.
Security 1. Remove any disc or USB storage device. 2. Press and hold the @ button on the front panel for 5 seconds or more. All settings will revert to the factory default settings. ✎ DivX® Video On Demand View DivX® VOD Registration Codes to purchase and play DivX® VOD contents. Support Remote Management When activated, lets Samsung Call Centre agents diagnose and fix problems with the product remotely. Requires an active Internet connection.
Settings Network Setup When you connect this product to a network, you can use network based applications and functions such as Smart Hub and BD-LIVE, and upgrade the product's software through the network connection. For more information about accessing and using Internet services, see the Network Services chapter of this manual on pages 43~50. Instructions for configuring the network connection start below.
✎ 7. You can get the network parameter values from your Internet provider. When finished entering all the parameter values, select OK, and then press the OK button. The home cinema verifies the network connection and then connects to the network. Wireless Network Wireless - Automatic You should be able to find the security code or pass phrase on one of the set up screens you used to set up your router or modem.
Settings 7. Select the IP setting field, and then set it to Enter manually. 8. Select a network parameter to enter (IP Address, for example), and then press OK button. Use the 78 buttons on the remote control to enter the numbers for the parameter. Or use the Num keypad to enter a parameter number. Press and hold the 123 button until the Num pad appears on the screen. When the Num pad appears, select a number using the 78:; button and then press the OK button.
5. ✎ You have three ways to complete the Wi-Fi connection: • Through the Wi-Fi device. • Through the product using PBC. • Through the product using a PIN. ✎ Each is covered below. Through the Wi-Fi Device 1. 2. Upgrading Software On the Wi-Fi device, follow the device's procedure for connecting to another Wi-Fi Direct device. See the device's user manual for instructions.
Settings Update now Update by USB You can use Update now to update the software through your network connection or by using a USB flash drive. The network instructions are below. The USB flash drive instructions are on this page. 1. 1. 2. 3. 4. 5. 6. 7. ✎ ✎ Select Update now, and then press the OK button. The Update now pop-up appears. The product searches on line for the latest software version. If it does not find an update, the "There are no new updates for you at the moment." pop-up appears.
Playing Content Your home cinema can play content located on Bluray/DVD/CD discs, USB devices, PCs, smart phones, tablets, and on the Web. To play content located on your PC or a mobile device, you must connect the PC or mobile device and the product to your network. To play content on your PC, you must also download and install AllShare network software or already have DLNA network software on your PC. ✎ PCs running Windows 7 and Windows 8 have DLNA software (Play To) built in.
Playing Content ✎ ✎ In the Filter( ) drop down, select Photos, Videos, or Music. Even though the product will display folders that contain all content types, it will only display files of the content type you selected For example, if you selected Music, you will only be able to see music files. ✎ ✎ In the Filter( ) drop down, select Photos, Videos, or Music.
In the Home screen, select MULTIMEDIA, and then press the OK button. 1. In the Home screen, move to MULTIMEDIA and press OK button. 2. Select Network Device at the bottom of the screen, and then press the OK button. Storages devices connected to the same network as the Home cinema are listed. 2. Select Storage Service at the bottom of the screen. The cloud services linked with your Samsung account appear. 3. Select a storage device, and then press the OK button.
Playing Content TITLE MENU 3D During playback, press this button to display the Title menu or Popup menu. • If your disc has a playlist, press the Sort By button to go to the playlist. Use 3D menu to select the Side by Side or Top Bottom option if the 3D content currently playing does not appear properly in 3D mode. ✎ Use 3D menu for 3D content only. If you apply the Side by Side or Top Bottom format to 2D content, it will not be displayed properly.
Repeat Mode Equaliser Settings Lets you repeat a title, chapter, or specific section. - Off : Select to return to normal playback. - Title : Choose to repeat a selected title. - Chapter : Choose to repeat a specific chapter. - Repeat A-B : Choose to repeat a specific section. Lets you set the equalizer. Press the OK button at the point where you want repeat play to start (A). 2. Press the OK button at the point where you want repeat play to stop (B).
Playing Content ✎ Using the Sort By & Options Menus Select the Filter( ) function, and then Videos to display videos only. ✎ Even though the product will display folders that contain all content types, it will only display files of the content type you selected For example, if you selected Videos, you will only be able to see video files. On the screen that lists the video files, use the 78:; buttons to select Sort By or Options in the upper right, and then press the OK button.
Music Screen Controls TRACK 001 TRACK 001 00:00/00:00 Rewind the track. 00:43 TRACK 002 03:56 TRACK 003 04:41 TRACK 004 04:02 TRACK 005 03:43 TRACK 006 03:40 TRACK 007 04:06 TRACK 008 03:52 TRACK 009 03:04 TRACK 010 04:02 00:03:35 On the Track List screen, use 78 buttons to move the highlight to the track you want. Press the OK button to play the track. On Screen Music Controls Pause a track. Play tracks in random order. Display the Equaliser. On the Music List screen only.
Playing Content On the screen that lists the music files, use the 78:; buttons to select Sort By or Options in the upper right, and then press the OK button. ✎ ✎ Music Sort By Depending on the disc or storage device, the Options menu may differ. All options may not be displayed. Rename Playlist and Delete Playlist appear only if a playlist exists. Repeating Tracks on an Audio CD Track Displays all the music tracks on the media or storage device.
- Use Clear All to deselect all selected tracks at once. Then, select individual tracks or use Select All to select all the tracks, and then press the ' (RETURN) button on your remote or select Play and then press the OK button. If you do not use Select All or select individual tracks, the Play Selected list will not change. Shuffling Tracks on an Audio CD You can set the product to play tracks on an audio CD (CD-DA/MP3) at random. 1. 2. During playback, use the ,.
Playing Content ✎ If you want to use Play Selected to watch videos, use the Filter( ) function to select Videos instead of Music. Using Play Selected Starting from the Home Screen ✎ 8. On the on-screen keyboard, accept the default name for the new playlist or enter a new name. When finished, select Done, press OK, and then go to Step 9. Navigate to the screen that displays the music you want to put into the playlist. Use the 78:; buttons to select a track, and then press the OK button.
4. 5. ✎ ✎ When finished, select Delete at the bottom left of the screen, and then press the OK button. A confirmation pop-up appears. 10. If you want to cancel ripping after ripping has begun, press the OK button and then select Yes. Select No to continue ripping. Select Yes, and then press the OK button. 11. When ripping is complete, the "Successfully ripped." message appears. Press the OK button. The Track List screen reappears.
Playing Content • The Home Cinema has an effective reception range of up to 10 meters in all directions if there are no obstacles. The connection will be automatically cut off if the device is out of this range. Even within this range, the sound quality may be degraded by obstacles such as walls or doors. • This wireless device may cause electrical interference. during its operation. To connect the Home Cinema to a Bluetooth device ✎ The AVRCP feature is supported.
✎ ✎ In Bluetooth connection mode, the Bluetooth connection will be lost if the distance between the Home Cinema System and the Bluetooth device exceeds 10 meters. When the Bluetooth device comes back into effective range or you restart the Bluetooth device, you have to pair the device and home cinema again to reconnect. In Bluetooth mode, the screen saver will start if the Bluetooth device stays in the Ready state for 5 minutes.
Playing Content Playing Photo Contents Send You can play photo contents located on a DVD, USB, mobile device, or PC. Using the Tools Menu While displaying a photo, press the TOOLS button on the remote. Select Settings(T) in the upper right corner of the screen, and then press the OK button. The Tools menu drop down list appears. Select Send to upload selected files to on-line sites (Picasa, Facebook, etc.) or devices.
Listening to the Radio Options ✎ Operating the Radio with the Remote Control 1. Press the SOURCE button to select FM. 2. Tune to the desired station. • Preset Tuning 1 : Press the PRESET button to select PRESET, and then press the 78 buttons to select a preset station. - Before you can tune to preset stations, you must add preset stations to the product's memory. • Manual Tuning : Press the PRESET button to select MANUAL, and then press the 78 buttons to tune to a lower or higher frequency.
Playing Content 5. To preset another station, repeat steps 2 to 4. • To tune to a preset station, press the PRESET button to select PRESET, and then press the 78 buttons to select the preset station. Using the Special Effects Remote Control Buttons Sports Announcer : Emphasizes the commentator's voice during a sports game to increase your absorption in the game. Stadium : Emphasizes spectators' cheering during a sports game to add immediacy. Off : Select for normal listening.
Network Services You can enjoy various network services such as streaming video or on-line apps by connecting the product to your network. ✎ If you press the button after you have logged in, the Sign In screen appears. You can select Link Accounts, Edit profile, Remove Account, and Sign out. To use network services, you must first: 1. Connect the product to a network. (See page 14) 2. Configure the network settings.
Network Services 3. Select Start, and then press the OK button. The Smart Hub Terms & Conditions, Privacy Policy screen appears. 4. On the Additional Services and Options screen, you must review and agree to both the Smart Hub Terms and Conditions and the Privacy Policy to use Smart Hub. 5. Scroll down, and then click the View details buttons to review the full documents.
✎ ✎ On the each movie or show information screen, the Watch Now button is displayed only after you have download one of the video streaming apps you can use to stream that particular movie or show. Watch Via appears if you have not downloaded the necessary video streaming app. To the right of Watch Via is a listing of the video streaming apps you can use to stream the movie or show. Select an app icon to download and install the app.
Network Services The Option Menu 2. Select Change View, and then press the OK button. If the current view is Most Played, you will be asked if you want to change to Custom View. If the current view is Custom View, you will be asked if you want to change the view to Most Played. Most Played sorts the apps by the number of times you ran each app. Custom View lets you arrange the apps to your liking. 3. Select OK, and then press the OK button to change the view.
3. 4. The Update Apps screens lists all the apps that have updates available. Select each app you want to update, and then press the OK button. You can also choose Select All to update all the apps listed. ✎ When you run the Web Browser with the product connected by HDMI to a BD Wise compatible TV - and BD Wise is on - the browser is maximized to fill the screen and the TV's resolution is set to the optimal resolution automatically. The Web Browser is not compatible with Java applications.
Network Services The Control Panel at a Glance Using the Keyboard Pop-up The Control Panel, which runs across the top of the screen, has a series of icons which start a number of useful functions. The icons are described below, starting with the icon on the far left of the screen. When you click the http://www.samsung.com , the or access a data or text entry field, and then press the OK button, the keyboard pop-up appears. http://www.samsung.com http://www.samsung.
Options on the Keyboard Pop-Up Enable/Disable Grabbing To access the keyboard pop-up options, highlight the button on the bottom left of the keyboard, and then press the OK button. Language Select the language for the keyboard. You can select English, French, Russian, etc. Turns the Grabber function on and off. When the Grabber function is on, you can move a web page up and down without dragging the scroll bar. The Grabber function is only available in Pointer Browsing.
Network Services Web Browser Settings Set as homepage : You can set the Browser's home page. Pop-up Block : Turns the Pop-up Block on and off. Page Block : You can determine whether to block advertisements and select the URLs for which advertisements are blocked. General : You can delete personal in information such as website history and browsing data (cookies, etc.), and reset all web browser settings to their factory defaults. You can also set the Security Mode.
Appendix Additional Information Digital Output Notes Connections HDMI OUT • Certain HDMI output resolutions may not work, depending on your TV. • You must have an HDMI connection to enjoy videos with 3D technology. • A long HDMI cable may cause screen noise. If this occurs, set HDMI Deep Colour to Off in the menu. Settings 3D Settings TV Aspect Ratio • Depending on the disc type, some aspect ratios may not be available.
Appendix Front Display Playing JPEG files • You cannot change the brightness of the and the VOL +, - button. button • You can’t enlarge the subtitle and PG graphics in the full screen mode. Playing Content Speaker Settings • When Sound Output is set to TV Speaker, audio is produced by the TV speakers. HDMI audio • When HDMI audio is output to the TV speakers, it is automatically down-mixed to 2 channels.
✎ ✎ ✎ ✎ ✎ ✎ The product may not play certain CD-RW/-R and DVD-R because of the disc type or recording conditions. If a DVD-RW/-R disc has not been recorded properly in DVD video format, it will not be playable. Your product will not play content that has been recorded on a DVD-R at a bitrate that exceeds 10 Mbps. Your product will not play content that has been recorded on a BD-R or USB device at a bitrate that exceeds 30 Mbps.
Appendix 1 The U.S., U.S. territories and Canada 2 Europe, Japan, the Middle East, Egypt, Africa, Greenland 3 Taiwan, Korea, the Philippines, Indonesia, Hong Kong 4 Mexico, South America, Central America, Australia, New Zealand, Pacific Islands, Caribbean 5 Russia, Eastern Europe, India, North Korea, Mongolia 6 China DVDVIDEO ✎ If the Region number of a Blu-ray Disc/DVD does not correspond to the Region number of this product, the product cannot play the disc.
Video File Support File Extension Container Video Codec Resolution Frame rate (fps) Bitrate (Mbps) 24/25/30 60 Audio Codec *.avi *.mkv *.asf *.wmv *.mp4 *.mov *.3gp *.vro *.mpg *.mpeg *.ts *.tp *.trp *.mov *.flv *.vob *.svi *.m2ts *.mts *.divx *.ps AVI MKV ASF MP4 3GP MOV FLV VRO VOB PS TS SVAF *.webm WebM VP8 1920x1080 6~30 20 Vorbis *.rmvb RMVB RV8/9/10 (RV30/40) 1920x1080 6~30 20 RealAudio 6 MVC Motion JPEG H.264 BP/MP/HP Divx 3.
Appendix Music File Support File Extension Type Codec Comments *.mp3 MPEG MPEG1 Audio Layer 3 - *.m4a *.mpa *.aac MPEG4 AAC - *.flac FLAC FLAC Supports up to 2ch *.ogg OGG Vorbis Supports up to 2ch *.wma WMA WMA Supports WMA 10 Pro (Up to 5.1) Does not support WMA lossless audio Supports up to M2 profile *.wav wav wav - *.mid *.midi midi midi type 0 and type 1 Seek not supported Supported on USB only *.ape ape ape NonSmart not supported *.aif *.aiff AIFF AIFF - *.
Digital Output Selections Setup PCM Connection Audio Stream on Blu-ray Disc Bitstream (Unprocessed) Up to PCM 7.1ch PCM Dolby Digital Up to PCM 5.1ch Dolby Digital Dolby Digital Plus Dolby Digital Plus Dolby TrueHD Dolby TrueHD DTSHD High Resolution Audio HT-H7500WM : Up to PCM 5.1ch HT-H7750WM : Up to PCM 7.1ch DTS-HD Master Audio DTS-HD High Resolution Audio DTS-HD Master Audio PCM 2ch Dolby Digital Up to PCM 5.1ch Dolby Digital DTS HT-H7500WM : Up to PCM 5.
Appendix Resolution according to the content type HT-H7500WM Blu-ray Disc/E-contents/Digital Contents playback Output Blu-ray Disc E-contents/ Digital contents Resolution of Blu-ray Disc 1080p@60F Setup BD Wise DVD playback HDMI Mode HDMI Mode 576i/480i Auto Max. Resolution of TV input Max.
✎ ✎ ✎ ✎ ✎ If the TV you connected to the product does not support Movie Frame or the resolution you selected, the message "If no pictures are shown after selecting 'Yes', please wait for 15 seconds to return to the previous resolution. Do you want to change the resolution?" appears. If you select Yes, the TV's screen will go to blank for 15 seconds, and then the resolution will revert to the previous resolution automatically.
Appendix Symptom Check/Remedy The remote control does not work. • Are you operating the remote within its operational range and within the proper angle relative to the sensor? • Are the batteries drained? • The disc is rotating but there is no picture. • Picture quality is poor and the picture is shaking. • • • • Audio language and subtitles do not work. • The Audio Language and subtitle functions will not work if the disc does not contain them.
Symptom Check/Remedy No HDMI output. • Check the connection between the TV and the HDMI jack of the product. • Check if your TV supports 576p/480p/720p/1080i/1080p HDMI input resolution. Abnormal HDMI output appears on the screen. • If random noise appears on the screen, it means that TV does not support HDCP (High-bandwidth Digital Content Protection). AllShare function You can see folders shared through AllShare, but cannot see the files. • AllShare only shows Video, Photo, and Music files.
Appendix Specifications Weight 2.7 kg Dimensions 430.0 (W) x 55.0 (H) x 312.0 (D) mm Operating Temperature Range +5°C to +35°C Operating Humidity Range 10 % to 75 % Signal/noise ratio 55 dB Usable sensitivity 12 dB Total harmonic distortion 0.
HT-H7500WM Speaker system Impedance Frequency Output sound Rated range pressure level input Maximum input Front 140Hz~ 20kHz Surround 165W 40Hz ~ 160Hz 87dB/W/M Subwoofer 170W Weights (Unit : kg) 95.0 x 280.0 x 101.0 1.75 95.0 x 150.0 x 101.0 0.64 320.0 x 80.5 x 101.0 1.02 200.0 x 390.0 x 350.0 5.75 Dimensions (W x H x D) (Unit : mm) Weights (Unit : kg) 95.0 x 1215.0 x 101.0 (Stand base: 276.0 x 23.0 x 264.0) 5.01 95.0 x 1160.0 x 101.0 (Stand base: 276.0 x 23.0 x 264.0) 4.73 320.
Appendix Licences Manufactured under license from Dolby Laboratories. Dolby and the double-D symbol are trademarks of Dolby Laboratories. For DTS patents, see http://patents.dts.com. Manufactured under license from DTS Licencing Limited. DTS, DTS-HD, the Symbol, DTS and the Symbol together, & DTS-HD and the Symbol together are registered trademarks of DTS, Inc. DTS-HD Master Audio | Essential and DTS Neo:Fusion II are trademarks of DTS, Inc. © DTS, Inc. All Rights Reserved.
Contact SAMSUNG WORLD WIDE If you have any questions or comments relating to Samsung products, please contact the SAMSUNG customer care centre. Area ` Europe AUSTRIA Contact Centre 0800 - SAMSUNG (0800 - 7267864) Web Site www.samsung.com/at/support www.samsung.com/be/support (Dutch) BELGIUM 02-201-24-18 www.samsung.com/be_fr/support (French) BOSNIA 051 331 999 www.samsung.com/support BULGARIA 07001 33 11 , sharing cost www.samsung.com/bg/support CROATIA 062 726 786 www.samsung.
HT-H7500WM HT-H7750WM Blu-ray™ Système audiovisuel manuel d'utilisation imaginez les possibilités Merci d'avoir choisi cet appareil Samsung. Pour recevoir une assistance plus complète, veuillez enregistrer votre produit sur www.samsung.com/register HT-H7500WM_7750WM-FRA-0515.
Consignes de Sécurité Ce symbole indique la présence d'une tension dangereuse dans l'appareil. Ne touchez jamais les composants internes du produit. ATTENTION RISQUES D'ÉLECTROCUTION. NE PAS OUVRIR. ATTENTION : POUR LIMITER LES RISQUES DE DÉCHARGE ÉLECTRIQUE, NE RETIREZ JAMAIS LE CACHE (NI L'ARRIÈRE DE L'APPAREIL). CERTAINES PIÈCES QU'IL CONTIENT NE SONT PAS RÉPARABLES PAR L'UTILISATEUR. VEUILLEZ CONTACTER UN TECHNICIEN QUALIFIÈ POUR TOUTE RÉPARATION.
AVERTISSEMENT : • AFIN D'ÉVITER TOUT RISQUE DE PROPAGATION D'INCENDIE, ÉLOIGNEZ LES BOUGIES OU LES AUTRES DISPOSITIFS À FEU NU DE L'APPAREIL. PRODUIT LASER DE CLASSE 1 Ce produit est classé comme PRODUIT LASER DE CLASSE 1. L'utilisation de commandes, de réglages ou de procédé différents de ceux spécifiés dans le présent document peut entraîner une exposition à un rayonnement dangereux. ATTENTION : • RAYONNEMENT LASER INVISIBLE LORSQUE L'APPAREIL EST OUVERT ET VERROUILLAGES DÉSACTIVÉS.
Sommaire MISE EN ROUTE LIRE UN CONTENU 5 Accessoires 5 Accessoires des enceintes 27 Lecture de disques disponibles dans le commerce 6 Façade 27 Lire des fichiers multimédias 7 Face arrière 29 Contrôle de la lecture Vidéo 8 Télécommande 32 Contrôle de la lecture de musique 37 Utilisation du système Bluetooth BRANCHEMENTS 9 40 Visionnage des photos Connexion des enceintes 41 Écouter la radio 12 Fixation du noyau torique en ferrite au cordon d'alimentation du module de réception sans fil (S
Mise en Route Vérifiez que tous les accessoires et tous les composants des enceintes figurant ci-dessous sont inclus. Accessoires • Télécommande • Pile au lithium Mise en Route Les figures et les illustrations du présent Manuel d'utilisation sont fournies à titre de référence uniquement et peuvent différer de l'apparence du produit réel. Des frais supplémentaires pourront vous être facturés dans les cas suivants : a.
Mise en Route HT-H7750WM - 7.1CH Câble d'enceinte x 2 Vis (5 x 20) x 16 Socle x 4 Enceinte centrale Avant/Supérieur avant x 2 Pied x 4 Enceinte d'ambiance x 2 Caisson de basse Module de réception sans fil Module (SWA-6000) Façade ICÔNES D'AFFICHAGE FONCTION ARRÊT LECTURE/ PAUSE OUVRIR/ FERMER RÉGLAGE DU VOLUME MARCHE/ ARRÊT AMPLIFICATEUR À TUBE À VIDE D H-EN HIG VACUUM TUBE SO UND NFC AFFICHAGE 5V 0.
✎ ✎ ✎ Lorsque l'appareil affiche le menu du disque Blu-ray, vous ne pouvez pas lancer la vidéo en appuyant sur le situé sur l'appareil ou la télécommande. Pour lire la vidéo, sélectionnez Play Movie ou Start dans bouton le menu du disque, puis appuyez sur le bouton OK. Si vous utilisez Internet ou lisez le contenu du périphérique USB sur le téléviseur via le Home cinéma, vous ne pouvez pas sélectionner le mode BD/DVD à l'aide du bouton SOURCE.
Mise en Route Télécommande Boîtier de la télécommande Appuyez sur ce bouton pour ouvrir et fermer le tiroir disque. Permet d'allumer et d'éteindre l'appareil. Appuyez pour sélectionner le mode Home Cinéma (HDMI, AUX, BD/DVD, etc.). Permet de régler le volume. Appuyez sur ces boutons pour effectuer un saut vers l'arrière ([) ou l'avant (]). ou Appuyez sur ces boutons pour effectuer une recherche vers l'arrière (() ou l'avant ())et maintenez-les enfoncés. Permet de couper le son momentanément.
Branchements Dans ce chapitre, vous trouverez plusieurs méthodes vous expliquant comment connecter votre appareil à d’autres composants externes. Avant de déplacer ou d'installer l’appareil, mettez-le hors tension et débranchez le cordon d’alimentation.
Branchements Enceintes d'ambiance Caisson de basse Placez les enceintes d'ambiance de chaque côté de votre position d'écoute. Si vous ne disposez pas d'assez d'espace, positionnez-les face à face. Elles doivent être situées à environ 60 à 90 cm de vos oreilles et légèrement inclinées vers le sol. * Contrairement aux enceintes avant et centrale, les enceintes d'ambiance servent principalement pour les effets sonores. Elles n'émettent donc pas de son en permanence.
Raccordement des câbles d'enceinte 1. Chaque faisceau de câbles d'enceinte doit être relié à l'enceinte correspondante. Pour cela, la prise avec le codage couleur sur chaque faisceau doit correspondre à l'autocollant coloré situé sur la face inférieure ou arrière de chaque enceinte. 2. Branchez les fiches des câbles de chaque enceinte à l'arrière de l'appareil en respectant les couleurs entre les fiches et les prises femelles des enceintes.
Branchements ✎ ✎ ✎ ✎ ✎ Si vous placez une enceinte à proximité de votre téléviseur, la couleur des images peut être déformée en raison du champ magnétique. Placez le module de réception sans fil en arrière de la position d'écoute. Si le module de réception sans fil est situé trop près de l'appareil, le son émis par les enceintes peut être interrompu en raison d'interférences.
Connexion à un téléviseur et des périphériques externes AUX IN FRONT TOP FRONT R R SUBWOOFER FRONT TOP FRONT L L IMPEDANCE : 3 AUX IN POWER FM ANT FM ANT LAN L CENTER SPEAKERS OUT R HDMI OUT 1 HDMI IN OPTICAL DIGITAL AUDIO IN 2 LAN L R 1 HDMI OUT Rouge W Blanche Méthode 1 HDMI IN Périphériques externes Méthode 2 HDMI OUT OPTICAL DIGITAL AUDIO IN 2 Branchements R HDMI IN Méthode 3 AUDIO OUT OPTICAL OUT Connexion de l'appareil à un téléviseur À l'aide d'un câble HDM
Branchements Réseau sans fil Connexion à un routeur réseau Vous pouvez connecter votre appareil à votre routeur réseau en utilisant l'une des méthodes illustrées cidessous.
Paramètres Procédure de réglage des paramètres initiaux 1 LIRE LE DISQUE • Le menu d'accueil n'apparaîtra pas si vous ne configurez pas les paramètres initiaux. • L'OSD (On Screen Display, Affichage à l'écran) peut changer dans ce produit après la mise à niveau de la version du logiciel. • Les étapes d'accès peuvent varier selon le menu sélectionné.
Paramètres Sélection d'une option sur l'écran Accueil Pour sélectionner une option sur l'écran Accueil, déplacez le curseur à l'aide des boutons 78:; jusqu'à ce que l'option de votre choix soit mise en surbrillance, puis appuyez sur le bouton OK. 3 Si l'appareil reste en mode Arrêt pendant plus de 5 minutes sans l'utiliser, un écran de veille s'affichera sur le téléviseur. Si l'appareil reste en mode d’écran de veille pendant plus de 20 minutes, l'alimentation sera automatiquement coupée.
Format TV Couleur intense HDMI Vous permet de régler la sortie de l'appareil sur la taille de l'écran de votre téléviseur. (Reportez-vous à la page 51) Cette option vous permet de régler l'appareil pour émettre des données vidéo en sortie avec Deep Colour via la prise HDMI OUT. L'option Deep Colour permet une reproduction plus fidèle des couleurs, notamment en termes de profondeur.
Paramètres Paramètres (Multiroom Link) : Vous pouvez profiter du son via une enceinte distante connectée au home cinéma par l’intermédiaire de votre réseau domestique. Pour utiliser l'enceinte en réseau, sélectionnez Multiroom. S'il y a une enceinte en réseau disponible, elle apparaîtra sur l'écran. - Ne pas utiliser : L'enceinte en réseau n'est pas utilisée. - Multiroom : L’enceinte en réseau émet du son.
Sortie numérique Paramètres réseau Cette option vous permet de définir la fonction Sortie numérique de manière à ce qu'elle corresponde aux capacités du récepteur AV que vous avez connecté à l'appareil. Pour obtenir plus de détails, reportez-vous au tableau de sélection des sorties numériques.
Paramètres Système Smart Hub Verr. classif. VOD Configuration Permet de verrouiller l'accès au contenu des Vidéos à la demande (VOD) en fonction de sa classification. Pour l'utiliser, vous devez entrer le code PIN de sécurité. Appuyez sur le bouton 123 et maintenez-le enfoncé jusqu'à ce que le clavier numérique apparaisse à l'écran. Lorsque le clavier numérique s'affiche, sélectionnez un numéro à l'aide du bouton 78:;, puis appuyez sur le bouton OK. ✎ Le code PIN de sécurité par défaut est 0000.
Sécurité 1. Retirez tout disque ou périphérique de stockage USB. 2. Appuyez et maintenez le bouton @ sur le devant pendant 5 secondes ou plus. Tous les réglages seront réinitialisés sur leur valeur d'origine. ✎ Lorsque les réglages d'usine par défaut sont rétablis, toutes les données Blu-ray utilisateur stockées sur le lecteur seront effacées. Général Vous pouvez spécifier la luminosité de l'affichage et le fuseau horaire.
Paramètres ❏ Câble - Manuel Configuration réseau Lorsque vous connectez cet appareil à un réseau, vous pouvez utiliser les applications et les fonctions basées sur les Réseaux telles que Smart Hub et BD-LIVE, et mettre à niveau le logiciel de l'appareil via la connexion réseau. Pour plus d'informations concernant l'accès et l'utilisation des services Internet, reportez-vous au chapitre Services réseau de ce manuel en pages 43 à 50.
✎ 7. Vous pouvez obtenir les valeurs du réseau auprès de votre fournisseur d'accès Internet. Après avoir terminé la saisie de toutes les valeurs, sélectionnez OK, puis appuyez sur le bouton OK. Le Home cinéma vérifie la connexion réseau, puis il se connecte au réseau. Réseau sans fil Vous devriez pouvoir trouver la phrase de passe ou le code de sécurité sur l'un des écrans de configuration servant à la configuration du routeur ou du modem.
Paramètres 7. Cliquez sur le champ Config. IP, puis choisissez Entrer manuellement. 8. Sélectionnez un paramètre réseau à saisir (ex. : Adresse IP), puis appuyez sur OK . Utilisez les boutons 78 de votre télécommande pour saisir les numéros du paramètre. Ou utilisez le clavier numérique pour entrer un numéro de paramètre. Appuyez sur le bouton 123 et maintenez-le enfoncé jusqu'à ce que le clavier numérique apparaisse à l'écran.
5. ✎ Vous avez trois manières de procéder à la connexion Wi-Fi. • Via le périphérique Wi-Fi • Via l'appareil en utilisant l'option PBC. • Via l'appareil en utilisant un code PIN. ✎ Chacune d'elles est indiquée ci-dessous. Via le périphérique Wi-Fi 1. 3. Mise à niveau du logiciel Sur le périphérique Wi-Fi, suivez la procédure du périphérique pour la connexion à un autre périphérique Wi-Fi Direct. Concernant les instructions, reportez-vous au manuel d'utilisation du périphérique.
Paramètres MàJ maintenant Mise à jour par USB Vous pouvez utiliser MàJ maintenant pour mettre à jour le logiciel via votre connexion réseau ou en utilisant une clé USB à mémoire flash. Les instructions du réseau sont indiquées ci-dessous. Les instructions de la clé USB à mémoire flash se trouvent sur cette page. 1. Sélectionnez MàJ maintenant, puis appuyez sur le bouton OK. La fenêtre contextuelle Mettre à jour maintenant s'affiche. 2. L’appareil recherche en ligne la version du logiciel la plus récente.
Lire un Contenu Votre Home cinéma peut lire le contenu situé sur des disques Blu-ray/DVD/CD, des périphériques USB, des ordinateurs, des smartphones, des tablettes et sur Internet. Pour lire le contenu situé sur votre ordinateur ou un périphérique mobile, vous devez connecter l’ordinateur ou le périphérique mobile et l’appareil à votre réseau.
Lire un Contenu ✎ ✎ Dans le menu déroulant Filtrer( ), sélectionnez Photos, Vidéos ou Musique. Même si l’appareil affiche des dossiers qui contiennent tous les types de contenu, il affichera uniquement les fichiers du type que vous avez sélectionné. Par exemple, si vous avez sélectionné Musique, vous ne verrez que les fichiers musicaux. Lecture de fichiers sur un périphérique de stockage Méthode 1 : Si l'appareil est éteint après que vous ayez connecté un périphérique de stockage 1.
1. 2. 3. 4. 5. 6. ✎ ✎ ✎ ✎ Pour lister un seul type de fichier support, utilisez la fonction Filtrer( ) située dans le coin supérieur droit de l’écran de l’élément ou du périphérique. Dans le menu déroulant Filtrer( ), sélectionnez Photos, Vidéos ou Musique. Même si l’appareil affiche des dossiers qui contiennent tous les types de contenu, il affichera uniquement les fichiers du type que vous avez sélectionné. Par exemple, si vous avez sélectionné Musique, vous ne verrez que les fichiers musicaux.
Lire un Contenu TITLE MENU 3D Au cours de la lecture, appuyez sur ce bouton pour afficher le menu Titre ou le menu Contextuel. • Si le disque possède une liste de lecture, appuyez sur le bouton Trier par pour y accéder. Utilisez le menu 3D pour sélectionner l'option Côteà-côte ou Haut-bas si le contenu 3D en cours de lecture n'apparaît pas correctement en mode 3D. ✎ 2 Boutons liés à la lecture L'appareil ne lit pas le son en mode Recherche, ou Lent.
Mode Répétition Paramètres Egaliseur Vous permet de répéter un titre, un chapitre ou une section spécifique. - Arrêt : cette option permet de revenir en mode de lecture normale. - Titre : cette option permet de répéter la lecture d'un titre spécifique. - Chapitre : cette option permet de répéter la lecture d'un chapitre spécifique. - Répétition A-B : cette option permet de répéter la lecture d'une section spécifique. Vous permet d'utiliser l'égaliseur.
Lire un Contenu Utilisation des menus Trier par & Options Sélectionnez la fonction Filtrer( afficher uniquement les vidéos. ✎ ) puis Vidéos pour Même si l’appareil affiche des dossiers qui contiennent tous les types de contenu, il affichera uniquement les fichiers du type que vous avez sélectionné. Par exemple, si vous avez sélectionné Vidéos, vous ne verrez que les fichiers vidéos.
Commandes de l’écran Musique TRACK 001 TRACK 001 00:00/00:00 Permet de rembobiner la piste. 00:43 TRACK 002 03:56 TRACK 003 04:41 TRACK 004 04:02 TRACK 005 03:43 TRACK 006 03:40 TRACK 007 04:06 TRACK 008 03:52 TRACK 009 03:04 TRACK 010 04:02 Permet d'avancer sur la piste. , 1 Lecture des pistes dans un ordre aléatoire. Sur l’écran Liste musicale uniquement. TRACK 001 00:03:35 Sur l’écran Liste des pistes, utilisez les boutons 78 pour mettre en surbrillance la piste désirée.
Lire un Contenu Sur l’écran listant les fichiers vidéos, utilisez les boutons 78:; pour sélectionner Trier par ou Options en haut à droite, puis appuyez sur le bouton OK. ✎ ✎ Musique Trier par Piste Permet d'afficher toutes les pistes de musique contenues sur le support ou le périphérique de stockage. Album Permet d'afficher toutes les musiques contenues sur le support ou le stockage classées par album.
- Utilisez Tout suppr pour désélectionner en une seule fois toutes les pistes sélectionnées. Puis, sélectionnez des pistes individuelles ou utilisez Sélect. tout pour sélectionner toutes les pistes, puis appuyez sur le bouton ' (RETOUR) de votre télécommande ou sélectionnez Lecture puis appuyez sur le bouton OK. Si vous n'utilisez pas l'option Sélect. tout ou ne sélectionnez pas de piste individuelle, la liste Lire élém. sél. ne sera pas modifiée.
Lire un Contenu ✎ Si vous souhaitez utiliser Lire les éléments sélectionnés pour regarder des vidéos, utilisez la fonction Filtrer( ) pour sélectionner Vidéos au lieu de Musique. Utilisation de Démarrer Lire les éléments sélectionnés à partir de l’écran d’accueil ✎ 9. 10. Sélectionnez LIRE LE DISQUE ou MULTIMEDIA en fonction du support que vous utilisez. - Si vous sélectionnez LIRE LE DISQUE, l’écran Liste des pistes s’affiche.
4. Une fois terminé, sélectionnez Supprimer au bas à gauche de l’écran, puis appuyez sur le bouton OK. Une fenêtre contextuelle de confirmation apparaît. 10. Si vous souhaitez annuler l'extraction après qu’elle a commencé, appuyez sur le bouton OK puis sélectionnez Oui. Sélectionnez Non pour poursuivre l'extraction. 5. Sélectionnez Oui, puis appuyez sur le bouton OK. ✎ La suppression de tous les fichiers de la liste de lecture entrainera la suppression de la liste de lecture elle-même.
Lire un Contenu • La port 10 m dans toutes les directions, si aucun obstacle ne se trouve sur le chemin parcouru par le signal. La connexion sera automatiquement coupée si l'appareil est hors de portée. Même si la distance est respectée, il est possible que la qualité sonore soit détériorée par des obstacles (ex. : murs, portes). • Ce périphérique sans fil peut provoquer des interférences électriques durant son fonctionnement.
✎ ✎ En mode Bluetooth, la connexion sera perdue si la distance entre l'Ensemble Home cinéma et le périphérique Bluetooth dépasse 10 m. Lorsque le périphérique Bluetooth est replacé dans la portée conseillée ou lorsque vous le redémarrez, vous devez apparier à nouveau le périphérique et le Home cinéma pour les reconnecter. En mode Bluetooth, l’économiseur d’écran s’active si le périphérique Bluetooth reste en l’état Prêt pendant 5 minutes.
Lire un Contenu Envoyer Visionnage des photos Vous pouvez visionner les photos contenues dans un DVD, une mémoire USB, un périphérique mobile ou un ordinateur. Utilisation du menu Outils Lors de l’affichage d’une photo, appuyez sur le bouton TOOLS de la télécommande. Sélectionnez Paramètres(T) situé dans le coin supérieur droit de l’écran, puis appuyez sur le bouton OK. La liste déroulante du menu Outils apparaît.
Écouter la radio Options ✎ • Pour écouter la radio, vous devez connecter l'antenne FM fournie. Fonctionnement du téléviseur à partir de la télécommande 1. Appuyez sur la touche SOURCE pour sélectionner FM. 2. Syntonisez la station désirée. • Syntonisation préréglée 1 : Appuyez sur le bouton PRESET pour sélectionner PRESET, puis appuyez sur les boutons 78 pour sélectionner une station préréglée.
Lire un Contenu 5. Pour prérégler une autre station, répétez les étapes 2 à 4. • Pour syntoniser une station préréglée, appuyez sur bouton PRESET pour sélectionner PRESET, puis appuyez sur les boutons 78 pour sélectionner la station préréglée. Utilisation des boutons spécifiques de la télécommande ❏ Sports Annonceur : Permet de mettre en valeur la voix du commentateur lors d'un match afin d'augmenter votre absorption dans le match.
Services Réseau Vous pouvez profiter de différents services réseau tels qu’une lecture vidéo en transit ou une application en ligne en connectant l'appareil au réseau. Pour utiliser les services réseau, vous devez tout d’abord : 1. Connectez l'appareil à un réseau (reportezvous à la page 14). 2. Configurez les paramètres réseau (reportezvous aux pages 22 à 24). Connexion à votre compte Samsung Avant d'accéder à MON VIDEO CLUB ou SAMSUNG APPS, nous vous conseillons de vous connecter à votre compte Samsung.
Services Réseau 3. Sélectionnez Démarrer, puis appuyez sur le bouton OK. L’écran Conditions générales, Politique de confidentialité Smart Hub s’affiche. 4. À l'écran Services et paramètres supplémentaires, vous devez prendre connaissance et accepter les conditions générales et la politique de confidentialité Smart Hub pour l'utiliser. 5. Déroulez le texte et cliquez sur les boutons Voir détails pour prendre connaissance de tous les documents.
✎ ✎ Sur chaque écran d’informations relatives au film ou à l’émission, le bouton Regarder maint. s’affiche uniquement si vous avez téléchargé l’une des applications de réception vidéo en continu que vous pouvez utiliser pour ce film ou cette émission en particulier. Regarder via s’affiche si n’avez pas téléchargé l’application de réception vidéo en continu nécessaire. Une liste des applications de réception vidéo en continu que vous pouvez utiliser est située à la droite de Regarder via.
Services Réseau 2. Le menu Options Le menu Options vous permet d'ajouter et de supprimer des applications de MES APPLIS. Il vous permet également de modifier la position d'une application dans MES APPLIS et de mettre à jour les applications. Déplacer 1. 2. 3. 4. Sur l'écran MES APPLIS, sélectionnez l'application que vous souhaitez déplacer, puis appuyez sur le bouton OK pendant 3 secondes. Le menu Options apparaît. Sélectionnez Déplacer, puis appuyez sur le bouton OK.
3. 4. L'écran Mettre à jour les applications répertorie toutes les applications dont les mises à jour sont disponibles. Sélectionnez chaque application que vous souhaitez mettre à jour, puis appuyez sur le bouton OK. Vous pouvez également choisir Sélectionner tout pour mettre à jour toutes les applications répertoriées. Sélectionnez MAJ, puis appuyez sur le bouton OK.
Services Réseau Le panneau de commande en un coup d’œil Utilisation de la fenêtre contextuelle du clavier Le panneau de commande, qui occupe la largeur en haut de l’écran, contient une série d’icônes qui permettent de gérer plusieurs fonctions utiles. Ces icônes sont décrites ci-dessous, en commençant par celle la plus à gauche sur l’écran. Lorsque vous cliquez sur l'adresse http://www.samsung.
Options de la fenêtre contextuelle du clavier Pour accéder aux options de la fenêtre contextuelle du clavier, mettez en surbrillance le bouton situé en bas à gauche du clavier, puis appuyez sur le bouton OK. Langue Permet de sélectionner la langue pour le clavier. Vous pouvez sélectionner English, French, Russian, (anglais, français, russe) etc. Activer/Désactiver la saisie Cette option permet d'activer et de désactiver la fonction de saisie.
Services Réseau Param. navigateur Web Déf. comme page acc. : vous pouvez définir la page d'accueil du navigateur. Bloquer pop-up : permet d'activer ou de désactiver le blocage de fenêtre contextuelle. Blocage de page : vous pouvez définir si les annonces publicitaires sont bloquées et sélectionner les URL pour lesquelles ces annonces publicitaires sont bloquées.
Annexes Sortie numérique Informations complémentaires Remarques Branchements SORTIE HDMI • Selon votre téléviseur, il est possible que certaines résolutions de sortie HDMI ne fonctionnent pas. • Vous devez disposer d'une connexion HDMI pour visionner les vidéos en 3D. • Un câble HDMI trop long peut provoquer du bruit à l'écran. Si c'est le cas, réglez Couleur intense HDMI sur Arrêt dans le menu.
Annexes Affichage du lecteur Lecture des fichiers JPEG • Vous ne pouvez pas modifier la luminosité de la touche , ni de la touche VOL +, -. • Vous ne pouvez pas agrandir les sous-titres et les graphiques PG pour les afficher en mode plein écran. Paramètre haut-parleur • Lorsque la Sortie son est définie sur Hautparleur TV, le son est émis depuis les enceintes du téléviseur. Son HDMI • Lorsque le son HDMI sort vers les haut-parleurs du téléviseur, il subit automatiquement un mixage final en deux canaux.
✎ ✎ ✎ ✎ ✎ ✎ Selon le type de disque ou les conditions d'enregistrement, il se peut que certains disques CDRW/-R et DVD-R ne puissent pas être lus sur cet appareil. Si un disque DVD-RW/-R n'a pas été enregistré correctement au format vidéo DVD, il ne pourra pas être lu. Votre appareil ne lit pas les contenus ayant été enregistrés sur un disque DVD-R selon un débit binaire dépassant les 10 Mbps.
Annexes 1 États-Unis, Territoires organisés des États-Unis et Canada 2 Europe, Japon, Moyen-Orient, Égypte, Afrique du Sud, Groenland 3 Taïwan, Corée, Philippines, Indonésie, Hong Kong 4 Mexique, Amérique du Sud, Amérique centrale, Australie, Nouvelle-Zélande, Îles du Pacifique, Caraïbes 5 Russie, Europe de l'Est, Inde, Corée du Nord, Mongolie 6 Chine DVD VIDÉO ✎ Si le code régional d'un disque Blu-ray/DVD ne correspond pas à celui de l'appareil, ce dernier ne peut pas lire le disque.
Prise en charge des fichiers vidéo Extension de fichier Conteneur Codec vidéo Résolution Vitesse de défilement (FPS) Débit binaire (Mbps) 24/25/30 60 Codec audio *.avi *.mkv *.asf *.wmv *.mp4 *.mov *.3gp *.vro *.mpg *.mpeg *.ts *.tp *.trp *.mov *.flv *.vob *.svi *.m2ts *.mts *.divx *.ps AVI MKV ASF MP4 3GP MOV FLV VRO VOB PS TS SVAF *.webm WebM VP8 1920x1080 6~30 20 Vorbis *.rmvb RMVB RV8/9/10 (RV30/40) 1920x1080 6~30 20 RealAudio 6 MVC Motion JPEG H.264 BP/MP/HP Divx 3.
Annexes Prise en charge des fichiers musicaux Extension de fichier Type Codec Observations *.mp3 MPEG MPEG1 Audio Layer 3 - *.m4a *.mpa *.aac MPEG4 AAC - *.flac FLAC FLAC Prend en charge jusqu'à 2 ca *.ogg OGG Vorbis Prend en charge jusqu'à 2 ca *.wma WMA WMA Prend en charge WMA 10 Pro (jusqu'à 5.1) Ne prend pas en charge le format audio sans perte WMA Prend en charge jusqu’au profil M2 *.wav wav wav - *.mid *.
Sélections des sorties numériques Configuration Connexion PCM Train de bits (non traités) PCM Jusqu'à PCM 7,1 ca PCM Dolby Digital Dolby Digital Plus Dolby Digital Plus Dolby TrueHD Dolby TrueHD DTS DTSHD High Resolution Audio HT-H7500WM : Jusqu'à PCM 5,1 ca HT-H7750WM : Jusqu'à PCM 7,1 ca DTS-HD Master Audio DTS-HD Master Audio Aucune Annexes Résolution pour disque Blu-ray Dolby D.
Annexes Résolution selon le type de contenu HT-H7500WM Lecture du disque Blu-ray/des e-contenus/des contenus numériques Lecture DVD Mode HDMI Puissance Disque Blu-ray E-content/Contenus numériques Résolution du disque Blu-ray 1080p/60F Configuration BD Wise Mode HDMI 576i/480i Résolution optimale de l'entrée du téléviseur Auto.
✎ ✎ ✎ ✎ ✎ Si le téléviseur que vous avez connecté à l'appareil ne prend pas en charge Trame vidéo ou la résolution sélectionnée, le message «Si, après avoir sélectionné "Oui", aucune image n'apparaît, patientez 15 secondes pour revenir à la résolution précédente. Modifier la résolution?» s'affiche. Si vous sélectionnez Oui, l'écran du téléviseur deviendra blanc pendant 15 secondes et la résolution reviendra automatiquement à la résolution précédente.
Annexes Problème Vérification/Solution La télécommande ne fonctionne pas. • Faites-vous fonctionner la télécommande dans sa plage opérationnelle et dans l'angle correct par rapport au capteur ? • Les piles sont-elles déchargées ? • Le disque tourne mais aucune image ne s'affiche. • La qualité est mauvaise et l'image tremble. • • • • La langue de la bandeson et les sous-titres ne fonctionnent pas. • Les fonctions langue de la bande son et sous-titres ne fonctionnent pas si le disque n’en comporte pas.
Problème Vérification/Solution Aucune sortie HDMI. • Vérifiez la connexion entre le téléviseur et la prise HDMI de l'appareil. • Vérifiez que votre téléviseur prend en charge les résolutions d'entrée HDMI 576p/480p/720p/1080i/1080p. Sortie HDMI anormale apparaît à l'écran. • Si du bruit aléatoire apparaît à l'écran, cela signifie que le téléviseur ne prend pas en charge la protection HDCP (High-bandwidth Digital Content Protection).
Annexes Caractéristiques techniques Généralités Tuner FM Poids 2.7 kg Dimensions 430.0 (L) x 55.0 (H) x 312.0 (P) mm Plage de températures de fonctionnement +5 °C à+35 °C Plage de taux d'humidité de fonctionnement 10 % à 75 % Rapport signal/bruit 55 dB Sensibilité utilisable 12 dB Distorsion harmonique totale 0.
HT-H7500WM Enceinte d'enceintes Impédance Niveau de pression Entrée Entrée Plage de fréquences acoustique de nominale maximale sortie Avant 165 W 140 Hz à 20 kHz Ambiophonique Enceinte centrale 3 Caisson de basse 40Hz à 160Hz Poids (Appareil : kg) 95.0 x 280.0 x 101.0 1.75 95.0 x 150.0 x 101.0 0.64 320.0 x 80.5 x 101.0 1.02 200.0 x 390.0 x 350.0 5.75 Dimensions (L x H x P) (Appareil : mm) Poids (Appareil : kg) 95.0 x 1215.0 x 101.0 (Socle: 276.0 x 23.0 x 264.0) 5.01 95.0 x 1160.
Annexes Licences Fabriqué sous licence par Dolby Laboratories. Dolby et le symbole représentant deux D sont des marques de commerce de Dolby Laboratories. Pour les brevets DTS, consultez le site http://patents.dts.com. Fabriqué sous licence de DTS Licensing Limited. DTS, DTSHD, le symbole, DTS et le symbole ensemble, et DTS-HD et le symbole ensemble sont des marques déposées de DTS, Inc. DTS-HD Master Audio | Essential et DTS Neo:Fusion II sont des marques de commerce de DTS, Inc. © DTS, Inc.
Comment contacter Samsung dans le monde Si vous avez des suggestions ou des questions concernant les produits Samsung, veuillez contacter le Service Consommateurs Samsung. Area ` Europe AUSTRIA Contact Centre 0800 - SAMSUNG (0800 - 7267864) Web Site www.samsung.com/at/support www.samsung.com/be/support (Dutch) BELGIUM 02-201-24-18 www.samsung.com/be_fr/support (French) BOSNIA 051 331 999 www.samsung.com/support BULGARIA 07001 33 11 , sharing cost www.samsung.com/bg/support CROATIA 062 726 786 www.
HT-H7500WM HT-H7750WM Blu-ray™ Thuisbioscoopsysteem gebruiksaanwijzing Ongekende mogelijkheden Hartelijk dank voor de aanschaf van dit Samsung-product. Voor een meer volledige service, registreert u het product op www.samsung.com/register HT-H7500WM_7750WM-NL-0515.
Veiligheidsinformatie Dit symbool geeft aan dat hoge spanning binnenin het product aanwezig is. Het is gevaarlijk contact te maken met onderdelen binnenin het product. LET OP GEVAAR VAN ELEKTRISCHE SCHOKKEN, NIET OPEN MAKEN LET OP: DE BEHUIZING (OF ACHTERZIJDE) NIET VERWIJDEREN, OM HET GEVAAR VAN ELEKTRISCHE SCHOKKEN TE VERMINDEREN. DIT APPARAAT BEVAT GEEN ONDERDELEN DIE DE GEBRUIKER ZELF KAN REPAREREN. LAAT ONDERHOUD OVER AAN GEKWALIFICEERD PERSONEEL.
WAARSCHUWING: • HOUD KAARSEN EN ANDERE VOORWERPEN MET OPEN VUUR TE ALLEN TIJDE UIT DE BUURT VAN HET PRODUCT OM HET VERSPREIDEN VAN VUUR TE VOORKOMEN. LASERPRODUCT VAN KLASSE 1 Dit product is geclassificeerd als een LASERPRODUCT van KLASSE 1. Indien er mechanismen of aanpassingen worden gebruikt of procedures worden uitgevoerd die niet in deze gebruiksaanwijzing worden vermeld, kan dit resulteren in blootstelling aan schadelijke straling.
Inhoud AAN DE SLAG INHOUD AFSPELEN 5 Toebehoren 27 Commerciële schijven afspelen 5 Luidsprekercomponenten 27 Multimediabestanden afspelen 6 Voorpaneel 7 Achterpaneel 29 Bedieningselementen voor het afspelen van video 8 Afstandsbediening 9 De luidsprekers aansluiten 32 Bedieningselementen voor het afspelen van muziek AANSLUITINGEN 37 Bluetooth gebruiken 40 Foto's bekijken 12 De toroïdale ferrietkern op het netsnoer van de draadloze ontvangstmodule (SWA-6000) aansluiten 41 Luisteren naar
Aan de Slag Controleer de verpakking op de aanwezigheid van de toebehoren en luidsprekeronderdelen die hieronder worden vermeld of weergegeven. Aan de Slag De afbeeldingen en illustraties in deze gebruiksaanwijzing dienen slechts te referentie en kunnen afwijken van hoe het apparaat er in werkelijkheid uitziet. In de volgende gevallen kunnen administratiekosten in rekening worden gebracht: a.
Aan de Slag HT-H7750WM - 7.1 kan. Luidsprekerkabel x2 Voor/ Boven voor x 2 Schroef (5x20) x 16 Standaardvoet x4 Midden Standaard x 4 Surround x 2 Subwoofer Draadloze ontvanger Module (SWA-6000) Voorpaneel PICTOGRAMMEN OP HET DISPLAY FUNCTION STOP AFSPELEN/ PAUZE OPENEN/ SLUITEN VOLUMEREGELING AAN/UIT VACUÜMBUISVERSTERKER D H-EN HIG VACUUM TUBE SO UND NFC DISPLAY 5V 0.
✎ ✎ U kunt de NFC-functie gebruiken door de aan de bovenkant van het product aan te raken met het compatibele Bluetooth-bronapparaat (zie pagina 39). Achterpaneel Aan de Slag ✎ Op het moment dat het product het menu van een Blu-ray Disc weergeeft, kunt u de film niet starten op het product of afstandsbediening te drukken. U kunt de film afspelen door in het door op de toets discmenu de optie Play Movie (Film afspelen) of Start te selecteren en op de toets OK te drukken.
Aan de Slag Afstandsbediening Uitleg over de afstandsbediening Druk op deze toets om disclade te openen en te sluiten. Druk op deze toets om de modus voor de thuisbioscoop te selecteren (HDMI, AUX, BD/DVD enzovoort). Het geluid tijdelijk uitschakelen. Indrukken om disc of bestanden af te spelen. of Indrukken om afspelen te pauzeren. Het product in- en uitschakelen. Het volume regelen. Achteruit ([) of vooruit (]) springen. of Ingedrukt houden om achteruit (() of vooruit ()) te zoeken.
Aansluitingen In dit gedeelte worden verschillende methoden beschreven om het product aan te sluiten op andere externe componenten. Schakel het product uit en haal de stekker uit het stopcontact voordat u het product gaat verplaatsen of installeren.
Aansluitingen Surroundluidsprekers Subwoofer Plaats deze luidsprekers naast uw luisterpositie. Als er niet genoeg ruimte is, plaatst u de luidsprekers tegenover elkaar. Plaats de luidsprekers circa 60 tot 90 cm boven uw oren, enigszins naar beneden gericht. * In tegenstelling tot de voor- en middenluidsprekers worden de surroundluidsprekers vooral gebruikt voor geluidseffecten. Er komt niet altijd geluid uit deze luidsprekers. De plaats van de subwoofer is niet zo belangrijk.
Aansluiting van luidsprekerkabels 1. Sluit elke kabelbundel van de luidspreker op de juiste luidspreker aan door de kleurencode van de stekker van de bundel te laten overeenkomen met de gekleurde sticker aan de onderzijde of achterzijde van elke luidspreker. 2. Sluit de luidsprekerkabelstekkers van elke luidspreker aan de achterzijde van het product aan door de juiste kleuren van de luidsprekerstekkers met de kleuren van de luidsprekeraansluitingen te verbinden.
Aansluitingen ✎ ✎ ✎ ✎ ✎ Als u een luidspreker dicht bij uw tv plaatst, kan de schermkleur veranderen als gevolg van het magnetische veld. Plaats de draadloze ontvanger achter de luisterpositie. Als de draadloze ontvanger te dicht bij het product is geplaatst, kan het geluid van de luidsprekers worden onderbroken als gevolg van storing.
Een televisie verbinden met externe apparaten AUX IN FRONT TOP FRONT R R SUBWOOFER FRONT TOP FRONT L L IMPEDANCE : 3 AUX IN POWER FM ANT FM ANT LAN L CENTER SPEAKERS OUT R HDMI OUT 1 HDMI IN OPTICAL DIGITAL AUDIO IN 2 LAN L R 1 HDMI OUT Rood W Wit Methode 1 HDMI IN Externe apparaten DIGITAL AUDIO IN Methode 2 HDMI OUT OPTICAL AUDIO OUT Aansluitingen R 2 HDMI IN Methode 3 OPTICAL OUT Aansluiten op een tv Sluit de HDMI-kabel (niet meegeleverd) aan op de HDMI-uitgan
Aansluitingen Aansluiten op een netwerkrouter Draadloos netwerk U kunt uw apparaat op uw netwerkrouter aansluiten via een van de methodes die hieronder geïllustreerd staan.
Instellingen De procedure voor de begininstellingen 1 AFSPELEN • Het startmenu wordt niet weergegeven als u de begininstellingen niet configureert. • Het OSD (On Screen Display) kan veranderen in dit product nadat een upgrade van de softwareversie is uitgevoerd. • De stappen om toegang te verkrijgen kunnen verschillen, afhankelijk van het geselecteerde menu.
Instellingen Een optie op het startscherm selecteren 1. ✎ Als u een optie in het startscherm wilt selecteren, gebruikt u de toetsen 78:; om de cursor te verplaatsten, totdat de gewenste optie wordt gemarkeerd. Vervolgens drukt u op de toets OK. Als u het product langer dan 5 minuten in de stopmodus laat staan zonder dat u het gebruikt, wordt een schermbeveiliging geactiveerd op uw tv. Als de schermbeveiliging van het product langer dan 20 minuten actief is, wordt de stroom automatisch uitgeschakeld.
Beeldverhouding HDMI diepe kleur Hiermee kunt u het beeld van het apparaat aanpassen aan de schermgrootte van uw tv (zie pagina 51). Hiermee kunt u het product beelden via de uitgang HDMI OUT laten versturen met een diepe kleur. Met Diep kleur worden de kleuren nauwkeuriger en met een grotere kleurdiepte gereproduceerd. BD Wise Resolutie De uitgangsresolutie van het HDMI-videosignaal instellen op BD Wise, Auto, 1080p, 1080i, 720p, 576p/480p. Het getal staat voor het aantal beeldlijnen per frame.
Instellingen Instellingen (Multiroom Link): U kunt het geluid weergeven via een externe luidspreker die op de thuisbioscoop is aangesloten via uw thuisnetwerk. Selecteer Multiroom om de netwerkluidspreker te gebruiken. Als een netwerkluidspreker beschikbaar is, verschijnt deze op het scherm. - Niet gebruiken : De netwerkluidspreker wordt niet gebruikt. - Multiroom : De netwerkluidspreker voert audio uit. Alle netwerkluidsprekers voeren dezelfde audio uit, ongeacht het kanaal, alleen via het PCM-indeling.
Digitaal UIT audio Netwerkinstellingen Hiermee kunt u de Digitaal UIT audio afstemmen op de mogelijkheden van de AV-ontvanger die u op het product hebt aangesloten. Meer informatie vindt u in de tabel voor selectie van digitale uitvoer (zie pagina 57). Hiermee kunt u de netwerkaansluiting configureren zodat u allerlei functies kunt gebruiken zoals internetservices of AllShare Wi-Fi-functionaliteit en software-upgrades kunt uitvoeren.
Instellingen Systeem Smart Hub Slot voor VOD-rating Instellingen Hier kunt u toegang tot Video-on-Demand (VOD) inhoud blokkeren op basis van de classificatie ervan. U moet de beveliingspincode invoeren om deze functie te kunnen gebruiken. Houd de toets 123 ingedrukt totdat het numerieke toetsenblok op het scherm wordt weergegeven. Als het numerieke toetsenblok verschijnt, selecteert u een nummer met de toets 78:; en drukt u vervolgens op de toets OK.
Beveiliging 1. Verwijder eventuele discs of USBopslagapparaten. 2. Houd de knop @ op het voorpaneel ten minste 5 seconden ingedrukt. Alle instellingen worden teruggezet naar de fabrieksinstellingen. ✎ DivX® Video On Demand De DivX® VOD-registratiecode weergeven om DivX® VOD-inhoud te kopen en af te spelen. Ondersteuning Extern beheer Wanneer deze functie is ingeschakeld, kan het callcenter van Samsung op afstand problemen met het product vaststellen en oplossen.
Instellingen ❏ Bedraad - Handmatig Netwerkinstelling Wanneer u dit product op een netwerk aansluit, kunt u netwerktoepassingen en -functies gebruiken zoals Smart Hub en BD-LIVE, en de software van het product upgraden via de netwerkverbinding. Meer informatie over de toegang tot en het gebruik van internetservices vindt u in het hoofdstuk Netwerkservices van deze handleiding op pagina 43~50. De instructies voor de configuratie van de netwerkverbinding beginnen hieronder.
✎ 7. U kunt de netwerkparameterwaarden opvragen bij uw internetprovider. Selecteer OK als u alle waarden hebt ingevoerd en druk dan op de toets OK. De thuisbioscoop controleert de netwerkverbinding en maakt vervolgens verbinding met het netwerk. Draadloos netwerk ❏ Draadloos - Handmatig Als u een statisch IP-adres hebt of de automatische procedure niet werkt, moet u de waarden voor de netwerkinstellingen handmatig instellen.
Instellingen 7. Selecteer het veld IP-instell. en stel het in op Handmatig invoeren. 8. Selecteer de in te voeren netwerkparameter (bijvoorbeeld IP-adres) en druk vervolgens op de toets OK. Gebruik de toetsen 78 op de afstandsbediening om de getallen voor de parameter in te voeren. Of gebruik het numerieke toetsenblok om het nummer van een parameter in te voeren. Houd de toets 123 ingedrukt totdat het numerieke toetsenblok op het scherm wordt weergegeven.
5. Er zijn drie manieren om de Wi-Fi-verbinding te leggen: • Via het Wi-Fi-apparaat. • Via het apparaat met behulp van PBC. • Via het product met behup van een pincode. ✎ ✎ Hieronder worden de verschillende methoden uitgelegd. Software upgraden Via het Wi-Fi-apparaat 1. 3. Volg de procedure op het Wi-Fi-apparaat om verbinding te maken met een ander Wi-Fi Directapparaat. Raadpleeg de gebruiksaanwijzing van het apparaat voor instructies.
Instellingen Nu bijwerken Bijwerken via USB U kunt Nu bijwerken gebruiken voor het bijwerken van de software via uw netwerkverbinding of met behulp van een USB-flashdrive. De netwerkinstructies vindt u hieronder. De aanwijzingen voor bijwerken met een USB-flashdrive vindt u op deze pagina. 1. Selecteer Nu bijwerken en druk vervolgens op de toets OK. Het pop-upvenster Nu bijwerken wordt weergegeven. 2. Het product zoekt online naar de nieuwste softwareversie. 3.
Inhoud Afspelen Uw thuisbioscoop kan inhoud afspelen vanaf Blu-ray/ dvd/cd-schijven, USB-apparaten, pc's, smartphones, tablets en het web. Voordat u inhoud op een pc of mobiel apparaat kunt afspelen, moet u de pc of het mobiele apparaat en het apparaat op uw netwerk aansluiten. Als u inhoud van uw pc wilt afspelen, moet u ook de AllSharenetwerksoftware downloaden of installeren of moet zich al DLNA-netwerksoftware op uw pc bevinden.
Inhoud Afspelen ✎ Selecteer Foto’s, Video’s of Muziek in de vervolgkeuzelijst Filteren ( ). ✎ ✎ Hoewel het product mappen voor alle typen inhoud weergeeft, worden alleen bestanden weergegeven met het type inhoud dat u hebt geselecteerd. Als u bijvoorbeeld Muziek hebt geselecteerd, worden alleen muziekbestanden weergegeven. ✎ Selecteer Foto’s, Video’s of Muziek in de vervolgkeuzelijst Filteren ( ).
1. Selecteer in het startscherm het item MULTIMEDIA en druk vervolgens op OK. 1. 2. Selecteer Netwerkapparaat onderaan op het scherm en druk vervolgens op OK. Opslagapparaten die zijn verbonden met hetzelfde netwerk als de thuisbioscoop, worden vermeld. 2. 3. Selecteer een opslagapparaat en druk vervolgens op OK. De mappen en bestanden die zijn gedeeld op het geselecteerde opslagapparaat worden vermeld. 3. 4. 5. 6. 5.
Inhoud Afspelen TITLE MENU 3D Tijdens het afspelen drukt u op deze toets om het titelmenu of pop-upmenu weer te geven. • Als uw schijf een afspeellijst bevat, drukt u op Sorteren op om naar de afspeellijst te gaan. Gebruik het menu 3D om de optie Naast elkaar of Boven onder te selecteren als de 3D-inhoud die op dat moment wordt afgespeeld niet goed wordt weergegeven in de 3D-modus. 2 Afspeeltoetsen ✎ Het product speelt geen geluid af in de modus Zoeken of Traag.
Herhalingsmodus Instell. toonregeling Hiermee kunt u een titel, hoofdstuk of bepaalde sectie herhalen. - Uit: Hiermee keert u terug naar normale weergave. - Titel: Hiermee laat u de geselecteerde titel herhalen. - Hoofdstuk: Hiermee kunt u het geselecteerde hoofdstuk herhalen. - Herhalen A-B: Hiermee kunt u de geselecteerde sectie herhalen. Hiermee kunt u de equalizer instellen. ✎ De equalizerinstellingen zijn alleen toegankelijk wanneer Equalizermodus is ingesteld op Aan. 1.
Inhoud Afspelen ✎ De menu's Sorteren op & Opties gebruiken Selecteer de functie Filteren ( ) en vervolgens Video’s om alleen video’s weer te geven. ✎ Hoewel het product mappen voor alle typen inhoud weergeeft, worden alleen bestanden weergegeven met het type inhoud dat u hebt geselecteerd. Als u bijvoorbeeld Video’s hebt geselecteerd, worden alleen videobestanden weergegeven.
Bedieningselementen in het muziekscherm TRACK 001 TRACK 001 00:00/00:00 Het nummer terugspoelen. Het nummer vooruitspoelen. 00:43 TRACK 002 03:56 TRACK 003 04:41 TRACK 004 04:02 TRACK 005 03:43 TRACK 006 03:40 TRACK 007 04:06 TRACK 008 03:52 TRACK 009 03:04 TRACK 010 04:02 Nummers in willekeurig volgorde afspelen. Alleen op het scherm Muzieklijst. TRACK 001 00:00:40 00:03:35 Gebruik de toetsen 78 op het scherm Nummerlijst om de markering naar het gewenste nummer te verplaatsen.
Inhoud Afspelen Selecteer op het scherm waarop de muziekbestanden worden vermeld met 78:; de optie Sorteren op of Opties rechtsbovenaan en druk op de toets OK. ✎ ✎ Muziek Sorteren op Nummer Geeft alle muziektracks op het media- of opslagapparaat weer. Album Alle muziek op de media of het opslagapparaat op album weergeven. Artiest Alle muziekbestanden op de media of het opslagapparaat weergeven op titel. Genre Alle muziek op de media of het opslagapparaat op genre weergeven.
- Gebruik Alles wissen om de selectie van alle geselecteerde nummers in één keer ongedaan te maken. Selecteer vervolgens afzonderlijke nummers of gebruik Alles select. om alle nummers te selecteren. Druk vervolgens op de toets ' (TERUG) op uw afstandsbediening of selecteer Afspln en druk op OK. Als u Alles select. niet gebruikt of geen afzonderlijke nummers selecteert, wordt de lijst Gesel. afspelen niet gewijzigd.
Inhoud Afspelen ✎ Als u Selectie afspelen wilt gebruiken om video’s te bekijken, gebruikt u de functie Filteren ( ) om Video’s te selecteren in plaats van Muziek. 8. Selectie afspelen gebruiken vanaf het startscherm 9. ✎ Selecteer AFSPELEN of MULTIMEDIA afhankelijk van de media die u gebruikt. 10. - Als u AFSPELEN hebt geselecteerd, verschijnt het scherm Nummerlijst. Gebruik de functie Filteren ( ) om Muziek te selecteren en volg de richtlijnen voor het starten in Stap 3 hierboven. 11.
4. Selecteer Verwijderen onderaan links op het scherm en druk dan op de knop OK. Het pop-upvenster met de bevestiging wordt weergegeven. 5. Selecteer Ja en druk vervolgens op OK. ✎ ✎ Als u alle bestanden uit een afspeellijst verwijdert, wordt de afseellijst zelf ook verwijderd. U kunt maximaal 5 afspeellijsten bewaren. Rippen 1. Plaats een USB-apparaat in de USB-aansluiting aan de voorzijde van het apparaat. Dit is het apparaat waarnaar u de bestanden zult rippen.
Inhoud Afspelen • Het effectieve ontvangstbereik van de thuisbioscoop is maximaal 10 meter in alle richtingen, mits er geen obstakels zijn. Als de afstand te groot wordt, wordt de verbinding automatisch verbroken. Zelfs binnen dit bereik kan de geluidskwaliteit verslechteren door obstakels zoals muren of deuren. • Dit draadloze apparaat kan elektrische interferentie veroorzaken wanneer het in bedrijf is.
✎ ✎ De Bluetooth-verbinding kan worden verbroken als in de Bluetooth-verbindingsmodus de afstand tussen het thuisbioscoopsysteem en het Bluetooth-apparaat te groot wordt (10 meter). Wanneer het Bluetooth-apparaat zich weer terugkeert binnen het werkende bereik of opnieuw wordt opgestart, moet u het apparaat en de thuisbioscoop opnieuw koppelen om weer een verbinding te maken. In de Bluetooth-modus start de schermbeveiliging als het apparaat 5 minuten lang in de stand Gereed blijft staan.
Inhoud Afspelen Foto's bekijken Verzenden U kunt foto's bekijken die op een dvd, USB, mobiel apparaat of pc zijn opgeslagen. Het menu Tools gebruiken Druk tijdens het weergeven van een foto op TOOLS op de afstandsbediening. Selecteer Instellingen (T) in de rechterbovenhoek van het scherm en druk vervolgens op OK. De vervolgkeuzelijst Extra verschijnt. Dia-instellingen Selecteer Verzenden om de geselecteerde bestanden te uploaden naar een online site (Picasa, Facebook, enz.) of apparaat.
Luisteren naar de radio Opties ✎ • Om naar de radio te kunnen luisteren, moet u de meegeleverde FM-antenne aansluiten. De radio bedienen met de afstandsbediening 1. Druk op de toets SOURCE om FM te selecteren. 2. Stem af op het gewenste station. • Tuner vooraf instellen 1: Druk op de toets PRESET om PRESET te selecteren en druk vervolgens op de toets 78 om een voorkeuzestation te selecteren.
Inhoud Afspelen 5. U kunt andere stations instellen door de stap 2 tot en met 4 te herhalen. • U kunt afstemmen op een voorkeuzestation door op de toets PRESET te drukken om PRESET en vervolgens op de toetsen 78 om het voorkeuzestation te selecteren. De toetsen van de afstandsbediening voor speciale effecten gebruiken ❏ Sport Aankondiger: Benadrukt de stem van de commentator tijdens een voetbalwedstrijd voor een nog intensieve spelbeleving.
Netwerkservices U kunt gebruikmaken van verschillende netwerkservices, zoals Smart Hub of BD-LIVE, door het apparaat aan te sluiten op het netwerk. Als u netwerkservices wilt gebruiken, moet eerst de volgende handelingen uitvoeren: 1. 2. Breng een verbinding tot stand tussen het product en een netwerk (zie pagina 14). De netwerkinstellingen configureren (zie pagina's 22-24). ✎ Als u de toets indrukt nadat u bent aangemeld, verschijnt het scherm Aanmelden.
Netwerkservices 3. Selecteer Start en druk vervolgens op de toets OK. Het scherm Smart Hub Terms & Conditions, Privacy Policy (Voorwaarden en privacybeleid voor Smart Hub) verschijnt. 4. Op het scherm Aanvullende services en opties moet u de voorwaarden en het privacybeleid voor Smart Hub doorlezen en aanvaarden voordat u Smart Hub mag gebruiken. 5. Ga omlaag en klik op Meer weergeven om de volledige documenten door te nemen.
✎ ✎ Op elk informatiescherm over films of programma’s, wordt de knop Nu kijken alleen weergegeven nadat u een van de videostreaming-apps die u kunt gebruiken voor het streamen van die specifieke film of dat programma, hebt gedownload. Bekijken via verschijnt als u de nodige videostreaming-app niet hebt gedownload. Rechts van Bekijken via bevindt zich een lijst van de videostreaming-apps die u kunt gebruiken om de film of het programma te streamen.
Netwerkservices 2. Het optiemenu In het optiemenu kunt u apps toevoegen aan en verwijderen uit MIJN APPS. U kunt er ook de positie van een app in MIJN APPS veranderen en apps bijwerken. Verplaatsen 1. 2. 3. 4. Selecteer de app die u wilt verplaatsen op het scherm MIJN APPS en houd de toets OK 3 seconden lang ingedrukt. Het menu Opties wordt weergegeven. Selecteer Verplaatsen en druk vervolgens op de toets OK. Gebruik de toetsen 78:; om de app te verplaatsen.
3. 4. Op het scherm Apps bijwerken worden alle apps vermeld waarvoor updates beschikbaar zijn. Selecteer de apps die u wilt bijwerken en druk vervolgens op de toets OK. U kunt ook Alles select. kiezen om alle vermelde apps bij te werken. Selecteer Update en druk vervolgens op de toets OK. 2. Kies op het scherm SAMSUNG APPS, selecteert u WebBrowser en druk vervolgens op OK.
Netwerkservices Het configuratiescherm in vogelvlucht Het configuratiescherm, dat boven aan het scherm wordt weergegeven, heeft een reeks pictogrammen waarmee een aantal nuttige functies kunnen worden gestart. De pictogrammen worden hieronder beschreven, om te beginnen het pictogram helemaal links op het scherm. Het toetsenbord-pop-upvenster gebruiken Wanneer u op of op klikt of een gegevens- of tekstinvoerveld opent en op OK drukt, wordt het popup-toetsenbord weergegeven. http://www.samsung.
Opties op het toetsenbord-pop-upvenster Als u de opties van de toetsenbord-pop-up wilt openen, markeert u de toets links onder het toetsenbord en drukt u op OK. Taalkeuze Hiermee selecteert u de taal voor het toetsenbord. U kunt Engels, Frans, Russisch enz. selecteren. Hiermee wordt de functie Grijpen in- en uitgeschakeld. Wanneer de Grabber-functie aan staat, kunt u een webpagina omhoog en omlaag schuiven zonder de schuifbalk te verslepen.
Netwerkservices Instellingen browser Inst. als startpag.: U kunt de startpagina van de browser instellen. Pop-upblocker: Hiermee wordt de popupblokkering in- en uitgeschakeld. Paginablokkering: U kunt bepalen of u advertenties wilt blokkeren en u kunt de URL's selecteren waarvoor de advertenties zijn geblokkeerd.
Bijlage Aanvullende informatie Digitaal UIT audio Opmerkingen Aansluitingen HDMI-UITGANG • Afhankelijk van uw televisie werken bepaalde HDMIuitvoerresoluties mogelijk niet. • U moet over een HDMI-aansluiting beschikken om video's met 3D-technologie te kunnen bekijken. • Als u een lange HDMI-kabel gebruikt, kan zich beeldruis voordoen. Als dit gebeurt, stelt u HDMI diepe kleur in op Uit in het menu. Instellingen 3D-instell.
Bijlage Front paneel JPEG-bestanden afspelen • U kunt de helderheid van de toets VOL +, - niet wijzigen. en de toets • U kunt de ondertiteling en presentatie-afbeelding niet vergroten in de modus voor volledig scherm. Luidsprekerinst. Inhoud Afspelen • Als Geluidsuitvoer is ingesteld op TV-luidspreker, wordt het geluid weergegeven via de luidsprekers van de televisie.
✎ ✎ ✎ ✎ ✎ ✎ Het product kan bepaalde CD-RW/-R- en DVD-Rdiscs mogelijk niet afspelen vanwege het disctype of de opnamecondities. Als een DVD-RW/-R-disc niet naar behoren is opgenomen in DVD-videoformaat, kan deze niet worden afgespeeld. Uw product speelt geen inhoud af die op een DVD-R is opgenomen met een bitsnelheid van meer dan 10 Mbps. Uw product speelt geen inhoud af die op een BD-R of USB-medium is opgenomen met een bitsnelheid van meer dan 30 Mbps.
Bijlage 1 De V.S., Amerikaanse territoria en Canada 2 Europa, Japan, het MiddenOosten, Egypte, Afrika, Groenland 3 Taiwan, Korea, de Filippijnen, Indonesië, Hongkong 4 Mexico, Zuid-Amerika, Centraal-Amerika, Australië, Nieuw-Zeeland, Eilanden in de Stille Zuidzee, Caraïbisch gebied 5 Rusland, Oost-Europa, India, Noord-Korea, Mongolië 6 China DVDVIDEO ✎ Als de regiocode van een Blu-ray-disc/DVD niet overeenkomt met de regiocode op dit product, kan de disc niet worden afgespeeld.
Ondersteunde videobestanden Bestandsextensie Houder Videocodec Resolution Beeldsnelheid Bitsnelheid Audiocodec (fps) (Mbps) *.avi *.mkv *.asf *.wmv *.mp4 *.mov *.3gp *.vro *.mpg *.mpeg *.ts *.tp *.trp *.mov *.flv *.vob *.svi *.m2ts *.mts *.divx *.ps AVI MKV ASF MP4 3GP MOV FLV VRO VOB PS TS SVAF VP6 640x480 6~30 4 *.webm WebM VP8 1920x1080 6~30 20 Vorbis *.rmvb RMVB RV8/9/10 (RV30/40) 1920x1080 6~30 20 RealAudio 6 MVC 24/25/30 60 Motion JPEG H.264 BP/MP/HP Divx 3.
Bijlage Ondersteunde muziekbestanden Bestandsextensie Type Codec Opmerkingen *.mp3 MPEG MPEG1 Audio Layer 3 - *.m4a *.mpa *.aac MPEG4 AAC - *.flac FLAC FLAC Tot 2 kan. ondersteund *.ogg OGG Vorbis Tot 2 kan. ondersteund *.wma WMA WMA WMA 10 Pro (tot 5.1) ondersteund Biedt geen ondersteuning voor WMA lossless audio Tot M2-profiel ondersteund *.wav wav wav - *.mid *.midi midi midi type 0 en type 1 Zoeken niet ondersteund Uitsluitend ondersteund op USB *.
Selectie van digitale uitvoer Instellingen PCM Aansluiting PCM Maximaal 7.1 PCMkanalen PCM Dolby Digital Maximaal 5.1 PCMkanalen Dolby Digital Dolby TrueHD DTS DTSHD High Resolution Audio Dolby TrueHD HT-H7500WM : Maximaal 5.1 PCMkanalen HT-H7750WM : Maximaal 7.1 PCMkanalen DTS DTS opnieuw gecodeerd Bijlage DTS-HD Master Audio PCM PCM 2-kanaals Maximaal 5.1 PCMkanalen Dolby Digital DTS HT-H7500WM : Maximaal 5.1 PCMkanalen HT-H7750WM : Maximaal 7.
Bijlage Resolutie volgens type inhoud HT-H7500WM Afspelen van Blu-ray-discs/E-inhoud/digitale inhoud Uitvoer Instellingen BD Wise DVD afspelen HDMI-modus HDMI-modus Blu-ray-disc E-inhoud/digitale inhoud Resolutie van Blu-ray-disc 1080p bij 60 beelden 576i/480i Auto Max. resolutie van tv-invoer Max.
✎ ✎ ✎ ✎ ✎ Als de tv die u hebt aangesloten op het product het filmbeeld of de geselecteerde resolutie niet ondersteunt, wordt het volgende bericht weergegeven: "Als na uw selectie geen beeld verschijnt, wacht u 15 seconden. De resolutie wordt automatisch teruggezet. Wilt u een andere resolutie selecteren?" wordt weergegeven. Als u Yes (Ja) selecteert, ziet u 15 seconden lang een leeg tv-scherm en wordt vervolgens automatisch teruggeschakeld naar de vorige resolutie.
Bijlage Symptoom Controle/oplossing De afstandsbediening werkt niet. • Gebruikt u de afstandsbediening binnen het werkbereik en onder de juiste hoek ten opzicht van de sensor? • Zijn de batterijen leeg? • De disc draait maar er is geen beeld. • De beeldkwaliteit is slecht en het beeld trilt. • • • • De geluidstaal en ondertiteling werken niet. • De geluidstaal en ondertiteling werken niet als de schijf deze niet bevat.
Symptoom Controle/oplossing Geen HDMI-uitvoer. • Controleer de aansluiting tussen de tv en de HDMI-aansluiting van het apparaat. • Controleer of uw tv een HDMI-invoerresolutie van 576p/480p/720p/1080i/1080p ondersteunt. Abnormale HDMI-uitvoer op het scherm. • Als er sneeuw te zien is op het scherm, betekent dit dat de tv geen HDCP (Highbandwidth Digital Content Protection) ondersteunt.
Bijlage Specificaties Gewicht 2,7 kg Afmetingen 430,0 (B) x 55,0 (H) x 312,0 (D) mm Temperatuurbereik tijdens gebruik +5°C tot +35°C Vochtigheidsgraad tijdens gebruik 10 % tot 75 % Signaal/ruisverhouding 55 dB Bruikbare gevoeligheid 12 dB Totale harmonische vervorming 0.
HT-H7500WM Gewicht Luidspreker Nominaal Maximaal Afmetingen (B x H x D) Impedantie Frequentiebereik Geluidsdrukniveau (Eenheid: ingangsvermogen ingangsvermogen (Eenheid: mm) systeem kg) Voorkant 140Hz 20kHz Surround Midden 165 W 87 dB/W/M 3 40Hz 160Hz Subwoofer 95,0 x 280,0 x 101,0 1,75 95,0 x 150,0 x 101,0 0,64 320,0 x 80,5 x 101,0 1,02 200,0 x 390,0 x 350,0 5,75 330 W 170 W 340 W 88dB/W/M HT-H7750WM Luidspreker Nominaal Impedantie Frequentiebereik Geluidsdrukniveau ingangsvermogen systee
Bijlage Licenties Vervaardigd onder licentie van Dolby Laboratories. Dolby en de dubbele D zijn handelsmerken van Dolby Laboratories. Raadpleeg http://patents.dts.com voor DTS-patenten. Vervaardigd onder licentie van DTS Licensing Limited. DTS, DTS-HD, het symbool, DTS en het symbool samen, & DTSHD en het symbool samen zijn gedeponeerde handelsmerken van DTS, Inc. DTS-HD Master Audio | Essential en DTS Neo:Fusion II zijn handelsmerken van DTS, Inc. © DTS, Inc. Alle rechten voorbehouden.
Contact Samsung wereldwijd Wanneer u suggesties of vragen heeft met betrekking tot Samsung producten, verzoeken wij u contact op te nemen met de consumenten service- en informatie dienst van Samsung. Area ` Europe AUSTRIA Contact Centre 0800 - SAMSUNG (0800 - 7267864) Web Site www.samsung.com/at/support www.samsung.com/be/support (Dutch) BELGIUM 02-201-24-18 www.samsung.com/be_fr/support (French) BOSNIA 051 331 999 www.samsung.com/support BULGARIA 07001 33 11 , sharing cost www.samsung.
HT-H7500WM HT-H7750WM Blu-ray™ Heimkino-System Bedienungsanleitung Unvorstellbare Möglichkeiten Vielen Dank, dass Sie sich für dieses Produkt von Samsung entschieden haben. Wenn Sie einen umfassenderen Service nutzen möchten, registrieren Sie bitte Ihr Produkt unter www.samsung.com/register HT-H7500WM_7750WM-GER-0519.
Sicherheitsinformationen Dieses Symbol weist auf eine hohe Spannung im Inneren des Geräts hin. Das Berühren von Teilen im Geräteinneren ist gefährlich. ACHTUNG STROMSCHLAGGEFAHR! NICHT ÖFFNEN! ACHTUNG: ZUR VERMEIDUNG VON STROMSCHLÄGEN DARF DIESES GERÄT NICHT GEÖFFNET WERDEN. IM GERÄTEINNEREN BEFINDEN SICH KEINE VOM BENUTZER ZU WARTENDEN TEILE. LASSEN SIE REPARATUREN NUR VON QUALIFIZIERTEM KUNDENDIENSTPERSONAL DURCHFÜHREN.
WARNUNG: • UM DAS AUSBRECHEN EINES BRANDES ZU VERHINDERN, DÜRFEN SICH KEINE KERZEN UND ANDERE GEGENSTÄNDE MIT OFFENEM FEUER IN DER NÄHE DES GERÄTS BEFINDEN. CLASS 1 LASER PRODUKT Dieses Gerät ist als CLASS 1 LASER Produkt eingestuft. Die Verwendung von anderen Bedienelementen, Einstellungen oder die Durchführung von Prozeduren, die von denen hier angegebenen abweichen, können zu einer zu einer gefährlichen Strahlenbelastung führen.
Inhalt ERSTE SCHRITTE WIEDERGABE VON INHALTEN 5 Zubehör 27 Wiedergabe von kommerziellen Disks 5 Lautsprecherkomponenten 27 Wiedergabe von Multimedia Dateien 6 Vorderseite 29 Steuern der Videowiedergabe 7 Rückseite 32 Steuern der Musikwiedergabe 8 Fernbedienung 37 Bluetooth verwenden 40 Anzeigen von Fotos ANSCHLÜSSE 9 41 Radio wiedergeben Anschließen der Lautsprecher 12 Anbringen des Ferrit-Ringkerns am Netzkabel des kabellosen Empfängermoduls (SWA-6000) 42 Verwenden der Tasten für Spezi
Erste Schritte Prüfen Sie, ob die im Folgenden aufgeführten Zubehör- und Lautsprecherkomponenten dem Karton beiliegen. Erste Schritte Die Abbildungen in dieser Anleitung dienen nur als Referenz und können sich vom aktuellen Produkt unterscheiden. Es kann eine Gebühr erhoben werden, wenn: a. Ein Techniker auf Ihre Anfrage bestellt wird und am Gerät kein Defekt vorliegt (z. B. weil Sie diese Bedienungsanleitung nicht gelesen haben) b.
Erste Schritte HT-H7750WM - 7.1CH Lautsprecher Cable 2x Schrauben (5x20) 16x Ständerfuß 4x Center Front/Front Top 2x Ständer 4x Surround Lautsprecher 2x Subwoofer Funkempfänger Modul (SWA-6000) Vorderseite DISPLAY SYMBOLE FUNKTION STOPP WIEDERGABE/ PAUSE ÖFFNEN/ SCHLIESSEN LAUTSTÄRKEREGLER NETZKABEL RÖHRENVERSTÄRKER D H-EN HIG VACUUM TUBE SO UND NFC ANZEIGE 5V 0.
✎ ✎ Um die NFC Funktion zu verwenden, mit dem kompatiblen Bluetooth-Gerät auf tippen (siehe Seite 39). die Oberseite des Geräts Rückseite Erste Schritte ✎ Wenn das Gerät das Blu-ray-Disk Menü anzeigt, kann der Film nicht durch Drücken der Taste am Gerät oder auf der Fernbedienung gestartet werden. Um den Film abzuspielen, müssen Sie Film Wiedergabe oder Start im Menü der Disk auswählen und anschließend die OK Taste drücken.
Erste Schritte Fernbedienung Übersicht der Fernbedienung Drücken Sie diese Taste, um das CDFach zu öffnen und zu schließen. Drücken, um den Modus des Heimkinosystems zu wählen (HDMI, AUX, BD/DVD, usw.). Damit schalten Sie den Ton vorübergehend aus. Zur Wiedergabe von Disks oder Dateien diese Taste drücken. oder Zum Unterbrechen der Wiedergabe diese Taste drücken. Drücken, um das Extras Menü aufzurufen.
Anschlüsse In diesem Kapitel werden verschiedene Methoden erläutert, mit denen dieses Gerät an andere externe Komponenten angeschlossen werden kann. Bevor Sie das Hauptgerät installieren oder an einer anderen Stelle aufstellen, müssen Sie es ausschalten und den Netzstecker ziehen.
Anschlüsse SurroundLautsprecher Subwoofer Stellen Sie die Rücklautsprecher seitlich von Ihrer Hörposition auf. Falls dafür der Platz nicht ausreicht, platzieren Sie die Rücklautsprecher einander gegenüberliegend. Platzieren Sie die Lautsprecher 60 bis 90 cm über Ihrem Kopf, leicht nach unten ausgerichtet. * Im Gegensatz zu den Front- und Center-Lautsprechern werden die Surround Lautsprecher hauptsächlich für Klangeffekte verwendet. Von diesen Lautsprechern wird nicht die ganze Zeit über Ton wiedergegeben.
Anschließen der Lautsprecherkabel 1. Ordnen Sie jedes Lautsprecherkabel dem entsprechenden Lautsprecher zu, indem Sie die farbig gekennzeichneten Stecker den farbigen Aufklebern am Boden oder der Rückseite eines jeden Lautsprechers zuordnen. 2. Schließen Sie die Stecker der Lautsprecherkabel aller Lautsprecher auf der Rückseite des Geräts an, wobei die Farbe des Steckers mit der Farbe der Anschlussbuchse übereinstimmen muss.
Anschlüsse ✎ ✎ ✎ ✎ ✎ Wenn Sie einen Lautsprecher in der Nähe des Fernsehers aufstellen, kann die Farbwiedergabe auf dem Bildschirm durch die von den Lautsprechern erzeugten magnetischen Felder gestört werden. Stellen Sie den Funkempfänger hinter der Hörerposition auf. Wenn sich der Funkempfänger zu nahe am Gerät befindet, kann der Klang aufgrund von Interferenzen beeinträchtigt werden.
Anschließen an ein Fernsehgerät und externes Gerät AUX IN FRONT TOP FRONT R R SUBWOOFER FRONT TOP FRONT L L IMPEDANCE : 3 AUX IN POWER FM ANT FM ANT LAN L CENTER SPEAKERS OUT R HDMI OUT 1 HDMI IN OPTICAL DIGITAL AUDIO IN 2 LAN L R 1 HDMI OUT W Weiß HDMI IN Methode 1 OPTICAL DIGITAL AUDIO IN 2 Methode 2 Anschlüsse R Rot Methode 3 Externe Geräte HDMI IN HDMI OUT AUDIO OUT OPTICAL OUT Anschluss an ein Fernsehgerät Schließen Sie ein HDMI-Kabel (nicht mitgeliefert) an
Anschlüsse WLAN-Netzwerk Anschließen an einen Netzwerk Router Sie können das Gerät mithilfe einer der im Folgenden beschriebenen Methoden mit Ihrem Netzwerk Router verbinden.
Einstellungen Ersteinstellungen konfigurieren 1 DISC WIEDERGEBEN • Das Home Menü wird nicht angezeigt, wenn die Ersteinstellungen nicht konfiguriert wurden. • Bildschirmanzeige dieses Geräts kann sich möglicherweise nach Aktualisierung der Softwareversion ändern. • Die Schritte für den Zugriff können sich je nach ausgewähltem Menü unterscheiden.
Einstellungen Auswahl einer Option auf dem Home Bildschirm 1. Um eine Option auf dem Home Bildschirm auszuwählen, müssen Sie mithilfe der 78:; Tasten den Cursor bewegen, bis die gewünschte Option markiert ist und anschließend die OK Taste drücken. ✎ Wenn nach Betätigung der Stopp Taste des Geräts das Gerät länger als 5 Minuten nicht benutzt wird, schaltet sich automatisch der Bildschirmschoner ein.
TV-Format HDMI-Deep Color Mit dieser Funktion kann die Bildausgabe des Geräts an die Bildschirmgröße Ihres Fernsehgeräts angepasst werden. (Siehe Seite 51) Mit dieser Option können Videos über die HDMI OUT Buchse mit der Deep Colour Farbtiefe wiedergeben werden. Deep Colour bietet genauere Farbwiedergabe mit größerer Farbentiefe. BD Wise BD Wise ist Samsungs neueste Geräteanschlussfunktion.
Einstellungen Einstellungen (Multiroom Link) : Sie können den Klang über kabellose Lautsprecher hören, die über das Netzwerk an das Heimkino System angeschlossen sind. Um den Netzwerklautsprecher zu nutzen, Multiroom auswählen. Wenn ein Netzwerklautsprecher verfügbar bar ist, erscheint er auf dem Bildschirm. - Nicht verwenden : Der Netzwerklautsprecher wird nicht verwendet. - Multiroom : Der Netzwerklautsprecher gibt Ton wieder.
Digital-Ausgang Netzwerkeinstellungen Mit dieser Funktion können Sie den DigitalAusgang an die Möglichkeiten des an das Gerät angeschlossenen AV-Receivers anpassen. Für weitere Einzelheiten schlagen Sie bitte in der Auswahltabelle für den Digitalausgang nach. (Siehe Seite 57) Mit dieser Funktion können Sie die Netzwerkverbindung konfigurieren, damit Sie Funktionen, wie Internetdienste oder AllShare Wi-Fi nutzen und Software Aktualisierungen durchführen können.
Einstellungen System Smart Hub VOD-Bewertungssperre Zurücksetzen Mit dieser Funktion können Sie den Zugriff auf Video on Demand (VOD) Inhalte auf Grundlage der Altersbeschränkung sperren. Um auf diesen Inhalt nutzen zu können, müssen Sie die Sicherheits-PIN eingeben. Die 123 Taste gedrückt halten, bis die Nummerntastatur auf dem Bildschirm erscheint. Wenn die Nummerntastatur erscheint, mithilfe der 78:; Taste eine Nummer auswählen und anschließend die OK Taste drücken.
Sicherheit 1. Entfernen Sie alle Disks und USB-Speichergeräte. 2. Drücken Sie die @ Taste auf dem Bedienfeld und halten Sie sie für 5 Sekunden oder länger gedrückt. Alle Einstellungen werden auf die Werkseinstellungen zurückgesetzt. Beim Zurücksetzen auf die Werkseinstellungen werden alle vom Benutzer gespeicherten BDDaten gelöscht. ✎ DivX® Video On Demand Anzeige von DivX® VOD-Registrierungscodes, um DivX® VOD-Inhalt zu erwerben und wiedergeben.
Einstellungen ❏ Kabel Manuell Konfiguration des Netzwerks Wenn Sie dieses Gerät an ein Netzwerk anschließen, können Sie auf dem Netzwerk basierende Anwendungen und Funktionen, wie Smart Hub und BD-LIVE verwenden sowie die Software des Geräts aktualisieren. Für weitere Informationen über den Zugriff und die Verwendung von Internet Diensten lesen Sie bitte das Kapitel Netzwerkdienste auf den Seiten 43-50 in dieser Bedienungsanleitung.
✎ Die Netzwerk Parameter können Sie bei ihrem Internetdienstanbieter erfragen. 7. Nachdem Sie alle Werte für die Parameter eingegeben haben, OK auswählen und anschließend die OK Taste drücken. Das Heimkino überprüft die Netzwerkverbindung und stellt anschließend eine Verbindung zum Netzwerk her. WLAN-Netzwerk ❏ Drahtlos Manuell Wenn Sie über eine statische IP-Adresse verfügen oder die automatische Einstellung nicht funktioniert, müssen Sie die Netzwerkeinstellung manuell durchführen.
Einstellungen 7. Wählen Sie das Feld IP-Einstell. und setzen Sie es auf Manuell eingeben. 8. Wählen Sie einen einzugebenden Netzwerkparameter aus (z. B. IP-Adresse) und drücken Sie die OK Taste. Verwenden Sie die 78 Tasten auf der Fernbedienung, um die Nummern für den Parameter einzugeben. Oder verwenden Sie die Nummerntastatur, um eine Parameternummer einzugeben. Die 123 Taste gedrückt halten, bis die Nummerntastatur auf dem Bildschirm erscheint.
5. Es stehen drei Wege zur Verfügung, die Wi-FiVerbindung abzuschließen: • Über das Wi-Fi Gerät. • Über dieses Gerät mithilfe von PBC. • Über dieses Gerät mithilfe einer PIN. ✎ ✎ Jede dieser Möglichkeiten wird im Folgenden beschrieben. Aktualisieren der Software Über das Wi-Fi Gerät 1. 2. Folgen Sie auf dem Wi-Fi Gerät den Anweisungen für den Anschluss an ein anderes Wi-Fi-Direkt Gerät. Schlagen Sie in der Bedienungsanleitung des Geräts für weitere Anweisungen nach.
Einstellungen Jetzt aktualisieren Aktualisierung über USB Sie können Jetzt aktualisieren verwenden, um die Software über Ihren Netzwerkanschluss oder über ein USB-Speichergerät zu aktualisieren. Es folgen die Anweisungen für die Aktualisierung über das Netzwerk. Die Anleitung für die Aktualisierung über ein USB-Speichergerät finden Sie auf dieser Seite. 1. Wählen Sie Jetzt aktualisieren, und drücken Sie die OK Taste. Das Jetzt aktualisieren PopupFenster erscheint. 2.
Wiedergabe von Inhalten Ihr Heimkino kann Inhalte von Blu-ray/DVD/CD Disks, USB-Geräten, PCs, Smartphones, Tablets und aus dem Web wiedergeben. Um auf Ihrem PC oder Mobilgeräten gespeicherte Inhalte wiederzugeben, müssen Sie den PC oder das mobile Gerät und dieses Gerät an Ihr Netzwerk anschließen. Um Inhalte auf Ihrem PC wiederzugeben, müssen Sie die AllShare Netzwerk Software herunterladen und installieren oder Sie verfügen bereits über eine DLNA Netzwerk Software auf Ihrem Computer.
Wiedergabe von Inhalten ✎ ✎ Wählen Sie in der Filter( ) Dropdown Liste Fotos, Videos oder Musik aus. Obwohl das Gerät die Ordner für alle Inhalte anzeigt, werden nur die Dateien von der Art des Inhalts angezeigt, die Sie ausgewählt haben. Wenn Sie z. B. Musik ausgewählt haben, werden nur Musikdateien angezeigt. ✎ ✎ 3. Wiedergabe von Dateien auf einem Speichergerät 4. Methode 1 : Wenn das Gerät eingeschaltet 5. wird, nachdem ein Speichergerät angeschlossen wurde 1. 2. Schalten Sie das Gerät ein.
1. 2. 3. 4. 5. 6. ✎ ✎ ✎ ✎ Um nur einen bestimmten Typ von Mediendateien aufzulisten, verwenden sie die Filter( ) Funktion in der rechten oberen Ecke des Eintrag- oder Gerätebildschirms. Wählen Sie in der Filter( ) Dropdown Liste Fotos, Videos oder Musik aus. Obwohl das Gerät die Ordner für alle Inhalte anzeigt, werden nur die Dateien von der Art des Inhalts angezeigt, die Sie ausgewählt haben. Wenn Sie z. B. Musik ausgewählt haben, werden nur Musikdateien angezeigt.
Wiedergabe von Inhalten TITLE MENU 3D Während der Wiedergabe diese Taste drücken, um das Titel Menü oder Popup Menü aufzurufen. • Wenn Ihre Disk über eine Wiedergabeliste verfügt, drücken Sie die Sortieren nach Taste, um zur Wiedergabeliste zu wechseln. Verwenden Sie das 3D Menü, um die Nebeneinander oder Oben/Unten Option auszuwählen, wenn der gerade wiedergegebene 3D Inhalt nicht korrekt im 3D Modus dargestellt wird. ✎ Verwenden Sie die 3D Menü ausschließlich für 3D Inhalte.
Wiederholmod. Equalizer-Einstell. Mit dieser Option kann ein Titel, Kapitel oder ein bestimmter Abschnitt wiederholt werden. - Aus : Kehrt zur normalen Wiedergabe zurück. - Titel : Wählen Sie diese Einstellung, um einen gewählten Titel zu wiederholen. - Kapitel : Wählen Sie diese Einstellung, um ein bestimmtes Kapitel zu wiederholen. - Wiederhol. A-B : Wählen Sie diese Einstellung, um einen bestimmten Abschnitt zu wiederholen. Hier können Sie den Equalizer einstellen.
Wiedergabe von Inhalten ✎ Verwenden der Sortieren nach & Optionen Menüs Wählen Sie die Filter( ) Funktion und anschließend Videos, um nur Videos anzuzeigen. ✎ Obwohl das Gerät die Ordner für alle Inhalte anzeigt, werden nur die Dateien von der Art des Inhalts angezeigt, die Sie ausgewählt haben. Wenn Sie z. B. Videos ausgewählt haben, werden nur Videodateien angezeigt.
Musik Bildschirm Steuerelemente TRACK 001 TRACK 001 00:00/00:00 Schneller Rücklauf des Titels. 00:43 TRACK 002 03:56 TRACK 003 04:41 TRACK 004 04:02 TRACK 005 03:43 TRACK 006 03:40 TRACK 007 04:06 TRACK 008 03:52 TRACK 009 03:04 TRACK 010 04:02 , 1 Wiedergabe der Titel in zufälliger Reihenfolge. Wird nur auf dem Musikliste Bildschirm angezeigt. TRACK 001 00:00:40 00:03:35 Verwenden Sie in der Titelliste die 78 Tasten, um den gewünschten Titel zu markieren.
Wiedergabe von Inhalten Auf dem Bildschirm mit den aufgelisteten Musikdateien mithilfe der 78:; Tasten Sortieren nach oder Optionen in der oberen rechten Ecke auswählen und anschließend die OK Taste drücken. ✎ ✎ Musik Sortieren nach Track Zeigt alle Musiktitel auf dem Medien- oder Speichergerät an. Album Zeigt alle Musikdateien auf dem Medien- oder Speichergerät nach Alben geordnet an. Interpret Zeigt alle Musikdateien auf dem Medien- oder Speichergerät nach Interpreten geordnet an.
- Verwenden Sie All. löschen, um alle ausgewählten Titel gleichzeitig abzuwählen. Wählen Sie anschließend einzelne Titel aus oder verwenden Sie die Alles auswählen, um alle Titel auszuwählen und drücken Sie dann die ' (RETURN) Taste auf der Fernbedienung oder wählen Sie Wiederg und drücken Sie anschließend die OK Taste. Wenn Sie nicht Alles auswählen oder einzelne Titel auswählen, wird die Ausw. wiederg. Liste nicht geändert. - Abbr. bricht alle Änderungen, die Sie auf dem Ausw. wiederg.
Wiedergabe von Inhalten ✎ Wenn Sie Ausgewählte wiedergeben für die Wiedergabe von Videos nutzen wollen, verwenden Sie die Filter( ) Funktion, um Videos anstelle von Musik auszuwählen. Auswahl wiedergeben über den Home Bildschirm verwenden. ✎ Wählen Sie DISK WIEDERGEBEN oder MULTIMEDIA je nachdem, welches Medium sie nutzen. - Wenn Sie DISK WIEDERGEBEN gewählt haben, wird der Bildschirm mit der Titelliste angezeigt.
4. Wählen Sie, wenn Sie fertig sind, Entfernen links unten auf dem Bildschirm aus und drücken Sie die OK Taste. Ein Bestätigungsfenster wird angezeigt. 5. Ja auswählen und anschließend die OK Taste drücken. ✎ Wenn alle Dateien aus einer Wiedergabeliste entfernt werden, wird die Wiedergabeliste selbst auch gelöscht. ✎ Es können bis zu 5 Wiedergabelisten gespeichert werden. Rippen 1. 3. 4. 5. 6. ✎ 7. 8. Wählen Sie anschließend mithilfe der 78 Tasten die Ripp. Taste aus und drücken Sie die OK Taste.
Wiedergabe von Inhalten • In einer hindernisfreien Umgebung hat das Heimkino einen Empfangsradius von 10 m. Die Verbindung wird automatisch unterbrochen, wenn sich das Gerät außerhalb der Reichweite befindet. Selbst innerhalb dieses Radius kann die Klangqualität durch Hindernisse wie Mauern oder Türen beeinträchtigt werden. • Dieses Funkgerät kann Interferenzen während des Betriebs verursachen. Anschließen eines Bluetooth-Geräts an das Heimkino ✎ Die AVRCP Funktion wird unterstützt.
✎ ✎ 1. 2. 3. 4. Einschalten des Geräts über Bluetooth Wenn das Heimkinosystem ausgeschaltet ist, kann durch Anschließen eines Smart Device, das bereits zuvor an das Gerät über eine Bluetooth-Verbindung angeschlossen wurde, das Heimkinosystem eingeschaltet werden. ✎ Das Heimkino muss für Schnellstart eingerichtet sein. ✎ Um diese Funktion nutzen zu können, Einstellungen > System > Schnellstart auf Ein setzen.
Wiedergabe von Inhalten Anzeigen von Fotos Senden Sie können auf DVDs, USB-Geräten, mobilen Geräten oder dem PC gespeicherte Fotos anzeigen. Extras Menü verwenden Drücken Sie während der Anzeige eines Fotos die TOOLS Taste auf der Fernbedienung. Wählen Sie Einstellungen(T) in der rechten oberen Ecke des Bildschirms aus und drücken Sie anschließend die OK Taste. Das Extras Dropdown Menu erscheint. Wählen Sie Senden, um die ausgewählten Dateien auf online Dienste (Picasa, Facebook, usw.
Radio wiedergeben Optionen ✎ • Um Radio hören zu können, müssen Sie die mitgelieferte UKW-Antenne anschließen. Bedienen des Radios mit der Fernbedienung 1. Drücken Sie die SOURCE Taste, um FM auszuwählen. 2. Stellen Sie den gewünschten Sender ein. • Gespeicherter Sender 1 : Drücken Sie die PRESET Taste, um PRESET auszuwählen. Drücken Sie anschließend die 78 Tasten, um einen gespeicherten Sender auszuwählen.
Wiedergabe von Inhalten 5. Zur Voreinstellung eines anderen Senders wiederholen Sie bitte Schritte 2 bis 4. • Um einen gespeicherten Sender aufzurufen, die PRESET Taste betätigen, um PRESET auszuwählen und anschließend die 78 Tasten drücken, um den gespeicherten Sender zu wählen. Verwenden der Tasten für Spezialeffekte auf der Fernbedienung ❏ Sports Sprecher : Hebt die Stimme des Kommentators bei Sportveranstaltungen hervor, damit Sie sich noch mehr in das Spiel hinein versetzt fühlen.
Netzwerkdienste Sie können Netzwerkdienste wie Video Streaming oder Online Apps in Anspruch nehmen, wenn Sie das Gerät an ein Netzwerk anschließen. Um Netzwerkdienste nutzen zu können, müssen Sie zuerst: 1. Schließen Sie das Gerät an ein Netzwerk an. (Siehe Seite 14) 2. Konfigurieren Sie die Netzwerkeinstellungen. (Siehe Seiten 22-24) ✎ Hinzufügen einer Kreditkarte Um ihrem Konto eine Kreditkarte hinzuzufügen, folgen Sie bitte den nachfolgenden Schritten: 1.
Netzwerkdienste 3. Wählen Sie Start, und drücken Sie die OK Taste. Der Bildschirm für die Geschäftsbedingungen & Datenschutzrichtlinien erscheint. 4. Auf dem Zusätzliche Dienste und Auswahlmöglichkeiten Bildschirm müssen Sie sowohl die Geschäftsbedingungen als auch die Datenschutzrichtlinie durchlesen und annehmen, um Smart Hub nutzen zu können. 5. Scrollen Sie nach unten und wählen Sie die Details anzeigen Taste, um den gesamten Text anzuzeigen.
✎ ✎ Auf jedem Bildschirm mit Informationen über den Film oder die Show wird die Jetzt ansehen Taste nur dann angezeigt, wenn Sie eine der VideoStreaming Anwendungen zum Streamen des Films oder der Show heruntergeladen haben. Ansehen über erscheint, wenn Sie die erforderliche Video Streaming Anwendung nicht heruntergeladen haben. Rechts von Ansehen über befindet sich eine Liste der Video-Streaming Anwendungen, die Sie zum Streamen des Films oder der Show verwenden können.
Netzwerkdienste 2. Das Optionen Menü Mit dem Optionen Menü können Sie Anwendungen zu EIGENE APPS hinzufügen oder löschen. Sie können ebenfalls die Position einer Anwendung in EIGENE APPS ändern und Anwendungen aktualisieren. Verschieben 1. 2. 3. 4. Wählen Sie auf dem EIGENE APPS Bildschirm die Anwendung aus, die Sie verschieben wollen, und halten Sie die OK Taste für 3 Sekunden gedrückt. Das Optionsmenü wird angezeigt. Wählen Sie Verschieben, und drücken Sie die OK Taste.
3. 4. Der Apps aktualisieren Bildschirm listet alle Anwendungen auf, für die Aktualisierungen bereitstehen. Wählen Sie alle Anwendungen aus, die Sie aktualisieren möchten, und drücken Sie die OK Taste. Sie können ebenfalls Alle wählen auswählen, um alle aufgelisteten Anwendungen zu aktualisieren. Wählen Sie Aktual., und drücken Sie die OK Taste. 2. Wählen Sie auf dem SAMSUNG APPS Bildschirm WebBrowser aus und drücken Sie die OK Taste.
Netzwerkdienste Die Systemsteuerung im Überblick Verwenden der virtuellen Tastatur Die Systemsteuerung, die sich am oberen Rand des Bildschirms befindet, verfügt über eine Reihe von Symbolen, die eine Reihe von nützlichen Funktionen starten. Die Symbole werden im Folgenden Beschrieben. Wenn Sie http://www.samsung.com oder anklicken oder auf ein Daten- oder Texteingabefeld zugreifen und anschließend die OK Taste drücken, erscheint die Popup-Tastatur. http://www.samsung.com http://www.samsung.
Optionen der virtuellen Tastatur Greifen aktivieren/deaktivieren Um die Optionen für die virtuelle Tastatur aufzurufen, die Taste unten links auf der Tastatur markieren und dann die OK Taste drücken. Sprache Wählt die Sprache der Tastatur aus. Sie können zwischen Englisch, Französisch, Russisch, usw. wählen. Zugelassene Seiten Empfohlener Text Die Tastatur schlägt bei der Texteingabe Wörter vor. Sie können diese Funktion Ein oder Aus schalten.
Netzwerkdienste 2. Webbrowser-Einstellung Als Startseite fest. : Sie können die Startseite des Browsers festlegen. Popup-Blocker : Schaltet den Pop-up Blocker ein und aus. Seitenblocker : Sie können festlegen, dass Werbung blockiert wird und die URLs auswählen, auf denen Werbung blockiert werden soll. Allgemein : Sie können persönliche Informationen, wie den Webseiten Verlauf und Browser Daten (Cookies, usw.) löschen und alle Webbrowser Einstellungen auf die Werkseinstellungen zurückzusetzen.
Anhang Digital-Ausgang Zusätzliche Informationen Hinweise Aufstellungsarten HDMI-AUSGANG • Je nach Fernsehgerät stehen für den HDMIAusgang bestimmte Auflösungen möglicherweise nicht zur Verfügung. • Sie müssen über einen HDMI-Anschluss verfügen, um Videos in 3D-Technologie genießen zu können. • Ein langes HDMI-Kabel kann Bildrauschen verursachen. Wenn dieser Fall eintritt, im Menü HDMI-Deep Color auf Aus setzen.
Anhang Frontdisplay Wiedergabe von JPEG-Dateien Taste und der VOL +, - Taste • Die Helligkeit der kann nicht geändert werden. • Sie können den Untertitel und die PG-Grafik im Vollbildschirmmodus nicht vergrößern. Lautsprechereinstellung Wiedergabe von Inhalten • Wenn Tonausgabe auf TV-Lautsprecher eingestellt ist, wird der Ton über die Lautsprecher des Fernsehgeräts wiedergegeben.
✎ ✎ ✎ ✎ ✎ ✎ Das Gerät kann unter Umständen einige CD-RW/-R und DVD-R Disks aufgrund des Disktyps oder der Aufnahmebedingungen nicht wiedergeben. Wenn eine DVD-RW/-R-Disk nicht korrekt im DVDVideoformat aufgenommen wurde, kann sie nicht wiedergegeben werden. Das Gerät kann keine Inhalte auf DVD-Rs wiedergeben, die bei einer Bitrate von mehr als 10 Mbps aufgenommen wurden. Das Gerät kann keine Inhalte auf BD-R Disks oder USB-Geräten wiedergeben, die bei einer Bitrate von mehr als 30 Mbps aufgenommen wurden.
Anhang 1 USA, US-Territorien und Kanada 2 Europa, Japan, Naher Osten, Ägypten, Afrika, Grönland 3 Taiwan, Korea, Philippinen, Indonesien, Hongkong 4 Mexiko, Südamerika, Mittelamerika, Australien, Neuseeland, Pazifische Inseln, Karibik 5 Russland, Osteuropa, Indien, Nordkorea, Mongolei 6 China ✎ Einige DivX, MKV- und MP4-Diskformate können möglicherweise nicht wiedergegeben werden. Dies hängt von deren Videoauflösung und der Bildfrequenz ab.
Unterstützte Videodatei Dateierweiterung Container *.avi *.mkv *.asf *.wmv *.mp4 *.mov *.3gp *.vro *.mpg *.mpeg *.ts *.tp *.trp *.mov *.flv *.vob *.svi *.m2ts *.mts *.divx *.ps AVI MKV ASF MP4 3GP MOV FLV VRO VOB PS TS SVAF *.webm *.rmvb Video Codec Resolution MVC Bildrate (fps) Bitrate (Mbps) 24/25/30 60 Audio Codec Motion JPEG H.264 BP/MP/HP Divx 3.
Anhang Unterstützte Musikdatei Dateierweiterung Typ Codec Bemerkungen *.mp3 MPEG MPEG1 Audio Layer 3 - *.m4a *.mpa *.aac MPEG4 AAC - *.flac FLAC FLAC Unterstützt bis zu 2 Kanäle *.ogg OGG Vorbis Unterstützt bis zu 2 Kanäle *.wma WMA WMA Unterstützt WMA 10 Pro (Bis 5.1) Verlustfreies WMA Audio wird nicht unterstützt. Unterstützung bis zu Profil M2 *.wav wav wav - *.mid *.midi midi midi Typ 0 und Typ 1 Suche wird nicht unterstützt. Wird nur auf USB unterstützt. *.
Auswahl des Digitalausgangs Setup PCM Anschluss Audiostream auf der Bluray Disc Bis zu PCM 7.1ch PCM Dolby Digital Bis zu PCM 5,1ch Dolby Digital Dolby Digital Plus Dolby Digital Plus Dolby TrueHD Dolby TrueHD DTS Bitstream (DTS Re-encoded) Bitstream (Dolby D Re-encoded) HDMI-fähiger AV Receiver PCM DTSHD High Resolution Audio HT-H7500WM : Bis zu PCM 5,1ch HT-H7750WM : Bis zu PCM 7,1ch DTS-HD Master Audio DTS re-encoded DTS Dolby D.
Anhang Auflösung nach Art des Inhalts HT-H7500WM Bei der Wiedergabe von Blu-ray Disk/E-content/Digital Content Ausgang Setup BD Wise DVD-Wiedergabe HDMI-Modus Blu-ray-Disc E-contents/ Digital contents Auflösung der Blu-ray-Disk 1080p bei 60 Bildern HDMI-Modus 576i/480i Max. Auflösung des TV-Eingangs Auto Max.
✎ ✎ ✎ ✎ ✎ Wenn das Fernsehgerät, an das Sie dieses Gerät angeschlossen haben Film Bildfrequenz oder die eingestellte Auflösung nicht unterstützt erscheint die Meldung "Se dopo aver selezionato "Sì" non viene visualizzata nessuna immagine, attendere 15 secondi per tornare alla risoluz. preced. Cambiare risoluzione?". Wenn Sie Ja ausgewählt haben, erscheint der Bildschirm des Fernsehgeräts für 15 Sekunden schwarz und kehrt dann automatisch zur vorherigen Auflösung zurück.
Anhang Symptom Überprüfen/Beheben Die Fernbedienung funktioniert nicht. • Verwenden Sie die Fernbedienung innerhalb der Reichweite der Fernbedienung und im richtigen Winkel zum Empfangssensor? • Sind die Batterien leer? • Die Disk dreht sich, es wird jedoch kein Bild angezeigt. • Die Bildqualität ist schlecht, und das Bild ist instabil. • • • • Die Audio-Sprache sowie die Untertitel funktionieren nicht.
Symptom Überprüfen/Beheben Keine HDMI-Ausgang. • Prüfen Sie die Verbindung zwischen dem Fernsehgerät und dem HDMI-Anschluss des Geräts. • Überprüfen Sie, ob Ihr Fernsehgerät die HDMI-Eingangsauflösungen 576p/480p/720p/1080i/1080p unterstützt. Es erscheinen anormale HDMI-Signale auf dem Bildschirm angezeigt. • Wenn das Fernsehgerät HDCP (High-bandwidth Digital Content Protection) nicht unterstützt, wird nur ein Rauschen auf dem Bildschirm angezeigt.
Anhang Technische Daten Allgemein UKWTuner Gewicht 2,7 kg Abmessungen 430,0 (B) x 55,0 (H) x 312,9 (T) mm Betriebstemperaturbereich +5°C bis +35°C Zulässiger Luftfeuchtigkeitsbereich 10 % bis 75 % Signal/Rauschabstand 55 dB Verwendbare Empfindlichkeit 12 dB Klirrfaktor 0,5 % HT-H7500WM 1080p, 1080i, 720p, 576p/480p HT-H7750WM 2D : 2160p, 1080p, 1080i, 720p, 576p/480p 3D : 1080p, 720p Video HDMI Verstärker Audio PCM Mehrkanal-Audio, Audio-Bitstrom, PCM-Audio Ausgangsleistung der Front
HT-H7500WM Lautsprecher Abmessungen (B x H x T) EingangsMaximale Impedanz Frequenzbereich Schalldruck Bewertung Eingangsleistung (Einheit : mm) System Front 140Hz bis 20kHz Surround Center 165W 87dB/W/M Subwoofer 170W 95,0 x 280,0 x 101,0 1,75 95,0 x 150,0 x 101,0 0,64 320,0 x 80,5 x 101,0 1,02 200,0 x 390,0 x 350,0 5,75 330W 3 40 Hz bis 160 88 dB/W/M Hz Gewicht (Einheit : kg) 340W HT-H7750WM Lautsprecher Abmessungen (B x H x T) EingangsMaximale Impedanz Frequenzbereich Schalldruck Bewertu
Anhang Lizenzen Hergestellt unter Lizenz von Dolby Laboratories. Dolby" sowie das Doppel-D-Symbol sind Warenzeichen der Dolby® Laboratories. Für DTS-Patente, siehe http://patents.dts.com. Hergestellt unter Lizenz von DTS Licensing Limited. DTS, DTS-HD, das Symbol, DTS und das Symbol zusammen, DTS-HD und das Symbol sind registrierte Warenzeichen von DTS Inc. DTS-HD Master Audio | Essential und DTS Neo:Fusion II sind eingetragene Warenzeichen der DTS, Inc. © DTS, Inc. Alle Rechte vorbehalten.
Kontakt zu Samsung Falls Sie Fragen oder Anregungen zu Samsung-Produkten haben, freuen wir uns über Ihre Kontaktaufnahme mit der Samsung-Kundenbetreuung. Area ` Europe AUSTRIA Contact Centre 0800 - SAMSUNG (0800 - 7267864) Web Site www.samsung.com/at/support www.samsung.com/be/support (Dutch) BELGIUM 02-201-24-18 www.samsung.com/be_fr/support (French) BOSNIA 051 331 999 www.samsung.com/support BULGARIA 07001 33 11 , sharing cost www.samsung.com/bg/support CROATIA 062 726 786 www.samsung.