Q80/85(1~46)_NOGB 2006.4.
Q80/85(1~46)_NOGB 2006.4.29 3:02 PM Page 4 Safety Warnings Precautions ENG CLASS 1 LASER PRODUCT CAUTION RISK OF ELECTRIC SHOCK. DO NOT OPEN CAUTION: TO REDUCE THE RISK OF ELECTRIC SHOCK, DO NOT REMOVE REAR COVER. NO USER SERVICEABLE PARTS INSIDE. REFER SERVICING TO QUALIFIED SERVICE PERSONNEL. PREPARATION CLASS 1 LASER PRODUCT KLASSE 1 LASER PRODUKT LUOKAN 1 LASER LAITE KLASS 1 LASER APPARAT PRODUCTO LASER CLASE 1 This Compact Disc player is classified as a CLASS 1 LASER product.
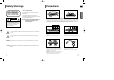
Q80/85(1~46)_NOGB 2006.4.29 3:02 PM Page 6 Features Contents ENG Multi-Disc Playback & FM Tuner USB Host Play You can enjoy media files such as pictures, movies and tunes saved in an MP3 player, digital camera or USB memory by connecting the storage device to the USB port of the home theater. PREPARATION SETUP Safety Warnings .................................................................1 Precautions.........................................................................2 Features ...........
Q80/85(1~46)_NOGB 2006.4.29 3:02 PM Page 8 Notes on Discs ENG DVD (Digital Versatile Disc) offers fantastic audio and video, thanks to Dolby Digital 1 DVD players and the discs are coded by region. These regional codes must match in order for the disc to play. If the codes do not match, the disc will not play. The Region Number for this player is given on the rear panel of the player. ~ 6 (Your DVD player will only play DVDs that are labeled with identical region codes.
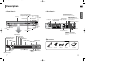
Q80/85(1~46)_NOGB 2006.4.29 3:02 PM Page 10 Description ENG —Rear Panel— Tuning Up & Skip ( ) buttons Tuning Down & Skip ( ) buttons Disc Tray Video Output Connector Connect the TV's video input jacks (VIDEO IN) to the VIDEO OUT connector. Direct Play buttons Volume control Open/ Close button Disc Change button Function button PREPARATION —Front Panel— Cooling Fan 5.
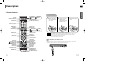
Q80/85(1~46)_NOGB 2006.4.29 3:02 PM Page 12 Description ENG PREPARATION —Remote Control— Insert Remote Batteries TV button DVD RECEIVER button DVD button TUNER button AUX button USB button OPEN/CLOSE button POWER button TV/VIDEO, DISC SKIP button 1 Remove the battery cover in the direction of the arrow. 2 Insert two 1.5V AAA batteries, paying attention to the correct polarities (+ and –). 3 Replace the battery cover.
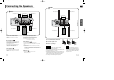
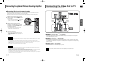
Q80/85(1~46)_NOGB 2006.4.29 3:02 PM Page 14 Connecting the Speakers ENG HT-TQ85 Before moving or installing the product, be sure to turn off the power and disconnect the power cord. HT-Q80 Rear Speaker (R) Rear Speaker (R) Rear Speaker (L) Rear Speaker (L) Center Speaker Center Speaker CONNECTIONS Front Speaker (R) Front Speaker (L) Front Speaker (R) Front Speaker (L) Subwoofer Subwoofer Position of the Home Theater • Place it on a stand, cabinet shelf, or under the TV stand.
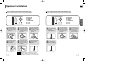
Q80/85(1~46)_NOGB 2006.4.29 3:02 PM Page 16 Speaker Installation ENG How to install the speaker and the stand (Tallboy type) 4 Connect the assembled stand to the SPEAKER (A). Component A: SPEAKER B: STAND C: STAND BASE D: Screw E: Screw A: SPEAKER B: STAND C: STAND BASE D: Screw E: Screw 2 Turning the screw (D) clockwise, connect it to two holes marked with the arrow using a screwdriver as shown in the ullustration.
Q80/85(1~46)_NOGB 2006.4.29 3:02 PM Page 18 Connecting the optional Wireless Receiving Amplifier ENG To connect the rear speakers wirelessly, you have to additionally purchase the wireless receiving module and TX card from your Samsung retailer. When you have purchased the wireless receiving module (SWA-3000) additionally HT-Q80 Front Speaker (L) Front Speaker (R) Center Speaker Connect the front, center and subwoofer speakers, referring to page 12.
Q80/85(1~46)_NOGB 2006.4.29 3:02 PM Page 20 Connecting the optional Wireless Receiving Amplifier Connecting the Video Out to TV ENG Choose one of the three methods for connecting to a TV. Resetting Wireless Communication Reset the system if a communication failure occurs, or if the Link indicator (blue LED) on the wireless receiver does not light up and the "REAR CHK" message blinks on the main unit's display.
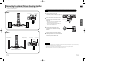
Q80/85(1~46)_NOGB 2006.4.29 3:02 PM Page 22 Connecting the HDMI IN/OUT HDMI Function ENG HDMI (High-Definition Multimedia Interface) is a next generation TV-type digital interface specification that enables transmitting digital video and audio over a single cable. In addition, it enables you to enjoy multi-channel digital audio. What is HDMI (High Definition Multimedia Interface)? COMPONENT OUT This device transmits DVD video signal digitally without the process of converting to analog.
Q80/85(1~46)_NOGB 2006.4.29 3:02 PM Page 24 HDMI Function(Con’t) Connecting External Components ENG Connecting an External Digital Component Example: Digital signal components such as a Set-top Box or CD Recorder. Resolution Selection • This function allows the user to select screen resolution for HDMI output. CONNECTIONS In Stop mode, press and hold the SD/HD (Standard Definition/High Definition)button on the remote control.
Q80/85(1~46)_NOGB 2006.4.29 3:02 PM Page 26 Connecting External Components(Con’t) Connecting the FM Antenna ENG Connecting an External Analog Component Example: Analog signal components such as a VCR. CONNECTIONS FM Antenna (supplied) Audio Cable (not supplied) If the external analog component has only one Audio Out, connect either left or right. 1 Connect AUX (Audio) In on the Home Theater to Audio Out on the external analog component. • Be sure to match connector colors.
Q80/85(1~46)_NOGB 2006.4.29 3:02 PM Page 28 Before Using Your Home Theater ENG Disc terminology Your Home Theater is capable of playing DVD, VCD, CD, MP3/WMA and JPEG discs.Depending on the disc you are using, these instructions may vary slightly. Read the instructions carefully before using. Groups and tracks (DVD-AUDIO) • DVD-audio is divided into several large sections called "groups" and smaller sections called "tracks". Numbers are allotted to these sections.
Q80/85(1~46)_NOGB 2006.4.29 3:02 PM Page 30 Disc Playback Selecting a Disc in the Disc changer ENG The DVD/CD function is automatically selected when Disc Skip is pushed. 1 Press OPEN/CLOSE button to open the disc tray. 2 Load a disc. 3 Press DISC SKIP button. To select a specific disc, press the corresponding DIRECT PLAY (1, 2, 3, 4, 5) buttons on the front panel or DISC SKIP on the remote control, until the required disc indicator flashes.
Q80/85(1~46)_NOGB 2006.4.29 3:02 PM Page 32 MP3/WMA-CD Playback Displaying Disc Information Data CDs (CD-ROM, CD-R, CD-RW) encoded in MP3/WMA format can be played. 1 Press the OPEN/CLOSE button to open the disc tray, and then load the MP3/WMA disc. 2 • The MP3/WMA menu screen will appear • • and playback will start. The appearance of the menu depends on the MP3/WMA disc. WMA-DRM files cannot be played. You can view disc playback information on the TV screen.
Q80/85(1~46)_NOGB 2006.4.29 3:02 PM Page 34 JPEG File Playback JPEG Images captured with a digital camera or camcorder, or JPEG files on a PC can be stored on a CD and then played back with this Home Theater. ENG Digest Function You can view 9 JPEG images on the TV screen. 1 Slide Mode Press DIGEST button during playback. 2 • JPEG files will be shown in • The selected image is played for 5 seconds before moving 9 windows. 2 Press SLIDE MODE button. • Playback starts automatically.
Q80/85(1~46)_NOGB 2006.4.29 3:02 PM Page 36 DivX Playback ENG Subtitle Display The functions on this page apply to DivX disc playback. Press the SUBTITLE button. Skip Forward/Back During playback, press the button. • Goes to the next file whenever you press • button, if there are over 2 files in the disk. Goes to the previous file whenever you press over 2 files in the disk. button, if there are • Each time you press the button, your selection will toggle between “SUBTITLE (1/8, 2/8 ...
Q80/85(1~46)_NOGB 2006.4.29 3:02 PM Page 38 Checking the Remaining Time Fast/Slow Playback Fast Playback DVD VCD CD Press Press the REMAIN button. • For checking the total and remaining time of a title or chapter ENG Slow Playback MP3 Press SLOW button. . • Each time the button is pressed during playback, the playback speed changes as follows: • Each time the button is pressed during playback, the playback speed changes as follows: being played.
Q80/85(1~46)_NOGB 2006.4.29 3:02 PM Page 40 Repeat Playback A-B Repeat Playback Repeat playback allows you to repeatedly play a chapter, title, track (song), or directory (MP3 file). DVD VCD CD MP3 ENG You can repeatedly play back a designated section of a DVD. JPEG DVD Press REPEAT button. • Each time the button is pressed during playback, the repeat playback mode changes as follows: DVDVIDEO DVDAUDIO Repeat Playback Options CHAPTER Repeatedly plays the selected chapter.
Q80/85(1~46)_NOGB 2006.4.29 3:02 PM Page 42 Step Function DVD Zoom (Screen Enlarge) Function VCD This function allows you to enlarge a particular area of the displayed image. DVD ENG VCD Press STEP button. • The picture moves forward one frame each time the button is pressed 1 during playback. Note • No sound is heard during step motion playback. Press ZOOM button. 2 Press Cursor , , , buttons to move to the area you want to enlarge. 3 Press ENTER button.
Q80/85(1~46)_NOGB 2006.4.29 3:02 PM Page 44 Bonus Group / Navigating Pages Bonus Group Selecting Audio/Subtitle Language Audio Language Selection Function DVDAUDIO Some DVD-Audio discs have an extra ‘bonus’ group that requires a 4-digit key number to access. See the disc packaging for details and the-key number. 1 Press INFO button twice. When you play a DVD-Audio disc that has a bonus group, the key number input screen appears automatically.
Q80/85(1~46)_NOGB 2006.4.29 3:02 PM Page 46 Playing Media Files using the USB HOST feature ENG You can enjoy media files such as pictures, movies and music saved in an MP3 player, USB memory or digital camera in high quality video with 5.1 channel home theater sound by connecting the storage device to the USB port of the home theater. 1 Connect the USB device to the USB port on the front of the unit. 2 Compatible Devices 1. USB devices that support USB Mass Storage v1.0.
Q80/85(1~46)_NOGB 2006.4.29 3:02 PM Page 48 Moving Directly to a Scene/Song Using Disc Menu ENG DVD You can use the menus for the audio language, subtitle language, profile, etc. DVD menu contents differ from disc to disc. DVD 1 VCD Moving to a Title/Track CD 2 Press INFO button. 01/05 001/040 0:00:37 1/1 Press Cursor , buttons or numeric buttons to select the desired title/track and then press ENTER button.
Q80/85(47~88)_NOBG_ENG 2006.4.29 3:02 PM Page 42 Setting the Language ENG OSD (On-Screen Display) language is set to English by default. 1 In Stop mode, press MENU button. 2 Press Cursor button to move to ‘Setup’ and then press ENTER button. 3 Select ‘Language’ and then press ENTER button 4 Press Cursor , button to select ‘OSD Language’ and then press ENTER button. 5 Press Cursor , button to select the desired language and then press ENTER button.
Q80/85(47~88)_NOBG_ENG 2006.4.29 3:02 PM Page 44 Setting TV Screen type ENG Depending on your TV type (Wide Screen or conventional 4:3), you can select the TV's aspect ratio. 1 In Stop mode, press MENU button. 2 Press Cursor button to move to ‘Setup’ and then press ENTER button. Adjusting the TV Aspect Ratio (Screen Size) The horizontal to vertical screen size ratio of conventional TVs is 4:3, while that of widescreen and high definition TVs is 16:9. This ratio is called the aspect ratio.
Q80/85(47~88)_NOBG_ENG 2006.4.29 3:02 PM Page 46 Setting Parental Controls (Rating Level) Use this to restrict playback of adult or violent DVDs you do not want children to view. 1 In Stop mode, press MENU button. 2 Setting the Password You can set the password for the Parental (rating level) setting. Press Cursor button to move to ‘Setup’ and then press ENTER button. 1 Press MENU button. MOVE MOVE 3 4 Press Cursor , button to select the desired rating level and then press ENTER button.
Q80/85(47~88)_NOBG_ENG 2006.4.29 3:02 PM Page 48 Setting the Wallpaper JPEG DVD ENG VCD While watching a DVD, VCD or JPEG CD, you can set the image you like as background wallpaper. Setting the Wallpaper 1 During playback, press PLAY/PAUSE button when an image you like appears. To select one of the 3 wallpaper settings you've made Press LOGO button. 2 1 In Stop mode, press MENU button. 2 Press Cursor button to move to ‘Setup’ and then press ENTER button.
Q80/85(47~88)_NOBG_ENG 2006.4.29 3:02 PM Page 50 DVD Playback Mode Setting the Speaker Mode Some DVD-Audio discs contain DVD-Video as well as DVD-Audio. To play back the DVD-Video portion of the DVD-Audio disc, set the unit to DVD-Video mode. 1 Press the MENU button while the disc tray is open. MOVE 2 Signal outputs and frequency responses from the speakers will automatically be adjusted according to your speaker configuration and whether certain speakers are used or not.
Q80/85(47~88)_NOBG_ENG 2006.4.29 3:02 PM Page 52 Setting the Delay Time ENG If the speakers cannot be placed at equal distances from the listening position, you can adjust the delay time of the audio signals from the center and rear speakers. 1 In Stop mode, press MENU button. 2 Press Cursor button to move to ‘Audio’ and then press ENTER button. 3 Press Cursor button to move to ‘DELAY TIME’ and then press ENTER button.
Q80/85(47~88)_NOBG_ENG 2006.4.29 3:02 PM Page 54 Setting the Test Tone Setting the DRC (Dynamic Range Compression) Use the Test Tone feature to check the speaker connections. 1 In Stop or no disc mode, press MENU button. 2 ENG This feature balances the range between the loudest and quietest sounds. You can use this function to enjoy Dolby Digital sound when watching movies at low volume at night. Press Cursor button to move to ‘Audio’ and then press ENTER button.
Q80/85(47~88)_NOBG_ENG 2006.4.29 3:02 PM Page 56 Setting the Audio ENG You can adjust the balance and level for each speaker. Method 1 1 In Stop mode, press MENU button. MOVE 3 When adjusting the audio quality using the setup screen ENTER RETURN EXIT 4 ENTER CHANGE Adjusting Front Speaker Balance 1 Press SOUND EDIT button and then press Cursor , . Adjusting Rear Speaker Balance 2 Press SOUND EDIT button and then press Cursor , .
Q80/85(47~88)_NOBG_ENG 2006.4.29 3:02 PM Page 58 AV SYNC Setup Sound Field (DSP)/EQ Function Video may look slower than the audio if it is connected to a digital TV. If this occurs, adjust the audio delay time to to match the video. 1 In Stop mode, press MENU button. 2 ENG DSP(Digital Signal Processor) DSP modes have been designed to simulate different acoustic environments.
Q80/85(47~88)_NOBG_ENG 2006.4.29 3:02 PM Page 60 Dolby Pro Logic II Mode You can select the desired Dolby Pro Logic II audio mode. Press PL II MODE button. • Each time the button is pressed, the mode changes as follows. Dolby Pro Logic II Effect ENG This function works only in Dolby Pro Logic MUSIC mode. 1 Press PL II MODE button to select ‘MUSIC’ mode. 2 Press PL II EFFECT button to select Panorama, then press Cursor , buttons to select the desired effect setting.
Q80/85(47~88)_NOBG_ENG 2006.4.29 3:02 PM Page 62 Listening to Radio Remote Control Unit Press the TUNER button to select the FM band. 1 Presetting Stations ENG Example: Presetting FM 89.10 in the memory 2 Tune in to the desired station. Automatic Tuning 1 Automatic Tuning 2 Manual Tuning 1 Press the TUNER button to select the FM band. When is pressed, a preset broadcast station is selected. Press and hold TUNING/CH to automatically search for active broadcasting stations.
Q80/85(47~88)_NOBG_ENG 2006.4.29 3:02 PM Page 64 Convenient Functions Sleep Timer Function You can set the time that the Home Theater will shut itself off. Press SLEEP button. • "SLEEP" will be displayed. Each time the button is pressed, the preset time changes as follows: 10 ➝ 20 ➝ 30 ➝ 60 ➝ 90 ➝ 120 ➝ 150 ➝ OFF. ENG Mute Function This is useful when answering a doorbell or telephone call. Press MUTE button. • ‘MUTE ON’ appears in the display.
Q80/85(47~88)_NOBG_ENG 2006.4.29 3:02 PM Page 66 Operating a TV with the Remote Control ENG TV Brand Code List When operating a TV with the remote control 1 2 3 4 5 Press TV button to set the remote to TV mode. Press POWER button to turn on the TV. Point the remote control toward the TV. While holding down POWER, enter the code corresponding to your brand of TV. Brand Code No. Brand 1 Admiral (M.
Q80/85(47~88)_NOBG_ENG 2006.4.29 3:02 PM Page 68 Before Calling for Service ENG Refer to the chart below when this unit does not function properly. If the problem you are experiencing is not listed below or if the instruction below does not help, turn off the unit, disconnect the power cord, and contact the nearest authorized dealer or Samsung Electronics Service Center. Symptom Disc tray does not open. Playback does not start.
Q80/85(47~88)_NOBG_ENG 2006.4.29 3:02 PM Page 70 Cautions on Handling and Storing Discs Small scratches on the disc may reduce sound and picture quality or cause skipping. Be especially careful not to scratch discs when handling them. Handling discs Do not touch the playback side of the disc. Hold the disc by the edges so that fingerprints will not get on the surface. Do not stick paper or tape on the disc.
Q80/85(47~88)_NOBG_ENG 2006.4.
Contact Multi-all 2005.11.18 3:42 PM Page 8 XEU (ENG) Contact SAMSUNG WORLD WIDE If you have any questions or comments relating to Samsung products, please contact the SAMSUNG customer care centre. Region North America Latin America Europe CIS Country CANADA MEXICO U.S.A ARGENTINE BRAZIL CHILE COSTA RICA ECUADOR EL SALVADOR GUATEMALA JAMAICA PANAMA PUERTO RICO REP.