FULL MANUAL HW-C400 Imagine the possibilities Thank you for purchasing this Samsung product. To receive more complete service, please register your product at www.samsung.
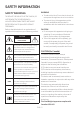
SAFETY INFORMATION SAFETY WARNINGS WARNING •• To reduce the risk of fire or electric shock, do TO REDUCE THE RISK OF ELECTRIC SHOCK, DO not expose this appliance to rain or moisture. NOT REMOVE THE COVER (OR BACK). •• To prevent injury, this apparatus must be NO USER-SERVICEABLE PARTS ARE INSIDE. securely attached to the floor/wall in REFER SERVICING TO QUALIFIED SERVICE accordance with the installation instructions. PERSONNEL.
Radiation Exposure Statement 10. Protect the power cord from being walked This equipment complies with IC RSS-102 on or pinched particularly at plugs, radiation exposure limits set forth for an convenience receptacles, and the point uncontrolled environment. This equipment should be installed and operated with minimum distance where they exit from the apparatus. 11. Only use attachments/accessories specified 20 cm between the radiator & your body. by the manufacturer. 12.
PRECAUTIONS 5. The battery used with this product contains chemicals that are harmful to the environment. Do not dispose of the battery 1. Ensure that the AC power supply in your in the general household trash. Do not house complies with the power expose the battery to excess heat, direct requirements listed on the identification sunlight, or fire. Do not short circuit, sticker located on the bottom of your disassemble, or overheat the battery. product.
CONTENTS 01 Checking the Components 7 02 Product Overview 8 03 Top Panel of the Soundbar -------------------------- 8 Bottom Panel of the Soundbar -------------------------- 9 Using the Remote Control 10 Inserting Batteries before using the Remote Control (AAA batteries X 2) -------------------------- 10 04 How to Use the Remote Control -------------------------- 10 Using the Hidden Buttons (Buttons with more than one function) -------------------------- 15 Output specifications for the
08 Connecting a USB Storage Device 22 09 Connecting a Mobile Device 24 10 11 Connecting via Bluetooth -------------------------- 24 Connecting a Soundbar to a mobile device via NFC function -------------------------- 27 Installing the Wall Mount (Optional) 28 Installation Precautions -------------------------- 28 Wall mount Components -------------------------- 28 Software Update 31 Reset -------------------------- 32 12 Troubleshooting 33 13 License 34 14 Open Source License No
01 CHECKING THE COMPONENTS SOUND MODE WOOFER CH LEVEL Soundbar Main Unit Power Cord (Soundbar) TONE CONTROL Soundbar Remote Control / Batteries •• For more information about the power supply and power consumption, refer to the label attached to the product. (Label: Bottom of the Soundbar Main Unit) •• To purchase additional components or optional cables, contact a Samsung Service Center or Samsung Customer Care. •• Design, specifications are subject to change without prior notice.
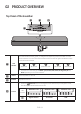
02 PRODUCT OVERVIEW Top Panel of the Soundbar Top Panel NFC The LED Indicator flashes, glows, or changes color depending on the Soundbar's current mode or status. The color of the LED indicator and the number of lights indicate the active mode as described below. LED indicator W W M W W White LED White LED Multicolor LED White LED White LED •• The Multicolor LED changes to White, Cyan, Green, Red, Yellow, Orange, Purple and Blue depending on the mode or status.
NFC Logo You can activate your Bluetooth connection by placing your phone in the NFC detection area of the Soundbar. •• When you plug in the AC cord, the power button will begin working in 4 to 6 seconds. •• When you turn on this unit, there will be a 4 to 5 second delay before it produces sound. •• If you hear sounds from both the TV and Soundbar, go to the Settings menu for the TV audio and change the TV speaker to External Speaker.
03 USING THE REMOTE CONTROL Inserting Batteries before using the Remote Control (AAA batteries X 2) Slide the back cover in the direction of the arrow until it is completely removed. Insert 2 AAA batteries (1.5V) so that their orientation is correct. Slide the back cover back into position. How to Use the Remote Control LED Power Turns the Soundbar on and off.
Volume Push the button up or down to adjust the volume. White moves to right X1 White moves to left X1 Volume Up Volume Down LED Indicator CH LEVEL By pressing the button, you can adjust the volume of the each speaker. LED White Blinks X1 Indicator “Center Level” (Sound Control) By pressing the button, you can set the audio function. The desired item can be adjusted using the Up/ Down buttons. Each time the mode changes, the Multicolor LED blinks in white.
7 Band EQ Press and hold the (Sound Control) button for about 5 seconds to adjust the sound for each frequency band. 150Hz, 300Hz, 600Hz, 1.2kHz, 2.5kHz, 5kHz, and 10kHz are selectable using the Left/Right buttons and each can be adjusted to a setting between -6 to +6 using the Up/Down buttons. (Make sure the Sound mode is set to "Standard".) 7 Band EQ 5 Sec Press and hold the (Sound Control) button for about 5 seconds. Using the Left/Right buttos and each can be adjusted to setting between -6 to+6.
SOUND MODE By pressing the button, you can select the desired audio mode. Each time the mode changes, the Multicolor LED blinks in white. (The sound mode may differ with the TV model.) White Blinks X1 LED Indicator “Surround Sound” “Standard” –– Surround Sound Provides a wider sound field than standard. –– Standard Outputs the original sound.
FE R W OO CH LE VE L CO TO NT NE RO L FE R CO TO NT NE RO L W OO CH LE VE L CO TO NT NE RO L CH LE VE L W OO FE R DE SO M UN OD D E WOOFER (BASS) LEVEL SO M UN OD D E Push the button up or down to adjust the bass level between -6 to +6. To set the woofer (bass) volume level to 0 (Default), press the button. (Subwoofer is not included.) TONE CONTROL By pressing the button, you can adjust the volume of the treble or bass sound. The desired item can be adjusted using the Up/Down buttons.
Using the Hidden Buttons (Buttons with more than one function) Hidden Button Reference page Remote Control Button Function WOOFER (Up) TV remote control On/Off page 16 Left TV Auto connect On/Off page 20 7 Band EQ page 12 DRC On/Off page 13 Bluetooth Power On/Off page 13 (Sound Control) SOUND MODE Output specifications for the different sound effect modes Effect Surround Sound Standard Input Output 2.0 ch 2.0 ch 5.1 ch 2.0 ch 2.0 ch 2.0 ch 5.1 ch 2.
Adjusting the Soundbar volume with a TV remote control Adjust the Soundbar volume using the TV’s remote control. •• This function can be used with IR remote controls only. Bluetooth remote controls (remote controls that require pairing) are not supported. •• Set the TV speaker to External Speaker to use this function. •• Manufacturers supporting this function: Samsung, VIZIO, LG, Sony, Sharp, PHILIPS, PANASONIC, TOSHIBA, Hisense, RCA TV remote control On/Off 1. Turn Off the Soundbar. 2.
04 CONNECTING THE SOUNDBAR Connecting Electrical Power Use the power components to connect the Soundbar to an electrical outlet in the following order: •• For more information about the required electrical power and power consumption, refer to the label attached to the product. (Label: Bottom of the Soundbar Main Unit) 1. Connect the power cord to the Soundbar. 2. Connect the power cord to a wall socket.
05 USING A WIRED CONNECTION TO THE TV Connecting using an Optical Cable Pre-connection Checklist •• When you use an optical cable and the terminals have covers, be sure to remove the covers. Optical Cable (not supplied) DIGITAL DIGITAL AUDIO IN AUDIO(OPTICAL) IN (OPTICAL) OPTICAL OUT Top of the Soundbar HDMI USB (5V 0.5A) Bottom of the (ARC) Soundbar LED White On -> Off Indicator “Digital Audio In” 1.
06 USING A WIRELESS CONNECTION TO THE TV Connecting via Bluetooth When a Samsung TV is connected using Bluetooth, you can hear stereo sound without the hassle of cables. •• Only one Samsung TV can be connected at a time. •• Samsung TV that supports Bluetooth can be connected. Check the specifications of your TV. The initial connection 1. Press the PAIR button on the Soundbar remote control or press (Source) button on the Soundbar top panel to enter the "Bluetooth" mode.
If the device fails to connect •• If you have an existing Soundbar (e.g., [AV]Soundbar C4-Series) on the list of speakers on the Samsung TV, delete it. •• Then repeat steps 1 through 3. Disconnecting the Soundbar from the Samsung TV Press the (Source) button on the top panel or on the remote control to select the mode other than “Bluetooth”. •• Disconnecting takes time because the Samsung TV must receive a response from the Soundbar. (The time required may differ, depending on the Samsung TV model.
07 CONNECTING AN EXTERNAL DEVICE Connecting using an Optical Cable Optical Cable BD / DVD player / Set-top (not supplied) box / Game console Bottom of the Soundbar DIGITAL DIGITAL AUDIO IN AUDIO(OPTICAL) IN (OPTICAL) Top of the Soundbar OPTICAL OUT HDMI USB (5V 0.5A) (ARC) R - AUDIO - L LED White On -> Off Indicator “Digital Audio In” 1.
08 CONNECTING A USB STORAGE DEVICE You can play music files located on USB storage devices through the Soundbar. USB port DIGITAL DIGITAL AUDIO IN AUDIO(OPTICAL) IN (OPTICAL) POWER POWER DIGITAL AUDIO IN (OPTICAL) USB (5V 0.5A) HDMI USB (5V 0.5A) (ARC) LED White On -> Off Indicator “USB” 1. Connect the USB device to the USB port on the bottom of the product. 2. Press the (Source) button on the top panel or remote control, and then select the “USB” mode. 3.
File Format Type Compatibility list Extension Codec Sampling Rate Bit Rate *.mp3 MPEG1 Layer2 32kHz ~ 48kHz 32kbps ~ 320kbps MPEG1 Layer3 32kHz ~ 48kHz 32kbps ~ 320kbps MPEG2 Layer3 16kHz ~ 24kHz 8kbps ~ 160kbps MPEG2.5 Layer3 8kHz ~ 12kHz 8kbps ~ 160kbps *.wma WMA7/8/9 32kHz ~ 48kHz 32kbps ~ 320kbps *.aac *.m4a AAC-LC (MPEG2/MPEG4 Audio Only) 32kHz ~ 48kHz 32kbps ~ 320kbps *.wav LPCM 32kHz ~ 192kHz 1,024kbps ~ 9,216kbps *.
09 CONNECTING A MOBILE DEVICE Connecting via Bluetooth When a mobile device is connected using Bluetooth, you can hear stereo sound without the hassle of cables. •• When you connect a paired Bluetooth device with the Soundbar off, the Soundbar automatically turns on. mobile device The initial connection •• When connecting to a new Bluetooth device, make sure the device is within 3.28 ft (1 m) distance. 1.
Notes on Bluetooth connection •• Locate a new device within 3.28 ft (1 m) to connect via Bluetooth communication. •• If asked for a PIN code when connecting a Bluetooth device, enter <0000>. •• The Soundbar automatically turns off after 18 minutes in the Ready state. •• The Soundbar may not perform Bluetooth search or connection correctly under the following circumstances: –– If there is a strong electrical field around the Soundbar.
Bluetooth Power On/Off If a previously paired Bluetooth device tries to pair with the Soundbar when the Bluetooth Power On function is on and the Soundbar is turned off, the Soundbar turns on automatically. 1. Press and hold the SOUND MODE button for more than 5 seconds on the remote while the Soundbar is turned on. 2. Multicolor LED indicator on the Soundbar blinks "Cyan”.
Connecting a Soundbar to a mobile device via NFC function Place your mobile device in the NFC detection area on top of the Soundbar. NFC Top of the Soundbar Bluetooth device NOTES •• Make sure that your mobile device has the NFC function turned on and that the screen is active. •• Bluetooth connection is unavailable when NFC of the mobile device is in card emulation mode. •• If asked for a PIN code when connecting a Bluetooth device, enter <0000>.
10 INSTALLING THE WALL MOUNT (OPTIONAL) Installation Precautions •• Install on a vertical wall only. •• Do not install in a place with high temperature or humidity. •• Verify whether the wall is strong enough to support the product’s weight. If not, reinforce the wall or choose another installation point. •• Purchase and use the fixing screws or anchors appropriate for the kind of wall you have (plaster board, iron board, wood, etc.). If possible, fix the support screws into wall studs.
1. NOTES –– If your TV is installed on the wall, install the Soundbar 2 inches (5cm) or more below --- 17,7” (450 mm) --- your TV. –– Use a pencil to mark the holes’ positions. CENTER LINE 2. 2’’ (50 mm) A B C 0.25’’ (6 mm) IMPORTANT NOTE –– The installation method shown here is for CONCRETE walls. Installation methods will vary depending on the wall type. For installation on dry wall, we strongly recommend you drill screw support holes into the underlying wood studs. 3. A B C D ENG - 29 0.
4. POWER POWER POWER DIGITAL AUDIO IN (OPTICAL) USB (5V 0.5A) 5. POWER POWER DIGITAL AUDIO IN (OPTICAL) USB (5V 0.5A) NOTE –– Supports for wall installation are built into the back of the Soundbar. CAUTION –– Press the Soundbar down with sufficient force to fix it to the wall. If the Soundbar is not firmly fixed to the wall, it could be accidently detached, resulting in personal injury. –– Do not bump into or strike the Soundbar (especially from the bottom).
11 SOFTWARE UPDATE 5. Plug USB into Soudbar and switch to USB source, the software will update automatically and will complete update within 2 minutes. During the update process, the 5 LEDs will start flashing in a loop, and Important: After upgrading, keep the original then the 5 LEDs will all be bright white, and Settings. then the 5 LEDs will flash in a loop again.
•• This product has a DUAL BOOT function. If the firmware fails to update, you can Reset update the firmware again. 5 Sec If LED sequence flashing is not displayed 1. Turn off the Soundbar, disconnect and then reconnect the USB storage device that contains the update files to the Soundbar’s USB port. With the Soundbar on, press the (Volume) buttons on the body at the same time for at least 5 seconds. The LED display changes as shown 2.
12 TROUBLESHOOTING Before seeking assistance, check the following. Soundbar does not turn on. Soundbar does not connect via Bluetooth. ;; Check whether the power cord of the Soundbar is correctly inserted into the outlet. ;; When connecting a new device, switch to Bluetooth Pairing for connection. (Press the PAIR button on the remote control or press the Soundbar works erratically. (Source) button on the body for at least 5 seconds.) ;; After removing the power cord, insert it again.
13 LICENSE Sound drops out when connected via Bluetooth. ;; If your device that is connected via Bluetooth moves too far away from the Soundbar, it may cause the sound to drop Dolby, Dolby Audio, and the double-D symbol out. Move the device closer to the are trademarks of Dolby Laboratories Licensing Soundbar. ;; If a part of your body is in contact with the Bluetooth transceiver or the product is Corporation. Manufactured under license from Dolby Laboratories. Confidential unpublished works.
14 OPEN SOURCE LICENSE NOTICE To send inquiries and requests for questions regarding open sources, contact Samsung Open Source (http://opensource.samsung.com) 15 IMPORTANT NOTES ABOUT SERVICE Figures and illustrations in this User Manual are provided for reference only and may differ from actual product appearance.
16 SPECIFICATIONS AND GUIDE Specifications Model Name HW-C400 USB 5V/0.5A Weight 4.4 lbs (2.0 kg) 25.2 x 2.6 x 4.2 inches Dimensions (W x H x D) (641.0 x 66.5 x 107.
LIMITED WARRANTY TO ORIGINAL PURCHASER Samsung Electronics Canada Inc.(SECA), warrants that this product is free from defective material and workmanship. SECA further warrants that if this product falls to operate properly within the specified warranty period and the failure is due to improper workmanship or defective materials, SECA will repair or replace the product at its option. All warranty repairs must be performed by a SECA Authorized Service Center.
© 2023 Samsung Electronics Co., Ltd. All rights reserved. Contact SAMSUNG WORLD WIDE If you have any questions or comments relating to Samsung products, please contact the SAMSUNG customer care Center. HEADQUARTERS Samsung Electronics Canada Inc. 2050 Derry Road West, Mississauga, Ontario L5N 0B9 Canada TEL: 1-800-SAMSUNG (1-800-726-7864) www.samsung.com/ca/support Country Samsung Service Center Web Site ` North America CANADA 1-800-SAMSUNG (726-7864) www.samsung.com/ca/support (English) www.
MANUEL COMPLET HW-C400 Imaginez les possibilités Merci d’avoir choisi un appareil Samsung. Pour recevoir une assistance plus complète, veuillez enregistrer votre produit sur www.samsung.
INFORMATIONS RELATIVES À LA SÉCURITÉ AVERTISSEMENTS AVERTISSEMENT •• Afin de diminuer les risques d’incendie ou de POUR ÉVITER LES RISQUES DE CHOC choc électrique, n’exposez pas cet appareil à ÉLECTRIQUE, NE DÉMONTEZ PAS LE CAPOT. la pluie ou à l’humidité. L’APPAREIL NE CONTIENT PAS DE PIÈCES RÉPARABLES PAR L’UTILISATEUR. S’ADRESSER À •• Pour éviter des blessures, cet appareil doit être solidement fixé au plancher/au mur UN SERVICE APRÈS-VENTE QUALIFIÉ. conformément aux directives d’installation.
Declaration d’exposition aux radiations: 10. Placez le cordon d’alimentation de sorte qu’il Cet equipement est conforme aux limites ne puisse être ni piétiné ni pincé, d’exposition aux rayonnements IC RSS-102 particulièrement au niveau de la fiche, de la etablies pour un environnement non controle. prise de courant et du point de sortie de Cet equipement doit etre installe et utilise avec l’appareil. un minimum de 20 cm de distance entre la source 11.
PRÉCAUTIONS 1. Assurez-vous que le bloc d'alimentation CA chez vous est conforme aux exigences de puissance figurant sur la plaque d'identification située à en dessous de votre produit. Installez votre produit horizontalement, sur un socle approprié (meuble), en laissant un espace suffisant pour la ventilation sur le pourtour 3~4 po. Faites attention à ne pas obstruer les orifices de ventilation. Ne posez pas l’ensemble sur un amplificateur ou un autre appareil susceptible de chauffer.
SOMMAIRE 01 Vérification des composants 7 02 Présentation du produit 8 03 Panneau supérieur du Soundbar -------------------------- 8 Panneau dessous du Soundbar -------------------------- 9 Utilisation de la télécommande 10 Insertion des piles avant d’utiliser la télécommande (2 piles AAA) -------------------------- 10 Comment utiliser la télécommande -------------------------- 10 Utilisation des boutons masqués (boutons ayant plusieurs fonctions) -------------------------- 15 Caractéri
08 Connexion à un périphérique de stockage USB 22 09 Connexion d'un appareil mobile 24 10 11 Connexion par Bluetooth -------------------------- 24 Connexion d’un Soundbar à un appareil mobile via la fonction NFC -------------------------- 27 Installation du support mural (en option) 28 Précautions d’installation -------------------------- 28 Composantes murales -------------------------- 28 Mise à jour logicielle 31 Réinitialisation -------------------------- 32 12 Dépannage 33 13
01 VÉRIFICATION DES COMPOSANTS SOUND MODE WOOFER CH LEVEL Unité principale du Soundbar Cordon d’alimentation (Soundbar) TONE CONTROL Télécommande/piles du Soundbar •• Pour plus d'informations sur l'alimentation et la consommation électriques, reportez-vous à l'étiquette apposée sur le produit (Étiquette : Partie inférieure de l’unité principale du Soundbar) •• Pour acheter des composants supplémentaires ou des câbles en option, contactez un centre de service Samsung ou le service clientèle Samsung.
02 PRÉSENTATION DU PRODUIT Panneau supérieur du Soundbar Panneau supérieur NFC Le voyant DEL clignote, s'allume ou change de couleur en fonction du statut ou du mode en cours du Soundbar. La couleur du voyant DEL et le nombre de lumières indiquent le mode actif tel que décrit ci-dessous.
Logo NFC Vous pouvez activer votre connexion Bluetooth en plaçant votre téléphone dans la zone de détection NFC du Soundbar. •• Lorsque vous branchez le câble d’alimentation CA, le bouton d’alimentation se met à fonctionner au bout de 4 à 6 secondes. •• Lorsque vous allumez cet appareil, vous devrez patienter 4 à 5 secondes avant qu’il ne produise du son.
03 UTILISATION DE LA TÉLÉCOMMANDE Insertion des piles avant d’utiliser la télécommande (2 piles AAA) Faites glisser le panneau arrière dans le sens de la flèche jusqu’à ce qu’il soit complètement retiré. Insérez 2 piles AAA (1,5 V) de manière à ce qu’elles soient bien orientées. Refaites glisser le panneau arrière dans sa position initiale. Comment utiliser la télécommande Alimentation Permet d'allumer et d'éteindre le Soundbar.
Volume Faites basculer ce bouton vers le haut ou vers le bas pour régler le volume. Voyant Le voyant blanc se déplace vers la droite 1 fois Le voyant blanc se déplace vers la gauche 1 fois Augmentation du volume Diminution du volume DEL CH LEVEL En appuyant sur le bouton, vous pouvez ajuster le volume de chaque haut-parleur. Voyant Le voyant blanc clignote 1 fois DEL « Center Level » (Contrôle du son) En appuyant sur le bouton, vous pouvez régler la fonction audio.
EQ 7 bandes Maintenez le bouton (Contrôle du son) enfoncé pendant environ 5 secondes pour régler le son pour chaque bande de fréquence. Vous pouvez utiliser les boutons Gauche/Droite pour sélectionner les fréquences suivantes : 150 Hz, 300 Hz, 600 Hz, 1,2 kHz, 2,5 kHz, 5 kHz et 10 kHz. Vous pouvez également définir chaque fréquence sur une valeur allant de -6 à +6 à l’aide des boutons Haut/Bas. (Veillez à ce que le mode son soit défini sur « Standard ».
SOUND MODE En appuyant sur le bouton, vous pouvez sélectionner le mode audio souhaité. Chaque fois que vous changez de mode, le voyant DEL multicolore clignote en blanc. (Le mode de son peut varier selon le modèle de téléviseur.) Le voyant blanc clignote 1 fois Voyant DEL « Surround Sound » « Standard » –– Surround Sound Fournit un champ sonore plus étendu que la norme.. –– Standard Émet le son d’origine.
W OO CH LE VE L CO TO NT NE RO L FE R SO M UN OD D E W OO CO TO NT NE RO L CH LE VE L CO TO NT NE RO L CH LE VE L W OO FE R SO M UN OD D E NIVEAU du WOOFER (BASSES) FE R OD D E Faites basculer le bouton vers le haut ou vers le bas pour régler le niveau des basses entre -6 à +6. Pour régler le niveau de volume du caisson de basses sur 0 (par défaut), appuyez sur ce bouton. (Le caisson de basses n’est pas fourni.
Utilisation des boutons masqués (boutons ayant plusieurs fonctions) Bouton masqué Bouton de la télécommande Fonction WOOFER (Haut) Activation/Désactivation de la télécommande du téléviseur Gauche (Contrôle du son) SOUND MODE Activation/désactivation de la connexion automatique du téléviseur Page de référence page 16 page 20 EQ 7 bandes page 12 Activation/Désactivation de DRC page 13 Activation/Désactivation de Bluetooth Power page 13 Caractéristiques de sortie pour les différents modes d’effets
Réglage du volume du Soundbar avec une télécommande du téléviseur Contrôlez le volume du Soundbar à l’aide de la télécommande du téléviseur. •• Cette fonction ne peut être utilisée qu’avec des télécommandes infrarouges. Les télécommandes Bluetooth (télécommandes qui nécessitent un appairage) ne sont pas prises en charge. •• Réglez le haut-parleur du téléviseur sur Haut-p. externe pour utiliser cette fonction.
04 CONNEXION DU SOUNDBAR Connexion de l'alimentation électrique Afin de brancher le Soundbar à une prise électrique, utilisez les composants d’alimentation dans l’ordre suivant : •• Pour plus d'informations sur les exigences en matière d'alimentation électrique et de consommation d'énergie, reportez-vous à l'étiquette apposée sur le produit. (Étiquette : Partie inférieure de l’unité principale du Soundbar) 1. Raccordez le cordon d’alimentation au Soundbar. 2.
05 UTILISATION D'UNE CONNEXION FILAIRE AVEC LE TÉLÉVISEUR Connexion à l'aide d'un câble optique Liste de contrôle de pré-connexion •• Lorsque vous utilisez un câble optique et que les bornes ont leurs caches, assurez-vous de retirer les caches. Câble optique (non fourni) DIGITAL DIGITAL AUDIO IN AUDIO(OPTICAL) IN (OPTICAL) OPTICAL OUT Dessus du Soundbar HDMI USB (5V 0.5A) Panneau dessous (ARC) du Soundbar Voyant Voyant blanc allumé -> éteint DEL « Digital Audio In » 1.
06 UTILISATION D'UNE CONNEXION SANS FIL AVEC LE TÉLÉVISEUR Connexion par Bluetooth Lorsqu'un téléviseur Samsung est connecté via Bluetooth, vous pouvez entendre le son stéréo sans les tracas du câblage. •• Un seul téléviseur Samsung peut être connecté à la fois. •• Un téléviseur Samsung prenant en charge Bluetooth peut être connecté. Vérifiez les spécifications de votre téléviseur. Connexion initiale 1.
En cas d'échec de la connexion de l'équipement •• Si vous avez un Soundbar existant (par exemple, “[AV]Soundbar C4-Series) dans la liste des haut-parleurs du téléviseur Samsung, supprimez-le. •• Répétez ensuite les étapes 1 à 3. Déconnexion du Soundbar du téléviseur Samsung Appuyez sur le bouton (Source) du panneau supérieur ou de la télécommande pour sélectionner le mode, autre que « Bluetooth ». •• La déconnexion prend du temps car le téléviseur Samsung doit recevoir une réponse du Soundbar.
07 CONNEXION D'UN APPAREIL EXTERNE Connexion à l'aide d'un câble optique Câble optique Lecteur BD/DVD/ Panneau dessous du Soundbar (non fourni) Décodeur/Console de jeu DIGITAL DIGITAL AUDIO IN AUDIO(OPTICAL) IN (OPTICAL) HDMI USB (5V 0.5A) Dessus du Soundbar (ARC) OPTICAL OUT R - AUDIO - L Voyant Voyant blanc allumé -> éteint DEL « Digital Audio In » 1.
08 CONNEXION À UN PÉRIPHÉRIQUE DE STOCKAGE USB Vous pouvez diffuser des morceaux se trouvant sur des périphériques de stockage à l’aide du Soundbar. Port USB DIGITAL DIGITAL AUDIO IN AUDIO(OPTICAL) IN (OPTICAL) POWER POWER DIGITAL AUDIO IN (OPTICAL) USB (5V 0.5A) HDMI USB (5V 0.5A) (ARC) Voyant DEL Voyant blanc allumé -> éteint « USB » 1. Connectez le périphérique USB au port USB situé en bas du produit. 2.
Liste de compatibilité Rallonge Codec Taux d’échantillonnage Débit binaire *.mp3 MPEG1 Layer2 32 kHz à 48 kHz 32 à 320 kbps MPEG1 Layer3 32 kHz à 48 kHz 32 à 320 kbps MPEG2 Layer3 16 kHz à 24 kHz 8 à 160 kbps MPEG2.5 Layer3 8 kHz à 12 kHz 8 à 160 kbps *.wma WMA7/8/9 32 kHz à 48 kHz 32 à 320 kbps *.aac *.m4a AAC-LC (MPEG2/MPEG4 audio uniquement) 32 kHz à 48 kHz 32 à 320 kbps *.wav LPCM 32 kHz à 192 kHz 1,024 à 9,216 kbps *.
09 CONNEXION D'UN APPAREIL MOBILE Connexion par Bluetooth Lorsqu'un appareil mobile est connecté par Bluetooth, vous pouvez entendre le son stéréo sans les tracas du câblage. •• Lorsque vous connectez un appareil Bluetooth associé alors que le Soundbar est éteint, le Soundbar s'allume automatiquement. Appareil mobile La connexion initiale •• Lors de la connexion à un nouvel appareil Bluetooth, assurez-vous que l'appareil est à moins d’3,28 pi (1 m) de distance. 1.
Remarques sur la connexion Bluetooth •• Localisez un nouvel appareil à moins d’3,28 pi (1 m) pour vous connecter via la communication Bluetooth. •• Si un code PIN vous est demandé lors de la connexion d’un appareil Bluetooth, entrez <0000>. •• Le Soundbar s’éteint automatiquement au bout de 18 minutes à l’état Prêt. •• Le Soundbar peut ne pas effectuer correctement la recherche ou la connexion Bluetooth dans les circonstances suivantes : –– S’il y a un fort champ électrique autour du Soundbar.
Activation/Désactivation de Bluetooth Power Si un périphérique Bluetooth précédemment apparié tente de s’apparier avec le Soundbar lorsque la fonction Bluetooth Power est activée et que le Soundbar est éteint, celui-ci se met automatiquement en marche. 1. Appuyez sur la touche SOUND MODE de la télécommande et maintenez-la enfoncée pendant plus de 5 secondes pendant que le Soundbar est allumé. 2. Le voyant multicolore du Soundbar clignote en « Cyan ».
Connexion d’un Soundbar à un appareil mobile via la fonction NFC Placez votre appareil mobile dans la zone de détection NFC au-dessus du Soundbar. NFC Dessus du Soundbar Périphérique Bluetooth REMARQUES •• Assurez-vous que la fonction NFC de votre appareil mobile est activée et que l’écran est actif. •• La connexion Bluetooth n’est pas disponible lorsque la technologie NFC de l’appareil mobile est en mode d’émulation de carte.
10 INSTALLATION DU SUPPORT MURAL (EN OPTION) Précautions d’installation •• Procédez à l’installation sur un mur vertical uniquement. •• N’installez pas le produit dans un endroit où la température ou le taux d’humidité est élevé. •• Vérifiez que le mur est suffisamment solide pour supporter le poids du produit. Sinon, renforcez le mur ou choisissez un autre point d’installation.
1. REMARQUES –– Si votre téléviseur est installé au mur, installez le Soundbar 2 pouces (5 cm) au minimum sous votre --- 17,7” (450 mm) --- téléviseur. –– Utilisez un crayon pour marquer les positions des trous. LIGNE CENTRALE 2. 2’’ (50 mm) A B C 0,25’’ (6 mm) REMARQUE IMPORTANTE –– La méthode d’installation indiquée correspond aux murs en BÉTON. Les méthodes d’installation dépendent de la matière du mur.
4. POWER POWER POWER DIGITAL AUDIO IN (OPTICAL) USB (5V 0.5A) 5. POWER POWER DIGITAL AUDIO IN (OPTICAL) USB (5V 0.5A) REMARQUE –– Des supports pour l’installation murale sont prévus à l’arrière du Soundbar. MISE EN GARDE –– Appuyez sur le Soundbar avec suffisamment de force pour le fixer au mur. Si le Soundbar n’est pas bien fixé, il peut se détacher et provoquer des blessures. –– Ne soumettez pas le Soundbar à des chocs (notamment en dessous).
11 MISE À JOUR LOGICIELLE 5. Insérez le connecteur USB dans le Soundbar et sélectionnez la source USB. Le logiciel se met à jour automatiquement en 2 minutes. Pendant le processus de mise à jour, les Important : après la mise à niveau, conservez les paramètres d’origine. 5 voyants commencent à clignoter en boucle, puis restent allumés en blanc, puis clignotent à nouveau en boucle.
Réinitialisation •• Ce produit a une fonction DUAL BOOT. Si le micrologiciel ne parvient pas à effectuer la mise à jour, vous pouvez à nouveau mettre à jour le micrologiciel. 5 Sec Si les voyants DEL ne clignotent pas dans l'ordre attendu 1. Éteignez le Soundbar, débranchez le périphérique de stockage qui contient les Alors que le Soundbar est allumé, appuyez sur les fichiers de mise à jour du port USB du boutons Soundbar, puis rebranchez-le. moins 5 secondes. L'affichage des voyants change 2.
12 DÉPANNAGE Avant de contacter l'assistance, effectuez les vérifications suivantes. Le Soundbar ne s’allume pas. Le Soundbar ne se connecte pas par Bluetooth. ;; Vérifiez si le cordon d'alimentation du Soundbar est correctement inséré dans la prise. ;; Lors de la connexion d'un nouvel appareil, passez à l'appairage Bluetooth pour la connexion. (Appuyez sur le bouton PAIR de la télécommande ou sur le bouton (Source) de l'unité pendant au moins 5 secondes.) Le Soundbar fonctionne par intermittence.
13 LICENCE Le son se coupe lors d’une connexion par Bluetooth. ;; Si votre appareil connecté par Bluetooth est trop éloigné du Soundbar, il est possible que le son soit coupé. Rapprochez l’appareil du Soundbar. Dolby, Dolby Audio, and the double-D symbol are trademarks of Dolby Laboratories Licensing ;; Si une partie de votre corps est en contact Corporation.
14 AVIS DE LICENCES LIBRES Pour envoyer des questions concernant les sources ouvertes, communiquez avec Samsung Open Source (http://opensource.samsung.com). 15 REMARQUE IMPORTANTE CONCERNANT LE SERVICE Les chiffres et les illustrations contenus dans ce Guide d’utilisation sont fournis à titre de référence uniquement et pourraient ne pas représenter exactement le produit.
16 CARACTÉRISTIQUES ET GUIDE Spécifications Nom de modèle HW-C400 USB 5V/0,5A Poids 4,4 lbs (2,0 kg) 25,2 x 2,6 x 4,2 po Dimensions (L x H x P) (641,0 x 66,5 x 107,0 mm) Plage de températures en fonctionnement +41°F à +95°F (+5°C à +35°C) Plage d’humidité en fonctionnement 10 % à 75 % AMPLIFICATEUR 20W x 2 Puissance de sortie nominale LPCM 2ch, Dolby Audio™ (supporting Dolby® Formats de lecture pris en charge Digital), DTS Appuyez sur le bouton SOUND MODE pendant au moins 5 secondes pour d
GARANTIE LIMITÉE À L’ACHETEUR INITIAL Samsung Electronics Canada Inc. (SECA) garantit ce produit contre tout défaut de fabrication. SECA garantit aussi que si cet appareil ne fonctionne pas convenablement durant la période de garantie SECA se réservera le droit de réparer ou de remplacer l’appareil défectueux. Toutes les réparations sous garantie doivent être effectuées par un Centre de service autorisé SECA.
© 2023 Samsung Electronics Co., Ltd. Tous droits réservés. Comment contacter Samsung dans le monde Si vous avez des suggestions ou des questions concernant les produits Samsung, veuillez contacter le Service Consommateurs Samsung. SIÈGE SOCIAL Samsung Electronics Canada Inc. 2050 Derry Road West, Mississauga, Ontario L5N 0B9 Canada TEL: 1-800-SAMSUNG (1-800-726-7864) www.samsung.com/ca_fr/support Pays Centre de service Samsung Site Web ` Amérique du Nord CANADA 1-800-SAMSUNG (726-7864) www.samsung.