FULL MANUAL HW-C400 Imagine the possibilities Thank you for purchasing this Samsung product. To receive more complete service, please register your product at www.samsung.
SAFETY INFORMATION SAFETY WARNINGS WARNING •• To reduce the risk of fire or electric shock, do TO REDUCE THE RISK OF ELECTRIC SHOCK, DO not expose this appliance to rain or moisture. NOT REMOVE THE COVER (OR BACK). •• To prevent injury, this apparatus must be NO USER-SERVICEABLE PARTS ARE INSIDE. securely attached to the floor/wall in REFER SERVICING TO QUALIFIED SERVICE accordance with the installation instructions. PERSONNEL.
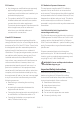
FCC Caution : FCC Radiation Exposure Statement : •• Any changes or modifications not expressly This equipment complies with FCC radiation approved by the party responsible for exposure limits set forth for an uncontrolled compliance could void the user’s authority to environment. This equipment should be installed operate this equipment. and operated so there is at least 8 inches (20 cm) •• This product satisfies FCC regulations when between the radiator and your body.
7. Do not block any ventilation openings. 14. Refer all servicing to qualified service Install in accordance with the manufacturer’s personnel. Servicing is required when the instructions. apparatus has been damaged in any way, 8. Do not install near any heat sources such as such as power-supply cord or plug is radiators, heat registers, stoves, or other damaged, liquid has been spilled or objects apparatus (including amplifiers) that produce have fallen into the apparatus, the apparatus heat.
4. Protect the product from moisture (i.e. vases), and excess heat (e.g. a fireplace) or equipment creating strong magnetic or electric fields. Unplug the power cable from the AC wall socket if the unit malfunctions. Your product is not intended for industrial use. It is for personal use only. Condensation may occur if your product has been stored in cold temperatures. If transporting the unit during the winter, wait approximately 2 hours until the unit has reached room temperature before using. 5.
CONTENTS 01 Checking the Components 8 02 Product Overview 9 03 Top Panel of the Soundbar -------------------------- Bottom Panel of the Soundbar -------------------------- 10 Using the Remote Control 9 11 Inserting Batteries before using the Remote Control (AAA batteries X 2) -------------------------- 11 04 How to Use the Remote Control -------------------------- 11 Using the Hidden Buttons (Buttons with more than one function) -------------------------- 16 Output specifications for the
08 Connecting a USB Storage Device 23 09 Connecting a Mobile Device 25 10 11 Connecting via Bluetooth -------------------------- 25 Connecting a Soundbar to a mobile device via NFC function -------------------------- 28 Installing the Wall Mount (Optional) 29 Installation Precautions -------------------------- 29 Wall mount Components -------------------------- 29 Software Update 32 Reset -------------------------- 33 12 Troubleshooting 34 13 License 35 14 Open Source License No
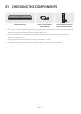
01 CHECKING THE COMPONENTS SOUND MODE WOOFER CH LEVEL Soundbar Main Unit Power Cord (Soundbar) (AH81-09821A) TONE CONTROL Soundbar Remote Control (AH81-15439A) / Batteries •• For more information about the power supply and power consumption, refer to the label attached to the product. (Label: Bottom of the Soundbar Main Unit) •• To purchase additional components or optional cables, contact a Samsung Service Center or Samsung Customer Care.
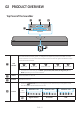
02 PRODUCT OVERVIEW Top Panel of the Soundbar Top Panel NFC The LED Indicator flashes, glows, or changes color depending on the Soundbar's current mode or status. The color of the LED indicator and the number of lights indicate the active mode as described below. LED indicator W W M W W White LED White LED Multicolor LED White LED White LED •• The Multicolor LED changes to White, Cyan, Green, Red, Yellow, Orange, Purple and Blue depending on the mode or status.
NFC Logo You can activate your Bluetooth connection by placing your phone in the NFC detection area of the Soundbar. •• When you plug in the AC cord, the power button will begin working in 4 to 6 seconds. •• When you turn on this unit, there will be a 4 to 5 second delay before it produces sound. •• If you hear sounds from both the TV and Soundbar, go to the Settings menu for the TV audio and change the TV speaker to External Speaker.
03 USING THE REMOTE CONTROL Inserting Batteries before using the Remote Control (AAA batteries X 2) Slide the back cover in the direction of the arrow until it is completely removed. Insert 2 AAA batteries (1.5V) so that their orientation is correct. Slide the back cover back into position. How to Use the Remote Control LED Power Turns the Soundbar on and off.
Volume Push the button up or down to adjust the volume. White moves to right X1 White moves to left X1 Volume Up Volume Down LED Indicator CH LEVEL By pressing the button, you can adjust the volume of the each speaker. LED White Blinks X1 Indicator “Center Level” (Sound Control) By pressing the button, you can set the audio function. The desired item can be adjusted using the Up/ Down buttons. Each time the mode changes, the Multicolor LED blinks in white.
7 Band EQ Press and hold the (Sound Control) button for about 5 seconds to adjust the sound for each frequency band. 150Hz, 300Hz, 600Hz, 1.2kHz, 2.5kHz, 5kHz, and 10kHz are selectable using the Left/Right buttons and each can be adjusted to a setting between -6 to +6 using the Up/Down buttons. (Make sure the Sound mode is set to "Standard".) 7 Band EQ 5 Sec Press and hold the (Sound Control) button for about 5 seconds. Using the Left/Right buttos and each can be adjusted to setting between -6 to+6.
SOUND MODE By pressing the button, you can select the desired audio mode. Each time the mode changes, the Multicolor LED blinks in white. (The sound mode may differ with the TV model.) White Blinks X1 LED Indicator “Surround Sound” “Standard” –– Surround Sound Provides a wider sound field than standard. –– Standard Outputs the original sound.
FE R W OO CH LE VE L CO TO NT NE RO L FE R CO TO NT NE RO L W OO CH LE VE L CO TO NT NE RO L CH LE VE L W OO FE R DE SO M UN OD D E WOOFER (BASS) LEVEL SO M UN OD D E Push the button up or down to adjust the bass level between -6 to +6. To set the woofer (bass) volume level to 0 (Default), press the button. (Subwoofer is not included.) TONE CONTROL By pressing the button, you can adjust the volume of the treble or bass sound. The desired item can be adjusted using the Up/Down buttons.
Using the Hidden Buttons (Buttons with more than one function) Hidden Button Reference page Remote Control Button Function WOOFER (Up) TV remote control On/Off page 17 Left TV Auto connect On/Off page 21 7 Band EQ page 13 DRC On/Off page 14 Bluetooth Power On/Off page 14 (Sound Control) SOUND MODE Output specifications for the different sound effect modes Effect Surround Sound Standard Input Output 2.0 ch 2.0 ch 5.1 ch 2.0 ch 2.0 ch 2.0 ch 5.1 ch 2.
Adjusting the Soundbar volume with a TV remote control Adjust the Soundbar volume using the TV’s remote control. •• This function can be used with IR remote controls only. Bluetooth remote controls (remote controls that require pairing) are not supported. •• Set the TV speaker to External Speaker to use this function. •• Manufacturers supporting this function: Samsung, VIZIO, LG, Sony, Sharp, PHILIPS, PANASONIC, TOSHIBA, Hisense, RCA TV remote control On/Off 1. Turn Off the Soundbar. 2.
04 CONNECTING THE SOUNDBAR Connecting Electrical Power Use the power components to connect the Soundbar to an electrical outlet in the following order: •• For more information about the required electrical power and power consumption, refer to the label attached to the product. (Label: Bottom of the Soundbar Main Unit) 1. Connect the power cord to the Soundbar. 2. Connect the power cord to a wall socket.
05 USING A WIRED CONNECTION TO THE TV Connecting using an Optical Cable Pre-connection Checklist •• When you use an optical cable and the terminals have covers, be sure to remove the covers. Optical Cable (not supplied) DIGITAL DIGITAL AUDIO IN AUDIO(OPTICAL) IN (OPTICAL) OPTICAL OUT Top of the Soundbar HDMI USB (5V 0.5A) Bottom of the (ARC) Soundbar LED White On -> Off Indicator “Digital Audio In” 1.
06 USING A WIRELESS CONNECTION TO THE TV Connecting via Bluetooth When a Samsung TV is connected using Bluetooth, you can hear stereo sound without the hassle of cables. •• Only one Samsung TV can be connected at a time. •• Samsung TV that supports Bluetooth can be connected. Check the specifications of your TV. The initial connection 1. Press the PAIR button on the Soundbar remote control or press (Source) button on the Soundbar top panel to enter the "Bluetooth" mode.
If the device fails to connect •• If you have an existing Soundbar (e.g., [AV]Soundbar C4-Series) on the list of speakers on the Samsung TV, delete it. •• Then repeat steps 1 through 3. Disconnecting the Soundbar from the Samsung TV Press the (Source) button on the top panel or on the remote control to select the mode other than “Bluetooth”. •• Disconnecting takes time because the Samsung TV must receive a response from the Soundbar. (The time required may differ, depending on the Samsung TV model.
07 CONNECTING AN EXTERNAL DEVICE Connecting using an Optical Cable Optical Cable BD / DVD player / Set-top (not supplied) box / Game console Bottom of the Soundbar DIGITAL DIGITAL AUDIO IN AUDIO(OPTICAL) IN (OPTICAL) Top of the Soundbar OPTICAL OUT HDMI USB (5V 0.5A) (ARC) R - AUDIO - L LED White On -> Off Indicator “Digital Audio In” 1.
08 CONNECTING A USB STORAGE DEVICE You can play music files located on USB storage devices through the Soundbar. USB port DIGITAL DIGITAL AUDIO IN AUDIO(OPTICAL) IN (OPTICAL) POWER POWER DIGITAL AUDIO IN (OPTICAL) USB (5V 0.5A) HDMI USB (5V 0.5A) (ARC) LED White On -> Off Indicator “USB” 1. Connect the USB device to the USB port on the bottom of the product. 2. Press the (Source) button on the top panel or remote control, and then select the “USB” mode. 3.
File Format Type Compatibility list Extension Codec Sampling Rate Bitrate *.mp3 MPEG 1 Layer2 16kHz ~ 48kHz 80kbps~320kbps MPEG 1 Layer3 16kHz ~ 48kHz 80kbps~320kbps MPEG 2 Layer3 16kHz ~ 48kHz 80kbps~320kbps MPEG 2.5 Layer3 16kHz ~ 48kHz 80kbps~320kbps Wave_Format_MSAudio1 16kHz ~ 48kHz 56kbps~128kbps Wave_Format_MSAudio2 16kHz ~ 48kHz 56kbps~128kbps AAC 16kHz ~ 96kHz 48kbps~320kbps AAC-LC 16kHz ~ 96kHz 128kbps~192kbps 5.1ch 320kbps HE-AAC 24kHz ~ 96kHz 48kbps~64kbps 5.
09 CONNECTING A MOBILE DEVICE Connecting via Bluetooth When a mobile device is connected using Bluetooth, you can hear stereo sound without the hassle of cables. •• When you connect a paired Bluetooth device with the Soundbar off, the Soundbar automatically turns on. mobile device The initial connection •• When connecting to a new Bluetooth device, make sure the device is within 3.28 ft (1 m) distance. 1.
Notes on Bluetooth connection •• Locate a new device within 3.28 ft (1 m) to connect via Bluetooth communication. •• If asked for a PIN code when connecting a Bluetooth device, enter <0000>. •• The Soundbar automatically turns off after 18 minutes in the Ready state. •• The Soundbar may not perform Bluetooth search or connection correctly under the following circumstances: –– If there is a strong electrical field around the Soundbar.
Bluetooth Power On/Off If a previously paired Bluetooth device tries to pair with the Soundbar when the Bluetooth Power On function is on and the Soundbar is turned off, the Soundbar turns on automatically. 1. Press and hold the SOUND MODE button for more than 5 seconds on the remote while the Soundbar is turned on. 2. Multicolor LED indicator on the Soundbar blinks "Cyan”.
Connecting a Soundbar to a mobile device via NFC function Place your mobile device in the NFC detection area on top of the Soundbar. NFC Top of the Soundbar Bluetooth device NOTES •• Make sure that your mobile device has the NFC function turned on and that the screen is active. •• Bluetooth connection is unavailable when NFC of the mobile device is in card emulation mode. •• If asked for a PIN code when connecting a Bluetooth device, enter <0000>.
10 INSTALLING THE WALL MOUNT (OPTIONAL) Installation Precautions •• Install on a vertical wall only. •• Do not install in a place with high temperature or humidity. •• Verify whether the wall is strong enough to support the product’s weight. If not, reinforce the wall or choose another installation point. •• Purchase and use the fixing screws or anchors appropriate for the kind of wall you have (plaster board, iron board, wood, etc.). If possible, fix the support screws into wall studs.
1. NOTES –– If your TV is installed on the wall, install the Soundbar 2 inches (5 cm) or more below --- 17.7” (450 mm) --- your TV. –– Use a pencil to mark the holes’ positions. CENTER LINE 2. 2’’ (50 mm) A B C 0.25’’ (6 mm) IMPORTANT NOTE –– The installation method shown here is for CONCRETE walls. Installation methods will vary depending on the wall type. For installation on dry wall, we strongly recommend you drill screw support holes into the underlying wood studs. 3. A B C D ENG - 30 0.
4. POWER POWER POWER DIGITAL AUDIO IN (OPTICAL) USB (5V 0.5A) 5. POWER POWER DIGITAL AUDIO IN (OPTICAL) USB (5V 0.5A) NOTE –– Supports for wall installation are built into the back of the Soundbar. CAUTION –– Press the Soundbar down with sufficient force to fix it to the wall. If the Soundbar is not firmly fixed to the wall, it could be accidently detached, resulting in personal injury. –– Do not bump into or strike the Soundbar (especially from the bottom).
11 SOFTWARE UPDATE 5. Plug USB into Soudbar and switch to USB source, the software will update automatically and will complete update within 2 minutes. During the update process, the 5 LEDs will start flashing in a loop, and Important: After upgrading, keep the original then the 5 LEDs will all be bright white, and Settings. then the 5 LEDs will flash in a loop again.
•• This product has a DUAL BOOT function. If the firmware fails to update, you can Reset update the firmware again. 5 Sec If LED sequence flashing is not displayed 1. Turn off the Soundbar, disconnect and then reconnect the USB storage device that contains the update files to the Soundbar’s USB port. With the Soundbar on, press the (Volume) buttons on the body at the same time for at least 5 seconds. The LED display changes as shown 2.
12 TROUBLESHOOTING Refer to the instructions below if this product does not function properly. If the problem you are experiencing is not listed below or if the instructions below do not help, turn off the product, disconnect the power cord, and contact Samsung Electronics at 1-800-SAMSUNG (1-800-726-7864). Soundbar does not turn on. Soundbar does not connect via Bluetooth. ;; Check whether the power cord of the Soundbar is correctly inserted into the outlet.
13 LICENSE Sound drops out when connected via Bluetooth. ;; If your device that is connected via Bluetooth moves too far away from the Soundbar, it may cause the sound to drop Dolby, Dolby Audio, and the double-D symbol out. Move the device closer to the are trademarks of Dolby Laboratories Licensing Soundbar. Corporation. Manufactured under license from ;; If a part of your body is in contact with the Dolby Laboratories. Confidential unpublished Bluetooth transceiver or the product is works.
14 OPEN SOURCE LICENSE NOTICE To send inquiries and requests for questions regarding open sources, contact Samsung Open Source (http://opensource.samsung.com) 15 IMPORTANT NOTES ABOUT SERVICE •• Figures and illustrations in this User Manual are provided for reference only and may differ from actual product appearance. •• An administration fee may be charged if either: a. An engineer is called out to your home at your request and there is no defect in the product. b.
16 SPECIFICATIONS AND GUIDE Specifications Model Name HW-C400 USB 5V/0.5A Weight 4.4 lbs (2.0 kg) 25.2 x 2.6 x 4.2 inches Dimensions (W x H x D) (641.0 x 66.5 x 107.
LIMITED WARRANTY TO ORIGINAL PURCHASER This SAMSUNG brand product, as supplied and distributed by SAMSUNG and delivered new, in the original carton to the original consumer purchaser, is warranted by SAMSUNG against manufacturing defects in materials and workmanship for a limited warranty period of: One (1) Year Parts and Labor* (*90 Days Parts and Labor for Commercial Use) This limited warranty begins on the original date of purchase, and is valid only on products purchased and used in the United States.
QUESTIONS OR COMMENTS? Country IN THE US Samsung Service Center 1-800-SAMSUNG (726-7864) Web Site Address www.samsung.com/us/support Samsung Electronics America, Inc. 85 Challenger Road Ridgefield Park, NJ 07660 © 2023 Samsung Electronics Co., Ltd. All rights reserved.