HW-J6000 HW-J6001 User manual Curved Soundbar Imagine the possibilities Thank you for purchasing this Samsung product. To receive more complete service, please register your product at www.samsung.com/register HW-J6000_J6001_XA_ENG_0324.
GETTING STARTED GETTING STARTED FEATURES Samsung Remote App Bluetooth Function Control your Soundbar in the palm of your hand with the Samsung Audio Remote App*. This convenient app is a control hub for basic controls like power, volume, and media controls, as well as custom settings like equaliser setting.
GETTING STARTED SAFETY INFORMATION TO REDUCE THE RISK OF ELECTRIC SHOCK, DO NOT REMOVE THE COVER (OR BACK). NO USER-SERVICEABLE PARTS ARE INSIDE. REFER SERVICING TO QUALIFIED SERVICE PERSONNEL. ENG SAFETY WARNINGS This symbol indicates “dangerous voltage” inside the product that presents a risk of electric shock or personal injury. CAUTION RISK OF ELECTRIC SHOCK DO NOT OPEN This symbol indicates important instructions accompanying the product.
GETTING STARTED PRECAUTIONS 68.6 mm 99.1mm 99.1mm 99.1mm Ensure that the AC power supply in your house complies with the power requirements listed on the identification sticker located on the back of your product. Install your product horizontally, on a suitable base (furniture), with enough space around it for ventilation (7~10 cm). Make sure the ventilation slots are not covered. Do not place the unit on amplifiers or other equipment which may become hot. This unit is designed for continuous use.
GETTING STARTED CONTENTS ENG 2 GETTING STARTED 23 FUNCTIONS 2 Features 23 Input Mode 3 Safety Information 24 Bluetooth 6 What’s Included 27 Software Update 7 DESCRIPTIONS 28 TROUBLESHOOTING 7 Top / Front Panel 28 8 Rear / Bottom Panel 9 Remote Control Troubleshooting 29 APPENDIX 29 Specifications 11 INSTALLATION 11 Installing the Soundbar 11 Installing the Wall Mount 14 Attaching the Soundbar to your TV's Stand 14 Installing Soundbar to Free-Standing Figures and illustr
GETTING STARTED WHAT’S INCLUDED BEFORE READING THE USER’S MANUAL Note the following terms before reading the user manual. + Icons used in this manual Icon Term Caution Note Definition Indicates a situation where a function does not operate or settings may be cancelled. Indicates tips or instructions on the page that help you operate a function. Check for the supplied accessories shown below.
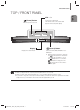
DESCRIPTIONS DESCRIPTIONS TOP / FRONT PANEL Controls the volume level. The numeric value of the volume level appears in the front panel display. (Power) Button Turns the power on and off. ENG VOL. - / + (Source) Button Display Selects the D.IN, AUX, HDMI, BT, TV, or USB input. Displays the current mode. ● While the unit is powered on, pressing (Source) button for more than the 3 seconds sets the button to act as (Mute) button.
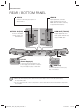
DESCRIPTIONS REAR / BOTTOM PANEL AUX IN HDMI IN Connect to the Analogue output of an external device. Inputs digital video and audio signals simultaneously using an HDMI cable. Use when connecting a supported external device. OPTICAL IN (D.IN) HDMI OUT (TV-ARC) Connect to the digital (optical) output of an external device. Outputs digital video and audio signals simultaneously using an HDMI cable. HDMI IN DC 14V AUX IN HDMI OUT (TV-ARC) OPTICAL IN 5V 0.
DESCRIPTIONS REMOTE CONTROL ENG SOURCE Press to select a source connected to the Soundbar. Mute You can turn the volume down to 0 with the push of a button. Press again to restore the sound to the previous volume level. Repeat Press to set the Repeat function during music playback from a USB device. OFF - REPEAT : Cancells Repeat Playback. TRACK - REPEAT : Repeatedly play a track. ALL - REPEAT : Repeatedly play all tracks. RANDOM - REPEAT : Plays tracks in random order.
DESCRIPTIONS Power Turns the Soundbar on and off. Volume Adjusts the volume level of the unit. Play / Pause Press the & button to pause a file temporarily. Press the & button again to play the selected file. Skip Back If there is more than one file on the device you are playing, and you press the # button, the previous file is selected.
INSTALLATION INSTALLATION INSTALLING THE SOUNDBAR ENG INSTALLING THE WALL MOUNT + Installation Precautions ● Install on a vertical wall only. ● For the installation, avoid a location with high temperature or humidity, or a wall that cannot sustain the weight of the set. ● Check the strength of the wall. If the wall is not strong enough to support the unit, reinforce the wall or install the unit on a different wall that can support the unit's weight.
INSTALLATION Center Line Center Line 2. Mark the location where the screws will go through on the wall, and then remove the installation guide. Next, drill holes for the screws using an appropriately sized drill bit. 3. Fasten the Bracket-Wall (2EA) and screws to the marked locations. 4. Lift up the product after inserting the Bracket-Wall as shown. 12 HW-J6000_J6001_XA_ENG_0324.
INSTALLATION ENG OPTICAL IN HDMI OUT (TV-ARC) 5V 0.5A AUX IN DC 14V HDMI IN 5. Insert and fasten Holder-Fix Mount into each hole on the product’s bottom side. The product is fixed to the Bracket-Wall. ● Do not hang onto the installed unit and avoid striking or dropping the unit. ● Secure the unit firmly to the wall so that it does not fall off. If the unit falls off, it may cause an injury or damage the product.
INSTALLATION ATTACHING THE SOUNDBAR TO YOUR TV'S STAND You can attach the Soundbar to your TV's stand if you have a Samsung TV that has a stand that is compatible with this Soundbar. ● This Soundbar is compatible with model JU6700, JU6500 and JU7500, 48 inch, 55 inch and 65 inch, JU6610 - 48 inch and 55 inch, 2015 Samsung curved TVs. Please visit the home page of Samsung Electronics (www.Samsung.com) to see a detailed list of the compatible models.
CONNECTIONS CONNECTIONS ENG ● Do not connect the power cord of this product or your TV to a wall outlet until all connections between components are complete. ● Before moving or installing this product, be sure to turn off the power and disconnect the power cord. CONNECTING THE SUBWOOFER CONNECTING TO THE SUBWOOFER AUTOMATICALLY The main unit and subwoofer should link (connect wirelessly) automatically when the main unit and subwoofer are turned on.
CONNECTIONS ● Before moving or installing the product, be sure to turn off the power and disconnect the power cord. ● If the main unit is powered off, the wireless subwoofer will be in standby mode and the STANDBY LED on the upper side will come on after the Link indicator (Blue LED) blinks for 30 seconds. ● If you use a device that uses the same frequency (2.4GHz) as the Soundbar near the Soundbar, interference may cause some sound interruption.
CONNECTIONS CONNECTING TO A TV ENG CONNECTIONS WITH TV USING HDMI (DIGITAL) CABLE HDMI Cable HDMI IN HDMI OUT (TV-ARC) HDMI OUT (TV-ARC) HDMI IN DC 14V AUX IN 5V 0.5A HDMI OUT (TV-ARC) OPTICAL IN 1. Connect an HDMI cable from the HDMI OUT (TV-ARC) jack on the back of the product to the HDMI IN jack on your TV. (Source) button on the top panel of Soundbar or the SOURCE button on remote control to select 2. Press the the D.IN mode.
CONNECTIONS + Auto Power Link If you have connected the main unit to a TV with a digital optical cable, set the Auto Power function ON to have the Soundbar turn on automatically when you turn the TV on. AUTO POWER LINK Display ON OFF - ANYNET+ / ON - POWER LINK OFF ON - ANYNET+ / OFF - POWER LINK 1. Connect the Soundbar and a TV with an Optical cable (not supplied). (Source) button on the main unit’s top panel or the SOURCE button on the remote control to 2. Press the select the D.IN mode. 3.
CONNECTIONS ENG ● Switching the Soundbar’s mode from TV to another mode automatically terminates TV SoundConnect. ● To connect the Soundbar to another TV, the existing connection must be terminated. ● Terminate the connection to the existing TV, and then press the & button on the remote control for 5 seconds to connect to another TV. ● The TV SoundConnect (SoundShare) function is supported by some Samsung TVs released from 2012 on.
CONNECTIONS CONNECTIONS WITH EXTERNAL DEVICE HDMI CABLE HDMI is the standard digital interface for connecting to TVs, projectors, DVD players, Blu-ray players, set top boxes, and more. HDMI prevents any degradation to the signal due to conversion to analogue and maintains the video and audio quality of the original digital source. HDMI Cable Digital Devices HDMI OUT HDMI IN HDMIIN HDMI IN DC 14V AUX IN OPTICAL IN HDMI OUT (TV-ARC) 5V 0.5A 1.
CONNECTIONS + AUX Cable 1. Connect AUX IN (Audio) on the main unit to the AUDIO OUT jack of the Source Device. ENG 2. Press the (Source) button on the top panel of Soundbar or the SOURCE button on remote control to select the AUX mode. + Optical Cable 1. Connect OPTICAL IN (Audio) on the main unit to the OPTICAL OUT jack of the Source Device. 2. Press the (Source) button on the top panel of Soundbar or the SOURCE button on remote control to select the D.IN mode.
CONNECTIONS ● Digital camera PTP protocols are not supported. ● Do not remove the USB device while it is transferring files. ● DRM-protected music files (MP3, WMA) from commercial web sites cannot be played. ● External HDDs are not supported. ● Mobile phone devices are not supported. ● File Format Type Compatibility list: Extension Codec Sampling Rate Bit rate MPEG 1 Layer2 16KHz ~ 48KHz 80kbps~320kbps MPEG 1 Layer3 16KHz ~ 48KHz 80kbps~320kbps MPEG 2 Layer3 16KHz ~ 48KHz 80kbps~320kbps MPEG 2.
FUNCTIONS FUNCTIONS INPUT MODE Input mode ENG Press the (Source) button on the main unit’s top panel or the SOURCE button on the remote control to select the mode you want. Display Optical Digital input D.IN ARC (HDMI OUT) input AUX input AUX HDMI input HDMI BLUETOOTH mode BT TV SoundConnect TV USB mode USB The unit turns off automatically in the following situations. ● D.IN / HDMI / BT / TV / USB / ARC Mode - If there is no audio signal for 25 minutes.
FUNCTIONS BLUETOOTH You can connect a Bluetooth device to the Soundbar and enjoy music with high quality stereo sound, all without wires! TO CONNECT THE SOUNDBAR TO A BLUETOOTH DEVICE Check if the Bluetooth device supports the Bluetooth compliant stereo headset function. Connect Bluetooth device 1. Press the (Source) button on the main unit’s top panel or the SOURCE button on the remote control to select the BT mode. • You will see BT READY on the front display of the Soundbar. 2.
FUNCTIONS ● ● ● ● ● If asked for PIN code when connecting a Bluetooth device, enter <0000>. Only one Bluetooth device can be paired at a time. The Bluetooth connection will be terminated when you turn the Soundbar off. The Soundbar may not perform Bluetooth search or connection correctly under the following circumstances: - If there is a strong electrical field around the Soundbar. - If several Bluetooth devices are simultaneously paired with the Soundbar.
FUNCTIONS ● In Bluetooth connection mode, the Bluetooth connection will be lost if the distance between the Soundbar and the Bluetooth device exceeds 10 meters. ● The Soundbar automatically turns off after 25 minutes in the Ready state. + More About Bluetooth Bluetooth is a technology that enables Bluetooth-compliant devices to interconnect easily with each other using a short wireless connection.
FUNCTIONS SOFTWARE UPDATE ENG HDMI IN DC 14V AUX IN OPTICAL IN 5V 0.5A HDMI OUT (TV-ARC) 5V 0.5A Samsung may offer updates for the Soundbar's system firmware in the future. If an update is offered, you can update the firmware by connecting a USB device with the firmware update stored on it to the USB port on your Soundbar. Note that if there are multiple update files, you must load them onto the USB device singly and use them to update the firmware one file at a time. Please visit samsung.
TROUBLESHOOTING TROUBLESHOOTING TROUBLESHOOTING Before requesting service, please check the following. The unit will not turn on. • Is the power cord plugged into the outlet? Connect the power plug to the outlet. A function does not work when the button is pressed. • Is there static electricity in the air? Disconnect the power plug and connect it again. Sound is not produced. • Is the Mute function on? Press the • Is the volume set to minimum? Adjust the Volume.
APPENDIX APPENDIX SPECIFICATIONS ENG Model name HW-J6000, HW-J6001 USB Weight GENERAL Dimensions (W x H x D) 5V / 0.5A Main Unit 2.7 kg Subwoofer (PS-WJ6000, PS-WJ6001) 6.8 kg Main Unit 1078 x 47.
HW-J6000 HW-J6001 Manual do utilizador Curved Soundbar Imagine as possibilidades Obrigado por ter adquirido um produto Samsung. Para receber assistência completa, registe o produto em www.samsung.com/register HW-J6000_J6001_XA_POR_0324.
ANTES DE UTILIZAR antes de utilizar FUNCIONALIDADES Samsung Remote App Função Bluetooth Controle o Soundbar na palma da sua mão com a aplicação Samsung Audio Remote App*. Esta conveniente aplicação é um centro de controlo para comandos básicos como ligar/desligar, volume e controlos multimédia, bem como para definições personalizadas como a definição do equalizador.
ANTES DE UTILIZAR INFORMAÇÕES DE SEGURANÇA PARA REDUZIR O RISCO DE CHOQUES ELÉCTRICOS, NÃO RETIRE A TAMPA POSTERIOR. O INTERIOR NÃO CONTÉM PEÇAS PASSÍVEIS DE REPARAÇÃO PELO UTILIZADOR. A MANUTENÇÃO DEVE SER EFECTUADA POR PESSOAL TÉCNICO QUALIFICADO. POR COMPONENTES INCLUÍDOSAVISOS DE SEGURANÇA Este símbolo indica a existência de "tensão perigosa" no interior do aparelho, o que representa risco de choque eléctrico ou ferimentos. CUIDADO RISCO DE CHOQUE ELÉCTRICO.NÃO ABRIR.
ANTES DE UTILIZAR PRECAUÇÕES 68.6 mm 99.1mm 99.1mm 99.1mm Certifique-se de que a fonte de alimentação de CA em sua casa está em conformidade com o indicado no autocolante de identificação, situado na parte de trás do produto. Instale o produto na horizontal, sobre uma base adequada (móvel), com espaço suficiente para permitir a ventilação 7~10 cm. Certifique-se de que os orifícios de ventilação não estão tapados.
ANTES DE UTILIZAR CONTEÚDOS ANTES DE UTILIZAR 23 FUNÇÕES 2 Funcionalidades 23 Mode d’entrée 3 Informações de segurança 24 Bluetooth 6 Componentes incluídos 27 Actualização de software 7 DESCRIÇÕES 7 Painel superior / anterior 28 RESOLUÇÃO DE PROBLEMAS 8 Painel anterior / inferior 28 9 Controlo Remoto POR 2 Resolução de problemas 29 APÊNDICE 11 INSTALAÇÃO 11 Instalar o Soundbar 11 Instalar a fixação de parede 14 Fixar o Soundbar ao suporte do televisor 14 Instalação Indepen
ANTES DE UTILIZAR COMPONENTES INCLUÍDOS ANTES DE LER O MANUAL DO UTILIZADOR Antes de proceder à leitura deste manual, tenha em atenção os seguintes termos. + Ícones utilizados no manual Ícone Termo Cuidado Nota Definição Indica uma situação em que uma função não pode ser utilizada ou em que as definições possam ter sido canceladas. Refere-se a sugestões ou instruções na página, que ajudam na utilização de cada função. Verifique, abaixo, os acessórios fornecidos.
DESCRIÇÕES DESCRIÇÕES PAINEL SUPERIOR / ANTERIOR Controlo o nível do volume. O nível numérico de volume é apresentado no ecrã do painel anterior. Botão (ligar) Liga ou desliga o produto. POR VOL. - / + Botão (Origem) Visor Selecciona a entrada D.IN, AUX, HDMI, BT, TV, USB. ● Enquanto a unidade está ligada, (Origem) durante premir o botão mais de 3 segundos configura o botão para funcionar como o botão (Silêncio).
DESCRIÇÕES PAINEL ANTERIOR / INFERIOR AUX IN HDMI IN Ligue à saída analógica de um dispositivo externo. Permite a entrada de sinais de áudio e de vídeo digital em simultâneo utilizando um cabo HDMI. Utilize quando ligar um dispositivo externo suportado. OPTICAL IN (D.IN) HDMI OUT (TV-ARC) Liga à saída digital (óptica) de um dispositivo externo. A saída de sinais de áudio e de vídeo digital em simultâneo utilizando um cabo HDMI. HDMI IN DC 14V AUX IN HDMI OUT (TV-ARC) OPTICAL IN 5V 0.
DESCRIÇÕES CONTROLO REMOTO POR SOURCE Prima para seleccionar uma origem ligada ao Soundbar. Silêncio Pode reduzir o volume para 0 premindo um botão. Prima novamente para repor o som ao último nível de volume utilizado. Repetir Pode definir a função Repetir durante a reprodução de música localizada numa unidade USB. OFF - REPEAT : Cancela a reprodução repetitiva. TRACK - REPEAT : Reproduz uma faixa repetidamente. ALL - REPEAT : Reproduz repetidamente todas as faixas.
DESCRIÇÕES Ligar Liga ou desliga o produto. Volume Ajusta o nível de volume da unidade. Reproduzir/Pausa Prima o botão & para colocar temporariamente em pausa a reprodução do ficheiro. Prima o botão & novamente para reproduzir o ficheiro seleccionado. Retroceder Se existir mais de um ficheiro no dispositivo que está a reproduzir e premir o botão # o ficheiro anterior é seleccionado.
INSTALAÇÃO INSTALAÇÃO INSTALAR O SOUNDBAR POR INSTALAR A FIXAÇÃO DE PAREDE + Precauções de instalação ● Instale apenas numa parede vertical. ● No que diz respeito à instalação, evite paredes sujeitas a temperaturas elevadas ou humidade, caso contrário a parede pode não aguentar o peso do aparelho. ● Verifique a solidez da parede. Se a parede não for suficientemente resistente para suportar a unidade, reforce a parede ou instale a unidade noutro local que suporte o peso da unidade.
INSTALAÇÃO Center Line Center Line 2. Assinale com uma caneta o local em que os parafusos serão aplicados na parede e, em seguida, remova a guia de instalação. Em seguida, perfure os orifícios para os parafusos utilizando uma broca de tamanho adequado. 3. Aperte o Suporte para Instalação na Parede (2 EA) e os parafusos nos locais marcados. 4. Levante o produto após inserir o Suporte para Instalação na Parede conforme demonstrado. 12 HW-J6000_J6001_XA_POR_0324.
INSTALAÇÃO POR OPTICAL IN HDMI OUT (TV-ARC) 5V 0.5A AUX IN DC 14V HDMI IN 5. Insira e aperte o Parafuso de Fixação do Suporte em cada orifício na parte inferior do produto. O produto está fixo ao Suporte para Instalação na Parede. ● Não exerça pressão sobre a unidade instalada e não sujeite a unidade a impactos ou quedas. ● Fixe bem a unidade à parede para que não caia. Se a unidade cair, poderá provocar danos pessoais ou danificar o produto.
INSTALAÇÃO FIXAR O SOUNDBAR AO SUPORTE DO TELEVISOR Pode fixar o Soundbar ao suporte do televisor se tiver um televisor Samsung com um suporte compatível como este Soundbar. ● Este Soundbar é compatível com os modelos seguintes de televisores Samsung curvos de 2015: JU6700, JU6500 e JU7500, de 48, 55 e 65 polegadas e o modelo JU6610 de 48 e 55 polegadas. Visite a página da Samsung Electronics (www.Samsung.com) para obter uma lista detalhada dos modelos compatíveis.
LIGAÇÕES ligações POR ● Não ligue o cabo de alimentação deste produto ou o televisor à rede eléctrica até que todas as ligações entre componentes estejam concluídas. ● Antes de mover ou instalar este produto, certifique-se de que desliga a unidade e o cabo de alimentação. LIGAR O SUBWOOFER LIGAR AO SUBWOOFER AUTOMATICAMENTE A unidade principal e o subwoofer devem estabelecer ligação (sem fios) automaticamente quando a unidade principal e o subwoofer são ligados.
LIGAÇÕES ● Antes de deslocar ou instalar o produto, desligue o aparelho e retire o cabo de alimentação. ● Se a unidade principal estiver desligada, o subwoofer sem fios ficará no modo de espera e o LED STANDBY, na parte superior, acender-se-á após o indicador Link (LED azul) ficar intermitente durante 30 segundos. ● Se utilizar um dispositivo que utiliza a mesma frequência (2,4 GHz) que o Soundbar junto do Soundbar, poderão ocorrer interferências no som.
LIGAÇÕES LIGAR A UM TELEVISOR POR LIGAÇÕES AO TELEVISOR UTILIZANDO UM CABO HDMI (DIGITAL) Cabo HDMI HDMI IN HDMI OUT (TV-ARC) HDMI OUT (TV-ARC) HDMI IN DC 14V AUX IN 5V 0.5A HDMI OUT (TV-ARC) OPTICAL IN 1. Ligue um cabo HDMI entre a tomada HDMI OUT (TV-ARC) na parte posterior do produto e a tomada HDMI IN no seu televisor. (Origem) no painel superior da unidade principal ou o botão SOURCE no controlo remoto para 2. Prima o botão seleccionar o modo de D.IN.
LIGAÇÕES + Auto Power Link Se ligar a unidade principal a um televisor com um cabo óptico digital, active a função Ligar automático para que o Soundbar ligue automaticamente quando ligar o televisor. AUTO POWER LINK Visor LIGADO OFF - ANYNET+ / ON - POWER LINK DESLIGADO ON - ANYNET+ / OFF - POWER LINK 1. Ligue o Soundbar e um televisor com um cabo óptico (não fornecido). 2.
LIGAÇÕES POR ● Mudar o modo do Soundbar do televisor para outro modo termina automaticamente a ligação de som do televisor. ● Para ligar o Soundbar a outro televisor, é necessário terminar a ligação existente. ● Termine a ligação ao televisor existente e, em seguida, prima o botão & no controlo remoto durante 5 segundos para ligar a outro televisor. ● A função TV SoundConnect (SoundShare) é suportada por alguns televisores Samsung comercializados a partir de 2012.
LIGAÇÕES LIGAÇÕES A UM DISPOSITIVO EXTERNO CABO HDMI HDMI é uma interface digital padrão para a ligação de dispositivos como um televisor, projector, leitor de DVD, leitor de Blu-ray, Set-top Box e outros. Como HDMI transmite o sinal digital de melhor qualidade, pode desfrutar de vídeo e áudio superior, tal como criado na origem digital. Cabo HDMI Dispositivos Digitais HDMI OUT HDMI IN HDMIIN HDMI IN DC 14V AUX IN OPTICAL IN HDMI OUT (TV-ARC) 5V 0.5A 1.
LIGAÇÕES + Cabo AUX 1. Ligue a AUX IN (Áudio) na unidade principal à ficha de AUDIO OUT do dispositivo fonte. POR 2. Prima o botão (Origem) no painel superior da unidade principal ou o botão SOURCE no controlo remoto para seleccionar o modo de AUX. + Cabo Óptico 1. Ligue a OPTICAL IN (Áudio) na unidade principal à ficha de OPTICAL OUT do dispositivo fonte. 2. Prima o botão (Origem) no painel superior da unidade principal ou o botão SOURCE no controlo remoto para seleccionar o modo de D.IN.
LIGAÇÕES ● Não são suportados protocolos PTP para câmaras digitais. ● Não retire o dispositivo USB durante a transferência de ficheiros. ● Ficheiros de música (MP3, WMA) de um sítio da Web comercial com protecção DRM não serão reproduzidos. ● Não são suportados HDDs externos. ● Não são suportados dispositivos móveis.
FUNÇÕES funções MODE D’ENTRÉE Modo de entrada POR Prima o botão (Origem) no painel superior da unidade principal ou o botão SOURCE no controlo remoto para seleccionar o modo pretendido. Visor Entrada Digital óptica D.IN Entrada ARC (HDMI OUT) Entrada AUX AUX Entrada HDMI HDMI Modo BLUETOOTH BT TV SoundConnect TV Modo USB USB A unidade desliga-se automaticamente nas seguintes condições: ● Modo D.IN / HDMI / BT / TV / USB / ARC - Caso não exista qualquer sinal de áudio durante 25 minutos.
FUNÇÕES BLUETOOTH Pode ligar um dispositivo Bluetooth a Soundbar e ouvir música com som estéreo de alta qualidade, sem fios! PARA LIGAR O SOUNDBAR A UM DISPOSITIVO BLUETOOTH Verifique se o dispositivo Bluetooth suporta a função de auscultadores estéreo compatíves com Bluetooth. Ligar Dispositivo Bluetooth 1. Prima o botão (Origem) no painel superior da unidade principal ou o botão SOURCE no controlo remoto para seleccionar o modo de BT.
FUNÇÕES ● ● ● ● ● ● ● Se for solicitado um código PIN ao ligar ao dispositivo Bluetooth, introduza <0000>. Apenas é possível emparelhar um dispositivo Bluetooth de cada vez. A ligação Bluetooth será terminada quando o Soundbar é desligado. O Soundbar pode não efectuar a procura e ligação de Bluetooth correctamente nas circunstâncias seguintes: - Se existir um campo eléctrico forte à volta do Soundbar. - Se vários dispositivos Bluetooth estiverem emparelhados com o Soundbar em simultâneo.
FUNÇÕES ● No modo de ligação Bluetooth, a ligação Bluetooth será desactivada se a distância entre o sistema Soundbar e o dispositivo Bluetooth for superior a 10 m. ● O Soundbar desliga-se automaticamente ao fim de 25 no estado Ready. + Mais sobre Bluetooth O Bluetooth é uma tecnologia que permite aos dispositivos compatíveis com Bluetooth serem facilmente interligados, através de uma ligação sem fios de curta distância.
FUNÇÕES ACTUALIZAÇÃO DE SOFTWARE POR HDMI IN DC 14V AUX IN OPTICAL IN 5V 0.5A HDMI OUT (TV-ARC) 5V 0.5A A Samsung poderá vir a disponibilizar actualizações para o firmware do sistema Soundbar. Se for disponibilizada uma actualização, actualize o firmware ligando uma unidade USB com a actualização do firmware armazenada à porta USB do Soundbar.
RESOLUÇÃO DE PROBLEMAS Resolução de problemas RESOLUÇÃO DE PROBLEMAS Antes de solicitar assistência, verifique o seguinte. A unidade não liga. • O cabo de alimentação está ligado à tomada? Ligue a ficha à tomada. Um função não é executada quando se carrega no botão. • Há electricidade estática no ar? Desligue a ficha e volte a ligá-la. Não é emitido som. • A função Silêncio está ligada? Prima o botão • O volume está no mínimo? Regular o Volume. (Silêncio) para cancelar a função.
APÊNDICE apêndice ESPECIFICAÇÕES POR Nome do modelo HW-J6000, HW-J6001 USB Peso GERAL AMPLIFICADOR Dimensões (L x A x P) 5V / 0,5 A Unidade principal 2,7 kg Subwoofer (PS-WJ6000, PS-WJ6001) 6,8 kg Unidade principal 1078 x 47,5 x 129 mm Subwoofer (PS-WJ6000, PS-WJ6001) 452 x 335 x 154 mm Limites da temperatura de funcionamento +5 °C a +35 °C Limites de humidade de funcionamento 10 % a 75 % Potência nominal de saída Unidade principal 22W/CH x 6, 4 OHM, THD=10%, 1KHz Subwoofer (PS-WJ6000, P
©2015 Samsung Electronics Co.,Ltd. All rights reserved Contact SAMSUNG WORLD WIDE If you have any questions or comments relating to Samsung products, please contact the SAMSUNG customer care Centre. © 2015 Samsung Electronics Co., Ltd. Todos os direitos reservados. Contacte a Samsung Internacional Se tem algumas dúvidas ou comentários sobre os nossos produtos, por favor contacte a linha de apoio a Clientes Samsung.