HW-J8500 HW-J8501 Wireless Subwoofer (PS-WJ8500 / PS-WJ8501) User manual Curved Soundbar Imagine the possibilities Thank you for purchasing this Samsung product. To receive more complete service, please register your product at www.samsung.
GETTING STARTED GETTING STARTED FEATURES Immersive Surround Sound from 9.1Ch USB Host Support Great TVs require great sound. The Curved Soundbar gives your curved TV an even more powerful sound experience with 350 watts of amazing 9.1Ch surround sound. Speakers on both sides expand the optimal listening area, enhancing the surround sound effect to provide you with a more layered and immersive listening experience.
GETTING STARTED SAFETY INFORMATION SAFETY WARNINGS TO REDUCE THE RISK OF ELECTRIC SHOCK, DO NOT REMOVE THE COVER (OR BACK). NO USER-SERVICEABLE PARTS ARE INSIDE. REFER SERVICING TO QUALIFIED SERVICE PERSONNEL. The lighting flash and arrowhead within the triangle indicates that there is dangerous voltage Inside the product. CAUTION RISK OF ELECTRIC SHOCK. DO NOT OPEN. The explanation point within the triangle indicates that there are important instructions accompanying the product.
GETTING STARTED PRECAUTIONS 2.7 inch 3.9 inch 3.9 inch 3.9 inch Ensure that the AC power supply in your house complies with the power requirements listed on the identification sticker located on the back of your product. Install your product horizontally, on a suitable base (furniture), with enough space around it for ventilation (3~4 inches). Make sure the ventilation slots are not covered. Do not place the unit on amplifiers or other equipment which may become hot.
GETTING STARTED CONTENTS GETTING STARTED 24 FUNCTIONS 2 Features 24 Input Mode 3 Safety Information 25 Bluetooth 6 What’s Included 27 Using the Multiroom App 28 Using the Network Standby On Function 29 Software Update 7 DESCRIPTIONS 7 Top / Front Panel 8 Rear / Bottom Panel 31 TROUBLESHOOTING 9 Remote Control 31 Troubleshooting 11 INSTALLATION 32 APPENDIX 11 Installing the Soundbar 32 11 Wall Mounting the Soundbar and a TV 13 Attaching the Soundbar to your TV's Stand 1
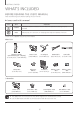
GETTING STARTED WHAT’S INCLUDED BEFORE READING THE USER’S MANUAL Note the following terms before reading the user manual. ++Icons used in this manual Icon Term Definition Caution Indicates a situation where a function does not operate or settings may be canceled. Note Indicates tips or instructions on the page that help you operate a function. Check for the supplied accessories shown below.
DESCRIPTIONS DESCRIPTIONS TOP / FRONT PANEL Controls the volume level. The numeric value of the volume level appears in the front panel display. (Power) Button Turns the power on and off. (Source) Button Display Selects the D.IN, AUX, HDMI, BT, TV, or USB input. Displays the current mode. ●● While the unit is powered on, (Source) button pressing the for more than 3 seconds sets the (Mute) button to act as the (Mute) button.
DESCRIPTIONS REAR / BOTTOM PANEL OPTICAL IN (D.IN) Connect to the digital (optical) output of an external device. HDMI OUT (TV-ARC) Outputs digital video and audio signals simultaneously using an HDMI cable. HDMI IN Inputs digital video and audio signals simultaneously using an HDMI cable. Use when connecting a supported external device. LAN Lets you connect to a network using a LAN cable. AUX IN AUX IN LAN HDMI IN HDMI OUT (TV-ARC) OPTICAL IN Connect to the Analog output of an external device.
DESCRIPTIONS REMOTE CONTROL Mute You can turn the volume down to 0 with the push of a button. Press again to restore the sound to the previous volume level. Repeat Press to set the Repeat function during music playback from a USB device. OFF - REPEAT : Cancels Repeat Playback. TRACK - REPEAT : Repeatedly play a track. ALL - REPEAT : Repeatedly play all tracks. RANDOM - REPEAT : Plays tracks in random order. (A track that has already been played may be played again.
DESCRIPTIONS Power Turns the Soundbar on and off. Volume Adjusts the volume level of the unit. Play / Pause Press the p button to pause a file temporarily. Press the p button again to play the selected file. Skip Back If there is more than one file on the device you are playing, and you press the [ button, the previous file is selected. SOUND EFFECT You can select the sound modes - STANDARD (Original Sound), MUSIC, CLEAR VOICE, SPORTS, MOVIE, and NIGHT MODE - depending on the content you want to listen to.
INSTALLATION INSTALLATION INSTALLING THE SOUNDBAR ENG WALL MOUNTING THE SOUNDBAR AND A TV ●● This Soundbar is compatible with model S9000 and S9500, 65 inch and 78 inch, 2015 Samsung curved TVs. Please visit the home page of Samsung Electronics (www.Samsung.com) to see a detailed list of the compatible models.
AUX IN LAN HDMI IN HDMI OUT (TV-ARC) OPTICAL IN INSTALLATION Wi-Fi SETUP SPK ADD DC 24V AUX IN LAN HDMI IN HDMI OUT (TV-ARC) OPTICAL IN 5V 0.5A TV 5V 0.5A Wi-Fi SETUP SPK ADD DC 24V 3. Fasten the four Holder-Screws 1 and four of the Holder-Screws 2 to the four holes in the Soundbar, as TV shown in the illustration. TV TV 4. To mount the Soundbar on a compatible Samsung TV, use the Guide on the TV to position the TV-Mount on the TV correctly. TV TV 5.
INSTALLATION Soundbar base ENG TV base, with TV-Mount attached 7. Carefully push the Soundbar onto the TV-Mount as far as it will go, as shown in the illustration. 8. Fasten the Holder-Fix Mount to the Soundbar to fix the Soundbar to the TV-Mount. ATTACHING THE SOUNDBAR TO YOUR TV'S STAND You can attach the Soundbar to your TV's stand if you have a Samsung TV that has a stand that is compatible with this Soundbar.
INSTALLATION 4. Align the Soundbar’s center with the center of the base of the TV, and then carefully push it onto the stand as far as it will go, as shown in the illustration. Be careful not to unbalance the TV. ●● Do not place heavy items on the main unit. Do not step on the main unit. INSTALLING THE SOUNDBAR AS A FREE-STANDING UNIT 2 3 AUX IN LAN HDMI IN HDMI OUT (TV-ARC) OPTICAL IN 4 Wi-Fi SETUP 5V 0.5A SPK ADD DC 24V AUX IN LAN HDMI IN HDMI OUT (TV-ARC) OPTICAL IN 1 5V 0.
INSTALLATION ASSEMBLING THE CLAMP-WIRE OPTICAL IN HDMI IN HDMI OUT (TV-ARC) LAN HDMI IN AUX IN LAN AUX IN LAN AUX IN HDMI OUT (TV-ARC) OPTICAL IN OPTICAL IN HDMI OUT (TV-ARC) HDMI IN LAN AUX IN HDMI IN HDMI OUT (TV-ARC) OPTICAL IN ENG Clamp-Wire Attach the clamp-wire to the unit as shown, and then run the cables through the clamp-wire to keep them neat. MOUNTING THE COVER-FEET (4 PIECES) ONTO THE SUBWOOFER R WE PO 1 2 3 1.
CONNECTIONS CONNECTIONS ●● Do not connect the power cord of this product or your TV to a wall outlet until all connections between components are complete. ●● Before moving or installing this product, be sure to turn off the power and disconnect the power cord. CONNECTING THE SUBWOOFER CONNECTING TO THE SUBWOOFER AUTOMATICALLY The Subwoofer's linking ID is preset at the factory and the main unit and subwoofer should link (connect wirelessly) automatically when the main unit and subwoofer are turned on.
CONNECTIONS ●● The wireless receiving antenna is built into the wireless subwoofer. Keep the unit away from water and moisture. ●● For optimal listening performance, make sure that the area around the wireless subwoofer location is clear of any obstructions. 17 ENG ●● Before moving or installing the product, be sure to turn off the power and disconnect the power cord.
CONNECTIONS CONNECTING TO A TV CONNECTING TO A TV USING AN HDMI (DIGITAL) CABLE HDMI Cable HDMI IN AUX IN LAN HDMI IN HDMI OUT (TV-ARC) OPTICAL IN HDMI OUT (TV-ARC) Wi-Fi SETUP 5V 0.5A SPK ADD DC 24V 1. Connect an HDMI cable from the HDMI OUT (TV-ARC) jack on the back of the product to the HDMI IN jack on your TV. 2. Press the (Source) button on the top panel of the Soundbar or the SOURCE button on the remote control to select the D.IN mode.
CONNECTIONS ++Auto Power Link AUTO POWER LINK Display ON OFF - ANYNET+ / ON - POWER LINK OFF ON - ANYNET+ / OFF - POWER LINK 1. Connect the Soundbar and a TV with a digital optical cable (not supplied). 2. Press the (Source) button on the main unit’s top panel or the SOURCE button on the remote control to select the D.IN mode. 3. Press the Anynet+ button on the remote control to toggle the Auto Power Link function on and off. ●● Depending on the connected device, Auto Power Link may not function.
CONNECTIONS ●● The TV SoundConnect (SoundShare) function is supported by some Samsung TVs released from 2012 on. Check whether your TV supports the TV SoundConnect (SoundShare) function before you begin. (For further information, refer to the TV’s user manual.). ●● If your Samsung TV was released before 2014, check the SoundShare setting menu. ●● If the distance between the TV and Soundbar exceeds 32.8 ft, the connection may not be stable or the audio may stutter.
CONNECTIONS CONNECTING TO EXTERNAL DEVICES ENG HDMI CABLE HDMI is the standard digital interface for connecting to TVs, projectors, DVD players, Blu-ray players, set top boxes, and more. HDMI prevents any degradation to the signal due to conversion to analog and maintains the video and audio quality of the original digital source. HDMI Cable HDMI OUT HDMI IN AUX IN LAN HDMI IN HDMI OUT (TV-ARC) OPTICAL IN Digital Devices Wi-Fi SETUP 5V 0.5A SPK ADD DC 24V 1.
CONNECTIONS ++AUX Cable 1. Connect AUX IN (Audio) on the main unit to the AUDIO OUT jack of the Source Device. 2. Press the (Source) button on the top panel of the Soundbar or the SOURCE button on the remote control to select the AUX mode. ++Optical Cable 1. Connect OPTICAL IN (Audio) on the main unit to the OPTICAL OUT jack of the Source Device. 2. Press the (Source) button on the top panel of the Soundbar or the SOURCE button on the remote control to select the D.IN mode.
CONNECTIONS ●● Digital camera PTP protocols are not supported. ●● Do not remove the USB device while it is transferring files. ENG ●● DRM-protected music files (MP3, WMA) from commercial web sites cannot be played. ●● External HDDs are not supported. ●● Mobile phone devices are not supported. ●● File Format Type Compatibility list: Extension *.mp3 *.wma Codec Sampling Rate Bitrate MPEG 1 Layer1 32/44.1/48 32 ~ 448kbps MPEG 1 Layer2 32/44.1/48 32 ~ 384kbps MPEG 1 Layer3 32/44.
FUNCTIONS FUNCTIONS INPUT MODE Press the (Source) button on the main unit’s top panel or the SOURCE button on the remote control to select the mode you want. Input mode Optical Digital input ARC (HDMI OUT) input Display D.IN AUX input AUX HDMI input HDMI BLUETOOTH mode BT TV SoundConnect TV USB mode USB AUTO POWER DOWN FUNCTION The unit turns off automatically in the following situations. ●● D.IN / HDMI / BT / TV / USB / ARC Mode -- If there is no audio signal for 15 minutes.
FUNCTIONS BLUETOOTH TO CONNECT THE SOUNDBAR TO A BLUETOOTH DEVICE Check if the Bluetooth device supports the Bluetooth compliant stereo headset function. Connect Bluetooth device 1. Press the (Source) button on the main unit’s top panel or the SOURCE button on the remote control to select the BT mode. • You will see BT READY on the front display of the Soundbar. 2. Select the Bluetooth menu on the Bluetooth device you want to connect. (Refer to the Bluetooth device's user manual.) 3.
FUNCTIONS ●● The Soundbar supports SBC data (44.1kHz, 48kHz). ●● Connect only to a Bluetooth device that supports the A2DP (AV) function. ●● You cannot connect the Soundbar to a Bluetooth device that supports only the HF (Hands Free) function. ●● Once you have paired the Soundbar to a Bluetooth device, selecting "[Samsung] HW-Jxxxx" from the device's scanned devices list will automatically change the Soundbar to BT mode.
FUNCTIONS USING THE MULTIROOM APP BEFORE YOU BEGIN ++Communication Basics Smart Device: Android or iOS (App Control) Internet Wireless Router Requirements: 1. A Wireless Router and a Smart Device. 2. The wireless router must be connected to the Internet. 3. The smart device must be connected to the router via a Wi-Fi connection. INSTALLING THE SAMSUNG MULTIROOM APP To use the Soundbar with the Samsung Multiroom App, you must download and then install the Samsung Multiroom App on your smart device.
FUNCTIONS ++Launching the Samsung Multiroom App To launch the Samsung Multiroom app, tap the Multiroom app icon on your smart device. Connecting the Soundbar to Your Network On your smart device, select the Samsung Multiroom app. Follow the directions on your smart device’s screen. ●● Use Cat 7 (*STP Type) cable for the connection.
FUNCTIONS SOFTWARE UPDATE AUX IN LAN HDMI IN HDMI OUT (TV-ARC) OPTICAL IN ENG Wi-Fi SETUP 5V 0.5A SPK ADD DC 24V 5V 0.5A UPDATING WITH USB Samsung may offer updates for the Soundbar's system firmware in the future. If an update is offered, you can update the firmware by connecting a USB device with the firmware update stored on it to the USB port on your Soundbar.
FUNCTIONS ●● After the update, all settings are reset to their factory default settings. We recommend you write down your settings so that you can easily reset them after the update. Note that updating firmware resets the subwoofer connection too. If connection to the subwoofer is not re-established automatically after the update, refer to page 16. If the firmware fails to update, we recommend formatting the USB device in FAT16 and trying again. ●● Do not format the USB device in the NTFS format.
TROUBLESHOOTING TROUBLESHOOTING TROUBLESHOOTING The unit will not turn on. ¼¼Connect the power plug to the outlet. • Is the power cord plugged into the outlet? A function does not work when the button is pressed. ¼¼Disconnect the power plug and connect it again. • Is there static electricity in the air? Sound is not produced. • Is the Mute function on? ¼¼Press the function. • Is the volume set to minimum? (Mute) button to cancel the Mute ¼¼Adjust the Volume. The remote control does not work.
APPENDIX APPENDIX Specifications Model name HW-J8500, HW-J8501 5V / 0.5A USB Weight GENERAL AMPLIFIER Dimensions + (W x H x D) Main Unit 11.0 lbs Subwoofer (PS-WJ8500, PS-WJ8501) 23.4 lbs Main Unit 57.1 x 2.4 x 7.3 inches Subwoofer (PS-WJ8500, PS-WJ8501) 19.7 x 13.1 x 7.
WARRANTY LIMITED WARRANTY TO ORIGINAL PURCHASER This SAMSUNG brand product, as supplied and distributed by Samsung Electronics America, Inc.
QUESTIONS OR COMMENTS? COUNTRY U.S.A CALL 1-800-SAMSUNG (1-800-726-7864) OR VISIT US ONLINE AT WRITE www.samsung.com/us/ support Samsung Electronics America, Inc. 85 Challenger Road Ridgefield Park, NJ 07660 ©2015 Samsung Electronics Co.,Ltd.