FULL MANUAL HW-R650 Imagine the possibilities Thank you for purchasing this Samsung product. To receive more complete service, please register your product at www.samsung.
SAFETY INFORMATION SAFETY WARNINGS WARNING •• To reduce the risk of fire or electric shock, do TO REDUCE THE RISK OF ELECTRIC SHOCK, DO not expose this appliance to rain or moisture. NOT REMOVE THE COVER (OR BACK). CAUTION NO USER-SERVICEABLE PARTS ARE INSIDE. REFER SERVICING TO QUALIFIED SERVICE •• TO PREVENT ELECTRIC SHOCK, MATCH WIDE PERSONNEL. BLADE OF PLUG TO WIDE SLOT, FULLY Refer to the table below for an explanation of INSERT. symbols which may be on your Samsung product.
PRECAUTIONS 5. The battery used with this product contains chemicals that are harmful to the environment. Do not dispose of the battery 1. Ensure that the AC power supply in your in the general household trash. Do not house complies with the power expose the battery to excess heat, direct requirements listed on the identification sunlight, or fire. Do not short circuit, sticker located on the bottom of your disassemble, or overheat the battery. product.
CONTENTS 01 Checking the Components Inserting Batteries before using the Remote Control (AA batteries X 2) 02 03 04 05 06 2 -------------------------- Product Overview 2 3 Front Panel / Right Side Panel of the Soundbar -------------------------- 3 Bottom Panel of the Soundbar -------------------------- 4 Connecting the Soundbar 5 Connecting Electrical Power -------------------------- 5 Connecting the Soundbar to the Subwoofer –– Automatic connection between the Subwoofer and the Soundb
07 08 09 10 Connecting a Mobile Device 18 Connecting via Bluetooth -------------------------- 18 Using the Samsung Audio Remote App –– Installing the Samsung Audio Remote App –– Launching the Samsung Audio Remote App -------------------------- 21 -------------------------- 21 -------------------------- 21 Using the Remote Control 22 How to Use the Remote Control -------------------------- 22 Adjusting the Soundbar volume with a TV remote control -------------------------- 25 Using the Hidden
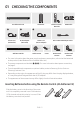
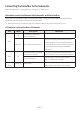
01 CHECKING THE COMPONENTS PAIR SOUND MODE VOL WOOFER SOUNDBAR Soundbar Main Unit 1 2 Power Cord (Subwoofer) AC/DC Adapter (Main Unit) Subwoofer Remote Control / Batteries 3 Power Cord (AC/DC Adapter) x2 Wall Mount Guide HDMI Cable Holder-Screw Micro USB to USB adapter Cable x2 Screw Bracket-Wall Mount L Bracket-Wall Mount R •• For more information about the power supply and power consumption, refer to the label attached to the product.
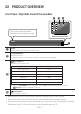
02 PRODUCT OVERVIEW Front Panel / Right Side Panel of the Soundbar Position the product so that the SAMSUNG logo is located on the top. Right Side of the Soundbar Display Displays the product’s status and current mode. +/- (Volume) Button Adjusts the volume. •• When adjusted, the volume level appears on the Soundbar’s front display. (Source) Button Selects the source input mode. Input mode Display Optical Digital input D.IN ARC (HDMI OUT) input D.
Bottom Panel of the Soundbar DIGITAL AUDIO IN (OPTICAL) USB (5V 0.5A) AUX IN HDMI IN HDMI IN HDMI OUT (TV-ARC) HDMI OUT (TV-ARC) DIGITAL AUDIO IN (OPTICAL) USB (5V 0.5A) AUX IN HDMI IN DC 24V DC 24V HDMI OUT (TV-ARC) DIGITAL AUDIO IN (OPTICAL) Connect to the digital (optical) output of an external device. USB (5V 0.5A) Connect a USB device here to play music files on the USB device through the Soundbar. AUX IN Connect to the Analogue output of an external device.
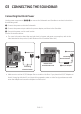
03 CONNECTING THE SOUNDBAR Connecting Electrical Power Use the power components (1, 2, 3) to connect the Subwoofer and Soundbar to an electrical outlet in the following order: 1 Connect the power cord to the Subwoofer. 2 Connect the power output cable to the power adapter, and then to the Soundbar. 3 Connect the power cord to a wall socket. See the illustrations below. •• For more information about the required electrical power and power consumption, refer to the label attached to the product.
Connecting the Soundbar to the Subwoofer When the subwoofer is connected, you can enjoy rich bass sound. Automatic connection between the Subwoofer and the Soundbar When you turn the power on after connecting the power cables to the Soundbar and subwoofer, the subwoofer is automatically connected to the Soundbar. •• When auto pairing is complete, the blue indicators at the rear of the subwoofer turn on.
Manually connecting the Subwoofer if automatic connection fails Before performing the manual connection procedure below: •• Check whether the power cables for the Soundbar and subwoofer are connected properly. •• Make sure that the Soundbar is turned on. 1. Press and hold ID SET on the rear of the subwoofer for at least 5 seconds. •• The red indicator on the rear of the subwoofer turns off and the blue indicator blinks. 5 Sec Rear of Subwoofer 2.
NOTES •• Do not connect the power cord of this product or your TV to a wall outlet until all connections between components are complete. •• Before moving or installing this product, be sure to turn off the power and disconnect the power cord. •• If the main unit is powered off, the wireless subwoofer will go into stand-by mode and the STANDBY LED on the rear of the sub-woofer will turn red after blinking in blue several times. •• If you use a device that uses the same frequency (5.
2. Check the standby status of the Wireless Receiver Module after plugging it into an electrical outlet. •• The LINK LED indicator (blue LED) on the Wireless Receiver Module blinks. If the LED does not blink, press the ID SET button on the back of the Wireless Receiver Module with a pen tip for 5~6 seconds until the LINK LED indicator blinks (in Blue). For more about the LED, please refer to the SWA-8500S user manual.
04 CONNECTING TO YOUR TV Hear TV sound from your Soundbar through wired or wireless connections. •• When the Soundbar is connected to selected Samsung TVs, the Soundbar can be controlled using the TV’s remote control. –– This feature is supported by 2017 and later Samsung Smart TVs that support Bluetooth when you connect the Soundbar to the TV using an optical cable. –– This function also allows you to use the TV menu to adjust the sound field and various settings as well as the volume and mute. Method 1.
•• If “TV ARC” does not appear in the display window of the Soundbar main unit, confirm that the HDMI cable is connected to the correct port. •• Use the volume buttons on the TV’s remote control to change the volume on the Soundbar. NOTES •• HDMI is an interface that enables the digital transmission of video and audio data with just a single connector. •• If the TV provides an ARC port, connect the HDMI cable to the HDMI IN (ARC) port. •• We recommend you use a coreless HDMI cable if possible.
Auto Power Link Auto Power Link automatically turns on the Soundbar when the TV is turned on. 1. Connect the Soundbar and a TV with a digital optical cable (not supplied). 2. Press the Left button on the remote control for 5 seconds to turn Auto Power Link on or off. •• Auto Power Link is set to ON by default. (To turn off this function, hold the Left button on the remote for 5 seconds.) •• Depending on the connected device, Auto Power Link may not function. •• This function is only available in the “D.
If the device fails to connect •• If a previously connected Soundbar listing (e.g. “[AV] Samsung Soundbar R6-Series”) appears in the list, delete it. •• Then repeat steps 1 through 3. NOTE •• After you have connected the Soundbar to your TV the first time, use the “BT READY” mode to reconnect. Disconnecting the Soundbar from the TV Press the (Source) button on the right side panel or on the remote control and switch to any mode but “BT”.
05 CONNECTING AN EXTERNAL DEVICE Connect to an external device via a wired or wireless network to play the external device’s sound through the Soundbar. Connecting using an HDMI Cable Bottom of the Soundbar HDMI OUT External Device HDMI IN HDMI Cable HDMI OUT (TV-ARC) HDMI IN (ARC) HDMI Cable HDMI Right Side of the Soundbar 1. Connect an HDMI cable from the HDMI IN jack on the back of the product to the HDMI OUT jack on your digital device. 2.
Connecting using an Optical or Analogue Audio (AUX) Cable Right Side of the Soundbar BD / DVD player / Set-top box / Game console OPTICAL OUT DIGITAL AUDIO IN (OPTICAL) Optical Cable (not supplied) R - AUDIO - L HDMI IN USB (5V 0.5A) AUX IN HDMI OUT (TV-ARC) Audio (AUX) Cable (not supplied) Bottom of the Soundbar 1 Optical Cable XX Connect DIGITAL AUDIO IN (OPTICAL) on the main unit to the OPTICAL OUT jack of the Source Device using a digital optical cable (not supplied). YY Select “D.
06 CONNECTING A USB STORAGE DEVICE You can play music files located on USB storage devices through the Soundbar. Display USB port DIGITAL AUDIO IN (OPTICAL) USB (5V 0.5A) AUX IN HDMI IN DC 24V HDMI OUT (TV-ARC) USB (5V 0.5A) USB Micro USB to USB adapter Cable 1. Connect a Micro USB to USB adapter cable with a male USB 2.0 Micro USB plug (Type B) on one end and a standard female 2.0 USB jack (Type A) on the other end to the micro USB jack on your Soundbar. 2.
File Format Type Compatibility list Extension Codec Sampling Rate Bitrate *.mp3 MPEG 1 Layer2 16kHz ~ 48kHz 80kbps~320kbps MPEG 1 Layer3 16kHz ~ 48kHz 80kbps~320kbps MPEG 2 Layer3 16kHz ~ 48kHz 80kbps~320kbps MPEG 2.5 Layer3 16kHz ~ 48kHz 80kbps~320kbps Wave_Format_MSAudio1 16kHz ~ 48kHz 56kbps~128kbps Wave_Format_MSAudio2 16kHz ~ 48kHz 56kbps~128kbps AAC 16kHz ~ 96kHz 48kbps~320kbps AAC-LC 16kHz ~ 96kHz 128kbps~192kbps 5.1ch 320kbps HE-AAC 24kHz ~ 96kHz 48kbps~64kbps 5.
07 CONNECTING A MOBILE DEVICE Connecting via Bluetooth When a mobile device is connected using Bluetooth, you can hear stereo sound without the hassle of cabling. •• You cannot connect more than one Bluetooth device at a time. PAIR OR Bluetooth device ND SOUODE M The initial connection 1. Press the PAIR button on the remote control to enter the “BT PAIRING” mode. (OR) a. Press the (Source) button on the right side panel and then select “BT”.
What is the difference between BT READY and BT PAIRING? •• BT READY : In this mode, you can search for previously connected TVs or connect a previously connected mobile device to the Soundbar. •• BT PAIRING : In this mode, you can connect a new device to the Soundbar. (Press the on the remote control or press and hold the PAIR button (Source) button on the right side of the Soundbar for more than 5 seconds while the Soundbar is in “BT” mode.
Disconnecting the Bluetooth device from a Soundbar You can disconnect a Bluetooth device from the Soundbar. For instructions, see the Bluetooth device’s user manual. •• The Soundbar will be disconnected. •• When the Soundbar is disconnected from the Bluetooth device, the Soundbar will display “BT DISCONNECTED” on the front display. Disconnecting the Soundbar from the Bluetooth device Press the (Source) button on the right side panel or on the remote control, and then change to any mode except “BT”.
Using the Samsung Audio Remote App Installing the Samsung Audio Remote App To control the Soundbar with your smart device and the Samsung Audio Remote app, download the Samsung Audio Remote app from the Google Play store. Market search : Samsung Audio Remote Launching the Samsung Audio Remote App To launch and use the Samsung Audio Remote app, touch the Audio Remote icon on your smart device, and then follow the directions on the screen.
08 USING THE REMOTE CONTROL How to Use the Remote Control Turns the Soundbar on and off. Power PAIR Press to select a source connected to the Soundbar. •• BT PAIRING mode To turn on “BT PAIRING” mode, change the source to “BT” mode, and then press and hold the (Source) button for more than 5 seconds. Source Press the (Mute) button to mute the sound. Press it again PAIR to unmute the sound.
Press the PAIR button. “BT PAIRING” appears in the Soundbar’s display. You can connect the Soundbar to a new Bluetooth device in this mode by selecting the Soundbar from the Bluetooth device's search list. PAIR Bluetooth PAIR SOUND MODE Play / Pause VOL WOOFER PAIR SOUND MODE Press the p button to pause a music file temporarily. When you press the button again, the music file plays. •• Auto Power Down Function The unit turns off automatically in the following situations: –– In D.
•• Volume Restriction function To protect your hearing, the Volume Restriction function restricts the volume to 20 if you turn on the Soundbar when the volume is set higher than 20. –– The default value for the Volume Restriction function is Off. You must turn it on to activate it. –– When turned on, the Volume Restriction function stays on even when the power is turned off. –– To turn Volume Restriction on or off, press and hold the Down button on the remote control for 5 seconds.
Adjusting the Soundbar volume with a TV remote control 4. If you want to return the Soundbar to the If you have a Samsung TV, you can adjust the Soundbar’s volume using the IR remote control that came with your Samsung TV. button for 5 seconds repeatedly until default mode (control by a Samsung TV remote), push up and hold the WOOFER “SAMSUNG-TV REMOTE” appears in the display.
Using the Hidden Buttons (Buttons with more than one function) Hidden Button Reference page Remote Control Button Function WOOFER TV remote control On/Off (Standby) page 25 BT Pairing page 22 Auto Power Down On/Off (AUX mode) page 23 Initialise (Standby) page 30 (Source) p (Play / Pause) BT Ready page 13 Left Auto Power Link ON/OFF page 23 Right Anynet+ ON/OFF page 23 Up ID SET page 23 Down Volume restriction On/Off page 24 7 Band EQ page 24 DRC ON/OFF (Standby) page 22 Blue
09 INSTALLING THE WALL MOUNT Wallmount Components Wall Mount Guide Installation Precautions x2 •• Install on a vertical wall only. •• Do not install in a place with high x2 Holder-Screw temperature or humidity. •• Verify whether the wall is strong enough to Screw x2 support the product’s weight. If not, reinforce the wall or choose another installation point.
2. Align the Wall Mount Guide’s Centre Line 5. Push a screw (not supplied) through each with the centre of your TV (if you are Holder-Screw, and then screw each screw mounting the Soundbar below your TV), and firmly into a support screw hole. then fix the Wall Mount Guide to the wall using tape. •• If you are not mounting below a TV, place the Centre Line in the centre of the installation area. 6.
7. Install the Soundbar with the attached Bracket-Wall Mounts by hanging the Bracket-Wall Mounts on the Holder-Screws on the wall. 10 SOFTWARE UPDATE Samsung may offer updates for the Soundbar’s system firmware in the future. USB port DIGITAL AUDIO IN (OPTICAL) USB (5V 0.5A) AUX IN HDMI IN DC 24V HDMI OUT (TV-ARC) USB (5V 0.5A) 8. Slide the Soundbar down as shown below so that the Bracket-Wall Mounts rest securely Micro USB to USB adapter Cable on the Holder-Screws.
Updating Procedure If UPDATE is not displayed Important: The updating function erases all user settings. We recommend you write down your settings so that you can easily reset them after the update. Note that updating the firmware resets the subwoofer connection too. 1. Connect a Micro USB to USB adapter cable with a male USB 2.0 Micro USB plug (Type B) on one end and a standard female 2.0 USB jack (Type A) on the other end to the micro USB jack on your Soundbar. 2.
11 TROUBLESHOOTING Before seeking assistance, check the following. The unit will not turn on. Is the power cord plugged into the outlet? ;; Connect the power plug to the outlet. A function does not work when the button is pressed. Is there static electricity in the air? ;; Disconnect the power plug and connect it again. Sound dropouts occur in BT mode. ;; See the Bluetooth connection sections on pages 12 and 18. Sound is not produced.
12 LICENCE 13 OPEN SOURCE LICENCE NOTICE To send inquiries and requests regarding open sources, contact Samsung via Email Manufactured under license from Dolby Laboratories. Dolby, Dolby Audio, Pro Logic, and the double-D symbol are trademarks of Dolby Laboratories. For DTS patents, see http://patents.dts.com. (oss.request@samsung.com). 14 IMPORTANT NOTES ABOUT SERVICE Manufactured under license from DTS Licensing Limited.
15 SPECIFICATIONS AND GUIDE Specifications Model Name HW-R650 USB 5V/0.5A Weight 2.9 kg Dimensions (W x H x D) 1060.0 x 59.0 x 87.5 mm Operating Temperature Range +5°C to +35°C Operating Humidity Range 10 % ~ 75 % AMPLIFIER Rated Output power 30W x 6 LPCM 2ch, Dolby Audio™ Supported play formats (supporting Dolby® Digital), DTS Subwoofer Name PS-WR65D Weight 6.0 kg Dimensions (W x H x D) 200.0 x 353.0 x 302.0 mm AMPLIFIER Rated Output power 160W NOTES •• Samsung Electronics Co.
THÔNG TIN AN TOÀN CẢNH BÁO AN TOÀN CẢNH BÁO •• Để giảm nguy cơ cháy hay bị điện giật, không ĐỂ GIẢM NGUY CƠ BỊ ĐIỆN GIẬT, KHÔNG THÁO để thiết bị này tiếp xúc với nước mưa hoặc hơi VỎ (HOẶC PHÍA SAU). BÊN TRONG KHÔNG CÓ BỘ ẩm. PHẬN NÀO CÓ THỂ DÙNG ĐƯỢC VỚI NGƯỜI CHÚ Y DÙNG. ĐƯA SẢN PHẨM ĐẾN NHÂN VIÊN BẢO DƯỠNG CÓ ĐỦ CHUYÊN MÔN ĐỂ BẢO DƯỠNG.
PHÒNG NGỪA 5. Pin được sử dụng cùng với sản phẩm này chứa các chất hoá học có hại cho môi trường. ́ Không vứ t bỏ pin cùng rác sinh hoạt chung. 1. Đảm bảo nguồn cấp điện AC trong nhà bạn Không ném pin vào lửa. Không ngắt mạch, tuân theo các yêu cầu về nguồn điện được tháo rời hoặc để pin quá nóng. Thay pin nêu trên nhãn nhận biết nằm ở phía dưới không đúng cách có thể gây cháy nổ. Chỉ cùng của sản phẩm. Lắp đặt sản phẩm của được thay cùng loại pin hoặc tương đương.
NỘI DUNG 01 Kiểm Tra Linh Kiện 2 Lắp pin trước khi sử dụng Điều khiển từ xa (2 pin AA) 02 03 04 05 06 -------------------------- Tổng quan về Sản phẩm 2 3 Mặt Trước / Cạnh Phải của Soundbar -------------------------- 3 Mặt Đáy của Soundbar -------------------------- 4 Kết nối Soundbar 5 Kết nối với Nguồn Điện -------------------------- 5 Kết nối Soundbar với Loa trầm –– Kết nối tự động giữa loa trầm và Soundbar –– Kết nối thủ công với loa trầm nếu không kết nối tự động được -------
07 08 09 10 Kết nối với Thiết bị di động 18 Kết nối qua Bluetooth -------------------------- 18 Sử dụng Ứng dụng Samsung Audio Remote –– Cài đặt Ứng dụng Samsung Audio Remote –– Khởi chạy Ứng dụng Samsung Audio Remote -------------------------- 21 -------------------------- 21 -------------------------- 21 Sử dụng Điều khiển từ xa 22 Cách Sử dụng Điều khiển từ xa -------------------------- 22 Điều chỉnh âm lượng Soundbar bằng điều khiển TV từ xa -------------------------- 25 Sử dụng các Nút
01 KIỂM TRA LINH KIỆN PAIR SOUND MODE VOL WOOFER SOUNDBAR Thiết bị Chính Soundbar 1 2 Dây Nguồn (Loa trầm) Loa trầm Điều khiển từ xa / Pin 3 Bộ chuyển đổi AC/DC (Thiết bị Chính) Dây Nguồn (Bộ chuyển đổi AC/DC) x2 Chi tiết Treo Tường Cáp HDMI Chi tiết giữ - Vít Cáp chuyển đổi Micro USB thành USB x2 Vít Giá Treo Tường T Giá Treo Tường P •• Đối với nguồn điện và Công suất Tiêu thụ, hãy tham khảo nhãn đính kèm với sản phẩm.
02 TỔNG QUAN VỀ SẢN PHẨM Mặt Trước / Cạnh Phải của Soundbar Đặt sản phẩm sao cho logo SAMSUNG nằm ở trên đầu. Cạnh Phải của Soundbar Màn hình Hiển thị trạng thái của sản phẩm và chế độ hiện tại. Nút +/- (Âm lượng) Điều chỉnh âm lượng. •• Khi bạn điều chỉnh, mức âm lượng sẽ xuất hiện trên màn hình trước của Soundbar. Nút (Nguồn tín hiệu) Chọn chế độ nguồn vào. Chế độ nguồn vào Màn hình Đầu vào Kỹ thuật số Quang D.IN Đầu vào ARC (HDMI OUT) D.
Mặt Đáy của Soundbar DIGITAL AUDIO IN (OPTICAL) HDMI IN HDMI IN USB (5V 0.5A) AUX IN HDMI OUT (TV-ARC) HDMI OUT (TV-ARC) DIGITAL AUDIO IN (OPTICAL) USB (5V 0.5A) AUX IN HDMI IN DC 24V DC 24V HDMI OUT (TV-ARC) DIGITAL AUDIO IN (OPTICAL) Nối với đầu ra kỹ thuật số (quang) của thiết bị bên ngoài. USB (5V 0.5A) Kết nối thiết bị USB tại đây để phát tập tin nhạc trên thiết bị USB qua Soundbar. AUX IN Kết nối với đầu ra Tương tự của thiết bị bên ngoài.
03 KẾT NỐI SOUNDBAR Kết nối với Nguồn Điện Sử dụng các bộ phận nguồn (1, 2, 3) để kết nối Loa trầm và Soundbar với ổ cắm điện theo thứ tự sau: 1 Kết nối dây nguồn với Loa trầm. 2 Kết nối cáp nguồn ra với bộ điều hợp nguồn, rồi đến Soundbar. 3 Kết nối dây nguồn với ổ cắm điện. Xem hình minh họa bên dưới. •• Để biết thêm thông tin về nguồn điện cần dùng và mức tiêu thụ điện năng, hãy xem nhãn dán trên sản phẩm.
Kết nối Soundbar với Loa trầm Khi đã kết nối loa trầm, bạn có thể thưởng thức âm trầm dày dặn. Kết nối tự động giữa loa trầm và Soundbar Lúc bạn bật nguồn điện sau khi nối cáp điện với Soundbar và loa trầm, loa trầm sẽ tự động được kết nối với Soundbar. •• Khi quá trình ghép đôi tự động hoàn tất, đèn báo màu xanh lam ở mặt sau của loa trầm sẽ bật.
Kết nối thủ công với loa trầm nếu không kết nối tự động được Kiểm tra trước khi kết nối thủ công •• Kiểm tra xem cáp điện có được kết nối đúng cách vào Soundbar và loa trầm không. •• Bảo đảm rằng Soundbar được bật. 1. Nhấn và giữ ID SET ở mặt sau của loa trầm trong ít nhất 5 giây. •• Đèn báo màu đỏ ở mặt sau của loa trầm sẽ tắt và đèn báo màu xanh lam sẽ nhấp nháy. 5 Sec Mặt sau của Loa trầm 2. Nhấn và giữ nút Lên trên điều khiển từ xa trong ít nhất 5 giây.
GHI CHÚ •• Không cắm dây điện của sản phẩm này hoặc của TV vào ổ cắm điện cho đến khi tất cả các bộ phận đã được kết nối xong. •• Trước khi di chuyển hay lắp sản phẩm này, hãy nhớ tắt nguồn điện và rút dây điện. •• Nếu thiết bị chính bị tắt nguồn, thì loa trầm không dây sẽ chuyển sang chế độ chờ và đèn LED STANDBY ở mặt sau sẽ sáng Đỏ sau khi nhấp nháy màu Xanh lam vài lần. •• Nếu bạn dùng thiết bị có sử dụng cùng tần số (5,8 GHz) như Soundbar ở gần Soundbar, thì sóng giao thoa có thể làm ngắt tiếng.
2. Kiểm tra trạng thái chờ của Mô đun Bộ thu Không dây sau khi cắm vào ổ cắm điện. •• Đèn LED LINK (đèn LED màu lam) trên Mô đun Bộ thu Không dây nhấp nháy. Nếu đèn LED không nhấp nháy, hãy dùng đầu bút nhấn vào nút ID SET ở phía sau của Mô-đun Bộ thu Không dây khoảng 5 đến 6 giây cho tới khi đèn LED LINK nhấp nháy (Màu lam). Để biết thêm về đèn LED, vui lòng tham khảo hướng dẫn sử dụng SWA-8500S.
04 KẾT NỐI VỚI TV Nghe âm thanh từ TV trên Soundbar bằng kết nối không dây hoặc có dây. •• Khi Soundbar được kết nối với TV Samsung đã chọn, bạn có thể điều khiển Soundbar bằng điều khiển từ xa của TV. –– Các TV Thông minh của Samsung phiên bản 2017 trở lên sẽ hỗ trợ tính năng này và hỗ trợ cả Bluetooth khi bạn kết nối Soundbar với TV bằng cáp quang. –– Chức năng này cũng cho phép bạn sử dụng menu của TV để điều chỉnh trường âm thanh và nhiều cài đặt khác, cũng như chỉnh âm lượng và tắt tiếng.
•• Nếu tính năng “TV ARC” không xuất hiện trong cửa sổ hiển thị của thiết bị chính Soundbar thì bạn cần xác nhận rằng cáp HDMI đã được cắm đúng cổng. •• Sử dụng các nút âm lượng trên điều khiển từ xa của TV để thay đổi âm lượng trên Soundbar. GHI CHÚ •• HDMI là giao diện cho phép truyền dữ liệu video và âm thanh kỹ thuật số chỉ qua một đầu nối. •• Nếu TV có cổng ARC, hãy cắm cáp HDMI vào cổng HDMI IN (ARC). •• Chúng tôi khuyên bạn nên sử dụng cáp HDMI không lõi, nếu được.
Auto Power Link Chức năng Auto Power Link sẽ tự động bật Soundbar khi bạn bật TV. 1. Kết nối Soundbar và TV bằng cáp quang (không đi kèm) kỹ thuật số. 2. Nhấn nút Trái trên điều khiển từ xa trong 5 giây để bật hoặc tắt Auto Power Link. •• Auto Power Link được đặt thành ON theo mặc định. (Để tắt chức năng này, hãy giữ nút Trái trên điều khiển từ xa trong 5 giây.) •• Tùy theo thiết bị được kết nối, Auto Power Link có thể không hoạt động. •• Chức năng này chỉ khả dụng ở chế độ “D.IN”. Phương thức 2.
Nếu thiết bị không kết nối được •• Nếu Soundbar đã kết nối trước đây (ví dụ: “[AV] Samsung Soundbar R6-Series”) xuất hiện trong danh sách, hãy xóa mục đó. •• Sau đó lặp lại các bước từ 1 đến 3. LƯU Ý •• Sau khi bạn đã kết nối Soundbar với TV của mình lần đầu tiên, hãy sử dụng chế độ “BT READY” để kết nối lại. Ngắt kết nối giữa Soundbar và TV Nhấn nút (Nguồn tín hiệu) ở cạnh phải hoặc trên điều khiển từ xa và chuyển sang bất kỳ chế độ nào không phải “BT”.
05 KẾT NỐI VỚI THIẾT BỊ BÊN NGOÀI Kết nối với thiết bị bên ngoài qua mạng không dây hoặc có dây để phát âm thanh từ thiết bị đó trên Soundbar. Kết nối bằng Cáp HDMI Đáy Soundbar HDMI OUT Thiết bị Bên ngoài HDMI IN Cáp HDMI HDMI OUT (TV-ARC) HDMI IN (ARC) Cáp HDMI HDMI Cạnh Phải của Soundbar 1. Kết nối cáp HDMI giữa giắc HDMI IN ở mặt sau của sản phẩm và giắc HDMI OUT trên thiết bị số. 2. Kết nối cáp HDMI giữa giắc HDMI OUT (TV-ARC) ở mặt sau của sản phẩm và giắc HDMI IN trên TV. 3.
Kết nối bằng cáp quang hoặc cáp âm thanh analog (AUX) Đầu phát BD/DVD/ Cạnh Phải của Soundbar Bộ giải mã tín hiệu/ Máy chơi trò chơi OPTICAL OUT DIGITAL AUDIO IN (OPTICAL) Cáp Quang (không đi kèm) R - AUDIO - L HDMI IN USB (5V 0.5A) AUX IN HDMI OUT (TV-ARC) Cáp Âm thanh (AUX) (không đi kèm) Đáy Soundbar 1 Cáp Quang XX Kết nối DIGITAL AUDIO IN (OPTICAL) trên thiết bị chính với giắc OPTICAL OUT của Thiết bị Nguồn bằng cáp quang (không đi kèm) kỹ thuật số. YY Chọn chế độ “D.
06 KẾT NỐI VỚI THIẾT BỊ LƯU TRỮ USB Bạn có thể phát tập tin nhạc trên thiết bị lưu trữ USB qua Soundbar. Màn hình Cổng USB DIGITAL AUDIO IN (OPTICAL) USB (5V 0.5A) AUX IN HDMI IN DC 24V HDMI OUT (TV-ARC) USB (5V 0.5A) USB Cáp chuyển đổi Micro USB thành USB 1. Kết nối cáp chuyển đổi Micro USB thành USB (có một đầu cắm USB 2.0 Micro USB (Type B) và một giắc nhận USB 2.0 (Type A) tiêu chuẩn) với giắc micro USB trên Soundbar. 2. Kết nối thiết bị USB với đầu nhận của cáp chuyển đổi. 3.
Danh sách Kiểu Định dạng Tập tin Tương thích Phần mở rộng Codec Tốc độ lấy mẫu Tốc độ bit *.mp3 MPEG 1 Layer2 16kHz ~ 48kHz 80kbps~320kbps MPEG 1 Layer3 16kHz ~ 48kHz 80kbps~320kbps MPEG 2 Layer3 16kHz ~ 48kHz 80kbps~320kbps MPEG 2.
07 KẾT NỐI VỚI THIẾT BỊ DI ĐỘNG Kết nối qua Bluetooth Khi kết nối sản phẩm với một thiết bị di động qua Bluetooth, bạn có thể nghe âm thanh stereo mà không cần phải lắp cáp. •• Bạn không thể kết nối nhiều thiết bị Bluetooth cùng lúc. PAIR HOẶC Thiết bị Bluetooth ND SOUODE M Kết nối ban đầu 1. Nhấn nút (HOẶC) PAIR trên xa điều khiển để chuyển sang chế độ “BT PAIRING”. a. Nhấn nút (Nguồn tín hiệu) trên pa-nen bên phải, rồi chọn “BT”.
Sự khác nhau giữa BT READY và BT PAIRING? •• BT READY : Trong chế độ này, bạn có thể tìm kiếm các TV đã kết nối trước đó hoặc kết nối với một thiết bị di động đã từng kết nối với Soundbar. •• BT PAIRING : Trong chế độ này, bạn có thể kết nối thiết bị mới với Soundbar. (Nhấn nút điều khiển từ xa hoặc nhấn và giữ nút PAIR trên (Nguồn tín hiệu) ở bên phải Soundbar trong hơn 5 giây khi Soundbar đang ở chế độ “BT”.
Ngắt kết nối giữa thiết bị Bluetooth và Soundbar Bạn có thể ngắt kết nối thiết bị Bluetooth khỏi Soundbar. Để biết hướng dẫn, xem sách hướng dẫn sử dụng thiết bị Bluetooth. •• Soundbar sẽ bị ngắt kết nối. •• Khi Soundbar được ngắt kết nối với thiết bị Bluetooth, Soundbar sẽ hiển thị “BT DISCONNECTED” trên màn hình phía trước.
Sử dụng Ứng dụng Samsung Audio Remote Cài đặt Ứng dụng Samsung Audio Remote Để điều khiển Soundbar bằng thiết bị thông minh của bạn và ứng dụng Samsung Audio Remote, hãy tải xuống ứng dụng Samsung Audio Remote từ cửa hàng Google Play. Tìm kiếm thị trường : Samsung Audio Remote Khởi chạy Ứng dụng Samsung Audio Remote Để khởi chạy và sử dụng ứng dụng Samsung Audio Remote, hãy chạm vào biểu tượng Audio Remote trên thiết bị thông minh của bạn rồi làm theo các hướng dẫn trên màn hình.
08 SỬ DỤNG ĐIỀU KHIỂN TỪ XA Cách Sử dụng Điều khiển từ xa Bật và tắt Soundbar. Nguồn điện PAIR Nhấn để chọn nguồn tín hiệu được kết nối với Soundbar. Nguồn tín hiệu Nhấn nút (Tắt tiếng) để tắt tiếng. Nhấn nút này một PAIR lần nữa để bật tiếng. Tắt tiếng SOUND MODE VOL WOOFER SOUNDBAR PAIR SOUND MODE Bạn có thể chọn hiệu ứng âm thanh mong muốn SOUND MODE trong số các tùy chọn STANDARD, SURROUND SOUND, GAME hoặc SMART.
Nhấn nút PAIR. “BT PAIRING” sẽ xuất hiện trên màn hình của Soundbar. Bạn có thể kết nối Soundbar với thiết bị Bluetooth mới trong chế độ này bằng cách chọn Soundbar từ danh sách tìm kiếm thiết bị Bluetooth. PAIR Bluetooth PAIR SOUND MODE Phát/ Tạm dừng VOL WOOFER PAIR SOUND MODE Nhấn nút p để tạm thời tạm dừng tập tin nhạc. Nếu bạn nhấn nút này lần nữa, tập tin nhạc sẽ được phát tiếp. •• Chức năng Auto Power Down Thiết bị tự động tắt đi trong các trường hợp sau. –– Chế độ D.
•• Chức năng Giới hạn âm lượng Để bảo vệ thính lực của bạn, chức năng Giới hạn âm lượng hạn chế âm lượng ở mức 20 nếu bạn bật Soundbar khi âm lượng được đặt ở mức trên 20. –– Giá trị mặc định cho chức năng Giới hạn âm lượng sẽ là Tắt. Bạn phải bật lên để kích hoạt chức năng này. –– Khi đã bật, chức năng Giới hạn âm lượng sẽ luôn được bật, ngay cả khi đã tắt nguồn thiết bị. –– Để tắt hoặc bật Giới hạn âm lượng, hãy nhấn và giữ nút Xuống trên điều khiển từ xa trong 5 giây.
4. Nếu bạn muốn điều khiển Soundbar bằng Điều chỉnh âm lượng Soundbar bằng điều khiển TV từ xa chế độ mặc định (điều khiển bằng điều khiển từ xa của TV Samsung), hãy nhấn và giữ nút WOOFER liên tục trong 5 giây cho đến khi Nếu bạn có TV Samsung, bạn có thể điều chỉnh âm lượng của Soundbar bằng điều khiển từ xa IR đi kèm với TV. “SAMSUNG-TV REMOTE” xuất hiện trên màn hình.
Sử dụng các Nút Ẩn (Các nút có nhiều chức năng) Nút Ẩn Trang tham khảo Nút trên Điều khiển Từ xa Chức năng WOOFER Bật/Tắt Điều khiển từ xa tivi (Chờ) Trang 25 Ghép đôi BT Trang 22 (Nguồn tín hiệu) Bật/Tắt Auto Power Down (Chế độ AUX) Trang 23 p (Phát/Tạm dừng) Khởi chạy (Chờ) Trang 30 BT Sẵn sàng Trang 13 Trái Auto Power Link ON/OFF Trang 23 Phải Anynet+ ON/OFF Trang 23 Lên ID SET Trang 23 Xuống Bật/Tắt Giới hạn âm lượng Trang 24 EQ 7 Dải Trang 24 DRC ON/OFF (Chờ) Trang 22
09 LẮP GIÁ TREO TƯỜNG Phụ kiện Treo tường Chi tiết Treo Tường Điềm cần chú ý khi Lắp đặt x2 •• Chỉ lắp trên tường thẳng đứng. •• Không lắp ở nơi có nhiệt độ hoặc độ ẩm cao. x2 Chi tiết giữ - Vít •• Xác minh xem tường có đủ chắc để giữ được sản phẩm không. Nếu không, hãy gia cố Vít x2 tường hoặc chọn nơi lắp khác. •• Mua và sử dụng vít gắn hoặc móc neo phù hợp với kiểu tường (tấm thạch cao, tấm sắt, Giá Treo Tường gỗ, v.v...). Nếu có thể, hãy bắt vít đỡ vào khung tường.
2. Căn chỉnh Trục Tâm của Chi tiết Treo Tường 5. Ấn vít (không đi kèm) qua từng Chi tiết giữ với phần chính giữa của TV (nếu bạn định lắp - Vít, rồi vặn chặt từng vít vào lỗ vít đỡ. Soundbar ở dưới TV), sau đó cố định Chi tiết Treo Tường vào tường bằng băng dính. •• Nếu bạn không lắp bên dưới TV, hãy đặt Trục Tâm ở chính giữa khu vực lắp đặt. 6. Lắp 2 Giá Treo Tường theo đúng hướng ở đáy của Soundbar bằng 2 Vít. Trục Tâm 3.
7. Lắp Soundbar đã gắn Giá Treo Tường bằng cách treo Giá Treo Tường lên Chi tiết giữ - Vít trên tường. 10 CẬP NHẬT PHẦN MỀM Samsung có thể cung cấp các bản cập nhật cho chương trình cơ sở của hệ thống Soundbar trong tương lai. Cổng USB DIGITAL AUDIO IN (OPTICAL) 8. Trượt Soundbar xuống dưới như trong hình USB (5V 0.5A) AUX IN minh họa bên dưới để Giá Treo Tường nằm HDMI IN DC 24V HDMI OUT (TV-ARC) USB (5V 0.5A) chắc chắn trên Chi tiết giữ - Vít.
Quy trình Cập nhật Nếu UPDATE không xuất hiện Quan trọng: Chức năng cập nhật sẽ xóa toàn bộ 1. Tắt Soundbar, rút và cắm lại thiết bị lưu trữ cài đặt người dùng. Bạn nên ghi lại các cài đặt của USB có chứa tập tin cập nhật vào cổng USB mình để có thể dễ dàng đặt lại sau khi cập nhật. của Soundbar. Hãy lưu ý việc cập nhật vi phần mềm cũng sẽ đặt 2. Rút dây điện của Soundbar, cắm lại và bật lại kết nối của loa trầm. Soundbar. 1. Kết nối cáp chuyển đổi Micro USB thành USB (có một đầu cắm USB 2.
11 XỬ LÝ SỰ CỐ Trước khi yêu cầu bảo trì, hãy kiểm tra các mục sau. Thiết bị không bật. Dây điện có được cắm vào ổ cắm điện không? ;; Cắm phích điện vào ổ cắm điện. Một chức năng không hoạt động khi nhấn nút. Có điện tĩnh trong không khí không? ;; Rút phích điện và cắm lại. Mất tiếng ở chế độ BT. ;; Xem các phần kết nối Bluetooth trên 12 và 18. Không có tiếng. Chức năng Tắt tiếng có bật không? ;; Nhấn nút VOL để hủy chức năng đó.
12 GIẤY PHÉP 13 THÔNG BÁO GIẤY PHÉP NGUỒN MỞ Để gửi truy vấn và yêu cầu về các nguồn mở, hãy Manufactured under license from Dolby Laboratories. Dolby, Dolby Audio, Pro Logic, and the double-D symbol are trademarks of Dolby Laboratories. For DTS patents, see http://patents.dts.com. liên hệ với Samsung qua Email (oss.request@samsung.com). 14 LƯU Ý QUAN TRỌNG VỀ DỊCH VỤ Manufactured under license from DTS Licensing Limited.
15 THÔNG SỐ KỸ THUẬT VÀ HƯỚNG DẪN Thông số kỹ thuật Tên kiểu máy HW-R650 USB 5V/0,5A Trọng lượng 2,9 kg Kích thước (Rộng x Cao x Sâu) 1060,0 x 59,0 x 87,5 mm Phạm vi nhiệt độ hoạt động +5°C đến +35°C Phạm vi độ ẩm hoạt động 10 % ~ 75 % BỘ KHUẾCH ĐẠI Công suất đâ ̀u ra danh định 30W x 6 LPCM 2ch, Dolby Audio™ Định dạng phát được hỗ trợ (hỗ trợ Dolby® Digital), DTS Tên Loa trầm PS-WR65D Trọng lượng 6,0 kg Kích thước (Rộng x Cao x Sâu) 200,0 x 353,0 x 302,0 mm
TRUNG TÂM BẢO HÀNH SAMSUNG Cảm ơn Quý khách đã lựa chọn và sử dụng sản phẩm của Công ty TNHH Điện Tử SAMSUNG VINA. 1. Phục vụ Quý khách trong quá trình sử dụng sản phẩm luôn được chúng tôi quan tâm chăm sóc.
© 2019 Samsung Electronics Co., Ltd. All rights reserved. Contact SAMSUNG WORLD WIDE If you have any questions or comments relating to Samsung products, please contact the SAMSUNG customer care Centre. Area Contact Centre Web Site ` Asia Pacific CHINA 400-810-5858 www.samsung.com/cn/support TAIWAN 0800-329-999 www.samsung.com/tw/support HONG KONG 3698 4698 MACAU 0800 333 www.samsung.com/hk/support (Chinese) www.samsung.com/hk_en/support (English) SINGAPORE 1800 7267864 | 1800-SAMSUNG www.