FULL MANUAL HW-S60B / HW-S61B / HW-S68CB Imagine the possibilities Thank you for purchasing this Samsung product. To receive more complete service, please register your product at www.samsung.
SAFETY INFORMATION WARNING •• The following also applies to the Wireless Subwoofer (PS-WC74B). •• To reduce the risk of fire or electric shock, do not expose this appliance to rain or moisture. •• To prevent injury, this apparatus must be SAFETY WARNINGS securely set on a solid surface or attached to TO REDUCE THE RISK OF ELECTRIC SHOCK, DO a wall in accordance with the installation NOT REMOVE THE COVER (OR BACK). instructions. NO USER-SERVICEABLE PARTS ARE INSIDE.
FCC Caution : FCC Radiation Exposure Statement : •• Any changes or modifications not expressly This equipment complies with FCC radiation approved by the party responsible for exposure limits set forth for an uncontrolled compliance could void the user’s authority to environment. This equipment should be installed operate this equipment. and operated so there is at least 8 inches (20 cm) •• This product satisfies FCC regulations when between the radiator and your body.
7. Do not block any ventilation openings. 14. Refer all servicing to qualified service Install in accordance with the manufacturer’s personnel. Servicing is required when the instructions. apparatus has been damaged in any way, 8. Do not install near any heat sources such as such as power-supply cord or plug is radiators, heat registers, stoves, or other damaged, liquid has been spilled or objects apparatus (including amplifiers) that produce have fallen into the apparatus, the apparatus heat.
4. Protect the product from moisture (i.e. vases), and excess heat (e.g. a fireplace) or equipment creating strong magnetic or electric fields. Unplug the power cable from the AC wall socket if the unit malfunctions. Your product is not intended for industrial use. It is for personal use only. Condensation may occur if your product has been stored in cold temperatures. If transporting the unit during the winter, wait approximately 2 hours or until the unit has reached room temperature before using. 5.
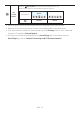
CONTENTS 01 Checking the Components 8 02 Product Overview 9 03 Front Panel / Top Panel of the Soundbar -------------------------- Bottom Panel of the Soundbar -------------------------- 11 Using the Remote Control 9 12 Inserting Batteries before using the Remote Control (AAA batteries X 2) -------------------------- 12 04 05 How to Use the Remote Control -------------------------- 12 Active Voice Amplifier (AVA) -------------------------- 16 Using the Hidden Buttons (Buttons with more t
06 Connecting an External Device Connecting using an Optical Cable 07 34 -------------------------- 34 Connecting a Mobile Device 35 Method 1. Connecting via Bluetooth -------------------------- 35 Method 2.
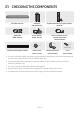
01 CHECKING THE COMPONENTS SOUND MODE WOOFER CH LEVEL TONE CONTROL Soundbar Main Unit Subwoofer (HW-S68CB only) Soundbar Remote Control (AH81-15047A) / Batteries HDMI Cable (BN39-02661A) AC/DC Adapter (BN44-01014A) Power Cord (3903-001117) 1EA (HW-S60B/S61B) 2EA (HW-S68CB) A TYPE : 450mm x2 x2 x2 (M4 x L10) Wall Mount Guide (AH81-15186A) Holder-Screw (AH61-04110A) Bracket-Wall Mount (AH61-04235A) Screw (6001-001202) •• For more information about the power supply and power consumption, refer
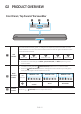
02 PRODUCT OVERVIEW Front Panel / Top Panel of the Soundbar Top Panel The LED Indicator flashes, glows, or changes color depending on the Soundbar's current mode or status. The color of the LED indicator and the number of lights indicate the active mode as described below. LED indicator W W M W W White LED White LED Multicolor LED White LED White LED •• The Multicolor LED changes to White, Cyan, Green, Red, and Blue depending on the mode or status.
Press the (Mic On/Off) button to turn the microphone on or off. When the microphone is off, the LED Indicator will light red. Mic On/Off Button LED Indicator Red On “Mic Off” “Mic On” •• When you plug in the AC cord, the power button will begin working in 4 to 6 seconds. •• When you turn on this unit, there will be a 4 to 5 second delay before it produces sound.
Bottom Panel of the Soundbar DC 19V DC 19V SERVICE SERVICE HDMI HDMI (ARC) (ARC) DIGITAL AUDIO IN (OPTICAL) DC 19V HDMI (ARC) SERVICE DIGITAL AUDIO IN DIGITAL (OPTICAL) AUDIO IN (OPTICAL) DC 19V (Power Supply In) Connect the AC/DC power adapter. (See page 19) SERVICE Connect a USB storage device to upgrade the product's software. DIGITAL AUDIO IN (OPTICAL) Connect to the digital (optical) output of an external device.
03 USING THE REMOTE CONTROL Inserting Batteries before using the Remote Control (AAA batteries X 2) Slide the back cover in the direction of the arrow until it is completely removed. Insert 2 AAA batteries (1.5V) oriented so that their polarity is correct. Slide the back cover back into position. How to Use the Remote Control LED Power Turns the Soundbar on and off.
(Mute) Press the (Mute) button to mute the sound. Press it again to unmute the sound. LED Blinks X Repeatly Indicator Volume Push the button up or down to adjust the volume. White moves to right X1 White moves to left X1 Volume Up Volume Down LED Indicator CH LEVEL By pressing the button, you can adjust the volume of the each speaker. LED White Blinks X1 Indicator “Center Level” “Side Level” –– If the Rear Speakers (sold separately) are connected, the setting “Rear Level” is supported.
(Sound Control) By pressing the button, you can set the audio function. The desired item can be adjusted using the Up/ Down buttons. Each time the mode changes, the Multicolor LED blinks in white. White Blinks X1 LED Indicator “SpaceFit Sound” “ Active Voice Amplifier” “Voice enhancement” “Night mode” “Sync” “Virtual” –– Press and hold the (Sound Control) button for about 5 seconds to adjust the sound for each frequency band. 150Hz, 300Hz, 600Hz, 1.2kHz, 2.
Up/Down/Left/Right Press Up/Down/Left/Right on the button to select or set functions. •• Music Skip Press the Right button to select the next music file. Press the Left button to select the previous music file. •• ID SET Press and hold the Up button for 5 seconds to complete ID SET (when connecting to a wireless subwoofer or wireless rear speakers). (Info) Press the button to display information about the current function. (See page 9.
Active Voice Amplifier (AVA) •• Analyzes external noise in real time while soundbar is playing, so that voice audio can always be heard clearly. •• No data is saved during the analysis.
Output specifications for the different sound effect modes Output Effect Adaptive Sound DTS Virtual:X Music Game Standard Input With Subwoofer Only With Subwoofer & Wireless Rear Speaker Kit 2.0 ch 5.1 ch 7.1 ch 5.1 ch 5.1 ch 7.1 ch Dolby Atmos® 5.1 ch 7.1 ch 2.0 ch 5.1 ch 7.1 ch 5.1 ch 5.1 ch 7.1 ch Dolby Atmos® 5.1 ch 7.1 ch 2.0 ch 5.1 ch 7.1 ch 5.1 ch 5.1 ch 7.1 ch Dolby Atmos® 5.1 ch 7.1 ch 2.0 ch 5.1 ch 7.1 ch 5.1 ch 5.1 ch 7.1 ch Dolby Atmos® 5.1 ch 7.
Adjusting the Soundbar volume with a TV remote control Adjust the Soundbar volume using the TV’s remote control. •• This function can be used with IR remote controls only. Bluetooth remote controls (remote controls that require pairing) are not supported. •• Set the TV speaker to External Speaker to use this function. •• Manufacturers supporting this function: Samsung, VIZIO, LG, Sony, Sharp, PHILIPS, PANASONIC, TOSHIBA, Hisense, RCA 1. Turn Off the Soundbar. 2.
04 CONNECTING THE SOUNDBAR Connecting Electrical Power (HW-S60B/S61B model) Use the power components to connect the Soundbar to an electrical outlet in the following order: •• For more information about the required electrical power and power consumption, refer to the label attached to the product. (Label: Bottom of the Soundbar Main Unit) 1. First connect the power cable to the AC/DC adapter. Connect the AC/DC adapter (with the power cable) to the Soundbar. 2. Connect the power cord to a wall socket.
Connecting the power and units (HW-S68CB model) Use the power components to connect the Subwoofer and Soundbar to an electrical outlet in the following order: •• For more information about the required electrical power and power consumption, refer to the label attached to the product. (Label: Bottom of the Soundbar Main Unit) 1. Connect the power cord to the Subwoofer. Power Cord Rear of Subwoofer Connecting Electrical Power 2. First connect the power cable to the AC/DC adapter.
3. Connect power to the Soundbar and Subwoofer. The Subwoofer is automatically connected when the Soundbar is turned on. Blue is On NOTES •• Connect power to the Subwoofer first. The Subwoofer will be automatically connected when turning on the Soundbar. •• If you unplug and reconnect the power cord when the product is turned on, the Soundbar turns on automatically. •• Make sure to rest the AC/DC Adapter flat on a table or the floor.
3. Press and hold the Up button on the remote control for at least 5 seconds. Red → Green → Blue Blinks PAIR 5 Sec ND SOUODE M •• The Soundbar will automatically power on when ID SET is complete. 4. Check if the LINK LED is solid blue (connection complete). The LINK LED indicator stops blinking and glows a solid blue when a connection is established between the Soundbar and the Wireless Subwoofer.
LED Indicator Lights on the Rear of Subwoofer LED Status On Description Successfully connected (normal operation) Resolution Check if the power cable Blue attached to the main Soundbar unit is connected Blinking Recovering the connection properly or wait about 5 minutes. If blinking persists, try manually connecting the subwoofer. See page 21. Check if the power cable Red Standby (with the Soundbar attached to the main main unit turned off) Soundbar unit is connected properly.
05 CONNECTING TO A TV Connecting the TV that supports HDMI ARC (Audio Return Channel) CAUTION •• When both the HDMI cable and optical cable are connected, the HDMI signal is received first. •• To connect the HDMI cable between the TV and Soundbar, be sure to connect the terminals marked ARC. Otherwise, the TV sound may not be output. •• The recommended cable is High Speed HDMI Cable with Ethernet. Connect to the HDMI IN (ARC) or (eARC) port of your TV.
NOTES •• When you connect the TV that supports the HDMI ARC (Audio Return Channel) to the Soundbar with an HDMI cable, you can transmit the digital video and audio data without connecting a separate optical cable. •• We recommend you use a coreless HDMI cable if possible. If you use a cored HDMI cable, use one whose diameter is less than 0.55 inches (14 mm). •• This function is not available if the HDMI cable does not support ARC.
Connecting using an Optical Cable Pre-connection Checklist •• When both the HDMI cable and optical cable are connected, the HDMI signal is received first. •• When you use an optical cable and the terminals have covers, be sure to remove the covers. Optical Cable (not supplied) DIGITAL AUDIO IN (OPTICAL) OPTICAL OUT HDMI Bottom of the (ARC) Top of the Soundbar Soundbar LED White On -> Off Indicator “Digital Audio In” 1.
Connecting via Bluetooth When a Samsung TV is connected using Bluetooth, you can hear stereo sound without the hassle of cabling. •• Only one Samsung TV can be connected at a time. •• Samsung TV that supports Bluetooth can be connected. Check the specifications of your TV. The initial connection 1.
If the device fails to connect •• If you have an existing Soundbar (e.g., S-Series Soundbar) on the list of speakers on the Samsung TV, delete it. •• Then repeat steps 1 through 3. Disconnecting the Soundbar from the Samsung TV Press the (Multi Function) button at the top of the Soundbar or the (Source) button on the remote control to select the mode other than “Bluetooth”. •• Disconnecting takes time because the Samsung TV must receive a response from the Soundbar.
Connecting via Wi-Fi Pre-connection Checklist •• Wi-Fi connection is available only on Samsung TV. •• Check whether the wireless router (Wi-Fi) is turned on and the TV is connected to the router. •• The TV and Soundbar must be connected to the same wireless network (Wi-Fi). •• If your wireless router (Wi-Fi) uses a DFS channel, you will not be able to establish a Wi-Fi connection between the TV and Soundbar. Contact your Internet service provider for details.
Connecting to a TV that supports Dolby Atmos® Pre-connection Checklist •• Dolby Atmos® is supported in "TV ARC" or "Wi-Fi" mode. •• Make sure that the content supports Dolby Atmos®. Connect to the HDMI IN (ARC) or (eARC) port of your TV. Connect to the HDMI (ARC) port of HDMI IN (ARC) HDMI Cable DIGITAL theAUDIO Soundbar main unit. IN (OPTICAL) HDMI (ARC) Top of the Soundbar Bottom of the Soundbar LED White On -> Off Indicator “TV ARC” 1.
TV menu Wi-Fi LED White On -> Off Indicator “Wi-Fi” 1. Connect the Soundbar and TV to the same wireless network (Wi-Fi). 2. For sound output of the TV, select Soundbar. 3. TV sound is output from the Soundbar. NOTES •• Configuring Dolby Atmos® on a BD player or other device connected to the TV. Open the audio output options on the settings menu of your BD player or other device and make sure that “No Encoding” is selected for Bitstream.
Using the Q-Symphony Function For Q-Symphony, the Soundbar syncs with a Samsung TV to output sound through two devices for optimum surround effect. When the Soundbar is connected, the menu, “TV+Soundbar” appears under the Sound Output menu of the TV. Select the corresponding menu.
Using the SpaceFit Sound Provides optimized sound quality by analyzing the listening spaces. Method 1. Connecting via Soundbar To enable this function, turn on the SpaceFit Sound mode with the remote control of the Soundbar. ( (Sound Control) → "SpaceFit Sound Off" → ▲ ( Up ) → "SpaceFit Sound On") •• This is available in all Sound modes. Method 2. Connecting via TV To enable this function, turn on the Adaptive Sound+ mode on your Samsung TV menu.
06 CONNECTING AN EXTERNAL DEVICE Connecting using an Optical Cable Bottom of the Soundbar Optical Cable BD / DVD player / Set-top (not supplied) box / Game console DIGITAL AUDIO IN (OPTICAL) HDMI Top of the Soundbar (ARC) OPTICAL OUT R - AUDIO - L LED White On -> Off Indicator “Digital Audio In” 1.
07 CONNECTING A MOBILE DEVICE Method 1. Connecting via Bluetooth When a mobile device is connected using Bluetooth, you can hear stereo sound without the hassle of cabling. •• When you connect a paired Bluetooth device with the Soundbar off, the Soundbar automatically turns on. The initial connection •• When connecting to a new Bluetooth device, make sure the device is within 3.28 ft (1 m) distance. 1.
Notes on Bluetooth connection •• Locate a new device within 3.28 ft (1 m) to connect via Bluetooth communication. •• If asked for a PIN code when connecting a Bluetooth device, enter <0000>. •• The Soundbar automatically turns off after 18 minutes in the Ready state. •• The Soundbar may not perform Bluetooth search or connection correctly under the following circumstances: –– If there is a strong electrical field around the Soundbar.
Disconnecting the Bluetooth device from a Soundbar You can disconnect a Bluetooth device from the Soundbar. For instructions, see the Bluetooth device’s user manual. •• The Soundbar will be disconnected. •• If the Soundbar is disconnected from the Bluetooth device, the multicolor LED indicator on the Soundbar blinks "Red” three times.
Method 2. Connecting via Wi-Fi (Wireless Network) To connect a Soundbar to a mobile device via a wireless network (Wi-Fi), the SmartThings app is required. The initial connection 1. Install and launch the SmartThings app from your mobile device (smartphone or tablet). 2. On the app, follow the screen instructions to add the Soundbar. •• The automatic pop-up (the second screenshot below) may not show on some devices. If the pop-up window does not appear, press “ ” on the Home screen.
Using the Tap Sound Tap the Soundbar with your mobile device to play audio from the mobile device through the Soundbar. •• This function may not be supported, depending on the mobile device. •• This function is only compatible with Samsung mobile devices with Android 8.1 or later. SmartThings App Top of the Soundbar Mobile device 1. Turn on the Tap Sound function on your mobile device. •• For details on how to turn on the function, refer to “Enable the Tap Sound function” below. 2.
08 CONNECTING VIA APPLE AIRPLAY 2 •• This feature may not be available in some countries. •• This Samsung Soundbar supports AirPlay 2 and requires iOS 11.4 or later. With AirPlay 2, you can stream music, podcasts, and other audio from your Apple devices to the Samsung Soundbar. •• Make sure the Soundbar is powered on and connected to the same Wi-Fi network as your Apple device. •• Select from an AirPlay-supported app or Control Center on your iPhone, iPad, or Mac.
09 INSTALLING THE WALL MOUNT Installation Precautions •• Install on a vertical wall only. •• Do not install in a place with high temperature or humidity. •• Verify whether the wall is strong enough to support the product’s weight. If not, reinforce the wall or choose another installation point. •• Purchase and use the fixing screws or anchors appropriate for the kind of wall you have (plaster board, iron board, wood, etc.). If possible, fix the support screws into wall studs.
Wallmount Components 2. Align the Wall Mount Guide’s Center Line with the center of your TV (if you are mounting the Soundbar below your TV), and then fix the Wall Mount Guide to the wall A TYPE : 450mm using tape. Wall Mount Guide (AH81-15186A) •• If you are not mounting below a TV, place the Center Line in the center of the x2 x2 installation area. (M4 x L10) Holder-Screw Screw (AH61-04110A) (6001-001202) A TYPE : 450mm x2 Center Line 3.
5. Push a screw (not supplied) through each 7. Install the Soundbar with the attached Holder-Screw, and then screw each screw Bracket-Wall Mounts by hanging the firmly into a support screw hole. Bracket-Wall Mounts on the Holder-Screws on the wall. (Not supplied) 6. Install the 2 Bracket-Wall Mounts in the correct orientation on the bottom of the Soundbar using 2 Screws. 8. Slide the Soundbar down as shown below so that the Bracket-Wall Mounts rest securely on the Holder-Screws.
10 INSTALLING THE SOUNDBAR IN FRONT OF TV 11 SOFTWARE UPDATE Auto Update When the Soundbar is connected to the Internet, software updates automatically occur even when the Soundbar is turned off. •• To use the Auto Update function, the Soundbar must be connected to the Internet. The Wi-Fi connection to the Soundbar will be terminated if the Soundbar’s power cord is disconnected or the power is cut off. If the 1.
1. Go to (www.samsung.com) → search for the model name from the customer support menu option. •• For more information about update, refer to Upgrade Guide. 2. Download the upgrade file (USB type). 3. Unzip the file to create a folder with the file name. 4. Store the created folder in a USB and then connect it to the Soundbar. 5. Turn on the Soundbar. Then the product is updated within 3 minutes. 5 Sec With the Soundbar on, press the (Volume) buttons on the body at the same time for at least 5 seconds.
12 TROUBLESHOOTING Refer to the instructions below if this product does not function properly. If the problem you are experiencing is not listed below or if the instructions below do not help, turn off the product, disconnect the power cord, and contact Samsung Electronics at 1-800-SAMSUNG (1-800-726-7864). Soundbar does not turn on. ;; Check whether the power cord of the Soundbar is correctly inserted into the outlet. Soundbar works erratically. ;; After removing the power cord, insert it again.
There is no sound in when connecting to the Unable to connect to Wi-Fi. TV in HDMI (ARC) mode. ;; Your device is unable to play the input signal. Change the TV’s audio output to PCM or Dolby Digital. (For a Samsung TV: Home ( ) → Menu → Settings ( ) → All Settings ( ) → Sound → Expert Settings → Digital Output Audio Format) The Soundbar will not connect via Bluetooth. ;; When connecting a new device, switch to Bluetooth Pairing for connection.
13 LICENSE •• Use your phone, tablet or computer as a remote control for Spotify. Go to spotify. Dolby, Dolby Atmos, and the double-D symbol are registered trademarks of Dolby com/connect to learn how •• The Spotify Software is subject to third Laboratories Licensing Corporation. party licenses found here : Manufactured under license from Dolby https://www.spotify.com/connect/third- Laboratories. Confidential unpublished works. party-licenses. Copyright © 2012-2021 Dolby Laboratories.
14 OPEN SOURCE LICENSE NOTICE [ENERGY STAR] ENERGY STAR qualified model only –– Your Samsung product is ENERGY STAR qualified in its factory default setting. Change to certain features, settings and functionality in this product can change the power consumption, possibly beyond the limits required for ENERGY STAR qualification. –– Environmental Protection Agency and Department of Energy. ENERGY STAR is a joint program of the Government agencies, designed to promote energy efficient products and practices.
16 SPECIFICATIONS AND GUIDE Specifications Soundbar Model Name HW-S60B / HW-S61B / HW-S68CB Weight 6.0 lbs (2.7 kg) 26.4 x 2.4 x 4.1 inches Dimensions (W x H x D) (670.0 x 62.0 x 105.0 mm) Operating Temperature Range +41°F to +95°F (+5°C to +35°C) Operating Humidity Range 10 % ~ 75 % AMPLIFIER Rated Output power (30W x 2) + (30W x 2) + (30W x 2) + 20W Dolby 5.1ch / Dolby Digital Plus / Supported play formats Dolby ATMOS (Dolby Digital Plus) / DTS 5.
LIMITED WARRANTY TO ORIGINAL PURCHASER This SAMSUNG brand product, as supplied and distributed by SAMSUNG and delivered new, in the original carton to the original consumer purchaser, is warranted by SAMSUNG against manufacturing defects in materials and workmanship for a limited warranty period of: One (1) Year Parts and Labor* (*90 Days Parts and Labor for Commercial Use) This limited warranty begins on the original date of purchase, and is valid only on products purchased and used in the United States.
QUESTIONS OR COMMENTS? Country IN THE US Samsung Service Center 1-800-SAMSUNG (726-7864) Web Site Address www.samsung.com/us/support Samsung Electronics America, Inc. 85 Challenger Road Ridgefield Park, NJ 07660 © 2022 Samsung Electronics Co., Ltd. All rights reserved.