
User Manual
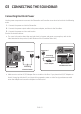


Table Of Contents
- HW-Q60T_ENG
- 01 Checking the Components
- 02 Product Overview
- 03 Connecting the Soundbar
- 04 Connecting to your TV
- 05 Connecting an External Device
- 06 Connecting a USB Storage Device
- 07 Connecting a Mobile Device
- 08 Using the Remote Control
- 09 Installing the Wall Mount
- 10 Placing the Soundbar on a TV stand
- 11 Software Update
- 12 Troubleshooting
- 13 License
- 14 Open Source License Notice
- 15 Important Notes About Service
- 16 Specifications and Guide
- HW-Q60T_FRA
- 01 Vérification des Composants
- 02 Présentation du Produit
- 03 Branchement du Soundbar
- 04 Branchement à votre Téléviseur
- 05 Branchement d’un Périphérique Externe
- 06 Connexion à un périphérique de stockage USB
- 07 Branchement d’un Appareil Mobile
- 08 Utlisation de la Télécommande
- 09 Installation du Support Mural
- 10 Placement du Soundbar sur un support de Téléviseur
- 11 Mise à jour Logicielle
- 12 Dépannage
- 13 Licence
- 14 Avis de Licences Libres
- 15 Remarque Importante Concernant le Service
- 16 Caractéristiques et Guide

ENG - 7
Manually connecting the Subwoofer if automatic connection fails
Before performing the manual connection procedure below:
• Check whether the power cables for the Soundbar and subwoofer are connected properly.
• Make sure that the Soundbar is turned on.
1. Press and hold ID SET on the rear of the subwoofer for at least 5 seconds.
• The red indicator on the rear of the subwoofer turns off and the blue indicator blinks.
5 Sec
Rear of Subwoofer
2. Press and hold the Up button on the remote control for at least 5 seconds.
• The ID SET message appears on the display of the Soundbar for a moment, and then it
disappears.
• The Soundbar will automatically power on when ID SET is complete.
SOUND
MODE
PAIR
5 Sec
ID SET
SAMSUNG logo is on the top
3. Check if the LINK LED is solid blue (connection complete).
Blue is On
The LINK LED indicator stops blinking and
glows a solid blue when a connection is
established between the Soundbar and the
Wireless Subwoofer.