
User Manual


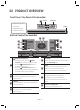


Table Of Contents
- HW-Q800T_ENG
- 01 Checking the Components
- 02 Product Overview
- 03 Using the Remote Control
- 04 Connecting the Soundbar
- 05 Using a wired connection to the TV
- 06 Using a wireless connection to the TV
- 07 Connecting an External Device
- 08 Connecting a Mobile Device
- 09 Installing the Wall Mount
- 10 Installing the Soundbar above a TV Stand
- 11 Software Update
- 12 Troubleshooting
- 13 License
- 14 Open Source License Notice
- 15 Important Notes About Service
- 16 Specifications and Guide
- HW-Q800T_SPA
- 01 Verificación de los componentes
- 02 Información general del producto
- 03 Uso del control remoto
- 04 Conexión de la Soundbar
- 05 Uso de una conexión con cable al TV
- 06 Uso de una conexión inalámbrica al TV
- 07 Conexión a un dispositivo externo
- 08 Conexión a un dispositivo móvil
- 09 Instalación del soporte de montaje en la pared
- 10 Instalación de la Soundbar sobre un soporte para TV
- 11 Actualización de software
- 12 Resolución de problemas
- 13 Licencia
- 14 Aviso Sobre Licencia de código abierto
- 15 Nota Importante Sobre el Servicio
- 16 Especificaciones y Guía

ENG - 5
01 CHECKING THE COMPONENTS
VOL WOOFER
SOUNDBAR
SOUND
MODE
PAIR
Soundbar Main Unit Soundbar Remote Control
/
Batteries
Subwoofer
x 2
Power Cord
(Subwoofer, Soundbar)
AC/DC Adapter
(Soundbar)
HDMI Cable
x 2
(M4 x L10)
x 2
Wall Mount Guide Holder-Screw Screw
x 2
x 4
Bracket-Wall Mount Rubber-Foot
• For more information about the power supply and power consumption, refer to the label attached
to the product. (Label: Bottom of the Soundbar Main Unit)
• To purchase additional components or optional cables, contact a Samsung Service Center or
Samsung Customer Care.
• For more information about the wallmount or rubber-foot, see pages 21~22.
• Design, specications, and App screen are subject to change without prior notice.
Inserting Batteries before using the Remote Control (AA batteries X 2)
Slide the back cover in the direction of the arrow
until it is completely removed. Insert 2 AA batteries
(1.5V) oriented so that their polarity is correct. Slide
the battery cover back into position.