Contact SAMSUNG WORLDWIDE If you have any questions or comments relating to Samsung products, please contact the SAMSUNG customer care centre. Country AUSTRALIA CHINA HONG KONG INDIA INDONESIA JAPAN MALAYSIA NEW ZEALAND PHILIPPINES SINGAPORE THAILAND TAIWAN VIETNAM SOUTH AFRICA U.A.
Precautions When Displaying a Still Image A still image may cause permanent damage to the TV screen • Do not display a still image on the LCD panel for more than 2 hours as it can cause screen image retention. This image retention is also known as “screen burn”. To avoid such image retention, reduce the degree of brightness and contrast of the screen when displaying a still image.
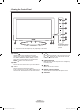
Contents Connecting and Preparing Your TV Function Description ■ ■ ■ ■ ■ ■ ■ ■ ■ ■ ■ ■ ■ ■ ■ ■ ■ ■ ■ ■ ■ List of Parts.........................................................................2 Installing the Stand.............................................................2 Installing the Wall Mount Kit...............................................2 Viewing the Control Panel..................................................3 Viewing the Connection Panel............................................
Connecting and Preparing Your TV List of Parts Please make sure the following items are included with your LCD TV. If any items are missing, contact your dealer. Remote Control & Batteries (AAA x 2) Power Cord • Owner’s Instructions Cover-Bottom • Warranty card Stand Screw (M4xL 16) • Safety Guide Stand Cleaning Cloth • Registration Cards ➣ Warranty card / Safety Guide / Registration Cards (Not available in all locations) ➣ The stand and stand screw may not be included depending on the model.
Viewing the Control Panel 1 2 3 4 5 6 8 78 Front Panel buttons Touch each button to operate. ➣ The product colour and shape may vary depending on the model. 1 SOURCE Toggles between all the available input sources (TV, AV1, AV2, S-Video, Component1, Component2, PC, HDMI1, HDMI2/DVI, HDMI3, HDMI4). In the onscreen menu, use this button as you would use the ENTER button on the remote control. 2 MENU Press to see an on-screen menu of your TV’s features. 3 – VOL + Press to increase or decrease the volume.
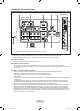
Viewing the Connection Panel [TV Side Panel] HDMI IN4 [TV Rear Panel] ! 0 9 Power Input 8 ➣ The product colour and shape may vary depending on the model. ➣ Whenever you connect an external device to your TV, make sure that power on the unit is turned off. ➣ When connecting an external device, match the colour of the connection terminal to the cable. 1 PC IN [PC] / [AUDIO] Connect to the video and audio output jack on your PC.
DVI IN(HDMI2) [R-AUDIO-L] - DVI audio outputs for external devices. ➣ Supported modes for HDMI/DVI and Component. HDMI/DVI 50Hz HDMI/DVI 60Hz Component 480i X X O 480p X O O 576i X X O 576p O X O 720p O O O 1080i O O O 1080p O O O 4 ANT IN To view television channels correctly, a signal must be received by the set from one of the following sources: - An outdoor aerial / A cable television network / A satellite network 5 SERVICE - Connector for SERVICE only.
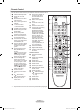
Remote Control You can use the remote control up to a distance of about 23 feet from the TV. 1 Television Standby button. 2 Selects the TV mode directly. 3 Number buttons for direct channel access 4 One or more digit channel selection 5 +: Volume increase –: Volume decrease 6 Available source selection 7 Electronic Program Guide (EPG) display 8 Use to quickly select frequently used functions.
Installing Batteries in the Remote Control 1. 2. 3. Lift the cover at the back of the remote control upward as shown in the figure. Install two AAA size batteries. ➣ Make sure to match the “+” and “–” ends of the batteries with the diagram inside the compartment. Replace the cover. ➣ Remove the batteries and store them in a cool, dry place if you won’t be using the remote control for a long time. ➣ Using the remote control with the ON/OFF light button set to On will reduce the battery usage time.
Viewing the Menus Picture 1. With the power on, press the MENU button. The main menu appears on the screen. The menu’s left side has icons: Picture, Sound, Channel, Setup, Input, Application. 2. Press the ▲ or ▼ button to select one of the icons. Then press the ENTER button to access the icon’s sub-menu. 3. Press the EXIT button to exit. ➣ The on-screen menus disappear from the screen after about one minute.
3. Press the ▲ or ▼ button to select the channel source to memorize. Press the ENTER button to select “Start”. ➣ Digital & Analogue: “Digital” and “Analogue” channels. Digital: “Digital” channels. Analogue: “Analogue” channels. ➣ The channel search will start and end automatically. ➣ Press the ENTER button at any time to interrupt the memorization process. ➣ After all the available channels are stored, the message “Set the Clock Mode.” is displayed. Plug & Play Select the channel source to memorize.
Channel Control Storing Channels Automatically Channel You can scan for the frequency ranges available to you (and availability depends on your area). Automatically allocated programme numbers may not correspond to actual or desired programme numbers. However, you can sort numbers manually and clear any channels you do not wish to watch. 1. Press the MENU button to display the menu. Press the ▲ or ▼ button to select “Channel”, then press the ENTER button. Auto Store 2.
Analogue Channel Channel 3. Press the ▲ or ▼ button to select “Analogue Channel”, then press the ENTER button. ➣ If a channel is locked using the “Child Lock” function, the PIN input window appears (refer to page 21). 4. Press the ◄ or ► button to select the required item below. Press the ▲ or ▼ button to adjust to the setting satisfied. 5. Press the EXIT button to exit.
Viewing the EPG (Electronic Programme Guide) Information Channel The EPG (Electronic Programme Guide) information is provided by the broadcasters. Programme entries may appear blank or out of date as a result of the information broadcast on a given channel. The display will dynamically update as soon as new information becomes available. 1. Press the MENU button to display the menu. Auto Store Manual Store 2. Press the ▲ or ▼ button to select “Channel”, then press the ENTER button. Full Guide 3.
Setting the Default Guide Channel You can decide whether to display either the “Mini Guide” or the “Full Guide” when the GUIDE button on the remote control is pressed. 1. Press the MENU button to display the menu. Full Guide Press the ▲ or ▼ button to select “Channel”, then press the ENTER Mini Guide button. Default Guide : Mini Guide ► 2. Press the ▲ or ▼ button to select “Default Guide”, then press the ENTER Channel List button. Channel Mode : Added Ch.
Managing Channels Using this menu, you can Add/Delete or set Favourite channels and use the program guide for digital broadcasts. Viewing All Channels Mini Guide Channel Show all currently available channels. To use the Channel List function, operate the “Auto Store” first. 1. Press the MENU button. Press the ▲ or ▼ button to select “Channel”, then press the ENTER button. Press the ▲ or ▼ button to select “Channel List”, then press the ENTER button.
Erasing and Adding Channels Mini Guide Default Guide Channel : Mini Guide Channel List Channel Mode : Added Ch. Child Lock : On Fine Tune Signal Information LNA 824 825 All Channels You can delete or add a channel to display the channels you want. 1. Press the MENU button. Press the ▲ or ▼ button to select “Channel”, then press the ENTER button. Press the ▲ or ▼ button to select “Channel List”, then press the ENTER button. 2. Press the ◄ button to select “Added Channels”. 3.
Locking and Unlocking Channels Default Guide Channel Mode : Added Ch. Child Lock : On Signal Information LNA 824 825 : Off UKTV Gold UKTV style 1 C -- 2 A 3 A 4 A 5 A 6 A 7 A 8 C -C -C -C -C -C -C -- A A All Channel Type All Channels Unlocking channels 7. Press the ▲ or ▼ button to select the channels you want to Unlock, then press the TOOLS button. 8. Press the ▲ or ▼ button to select “Unlock”, then press the ENTER button. 9. Enter your 4 digit PIN number.
Reserving a Program (Timer Viewing) If you reserve a program you want to watch, the channel is automatically switched to the reserved channel in the Channel List; even when you are watching another channel. To reserve a program, set the current time first. See pages 31~32. Mini Guide Channel 1. Press the MENU button. Press the ▲ or ▼ button to select “Channel”, then press the ENTER button. Press the ▲ or ▼ button to select “Channel List”, then press the ENTER button.
Confirming a Viewing Reservation Mini Guide Channel You can view, modify or delete a reservation. 1. Press the MENU button. Press the ▲ or ▼ button to select “Channel”, then press the ENTER button. Press the ▲ or ▼ button to select “Channel List”, then press the ENTER button. Default Guide : Mini Guide Channel List Channel Mode : Added Ch. Child Lock : On Fine Tune Signal Information LNA 2. Press the ◄ button to select “Added Channels”. Canceling a reservation 4.
Edit Channel Name-Analogue Mini Guide Default Guide Channel Channels can labeled so that their call letters appear whenever the channel is selected. 1. Press the MENU button. Press the ▲ or ▼ button to select “Channel”, then press the ENTER button. Press the ▲ or ▼ button to select “Channel List”, then press the ENTER button. : Mini Guide Channel List Channel Mode : Added Ch. Child Lock : On Fine Tune Signal Information LNA • • • • • Numeric buttons: You can enter numbers.
Editing the Channel Number-Digital Added Channels 1. Press the MENU button. Press the ▲ or ▼ button to select “Channel”, then press the ENTER button. Press the ▲ or ▼ button to select “Channel List”, then press the ENTER button. 2. Select the channel number that you wish to edit by pressing the ▲ or ▼ button repeatedly, then press the TOOLS button. 824 825 Television X UKTV style 825 UKTV style Delete 2 C -A 3 ♥ C -A 4 C -A 5 C -A 6 C -A 7 C -A 8 C -A All Channel Type 3.
Setting the Channel Mode Channel You can display either the added channels list or the favourite channels list when the CH LIST button on the remote control is pressed. Default Guide : Mini Guide 1. Press the MENU button to display the menu. Channel List Press the ▲ or ▼ button to select “Channel”, then press the ENTER button. Channel Mode : Added Ch. ► Child Lock : On Fine Tune Signal Information : Off Default Guide : Mini Guide Channel List Channel 2.
Fine Tuning Analogue Channels Channel 1. Use the number buttons to directly select the channel that you want to fine tune. 2. Press the MENU button to display the menu. Press the ▲ or ▼ button to select “Channel”, then press the ENTER button. 3. Press the ▲ or ▼ button to select “Fine Tune”, then press the ENTER button. 4. Press the ◄ or ► button to adjust the fine tuning. Press the ENTER button. 5. Press the EXIT button to exit.
LNA (Low Noise Amplifier) Channel If the TV is operating in a weak-signal area, the LNA function can improve the reception (a low-noise preamplifier boosts the incoming signal). 1. Press the MENU button to display the menu. Fine Tune Press the ▲ or ▼ button to select “Channel”, then press the ENTER Signal Information button. LNA : Off ► 2. Press the ▲ or ▼ button to select “LNA”, then press the ENTER button. 3. Press the ▲ or ▼ button to select “Off” or “On”. Press the ENTER 4.
Picture Control Changing the Picture Standard Picture You can select the type of picture which best corresponds to your viewing requirements. 1. Press the MENU button to display the menu. Press the ENTER button to select “Picture”. Mode :Standard Backlight :7 Contrast : 95 Brightness : 45 Sharpness : 50 Colour : 50 Tint (G/R) : G50/R50 Detailed Settings 2. Press the ENTER button to select “Mode”. Press the ▲ or ▼ button to select “Dynamic”, “Standard” or “Movie”. Press the ENTER button.
Adjusting the Detailed Settings Samsung’s new TVs allow you to make even more precise picture settings than previous models. See below to adjust detailed picture settings. Activating Detailed Settings Picture 1. Press the MENU button to display the menu. Press the ENTER button to select “Picture”. 2. Press the ENTER button to select “Mode”. Press the ▲ or ▼ button to select “Standard” or “Movie”, then press the ENTER button. ➣ “Detailed Settings” is available in “Standard” or “Movie” mode. 3.
Configuring Picture Options Activating Picture Options Tint (G/R) Picture 1. Press the MENU button to display the menu. Press the ENTER button to select “Picture”. 2. Press the ▲ or ▼ button to select “Picture Options”, then press the ENTER button. ➣ Press the ▲ or ▼ button to select a particular item. Press the ENTER button. button.
DNIe: Off/Demo/On This TV includes the DNIe function so as to provide a high visual quality. If you set DNIe to on, you can view the screen with the DNIe feature activated. If you set the DNIe to Demo, you can view the applied DNIe and normal pictures on the screen, for demonstration purposes. Using this function, you can view the difference in the visual quality.
Viewing Picture-in-Picture You can display a sub picture within the main picture of set programme or video input. In this way, you can watch the picture of set programme or video input from any connected equipment while watching the main picture. PIP: On/Off You can activate or deactivate the PIP function. Main picture Component 1, 2 HDMI 1, HDMI/DVI 2, HDMI 3, HDMI 4 PC Sub picture Setup 1. Press the MENU button to display the menu.
Sound Control Changing the Sound Standard Mode: Standard/Music/Movie/Speech/Custom You can select the type of special sound effect to be used when watching a given broadcast. Easy Setting 1. Press the TOOLS button on the remote control. 2. Press the ▲ or ▼ button to select “Sound Mode”. 3. Press the ◄ or ► button to select the required option. 4. Press the EXIT or TOOLS button to exit.
Audio Format: MPEG/Dolby Digital When sound is emitted from both the main speaker and the audio receiver, a around echo may occur due to the decoding speed difference between the main speaker and the audio receiver. In this case, use the TV Speaker function. ➣ While viewing a Digital channel, this function can be selected. ➣ You can only select the language among the actual languages being broadcast. Manufactured under license from Dolby Laboratories.
Connecting Headphones (Sold separately) You can connect a set of headphones to your set if you wish to watch a TV program without disturbing other people in the room. TV Side Panel ➣ When you insert the headphone’s plug into the headphone jack, you can not operate “Mode”, “Equalizer”, “SRS TruSurround XT” and “TV Speaker” in Sound menu. ➣ Prolonged use of headphones at a high volume may damage your hearing. ➣ You will not hear sound from the speakers when you connect headphones to the TV.
Option 2: Setting the Clock Automatically button. button. Plug & Play Setup The Clock can be set automatically if you are receiving a digital signal. 1. Press the MENU button to display the menu. Press the ▲ or ▼ button to select “Setup”, then press the ENTER Press the ▲ or ▼ button to select “Time”, then press the ENTER Time ► Change PIN Parental Lock Subtitle Teletext Language : ---- Preference Wall-Mount Adjustment Melody 2. Press the ENTER : Off button to select “Clock”.
Setting the Sleep Timer Setup You can select a time period of between 30 and 180 minutes after which the television automatically switches to standby mode. 1. Press the MENU button to display the menu. Plug & Play Press the ▲ or ▼ button to select “Setup”, then press the ENTER button. Time ► 2. Press the ▲ or ▼ button to select “Time”, then press the ENTER button. Change PIN Parental Lock Subtitle Teletext Language : ---- Preference Wall-Mount Adjustment Melody 3.
Switching the Television On and Off Automatically button. button. Plug & Play Setup 1. Press the MENU button to display the menu. Press the ▲ or ▼ button to select “Setup”, then press the ENTER 2. Press the ▲ or ▼ button to select “Time”, then press the ENTER Time ► Change PIN Parental Lock Subtitle Teletext Language : ---- Preference Wall-Mount Adjustment Melody 3. Press the ▲ or ▼ button to select “Timer 1”, “Timer 2”, “Timer 3”, then press the ENTER button.
Function Description Setting Up Your Personal ID Number (PIN) Press the MENU button to display the menu. Press the ▲ or ▼ button to select “Setup”, then press the ENTER button. Plug & Play Time Setup 1. 2. Change PIN ► Parental Lock Subtitle Teletext Language : ---- Preference Wall-Mount Adjustment Melody : Off Entertainment : Off 3. Press the ▲ or ▼ button to select “Change PIN”, then press the ENTER button. The “Enter PIN” is displayed. 4.
Setting up the Parental Lock This feature allows you to prevent unauthorized users, such as children, from watching unsuitable programmes by a 4-digit PIN (Personal Identification Number) code that is defined by the user. Press the MENU button to display the menu. Press the ▲ or ▼ button to select “Setup”, then press the ENTER Time button. Change PIN Setup 1. 2. Parental Lock ► Subtitle Teletext Language : ---- Preference Wall-Mount Adjustment 3.
Setting the Subtitle You can activate and deactivate the subtitles. Use this menu to set the Subtitle Mode. “Normal” under the menu is the basic subtitle and “Hard of hearing” is the subtitle for a hearing-impaired person. Change PIN button. Setup 1. Press the MENU button to display the menu. 2. Press the ▲ or ▼ button to select “Setup”, then press the ENTER 3. Press the ▲ or ▼ button to select “Subtitle”, then press the ENTER button.
Selecting a Teletext Language Parental Lock Setup You can set the Teletext language by selecting the language type. 1. Press the MENU button to display the menu. Press the ▲ or ▼ button to select “Setup”, then press the ENTER button. 2. Press the ▲ or ▼ button to select “Teletext Language”, then press the ENTER button. 3. Select a particular language by pressing the ▲ or ▼ button repeatedly. Press the ENTER button.
Melody/Entertainment/Energy Saving Preference Setup 1. Press the MENU button to display the menu. Press the ▲ or ▼ button to select “Setup”, then press the ENTER button. 2. Select the required option by pressing the ▲ or ▼ button, then press the ENTER button. 3. When you are satisfied with your setting, press the ENTER button. 4. Press the EXIT button to exit.
Upgrading the Software HDMI IN4 To keep your product up-to-date with new Digital Television features then software upgrades are periodically broadcast as part of the normal Television signal. It will automatically detect these signals and display the software upgrade banner. You are given the option to install the upgrade. 1. Insert a USB drive containing the firmware upgrade into the WISELINK port TV Side Panel on the side of the TV. 2. Press the MENU button to display the menu.
To Select the Source Input Use to select TV or other external input sources such as DVD players or Cable Box/Satellite receivers (Set-Top Box) connected to the TV. Use to select the input source of your choice. 1. Press the MENU button to display the menu. Press the ▲ or ▼ button to select “Input”, then press the ENTER button. 2. Press the ENTER button to select “Source List”. Press the ▲ or ▼ button to select signal source, then press the ENTER button.
PC Display Using Your TV as a Computer (PC) Display Setting Up Your PC Software (Based on Windows XP) The Windows display-settings for a typical computer are shown below. The actual screens on your PC will probably be different, depending upon your particular version of Windows and your particular video card. However, even if your actual screens look different, the same basic set-up information will apply in almost all cases. (If not, contact your computer manufacturer or Samsung Dealer.) 1.
Setting up the TV with your PC Picture ➣ Preset: Press the SOURCE button to select PC mode. 1. Press the MENU button to display the menu. Press the ▲ or ▼ button to select “Picture”, then press the ENTER button. 2. Press the ▲ or ▼ button to select “Auto Adjustment” or “Screen Adjustment”, then press the ENTER button. 3. When you are satisfied with your setting, press the ENTER button. 4. Press the EXIT button to exit.
WISELINK Using the WISELINK Function Connecting a USB Device TV Side Panel HDMI IN4 This function enables you to view and listen to photo (JPEG) and audio files (MP3) saved on a USB Mass Storage Class (MSC) device. 1. Press the POWER button on the remote control or front panel. ➣ The TV is powered on. 2. Connect a USB device containing JPEG and/or MP3 files to the WISELINK jack (USB jack) on the side of the TV.
Using the WISELINK Menu 1. Press the MENU button. Press the ▲ or ▼ button to select “Application”, then press the ENTER button. 2. Press the ▲ or ▼ button to select “WISELINK”, then press the ENTER button. ➣ The “WISELINK” menu is displayed. WISELINK SUM 851.98MB/995.00MB Free PHOTO Photo Music Setup SUM Device Return O Press the W.LINK button on the remote control to display the “WISELINK” menu.
Screen Display Photo 2 image_1.jpg Month Date Color Composition Folder Favourite 1File(s) Selected6 : Jan : Jan.01.2008 : Gray : : P-other : ★★★ 1 Preference Monthly 3 SUM5 4 Jan Nov ▲ Timeline 7 Device Favourites Setting Select Jump Option 1 Currently selected photo Shows the currently selected photo. 2 Photo Information Window Shows information about the currently selected photo. You can change the “Color”, “Composition”, and “Favourite”.
Sorting Photo List You can sort photos in the Photo List by a particular standard. 1. Press the W.LINK button on the remote control to display the “WISELINK” menu. 2. Press the ◄ or ► button to select “Photo”, then press the ENTER button. ➣ Photo files are displayed. 3. Press the ▲ or ▼ button to select a sorting standard. (“Monthly”, “Timeline”, “Color”, “Composition”, “Folder”, “Preference”) ➣ The photos are sorted according to the newly selected sorting standard. 4.
Color Sorts photos by color. ➣ You can change the photo color information. 1. Select “Color” as the sorting standard in the Photo List. 2. Press the ◄ or ► button to select from the sublist of files grouped by color. ➣ To move to the previous / next group, press the (REW) or (FF) button. 3. Press the TOOLS button. Press the ▲ or ▼ button to select “Play Current Group”. 4. Press ENTER to play the selected group of photo files from the sublist. Changing the color information 1.
Folder Sorts photos by folder. ➣ If there are many folders in USB, the photos files are shown in order in each folder. The photo file in the Root folder is shown first and the others are shown in alphabetical order by name. 1. Select “Folder” as the sorting standard in the Photo List. 2. Press the ◄ or ► button to select from the sublist of files grouped by folder. ➣ To move to the previous / next group, press the (REW) or (FF) button. 3. Press the TOOLS button.
Deleting the Photo file 1. Press the ◄ or ► button to select the desired photo in the Photo list. 2. Press the TOOLS button. 3. Press the ▲ or ▼ button to select “Delete”, then press the ENTER button. ➣ The “Delete this file?” message appear. 4. Press the ◄ or ►button to select “OK”, then press the ENTER button. ➣ The photo is deleted. ➣ When a read-only file is deleted, the “This File is read-only file. Delete it?” message appear. ➣ If you select “Cancel”, the deletion is cancelled. 5.
Viewing a Photo or Slide Show Viewing a Slide Show 1. Press the W.LINK button on the remote control to display the “WISELINK” menu. 2. Press the ◄ or ► button to move to “Photo”, then press the ENTER button. ➣ Photo files are displayed. 3. Press the ◄ or ► button to select the desired photo in the Photo list. 4. Press the TOOLS button. 5. Press the ▲ or ▼ button to select “Slide Show”, then press the ENTER button. Photo image_1.jpg Month Date Color Composition Folder Favourite : Jan Slide Show : Jan.
Viewing a photo 1. Press the W.LINK button on the remote control to display the “WISELINK” menu. 2. Press the ◄ or ► button to move to “Photo”, then press the ENTER button. ➣ Photo files are displayed. 3. Press the ◄ or ► button to select the desired photo in the Photo list. Then Press the Yellow button to select only one file. 4. Press the ENTER button over a photo icon. ➣ The currently selected photo is displayed in full screen. 20/22 image_1.jpg SUM 440x440 E Slide Show Previous 2.
Zoom You can zoom into images in full screen mode. Press the ▲ or ▼ button to select “Zoom”, then press the ENTER button. Press the ◄ or ► button repeatedly to increase or decrease the Zoom effect. (x1 → x2 → x4) To move the enlarged photo image, press the ENTER button, then press the ▲/▼/◄/► buttons. ➣ Note that when the enlarged picture is smaller than the original screen size, the location change function doesn’t work. ➣ The enlarged file is not saved.
Background Music Setting You can set the background music. Press the ▲ or ▼ button to select “Background Music Setting”, then press the ENTER button. ➣ If you turn off the “Background Music”, even if the “Background Music Settings” have been set up, the background music will not be played. ➣ Loading music files is needed to change BGM mode. Play music files in music category to load. ➣ “Background Music setting” menu is displayed. Press the ◄ or ► button to select the desired BGM (Background music) mode.
Using the Music List This menu shows MP3 files from among the files saved on a USB memory device. 1. Press the W.LINK button on the remote control to display the “WISELINK” WISELINK menu. SUM 851.98MB/995.00MB Free Music Photo Music Setup SUM 2. Press the ◄ or ► button to select “Music”, then press the ENTER button. ➣ Music files are displayed. (Play) / ENTER button over a music icon to play ➣ Press the the music. (REW) or ➣ To move to the previous / next group, press the (FF) button.
5 Item Selection Information Shows the number of music files that are selected by pressing the Yellow button. 6 Help Items • Red(Device) button: Selects a connected device. • Green(Favourites Setting) button: Changes the favourites setting for the selected music. Press this button repeatedly until the desired value appears. (Refer to page 58) • Yellow(Select) button: Selects music files from the music list. Selected music files are marked with a symbol the left.
Artist Sorts music files by the artist. ➣ It sorts the music file by artist in alphabetical order. 1. Select “Artist” as the sorting standard in the Music List. 2. Press the ◄ or ► button to select from the sublist of files grouped in alphabetical order. ➣ To move to the previous / next group, press the (REW) or (FF) button. 3. Press the TOOLS button. 4. Press the ▲ or ▼ button to select “Play Current Group”. 5. Press ENTER to play the selected group of music files from the sublist.
Genre Sorts music files by the genre. 1. Select “Genre” as the sorting standard in the Music List. 2. Press the ◄ or ► button to select from the sublist of files grouped by Genre. ➣ To move to the previous / next group, press the (REW) or (FF) button. 3. Press the TOOLS button. 4. Press the ▲ or ▼ button to select “Play Current Group”. 5. Press ENTER to play the selected group of music files from the sublist.
Deleting the Music file 1. Press the ◄ or ► button to select the desired music file in the music list. 2. Press the TOOLS button. 3. Press the ▲ or ▼ button to select “Delete”, then press the ENTER button. ➣ The “Delete this file?” message appear. 4. Press the ◄ or ► button to select “OK”, then press the ENTER button. ➣ The music is deleted. ➣ When a read-only file is deleted, the “This File is read-only file. Delete it?” message appear. ➣ If you select “Cancel”, the deletion is cancelled. 5.
Playing a Music File Playing a music file 1. Press the W.LINK button on the remote control to display the “WISELINK” menu. 2. Press the ◄ or ► button to select “Music”, then press the ENTER button. ➣ Music files are displayed. 3. Pressing the ◄ or ► button to select a music file to be played, then press the ENTER button. ➣ This menu only shows files with the MP3 file extension. Files with other file extensions are not displayed, even if they are saved on the same USB device.
Playing the selected music files 1. Press the W.LINK button on the remote control to display the WISELINK menu. 2. Press the ◄ or ► button to select “Music”, then press the ENTER button. 3. Press the ◄ or ► button to select the desired music file, then press the yellow button. Repeat the above operation to select multiple music files. ➣ The mark appears to the left of the selected music file.
Using the Setup Menu Setup displays the user settings of the WISELINK menu. 1. Press the W.LINK button on the remote control to display the WISELINK menu. 2. Press the ◄ or ► button to select “Setup”, then press the ENTER button. 3. Press the ▲ or ▼ button to select the desired option. (Slide Show Speed, Music Repeat Mode, Screen Saver Run Time, Information, Remove Safely) 4. Press the ◄ or ► button to select the option, then press the ENTER button. WISELINK 851.98MB/995.
About Anynet+ What is Anynet+? Anynet+ is a function that enables you to control all connected Samsung devices that support Anynet+ with your Samsung TV’s remote. Connecting Anynet+ Devices The Anynet+ system can be used only with Samsung devices that have the Anynet+ feature. To be sure your Samsung device has this feature, check if there is an Anynet+ logo on it. To connect to a TV TV Anynet+ Device 1 HDMI 1.3 Cable Anynet+ Device 2 HDMI 1.3 Cable Anynet+ Device 3 HDMI 1.
Setting Up Anynet+ The following settings help set the Anynet+ functions. To use the Anynet+ Function, Anynet+ (HDMI-CEC) must be set to On Application 1. Press the MENU button. Press the ▲ or ▼ button to select “Application”, then press the ENTER button. 2. Press the ▲ or ▼ button to select “Anynet+ (HDMI-CEC)”, then press the ENTER button. 3. Press the ENTER button to select “Anynet+ (HDMI-CEC)”. 4. Press the ▲ or ▼ button to select “On”, then press the ENTER button.
Anynet+ Menu The Anynet+ menu changes depending on the type and status of the Anynet+ devices connected to the TV. Anynet+ Menu View TV Device List Record Menu on Device Device Operation Timer Recording Stop Recording Receiver Setup Description Switches from Anynet+ to TV broadcast mode. Displays the Anynet+ device list. Starts a recording. (This menu works only for a device supporting recording.) Shows the menu of the connected device.
Listening through a Receiver (Home theater) You can listen to sound through a receiver instead of the TV speaker. Tools 1. Press the TOOLS button. Press the ▲ or ▼ button to select “Receiver”. Device List Record 2. Press the ◄ or ► button to select to “On”. Timer Recording Now you can listen to sound through the receiver. Receiver ◄ Off ► 3. Press the EXIT button to exit. Picture Mode : Standard Sound Mode : Custom ➣ If your receiver supports audio only, it may not appear in the device list.
Recommendations for Use Teletext Feature Most television stations provide written information services via Teletext. The index page of the teletext service gives you information on how to use the service. In addition, you can select various options to suit your requirements by using the remote control buttons. ➣ For teletext information to be displayed correctly, channel reception must be stable. Otherwise, information may be missing or some pages may not be displayed.
The teletext pages are organized according to six categories: Part A B C D E F Contents Selected page number. Broadcasting channel identity. Current page number or search indications. Date and time. Text. Status information. FASTEXT information.
Remembering the Position 2. Adjust to the desired position using the ▲,▼,◄,► buttons. ➣ If you press an arrow button when no OSD is displayed on the TV screen, the Adjustment screen appears. ➣ Press the INFO button to reset. Press the ◄ or ► button to select “Yes”, then press the ENTER button. The position is initialized to the default setting. 3. Press the blue button. Press the ▲ and ▼ buttons to select a save mode from either Position 1, Position 2 or Position 3 in order to save the current position.
Using the Anti-Theft Kensington Lock (depending on the model) The Kensington Lock is a device used to physically fix the system when using it in a public place. The appearance and locking method may differ from the illustration depending on the manufacturer. Refer to the manual provided with the Kensington Lock for proper use. The locking device has to be purchased separately. Cable Figure 2 Figure 1 ➣ The location of the Kensington Lock may be different depending on its model. 1.
경고 경고 주의 Securing the TV to the Wall Caution: Pulling, pushing, or climbing on the TV may cause the TV to fall. In particular, ensure your children do not hang over or destabilize the TV; doing so may cause the TV to tip over, causing serious injuries or death. 주의 Follow all safety precautions provided on the included Safety Flyer. For added stability, install the anti-fall device for safety purposes, as follows. To avoid the TV from falling: 1.
Troubleshooting: Before Contacting Service Personnel No sound or picture • • • • Check that the mains lead has been connected to a wall socket. Check that you have pressed the button on your set. Check the picture contrast and brightness settings. Check the volume. Normal picture but no sound • Check the volume. • Check whether the MUTE button has been pressed on the remote control. • Check if “TV Speaker” is off.
Specifications Model Name LA32A650 LA40A650 Screen Size (Diagonal) 32 inches 40 inches 1920 x 1080 @ 60 Hz 1920 x 1080 @ 60 Hz 10W x 2 10W x 2 806 x 81 x 528 mm 806 x 252 x 584 mm 998 x 83 x 638 mm 998 x 300 x 698 mm 14 kg 20 kg PC Resolution Sound Output Dimensions (WxDxH) Body With stand Weight With Stand Environmental Considerations Operating Temperature Operating Humidity Storage Temperature Storage Humidity 10°C to 40°C (50°F to 104°F) 10% to 80%, non-condensing -20°C to 45°C (-4°F to 11
This page is intentionally left blank. BN68-01412L-01ENG.