Contact SAMSUNG WORLDWIDE If you have any questions or comments relating to Samsung products, please contact the SAMSUNG customer care centre.
❑ License TruSurround HD, SRS and symbol are trademarks of SRS Labs, Inc. TruSurround HD technology is incorporated under license from SRS Labs, Inc. Manufactured under license from Dolby Laboratories. Dolby and the double-D symbol are trademarks of Dolby Laboratories. ❑ Precautions When Displaying a Still Image A still image may cause permanent damage to the TV screen ● Do not display still image and partially still on the LCD panel for more than 2 hours as it can cause screen image retention.
Contents CONNECTING AND PREPARING YOUR TV ■ Viewing the Control Panel.................................................................. 2 ■ Accessories........................................................................................ 3 ■ Viewing the Connection Panel............................................................ 3 ■ Viewing the Remote Control............................................................... 5 ■ Installing Batteries in the Remote Control.......................................
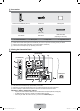
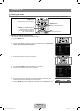
CONNECTING AND PREPARING YOUR TV N Figures and illustrations in this User Manual are provided for reference only and may differ from actual product appearance. Product design and specifications may be changed without notice in order to enhance product performance. ¦ Viewing the Control Panel N The product colour and shape may vary depending on the model. N The front panel buttons can be activated by touching them with your finger. 1 2 3 4 5 6 7 8 1 SOURCEE Toggles between all the available input sources.
¦ Accessories Remote Control & Batteries (AAA x 2) Power Cord Cleaning Cloth (M4 X L16) Cover-Bottom ● Owner’s Instructions Holder-Wire Cable (depending on the model) Stand Screw ● Warranty card ● Safety Guide ● Registration Cards N Please make sure the following items are included with your LCD TV. If any items are missing, contact your dealer. N Warranty card / Safety Guide / Registration Cards (Not available in all locations) N The items colour and shape may vary depending on the model.
N What is HDMI? ‘High Definition Multimedia interface’ allows the transmission of high definition digital video data and multiple channels of digital audio. The HDMI / DVI terminal supports DVI connection to an extended device with the appropriate cable (not supplied). The difference between HDMI and DVI is that the HDMI device is smaller in size, has the HDCP (High Bandwidth Digital Copy Protection) coding feature installed, and supports multi - channel digital audio.
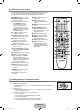
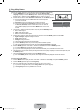
¦ Viewing the Remote Control N You can use the remote control up to a distance of about 23 feet from the TV. N The performance of the remote control may be affected by bright light. N The product colour and shape may vary depending on the model. 1 POWER : Turns the TV on and off. 2 NUMERIC BUTTONS : Press to change the channel. 3 E : Performs the same function as the ENTERE button of the directional buttons.
OPERATION ¦ Viewing the menus Before using the TV, follow the steps below to learn how to navigate the menu in order to select and adjust different functions. MENU Button Display the main on-screen menu. RETURN Button Return to the previous menu. ENTERE / DIRECTION Buttons Move the cursor and select an item. Select the currently selected item. Confirm the setting. EXIT Exit the on-screen menu. ❑ Operation the OSD (On Screen Display) The access step may differ depending on the selected menu. 1.
¦ Plug & Play Feature When the TV is initially powered on, basic settings proceed automatically and subsequently. 1. Press the POWER button on the remote control. The message Select the OSD Language.is displayed. Press the ENTERE button. Select the appropriate language by pressing the ▲ or ▼ button. Press the ENTERE button to confirm your choice. 2. Press the ◄ or ► button to select Store Demo or Home Use, then the ENTERE button.
CHANNEL CONTROL ¦ Configuring the Channel Menu ❑ Antenna ❑ Auto Store Channel Your TV can memorize both Air and Cable channels. N If the antenna is connected to ANT 1 IN (AIR), select “Air” and if it is connected to ANT 2 IN(CABLE), select “Cable”. N If both ANT 1 IN (AIR) and ANT 2 IN (CABLE) are connected, select the antenna input you want. N If the antenna input is not selected properly, noise may appear on the screen.
❑ Full Guide / Mini Guide The EPG (Electronic Programme Guide) information is provided by the broadcasters. Programme entries may appear blank or out of date as a result of the information broadcast on a given channel. The display will dynamically update as soon as new information becomes available. O You can also display the guide menu simply by pressing the GUIDE button. (To configure the Default Guide, refer to the descriptions.
Using the Full / Mini Guide Full Guide Mini Guide DTV Cable 900 f tn Freshmen On Campus 2:00 - 2:30 15:39 Wed 16 Jan No Detailed Information 900 901 902 903 903 ▼ 903 2:00 2:30 ▼ 5:00 Watch DTV Cable 900 f tn Freshmen On Campus Street Hypnosis Booze Britain Information Page ■ Full Guide ■ Exit Today 2:00 - 3:00 3:00 - 4:00 f tn Freshmen O.. Street Hypn..
N Channel Status Display Icons ● A : An Analogue channel. ● c : A channel selected by pressing the yellow button. ● * : A channel set as a Favourite. ● ( : A programme currently being broadcast. ● \ : A locked channel. ● ) : A reserved programme Channel List Option Menu (in All Channels / Added Channels / Favourites) N Press the TOOLS button to use the option menu. N Option menu items may differ depending on the channel status.
Auto Store N For further details on setting up options, refer to page 8. N If a channel is locked using the Child Lock function, the PIN input window appears. Channel List Option Menu (in Programmed) You can view, modify or delete a reservation. N Press the TOOLS button to use the option menu. Change Info Programmed Select to change a viewing reservation. Cancel Schedules Select to cancel a viewing reservation. 1 / 1 / 2009 01:59 pm 5 Information Select to view a viewing reservation.
Tint(G/R) Adjusts the colour tint of the picture. N Select a picture mode to be adjusted first. The adjusted values are saved for each picture mode. N When you make changes to Backlight, Contrast, Brightness, Sharpness, Colour or Tint(G/R), the OSD will be adjusted accordingly. N In analogue TV, AV1, AV2 modes of the PAL system, you cannot use the Tint(G/R) Function. N In PC mode, you can only make changes to Backlight, Contrast and Brightness.
Size You can select the picture size which best corresponds to your viewing requirements. T Press the TOOLS button to display the Tools menu. You can also set the size by selecting Tools Picture Size. O ● ● ● ● ● ● N N N N N N N N N You can select these options by simply pressing the P.SIZE button on the remote control. Auto Wide: Automatically adjusts the picture size to the 16:9 aspect ratio. 16:9: Adjusts the picture size to 16:9 appropriate for DVDs or wide broadcasting.
■ Blue Only Mode → Off / On This function is for AV device measurement experts. This function displays the blue signal only by removing the red and green signals from the video signal so as to provide a Blue Filter effect that is used to adjust the Colour and Tint of video equipment such as DVD players, Home Theatres, etc.
● Display Modes Both screen position and size will vary depending on the type of PC monitor and its resolution. The resolutions in the table are recommended.
SOUND CONTROL ¦ Configuring the Sound Menu ❑ Mode → Standard / Music / Movie / Clear Voice / Custom ❑ Equalizer The sound settings can be adjusted to suit your personal preferences. Mode Sound You can select a sound mode to suit your personal preferences. T Press the TOOLS button to display the Tools menu. You can also configure the sound mode by selecting Tools → Sound Mode.
❑ Audio Format → MPEG / Dolby Digital / Advanced (digital channels only) When sound is emitted from both the main speaker and the audio receiver, a sound echo may occur due to the decoding speed difference between the main speaker and the audio receiver. In this case, use the TV Speaker function. N While viewing a digital channel, this function can be selected. N The Audio Format appears according to the broadcasting signal.
SETUP ¦ Configuring the Setup Menu ❑ Plug & Play Content of Plug & Play,please refer to page 7. Plug & Play ❑ Language→中文/English Language Setup You can set the menu language you want. ❑ Time Clock :English Time ► Game Mode : Off BD Wise Child Lock Change PIN Subtitle Preference Digital Text : On : On Setting the clock is necessary in order to use the various timer features of the TV. : Disable N The current time will appear every time you press the INFO button.
❑ Game Mode → Off / On When connecting to a game console such as PlayStation™ or Xbox™, you can enjoy a more realistic gaming experience by selecting game menu. N Restrictions on game mode (Caution) – To disconnect the game console and connect another external device, set Game Mode to Off in the setup menu. – If you display the TV menu in Game Mode, the screen shakes slightly. N Game Mode is not available in TV and PC mode.
❑ Preference Primary Audio Language / Secondary Audio Language / Primary Subtitle Language / Secondary Subtitle Language Using this feature, users can select one of the languages. The language selected here is the default when the user selects a channel. If you change the language setting, the Subtitle Language and the Audio Language of the Language menu are automatically changed to the selected language.
INPUT / SUPPORT ¦ Configuring the Input Menu ❑ Source List Input Use to select TV or other external input sources such as DVD / Blu-ray players / Satellite receivers (Set-Top Box) connected to the TV. Use to select the input source of your choice. O Press the SOURCE button on the remote control to view an external signal source. TV mode can be selected by pressing the TV button.
❑ Software Upgrade To keep your product up-to-date with new Digital Television features then software upgrades are periodically broadcast as part of the normal Television signal. It will automatically detect these signals and display the software upgrade banner. You are given the option to install the upgrade. N Current Version shows version of the software being installed in the TV. N Alternative Software shows the previous version that can be replaced.
Media Play (USB) ¦ Connecting a USB Device 1. Press the POWER button to turn the TV on. TV Side Panel 2. Connect a USB device containing photo and/or music files to the USB jack on the side of the TV. 4 3. When the Application selection screen is displayed, press the ENTERE button to select Media Play (USB). N MTP (Media Transfer Protocol) is not supported. N The file system supports FAT16, FAT32 and NTFS.
¦ Media Play Function Entering the Media Play (USB) Menu Application This function enables you to view and listen to photo and/or music files saved on a USB Mass Storage Class (MSC) device. Media Play (USB) ► Anynet+ (HDMI-CEC) 1. Press the MENU button. Press the ▲ or ▼ button to select Application, then press the ENTERE button. 2. Press the ▲ or ▼ button to select Media Play (USB), then press the ENTERE button. N The Media Play (USB) menu is displayed. O Press the MEDIA.
1 Current Sort key: This field shows the current standard for sorting files. Press the ◄ or ► button to change the standard for sorting files. 2 View Groups: Shows the detailed groups of the files sorted according the selected Sort key. The sort group where the currently selected file is contained is highlighted. 3 Currently selected file: The selected file is the file you can now control. Photo file are displayed as thumbnail images. 4 Current Device: Shows the currently selected device name.
¦ Photo List Option Menu 1. Press the MEDIA.P button. 2. Press the ◄ or ► button to select Photo, then press the ENTERE button. 3. Press the ◄ or ► button to select the desired photo file. N Selecting Multiple Photos Press the ◄ or ► button to select the desired photo file. Then press the Yellow button. Repeat the above operation to select multiple photo files. The mark c appears to the selected photo file. 4. Press the TOOLS button. N The option menu changes according to the current status.
¦ Viewing a Photo or Slide Show Viewing a Slide Show 1. Press the ◄ or ► button to select a photo file. Colour Preference Folder Basic View Timeline 2. Press the TOOLS button. Slide Show Play Current Group Information Remove Safely 5/15 3. Press the ▲ or ▼ button to select Slide Show, then press the ENTERE button. N All files in the photo list will be used for the Slide Show. N During the slide show, files are displayed in order from the currently shown file. 1231.jpg 1232.jpg SUM 1233.
To perform a Slide Show with only the selected files 1. Press the ◄ or ► button to select the desired photo in the Photo list. 2. Press the Yellow button. 3. Repeat the above operation to select multiple photos. N The c mark appears to the left of the selected photo. N If you select one file, the Slide Show will not be performed. N To deselect all selected files, press the TOOLS button and select Deselect All. 4. Press the ∂ (Play)/ENTERE button. N The selected files will be used for the Slide Show.
❑ Background Music You can select background music when watching a Slide Show. N To use this feature, there must be music and photo files stored on the USB device. N Loading music files is needed to change BGM mode. Play music files in music category to load. ■ Background Music → Off / On ● Off: Background music is not played. ● On: When the background music is available, if you select On, the music is played back.
¦ Sorting the Music List You can sort music files in the Music List by a particular standard. Genre 1. Press the MEDIA.P button. Folder 2. Press the ◄ or ► button to select Music, then press the ENTERE button. Energetic 3. Press the ▲ button to move to the Sort key Section. 4. Press the ◄ or ► button to select a sorting standard. (Basic View, Title, Artist, Mood, Genre, Folder, Preference) N The Music files are sorted according to the newly selected sorting standard.
¦ Music List Option Menu 1. Press the MEDIA.P button. Genre 2. Press the ◄ or ► button to select Music, then press the ENTERE button. 3. Press the ◄ or ► button to select the desired Music file. N Selecting Multiple Music Files Press the◄ or ► button to select the desired music file. Then press the Yellow button. Repeat the above operation to select multiple music files. The mark c appears to the selected music file. 4. Press the TOOLS button.
¦ Playing Music Playing a music file 1. Press the ◄ or ► button to select a music file to be played. ▶ 00:00:04 / 00:04:04 3/37 2. Press the ∂ (Play)/ENTERE button. I Love You Way HaHaHa N This menu only shows files with the MP3 file extension. Files with other file extensions are not displayed, even if they are saved on the same USB device. N The selected file is displayed at the top with its playing time. N To adjust the music volume, press the volume button on the remote control.
¦ Music Play option Menu Music Play Option Menu ❑ Repeat Mode → On / Off You can play music files repeatedly. Tools Repeat Mode ❑ Picture Setting / Sound Setting ◀ On ▶ Picture Setting Sound Setting You can configure the picture and sound settings. Information Remove Safely ❑ Information The music file information is displayed. U Move L Adjust e Exit ❑ Remove Safely You can remove the device safely from the TV. ¦ Using the Setup Menu Setup displays the user settings of the Media Play menu. 1.
ANYNET+ ¦ Connecting Anynet+ Devices What is Anynet+? Anynet+ is a function that enables you to control all connected Samsung devices that support Anynet+ with your Samsung TV’s remote. The Anynet+ system can be used only with Samsung devices that have the Anynet+ feature. To be sure your Samsung device has this feature, check if there is an Anynet+ logo on it. To connect to a TV Anynet+ Device 1 TV Anynet+ Device 2 Anynet+ Device 3 Anynet+ Device 4 HDMI 1.3 Cable HDMI 1.3 Cable HDMI 1.3 Cable 1.
¦ Setting Up Anynet+ Application T Press the TOOLS button to display the Tools menu. You can also display Anynet+ menu by selecting Tools → Anynet+ (HDMI-CEC). Media Play (USB) + Anynet (HDMI-CEC) ► ❑ Setup Anynet+ (HDMI-CEC) → Off / On To use the Anynet+ Function, Anynet+ (HDMI-CEC) must be set to On. N When the Anynet+ (HDMI-CEC) function is disabled, all the Anynet+ related operations are deactivated.
TV Remote Control Buttons Available in Anynet+ Mode Device Type Operating Status Anynet+ Device After switching to the device, when the menu of the corresponding device is displayed on the screen.
¦ Troubleshooting for Anynet+ Problem Anynet+ does not work. Possible Solution ● Check if the device is an Anynet+ device. The Anynet+ system supports Anynet+ devices only. ● Connect only one receiver (home theatre). ● Check if the Anynet+ device power cord is properly connected. ● Check the Anynet+ device’s Video/Audio/HDMI 1.3 cable connections. ● Check whether Anynet+ (HDMI-CEC) is set to On in the Anynet+ setup menu. ● Anynet+ doesn’t work in certain situations.
RECOMMENDATIONS ¦ Installing the Stand 1. Attach your LCD TV to the stand. N Two or more people should carry the TV. N Make sure to distinguish between the front and back of the stand when assembling them. N To make sure the TV is installed on the stand at a proper level, do not apply excess downward pressure to the upper left of right sides of the TV. 2. Fasten two screws at position 1 and then fasten two screw at position 2. N Stand the product up and fasten the screws.
¦ Anti-Theft Kensington Lock (depending on model) The Kensington Lock is a device used to physically fix the system when using it in a public place. The appearance and locking method may differ from the illustration depending on the manufacturer. Refer to the manual provided with the Kensington Lock for proper use. N The locking device has to be purchased separately. N The location of the Kensington Lock may be different depending on its model. 1.
¦ Securing the TV to the Wall Caution: Pulling, pushing, or climbing on the TV may cause the TV to fall. In particular, ensure your children do not hang over or destabilize the TV; doing so may cause the TV to tip over, causing serious injuries or death. Follow all safety precautions provided on the included Safety Flyer. For added stability, install the anti-fall device for safety purposes, as follows. To secure the TV: 1. Put the screws into the clamps and firmly fasten them onto the wall.
¦ Troubleshooting: Before Contacting Service Personnel Problem No sound or picture Possible Solution Normal picture but no sound Check the volume. Check whether the MUTEM button has been pressed on the remote control. Check the Speaker Select settings. Screen is black and power indicator light blinks steadily On your computer check; Power, Signal Cable. The TV is using its power management system. Move the computer’s mouse or press any key on the keyboard.
¦ Specifications Model Name LA40B610 LA46B610 Screen Size (Diagonal) 40 inches 46 inches PC Resolution (Optimum) 1920 X 1080 @ 60 Hz 1920 X 1080 @ 60 Hz 10W x 2 10W x 2 998 x 79 x 638 mm 998 x 255 x 699 mm 1131 x 79 x 714 mm 1131 x 277 x 779 mm 19 Kg 24 Kg Sound Output Dimension (WxDxH) Without Stand With stand Weight With Stand Environmental Considerations Operating Temperature Operating Humidity Storage Temperature Storage Humidity 10°C to 40°C (50°F to 104°F) 10% to 80%, non-condensing -2