Quick Reference Guide LabelManager ® 280
Copyright © 2012 Sanford, L.P. All rights reserved. No part of this document or the software may be reproduced or transmitted in any form or by any means or translated into another language without the prior written consent of Sanford, L.P. Trademarks DYMO, DYMO Label, and LabelManager are registered marks in the US and other countries. All other trademarks are the property of their respective holders.
Quick Reference Guide This guide describes some of the features of your DYMO® LabelManager® 280 label maker. Read the following sections for information about using your label maker.
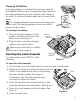
Connecting the Power The label maker is powered by a rechargeable, lithium-ion (Li-ion) battery pack. Inserting the Battery The battery pack included with your label maker comes partially charged. Make sure the charging adapter is disconnected before handling the Li-ion battery pack. To insert the battery 1 Slide the battery compartment cover away from the label maker. See Figure 1. 2 Insert the battery into the battery compartment as shown in Figure 1. 3 Replace the battery cover.
Charging the Battery A charging adapter is included with your label maker for recharging the battery pack. Charging the battery pack will take approximately three hours; however, after charging for about 10 minutes, the label maker can be used to print labels. The charging adapter is only used for recharging the battery pack; the charging adapter cannot be used to power the label maker. Figure 2 To recharge the battery 1 Plug the charging adapter into the power connector on the top of the label maker.
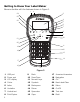
Getting to Know Your Label Maker Become familiar with the features shown in Figure 5.
Quick Tips To print multiple copies, press and hold To open saved labels, press and hold Pressing for several seconds. for several seconds. displays the Format, Insert, Open, and Settings tabs. Select the font, font size, formatting, border, text direction, alignment and length for your label. Change the default settings. A cba Insert symbols, clip art, date and time, autonumbering, or saved text into a label. Open a saved label.
To install the software on a Mac OS® system 1 Download the latest version of DYMO Label software from the DYMO Web site at lm280.dymo.com. 2 Double-click the Installer icon and follow the on-screen instructions. Connecting the Label Maker to Your Computer The label maker connects to your computer using the USB connection located on the top of the label maker. Do not connect the label maker to your computer until after the software installation is complete.
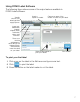
Using DYMO Label Software The following figure shows some of the major features available in DYMO Label software. Visually choose your label type and apply layouts. Apply a layout to a label. Capture an area of the screen to insert on your label. Insert text, addresses, images, shapes, lines, barcodes, dates, and counters. Store your favorite addresses or other data in the Address Book; automatically insert the data on your label. Select a label maker to print your labels. Print a label.
Safety Precautions for Lithium-ion Rechargeable Battery Pack Inaccurate handling of a lithium-ion rechargeable battery may cause leakage, heat, smoke, an explosion, or fire. This could cause deterioration of performance or failure. This may also damage the protection device installed in the battery pack. This could damage equipment or injure users. Thoroughly follow the instructions below.
1-Year Warranty for Your DYMO Product Your electronic DYMO product is sold with a 1-year warranty from the date of purchase against defects in material and workmanship.
10
DISTRIBUTED BY: DYMO, ATLANTA, GA 30328 800-426-7827: WWW.DYMO.COM ©2012 SANFORD, L.P.