Country Armenia AUSTRIA Azerbaijan Belarus BELGIUM CZECH DENMARK ESTONIA FINLAND FRANCE GERMANY Georgia HUNGARY EIRE ITALIA KAZAKHSTAN KYRGYZSTAN LATVIA LITHUANIA LUXEMBURG Moldova NETHERLANDS NORWAY POLAND PORTUGAL RUSSIA SLOVAKIA SPAIN SWEDEN Switzerland TADJIKISTAN U.K UKRAINE UZBEKISTAN Customer Care Centre 0-800-05-555 0810 - SAMSUNG (7267864, € 0.07/min) 088-55-55-555 810-800-500-55-500 Web Site www.samsung.com/at www.samsung.com/be (Dutch) 02-201-24-18 www.samsung.
Figures and illustrations in this User Manual are provided for reference only and may differ from actual product appearance. Product design and specifications may be changed without notice. Digital TV notice Functionalities related to Digital TV (DVB) are only available in countries/areas where DVB-T (MPEG2 and MPEG4 AVC) digital terrestrial signals are broadcasted or where you are able to access to a compatible DVB-C (MPEG2 and MPEG4 AAC) cable-TV service.
Contents Getting Started 4 4 4 5 6 6 Accessories Viewing the Control Panel Viewing the Remote Control Connecting to an Antenna Plug & Play (Initial Setup) Connections 7 8 9 Connecting to an AV Device Connecting to an Audio Device Changing the Input Source 9 10 10 12 13 16 18 20 How to Navigate Menus Using the INFO button (Now & Next guide) Planning Your Viewing Channel Menu Picture Menu Sound Menu Setup Menu Support Menu 7 9 Basic Features Advanced Features 22 Other Information 32 22 Connecti
Getting Started Accessories ✎✎Please make sure the following items are included with your LCD TV. If any items are missing, contact your dealer. ✎✎The items’ colours and shapes may vary depending on the models. yy Remote Control & Batteries (AAA x 2) yy Owner’s Instructions yy Warranty Card / Safety Guide (Not available in some locations) yy Cleaning Cloth yy Power Cord See separate guide for installing the stand.
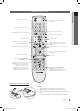
Turns the TV on and off. (P. 6) 01 Getting Started Viewing the Remote Control Displays and selects the available video sources. (P. 9) Press to directly access to channels. Returns to the previous channel. Alternately selects Teletext, Double or MiX. Cuts off the sound temporarily. Adjusts the volume. Changes channels. Display the main on-screen menu. (P. 9) Displays channel list on the screen. (P. 13) Display the EPG (Electronic Programme Guide). (P. 10) Views the Media play. (P.
Getting Started Connecting to an Antenna When the TV is initially powered on, basic settings proceed automatically. ✎✎Preset: Connecting the mains and antenna. VHF/UHF Antenna Cable or R-AUDIO-L ANT OUT PR PB Y Power Input Plug & Play (Initial Setup) When the TV is initially powered on, a sequence of on-screen prompts will assist in configuring basic settings. Press the POWERP button. Plug & Play is available only when the Input source is set to TV.
Connections 02 Connections Connecting to an AV Device Using an HDMI / DVI Cable: HD connection (up to 1080p) Available devices: DVD, Blu-ray player, HD cable box, HD STB (Set-Top-Box) satellite receiver, cable box, satellite receiver (STB) DVD W Y W R W R B G HDMI OUT Red White 26” 32” AUDIO OUT W PR R R-AUDIO-L PR R-AUDIO-L DVI OUT ✎✎HDMI IN 1(DVI), 2, 3 / PC/DVI AUDIO IN PR R-AUDIO-L PB PB Y PB Y Y xx When using an HDMI/DVI cable connection, you must use the HDMI IN 1(DVI) jack.
Connections Connecting to an Audio Device Using an Optical or Audio Cable Connection Available devices: digital audio system, amplifier, DVD home theatre ✎✎The product colour and shape may vary depending on the model. OPTICAL Digital Audio System R-AUDIO-L PR PB Y Headphone ✎✎DIGITAL AUDIO OUT (OPTICAL) xx When a digital audio system is connected to the DIGITAL AUDIO OUT (OPTICAL) jack, decrease the volume of both the TV and the system. xx 5.
P.SIZE S.MODE P.MODE Edit Name ■■ VCR / DVD / Cable STB / Satellite STB / PVR STB / AV Receiver / Game / Camcorder / PC / DVI PC / DVI Devices / TV / IPTV / Blu-ray / HD DVD / DMA: Name the device connected to the input jacks to make your input source selection easier. Source List Use to select TV or other external input sources such as DVD / Blu-ray players / cable box / STB satellite receiver connected to the TV.
Basic Features P.SIZE S.MODE Using the INFO button (Now & Next guide) The display identifiesPOWER the current channel and the status of certain audio-video settings. The Now & Next guide shows daily TV programme information for each channel according to the broadcasting time. yy Scroll ◄, ► to view information for a desired programme while watching the current channel. yy Scroll ▲, ▼ to view information for other channels. If you want to move to the currently selected channel, press the ENTERE button.
¦¦ Using Favourite Channels Delete or set favourites channels and use the programme guide for digital broadcasts. Select a channel in the Channels, My Channels or Scheduled screen. * My Channels c1 c2 Channels All Air TV 15 Radio Data/Other Analogue 3 23 33 32 5 4 27 BBC World bid-up.tv Boonerang Cartoon Nwk Class News \ Coming Soon Discovery Select Sort Antena B Zoom (in Channel Manager) Shows all favourite channels. 1futech * 24ore.
Basic Features Channel Menu Manual Store Scans for a channel manually and stores in the TV. ¦¦ Retuning channels ✎✎If a channel is locked using the Child Lock function, Antenna (Air / Cable) ■■ Digital Channel: (available in DTV mode) When scanning has finished, channels are updated in the channel list. the PIN input window appears. Before your television can begin memorizing the available channels, you must specify the type of signal source that is connected to the TV (i.e.
(in Channel Manager) Set each channel using the Channel Manager menu options (Lock / Unlock, Timer Viewing, Sort, Delete, Select All / Deselect All). Option menu items may differ depending on the channel status. 1. Select a channel and press the TOOLS button. Channel List Transfer Imports or exports the channel map. You should connect a USB storage to use this function. ✎✎The PIN number input screen appears. Enter your 4 digit PIN number. ✎✎The default PIN number of a new TV set is ‘0-0-0-0’. 2.
Basic Features ¦¦ Economical Solutions ■■ White Balance: Adjust the colour temperature for a more natural picture. R-Offset / G-Offset / B-Offset: Adjust each colour’s (red, green, blue) darkness. ECO Solution ■■ Energy Saving (Off / Low / Medium / High / Picture Off / Auto) t : Adjust the brightness of the TV in order to reduce power consumption. If you select Picture Off, the screen is turned off, but the sound remains on. Press any button except volume button to turn on the screen.
P P.SIZE Auto Visualisation: When changing analogue channels, displays signal strength. Auto Wide: Automatically adjusts the picture size to the 16:9 aspect ratio. 16:9 : Adjusts the picture size to 16:9 for DVDs or wide broadcasting. Wide Zoom: Magnifies the picture size more than 4:3. ✎✎ Adjusts the Position by using ▲, ▼ buttons. Zoom: Magnifies the 16:9 wide pictures vertically to fit the screen size. ✎✎ Adjusts the Position or Size by using ▲, ▼ button.
Basic Features Screen ¦¦ Adjusting sound settings ■■ Coarse / Fine: Removes or reduces picture noise. If the noise is not removed by Fine-tuning alone, then adjust the frequency as best as possible (Coarse) and Finetune again. After the noise has been reduced, readjust the picture so that it is aligned to the centre of screen. ■■ Position: Adjust the PC screen position with direction button (▲ / ▼ / ◄ / ►). ■■ Image Reset: Resets the image to default settings.
I-II DUAL MEDIA.P (not available in all locations) SUBT. (digital channels only) GUIDE This function handles the Audio Stream for the AD (Audio Description) which is sent along with the Main audio from the broadcaster. AD ■■ Audio Description (Off / On): Turn the audio description function on or off. ■■ Volume: Adjust the audio description volume. Auto Volume (Off / Normal / Night) To equalize the volume level on each channel, set to Normal.
Basic Features Setup Menu On Time / Off Time: Set the hour, minute, and activate / inactivate. (To activate timer with the setting you have chosen, set to Activate.) ¦¦ Setting the Time Volume: Set the desired volume level. Time ■■ Clock: Setting the clock is for using various timer features of the TV. OO The current time will appear every time you press the INFO button. ✎✎ If you disconnect the power cord, you have to set the clock again.
P ✎✎ control buttons in the following sequence, which resets the PIN to “0-0-0-0”: POWER (off) → MUTE → 8 → 2 → 4 → POWER (on). ¦¦ Other Features ✎✎NOTE –– To disconnect the game console and connect another external device, set Game Mode to Off in the setup menu. –– If you display the TV menu in Game Mode, the screen shakes slightly. ■■ Menu Language: Set the menu language. ■■ Teletext Language: Set a desired language for teletext.
Basic Features ¦¦ Picture In Picture (PIP) ■■ Signal Information: (digital channels only) HDTV channel’s reception quality is either perfect or the channels are unavailable. Adjust your antenna to increase signal strength. PIP t Watches simultaneously the TV tuner and one external video source. PIP (Picture-in-Picture) does not function in the same mode. ✎✎NOTE xx If you turn the TV off while watching in PIP mode, the PIP window will disappear.
HD Connection Guide ✎✎ If the function is selected during the software Refer to this information when connecting external devices to the TV. ✎✎ The time required to download the software is Contact Samsung transmission period, software will be automatically searched and downloaded. determined by the signal status. ■■ Standby Mode Upgrade: A manual upgrade will be automatically performed at selected time.
Advanced Features Connecting to a PC Using an HDMI/DVI Cable / a D-sub Cable DVI OUT R-AUDIO-L PR PB AUDIO OUT AUDIO OUT PC OUT Y PR R-AUDIO-L PB Y R-AUDIO-L PR PB Y R-AUDIO-L PR PB Y Display Modes (D-Sub and HDMI/DVI Input) Optimal resolution is 1360 X 768 @ 60 Hz.
MEDIA.P Enjoy photos, music and/or movie files saved on a USB Mass Storage Class (MSC) device. 04 Advanced Features UIDE Media Play MediaPlay Videos AD SUM Change Device View Devices E Enter R Return ¦¦ Connecting a USB Device 1. Turn on your TV. TV Side Panel 2. Connect a USB device containing photo, music and/or movie files to the USB (HDD) jack on the side of the TV. 3. When USB is connected to the TV, popup window appears. Then you can select Media Play.
Advanced Features ¦¦ Screen Display Move to the desired file using the up/down/right/left buttons and then press the ENTERE or � (Play) button. The file is played. ✎✎Supports the Device Mode and Contents Mode in Media Play homepage. Information: You can ascertain the selected file name and the number of files and page. Videos Movie 01.avi Movie 03.avi Movie 05.avi Sort List Section: Displays the sorting standard. Jan.10.2010 Jan.10.2010 Jan.10.2010 Movie 07.avi Movie 02.avi Movie 04.avi Movie 06.
File Extention Container *.avi *.mkv ASF *.wmv ASF 3GPP *.vro VRO VOB *.mpg *.mpeg PS *.ts *.tp *.trp Frame rate (fps) Bit rate (Mbsp) 1920x1080 6 ~ 30 8 XviD 1920x1080 6 ~ 30 8 H.264 BP / MP / HP 1920x1080 6 ~ 30 25 MPEG4 SP / ASP 1920x1080 6 ~ 30 8 Divx 3.11 / 4.x / 5.1 / 6.0 1920x1080 6 ~ 30 8 XviD 1920x1080 6 ~ 30 8 H.264 BP / MP / HP 1920x1080 6 ~ 30 25 MPEG4 SP / ASP 1920x1080 6 ~ 30 8 Window Media Video v9 1920x1080 6 ~ 30 25 H.
Advanced Features Playing movie continuously (Resume Play) If you exit the playing movie function, the movie can be played later from the point where it was stopped. 1. Select the movie file you want to play continuously by pressing the ◄ or ► button to select it from the file list section. 2. Press the � (Play) / ENTERE button. 00:04:03 / 00:07:38 1/1 Movie 01.avi 3. Select Play Continuously (Resume Play) by pressing the Blue button. The Movie will begin to play from where it was stopped.
Playing the selected video/music/photo files 1. Press the Yellow button in the file list to select the desired file. Videos 2 files selected /Movie 01.avi 2. Repeat the above operation to select multiple files. Movie 01.avi ✎✎ NOTE Movie 02.avi Jan.10.2010 Jan.10.2010 Movie 03.avi xx The (c) mark appears to the left of the selected files. xx To cancel a selection, press the yellow button again. xx To deselect all selected files, press the TOOLS button and Movie 04.avi Jan.10.2010 Movie 05.
Advanced Features Videos/Music/Photos Play Option menu During playing a file, press the TOOLS button. Category Operation Videos Music Photos Title You can move the other file directly. ✓ Repeat Mode You can play movie and music files repeatedly. ✓ Picture Size (Mode1 / Mode2 / Original) You can adjust the picture size to your preference. Picture Setting You can adjust the picture setting. (p. 13, 14, 15, 16) ✓ Sound Setting You can adjust the sound setting. (p.
What is Anynet+? t Anynet+ is a function that enables you to control all connected Samsung devices that support Anynet+ with your Samsung TV’s remote. The Anynet+ system can be used only with Samsung devices that have the Anynet+ feature. To be sure your Samsung device has this feature, check if there is an Anynet+ logo on it. To connect to Home Theatre TV Home Theatre Optical Cable Anynet+ Device 1 Anynet+ Device 2, 3 04 Advanced Features Anynet+ HDMI Cable HDMI Cable 1.
Advanced Features ¦¦ Setting Up Anynet+ ■■ Setup Anynet+ (HDMI-CEC) (Off / On): To use the Anynet+ Function, Anynet+ (HDMI-CEC) must be set to On. When the Anynet+ (HDMI-CEC) function is disabled, all the Anynet+ related operations are deactivated. ✎✎ Auto Turn Off (No / Yes): Setting an Anynet+ Device to turn off automatically when the TV is turned off. The active source on the TV must be set to TV to use the Anynet+ function. ✎✎ ✎✎ Even if an external device is still recording, it may turn off.
You can listen to sound through a receiver (i.e Home Theatre) instead of the TV speaker. 1. Select Receiver and set to On. 2. Press the EXIT button to exit. ✎✎ If your receiver supports audio only, it may not appear in the device list. ✎✎ The receiver will work when you have properly connected the optical in jack of the receiver to the DIGITAL AUDIO OUT (OPTICAL) jack of the TV. ✎✎ When the receiver (i.e Home Theatre) is set to On, you can hear sound output from the TV’s Optical jack.
Other Information Analogue Channel Teletext Feature The index page of the Teletext service gives you information on how to use the service. For Teletext information to be displayed correctly, channel reception must be stable. Otherwise, information may be missing or some pages may not be displayed. ✎✎You can change Teletext pages by pressing the numeric buttons on the remote control. 1 2 / (Teletext on/mix): Activate the Teletext mode after selecting the channel providing the Teletext service.
¦¦ Installing the Wall Mount Kit Wall mount items (sold separately) allow you to mount the TV on the wall. For detailed information on installing the wall mount, see the instructions provided with the Wall Mount items. Contact a technician for assistance when installing the wall mount bracket. Samsung Electronics is not responsible for any damage to the product or injury to yourself or others if you elect to install the TV on your own.
Other Information Anti-Theft Kensington Lock The Kensington Lock is a device used to physically fix the system when using it in a public place. The appearance and locking method may differ from the illustration depending on the manufacturer. Refer to the manual provided with the Kensington Lock for proper use. 1 2 ✎✎Please find a “K” icon on the rear of the TV. A kensington slot is beside the “K” icon. 1.
If you have any questions about the TV, first refer to this list. If none of these troubleshooting tips apply, please visit “www.samsung.com,” then click on Support, or contact the call centre listed on the back-cover of this manual. Issues Solutions and Explanations Picture Quality First of all, please perform the Picture Test and confirm that your TV is properly displaying test image. (go to MENU - Support - Self Diagnosis - Picture Test) (P.
Other Information Issues Solutions and Explanations No Picture, No Video The TV will not turn on. • • • Make sure the AC power cord is securely plugged in to the wall outlet and the TV. Make sure the wall outlet is working. Try pressing the POWER button on the TV to make sure the problem is not the remote. If the TV turns on, refer to “The remote control does not work” below. The TV turns off automatically. • • • • Ensure the Sleep Timer is set to Off in the Setup menu. (P.
Solutions and Explanations Your settings are lost after 30 minutes or every time the TV is turned off. • If the TV is in the Store Demo mode, it will reset audio and picture settings every 30 minutes. Change the settings from Store Demo mode to Home Use mode in the Plug & Play (Initial setup) procedure. Press the SOURCE button to select TV mode, and go to MENU → Setup → Plug & Play (Initial setup) → ENTERE. You have intermittent loss of audio or video.
Other Information Specifications Panel native Environmental Considerations Operating Temperature Operating Humidity Storage Temperature Storage Humidity TV System Colour/video system Sound System HDMI IN 1 ~ 3 1360 X 768 @ 60 Hz 10°C to 40°C (50°F to 104°F) 10% to 80%, non-condensing -20°C to 45°C (-4°F to 113°F) 5% to 95%, non-condensing Analogue : Depending on your country selection Digital : DVB-T/DVB-C Analogue : PAL, SECAM, NTSC-4.43, NTSC-3.58, PAL60 Digital : MPEG-2 MP@ML, MPEG-4, H.
A Amplify Antenna Anynet+ Audio Out Auto Adjustment Auto Volume H 16 12 29 8, 29 15 17 B Background Music Balance L/R Basic View Batteries Black Tone Blanking Bracket Brightness 27 16 27 5 14 33 13 C Change PIN 6, 19 Channel Manager 11 Clock 18 Colour Tone 15 Component 7 Connecting to a PC 22 Connecting to an Audio Device 8 D Digital Audio Out DivX® VOD D-sub Dynamic Dynamic Contrast 8, 29 28 22 13 14 E Edit Name Editing Channels Energy Saving Equalizer External Speaker EPG 9 12 14 16 17 10 F Favou
This page is intentionally left blank. BN68-02592A_Eng.
Les figures et illustrations contenues dans ce mode d’emploi sont fournies pour référence uniquement. Elles peuvent différer de l’aspect réel du produit. La conception et les spécifications du produit sont susceptibles d’être modifiées sans préavis.
Sommaire Mise en route 4 4 4 5 6 6 Accessoires Présentation du panneau de commande Présentation de la télécommande Raccordement à une antenne Plug & Play (configuration initiale) Connexions 7 8 9 Connexion à un périphérique AV Connexion à un système audio Changement de la source d’entrée 9 10 10 12 13 16 18 20 Navigation dans les menus Utilisation du bouton INFO (Guide Now & Next) Planification des émissions à regarder Menus Chaîne Menu Image Menu Son Menu Configuration Menu Assistance 7 9 Fonctio
Mise en route Accessories ✎✎Vérifiez que les éléments suivants sont inclus avec votre téléviseur LCD. S’il manque des éléments, contactez votre revendeur. ✎✎La couleur et la forme des éléments peuvent varier en fonction du modèle. yy Télécommande et piles (AAA x 2) yy Instructions d’utilisation yy Carte de garantie / Manuel de sécurité (non disponible dans certains pays) yy Chiffon de nettoyage yy Câble d’alimentation Pour installer le pied, consultez le guide approprié.
Permet d’allumer et éteindre la télévision. (P. 6) 01 Mise en route Présentation de la télécommande Permet d’afficher et de sélectionner les sources vidéo disponibles. (P. 9) Appuyez pour atteindre les chaînes directement. Permet de revenir à la chaîne précédente. Permet de choisir Télétexte, Double ou Mixte. Permet de couper temporairement le son. Permet de régler le volume. Permet de changer de chaîne. Permet d’afficher le menu principal à l’écran. (P. 9) MEDIA.
Mise en route Raccordement à une antenne Lorsque vous allumez le téléviseur pour la première fois, des réglages de base s’effectuent de manière automatique. ✎✎Préréglage : connexion du câble d’alimentation et de l’antenne. Antenne VHF/UHF Câble ou R-AUDIO-L ANT OUT PR PB Y Prise D'alimentation Plug & Play (configuration initiale) Lorsque le téléviseur est allumé pour la première fois, plusieurs invites s’affichent pour vous aider à configurer les réglages de base. Appuyez sur le bouton POWERP.
Connexions 02 Connexions Connexion à un périphérique AV Utilisation d’un câble HDMI/DVI : connexion HD (jusqu’à 1080p) Périphériques disponibles : lecteur DVD, lecteur Blu-ray, décodeur câble HD, décodeur HD, récepteur satellite, décodeur câble, récepteur satellite (décodeur) DVD W Y W R W R B G HDMI OUT Red White 26” 32” AUDIO OUT W PR R R-AUDIO-L PR R-AUDIO-L DVI OUT ✎✎HDMI IN 1(DVI), 2, 3, / PC/DVI AUDIO IN PR R-AUDIO-L PB PB Y PB Y Y xx Lorsque vous utilisez une connexion avec
Connexions Connexion à un système audio Utilisation d’une connexion par câble audio ou optique Périphériques disponibles : système audio numérique, amplificateur, système home cinéma DVD La couleur et la forme du produit peuvent varier en fonction du modèle. OPTICAL Système audio numérique R-AUDIO-L PR PB Y Ecouteurs ✎✎DIGITAL AUDIO OUT (OPTICAL) xx Lorsqu’un système audio numérique est connecté à la prise DIGITAL AUDIO OUT (OPTICAL), diminuez le volume du téléviseur et du système.
P.SIZE S.MODE P.MODE Modif. nom ■■ VCR / DVD / Décodeur Câble / Décodeur satellite / Décodeur PVR / Récepteur AV / Jeux / Caméscope / PC / DVI PC / Périph. DVI / TV / IPTV / Blu-ray / HD DVD / DMA Nommez le périphérique connecté aux prises d’entrée pour faciliter la sélection de la source d’entrée. Liste Source Permet de sélectionner le téléviseur ou d’autres sources d’entrée externes (telles qu’un lecteur DVD, un lecteur Blu-ray, un décodeur câble ou un récepteur décodeur) connectées au téléviseur.
Fonctions de base Utilisation du P.SIZE bouton INFO (Guide NowS.MODE & Next) L’affichage identifie laPOWER chaîne en cours et l’état de certains paramètres audio et vidéo. Le Guide Now & Next affiche des informations quotidiennes sur les programmes de télévision en fonction de l’heure de diffusion. yy Faites défiler à l’aide des boutons ◄, ► pour afficher des informations sur le programme de votre choix, tout en regardant la chaîne actuelle.
¦¦ Utilisation des chaînes favorites Supprimez ou définissez des chaînes favorites et utilisez le guide des programmes pour les émissions numériques. Sélectionnez une chaîne dans l’écran Chaînes, Mes chaînes ou Programmé. * Mes chaînes Chaînes Hertzien ■■ ■■ c1 c2 All TV 15 Radio Data/Other Analogue 3 23 33 32 5 4 27 Antenne B Zoom Sélectionner 1futech * 24ore.tv abc1 r BBC World bid-up.
Fonctions de base Menu Chaîne ¦¦ Nouvelle syntonisation des chaînes Antenne (Hertzien / Câble) Avant que votre téléviseur ne puisse commencer à mémoriser les chaînes disponibles, vous devez spécifier le type de la source du signal reliée au téléviseur (c’est-à-dire : soit une antenne, soit le câble). Mémorisation Manuelle Recherche manuellement une chaîne et la mémorise dans le téléviseur. ✎✎Si une chaîne est verrouillée par la fonction Verrouillage Parental, la fenêtre de saisie du code PIN s’affiche.
■■ Verrouiller / Déverrouiller : vous pouvez verrouiller une chaîne afin qu’elle ne puisse pas être sélectionnée ni visualisée. ✎✎REMARQUE Transfert liste chaînes Importe ou exporte la carte des chaînes. Vous devez connecter un périphérique de stockage USB pour utiliser cette fonction. L'écran de saisie du code PIN apparaît. Entrez votre code PIN à quatre chiffres. Le code PIN par défaut d'un nouveau téléviseur est "0-0-0-0".
Fonctions de base ¦¦ Solutions économiques ■■ Balance blancs : permet de régler la température des couleurs afin d’obtenir une image plus naturelle. Aj. Rouge / Aj. Vert / Aj. Bleu : permet de régler la profondeur de chaque couleur (rouge, vert, bleu). Solution Eco ■■ Mode éco. (Arrêt / Bas / Moyen / Elevé / Image désactivée / Auto.) t : permet de régler la luminosité du téléviseur afin de réduire la consommation d’énergie.
P P.SIZE 16:9 Auto : règle automatiquement la taille de l’image sur le format 16:9. 16:9 : règle la taille de l’image sur 16:9 pour les DVD ou la diffusion au format grand écran. Zoom large : agrandit l’image à une taille supérieure à 4:3. ✎✎ Réglez la position à l’aide des boutons ▲, ▼. Zoom : agrandit l’image en 16:9 (dans le sens vertical) pour l’adapter à la taille de l’écran. ✎✎ Réglez la position ou la taille à l’aide des boutons ▲, ▼.
Fonctions de base Ecran ¦¦ Réglage des paramètres sonores ■■ Régl. Base / Regl. Préc : élimine ou réduit les parasites visuels. Si vous ne pouvez pas éliminer ces parasites au moyen d’un réglage précis uniquement, réglez la fréquence (Régl. Base) au mieux, puis effectuez de nouveau un réglage précis. Une fois les parasites réduits, effectuez un nouveau réglage de l’image pour l’aligner au centre de l’écran. Egaliseur Règle le mode Son.
I-II DUAL MEDIA.P (non disponible dans tous les pays) GUIDE SUBT. (chaînes numériques uniquement) Cette fonction traite le flux audio relatif à la description audio (AD) lorsqu’il est envoyé avec le son principal par le radiodiffuseur. AD ■■ Description audio (Arrêt / Activé) : active ou désactive la fonction de description audio. ■■ Volume : permet de régler le volume de description audio.
Fonctions de base Menu Configuration Période d’activation / Période de désactivation : sélectionnez l’heure, les minutes et l’action Activer / Désactiver. (Pour activer le minuteur selon les réglages définis, choisissez Activer.) ¦¦ Réglage de l’heure Volume : sélectionnez le niveau de volume désiré. Heure ■■ Horloge : le réglage de l’heure est nécessaire pour utiliser différentes fonctions de minuterie du téléviseur. OO L’heure actuelle s’affiche à chaque fois que vous appuyez sur le bouton INFO.
P Autor. tout : déverrouille toutes les évaluations TV. ✎✎ Les options du menu Verrouillage parental diffèrent selon les pays. ■■ Modifier PIN : permet de modifier le code personnel demandé pour pouvoir configurer le téléviseur. Si vous avez oublié le code PIN, appuyez sur les boutons de la télécommande dans l’ordreP.SIZE suivant, ce qui a pour effet de le réinitialiser sur "0-0-0-0" : POWER (Arrêt) → MUTE → 8 → 2 → 4 → POWER (Marche).
Fonctions de base ¦¦ Incrustation d’image (PIP) PIP t Permet de regarder simultanément le tuner TV et une source vidéo externe. PIP (Incrustation d’image) ne fonctionne pas dans le même mode. ✎✎REMARQUE xx Si vous éteignez le téléviseur alors que le mode PIP est ■■ Informations de signal : (chaînes numériques uniquement) soit la qualité de réception des chaînes HDTV est parfaite, soit les chaînes ne sont pas disponibles. Réglez votre antenne afin d’augmenter l’intensité du signal.
Guide de connexion HD ✎✎ Consultez ces informations lors de la connexion de périphériques externes au téléviseur. ✎✎ Contacter Samsung ■■ Mise à niveau en mode veille : une mise à niveau manuelle est automatiquement effectuée à l’heure indiquée. Etant donné que la mise sous tension s’effectue de façon interne, il se peut que l’écran LCD s’allume légèrement. Le phénomène peut se poursuivre pendant plus d’une heure jusqu’à ce que la mise à jour du logiciel soit terminée.
Fonctions avancées Connexion à un ordinateur Utilisation d’un câble HDMI/DVI / D-Sub DVI OUT R-AUDIO-L PR PB AUDIO OUT AUDIO OUT PC OUT Y R-AUDIO-L PR PB Y R-AUDIO-L PR PB Y R-AUDIO-L PR PB Y Modes d’affichage (Entrées D-Sub et HDMI/DVI) La résolution optimale est de 1360 x 768 @ 60 Hz Mode IBM MAC Résolution 640 x 350 720 x 400 640 x 480 832 x 624 640 x 480 800 x 600 VESA DMT 1024 x 768 VESA CVT VESA GTF 1280 x 720 1360 x 768 720 x 576 1280 x 720 1280 x 720 Fréquence horizontale (kHz
MEDIA.P Vous pouvez lire les photos, la musique et/ou les films enregistrés sur un périphérique USB de type MSC. AD 04 Fonctions avancées UIDE Media Play MediaPlay Videos SUM Changer disp. Afficher les app. E Entrer R Retour ¦¦ Connexion d’un périphérique USB 1. Allumez votre téléviseur. Panneau latéral du téléviseur 2. Connectez un périphérique USB contenant des fichiers photo, de la musique et/ou des films à la prise USB (HDD) située sur le côté du téléviseur. 3.
Fonctions avancées ¦¦ Affichage Accédez au fichier de votre choix à l’aide des boutons haut/bas/droite/gauche et appuyez ensuite sur le bouton ENTERE ou � (Lecture). La lecture du fichier commence. ✎✎Prise en charge de Mode Périphérique et Mode Contenu dans la page d’accueil Media Play. Informations : Vous pouvez vérifier le nom du fichier sélectionné, le nombre de fichiers, ainsi que la page. Videos 1/1 Page /Movie 01.avi Movie 01.avi Movie 03.avi Movie 05.
Extension de fichier *.avi *.mkv Conteneur AVI MKV *.asf ASF *.wmv ASF *.mp4 MP4 *.3gp 3GPP *.vro VRO VOB *.mpg *.mpeg PS *.ts *.tp *.trp Codec vidéo Résolution Fréquence d'images (i/s) Débit binaire (Mbit/s) Divx 3.11 / 4.x / 5.1 / 6.0 1920x1080 6 ~ 30 8 XviD 1920x1080 6 ~ 30 8 H.264 BP / MP / HP 1920x1080 6 ~ 30 25 MPEG4 SP / ASP 1920x1080 6 ~ 30 8 Divx 3.11 / 4.x / 5.1 / 6.0 1920x1080 6 ~ 30 8 XviD 1920x1080 6 ~ 30 8 H.
Fonctions avancées Lecture d’un film en continu (Resume Play) Si vous quittez la fonction de lecture de vidéos ou de programmes, il est possible de reprendre la lecture ultérieurement, au point où vous l’avez arrêtée. 1. Pour sélectionner le fichier film que vous souhaitez lire en continu, 00:04:03 / 00:07:38 1/1 appuyez sur le bouton ▲ ou ▼ dans la section Liste des fichiers. 2. Appuyez sur le bouton �(Lecture)/ENTERE. Movie 01.avi 3. Sélectionnez Rappel lecture cont.
Lecture des fichiers musicaux / vidéos / photos sélectionnés 1. 2. 3. Appuyez sur le bouton jaune dans la liste des fichiers pour sélectionner le fichier de votre choix. Répétez l’opération ci-dessus pour sélectionner plusieurs fichiers. REMARQUE xx La marque (c) s’affiche à gauche des fichiers sélectionnés. xx Pour annuler une sélection, appuyez à nouveau sur le bouton jaune. xx Pour désélectionner tous les fichiers, appuyez sur le bouton TOOLS et sélectionnez Désélectionner tout.
Fonctions avancées Menu des options de lecture de vidéos / musique / photos Pendant la lecture d’un fichier, appuyez sur le bouton TOOLS. Menu d’options Opérations Videos Music Photos Titre Vous pouvez déplacer directement l'autre fichier. ✓ Mode de répétition Vous pouvez lire des fichiers musicaux, vidéo et en boucle. ✓ Taille d'image (Mode1 / Vous pouvez régler le format de l'image suivant vos préférences. Mode2 / Original) Vous pouvez régler les paramètres d'image. (p.
En quoi consiste Anynet+ ? t Anynet+ est une fonction qui vous permet de contrôler tous les appareils Samsung connectés compatibles Anynet+ à l’aide de votre télécommande Samsung. Le système Anynet+ peut être utilisé uniquement avec les appareils Samsung disposant de la fonction Anynet+. Pour être sûr que votre appareil Samsung dispose de cette fonction, vérifiez qu’il comporte le logo Anynet+.
Fonctions avancées ¦¦ Configuration d’Anynet+ ■■ Configuration Anynet+ (HDMI-CEC) (Arrêt / Activé) : pour utiliser la fonction Anynet+, l’option Anynet+ (HDMI-CEC) doit être définie sur Activé Lorsque la fonction Anynet+ (HDMI-CEC) est désactivée, toutes les activités qui y sont associées sont indisponibles. ✎✎ Arrêt automatique (Non / Oui) : configuration de l’arrêt automatique d’un appareil Anynet+ lorsque le téléviseur est mis hors tension.
Vous pouvez écouter du son via un récepteur (c’est-à-dire un système home cinéma) au lieu du haut-parleur du téléviseur. 1. Sélectionnez Récepteur et définissez l’option sur Activé. 2. Appuyez sur le bouton EXIT pour quitter le menu. Si votre récepteur ne prend en charge que l’audio, il se peut qu’il ne figure pas dans la liste d’appareils. Le récepteur fonctionnera lorsque vous aurez correctement raccordé la prise d’entrée optique du récepteur à la prise DIGITAL AUDIO OUT (OPTICAL) du téléviseur.
Informations supplémentaires Fonction Télétexte de chaîne analogique La page d’index du télétexte contient des instructions sur l’utilisation du service. Pour que les informations du télétexte s’affichent correctement, la réception des chaînes doit être stable. Autrement, des informations pourraient manquer ou certaines pages ne pas s’afficher. ✎✎Vous pouvez changer de page de télétexte en appuyant sur les boutons numériques de la télécommande.
Les éléments du support mural (vendus séparément) permettent de fixer le téléviseur au mur. Pour plus d’informations sur l’installation du support mural, reportez-vous aux instructions fournies avec les éléments du support mural. Faites appel à un technicien pour installer la fixation murale.
Informations supplémentaires Verrou antivol Kensington L’antivol Kensington est un dispositif utilisé pour fixer physiquement le système lorsqu’il est utilisé dans un endroit public. L’aspect et la méthode de verrouillage peuvent différer de l’illustration en fonction du fabricant. Consultez le manuel fourni avec le verrou Kensington pour obtenir des instructions d’utilisation. 1 2 ✎✎Une icône “K” est présente à l’arrière du téléviseur. Un verrou Kensington se trouve à côté de l’icône “K”. 1.
Si vous avez des questions sur le téléviseur, commencez par consulter la liste ci-dessous. Si aucune de ces astuces de dépannage ne s’applique à votre problème, rendez-vous sur le site "www.samsung.com", puis cliquez sur Service ou contactez le centre d’appel dont les coordonnées figurent sur la couverture arrière du présent manuel. Problèmes Solutions et explications Qualité de l'image Exécutez tout d'abord le Test de l'image pour vérifier que votre téléviseur affiche correctement l'image de test.
Informations supplémentaires Problèmes Solutions et explications Aucune image, aucune vidéo Le téléviseur ne s'allume pas. • • • Le téléviseur s'éteint automatiquement. • • • • Aucune image / vidéo n’est affichée. • • • • Vérifiez que le cordon d'alimentation secteur est branché correctement sur la prise murale et sur le téléviseur. Vérifiez que la prise murale est opérationnelle. Essayez d'appuyer sur le bouton POWER du téléviseur pour vous assurer que le problème n'est pas dû à la télécommande.
Solutions et explications Vos paramètres sont perdus après 30 minutes ou à chaque mise hors tension du téléviseur. • Si le téléviseur est en mode Démo. magasin, les paramètres audio et vidéo sont réinitialisés toutes les 30 minutes. Remplacez le mode Démo. magasin par le mode Util. domicile dans la procédure Plug & Play (configuration initiale).
Informations supplémentaires Caractéristiques techniques Résolution native du panneau Conditions ambiantes Température en service Humidité en fonctionnement Température de stockage Humidité sur le lieu de stockage Système TV Système de couleur/vidéo Sound System HDMI IN 1 ~ 4 1360 X 768 @ 60 Hz 10°C à 40°C (50°F à 104°F) 10% à 80%, sans condensation -20°C à 45°C (-4°F à 113°F) 5% à 95%, sans condensation Analogique : en fonction du pays sélectionné Numérique : DVB-T/DVB-C Analogique : PAL, SECAM, NTSC-4.
A H Aff. de base Amplifier Antenne Anynet+ Arr.-plan Acc.
Cette page est laissée intentionnellement vierge. BN68-02592ABF-00Fre.
Die Abbildungen und Illustrationen in diesem Handbuch dienen nur zur Information und können vom tatsächlichen Aussehen des Geräts abweichen. Änderungen an Ausführung und technischen Daten vorbehalten.
Inhalt Erste Schritte 4 4 4 5 6 6 Zubehör Bedienfeld Fernbedienung Verbinden mit einer Antenne Plug & Play (Anfangseinstellung) Anschlüsse 7 8 9 Anschließen an ein AV-Gerät Anschließen an ein Audiogerät Signalquellen wählen 7 9 Grundfunktionen 9 Navigieren in den Menüs 10 Verwenden der INFO-Taste (Elektronische Programmzeitschrift) 10 Fernsehplanung 12 Kanalmenü 13 Bildmenü 16 Tonmenü 18 Einstellungsmenü 20 Unterstützungsmenü Erweiterte Funktionen 22 Anschließen an einen PC 23 Media Play 29 Anyne
Erste Schritte Zubehör ✎✎Überprüfen Sie die Verpackung Ihres LCD-Fernsehgeräts auf Vollständigkeit. Falls Komponenten fehlen sollten, setzen Sie sich bitte mit Ihrem Händler in Verbindung. ✎✎Die Farbe und die Form der Teile können sich je nach Modell unterscheiden. yy Fernbedienung und 2 Batterien (Typ AAA) yy Bedienungsanleitung yy Garantiekarte / Sicherheitshinweise (nicht überall verfügbar) yy Reinigungstuch yy Netzkabel Weitere Informationen finden Sie im Installationshandbuch für den Standfuß.
Anzeigen und Auswählen aller verfügbaren Videosignalquellen. (Seite 6) 01 Erste Schritte Fernbedienung Anzeigen und Auswählen aller verfügbaren Videosignalquellen. (Seite 9) Hiermit wechseln Sie direkt zu einem Kanal. Zurück zum vorherigen Kanal. Abwechselnde Auswahl von „Teletext“, „Doppel“ oder „Mix“. Drücken Sie diese Taste, um den Ton vorübergehend auszuschalten. Lautstärke einstellen Wechseln des Kanals Bildschirmmenü anzeigen. (Seite 9) Anzeige der Senderliste auf dem Bildschirm.
Erste Schritte Verbinden mit einer Antenne Wenn das Fernsehgerät zum ersten Mal eingeschaltet wird, werden automatisch die Grundeinstellungen vorgenommen. ✎✎Voreinstellung: Anschließen ans Stromnetz und an die Fernsehantenne. VHF/UHF-Antenne Kabel oder R-AUDIO-L ANT OUT PR PB Y netzanschluss Plug & Play (Anfangseinstellung) Wenn das Fernsehgerät erstmals eingeschaltet wird, helfen eine Reihe aufeinanderfolgender Abfragen beim Durchführen der Grundeinstellungen. Drücken Sie die POWERP.
Anschlüsse 02 Anschlüsse Anschließen an ein AV-Gerät Mit Hilfe eines HDMI/DVI-Kabels: HD-Anschluss (max. 1080p) Verfügbare Geräte: DVD, Blu-ray-Player, HD-Kabelreceiver, HD-Satellitenreceiver, Kabelreceiver, Satellitenreceiver DVD W Y W R W R B G HDMI OUT Red White 26” 32” AUDIO OUT W PR R R-AUDIO-L PR R-AUDIO-L DVI OUT ✎✎HDMI IN 1(DVI), 2, 3 / PC/DVI AUDIO IN PR R-AUDIO-L PB PB Y PB Y Y xx Eine Verbindung über HDMI/DVI-Kabel kann nur über HDMI IN 1(DVI) erfolgen.
Anschlüsse Anschließen an ein Audiogerät Mit Hilfe eines Glasfaserkabels oder eines Audiokabels Verfügbare Geräte: Digital-Audiosystem, Verstärker, DVD-Heimkino ✎✎Form und Farbe können sich je nach Modell unterscheiden. OPTICAL Digital AudioSystem R-AUDIO-L PR PB Y Headphone ✎✎DIGITAL AUDIO OUT (OPTICAL) xx Wenn ein Digital Audio-System mit dem DIGITAL AUDIO OUT (OPTICAL)-Anschluss verbunden ist, reduzieren Sie die Lautstärke von Fernsehgerät und System. xx 5.
P.SIZE S.MODE P.MODE Signalquellen wählen 02 Anschlüsse Name bearbeiten ■■ Videorekorder / DVD / Kabelreceiver / Satellitenreceiver / PVR-Receiver / AV-Receiver / Spiel / Camcorder / PC / DVI PC / DVI-Geräte / TV / IPTV / Blu-Ray / HD DVD / DMA Vergeben Sie Namen für die an die Eingangsbuchsen angeschlossenen Geräte, um die Auswahl der Signalquelle zu vereinfachen. Quellen Hiermit wählen Sie, ob das Fernsehgerät mit einem Fernsehsignal versorgt wird oder an andere externe Signaleingänge wie z. B.
P Grundfunktionen Verwenden der INFO-Taste (Elektronische Programmzeitschrift) P.SIZE S.MODE Auf dem Bildschirm werden der aktuelle Kanal POWER und bestimmte Audio/Video-Einstellungen angezeigt. Die elektronische Programmführer zeigt entsprechend der Sendezeit für jeden Kanal tagesaktuelle Fernsehprogramminformation an. yy Blättern Sie mit ◄, ►, um Informationen zu einem gewünschten Programm anzuzeigen, während Sie einen anderen Sender anzeigen.
¦¦ Verwenden von Favoriten Mit diesem Menü können Sie Favoriten löschen oder einstellen und den Programmführer für digitale Sendungen verwenden. Wählen Sie im Fenster Sender, Eigene Kanäle oder Vorgemerkt einen Sender. * Eigene Kanäle Sender Terrestrisch ■■ ■■ c1 c2 All TV 15 Radio Data/Other Analogue 3 23 33 32 5 4 27 TV-Empfang B Zoom Auswählen 1futech * 24ore.tv abc1 r BBC World bid-up.
Grundfunktionen Kanalmenü ¦¦ Kanäle neu einstellen Antennentyp (Terrestrisch / Kabel) Ehe Ihr Fernseher beginnen kann, die verfügbaren Kanäle zu speichern, müssen Sie die Art der Signalquelle angeben, die an das Fernsehgerät angeschlossen ist (z. B.: Terrestrisch oder Kabel). Manuelle Suche nach einem Kanal und Speichern im Fernsehgerät. ✎✎Wenn ein Kanal mit der Kindersicherung gesperrt wurde, wird das Eingabefenster für die PIN geöffnet.
■■ Von USB importieren: Importieren der Kanalliste vom USB-Speicher. ■■ Sperren / Freigabe: Sie können einen Kanal sperren, sodass er nicht ausgewählt und angezeigt werden kann. ■■ Auf USB exportieren: Exportieren der Kanalliste auf den USB-Speicher. ✎✎HINWEIS Importieren oder Exportieren der Kanaltabelle. Schließen Sie einen USB-Speicher an, um diese Funktion zu verwenden. Der Eingabebildschirm für die PIN wird geöffnet. Geben Sie nun Ihre vierstellige PIN ein.
Grundfunktionen ¦¦ Möglichkeiten zum Sparen ■■ Farbraum (Auto / Nativ): Stellen Sie den Bereich der Farben ein, aus denen das Bild erstellt wird ■■ Weißabgleich: Einstellen der Farbtemperatur für ein natürlicheres Bild. Öko-Lösung ■■ Energiesparmod. (Aus / Gering / Mittel / Hoch / Bild aus / Auto) t: Mit dieser Funktion stellen Sie die Helligkeit des Fernsehgeräts ein, um den Stromverbrauch zu senken. Wenn Sie Bild aus wählen, wird der Bildschirm abgeschaltet, aber der Ton bleibt an.
P P.SIZE Automatische Breite: Mit dieser Option stellen Sie das Bildformat automatisch auf das Seitenverhältnis 16:9 ein. 16:9 : Wählen Sie diese Option aus, um als Bildformat das Seitenverhältnis 16:9 für DVDs oder Breitbildsendungen einzustellen. Breitenzoom: Diese Option vergrößert das Bild auf mehr als 4:3. Einstellen der Position mit den Tasten ▲, ▼. ✎✎ Zoom: Wählen Sie diese Option aus, um das 16:9-Breitbild auf die volle Bildschirmhöhe zu vergrößern.
Grundfunktionen Bildschirm ¦¦ Anpassen der Toneinstellungen ■■ Grob / Fein: Entferneb oder Reduzieren von Bildrauschen. Falls sich das Bildrauschen durch die Feinabstimmung allein nicht beheben lässt, stellen Sie zunächst die Frequenz möglichst genau ein (Coarse (Grob). Führen Sie dann erneut eine Feinabstimmung durch. Nachdem Sie das Bildrauschen durch die Grobund Feinabstimmung des Bildes verringert haben, stellen Sie die Position des Bildes so ein, dass es auf dem Bildschirm zentriert ist.
I-II DUAL MEDIA.P (nicht überall verfügbar) (nur Digitalkanäle) GUIDE SUBT. Diese Funktion verarbeitet den Audiostream für den Audiokommentar (Audio für Sehgeschädigte), der vom Sender zusammen mit dem Vordergrundton übertragen wird. AD ■■ Audio für Sehgeschädigte (Aus / Ein): Hiermit wird der Audiokommentar für Sehbehinderte ein- und ausgeschaltet. ■■ Lautstärke: Hiermit regeln Sie die Lautstärke des Audiokommentars für Sehgeschädigte.
Grundfunktionen Einstellungsmenü ¦¦ Einstellen der Uhrzeit Zeit ■■ Uhr: Die Uhr muss eingestellt werden, damit Sie die verschiedenen Timerfunktionen des Fernsehgeräts verwenden können. OO Jedes Mal, wenn Sie die Taste INFO drücken, wird die aktuelle Zeit angezeigt. ✎✎ Wenn Sie das Netzkabel ziehen, müssen Sie die Uhr erneut einstellen. Uhr-Modus (Auto / Manuell) Je nach Sendestation und Signal ist die automatisch eingestellte Zeit möglicherweise nicht korrekt.
POWER P ✎✎ Wenn Sie den PIN-Code vergessen haben, drücken Sie die Fernbedienungstasten in der angegebenen Reihenfolge, um die PIN auf „0-0-00“ zurückzusetzen: POWER (Aus) → MUTE P.SIZE→ 8 → 2 → 4 → POWER (Ein). ¦¦ Weitere Funktionen Sprache ■■ Menüsprache: Stellen Sie die Menüsprache ein. ■■ Teletextsprache: Einstellen der gewünschten Teletextsprache. ✎✎ Englisch ist der Standardwert in Fällen, wo die ausgewählte Sprache für die Sendung nicht verfügbar ist.
Grundfunktionen ¦¦ Bild-im-Bild (PIP) ■■ Signalinformation: (Nur digitale Kanäle nur) Die Empfangsqualität des HDTV-Kanals ist entweder perfekt, oder die Kanäle sind nicht verfügbar. Stellen Sie Ihre Antenne so ein, dass die Signalstärke zunimmt. PIP t Gleichzeitige Anzeige des Fernsehbilds und des Bilds von einer externen Videoquelle. PIP (Bild-im-Bild) funktioniert nicht, für zwei gleiche Signalquellen.
✎✎ ✎✎ ■■ Update im Standby: Zur gewählten Zeit erfolgt das manuelle Update automatisch. Da die Stromversorgung des Geräts intern eingeschaltet wird, kann der LCD-Bildschirm ein wenig beleuchtet sein. Dieser Zustand kann etwas mehr als eine Stunde andauern, bis die Softwareaktualisierung abgeschlossen ist. HD-Anschlussplan Beachten Sie diese Informationen, wenn Sie externe Geräte an den Fernseher anschließen.
Erweiterte Funktionen Anschließen an einen PC Mit Hilfe eines HDMI/DVI-Kabels oder eines D-Sub-Kabels DVI OUT R-AUDIO-L PR PB AUDIO OUT AUDIO OUT PC OUT Y R-AUDIO-L PR PB Y R-AUDIO-L PR PB Y R-AUDIO-L PR PB Y Anzeigemodi (D-Sub- und HDMI/DVI-Eingang) Die optimale Auflösung beträgt 1360 x 768 @ 60 Hz Modus IBM MAC Auflösung Horizontalfrequenz (kHz) Vertikalfrequenz (Hz) Pixeltakt (MHz) Synchronisationspolarität (H/V) 640 x 350 720 x 400 640 x 480 832 x 624 31.469 31.469 35.000 49.
Mit dieser Funktion können Sie auf einem USBSpeichermedium (MSC) Foto-, Musik und/oder Filmdateien anzeigen bzw. wiedergeben. 04 Erweiterte Funktionen Media Play MediaPlay Videos SUM Gerät wechseln Geräte anzeigen E Eingabe R Zurück ¦¦ Anschließen eines USB-Geräts 1. Schalten Sie den Fernseher ein. 2. Schließen Sie ein USB-Gerät mit Foto-, Musik und/oder Filmdateien an die USB (HDD)Buchse seitlich am Fernsehgerät an. 3. Wenn ein USB-Gerät an den Fernseher angeschlossen ist, wird ein Fenster geöffnet.
Erweiterte Funktionen ¦¦ Bildschirmanzeige Navigieren Sie mit den Pfeiltasten (Auf / Ab / Rechts / Links) zu der gewünschten Datei und drücken Sie dann die ENTERE oder die Taste � (Wiedergabe). Die Datei wird wiedergegeben. ✎✎Unterstützt den Gerätemodus und den Inhaltsmodus auf der Startseite von Media Play. Informationen : Hier können Sie den Namen der gewählten Datei sowie die Anzahl der Dateien und Seiten überprüfen. Videos 1/1 Seite /Movie 01.avi Movie 01.avi Jan.10.2010 Movie 03.avi Jan.10.
Dateinamenserweiterung *.avi *.mkv Container AVI MKV *.asf ASF *.wmv ASF *.mp4 MP4 *.3gp 3GPP *.vro VRO VOB *.mpg *.mpeg PS *.ts *.tp *.trp Video-Codec Auflösung Framerate (f/s) Bitrate (Mbit/s) Divx 3.11 / 4.x / 5.1 / 6.0 1920x1080 6 ~ 30 8 XviD 1920x1080 6 ~ 30 8 H.264 BP / MP / HP 1920x1080 6 ~ 30 25 MPEG4 SP / ASP 1920x1080 6 ~ 30 8 Divx 3.11 / 4.x / 5.1 / 6.0 1920x1080 6 ~ 30 8 XviD 1920x1080 6 ~ 30 8 H.
Erweiterte Funktionen Filmwiedergabe fortsetzen (Wiedergabe fortsetzen) Wenn Sie die Filmwiedergabefunktion verlassen, kann der Film später von dem Punkt an abgespielt werden, an dem Sie unterbrochen haben. 1. 2. 3. Wählen Sie die Filmdatei, deren Wiedergabe Sie fortsetzen möchten. Drücken Sie dazu in der Dateiliste auf ▲ oder ▼. Drücken Sie auf �(Wiedergabetaste) / ENTERE. Wählen Sie mit der blauen Taste die Funktion für Wiedergabe fortsetzen (Wiedergabe fortsetzen).
Abspielen ausgewählter Video / Musik / Fotodateien 1. 2. Videos Drücken Sie die gelbe Taste in der Dateiliste, um die gewünschte Datei auszuwählen. Wiederholen Sie den obigen Vorgang, um mehrere Dateien auszuwählen. Movie 01.avi Movie 02.avi Jan.10.2010 Jan.10.2010 Movie 03.avi ✎✎ HINWEIS Movie 04.avi Jan.10.2010 Movie 05.avi xx Links neben dem Namen der gewähten Datei wird das Symbol c angezeigt. xx Drücken Sie die gelbe Taste noch einmal, um die Auswahl einer Datei zu stornieren.
Erweiterte Funktionen Optionsmenü für die Video / Musik / Fotowiedergabe Drücken Sie während der Wiedergabe die Taste TOOLS. Kategorie Vorgang Videos Musik ✓ ✓ ✓ Titel Sie können die andere Datei direkt verschieben. Wiederholungsmodus Sie können Film- und Musikdateien wiederholt abspielen. Bildformat (Modus1 / Modus2 / Original) Sie können Bildformat entsprechend Ihren Wünschen anpassen. Bildeinstellungen Sie können die Bildeinstellungen festlegen. (S.
Was ist Anynet+?t Bei Anynet+ handelt es sich um eine Funktion, mit der Sie alle angeschlossenen Samsung-Geräte, die Anynet+ unterstützen, mit der Fernbedienung für Ihr Samsung-Fernsehgerät steuern können. Das Anynet+-System unterstützt nur Anynet+-fähige Samsung-Geräte. Wenn Sie wissen möchten, ob Ihr Samsung-Gerät diese Funktion unterstützt, suchen Sie das Anynet+-Logo auf Ihrem Gerät.
Erweiterte Funktionen ¦¦ Einrichten von Anynet+ ■■ Setup Anynet+ (HDMI-CEC) (Aus / Ein): Damit Sie die Funktionen von Anynet+ nutzen können, muss Anynet+ (HDMI-CEC) aktiviert Ein sein. Wenn die Funktion “Anynet+ (HDMI-CEC)” deaktiviert wird, sind auch alle Vorgänge in Verbindung mit Anynet+ deaktiviert. ✎✎ Autom. Ausschalten (Nein / Ja): Automatisches Abschalten von Anynet+-Geräten durch Abschalten des Fernsehgeräts.
Sie können die Tonwiedergabe über einen Receiver (d. h. Heimkinosystem) anstelle des TV-Lautsprechers laufen lassen. 1. Wählen Sie Receiver und aktivieren Sie ihn (Ein). 2. Zum Beenden drücken Sie die Taste EXIT. Wenn Ihr Receiver nur Audiosignale unterstützt, wird er in der Geräteliste möglicherweise nicht angezeigt. Der Receiver kann eingesetzt werden, wenn Sie den optischen Eingang des Receivers mit dem optischen Ausgang des Fernsehgeräts DIGITAL AUDIO OUT (OPTICAL) verbunden haben. Wenn der Receiver (d.
Weitere Informationen Teletext für Analogkanäle Auf der Videotext-Indexseite finden Sie Verwendungshinweise zum Videotext. Für die korrekte Anzeige von Teletextinformationen muss der Senderempfang einwandfrei sein. Andernfalls können Informationen unvollständig sein oder einige Seiten nicht angezeigt werden. ✎✎Sie können die Videotextseiten durch Drücken der Zifferntasten auf der Fernbedienung wechseln.
¦¦ Anbringen der Wandhalterung Mit der separat erhältlichen Wandhalterung können Sie das Fernsehgerät an einer Wand befestigen. Detaillierte Informationen zum Montieren der Wandhalterung finden Sie in den Anweisungen, die im Lieferumfang der Wandhalterung enthalten sind. Lassen Sie sich beim Anbringen der Wandhalterung von einem Techniker helfen. Samsung Electronics haftet nicht für Schäden an Gerät oder Personen, wenn die Montage vom Kunden selbst durchgeführt wird.
Weitere Informationen Kensington-Schloss als Diebstahlsicherung Ein Kensington-Schloss dient zur physischen Sicherung des Systems bei Verwendung in öffentlichen Bereichen. Je nach Hersteller können Aussehen und Verriegelungsverfahren von der Abbildung abweichen. Informationen zur richtigen Anwendung entnehmen Sie bitte der Bedienungsanleitung des Kensington-Schlosses. 1 2 ✎✎Suchen Sie das Symbol „ K “ auf der Rückseite des Fernsehgeräts. 1.
Bei Fragen zum Fernsehgerät schauen Sie zuerst in dieser Liste nach. Wenn keiner dieser Tipps zur Fehlerbehebung weiterhilft, öffnen Sie die Website „www.samsung.com“ und klicken Sie dort auf „Support“ oder wenden Sie sich an das in der Liste auf der letzten Seite angegebene Callcenter. Problem Lösungen und Erklärungen Bildqualität Führen Sie zu allererst den Bildtest durch, um zu bestätigen, dass Ihr Fernsehgerät das Testbild korrekt anzeigt.
Weitere Informationen Problem Lösungen und Erklärungen Kein Bild, kein Video Der Fernseher kann nicht eingeschaltet werden. • Das Fernsehgerät schaltet sich automatisch aus. • • • • • • Kein Bild/Video. • • • • Vergewissern Sie sich, dass das Netzkabel sicher mit der Wandsteckdose und dem Fernsehgerät verbunden ist. Vergewissern Sie sich, dass die Netzsteckdose Strom liefert. Drücken Sie die POWER am Fernsehgerät, um zu prüfen, ob die Fernbedienung richtig funktioniert.
Lösungen und Erklärungen Ihre Einstellungen gehen nach 30 Minuten oder bei jedem Abschalten des Fernsehers verloren. • Wenn das Fernsehgerät im Modus Shop-Demo läuft, werden die Ton- und Bildeinstellungen alle 30 Minuten zurückgesetzt. Wechseln Sie mit dem Plug & Play-Prozess (erstmals einrichten) vom Modus Shop-Demo zu Privatgebrauch. Drücken Sie diese Taste SOURCE, um den TV-Modus auszuwählen. Wechseln Sie dann zu MENU → Einstell. → Plug & Play (erstmals einrichten) → ENTERE.
Weitere Informationen Technische Daten Bildschirm (nativ) Umgebungsbedingungen Betriebstemperatur Luftfeuchtigkeit (bei Betrieb) Lagerungstemperatur Luftfeuchtigkeit (Lagerung) TV-System Fernsehnorm/Videosystem Audiosystem HDMI IN 1 – 4 1360 x 768 bei 60 Hz 10° C bis 40° C 10% bis 80%, nicht kondensierend -20° C bis 45° C 5% bis 95%, nicht kondensierend Analog: Je nach eingestelltem Land. Digital: DVB-T/DVB-C Analog: PAL, SECAM, NTSC-4.43, NTSC-3.58, PAL60 Digital: MPEG-2 MP@ML, MPEG-4, H.
A H Alle wählen 13 Anschließen an ein Audiogerät 8 Anschließen an einen PC 22 Anynet+ 29 Audio Out 8, 29 Aufnehmen 30 Autom. Einstellung 15 Automatische Lautstärke 17 Hautton HDMI Heimkino Helligkeit Hintergrundmusik B Balance Basisansicht Batterien Bearbeiten von Sendern Bildformat 16 27 5 12 15, 27 D Diashow Digitaler Audioausgang DivX® VOD D-sub Drehen Dynamisch 26 8, 29 28 22 28 13 E Eigendiagnose EIN/AUS-Taste Elektronischer Programmführer Empfänger Energiesparmod. EPG Equalizer Ext.
Diese Seite wurde absichtlich leer belassen. BN68-02592BF-Ger.
De figuren en illustraties in deze gebruikershandleiding dienen alleen ter referentie en kunnen afwijken van het werkelijke uiterlijk van het product. Productontwerp en -specificaties kunnen zonder kennisgeving worden gewijzigd. Opmerking over digitale tv 1. 2. 3. 4. 5. 6.
Inhoud Aan de slag 4 4 4 5 6 6 Accesoires Overzicht van het bedieningspaneel Overzicht van de afstandsbediening Aansluiten op een antenne Plug & Play (eerste instelling) Aansluitingen 7 8 9 Aansluiten op een AV-apparaat Aansluiten op een audioapparaat De ingangsbron wijzigen Basisfuncties 9 10 10 12 13 16 18 20 De menu’s gebruiken De INFO-knop gebruiken (Now & Next-gids) Programma’s plannen Het menu Kanaal Het menu Beeld Het menu Geluid Het menu Instellingen Het menu Ondersteuning 7 9 Uitgebreide
Aan de slag Accesoires ✎✎Controleer of de volgende onderdelen bij uw lcd-tv zijn geleverd. Neem contact op met uw verkoper als er onderdelen ontbreken. ✎✎De vorm en kleur van items kunnen variëren, afhankelijk van de modellen. yy Afstandsbediening en batterijen (AAA x 2) yy Gebruikershandleiding yy Garantiekaart/Veiligheidsvoorschriften (niet op alle locaties beschikbaar) yy Schoonmaakdoekje yy Netsnoer Zie de aparte gebruiksaanwijzing voor plaatsing van de voet.
De tv in- en uitschakelen. (P. 6) 01 Aan de slag Overzicht van de afstandsbediening De beschikbare videobronnen weergeven en selecteren. (P. 9) Druk op deze toets voor directe toegang tot kanalen. Terug naar het vorige kanaal. Wisselen tussen Teletekst, Dubbel en Mix. Geluid tijdelijk uitschakelen. Het volume regelen. Van kanaal wisselen. Het hoofdmenu weergeven. (P. 9) De kanaallijst op het scherm weergeven. (P. 13) De EPG (Electronic Programme Guide) weergeven. (P. 10) Media Play weergeven. (P.
Aan de slag Aansluiten op een antenne Wanneer u de tv voor het eerst inschakelt, worden er automatisch enkele basisinstellingen uitgevoerd. ✎✎Vooraf doen: het netsnoer en de antenne aansluiten. VHF/UHF-antenne Kabel of R-AUDIO-L ANT OUT PR PB Y netvoeding Plug & Play (eerste instelling) Wanneer de tv voor het eerst wordt ingeschakeld, verschijnt er een reeks instructies op het scherm die u helpen de basisinstellingen te configureren. Druk op de toets POWERP.
Aansluitingen 02 Aansluitingen Aansluiten op een AV-apparaat Gebruik van een HDMI/DVI-kabel: HD-aansluiting (tot 1080p) Beschikbare apparaten: dvd-speler/blu-rayspeler/HD-kabelbox/HD STB-satellietontvanger (set-top-box), kabelbox, satellietontvanger (STB) Dvd-speler W Y W R W R B G HDMI OUT Red White 26” 32” AUDIO OUT W PR R R-AUDIO-L PR R-AUDIO-L DVI OUT ✎✎HDMI IN 1(DVI), 2, 3 / PC/DVI AUDIO IN PR R-AUDIO-L PB PB Y PB Y Y xx Bij gebruik van de HDMI/DVI-kabelaansluiting moet u de
Aansluitingen Aansluiten op een audioapparaat Gebruik van een optische of audiokabelaansluiting Beschikbare apparaten: digitaal audiosysteem, versterker, dvd-thuisbioscoop. ✎✎De vorm en kleur van het product kunnen variëren, afhankelijk van het model.
P.SIZE S.MODE P.MODE Naam wijzigen ■■ VCR / DVD / Kabel STB / Satelliet STB / PVR STB / AV-ontvanger / Spelcomputer / Camcorder / PC DVI PC / DVI-apparaten / TV / IPTV / Blu-ray / HD DVD / DMA: geef het apparaat dat op de ingangen is aangesloten een naam om de selectie van de ingangsbron gemakkelijker te maken. Bronlijst Hiermee kunt u de tv of andere externe ingangsbronnen zoals dvd-spelers, blu-rayspelers, kabelboxen en STBsatellietontvangers die op de tv zijn aangesloten, selecteren.
Basisfuncties P.SIZE S.MODE De INFO-knop gebruiken (Now & Next-gids) Op het scherm worden het huidige kanaal POWER en de status van bepaalde audio-/videoinstellingen weergegeven. In de Now & Next-gids vindt u de dagelijkse programma-informatie voor elk kanaal op basis van het uitzendtijdstip. yy Scroll ◄ of ► om informatie over een gewenst programma te bekijken terwijl u naar het huidige kanaal kijkt. yy Scroll ▲ of ▼ om informatie voor andere kanalen te bekijken.
¦¦ Favoriete kanalen gebruiken U kunt favoriete kanalen toevoegen of verwijderen en de programmagids voor digitale uitzendingen gebruiken. Selecteer een kanaal in het scherm Kanalen, Mijn kanalen of Gepland. * Mijn kanalen Kanalen Ant ■■ ■■ c1 c2 All Antenne TV 15 Radio Data/Other Analogue 3 23 33 32 5 4 27 B Zoom Selecteren 1futech * 24ore.tv abc1 r BBC World bid-up.
Basisfuncties Het menu Kanaal ¦¦ Kanalen opnieuw afstemmen Antenne (Ant / Kabel) Voordat de beschikbare kanalen in het geheugen van uw televisie kunnen worden opgeslagen, moet u het type signaalbron opgeven dat op de tv is aangesloten (antenne of kabel). Scant handmatig op een kanaal en slaat het op in het geheugen van de tv. ✎✎Wanneer een kanaal is vergrendeld met de functie Kinderslot, wordt er een venster weergegeven waarin u een pincode kunt opgeven.
Hiermee kunt u het kanalenoverzicht importeren of exporteren. U moet een USB-opslagapparaat aansluiten om deze functie te kunnen gebruiken. ✎✎Het invoerscherm voor de pincode verschijnt. Geef uw viercijferige pincode op.
Basisfuncties ¦¦ Economische oplossingen ■■ Witbalans: de kleurtemperatuur aanpassen voor een natuurlijker beeld. R-basis / G-basis / B-basis: de donkerte voor elke kleur (rood, groen, blauw) aanpassen. ECO-oplossing ■■ Spaarstand (Uit / Laag / Middel / Hoog / Beeld uit / Auto)t : de helderheid van de tv aanpassen om het energieverbruik te verminderen. Als u de optie Beeld uit selecteert, wordt het scherm uitgeschakeld, maar blijft u het geluid horen.
P P.SIZE Auto-breed: hiermee wordt het beeldformaat automatisch op 16:9 ingesteld. 16:9 : hiermee wordt het beeldformaat op 16:9 ingesteld voor dvd’s of breedbeelduitzendingen. Breedbeeldzoom: hiermee wordt het beeld verder dan 4:3 vergroot. ✎✎ Pas de positie aan met de toetsen ▲ en ▼. Zoom: hiermee vergroot u het 16:9-breedbeeldformaat verticaal zodat het schermvullend wordt. ✎✎ Pas de positie of grootte aan met de toetsen ▲ en ▼.
Basisfuncties Scherm ¦¦ Geluidsinstellingen aanpassen ■■ Grof / Fijn: beeldruis verwijderen of verminderen. Als door een fijnafstemming van het kanaal de ruis niet verdwijnt, stelt u de frequentie zo goed mogelijk in (Grof) en voert u opnieuw een fijnafstemming uit. Stel het beeld opnieuw in het midden van het scherm in nadat de ruis is verminderd. ■■ Positie: pas de positie van het pc-scherm aan met de richtingstoetsen (▲ / ▼ / ◄ / ►).
I-II DUAL MEDIA.P (niet in alle locaties beschikbaar) SUBT. (alleen digitale kanalen) GUIDE Deze functie verwerkt het geluidsspoor (Audio Stream) voor de AD (Audio Description), dat samen met het hoofdgeluid (Main audio) wordt uitgezonden. AD ■■ Audiobeschrijving (Uit / Aan): de geluidsbeschrijving in- of uitschakelen. ■■ Volume: het volume voor de audiobeschrijving regelen. Auto Volume (Uit / Normaal / Nacht) Als u het volume op elk kanaal gelijk wilt zetten, stelt u Normaal in.
Basisfuncties Het menu Instellingen Inschakeltijd / Uitschakeltijd: het uur en de minuut instellen en activeren/deactiveren. (Als u de timer met de gewenste instelling wilt activeren, kiest u Activeren.) ¦¦ De tijd instellen Volume: het gewenste geluidsvolume instellen. Tijd ■■ Klok: het instellen van de klok is belangrijk voor de diverse timerfuncties van de tv. OO De huidige tijd wordt telkens weergegeven wanneer u op de toets INFO drukt.
P ✎✎ Taalkeuze ■■ Taalkeuze: de menutaal instellen. ■■ Teleteksttaal: de gewenste taal voor teletekst instellen. Engels is de standaardtaal als de geselecteerde taal niet beschikbaar is in de uitzending. I-II voor ■■ Voorkeur (Eerste taal voor audio / Tweede taal audio / Eerste taal ondertitel / Tweede taalDUAL ondertitel / Eerste taal teletekst / Tweede taal teletext): selecteer een taal als standaardtaal voor wanneer een kanaal wordt geselecteerd.
Basisfuncties ¦¦ Picture In Picture (PIP) ■■ Signaalinformatie: (alleen digitale kanalen) de ontvangstkwaliteit van het HDTV-kanaal is ofwel perfect, ofwel de kanalen zijn niet beschikbaar. Stel de antenne bij om de signaalsterkte te vergroten. PIP t Gelijktijdig een tv-programma en beeld van een externe videobron bekijken. PIP (Picture-in-Picture) werkt niet in dezelfe modus. ✎✎OPMERKING xx Als u tijdens weergave in de de PIP-modus de tv uitschakelt, verdwijnt het PIP-venster.
Handleiding HD-verbinding ✎✎ Als de functie tijdens de softwareoverdrachtsperiode Raadpleeg deze informatie wanneer u externe apparaten op de tv aansluit. ✎✎ De benodigde tijd voor het downloaden van de Contact opnemen met Samsung wordt geselecteerd, wordt er automatisch naar software gezocht en wordt deze gedownload. software wordt door de signaalstatus bepaald. ■■ Upgrade standby-modus: er wordt op de geselecteerde tijd automatisch een handmatige upgrade uitgevoerd.
Uitgebreide functies Aansluiten op een pc Gebruik van een HDMI/DVI-kabel of D-Sub-kabel DVI OUT R-AUDIO-L PR PB AUDIO OUT AUDIO OUT PC OUT Y PR R-AUDIO-L PB Y R-AUDIO-L PR PB Y R-AUDIO-L PR PB Y Weergavemodi (D-Sub en HDMI/DVI-invoer) De optimale resolutie is 1360 X 768 bij 60. Modus IBM MAC Resolutie 640 x 350 720 x 400 640 x 480 832 x 624 640 x 480 800 x 600 VESA DMT 1024 x 768 VESA CVT VESA GTF 1280 x 720 1360 x 768 720 x 576 1280 x 720 1280 x 720 Horizontale frequentie (kHz) 31.
MEDIA.P Geniet van foto-, muziek- en filmbestanden die op een USB MSC-apparaat en. 04 Uitgebreide functies UIDE Media Play MediaPlay Videos AD SUM Apparaat wijzigen Apparaten tonen E Enter R Terug ¦¦ Een USB-apparaat aansluiten 1. Zet de tv aan. 2. Sluit een USB-apparaat met foto-, muziek en/of filmbestanden aan op de USB (HDD)-aansluiting aan de zijkant van de tv. 3. Wanneer het USB-apparaat op de tv is aangesloten, verschijnt er een popupvenster. Vervolgens kunt u Media Play selecteren.
Uitgebreide functies ¦¦ Schermweergave Ga naar het gewenste bestand met de toetsen voor omhoog / omlaag / links / rechts en druk op de toets ENTERE of � (Afspelen). Het bestand wordt afgespeeld. ✎✎Ondersteunt de apparaatmodus en Inhoudsmodus voor de homepage van Media Play. Informatie: hier ziet u de naam van het geselecteerde bestand en het aantal bestanden en pagina’s. Videos Movie 01.avi Movie 03.avi Movie 05.avi Sorteerlijst: hier ziet u de sorteervolgorde.
Bestandsextensie Videocodec Resolutie Framesnelheid (fps) Bitsnelheid (Mbps) Divx 3.11 / 4.x / 5.1 / 6.0 1920x1080 6 ~ 30 8 XviD 1920x1080 6 ~ 30 8 H.264 BP / MP / HP 1920x1080 6 ~ 30 25 MPEG4 SP / ASP 1920x1080 6 ~ 30 8 Divx 3.11 / 4.x / 5.1 / 6.0 1920x1080 6 ~ 30 8 XviD 1920x1080 6 ~ 30 8 H.264 BP / MP / HP 1920x1080 6 ~ 30 25 Container *.avi *.mkv AVI MKV *.asf ASF *.wmv ASF *.mp4 MP4 *.3gp 3GPP *.vro VRO VOB *.mpg *.mpeg PS *.ts *.tp *.
Uitgebreide functies Films doorlopend afspelen (Afspelen hervatten) Als u een film die wordt afgespeeld verlaat, kan deze later weer worden hervat op het punt waar deze was gestopt. 1. Selecteer het filmbestand dat u doorlopend wilt afspelen door het 00:04:03 / 00:07:38 met de toets ◄ of ► in de bestandenlijst te selecteren. 2. Druk op de toets �(Afspelen) / ENTERE. 1/1 Movie 01.avi 3. Selecteer Doorlopend afspelen (Afspelen hervatten) door op de blauwe toets te drukken.
De geselecteerde video- / muziek- / fotobestanden afspelen 1. Druk op de gele toets om het gewenste bestand in de bestandenlijst te selecteren. 2. Herhaal deze procedure om meerdere bestanden te selecteren. Videos ✎✎ OPMERKING Movie 01.avi bestanden. xx U annuleert een selectie door nogmaals op de gele toets te drukken. xx Als u de selectie van alle bestanden ongedaan wilt maken, drukt u op de toets TOOLS en selecteert u Niets selecteren. Druk op de toets � (Afspelen) / ENTERE. Movie 03.avi Jan.10.
Uitgebreide functies Opties voor het afspelen van video’s / muziek / foto’s Druk tijdens het afspelen van een bestand op de toets TOOLS. Categorie Betekenis Video's Muziek Foto's Titel U kunt het andere bestand rechtstreeks verplaatsen. ✓ Herhalingsmodus Hiermee kunt u film- en muziekbestanden herhaald afspelen. ✓ Beeldformaat (Modus1 / Modus2 / Oorspronkelijk) Hiermee kunt u het beeldformaat aan uw voorkeur aanpassen. ✓ Beeldinstelling Hiermee kunt u de beeldinstelling aanpassen. (pag.
Wat is Anynet+? t Anynet+ is een functie waarmee u alle aangesloten Samsung-apparaten die Anynet+ ondersteunen, kunt bedienen met de afstandsbediening van de Samsung-tv. Het Anynet+-systeem kan alleen worden gebruikt met Samsung-apparaten die de Anynet+-functie bezitten. Om u ervan te verzekeren dat uw Samsung-apparaat deze functie heeft, kunt u controleren of er een Anynet+-logo op het apparaat zit.
Uitgebreide functies ¦¦ Anynet+ instellen ■■ Instellingen Anynet+ (HDMI-CEC) (Uit/Aan): voor het gebruik van de Anynet+-functie dient Anynet+ (HDMI-CEC) op Aan te zijn ingesteld. ✎✎ Wanneer de functie Anynet+ (HDMI-CEC) is uitgeschakeld, worden alle met Anynet+ verwante bewerkingen uitgeschakeld.
U kunt geluid beluisteren via een ontvanger (thuisbioscoop) in plaats van de luidsprekers van de tv. 1. Selecteer Ontvanger en stel dit in op Aan. 2. Druk op de toets EXIT om het menu te verlaten. Als uw ontvanger alleen audio ondersteunt, verschijnt deze wellicht niet in de apparatenlijst. De ontvanger werkt wanneer u de optical in-aansluiting van de ontvanger correct hebt aangesloten op de DIGITAL AUDIO OUT (OPTICAL)-aansluiting van de tv.
Overige informatie De teletekstfunctie van het analoge kanaal Op de indexpagina van de teletekstdienst vindt u informatie over het gebruik van de dienst. Voor een juiste weergave van teletekstinformatie is een stabiele kanaalontvangst vereist. Anders kan bepaalde informatie ontbreken of worden bepaalde pagina’s niet weergegeven. ✎✎U kunt de teletekstpagina’s veranderen met de numerieke toetsen op de afstandsbediening.
¦¦ De wandbevestigingsset monteren Met de onderdelen voor wandbevestiging (apart verkrijgbaar) kunt u de tv aan de muur bevestigen. Zie de instructies bij de onderdelen voor wandbevestiging als u wilt weten hoe u de wandbevestiging installeert. Neem contact op met een technicus voor hulp alvorens de wandbeugel te bevestigen. Samsung Electronics is niet verantwoordelijk voor schade aan het product of voor verwondingen die u zelf of anderen oplopen wanneer u besluit de tv zelfstandig te installeren.
Overige informatie Kensington-slot tegen diefstal Het Kensington-slot is een vergrendeling waarmee u het systeem fysiek kunt vastzetten voor gebruik op een openbare plaats. Afhankelijk van de fabrikant, kan het uiterlijk en de vergrendelmethode enigszins afwijken van de afbeelding. Raadpleeg de handleiding bij het Kensington-slot voor het juiste gebruik. ✎✎Zoek het “K”-symbool aan de achterkant van de tv. Naast het 1 3 2 21 “K”-symbool bevindt zich een Kensington-slot. 1.
Wanneer u vragen over deze televisie hebt, kunt u eerst deze lijst raadplegen. Als geen van de tips in deze lijst van toepassing zijn, gaat u naar “www.samsung.com” en klikt u daar op Ondersteuning, of neemt u contact op met een van de callcenters die u op de achterkant van deze handleiding vindt. Probleem Oplossingen en uitleg Beeldkwaliteit Voer eerst de functie Het beeld testen uit om te controleren of uw televisie het testbeeld juist weergeeft.
Overige informatie Probleem Oplossingen en uitleg Geen beeld, geen video De tv kan niet worden ingeschakeld. • • • Controleer of het netsnoer stevig op het stopcontact en op de tv is aangesloten. Controleer of het stopcontact werkt. Druk op de POWER-knop op de tv om te controleren of het probleem niet bij de afstandsbediening ligt. Als de tv wordt ingeschakeld, raadpleegt u “De afstandsbediening werkt niet” hieronder. De tv wordt automatisch uitgeschakeld.
Oplossingen en uitleg Uw instellingen verdwijnen na 30 minuten of telkens wanneer de televisie wordt uitgeschakeld. • Als de tv zich in de modus Winkeldemo bevindt, worden de audio- en beeldinstellingen elke 30 minuten gereset. Wijzig de modus in de procedure Plug & Play (eerste instelling) van Winkeldemo in Thuisgebruik. Druk op de toets SOURCE om de modus Tv te selecteren en ga naar MENU → Instellingen → Plug & Play (eerste instelling) → ENTERE. Met tussenpozen valt het geluid of beeld weg.
Overige informatie Specificaties Scherm hardwarematig Omgevingsvereisten Gebruikstemperatuur Gebruiksvochtigheid Opslagtemperatuur Opslagvochtigheid Tv-systeem Kleuren-/videosysteem Geluidssysteem HDMI IN 1-4 1360 x 768 bij 60 Hz 10 °C tot 40 °C 10% tot 80%, niet-condenserend -20 °C tot 45 °C 5% tot 95%, niet-condenserend Analoog: afhankelijk van de landkeuze Digitaal: DVB-T/DVB-C Analoog: PAL, SECAM, NTSC-4.43, NTSC-3.58, PAL60 Digitaal: MPEG-2 MP@ML, MPEG-4, H.264/AVC MP@L3, MP@L4.0, HP@L4.0 BG.
A H Aansluiten op een audioapparaat 8 Aansluiten op een pc 22 Aan-uitlampje 4 Achtergrond muziek 27 Afdichtingsplaat 33 Afstandsbediening 5 Alg. weergave 27 Alles select 13 Antenne 12 Anynet+ 29 Audio Out 8, 29 Auto Volume 17 Autom. afstellen 15 HDMI Helderheid Herhalingsmodus Huidkleur B Balans Batterijen Beeldformaat Bronlijst 16 5 15, 27 9 C Component 7 D Digitale audio-uitgang DivX® VOD Draaien D-sub Dynamisch Dynamisch contrast 8, 29 28 27 22 13 14 E EPG Ext.
Deze pagina is opzettelijk leeg gelaten. BN68-02592F-Dut.