Country EIRE U.K Customer Care Centre 0818 717 100 0845 SAMSUNG(7267864) Web Site www.samsung.com www.samsung.com LCD TV user manual Contact SAMSUNG WORLDWIDE If you have any questions or comments relating to Samsung products, please contact the SAMSUNG customer care centre. LCD TV user manual imagine the possibilities Thank you for purchasing this Samsung product. To receive more complete service, please register your product at www.samsung.com/register Model______________ Serial No.
Figures and illustrations in this User Manual are provided for reference only and may differ from actual product appearance. Product design and specifications may be changed without notice. Digital TV notice Functionalities related to Digital TV (DVB) are only available in countries/areas where DVB-T (MPEG2 and MPEG4 AVC) digital terrestrial signals are broadcasted or where you are able to access to a compatible DVB-C (MPEG2 and MPEG4 AAC) cable-TV service.
Contents Getting Started 4 4 4 5 6 6 Accessories Viewing the Control Panel Viewing the Remote Control Connecting to an Antenna Plug & Play (Initial Setup) Connections 7 8 9 Connecting to an AV Device Connecting to an Audio Device Changing the Input Source Basic Features 9 10 10 12 13 16 18 20 How to Navigate Menus Using the INFO button (Now & Next guide) Planning Your Viewing Channel Menu Picture Menu Sound Menu Setup Menu Support Menu Advanced Features 22 22 23 29 36 39 42 Connecting to a PC N
Getting Started Accessories ✎✎Please make sure the following items are included with your LCD TV. If any items are missing, contact your dealer. ✎✎The items’ colours and shapes may vary depending on the models. yy Remote Control & Batteries (AAA x 2) yy Owner’s Instructions yy Cleaning Cloth yy Power Cord (46 ~ 55 inch TVs) yy Blanking Bracket yy Cable tie yy Holder-Ring (4ea) See separate guide for installing the stand.
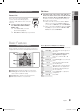
✎✎This is a special remote control for the visually impaired persons and has Braille points on the Power, Channel, and Volume buttons. Turns the TV on and off. (P. 6) When the ON/OFF light button is set to ON and a certain button is pressed, the remote control buttons will be lit for a moment. (Using the remote control with this button set to On will reduce the battery usage time.) Displays and selects the available video sources. (P.
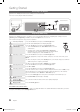
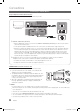
Getting Started Connecting to an Antenna When the TV is initially powered on, basic settings proceed automatically. ✎✎Preset: Connecting the mains and antenna. VHF/UHF Antenna Cable or R-AUDIO-L ANT OUT PR PB Y Power Input Plug & Play (Initial Setup) When the TV is initially powered on, a sequence of on-screen prompts will assist in configuring basic settings. Press the POWERP button. Plug & Play is available only when the Input source is set to TV.
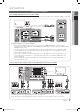
Connections 02 Connections Connecting to an AV Device Using an HDMI / DVI Cable: HD connection (up to 1080p) Available devices: DVD, Blu-ray player, HD cable box, HD STB (Set-Top-Box) satellite receiver, cable box, satellite receiver (STB) DVD W Y W R W R B G HDMI OUT Red White AUDIO OUT W PR R-AUDIO-L R ✎✎HDMI IN 1(DVI), 2, 3, 4 / PC/DVI AUDIO IN PR R-AUDIO-L PB PB PR R-AUDIO-L Y PB Y DVI OUT Y xx When using an HDMI/DVI cable connection, you must use the HDMI IN 1(DVI) jack.
Connections Connecting to an Audio Device Using an Optical or Audio Cable Connection Available devices: digital audio system, amplifier, DVD home theatre OPTICAL Digital Audio System R-AUDIO-L PR PB Y Headphone ✎✎DIGITAL AUDIO OUT (OPTICAL) xx When a digital audio system is connected to the DIGITAL AUDIO OUT (OPTICAL) jack, decrease the volume of both the TV and the system. xx 5.1 CH (channel) audio is available when the TV is connected to an external device supporting 5.1 CH.
Edit Name ■■ VCR / DVD / Cable STB / Satellite STB / PVR STB / AV Receiver / Game / Camcorder / PC / DVI PC / DVI Devices / TV / IPTV / Blu-ray / HD DVD / DMA: Name the device connected to the input jacks to make your input source selection easier. Source List Use to select TV or other external input sources such as DVD / Blu-ray players / cable box / STB satellite receiver connected to the TV.
Basic Features Using the INFO button (Now & Next guide) The display identifies the current channel and the status of certain audio-video settings. The Now & Next guide shows daily TV programme information for each channel according to the broadcasting time. yy Scroll ◄, ► to view information for a desired programme while watching the current channel. yy Scroll ▲, ▼ to view information for other channels. If you want to move to the currently selected channel, press the ENTERE button.
¦¦ Using Favourite Channels delete or set favourites channels and use the programme guide for digital broadcasts. Select a channel in the Channels, My Channels or Scheduled screen. * My Channels c1 c2 Channels All Air TV 15 Radio Data/Other Analogue 3 23 33 32 5 4 27 Antena B Zoom Select (in Channel Manager) Shows all favourite channels. 1futech * 24ore.tv abc1 r BBC World bid-up.
Basic Features Channel Menu ¦¦ Retuning channels Manual Store Scans for a channel manually and stores in the TV. ✎✎If a channel is locked using the Child Lock function, the PIN input window appears. Antenna (Air / Cable) t ■■ Digital Channel: When scanning has finished, channels are updated in the channel list. Before your television can begin memorizing the available channels, you must specify the type of signal source that is connected to the TV (i.e. an Air or a Cable system).
(in Channel Manager) Set each channel using the Channel Manager menu options (Lock / Unlock, Timer Viewing, Sort, Delete, Select All / Deselect All). Option menu items may differ depending on the channel status. 1. Select a channel and press the TOOLS button. Channel List Transfer Imports or exports the channel map. You should connect a USB storage to use this function. The PIN number input screen appears. Enter your 4 digit PIN number. ✎✎ ✎✎ The default PIN number of a new TV set is ‘0-0-0-0’. 2.
Basic Features ¦¦ Economical Solutions ECO Solution ■■ Energy Saving (Off / Low / Medium / High / Picture Off / Auto) t : Adjust the brightness of the TV in order to reduce power consumption. If you select Picture Off, the screen is turned off, but the sound remains on. Press any button except volume button to turn on the screen. ■■ ECO Sensor (Off / On): To enhance your power savings; the picture settings will automatically adapt to the light in the room.
xx The available items may differ depending on the ✎✎In PC mode, you can only make changes to the Colour xx In PC mode, only 16:9 and 4:3 modes can be Tone, Size and Auto Protection Time. : Normal Size : Auto Wide Screen Mode : 16:9 Digital Noise Filter : Auto MPEG Nosie Filter : Auto HDMI Black Level Film Mode : Normal : Off adjusted. xx Settings can be adjusted and stored for each Picture Options Colour Tone selected mode.
Basic Features ¦¦ Setting up the TV with Your PC ¦¦ Adjusting sound settings Set the input source to PC. Auto Adjustment t Adjust frequency values/positions and fine tune the settings automatically. ✎✎Not available when connecting through HDMI/DVI cable. Screen Equalizer Adjusts the sound mode. ■■ Balance L/R: Adjusts the balance between the right and left speaker. ■■ 100Hz / 300Hz / 1kHz / 3kHz / 10kHz (Bandwidth Adjustment): Adjusts the level of specific bandwidth frequencies.
(not available in all locations) (digital channels only) This function handles the Audio Stream for the AD (Audio Description) which is sent along with the Main audio from the broadcaster. ■■ Audio Description (Off / On): Turn the audio description function on or off. ■■ Volume: Adjust the audio description volume. Auto Volume (Off / Normal / Night) To equalize the volume level on each channel, set to Normal.
Basic Features Setup Menu On Time / Off Time: Set the hour, minute, and activate / inactivate. (To activate timer with the setting you have chosen, set to Activate.) ¦¦ Setting the Time Volume: Set the desired volume level. Source: Select TV or USB content to be played when the TV is turned on automatically. (USB can be selected only when a USB device is connected to the TV) Time ■■ Clock: Setting the clock is for using various timer features of the TV.
✎✎ ¦¦ Other Features Language ■■ Menu Language: Set the menu language. ■■ Teletext Language: Set a desired language for teletext. English is the default in cases where the selected language is unavailable in the broadcast. ✎✎ ■■ Preference (Primary Audio Language / Secondary Audio Language / Primary Subtitle Language / Secondary Subtitle Language / Primary Teletext Language / Secondary Teletext Language): Select a language, which will be the default language when a channel is selected.
Basic Features ¦¦ Picture In Picture (PIP) ■■ Signal Information: (digital channels only) HDTV channel’s reception quality is either perfect or the channels are unavailable. Adjust your antenna to increase signal strength. PIP t Watches simultaneously the TV tuner and one external video source. PIP (Picture-in-Picture) does not function in the same mode. ✎✎NOTE xx If you turn the TV off while watching in PIP mode, the PIP window will disappear.
✎✎ First, configure your network. For detailed procedures on using the Network Setup, refer to the “Network Connection” instructions. ✎✎ If the Internet connection does not operate properly, the connection may be broken. Please retry downloading. If the problem persists, download by USB and upgrade. ■■ By Channel: Upgrade the software using the broadcasting signal. ✎✎ If the function is selected during the software transmission period, software will be automatically searched and downloaded.
Advanced Features Connecting to a PC Using an HDMI/DVI Cable / a D-sub Cable DVI OUT R-AUDIO-L PR PB AUDIO OUT AUDIO OUT PC OUT Y R-AUDIO-L PR PB Y R-AUDIO-L PR PB Y R-AUDIO-L PR PB Y Display Modes (D-Sub and HDMI/DVI Input) Optimal resolution is 1920 X 1080 @ 60 Hz Mode IBM MAC VESA CVT VESA DMT VESA GTF VESA DMT / DTV CEA Resolution 640 x 350 720 x 400 640 x 480 832 x 624 1152 x 870 720 x 576 1152 x 864 1280 x 720 1280 x 960 640 x 480 640 x 480 640 x 480 800 x 600 800 x 600 800 x 600
¦¦ Connecting to a Wired Network You can attach your TV to your LAN using cable in three ways: yy You can attach your TV to your LAN by connecting the LAN port on the back of your TV to an external modem using a Cat 5 cable. See the diagram below.
Advanced Features Network Setup (Auto) Network Setup (Manual) Use the Automatic Network Setup when connecting your TV to a network that supports DHCP. To set up your TV’s cable network connection automatically, follow these steps: Use the Manual Network Setup when connecting your TV to a network that requires a Static IP address. How to set up automatically To get the Network connection values on most Windows computers, follow these steps: 1.
To connect your TV to your network wireless, you need a wireless router or modem and a Samsung Wireless LAN Adapter (WIS09ABGN), which you connect to your TV’s back or side panel USB jack. See the illustration below. ✎✎To use the SWL(Samsung Wireless Link) function, connect to the USB 1 (HDD) port.
Advanced Features Network Setup (Samsung Auto Configuration) Network Setup (PBC (WPS)) This function is available in APs (Access Points) that support Samsung Auto Configuration. If there is no such AP, you can connect through PBC (WPS) or manually. If your router has a PBC (WPS) button, follow these steps: 1. Connect your TV to your LAN as described in the previous section. ✎✎This function is available when SWL(Samsung Wireless Link) set to Off.
4. In the list of networks, press the ▲ or ▼ button to select a network, and then press the ENTERE button. ✎✎ If the AP is set to Hidden (Invisible), you have to select Add Network and enter the correct Network Na me (SSID) and Security Key to establish the connection. 5. If the Security/PIN pop-up appears, go to Step 6. If the Network Connecting Screen appears, go to Step 10. 6. Press the ▲ or ▼ button to select Security or PIN. For most home networks, you would select Security (for Security Key).
Advanced Features How to set up manually How to connect Samsung Wireless link To enter the Network settings into your TV, follow these steps: 1. Follow Steps 1 through 6 in the “How to set up using PBC (WPS)”. (P. 26) For the procedures to establish a connection, refer to the following: 1. Follow Steps 1 through 5 in the “How to set up using PBC (WPS)”. (P. 26) 2. Press the ▼ button to select Internet Protocol Setup, and then press ENTERE button.
Enjoy photos, music and/or movie files saved on a USB Mass Storage Class (MSC) device and/or your PC. 04 Advanced Features Media Play MediaPlay Videos SUM Change Device View Devices E Enter R Return ¦¦ Connecting a USB Device 1. Turn on your TV. TV Side Panel 2. Connect a USB device containing photo, music and/or movie files to the USB 1 (HDD) or USB 2 jack on the side of the TV. 3. When USB is connected to the TV, popup window appears. Then you can select Media Play.
Advanced Features ✎✎Functions that are not supported when connecting to a PC through a network: xx The Background Music and Background Music Setting functions. xx Sorting files by preference in the Photo, Music, and Movie folders. xx The � (REW) or µ (FF) button while a movie is playing. ✎✎The Divx DRM, Multi-audio, embedded caption does not supported. ✎✎Samsung PC Share manager should be permitted by the firewall program on your PC.
Move to the file you desired using the up/down/right/left buttons and then press the ENTERE or � (Play) button. The file is played. ✎✎Supports the Device Mode and Contents Mode in Media Play homepage. Information : You can ascertain the selected file name and the number of files and page. Videos Movie 01.avi Movie 03.avi Movie 05.avi Sort List Section : Displays sorting standard. Jan.10.2010 Jan.10.2010 Jan.10.2010 Movie 07.avi Movie 02.avi Movie 04.avi Movie 06.avi Movie 09.avi SUM A Jan.10.
Advanced Features yy Supported Video Formats File Extention Video Codec Resolution Frame rate (fps) Bit rate (Mbsp) Divx 3.11 / 4.x / 5.1 / 6.0 1920 x 1080 6 ~ 30 8 Container *.avi *.mkv *.asf *.wmv *.mp4 1920 x 1080 6 ~ 30 8 1920 x 1080 6 ~ 30 25 MPEG4 SP / ASP 1920 x 1080 6 ~ 30 8 Motion JPEG 800 x 600 6 ~ 30 8 Divx 3.11 / 4.x / 5.1 / 6.0 1920 x 1080 6 ~ 30 8 XviD 1920 x 1080 6 ~ 30 8 H.
If you exit the playing Videos function, it can be played later from the point where it was stopped. ✎✎If you will press the ENTERE button during playing the file, you can explore scene divided into 5 chapters you want. 1. Select the movie file you want to play continuously by pressing the ◄ or ► button to select it from the file list section. 2. Press the � (Play) / ENTERE button. 00:04:03 / 00:07:38 1/1 Movie 01.avi 3. Select Play Continuously (Resume Play) by pressing the Blue button.
Advanced Features Photos Viewing a Photo (or Slide Show) 1. Press the ◄ or ► button to select Photos, then press the ENTERE button in the Media Play menu. 2. Press the ◄/►/▲/▼ button to select the desired photo in the file list. 3. Press the ENTERE button or � (Play) button. Normal Image1024.jpg 1024x768 2010/2/1 3/15 –– While a photo list is displayed, press the � (Play) / ENTERE button on the remote control to start slide show.
During playing a file, press the TOOLS button. Option menu Operations Videos Title You can move the other file directly. ✓ Repeat Mode Picture Size (Mode1 / Mode2 / Original) Picture Setting You can play movie and music files repeatedly. ✓ You can adjust the picture size for preference. ✓ You can adjust the picture setting. (P. 13, 14, 15, 16) ✓ Sound Setting You can adjust the sound setting. (P. 16, 17) you can play the video file with Subtitle.
Advanced Features Anynet+ What is Anynet+? t Anynet+ is a function that enables you to control all connected Samsung devices that support Anynet+ with your Samsung TV’s remote. The Anynet+ system can be used only with Samsung devices that have the Anynet+ feature. To be sure your Samsung device has this feature, check if there is an Anynet+ logo on it. To connect to Home Theatre TV Home Theatre Optical Cable Anynet+ Device 1 Anynet+ Device 2, 3, 4 HDMI 1.3 Cable HDMI 1.3 Cable 1.
04 Advanced Features ¦¦ Setting Up Anynet+ ■■ Setup Anynet+ (HDMI-CEC) (Off / On): To use the Anynet+ Function, Anynet+ (HDMI-CEC) must be set to On. When the Anynet+ (HDMI-CEC) function is disabled, all the Anynet+ related operations are deactivated. ✎✎ Auto Turn Off (No / Yes): Setting an Anynet+ Device to turn off automatically when the TV is turned off. The active source on the TV must be set to TV to use the Anynet+ function. ✎✎ ✎✎ Even if an external device is still recording, it may turn off.
Advanced Features ¦¦ Listening through a Receiver You can listen to sound through a receiver (i.e Home Theatre) instead of the TV speaker. 1. Select Receiver and set to On. 2. Press the EXIT button to exit. ✎✎ If your receiver supports audio only, it may not appear in the device list. ✎✎ The receiver will work when you have properly connected the optical in jack of the receiver to the DIGITAL AUDIO OUT (OPTICAL) jack of the TV. ✎✎ When the receiver (i.
¦¦ Getting Started with Internet@TV Recommended Internet@TV brings useful and entertaining contents and services directly from the web to your TV. My Applications Samsung Apps by Date 1/1 04 Advanced Features Internet@TV Settings A Login B Mark as Favorite D Sort by R Return ✎✎NOTE xx Configure the network settings before using Internet@TV. For more information, refer to “Network Connection” (P. 23). xx Unsupported fonts within the provider’s content will not display normally.
Advanced Features ■■ System Setup Account Login For an application with multiple categories, use ◄ and ► to access the different categories. on country. Ticker Autorun (Off / On): Enable/disable ticker autorun upon powering on the TV. Channel Bound Service (Off / On): Some channels support application as an Internet data service, allowing you to access the Internet service while watching TV. Only available if supported by the broadcaster.
Using the Samsung Apps by category Samsung Apps Samsung Apps is a store for downloading applications to be used on Samsung TV/AV equipment. Users can enjoy a variety of contents like videos, music, photos, games, useful information etc. using the downloaded applications. Additional applications will be available hereafter.
Advanced Features AllShare Message / Media / ScreenShare ¦¦ About AllShare AllShare connects your TV and compatible Samsung mobile phones / devices through a network. On your TV, you can view call arrivals, SMS messages and schedules set on your mobile phones. In addition, you can play media contents including videos, photos and music saved on your mobile phones or the other devices (such as your PC) by controlling them on the TV via the network.
Using ScreenShare Function If a call arrives while you are watching TV, the alarm window appears. Using ScreenShare, you can browse various web contents provided by the mobile phone. For example, the image below displays an access page for contents on a mobile. You can read the mobile’s files and view the phone book and calendar on the TV. Also, in the phone book, you can make a call to another person, or send to SMS.
Other Information Analogue Channel Teletext Feature The index page of the Teletext service gives you information on how to use the service. For Teletext information to be displayed correctly, channel reception must be stable. Otherwise, information may be missing or some pages may not be displayed. ✎✎You can change Teletext pages by pressing the numeric buttons on the remote control. 1 / (Teletext on/mix/off): Activate the Teletext mode after selecting the channel providing the Teletext service.
05 Other Information Installing the Wall Mount ¦¦ Assembling the Blanking Bracket When installing the TV onto a wall, attach the Blanking Bracket into the part that connects to the stand as shown in the picture. Blanking bracket ¦¦ Preparing before installing Wall-Mount (46 ~ 55 inch TVs) To install a wall-mount from another manufacturer, use the Holder-Ring. ¦¦ Installing the Wall Mount Kit Wall mount items (sold separately) allow you to mount the TV on the wall.
Other Information ¦¦ Wall Mount Kit Specifications (VESA) ✎✎Wall mount kit is not supplied but sold separately. Install your wall mount on a solid wall perpendicular to the floor. When attaching to other building materials, please contact your nearest dealer. If installed on a ceiling or slanted wall, it may fall and result in severe personal injury.
The Kensington Lock is a device used to physically fix the system when using it in a public place. The appearance and locking method may differ from the illustration depending on the manufacturer. Refer to the manual provided with the Kensington Lock for proper use. TV Rear 1 2 ✎✎Please find a “K” icon on the rear of the TV. A kensington slot is beside the “K” icon. To lock the product, follow these steps: 3 1. Wrap the Kensington lock cable around a large, stationary object such as desk or chair.
Other Information Troubleshooting If you have any questions about the TV, first refer to this list. If none of these troubleshooting tips apply, please visit “www. samsung.com,” then click on Support, or contact the call centre listed on the back-cover of this manual. Issues Solutions and Explanations Picture Quality First of all, please perform the Picture Test and confirm that your TV is properly displaying test image. (go to MENU - Support - Self Diagnosis - Picture Test) (P.
Solutions and Explanations No Picture, No Video The TV will not turn on. • • • Make sure the AC power cord is securely plugged in to the wall outlet and the TV. Make sure the wall outlet is working. Try pressing the POWER button on the TV to make sure the problem is not the remote. If the TV turns on, refer to “The remote control does not work” below. The TV turns off automatically. • • • • Ensure the Sleep Timer is set to Off in the Setup menu. (P.
Other Information Issues Solutions and Explanations Your settings are lost after 30 minutes or every time the TV is turned off. • If the TV is in the Store Demo mode, it will reset audio and picture settings every 30 minutes. Change the settings from Store Demo mode to Home Use mode in the Plug & Play (Initial setup) procedure. Press the SOURCE button to select TV mode, and go to MENU → Setup → Plug & Play (Initial setup) → ENTERE. You have intermittent loss of audio or video.
Panel native 05 Other Information Specifications 1920 x 1080 @ 60 Hz Environmental Considerations Operating Temperature Operating Humidity Storage Temperature Storage Humidity 10°C to 40°C (50°F to 104°F) 10% to 80%, non-condensing -20°C to 45°C (-4°F to 113°F) 5% to 95%, non-condensing TV System Analogue : Depending on your country selection Digital: DVB-T/DVB-C/DVB-T2(UK Only) Colour/video system Analogue: PAL, SECAM, NTSC-4.43, NTSC-3.58, PAL60 Digital: MPEG-2 MP@ML, MPEG-4, H.
Other Information Index A F AllShare Amplify Antenna Anynet+ Audio Out Auto Adjustment Auto Volume 42 16 12 36 8, 36 16 17 B Background Music Balance L/R Basic View Batteries Black Tone Blanking Bracket Brightness 35 16 34 5 14 45 13 C Cable Tie 46 Change PIN 6, 19 Channel Manager 11 Clock 18 Colour Tone 15 Component 7 Connecting to a PC 22 Connecting to an Audio Device 8 D 11 15 13 14 12 H HDMI Headphones Home Theatre 7, 36 8 8, 36 I Installation Space Internet@TV 2 39 L Language Licence Lock
Warning! Important Safety Instructions Please read the appropriate section that corresponds to the marking on your Samsung product before attempting to install the product. CAUTION RISK OF ELECTRIC SHOCK DO NOT OPEN CAUTION: TO REDUCE THE RISK OF ELECTRIC SHOCK, DO NOT REMOVE COVER (OR BACK). THERE ARE NO USER SERVICEABLE PARTS INSIDE. REFER ALL SERVICING TO QUALIFIED PERSONNEL. This symbol indicates that high voltage is present inside.
Wiring the Mains Power Supply Plug (UK Only) IMPORTANT NOTICE The mains lead on this equipment is supplied with a moulded plug incorporating a fuse. The value of the fuse is indicated on the pin face of the plug and, if it requires replacing, a fuse approved to BSI1362 of the same rating must be used. Never use the plug with the fuse cover omitted if the cover is detachable. If a replacement fuse cover is required, it must be of the same colour as the pin face of the plug.
This page is intentionally left blank. BN68-02558K-Eng.