LCD TV LE32N7 LE40N7 LE46N7 Contact SAMSUNG WORLD-WIDE If you have any questions or comments relating to Samsung products, please contact the SAMSUNG customer care centre. Country BELGIUM CZECH REPUBLIC DENMARK FINLAND FRANCE GERMANY HUNGARY ITALIA LUXEMBURG NETHERLANDS NORWAY POLAND PORTUGAL RUSSIA SLOVAKIA SPAIN SWEDEN U.
Precautions When Displaying a Still Image A still image may cause permanent damage to the TV screen. WARNINGS: Image retention, commonly known as screen burn-in, can occur on most types of television if the same image is displayed continuously. The most common causes of image retention are logos that remain stationary on the TV screen. These logos are common on many programmes received via a Setop Box.
Contents CONNECTING AND PREPARING YOUR TV List of Parts ................................................................................... Installing the Stand ................................................................... Installing the Wall Mount Kit ............................................ Viewing the Control Panel ...................................................... Viewing the Connection Panel ............................................. Viewing the Remote Control .........................
WISELINK USING THE TELETEXT FEATURE Using the WISELINK Function........................................... 25 Using the WISELINK Menu ................................................. 26 Using the PHOTO (JPEG) List ............................................ 26 Viewing Photo File Information....................................... 28 Selecting a Photo and Slide Show.................................. 28 Rotating ....................................................................................
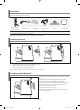
List of Parts Please make sure the following items are included with your LCD TV. If any items are missing, contact your dealer. M4 X L16 Remote Control & Batteries (AAA x 2) Power Cord Cover-Bottom Stand Screw X 4 Owner’s Instructions Stand Cleaning Cloth Registration Cards Registration Cards (Not available in all locations) The stand and stand screw may not be included depending on the model. Installing the Stand <2> 1. 2. 3.
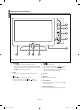
Viewing the Control Panel The product colour and shape may vary depending on the model. SOURCE Toggles between all the available input sources (TV, Ext.1, Ext.2, AV, S-Video, Component, PC, HDMI1, HDMI2, DTV). In the on-screen menu, use this button as you use the ENTER button on the remote control. MENU Press to see an on-screen menu of your TV’s features. Press to change channels. In the on-screen menu, use the buttons as you use the and buttons on the remote control.
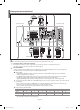
Viewing the Connection Panel [Rear Panel Jacks] [Side Panel Jacks] Power Input Whenever you connect an external device to your TV, make sure that power on the unit is turned off. When connecting an external device, match the colour of the connection terminal to the cable.
Connecting Set-Top Box, VCR or DVD - Connect the VCR or DVD SCART cable to the SCART connector of the VCR or DVD. - If you wish to connect both the Set-Top Box and VCR (or DVD), you should connect the Set-Top Box to the VCR (or DVD) and connect the VCR (or DVD) to your set. Connecting External A/V Devices - Connect RCA or S-VIDEO cable to an appropriate external A/V device such as VCR, DVD or Camcorder.
Viewing the Remote Control Selects a target device to be controlled by the Samsung remote control (TV, DVD, STB, CABLE, VCR) (Refer to page 48~52) Television Standby button Number buttons for direct channel access One/Two-digit channel selection It displays "Channel Manager" on the screen.
Switching On and Off The mains lead is attached to the rear of your set. 1. Plug the mains lead into an appropriate socket. The standby indicator lights up on the front of the set. 2. Press the button on the front of the set. You also can press the POWER button or the TV/DTV button on the remote control to turn the TV on. The programme that you were watching last is reselected automatically. 3. Press the numeric button (0~9) or channel up/down ( button on the right side of the set. 4.
If you want to reset this feature... 1. Press the MENU button to display the menu. Press the or button to select “Setup”, then press the ENTER button. 2. Press the ENTER button again, to select “Plug & Play”. 3. The message “Start Plug & Play” is displayed. - Storing Channels Automatically - Storing Channels Manually Storing Channels Automatically You can scan for the frequency ranges available to you (and availability depends on your country).
5. Press the or button to select “Colour System”, then press the ENTER button. 6. Select the colour standard required by pressing the 7. Press the 8. Select the sound standard required by pressing the or or button then, press the ENTER button. button to select “Sound System”, then press the ENTER button. or button, then press the ENTER button. If there is an abnormal sound or no sound, re-select the sound system required. 9.
Activating the Child Lock This feature allows you to prevent unauthorized users, such as children, from watching unsuitable programmes by muting out video and audio. Child Lock cannot be released using the buttons on the side. Only the remote control can release the Child Lock setting, so keep the remote control away from children. 1. Press the MENU button to display the menu. Press the or button to select “Channel”, then press the ENTER button. 2.
Assigning Channels Names Channel names will be assigned automatically when channel information is broadcast. These names can be changed, allowing you to assign new names. 1. Press the MENU button to display the menu. Press the or button to select “Channel”, then press the ENTER button. 2. Press the 3. If necessary, select the channel to be assigned to a new name by pressing the or button. Press the ENTER button. or button to select “Name”, then press the ENTER button.
Changing the Picture Standard You can select the type of picture which best corresponds to your viewing requirements. You can also press the P.MODE button on the remote control to select one of the picture settings. 1. Press the MENU button to display the menu. Press the or button to select “Picture”, then press the ENTER button. 2. Press the ENTER button again, to select “Mode”. Press the ENTER button again. 3. Press the or button to select the desired picture effect. Press the ENTER button. 4.
Changing the Colour Tone You can select the most comfortable colour tone to your eyes. 1. To select the desired picture effect, follow the “Changing the Picture Standard” instructions number 1 to 3 on page 13. 2. Press the 3. Press the or button to select the desired colour tone setting. Press the ENTER button. 4. Press the EXIT button to exit. or button to select “Colour Tone”, then press the ENTER button. Cool2: Makes the colour temperature bluer than “Cool1” menu.
Resetting the Picture Settings to the Factory Defaults You can return to the factory defaults picture settings. 1. To select the desired picture effect, follow the “Changing the Picture Standard” instructions number 1 to 3 on page 13. 2. Press the 3. Press the EXIT button to exit. or button to select “Reset”, then press the ENTER button. The “Reset” will be set for each picture mode. Changing the Picture Size You can select the picture size which best corresponds to your viewing requirements. 1.
Digital Noise Reduction If the broadcast signal received by your TV is weak, you can activate the Digital Noise Reduction feature to help reduce any static and ghosting that may appear on the screen. 1. Press the MENU button to display the menu. Press the or button to select “Picture”, then press the ENTER button. 2. Press the or button to select “Digital NR”, then press the ENTER button. 3. Press the or button to select “On” or “Off”. Press the ENTER button. 4.
Viewing the Picture In Picture (PIP) You can display a sub picture within the main picture of set programme or video input. In this way, you can watch the picture of set programme or video input from any connected equipment while watching the main picture. 1. Press the MENU button to display the menu. Press the or button to select “Picture”, then press the ENTER button. 2. Press the 3. Press the ENTER button again. Press the or button to select “On”, then press ENTER button.
Changing the Sound Standard You can select the type of the special sound effect to be used when watching a given broadcast. You can also select these options by simply pressing the S.MODE button on the remote control. 1. Press the MENU button to display the menu. Press the or button to select “Sound”, then press the ENTER button. 2. Press the ENTER button again, to select “Mode”. 3. Select the required sound effect by pressing the press the ENTER button. 4. Press the EXIT button to exit.
Adjusting the Volume Automatically Each broadcasting station has its own signal conditions, and so it is not easy for you to adjust the volume every time the channel is changed. This feature allows you to automatically adjust the volume of the desired channel by lowering the sound output when the modulation signal is high or by raising the sound output when the modulation signal is low. 1. Press the MENU button to display the menu. Press the or button to select “Sound”, then press the ENTER button. 2.
Resetting the Sound Settings to the Factory Defaults If Game Mode is On, the Reset Sound function is activated. Selecting the Reset function after setting the equalizer resets the equalizer setting to the factory defaults. 1. Press the MENU button to display the menu. Press the or button to select “Sound”, then press the ENTER button. 2. Press the 3. Press the EXIT button to exit. or button to select “Reset”, then press the ENTER button.
Setting the Sleep Timer You can select a time period of between 30 and 180 minutes after which the television automatically switches to standby mode. 1. Press the MENU button to display the menu. Press the or button to select “Setup”, then press the ENTER button. 2. Press the or button to select “Time”, then press the ENTER button. 3. Press the or button to select “Sleep Timer”, then press the ENTER button. 4.
Choosing Your Language When you start using your set for the first time, you must select the language which will be used for displaying menus and indications. 1. 2. Press the MENU button to display the on-screen menu. Press the or button to select “Setup”, then press the ENTER button. Press the or button to select “Language”, then press the ENTER button. 3. Select a particular language by pressing the Press the ENTER button. 4. Press the EXIT button to exit. or button repeatedly.
Setting the Blue Screen Mode / Selecting the Melody Blue Screen: If no signal is being received or the signal is very weak, a blue screen automatically replaces the noisy picture background. If you wish to continue viewing the poor picture, you must set the "Blue Screen" mode to "Off". Melody: You can hear melody sound when the television is powered on or off. 1. Press the MENU button to display the menu. Press the or button to select “Setup”, then press the ENTER button. 2.
Selecting the Source You can select among external sources connected to your TV’s input jacks. 1. Press the MENU button to display the menu. Press the ENTER button, to select “Input”. 2. Press the ENTER button again, to select “Source List”. When no external device is connected to your set, only “TV”, “Ext.1”, “Ext.2”, "DTV" are activated in the “Source List”. “AV”, “S-Video”, “Component”, “PC”, “HDMI1” , “HDMI2” are activated only when they are connected to your set. 3.
Using the WISELINK Function You can view stored photos (JPEG files) or play music files (MP3) using a memory card or USB storage media. The "Photo" menu supports image files in the JPEG format only. The "Music" menu supports sound files in the MP3 format only.
Using the WISELINK Menu This menu shows JPEG and MP3 files and folders saved on a memory card. 1. Press the MENU button to display the menu. Press the ENTER button, to select “Input”. 2. Press the or button to select “WISELINK”, then press the ENTER button. If the "Insert memory cards." message is displayed, check whether the memory card is correctly inserted into the WISELINK terminal on the side of the TV. 3. Press the or button to select the corresponding Memory Card, then press the ENTER button.
Using the Options Menu "Slide Show": Starts a slide show. (Refer to “Selecting a Photo and Slide Show” on page 28) "Rotate": You can rotate images in full screen mode. Images are rotated in the order of 90°, 180°, 270° and 0° (original state). (Refer to “Rotating” on page 29) You cannot save a rotated image. "Zoom": You can zoom into images in full screen mode. Images are zoomed in on in the order of X2, X3, X4 and X1 (original size).
Viewing Photo File Information When selecting a photo file, the photo file information is displayed on the left in the TV screen, such as the resolution, the date modified and the order of the file in the current directory. Such as the resolution File size Date modified Order of the file in the current directory Selecting a Photo and Slide Show This menu shows JPEG files and folders saved on a memory card. 1. Complete Steps 1 to 4 of "Using the WISELINK Menu". (Refer to page 26) 2.
"Background Music Setting": The saved file information is displayed as folder or MP3 file. 1. Select the "Background Music Settings" and press the ENTER button. Navigate to the folder that contains the MP3 files to use as the background music. Select an MP3 file and press ENTER button. The selected file is displayed in yellow. 2. MENU button again to return to the Slide Show screen. The selected background music is played.
Zooming-in Displays a 2x, 3x or 4x zoomed-in image in full screen mode. 1. Complete Steps 1 to 4 of "Using the WISELINK Menu". (Refer to page 26) 2. Press the or button to select “Photo”, then press the ENTER button. The saved file information is displayed as a folder or file. 3. Press the , , and buttons to select a file, then press the ENTER button. Pressing the button over a photo thumbnail displays the photo in full screen. The Menu is displayed.
Copying Image Files You can copy image files to a different memory card. 1. Complete Steps 1 to 4 of "Using the WISELINK Menu". (Refer to page 26) 2. Press the or button to select “Photo”, then press the ENTER button. The saved file information is displayed as a folder or file. 3. Press the , , and buttons to select a file, then press the ENTER button. Pressing the button over a photo thumbnail displays the photo in full screen. The Menu is displayed.
Printing a Photo You can print image files directly with your printer. 1. Complete Steps 1 to 4 of "Using the WISELINK Menu". (Refer to page 26) 2. Press the or button to select “Photo”, then press the ENTER button. The saved file information is displayed as a folder or file. 3. Press the , , and buttons to select a file, then press the ENTER button. Pressing the button over a photo thumbnail displays the photo in full screen. The Menu is displayed.
Copying Music Files You can copy music files to a different memory card. 1. Complete Steps 1 to 4 of "Using the WISELINK Menu". (Refer to page 26) 2. Press the or button to select “Music”, then press the ENTER button. The saved file information is displayed as a folder or file. 3. Press the or button to select a file, then press the ENTER button. To select all files or a file, press the INFO button to display the Music menus.
Using the Setup Menu Setup displays the user settings of the WISELINK menu. 1. Complete Steps 1 to 4 of "Using the WISELINK Menu". (Refer to page 26) 2. Press the or button to select “Setup”, then press the ENTER button. The saved file information is displayed as a folder or file. 3. Press the or button to select an item you want, then press the ENTER button. 4. Press the or button to select the option, then press the ENTER button. 5.
Previewing the DTV Menu System To help you navigate around the on-screen menu system and adjust the various settings available, refer to the following illustration. Available in the Digital TV mode. Press the D.MENU button.
Updating the Channel List Manually You can specify the channel or frequency for a fast channel search. 1. Press the D.MENU button to display the DTV menu. 2. Press the or button to select "Channel", then press the ENTER button. 3. Press the or button to select "Manual Store", then press the ENTER button. 4. To... Then...
Move 1. Press the D.MENU button to display the DTV menu. 2. Press the 3. Press the or button to select "Edit Favourite Channels", then press the ENTER button. or button to select "Channel", then press the ENTER button. 4. Select the required channel using the 5. Press the green button. or button. 6. Press the or button to select the channel that you want to move, and press the green or ENTER button. 7. Press the EXIT button to exit.
Displaying Programme Information While viewing a channel, additional information about the current programme may be displayed. 1. While viewing a programme, press the INFO button. 2. To exit from banner information, press the INFO button. The programme information is displayed. Viewing the EPG (Electronic Programme Guide) Information The EPG (Electronic Programme Guide) information is provided by the broadcasters.
Using the Scheduled List If you make a scheduled viewing list of programs you may like to see, the channel will be automatically switched to the scheduled program at the scheduled time even if you are watching another program. 1. Press the D.MENU button to display the DTV menu. 2. Press the ENTER button, to select "Guide". 3. Press the 4. Press the red button. The channel will be switched to the scheduled program. or button to select "Scheduled List", then press the ENTER button. 5.
Viewing All Channels and Favourite Channels In the EPG menu, you can display all channels or favourite channels. 1. Press the D.MENU button to display the DTV menu. 2. Press the ENTER button again, to select "Guide". 3. Select the your required guide ("Now & Next Guide" or "Full Guide") by pressing the or button. 4. Press the ENTER button. 5. Press the green button. All the channel lists and the favorite channel lists will be toggled. 6.
Choosing Your Language Preferred Subtitle Language : English Preferred Audio Language : English OSD Language : English Translucency Level : Medium Parental Lock When you start using your set for the first time, you must select the language which will be used for displaying menus and indications. 1. Press the D.MENU button to display the DTV menu. 2. Press the or button to select "Preference", then press the ENTER button. 3.
Setting the Subtitle You can activate and deactivate the subtitles. 1. Press the D.MENU button to display the DTV menu. 2. Press the or button to select "Feature", then press the ENTER button. 3. Press the ENTER button again, to select "Subtitle". 4. Select "On" by pressing the 5. Press the EXIT button to exit. or button. Press the ENTER button. Selecting the Preferred Language (Subtitle or Audio) You can change the default value for subtitle and audio languages.
Viewing Product Information You can view your product information. For service or repair, please contact a Samsung approved dealer. 1. Press the D.MENU button to display the DTV menu. 2. Press the 3. Press the ENTER button again, to select "Product Information". or button to select "System", then press the ENTER button. The Product Information menu is selected. - Software Version, Firmware Version 4. Press the EXIT button to exit.
Viewing Common Interface This contains information on CAM inserted in the CI slot and displays it. 1. Press the D.MENU button to display the DTV menu. 2. Press the 3. Press the or button to select "Common Interface", then press the ENTER button. 4. Press the ENTER button to display the information for your application. 5. Press the EXIT button to exit. or button to select "System", then press the ENTER button. The Application Info inserting is about the CI CARD.
Teletext Decoder Most set channels carry “ Teletext ”, pages of written information that provide information such as: Television programme times. News bulletins and Weather forecasts. Sports results. Subtitles for the hard of hearing. The Teletext pages are organized according to six categories: Part Contents A Selected page number. B Broadcasting station identity. C Current page number or search status. D Date and time. E Text. F Status information.
Selecting a Specific Teletext Page Press the number buttons on the remote control to enter the page number directly: 1. Enter the three-digit page number listed in the contents by pressing the corresponding numeric buttons. 2. If the selected page is linked with several secondary pages, the secondary pages are displayed in sequence. To freeze the display on a given page, press the PIP ( ) button. Press the PIP ( ) button again to resume. 3. Using the various display options: To display... Press the...
Setting Up Your Remote Control After it has been set up properly, your remote control can operate in five different modes: TV, DVD, Cable, Set-Top Box, VCR. Pressing the corresponding button on the remote control allows you to switch between these modes, and control whichever piece of equipment you choose. The remote control might not be compatible with all DVD Players, VCRs, Cable boxes, and Set-Top Boxes. Setting Up the Remote to Operate Your VCR 1. Turn off your VCR. 2.
Setting Up the Remote to Operate Your DVD 1. Turn off your DVD. 2. Press the DVD button on your TV’s remote control. 3. Press the SET button on your TV’s remote control. 4. Using the number buttons on your remote control, enter three digits of the DVD code listed on page 50~51 of this manual for your brand of DVD. Make sure you enter three digits of the code, even if the first digit is a “0”. (If there is more than one code listed, try the first one.) 5.
Remote Control Codes VCR Brand Code Brand Code SAMSUNG 000 001 002 003 004 005 077 078 079 MONTGOMERY WARD 020 ADMIRAL 020 MTC 002 025 AIWA 025 MULTITECH 002 005 025 038 AKAI 004 027 032 NEC 007 008 018 026 037 062 064 AUDIO DYNAMICS 007 026 OPTIMUS 020 BELL&HOWELL 018 ORION 073 074 075 076 BROKSONIC 022 PANASONIC 021 056 071 072 CANDLE 002 003 006 008 015 055 PENTAX 019 041 075 CANON 021 056 PENTEX RESEARCH+ 008 CITIZEN 002 003 006 008 015 055 PHILCO 021 056 059
CABLE BOX Brand Code Brand Code SAMSUNG 000 001 002 003 004 005 006 007 REGENCY 015 023 GI 041 SA 042 043 HAMLIN 003 024 031 SCIENTIFIC ATLAN 042 043 HITACHI 025 030 SPRUCER 022 JERROLD 038 039 STARGATE 2000 036 MACOM 025 030 SYLVANIA 016 MAGNAVOX 019 023 028 TEXSCAN 016 OAK 026 TOCOM 032 PANASONIC 003 022 027 037 044 UNIVERSAL 033 034 PHILIPS 019 021 023 028 VIEWSTAR 019 021 023 028 PIONEER 004 018 020 044 WARNER AMEX 046 RCA 014 022 040 ZENITH 017 029 035
DVD Brand Code Brand Code PANASONIC 024 034 124 134 136 137 138 THOMSON 145 PHILIPS 036 076 TOSHIBA 028 062 076 ROTEL 117 118 TECHNICS 139 RIO 120 TVIEW 072 RCA 023 035 074 075 131 132 TOKAI 073 RAITE 073 TEAC 096 ROWA 038 TECHWOOD 097 SAMPO 104 TREDEX 098 099 101 SONY 026 029 126 127 128 129 130 141 URBAN CONCEPTS 076 SHERWOOD 039 041 VENTURER 075 SVA 042 VOCOPRO 102 SYLVANIA 043 093 YAMAHA 032 063 SHARP 140 YAMAKAWA 040 073 SANSUI 062 XWAVE 103 S
Setting up Your PC Software (Based on Windows XP) The Windows display-settings for a typical computer are shown below. The actual screens on your PC may be different depending upon your particular version of Windows and your particular video card. Even if your actual screens look different, the same, basic set-up information will apply in almost all cases. (If not, contact your computer manufacturer or Samsung Dealer.) 1. First, click on “Control Panel” on the Windows start menu. 2.
Setting the PC Coarse and Fine Tuning of the Image (Image Lock): The purpose of picture quality adjustment is to remove or reduce picture noise. If the noise is not removed by Fine-tuning alone, then adjust the frequency as best as possible (coarse) and Fine-tune again. After the noise has been reduced, re-adjust the picture so that it is aligned on the center of screen. 1. Preset: Press the SOURCE button to select PC mode. 2. Press the MENU button to display the menu.
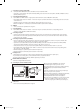
Using the Anti-Theft Kensington Lock The Kensington lock is a device used to physically fix the system when using it in a public place. The locking device has to be purchased separately. The appearance and locking method may differ from the illustration depending on the manufacturer. Please refer to the manual provided with the Kensington lock for proper use. 1. Insert the locking device into the Kensington slot on the LCD TV (Figure 1), and turn it in the locking direction (Figure 2). 2.
Technical and Environmental Specifications Model Name LE32N7 LE40N7 LE46N7 Screen Size (Diagonal) 32 inch 40 inch 46 inch 1360 x 768 @ 60 Hz 1360 x 768 @ 60 Hz 1360 x 768 @ 60 Hz H/V Separate, TTL, P. or N. 0.7 Vp-p @ 75 ohm H/V Separate, TTL, P. or N. 0.7 Vp-p @ 75 ohm H/V Separate, TTL, P. or N. 0.7 Vp-p @ 75 ohm PAL, SECAM-B/G, D/K, I, I/I, L/L’, NTPB (AV3.58, 4.43) BG, DK, I, L PAL, SECAM-B/G, D/K, I, I/I, L/L’, NTPB (AV3.58, 4.
Stand Swivel (Left / Right) -20˚ ~ 20˚ Design and specifications are subject to change without prior notice. This device is a Class B digital apparatus. English-56 BN68-01007T-01Eng.
Warning! Important Safety Instructions Please read the appropriate section that corresponds to the marking on your Samsung product before attempting to install the product. CAUTION RISK OF ELECTRIC SHOCK DO NOT OPEN CAUTION: TO REDUCE THE RISK OF ELECTRIC SHOCK, DO NOT REMOVE COVER (OR BACK). THERE ARE NO USER SERVICEABLE PARTS INSIDE. REFER ALL SERVICING TO QUALIFIED PERSONNEL. This symbol indicates that high voltage is present inside.
Wiring the Mains Power Supply Plug (UK Only) IMPORTANT NOTICE The mains lead on this equipment is supplied with a moulded plug incorporating a fuse. The value of the fuse is indicated on the pin face of the plug and, if it requires replacing, a fuse approved to BSI1362 of the same rating must be used. Never use the plug with the fuse cover omitted if the cover is detachable. If a replacement fuse cover is required, it must be of the same colour as the pin face of the plug.
Correct Disposal of This Product (Waste Electrical & Electronic Equipment) (Applicable in the European Union and other European countries with separate collection systems) This marking shown on the product or its literature, indicates that it should not be disposed with other household wastes at the end of its working life.