Contact SAMSUNG WORLDWIDE If you have any questions or comments relating to Samsung products, please contact the SAMSUNG customer care center. Comuníquese con SAMSUNG WORLDWIDE Si desea formular alguna pregunta o comentario en relación con los productos de Samsung, comuníquese con el centro de atención al cliente de SAMSUNG. Country Customer Care Center Web Site CANADA 1-800-SAMSUNG(726-7864) www.samsung.com U.S.A 1-800-SAMSUNG(726-7864) www.samsung.com Address Samsung Electronics Canada Inc.
Figures and illustrations in this User Manual are provided for reference only and may differ from actual product appearance. Product design and specifications may be changed without notice. Important Warranty Information Regarding Television Format Viewing ✎✎ See the warranty card for more information on warranty terms. Wide screen format LCD Displays (16:9, the aspect ratio of the screen width to height) are primarily designed to view wide screen format fullmotion video.
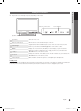
Contents Getting Started Advanced Features yy yy yy yy yy yy yy yy Media Play............................................................... 21 List of Features.......................................................... 4 Accessories............................................................... 4 Installing the LCD TV Stand....................................... 4 Viewing the Control Panel.......................................... 5 Viewing the Remote Control......................................
Getting Started List of Features yy Excellent Digital Interface & Networking: With a built-in HD digital tuner, nonsubscription HD broadcasts can be viewed without a cable box / STB (Set-Top-Box) satellite receiver. yy Media Play: Allows you to play music files, and pictures saved on a USB device. (P. 21) yy Self Diagnosis: You can check picture and sound operation. (P. 20) Accessories ✎✎Please make sure the following items are included with your LCD TV. If any items are missing, contact your dealer.
01 Getting Started Viewing the Control Panel ✎✎The product color and shape may vary depending on the model. Remote control sensor Power Indicator Speakers P (Power) Turns the TV on or off. Remote control sensor Aim the remote control towards this spot on the TV. SOURCEE Toggles between all the available input sources. In the on-screen menu, use this button as you would use the ENTERE button on the remote control.
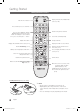
Getting Started Viewing the Remote Control Display and select the available video sources. (P. 10) Turns the TV on and off. Press to directly access to channels. Return to the previous channel. Press to select additional channels (digital) being broadcast by the same station. For example, to select channel ‘54-3’, press ‘54’, then press ‘-’ and ‘3’. Cut off the sound temporarily. Change channels. Adjusts the volume. Displays the main on-screen menu. Displays the channel list on the screen. (P.
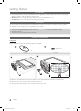
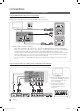
01 Getting Started Connecting to an Antenna When the TV is initially powered on, basic settings proceed automatically. ✎✎Connecting the power cord and antenna. VHF/UHF Antenna Cable or Power Input ANT OUT PR R-AUDIO-L PB Y Plug & Play (Initial Setup) When the TV is initially powered on, a sequence of on-screen prompts will assist in configuring basic settings. Press the POWERP button. Plug & Play is available only when the Input source is set to TV.
Connections Connecting to an AV Device Using an HDMI / DVI Cable: HD connection (up to 1080p) We recommend using the HDMI connection for the best quality HD picture. Available devices: DVD, Blu-ray player, HD cable box, HD satellite receiver (STB).
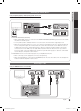
02 Connections Connecting to an Audio Device Using an Optical (Digital) or Audio (Analog) Cable Connection Available devices: Digital Audio System, Amplifier, Home Theater R AUDIO IN W R-AUDIO-L DVD Home Theater PR PB Y Digital audio system W Y W R W R B OPTICAL G Red White ✎✎DIGITAL AUDIO OUT (OPTICAL) xx When a Digital Audio System is connected to the DIGITAL AUDIO OUT (OPTICAL) jack, decrease the volume of both the TV and the system. PR R-AUDIO-L PB Y xx 5.
Basic Features Display Modes (D-Sub and HDMI/DVI Input) Optimal resolution is 1360x768@60Hz. Mode 640 x 350 Horizontal Frequency (KHz) 31.469 Vertical Frequency (Hz) 70.086 Pixel Clock Frequency (MHz) 25.175 Sync Polarity (H / V) +/- 720 x 400 31.469 70.087 28.322 -/+ 640 x 480 35.000 66.667 30.240 -/- 832 x 624 49.726 74.551 57.284 -/- 31.469 59.940 25.175 -/- 37.861 72.809 31.500 -/- 37.500 75.000 31.500 -/- 37.879 60.317 40.000 +/+ 48.077 72.188 50.000 +/+ 46.
Basic Features Channel Menu Before using the TV, follow the steps below to learn how to navigate the menu and select and adjust different functions. 1 ¦¦ Seeing Channels Channel List MEDIA.P OO MENUm → Channel → Channel List → ENTERE POWER P 2 3 4 A B C D 1 MENU button: Displays the main on-screen menu. Add, delete or set Favorite channels and use the program guide for digital broadcasts.
Basic Features MEDIA.P ¦¦ Using Favorite Channels How to Stop Auto Programming OO MENUm → Channel → Channel List → ENTERE 1. Press the ENTERE button. * Add to Favorite / Delete from Favorite t Set channels you watch frequently as Favorites. 1. Select a channel and press the TOOLS button. 2. Add or delete a channel using the Add to Favorite or Delete from Favorite menu respectively.
1. Press the ◄ / ► /▲ / ▼ buttons to select the desired channel in Channel List. 2. Press the TOOLS button, then select Timer Viewing. 3. Scroll up or down to adjust the settings in the box, or use the numeric buttons on your remote for entering the date and time. ✎✎ If you selected Once, Every Week or Every Day in Repeat, you can enter the date you want. 4. Select OK, then press the ENTERE button when done. ✎✎ NOTE xx Only memorized channels can be reserved.
Basic Features ¦¦ Setting up the TV with your PC ¦¦ Changing the Picture Options Set the input source to PC. Auto Adjustment t OO MENUm → Picture → Auto Adjustment → ENTERE Advanced Settings OO MENUm → Picture → Advanced Settings → ENTERE Adjust frequency values/positions and fine tune the settings automatically. (available in Standard / Movie mode) Compared to previous models, new Samsung TVs have a more precise picture.
OO MENUm → Picture → Picture Options → ENTERE ✎✎In PC mode, you can only make changes to the Color 2. Press the ENTERE button. Picture Options 4. Press the ENTERE button. Tone and Size. POWER Component (1080i/1080p) mode, you may need to center the picture: 1. Press the ◄ or ► button to select Position. P Color Tone : Normal Size : 16:9 Digital Noise Filter : Auto HDMI Black Level : Normal Film Mode : Off ► 3. Press the ▲, ▼, ◄ or ► button to move the picture.
MEDIA.P Basic Features Sound Menu ¦¦ Changing the Preset Sound Mode OO MENUm → Sound → Mode → ENTERE Mode t Multi-Track Sound (MTS) (analog channels only) ■■ Mono: Choose for channels that are broadcasting in mono or if you are having difficulty receiving a stereo signal. ■■ Stereo: Choose for channels that are broadcasting in stereo. ■■ Standard: Selects the normal sound mode. ■■ SAP: Choose to listen to the Separate Audio Program, which is usually a foreign-language translation.
¦¦ Setting the Time OO MENUm → Setup → Time → ENTERE ¦¦ Setting the On/Off Timer OO MENUm → Setup → Time → Timer 1 → ENTERE ■■ Timer 1 / Timer 2 / Timer 3: Three different on / off timer settings can be made. You must set the clock first. Time ✎✎The current time will appear every time you press the INFO button. ■■ Clock: Setting the clock is for using various timer features of the TV. ✎✎ If you disconnect the power cord, you have to set the clock again.
Basic Features ¦¦ Locking Programs OO MENUm → Setup → V-Chip → ENTERE V-Chip The V-Chip feature automatically locks out programs that are deemed inappropriate for children. The user must enter a PIN (personal ID number) before any of the V-Chip restrictions are set up or changed. ✎✎NOTE xx V-Chip function is not available in HDMI, Component or PC mode. xx The default PIN number of a new TV set is "0-0-0-0" xx Allow all: Press to unlock all TV ratings. xx Block all: Press to lock all TV ratings.
language, the Downloadable U.S. Rating menu will appear in English only. xx The rating will automatically block certain categories that are more restrictive. xx The rating titles (For example: Humor Level..etc) and TV ratings (For example: DH, MH, H..etc) may differ depending on the broadcasting station. How to watch a restricted channel If the TV is tuned to a restricted channel, the V-Chip will block it. The screen will go blank and the following message will appear: This channel is blocked by V-Chip.
Basic Features Melody (Off / Low / Medium / High) Set up so that a melody sound comes on when the TV is powered On or Off. ✎✎Only available when the Input source is set to TV. To turn the melody off, set Melody to Off. ✎✎The Melody does not play. ■■ Sound Test: Use the built-in melody sound to check for sound problems. ✎✎ If you hear no sound from the TV’s speakers, before performing the sound test, make sure Speaker Select is set to TV speaker in the Sound menu.
P Advanced Features MEDIA.P Enjoy photos and/or music files saved on a USB Mass Storage Class (MSC) device. 04 Advanced Features Media Play USB Device Name SUM 315.0MB/495.0MB Free OO MENUm → Application → Media Play (USB) → ENTERE E Enter e Exit ¦¦ Connecting a USB Device 1. Turn on your TV. USB TV Rear Panel 2. Connect a USB device containing photo and/or music files to the USB jack on the rear of the TV. USB Drive Photo 3.
Advanced Features USB xx MSC supports MP3 and JPEG files, and the PTP device supports JPEG files only. xx MTP (Media Transfer Protocol) is not supported. xx The playing duration of an mp3 file may be displayed as “00:00:00” if its playing time information is not found at the start of the file. xx The higher the resolution of the image, the longer it takes to display on the screen. xx The Photo or Music List displays up to 300 folders or files.
USB Photo Music Setup Photo Using the MP3 List DSC_0558.JPG 580 * 440 78.0KB File.....jpg File.....jpg File.....jpg Music File.....jpg File.....jpg File.....jpg File.....jpg File.....jpg File.....jpg File.....jpg 03 / 14 Folder icon Music list icon Photo File.....jpg SUM 307.2MB/973.7MB File.....jpg SUM 307.2MB/973.7MB SUM 307.2MB/973.7MB File.....jpg Move to the previous folder stage icon ✎✎The selected file is displayed on the top with its playing time.
Music 4.3MB 2 / 31 01-The Way.mp3 00:03:25 02-Run To Me.mp3 00:03:25 03-No More Sad Songs.mp3 00:03:25 04-Interference-gold.mp3 Advanced Features SUM 307.2MB/973.7MB 00:03:25 05-marketa_irglova-The_hill.mp3 00:03:25 06-I Will Carry You.mp3 00:03:25 07-marketa_irglova.mp3 00:03:25 08-Super World.mp3 00:03:25 Setup Using the Setup Menu ■■ Slide Show Speed: Select to control the slide show speed. You can select Fast, Normal or Slow.
Other Information Installing the Wall Mount Kit The wall mount kit (sold separately) allows you to mount the TV on the wall. For detailed information on installing the wall mount, see the instructions provided with the wall mount items. Contact a technician for assistance when installing the wall mount bracket. Samsung Electronics is not responsible for any damage to the product or injury to yourself or others if you elect to install the TV on your own.
Other Information Securing the TV to the Wall (LN32C350 Only) Caution: Pulling, pushing, or climbing on the TV may cause the TV to fall. In particular, ensure your children do not hang over or destabilize the TV. Doing so may cause the TV to tip over, causing serious injuries or death. Follow all safety precautions provided in the Safety Flyer included with your TV. For added stability and safety, you can purchase and install the anti-fall device as described below.
Caution: Pulling, pushing, or climbing onto the TV may cause the TV to fall. In particular, ensure that your children do not hang over or destabilize the TV; doing so may cause the TV to tip over, resulting in serious injuries or death. Follow all safety precautions provided on the included Safety Flyer. For added stability, install the anti-fall device for safety purposes, as follows.
Other Information Troubleshooting If the TV seems to have a problem, first try this list of possible problems and solutions. If none of these troubleshooting tips apply, visit samsung.com, then click on Support, or call Samsung customer service at 1-800-SAMSUNG. Issues Solutions and Explanations Poor picture First of all, please perform the Picture Test and confirm that your TV is properly displaying the test image. • go to MENU - Support - Self Diagnosis - Picture Test (P.
Solutions and Explanations 05 Other Information Issues No Picture, No Video The TV will not turn on. • Make sure the AC power cord is securely plugged into to the wall outlet and the TV. • Make sure the wall outlet is working. • Try pressing the POWER button on the TV to make sure the problem is not the remote. If the TV turns on, refer to ‘Remote control does not work’ below. • Ensure the Sleep Timer is set to Off in the Setup menu. (P.
Other Information Solutions and Explanations Issues Others The cable/set top box remote control does not turn the TV on or off, or adjust the volume. • Program the Cable/Sat remote control to operate the TV. Refer to the Cable/Sat user manual for SAMSUNG TV code. A “Mode Not Supported” message appears. • Check the supported resolution of the TV and adjust the external device’s output resolution accordingly. Refer to resolution settings in this manual. Caption on TV menu is greyed out.
Display Resolution 05 Other Information Specifications 1360 x768 Environmental Considerations Operating Temperature Operating Humidity Storage Temperature Storage Humidity 50°F to 104°F (10°C to 40°C) 10% to 80%, non-condensing -4°F to 113°F (-20°C to 45°C ) 5% to 95%, non-condensing Model Name LN26C350 LN32C350 Screen Size (Diagonal) 26 inches (26.0 inches measured diagonally) 32 inches (31.5 inches measured diagonally) 5WX2 5WX2 26.5 X 2.6 X 18 inches (673.3 X 65.6 X 456.0 (mm)) 26.5 X 8.
Other Information Dimensions ■■ Front view / side view 7 1 2 5 3 6 8 4 (Unit: inches) 265 Model name 1 2 3 4 8 26.5 22.7 12.8 17.2 18 26 20.2 7 LN26C350 2.6 8.7 LN32C350 31.3 27.5 15.5 18.3 20.7 23 2.6 9.7 6 ■■ Jack panel detail (5.2"H x 6.6"W) / rear view 26inches 32inches 5 5 6 1 26 32 132 4 2 2 3 6 4 3 (Unit: inches) Model name 1 2 3 4 5 6 LN26C350 13.8 17.1 0.3 3.4 7.9 3.9 LN32C350 16.6 19.5 0.3 5.8 7.9 7.
A Antenna Audio out Auto Adjustment Auto Program H 7 9 14 12 16 C Cables Caption Clear Scrambled Channel Clear Voice Component Composite 9 17 9, 10 14 20 16 16 F FAV.