Contact SAMSUNG WORLDWIDE If you have any questions or comments relating to Samsung products, please contact the SAMSUNG customer care center. Comment contacter Samsung dans le monde Si vous avez des suggestions ou des questions concernant les produits Samsung, veuillez contacter le Service Consommateurs Samsung. Country Customer Care Center Web Site CANADA 1-800-SAMSUNG(726-7864) www.samsung.com/ca U.S.A 1-800-SAMSUNG(726-7864) www.samsung.com/us Address Samsung Electronics Canada Inc.
❑ Important Warranty Information Regarding Television Format Viewing N See the warranty card for more information on warranty terms. Wide screen format LCD Displays (16:9, the aspect ratio of the screen width to height) are primarily designed to view wide screen format full-motion video. The images displayed on them should primarily be in the wide screen 16:9 ratio format, or expanded to fill the screen if your model offers this feature and the images are constantly moving.
Media Play (USB) Setting up Your TV ■ List of Features................................................................................... 2 ■ Accessories........................................................................................ 2 ■ Viewing the Control Panel.................................................................. 3 ■ Viewing the Remote Control............................................................... 4 ■ Installing Batteries in the Remote Control.................................
Setting up Your TV To use your TV, you first have to set it up to suit your environment. N Figures and illustrations in this User Manual are provided for reference only and may differ from actual product appearance. Product design and specifications may be changed without notice in order to enhance product performance. ¦ List of Features ● ● ● ● ● ● ● ● Adjustable picture settings that can be stored in the TV’s memory. Automatic timer to turn the TV on and off. A special sleep timer.
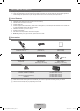
¦ Viewing the Control Panel N The product color and shape may vary depending on the model. N The front panel buttons can be activated by touching them with your finger. LN40B610, LN46B610, LN52B610 6 5 4 3 2 1 7 8 8 LN32B640 6 5 4 3 2 1 7 8 8 1 P (POWER): Press to turn the TV on and off. 2 POWER INDICATOR: Blinks and turns off when the power is on and lights up in stand-by mode. 3 z: Press to change channels.
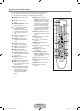
¦ Viewing the Remote Control N You can use the remote control up to a distance of about 23 feet from the TV. N The performance of the remote control may be affected by bright light. N The product color and shape may vary depending on the model. 1 POWER : Turns the TV on and off. 2 TV : Selects the TV mode directly. 3 NUMERIC BUTTONS : Press to change the channel. 4 _: Press to select additional channels (digital) being broadcast by the same station.
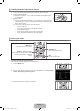
¦ Installing Batteries in the Remote Control 1. Lift the cover at the back of the remote control upward as shown in the figure. 2. Install two AAA size batteries. N Make sure to match the ‘+’ and ‘–’ ends of the batteries with the diagram inside the compartment. 3. Replace the cover. N Remove the batteries and store them in a cool, dry place if you won’t be using the remote control for a long time. (Assuming typical TV usage, the batteries should last for about one year.
4. Then press the ENTERE button to access the icon’s sub-menu. 6. Press the ◄ or ► button to decrease or increase the value of a particular item. The adjustment OSD may differ depending on the selected menu. Mode Picture 5. Press the ▲ or ▼ button to select the icon’s submenu. : Standard Backlight :7 Contrast Brightness Sharpness Color Tint (G/R) Advanced Settings Picture Options : 95 : 45 : 50 : 50 : G50/R50 ▲ Backlight ▼ ▶ 7 U Move L Adjust E Enter R Return Help icon 7.
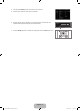
¦ Plug & Play Feature When the TV is initially powered on, basic settings proceed automatically and subsequently. 1. Press the POWERP button on the remote control. N You can also use the POWERP button on the TV. N The message Select Language of the OSD. is displayed. 2. Press the ENTERE button. Press the ▲ or ▼ button to select the language, then press the ENTERE button. The message Select ‘Home Use’ when installing this TV in your home. is displayed. Plug & Play Select Language of the OSD. 3.
Connections ¦ Connecting VHF and UHF Antennas If your antenna has a set of leads that look like the diagram to the right, see ‘Antennas with 300 Ω Flat Twin Leads’ below. If your antenna has one lead that looks like the diagram to the right, see ‘Antennas with 75 Ω Round Leads’. If you have two antennas, see ‘Separate VHF and UHF Antennas’.
¦ Connecting Cable TV To connect to a cable TV system, follow the instructions below. ANT IN Cable without a Cable Box Plug the incoming cable into the ANT IN terminal on the back of the TV. N Because this TV is cable-ready, you do not need a cable box to view unscrambled cable channels. Connecting to a Cable Box that Descrambles All Channels 1. Find the cable that is connected to the ANT OUT terminal on your cable box. N This terminal might be labeled ‘ANT OUT’, ‘VHF OUT’ or simply, ‘OUT’.
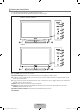
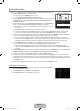
¦ Viewing the Connection Panel N The product color and shape may vary depending on the model. Rear Panel 1 3 or 2 Cable Television Network or 1 POWER INPUT Connects the supplied power cord. N The location of the POWER INPUT may be different depending on its model. 2 HDMI IN 1(DVI), 2, 3 / DVI AUDIO IN [R-AUDIO-L] Connects to the HDMI jack of a device with an HDMI output. N No sound connection is needed for an HDMI to HDMI connection.
6 7 4 R W R B G or R W Y 5 4 KENSINGTON LOCK The Kensington Lock (optional) is a device used to physically fix the system when used in a public place. If you want to use a locking device, contact the dealer where you purchased the TV. N The location of the Kensington Lock may be different depending on its model. 5 COMPONENT IN 1, 2 / AV IN 1 Connects Component video / audio. The COMPONENT IN 1 jack is also used as the AV IN 1 jack.
8 9 8 EX-LINK Connector for service only. 9 AUDIO OUT Connects to the audio input jacks on your Amplifier/Home theater. N When an audio amplifier is connected to the AUDIO OUT [R-AUDIO-L] jacks: Decrease the volume of the TV and adjust the volume level with the Amplifier’s volume control. Side Panel For devices frequently connected/disconnected from your TV, it is convenient to use the jacks on the side of your TV (e.g. Camcorder).
CHANNEL You can configure various settings for your TV channels with features such as Auto Program, Favorite Channels, and Signal Strength. ¦ Channel Menu ❑ Antenna → Air / Cable ❑ Auto Program ■ Channel Before your television can begin memorizing the available channels, you must specify the type of signal source that is connected to the TV (i.e. an Air or a Cable system). T Press the TOOLS button to display the Tools menu.
¦ Managing Channels ■ All Channels Shows all currently available channels. ■ Added Channels Shows all added channels. Added Channels Using this menu, you can add / delete or set favorite channels and use the program guide for digital broadcasts. Air 2 Air 4 Air 4-2 8 13 13-1 Antenna TV #8 Air Air * TV #3 * Zoom Alice’s Adventures in Wonderland Select T Tools ■ Favorite Shows all favorite channels. O To select the favorite channels you have set up, press the FAV.
■ Add to Favorite / Delete from Favorite You can set channels you watch frequently as Favorite. T Press the TOOLS button to display the Tools menu. You can also set the add to (or delete from) Favorites by selecting Tools → Add to Favorite (or Delete from Favorite). N The ‘*’ symbol will be displayed and the channel will be set as a favorite. N All favorite channels will be shown on Favorite menu.
PICTURE You can configure various picture options such as the picture mode, aspect ratio, and color to suit your personal preferences. ¦ Configuring the Picture Menu ❑ Mode You can select the type of picture which best corresponds to your viewing requirements. Dynamic Selects the picture for increased definition in a bright room. ■ Standard Selects the picture for the optimum display in a normal environment. ■ Natural Selects the picture for an optimum and eye-comfortable display.
■ Dynamic Contrast → Off / Low / Medium / High You can adjust the screen contrast so that the optimal contrast is provided. ■ Gamma You can adjust the primary color (red, green, blue) intensity. ■ Color Space Color space is a color matrix composed of red, green and blue colors. Select your favorite color space to experience the most natural color. ● Auto: Auto color space automatically adjusts to the most natural color tone based on program sources.
❑ Picture Options N In PC mode, you can only make changes to the Color Tone and Size from among the items in Picture Options. ■ ■ Color Tone → Cool / Normal / Warm1 / Warm2 / Warm3 N Warm1, Warm2 or Warm3 is only activated when the picture mode is Movie. N Settings can be adjusted and stored for each external device you have connected to an input of the TV.
■ Digital NR → Off / Low / Medium / High / Auto If the broadcast signal received by your TV is weak, you can activate the Digital Noise Reduction feature to help reduce any static and ghosting that may appear on the screen. N When the signal is weak, select one of the other options until the best picture is displayed. ■ HDMI Black Level → Normal / Low You can select the black level on the screen to adjust the screen depth.
¦ Using Your TV as a Computer (PC) Display Setting Up Your PC Software (Based on Windows XP) The Windows display-settings for a typical computer are shown below. The actual screens on your PC will probably be different, depending upon your particular version of Windows and your particular video card. However, even if your actual screens look different, the same basic set-up information will apply in almost all cases. (If not, contact your computer manufacturer or Samsung Dealer.) 1.
¦ Setting up the TV with your PC N Preset: Press the SOURCE button to select PC mode. ❑ Auto Adjustment Brightness Sharpness Picture Use the Auto Adjust function to have the TV automatically adjust the video signals it receives. The function also automatically fine-tunes the settings and adjusts the frequency values and positions. T Press the TOOLS button to display the Tools menu. You can also set the Auto Adjustment by selecting Tools → Auto Adjustment.
SOUND You can configure the sound mode, volume, multi-track sound options, etc. ¦ Configuring the Sound Menu ❑ Mode → Standard / Music / Movie / Clear Voice / Custom Sound T Press the TOOLS button to display the Tools menu. You can also set the sound mode by selecting Tools → Sound Mode. ● Standard: Selects the normal sound mode. ● Music: Emphasizes music over voices. ● Movie: Provides the best sound for movies. ● Clear Voice: Emphasizes voice over other sounds.
❑ Auto Volume → Off / On Each broadcasting station has its own signal conditions, and so it is not easy to adjust the volume every time the channel is changed. This feature lets you automatically adjust the volume of the desired channel by lowering the sound output when the modulation signal is high or by raising the sound output when the modulation signal is low.
SETUP You can set up additional functions. ¦ Configuring the Setup Menu ❑ Language Plug & Play Setup You can set the menu language. ❑ Time For detailed procedures on setting up options, refer to the ‘Setting the Time’ instructions.
■ V-Chip Lock → Off / On You can block rated TV Programs. ■ TV Parental Guidelines You can block TV programs depending on their rating. This function allows you to control what TV Parental Guidelines your children are watching. ALL FV V S L D Allow All ● TV-Y: Young children / TV-Y7: Children 7 and over / TV-G: General audience / TV-PG: TV-Y Block All TV-Y7 Parental guidance / TV-14: Viewers 14 and over / TV-MA: Mature audience TV-G ● ALL: Lock all TV ratings.
■ The number of all rating information Downloadable U.S. Rating The number of current rating information Parental restriction information can be used while watching DTV channels Rating title N If information is not downloaded from the broadcasting station, the Downloadable U.S. Downloadable U.S. Rating rating menu is deactivated. Humor Level ► 1/2 N Parental restriction information is automatically downloaded while watching DTV Allow All DH channels. It may take several seconds.
● ● N N N N N Background Opacity: This option consists of Default, Transparent, Translucent, Solid and Flashing. You can change the background opacity of the caption. Return to Default: This option sets each of Size, Font Style, Foreground Color, Background Color, Foreground Opacity and Background Opacity to its default. Digital Caption Options are available only when Default and Service1 ~ Service6 can be selected in Caption Mode. The availability of captions depends on the program being broadcast.
❑ Sleep Timer The sleep timer automatically shuts off the TV after a preset time (30, 60, 90, 120, 150 and 180 minutes). T Press the TOOLS button to display the Tools menu. You can also set the sleep timer by selecting Tools → Sleep Timer. N To cancel the Sleep Timer function, select Off.
INPUT / SUPPORT ¦ Input Menu ❑ Source List ■ TV / AV1 / AV2 / Component1 / Component2 / PC / HDMI1/DVI / HDMI2 / HDMI / HDMI4 / USB N You can choose only those external devices that are connected to the TV. In the Source List, connected inputs will be highlighted and sorted to the top. Inputs that are not connected will be sorted to the bottom. N PC always stays activated. N Using the color buttons on the remote with the Source list Red (Refresh): Refreshes the connected external devices.
■ Sound Test If you think you have a sound problem, please perform the sound test. You can check the sound by playing a built-in melody sound through the TV. N If you hear no sound from the TV’s speakers, before performing the sound test, make sure Speaker Select is set to TV speaker in the Sound menu. N The melody will be heard during the test even if Speaker Select is set to External Speaker or the sound is muted by pressing the MUTE button.
Media Play (USB) ¦ Connecting a USB Device 1. Press the POWER button to turn the TV on. TV Side Panel 2. Connect a USB device containing photo or music files to the USB jack on the side of the TV. 3. When the Application selection screen is displayed, press the ENTERE button to select Media Play (USB). USB Drive N MTP (Media Transfer Protocol) is not supported. N The file system supports FAT16, FAT32 and NTFS. N Certain types of USB Digital camera and audio devices may not be compatible with this TV.
Using the Remote Control Button in Media Play Menu Button ▲/▼/◄/► ENTERE ∂/∑ RETURN TOOLS ∫ π/μ INFO MEDIA.P z, EXIT, TV Operations Move the cursor and select an item. Select the currently selected item. While playing a slide show or music file: - Pressing the ENTERE button during play pauses the play. - Pressing the ENTERE button during pause resumes the play. Play or pause the Slide Show or music. Return to the previous menu. Run various functions from the Photo and Music menus.
Removing a USB Memory Device Safely You can remove the device safely from the TV. Color Folder 1. Press the TOOLS button in the Media Play file list screen, or while a Slide Show or music is being played. 2. Press the ▲ or ▼ button to select Safe Remove, then press the ENTERE button. 3. Remove the USB device from the TV. 5/15 1231.jpg SUM Screen Display Color Folder Preference 1 Basic View Preference 1232.jpg 1233.jpg Device 1234.
¦ Sorting the Photo List You can sort photos in the Photo List by a particular standard. Color 1. Press the MEDIA.P button. Folder Preference Basic View Timeline 2. Press the ◄ or ► button to select Photo, then press the ENTERE button. 5/15 3. Press the ▲ button to move to the Sort key Section. 4. Press the ◄ or ► button to select a sorting standard. (Basic View, Timeline, Color, Folder, Preference) N The photos are sorted according to the newly selected sorting standard. 1231.jpg 1232.jpg 1233.
¦ Photo List Option Menu 1. Press the MEDIA.P button. Basic View 2. Press the ◄ or ► button to select Photo, then press the ENTERE button. 3. Press the ◄ or ► button to select the desired photo file. N Selecting Multiple Photos Press the ◄ or ► button to select the desired photo file. Then press the Yellow button. Repeat the above operation to select multiple photo files. The mark c appears to the selected photo file. 4. Press the TOOLS button.
¦ Viewing a Photo or Slide Show Viewing a Slide Show 1. Press the ▼ button to select the File List Section. Color Folder 2. Press the TOOLS button. 3. Press the ▲ or ▼ button to select Slide Show, then press the ENTERE button. N All files in the File List Section will be used for the Slide Show. N During the slide show, files are displayed in order from the currently shown file. N The Slide Show progresses in the order sorted in the File List Section.
To perform a Slide Show with only the selected files 1. Press the ▼ button to select the File List Section. 2. Press the ◄ or ► button to select the desired photo in the File List Section. 3. Press the Yellow button. 4. Repeat the above operation to select multiple photos. N The c mark appears to the left of the selected photo. N If you select one file, the Slide Show will not be performed. N To deselect all selected files, press the TOOLS button and select Deselect All. 5. Press the ∂ (Play)/ENTERE button.
❑ Zoom You can magnify photos saved on a USB memory device. (x1 → x2 → x4) N To move the enlarged photo image, press the ENTERE button, then press the ▲/▼/◄/► buttons. Note that when the enlarged picture is smaller than the original screen size, the location change function doesn’t work. N The enlarged file is not saved. ❑ Background Music You can select background music when watching a Slide Show. N To use this feature, there must be music and photo files stored on the USB device.
¦ Sorting the Music List You can sort music files in the Music List by a particular standard. Genre 1. Press the MEDIA.P button. Folder Preference Basic View Title 2. Press the ◄ or ► button to select Music, then press the ENTERE button. Energetic 3. Press the ▲ button to move to the Sort key Section. 4. Press the ◄ or ► button to select a sorting standard. (Basic View, Title, Artist, Mood, Genre, Folder, Preference) N The Music files are sorted according to the newly selected sorting standard.
¦ Music List Option Menu 1. Press the MEDIA.P button. 2. Press the ◄ or ► button to select Music, then press the ENTERE button. 3. Press the ◄ or ► button to select the desired Music file. N Selecting Multiple Music Files Press the◄ or ► button to select the desired music file. Then press the Yellow button. Repeat the above operation to select multiple music files. The mark c appears to the selected music file. 4. Press the TOOLS button. N The option menu changes according to the current status.
¦ Playing Music Playing a music file 1. Press the ▼ button to select the File List Section. ▶ 00:00:04 / 00:04:04 3/37 2. Press the ◄ or ► button to select a music file to be played. Way I Love You HaHaHa 3. Press the ∂ (Play)/ENTERE button. N This menu only shows files with the MP3 file extension. Files with other file extensions are not displayed, even if they are saved on the same USB device.
¦ Music Play option Menu Music Play Option Menu Tools ❑ Repeat Mode → On / Off Repeat Mode ◀ On ▶ Picture Setting You can play music files repeatedly. Sound Setting Information Safe Remove ❑ Picture Setting / Sound Setting You can configure the picture and sound settings. U Move L Adjust e Exit ❑ Information The music file information is displayed. ❑ Safe Remove You can remove the device safely from the TV.
ANYNET+ ¦ Connecting Anynet+ Devices What is Anynet+? Anynet+ is a function that enables you to control all connected Samsung devices that support Anynet+ with your Samsung TV’s remote. The Anynet+ system can be used only with Samsung devices that have the Anynet+ feature. To be sure your Samsung device has this feature, check if there is an Anynet+ logo on it. To connect to a TV Anynet+ Device 1 TV Anynet+ Device 2 Anynet+ Device Anynet+ Device 4 HDMI 1. Cable HDMI 1. Cable HDMI 1.
¦ Setting Up Anynet+ Media Play (USB) Application T Press the TOOLS button to display the Tools menu. You can also display Anynet+ menu by selecting Tools → Anynet+ (HDMI-CEC). Anynet+ (HDMI-CEC) ❑ Setup ■ ■ Anynet+ (HDMI-CEC) → Off / On To use the Anynet+ Function, Anynet+ (HDMI-CEC) must be set to On. N When the Anynet+ (HDMI-CEC) function is disabled, all the Anynet+ related operations are deactivated.
TV Remote Control Buttons Available in Anynet+ Mode Device Type Operating Status Available Buttons Anynet+ Device After switching to the device, when the menu of the corresponding device is displayed on the screen.
¦ Troubleshooting for Anynet+ Problem Anynet+ does not work. ● ● ● ● ● ● ● ● ● I want to start Anynet+. ● ● ● I want to exit Anynet+. ● ● ● The message ‘Connecting to Anynet+ device...’ appears on the screen. The Anynet+ device does not play. The connected device is not displayed. ● ● ● ● Check whether or not the device supports Anynet+ functions. Check whether or not the HDMI 1.3 cable is properly connected. Check whether Anynet+ (HDMI-CEC) is set to On in the Anynet+ setup menu.
RECOMMENDATIONS ¦ Troubleshooting If the TV seems to have a problem, first try this list of possible problems and solutions. If none of these troubleshooting tips apply, call Samsung customer service at 1-800-SAMSUNG. Problem Possible Solution Poor picture. Try another channel. / Adjust the antenna. / Check all wire connections. Poor sound quality. Try another channel. / Adjust the antenna. No picture or sound. Try another channel. / Press the SOURCE button. Make sure the TV is plugged in.
Problem Possible Solution Image is not stable and may appear to vibrate when you have a computer connected to the PC input. If the setting is not correct, use your computer utility program to change the display settings. Your TV supports multiscan display functions within the following frequency domain: - Horizontal frequency (KHz): 30~60 - Vertical frequency (Hz): 60~75 - PC Maximum refresh rate (at 60 Hz): 1920 x 1080 Image is not centered on the screen. Adjust the horizontal and vertical position.
¦ Assembling the Cables Enclose the cables in the Holder-Wire Cable so that the cables are not visible through the transparent stand. N The product color and shape may vary depending on the model. ¦ Wall Mount Kit Specifications (VESA) Install your wall mount on a solid wall perpendicular to the floor. When attaching to other building materials, please contact your nearest dealer. If installed on a ceiling or slanted wall, it may fall and result in severe personal injury.
¦ Anti-Theft Kensington Lock N The product color and shape may vary depending on the model. The Kensington Lock is a device used to physically fix the system when using it in a public place. The appearance and locking method may differ from the illustration depending on the manufacturer. Refer to the manual provided with the Kensington Lock for proper use. N The locking device has to be purchased separately. N The location of the Kensington Lock may depending on its model. 3 2 1 1.
¦ Securing the TV to a Wall or Cabinet N The product color and shape may vary depending on the model. [ Caution: Pulling, pushing, or climbing on the TV may cause the TV to fall. In particular, ensure your children do not hang over or destabilize the TV; doing so may cause the TV to tip over, causing serious injuries or death. Follow all safety precautions provided on the included Safety Flyer. For added stability, install the anti-fall device for safety purposes, as follows.
¦ Specifications Model Name LN40B610 Screen Size (Diagonal) 40 inches (40.0 inches measured diagonally) PC Resolution (Optimum) 1920 x 1080 @ 60 Hz Sound (Output) Dimensions (WxDxH) Body With stand 10W x 2 39.3 x 3.1 x 25.1 (inch) / 998.0 x 79.3 x 638.0 (mm) 39.3 x 10.0 x 27.5 (inch) / 998.0 x 255.0 x 699.0 (mm) Weight Without Stand With Stand 32.6 lbs / 14.8 Kg 44.1 lbs / 20.
Model Name LN52B610 Screen Size (Diagonal) 52 inches (52.0 inches measured diagonally) PC Resolution (Optimum) 1920 x 1080 @ 60 Hz Sound (Output) Dimensions (WxDxH) Body With stand 10W x 2 50.2 x 3.2 x 31.7 (inch) / 1276.0 x 80.6 x 805.7 (mm) 50.2 x 12.0 x 34.1 (inch) / 1276.0 x 305.5 x 866.7 (mm) Weight Without Stand With Stand 57.3 lbs / 26.0 Kg 68.8 lbs / 31.
¦ Dimensions LN40B610 TOP VIEW JACK PANEL DETAIL 5.2"H X 6.6"W 3.1 39.3 34.8 25.1 19.6 27.5 10.0 20.4 FRONT VIEW / SIDE VIEW 7.9 (200 mm) 7.9 (200 mm) REAR VIEW NOTE: All drawings are not necessarily to scale. Some dimensions are subject to change without prior notice. Refer to the dimensions prior to performing installation of your TV. Not responsible for typographical or printed errors. © 2009 Samsung Electronics America, Inc English - 54 [610-NA]BN68-01900B-Eng.
LN46B610 TOP VIEW JACK PANEL DETAIL 5.2"H X 6.6"W 3.1 44.5 40.0 28.1 22.5 30.6 10.8 21.7 FRONT VIEW / SIDE VIEW 15.7 (400 mm) 15.7 (400 mm) REAR VIEW NOTE: All drawings are not necessarily to scale. Some dimensions are subject to change without prior notice. Refer to the dimensions prior to performing installation of your TV. Not responsible for typographical or printed errors. © 2009 Samsung Electronics America, Inc English - 55 [610-NA]BN68-01900B-Eng.
LN52B610 TOP VIEW JACK PANEL DETAIL 5.2"H X 6.6"W 3.2 50.2 45.5 31.7 25.7 34.1 12.0 21.7 FRONT VIEW / SIDE VIEW 15.7 (400 mm) 15.7 (400 mm) REAR VIEW NOTE: All drawings are not necessarily to scale. Some dimensions are subject to change without prior notice. Refer to the dimensions prior to performing installation of your TV. Not responsible for typographical or printed errors. © 2009 Samsung Electronics America, Inc English - 56 [610-NA]BN68-01900B-Eng.
LN32B640 TOP VIEW JACK PANEL DETAIL 5.2"H X 6.6"W 3.1 32.5 27.5 20.9 15.5 23.3 9.4 17.5 FRONT VIEW / SIDE VIEW 7.9 (200 mm) 7.9 (200 mm) REAR VIEW NOTE: All drawings are not necessarily to scale. Some dimensions are subject to change without prior notice. Refer to the dimensions prior to performing installation of your TV. Not responsible for typographical or printed errors. © 2009 Samsung Electronics America, Inc English - 57 [610-NA]BN68-01900B-Eng.
● This product uses parts of the software from the Independent JPEG Group. ● This product uses parts of the software owned by the Freetype Project (www.freetype.org). ● This product uses some software programs which are distributed under the GPL/LGPL license. Accordingly, the following GPL and LGPL software source codes that have been used in this product can be provided after asking to vdswmanager@ samsung.com.
1. 2. 3. 4. 5. To “convey” a work means any kind of propagation that enables other parties to make or receive copies. Mere interaction with a user through a computer network, with no transfer of a copy, is not conveying.
– c) You must license the entire work, as a whole, under this License to anyone who comes into possession of a copy. This License will therefore apply, along with any applicable section 7 additional terms, to the whole of the work, and all its parts, regardless of how they are packaged. This License gives no permission to license the work in any other way, but it does not invalidate such permission if you have separately received it.
8. 9. 10. 11. When you convey a copy of a covered work, you may at your option remove any additional permissions from that copy, or from any part of it. (Additional permissions may be written to require their own removal in certain cases when you modify the work.) You may place additional permissions on material, added by you to a covered work, for which you have or can give appropriate copyright permission.
12. 13. 14. 15. 16. Each contributor grants you a non-exclusive, worldwide, royalty-free patent license under the contributor’s essential patent claims, to make, use, sell, offer for sale, import and otherwise run, modify and propagate the contents of its contributor version.
17. Interpretation of Sections 15 and 16. If the disclaimer of warranty and limitation of liability provided above cannot be given local legal effect according to their terms, reviewing courts shall apply local law that most closely approximates an absolute waiver of all civil liability in connection with the Program, unless a warranty or assumption of liability accompanies a copy of the Program in return for a fee.
¦ GNU Lesser General Public License (LGPL) Version 3, 29 June 2007 Copyright (C) 2007 Free Software Foundation, Inc. Everyone is permitted to copy and distribute verbatim copies of this license document, but changing it is not allowed. Preamble The GNU General Public License is a free, copyleft license for software and other kinds of works. The licenses for most software and other practical works are designed to take away your freedom to share and change the works.
1. Source Code. The “source code” for a work means the preferred form of the work for making modifications to it. “Object code” means any non-source form of a work. A “Standard Interface” means an interface that either is an official standard defined by a recognized standards body, or, in the case of interfaces specified for a particular programming language, one that is widely used among developers working in that language.
A compilation of a covered work with other separate and independent works, which are not by their nature extensions of the covered work, and which are not combined with it such as to form a larger program, in or on a volume of a storage or distribution medium, is called an “aggregate” if the compilation and its resulting copyright are not used to limit the access or legal rights of the compilation’s users beyond what the individual works permit.
8. 9. 10. 11.
12. 13. 14. 15. 16. 17.
¦ END OF TERMS AND CONDITIONS How to Apply These Terms to Your New Programs If you develop a new program, and you want it to be of the greatest possible use to the public, the best way to achieve this is to make it free software which everyone can redistribute and change under these terms. To do so, attach the following notices to the program.
¦ LICENSE ISSUES The OpenSSL toolkit stays under a dual license, i.e. both the conditions of the OpenSSL License and the original SSLeay license apply to the toolkit. See below for the actual license texts. Actually both licenses are BSD-style Open Source licenses. In case of any license issues related to OpenSSL please contact openssl-core@openssl.org. OpenSSL License Copyright (c) 1998-2007 The OpenSSL Project. All rights reserved.
This page is intentionally left blank. [610-NA]BN68-01900B-Eng.
TÉLÉVISEUR ACL Guide de l’utilisateur Imaginez les possibilités Merci d’avoir acheté un produit Samsung. Pour obtenir un service complet, veuillez enregistrer votre produit à: www.samsung.com/register Modèle [610-canada]BN68-02089C-Fre.
❑ Remarques importantes sur la garantie relative au format de l'image du téléviseur N Voir le bon de garantie pour avoir plus d'information sur les conditions de garantie. Le format écran large des écrans ACL (16:9, soit le rapport hauteur/largeur de l’image) est conçu principalement pour les vidéos plein écran à écran large.
Table des matières Media Play (USB) Configuration de votre téléviseur ■ Liste des caractéristiques................................................................... 2 ■ Accessoires........................................................................................ 2 ■ Affichage du panneau de configuration.............................................. 3 ■ Affichage de la télécommande........................................................... 4 ■ Insertion des piles dans la télécommande.................
Configuration de votre téléviseur Pour utiliser votre téléviseur, vous devez d'abord le configurer en fonction de votre environnement. N Les figures et illustrations de ce guide de l'utilisateur ne sont fournies qu’à titre de référence. Elles peuvent différer du produit réel. La conception et les caractéristiques techniques du produit peuvent être modifiées sans préavis afin d’en améliorer la performance.
¦ Affichage du panneau de configuration N La couleur et la forme du produit peuvent varier en fonction du modèle. N Les touches du panneau avant s'activent par effleurement. LN40B610, LN46B610, LN52B610 6 5 4 3 2 1 7 8 8 LN32B640 6 5 4 3 2 1 7 8 8 1 P (ALIMENTATION): Appuyez sur cette touche pour mettre le téléviseur sous tension et hors tension. 2 TÉMOIN D’ALIMENTATION: Clignote puis s’arrête lorsque le téléviseur est allumé. S’allume en mode de veille.
¦ Affichage de la télécommande N Vous pouvez utiliser la télécommande à une distance maximale du téléviseur d’environ 7 m. N Une lumière intense peut affecter le bon fonctionnement de la télécommande. N La couleur et la forme du produit peuvent varier en fonction du modèle. 1 POWER : Permet de mettre le téléviseur sous tension et hors tension. 2 TV : Permet de sélectionner directement le mode TV. 3 TOUCHES NUMÉRIQUES : Ces touches servent à changer de canal.
¦ Insertion des piles dans la télécommande 1. Soulevez le couvercle à l'arrière de la télécommande, tel qu'illustré. 2. Insérez deux piles AAA dans la télécommande. N Assurez-vous de faire correspondre les pôles + et – des piles avec le schéma situé dans le compartiment. 3. Replacez le couvercle. N Retirez les piles et rangez-les dans un endroit frais et sec si vous n’utilisez pas la télécommande pendant une longue période.
4. Ensuite, appuyez sur ENTERE pour accéder au sous-menu de l'icône. 6. Appuyez sur la touche ◄ ou ► pour augmenter ou réduire la valeur d’un élément particulier. Le réglage du menu OSD varie en fonction du menu sélectionné. Mode Image 5. Appuyez sur la touche ▲ ou ▼ pour sélectionner le sous-menu de l’icône. : Standard Contre-jour :7 Contraste Luminosité Netteté Couleur Teinte (V/R) Réglages avancés Options d'image : 95 : 45 : 50 : 50 : V50/R50 ▲ Contre-jour ▼ ▶ 7 U Dépl.
¦ Fonction Prêt à I’emploi Au moment de la mise sous tension initiale du téléviseur, les paramètres de base sont automatiquement réglés. D’autres sont réglés en cours d’utilisation. 1. Appuyez sur la touche POWERP de la télécommande. N Vous pouvez également appuyer sur la touche POWERP du téléviseur. N Le message Select Language of the OSD. s'affiche. 2. Appuyez sur ENTERE. Appuyez sur la touche ▲ ou ▼ pour sélectionner la langue, suivie de la touche ENTERE. Le message Choisir « Util.
Connexions ¦ Connexion d'antennes VHF et UHF Si votre antenne comporte un câble semblable à celui de l'illustration de droite, reportez-vous à 'Antennes avec câble bipolaire plat de 300 Ω', ci-dessous. Si votre antenne est dotée d'un câble semblable à celui de l'illustration de droite, reportez-vous à la section 'Antenne équipée de câbles ronds 75 Ω'. Si vous avez deux antennes, voir 'Antennes VHF et UHF séparées'.
¦ Connexion pour la câblodiffusion Pour effectuer le branchement du service de câblodiffusion, procédez comme suit. ANT IN Câble sans câblosélecteur Branchez le câble d'arrivée à la borne ANT IN à l'arrière du téléviseur. N Comme ce téléviseur est doté d'un convertisseur, il est inutile d'ajouter un câblosélecteur pour écouter les canaux débrouillés. Branchement à un câblosélecteur servant à débrouiller tous les canaux 1. Repérez le câble connecté à la prise ANT OUT du câblosélecteur.
¦ Affichage du panneau de branchement N La couleur et la forme du produit peuvent varier en fonction du modèle. Panneau arrière 1 3 ou 2 Réseau de câblodistribution ou 1 ENTRÉE D’ALIMENTATION Sert à brancher le cordon d'alimentation fourni. N Selon le modèle, l’emplacement de l'ENTRÉE D’ALIMENTATION peut être différent. 2 HDMI IN 1(DVI), 2, 3 / DVI AUDIO IN [R-AUDIO-L] À brancher à la prise HDMI d’un appareil doté d’une sortie HDMI. N Aucune connexion audio n'est nécessaire entre deux appareils HDMI.
6 7 4 R W R B G ou R W Y 5 4 VERROU KENSINGTON Le verrou Kensington (en option) est un dispositif servant à immobiliser un appareil dans un endroit public. Si vous souhaitez utiliser un dispositif de verrouillage, communiquez avec le magasin où vous avez acheté le téléviseur. N L'emplacement du verrou Kensington peut varier en fonction du modèle. 5 COMPONENT IN 1, 2 / AV IN 1 À brancher à une composante vidéo/audio.
8 9 8 EX-LINK Connecteur utilisé à des fins de réparation seulement. 9 AUDIO OUT À brancher aux prises d’entrée audio de votre amplificateur/chaîne de cinéma maison. N Lorsqu’un amplificateur audio est branché aux prises de sortie gauche et droite AUDIO OUT [R-AUDIO-L]: Baissez le volume du téléviseur et réglez le volume à l’aide de la commande de volume de l’amplificateur.
Chaîne Vous pouvez configurer divers réglages pour les cannaux du téléviseur grâce aux fonctions telles que Prog. auto, Chaîne favorite et Puissance signal. ¦ Menu des canaux ❑ Antenne → Air / câble Chaîne Avant que votre téléviseur ne puisse commencer à mémoriser les canaux disponibles, vous devez spécifier le type de la source de signal branchée au téléviseur (c'est-à-dire une antenne ou le câble). T Appuyez sur la touche TOOLS pour afficher le menu Outils.
¦ Gestion des canaux ■ Tous les canaux Affiche tous les canaux actuellement accessibles. ■ Canaux ajoutés Affiche tous les canaux ajoutés. Canaux ajoutés Ce menu permet d'ajouter, de supprimer ou définir les canaux favoris et d'utiliser le télé-horaire pour les diffusions numériques. Air 2 Air 4 Air 4-2 8 13 13-1 Antenne TV #8 Air Air * TV #3 * Zoom Alice’s Adventures in Wonderland Choisir T Outils ■ Favori Affiche tous les canaux favoris.
■ Ajouter aux favoris / Effacer des favoris Vous pouvez définir comme favoris les canaux que vous regardez fréquemment. T Appuyez sur la touche TOOLS pour afficher le menu Outils. Il est également possible d'ajouter ou de supprimer des canaux dans la liste des favoris en sélectionnant Outils → Ajouter aux favoris (ou Effacer des favoris). N Le symbole « * » s’affiche et le canal est défini comme canal favori. N Tous les canaux supprimés sont affichés dans le menu Favori.
IMAGE Vous pouvez configurer divers options d'image telles que le mode, le rapport de forme et les couleurs de l’image afin de l’adapter à vos préférences. ¦ Configuration du menu Image ❑ Mode ■ Dynamique Choisit l'image offrant une meilleure définition dans une pièce claire. ■ Standard Choisit la meilleure image possible dans un environnement normal. ■ Naturel Sélectionne une qualité d’image optimale qui réduit la fatigue visuelle. N Naturel n’est pas disponible en mode PC.
■ Contraste dynam. → Off / Basse / Moyen / Haute Vous pouvez régler le constraste de manière à l'optimiser. ■ Gamma Il est possible de régler l'intensité des couleurs primaires (rouge, vert, bleu). ■ Espace couleur L'espace couleur est une matrice composée des couleurs rouge, vert et bleu. Sélectionnez votre espace couleur préféré pour obtenir des couleurs les plus naturelles possibles. ● Auto : Cet espace couleur s'ajuste automatiquement aux nuances naturelles en fonction des sources des programmes.
❑ Options d'image N En mode PC, vous ne pouvez modifier que Nuance coul. et Format dans Options d'image. ■ ■ Nuance coul. → Froide / Normal / Chaude1 / Chaude2 / Chaude3 N Chaude1, Chaude2 ou Chaude3 ne s’activent qu’en mode image Cinéma. N Les réglages peuvent être définis et mémorisés pour chacun des appareils externes branchés à une entrée du téléviseur. Options d'image Nuance coul. : Normal Format : 16:9 Réduct. bruit num. : Auto Nv nr HDMI : Normal Mode Film ▶ : Off Mode bleu seu.
■ Réduct. bruit num. → Off / Basse / Moyen / Haute / Auto Si le signal de diffusion capté par votre téléviseur est faible, vous pouvez activer la fonction de réduction numérique des bruits pour aider à éliminer les parasites et les images fantômes qui apparaissent à l'écran. N Lorsque le signal est faible, sélectionnez une des autres options jusuqu'à ce que la meilleure image soit affichée.
¦ Utilisation du téléviseur comme écran PC Configuration du logiciel sur votre PC (sous Windows XP) Les paramètres d'affichage de Windows pour un ordinateur type sont indiqués ci-dessous. Les fenêtres affichées sur votre PC auront probablement un aspect différent, selon la version de Windows et de la carte vidéo. Toutefois, même si les fenêtres semblent différentes, les mêmes données de configuration de base s’appliquent dans la plupart des cas.
¦ Configuration du téléviseur avec un PC N Préréglage: Appuyez sur la touche SOURCE pour sélectionner le mode PC. ❑ Réglage Auto Luminosité Netteté Image Utilisez la fonction « Réglage Auto » afin que le téléviseur règle automatiquement les signaux vidéo qu'il reçoit. Cette fonction règle également automatiquement les paramètres, les fréquences et les positions. T Appuyez sur la touche TOOLS pour afficher le menu Outils.
Son Vous pouvez choisir les réglages pour le mode sonore, le volume, les options sonores multipistes, etc. ¦ Configuration du menu Son ❑ Mode → Standard / Musique / Cinéma / Voix claire / Personnel Son T Appuyez sur la touche TOOLS pour afficher le menu Outils. Il est également possible de régler le son en choisissant Outils → Son Mode. ● Standard : Choisit le mode sonore normal. ● Musique : Accentue la musique par rapport aux dialogues. ● Cinéma : Offre le meilleur son pour les films.
❑ Volume auto → Off / On Chaque station de diffusion possède son propre type de signal; il n'est donc pas facile de régler le volume chaque fois que l'on change de canal. Cette fonction permet de régler automatiquement le volume de canal désiré en abaissant la sortie de son lorsque le signal de modulation est élevé ou en haussant la sortie de son lorsque le signal de modulation est bas. ❑ Sélect.
CONFIGURATION Vous pouvez régler des fonctions supplémentaires. ¦ Configuration du menu de configuration ❑ Langue Prêt à I’emploi ❑ Heure Pour les procédures détaillées concernant les options de configuration, veuillez consulter les instructions « Réglage de l’horloge ». (voir pages 27~28) ❑ Mode Jeu → Off / On Configuration Vous pouvez régler la langue de menu.
■ Blocage V-Chip → Off / On Vous pouvez bloquer des émissions selon un système de classification. ■ Cont. paren. TV Vous pouvez bloquez des émissions selon leur classification. Cette fonction permet de Cont. paren. TV contrôler ce que vos enfants regardent. ALL FV V S L D Perm. tout ● TV-Y: Jeunes enfants / TV-Y7 : Enfants de plus de 7 ans / TV-G : Tout public/TV-PG : TV-Y Bloq.
■ Nombre de tous les titres de classification Catég. américaine téléchargeable Titre de Il est possible d’utiliser de l’information sur le contrôle parental tout en regardant des canaux classification Nombre de titres de classification actuels numériques. Catég. américaine téléchargeable N Si l’information n’est pas téléchargée à partir de la station de radiodiffusion, le menu Humor Level ► 1/2 Catég. américaine téléchargeable est désactivé. Perm.
● ● N N N N N Opacité arrière-plan: Cette option vous permet de choisir entre Par défaut, Transparent, Translucide, Opaque et Clignotant. Vous pouvez modifier l'opacité de l'arrière-plan des sous-titres. Retour par défaut : Cette option rétablit les paramètres par défaut des fonctions suivantes : Format, Style de police, Couleur d'avant-plan, Couleur d'arrière-plan, Opacité d'avant-plan et Opacité d'arrière-plan.
❑ Mise en veille La mise en veille éteint automatiquement le téléviseur après le délai choisi (30, 60, 90, 120, 150 ou 180 min). T Appuyez sur la touche TOOLS pour afficher le menu Outils. Il est également possible de régler la mise en veille en choisissant Outils → Mise en veille. N Pour désactiver la fonction Mise en veille, sélectionnez Off.
ENTRÉE / SUPPORT TEChNIQUE ¦ Menu Input ❑ Liste source ■ Tv / Av1 / Av2 / Composant1 / Composant2 / PC / hDMI1/DvI / hDMI2 / hDMI / hDMI4 / USB N Vous pouvez sélectionner uniquement les appareils externes déjà branchés au téléviseur. Dans l'option Liste source, les entrées branchées sont en surbrillance et figurent en haut de la liste. Les entrées non branchées figurent au bas de la liste. N L’ordinateur demeure toujours sous tension.
■ Essai de son Si vous croyez qu'il y a un problème de son, effectuez un essai de son. Pour vérifier le son, vous pouvez faire jouer dans le téléviseur une mélodie préenregistrée. N Si les haut-parleurs du téléviseur n'émettent aucun son, assurez-vous que le mode Sélect. le haut-parleur est réglé à Hautparleur TV dans le menu Son. N Vous entendrez la mélodie durant l'essai même si le mode Sélect. le haut-parleur est réglé à Haut-p. externe ou si vous avez coupé le son avec la touche MUTE.
Media Play (USB) ¦ Connecting a USB Device 1. Appuyez sur la touche POWER pour mettre le téléviseur sous tension. 2. Branchez un dispositif USB contenant des photos ou de la musique dans la prise USB, située sur le côté du téléviseur. Panneau latéral du téléviseur 3. Lorsque l’écran de sélection Application s'affiche, appuyez sur la touche ENTERE pour choisir Media Play (USB). Clé USB N Le MTP (protocole de transfert de média) n’est pas pris en charge.
Utilisation des touches de la télécommande dans le menu Media Play Touche ▲/▼/◄/► ENTERE ∂/∑ RETURN TOOLS ∫ π/μ INFO MEDIA.P z, EXIT, TV Fonctions Permet de déplacer le curseur et de choisir un élément. Sélectionnez l’élément en surbrillance. En mode de lecture d’un diaporama ou fichier musical : - Appuyer sur la touche ENTERE pendant la lecture la met en pause. - Appuyer sur la touche ENTERE pendant la pause reprend la lecture. Lire ou interrompre la lecture d’un diaporama ou fichier musical.
Retrait sûr d’un dispositif de mémoire USB Il est possible de retirer le dispositif du téléviseur de façon sûre. 1. Appuyez sur la touche TOOLS pendant l’affichage de la liste des fichiers Media Play, ou pendant la lecture d’un diaporama ou fichier musical. Couleur Dossier P. préf. 2. Appuyez sur la touche ▲ ou ▼ pour choisir Supp. sécurité, puis sur ENTERE. 3. Retirez le dispositif USB du téléviseur. Aff. de base 5/15 1231.jpg SUM 1232.jpg 1233.jpg Appareil 1234.jpg P.
¦ Classement de la liste des photos Il est possible de classer les photos de la liste selon un critère particulier. Couleur 1. Appuyez sur la touche MEDIA.P. Dossier P. préf. Aff. de base P. date 2. Appuyez sur la touche ◄ ou ► pour choisir Photo, puis sur ENTERE. 3. Appuyez sur la touche ▲ pour passer à la section Clé de tri. 4. Appuyez sur la touche ◄ ou ► pour choisir un critère de classement. (Aff. de base, P. date, Couleur, Dossier, P. préf.) N Les photos sont classées selon le nouveau critère.
¦ Options du menu Liste des photos 1. Appuyez sur la touche MEDIA.P. Aff. de base P. date 2. Appuyez sur la touche ◄ ou ► pour choisir Photo, puis sur ENTERE. 3. Appuyez sur la touche ◄ ou ► pour choisir le fichier photo désiré. N Sélection de plusieurs photos Appuyez sur la touche ◄ ou ► pour choisir le fichier photo désiré. Appuyez ensuite sur la touche jaune. Répétez l’étape précédente pour sélectionner plusieurs fichiers photo. Le symbole c s’affiche à côté du fichier photo sélectionné. 4.
¦ Lecture d’une photo ou d’un diaporama Lecture d’un diaporama 1. Appuyez sur la touche ▼ pour sélectionner la section Liste des fichiers. Couleur Dossier 2. Appuyez sur la touche TOOLS. P. préf. 3. Appuyez sur la touche ▲ ou ▼ pour choisir Diaporama, puis sur ENTERE. N Tous les fichiers de la liste des photos feront partie du diaporama. 5/15 1231.jpg N Pendant le diaporama, les fichiers s’affichent dans l’ordre, à partir du fichier affiché.
Lecture d’un diaporama composé des fichiers choisis seulement 1. Appuyez sur la touche ▼ pour sélectionner la section Liste des fichiers. 2. Appuyez sur la touche ◄ ou ► pour choisir la photo désirée dans la section Liste des fichiers. 3. Appuyez sur la touche jaune. 4. Répétez la procédure ci-dessus pour choisir plusieurs photos. N Le symbole cs’affiche à la gauche de la photo choisie. N Un diaporama doit contenir plus d’un fichier.
❑ Zoom Vous pouvez agrandir les photos enregistrées sur un dispositif de mémoire USB. (x1 → x2 → x4) N Pour déplacer la photo agrandie, appuyez sur la touche ENTERE, suivie des touches ▲/▼/◄/►. Remarque : lorsque l’image agrandie est plus petite que sa taille originale à l’écran, le changement d’emplacement ne fonctionne pas. N Le fichier agrandi n’est pas sauvegardé. ❑ Musique de fond Vous pouvez choisir la musique de fond en regardant un diaporama.
¦ Classement de la liste de musique You can sort music files in the Music List by a particular standard. Genre 1. Appuyez sur la touche MEDIA.P. P. préf. Dossier Aff. de base Titre 2. Appuyez sur la touche ◄ ou ► pour choisir Music, puis sur ENTERE. Energetic 3. Appuyez sur la touche ▲ pour passer à la section Clé de tri. 4. Appuyez sur la touche ◄ ou ► pour choisir un critère de classement. (Aff. de base, Titre, P. artis., Ambiance, Genre, Dossier, P. préf.
¦ Options du menu Liste de fichiers musicaux 1. Appuyez sur la touche MEDIA.P. 2. Appuyez sur la touche ◄ ou ► pour choisir Music, puis sur ENTERE. 3. Appuyez sur la touche ◄ ou ► pour sélectionner le fichier musical désiré. N Sélection de plusieurs fichiers musicaux Appuyez sur la touche ◄ ou ► pour choisir le fichier musical désiré. Appuyez ensuite sur la touche jaune. Répéter l’étape précédente pour sélectionner plusieurs fichiers musicaux.
¦ Lecture musicale Lecture d’un fichier musical 1. Appuyez sur la touche ▼ pour sélectionner la section Liste des fichiers. 2. Appuyez sur la touche ◄ ou ► pour sélectionner le fichier musical à lire. ▶ 00:00:04 / 00:04:04 3/37 Way I Love You HaHaHa 3. Appuyez sur la touche ∂ (Lecture)/ENTERE. N Ce menu affiche uniquement les fichiers pourvus d’une extension MP3.
¦ Options du menu Lecture de la musique Options du menu Lecture de la musique Outils ❑ Modo rep. → On / Off Modo rep. ◀ On ▶ Réglage de l'image Vous pouvez lire des fichiers musicaux à répétition. Réglage du son Information Supp. sécurité ❑ Réglage de l'image / Réglage du son Vous pouvez choisir les réglages de l’image et les réglages sonores. U Dépl. L Réglage e Quitter ❑ Information L’information du fichier musical s’affiche. ❑ Supp.
ANyNET+ ¦ Branchement d’appareils Anynet+ Qu’est-ce qu’Anynet+? Anynet+ est une fonction qui permet de contrôler, à l’aide de la télécommande de votre téléviseur Samsung, tous vos appareils Samsung prenant en charge Anynet+. Le système Anynet+ peut être utilisé uniquement avec les appareils Samsung dotés de la fonction Anynet+. Afin de vérifier si votre appareil Samsung est doté de cette fonction, vérifiez s’il arbore le logo Anynet+. Branchement au téléviseur Appareil 1 Anynet+ Tv Câble hDMI 1.
¦ Configuration de la fonction Anynet+ ❑ Configuration ■ ■ Media Play (USB) Application T Appuyez sur la touche TOOLS pour afficher le menu Outils. Vous pouvez également afficher le menu Anynet+ en sélectionnant Outils → Anynet+ (HDMI-CEC). Anynet+ (HDMI-CEC) Anynet+ (HDMI-CEC) → Arrêt / Marche Pour utiliser la fonction Anynet+, Anynet+ (HDMI-CEC) doit être à Marche. N Lorsque la fonction Anynet+ (HDMI-CEC) est désactivée, toutes les opérations Anynet+ connexes sont désactivées.
Touches de la télécommande du téléviseur accessibles en mode Anynet+ Type appar. État de fonctionnement Touches accessibles Appareil Anynet+ Après une permutation vers l’appareil, lorsque le menu de l’appareil correspondant s’affiche à l’écran.
¦ Dépannage de la fonction Anynet+ Problème Anynet+ ne fonctionne pas. Solution possible ● Vérifier si l’appareil est bien un appareil Anynet+. Le système Anynet+ ne prend en charge que les appareils Anynet+. ● Ne brancher qu'un seul récepteur (chaîne de cinéma maison). ● Vérifier si le cordon d’alimentation de l’appareil Anynet+ est correctement branché. ● Vérifier les branchements des câbles vidéo/audio/HDMI 1.3 de l’appareil Anynet+.
RECOMMANDATIONS ¦ Dépannage Le tableau ci-dessous dresse la liste des problèmes courants et suggère des solutions. Si aucun de ces conseils de dépannage ne permet de corriger le problème, communiquez avec le service à la clientèle de Samsung en composant le 1-800-SAMSUNG. Problème Solution possible Image de qualité médiocre. Essayez un autre canal. / Réglez l’antenne. / Vérifiez tous les branchements de câbles. Son de qualité médiocre. Essayez un autre canal. / Réglez l’antenne.
Problème Solution possible L’écran est noir et le témoin d’alimentation clignote. Sur votre ordinateur, vérifiez : l’alimentation, le câble de signal. La télévision est en mode gestion d’énergie. Déplacez la souris de l’ordinateur ou appuyez sur une touche du clavier. Il est possible que l’image ne soit pas stable et qu’elle donne l’impression de vibrer lorsqu’un ordinateur est connecté à l’entrée PC.
¦ Assemblage des câbles Faites passer les câbles dans le câble porte-fil pour ne pas les voir au travers du support transparent. N La couleur et la forme du produit peuvent varier en fonction du modèle. ¦ Spécifications de l’ensemble d’installation murale (VESA) Installez votre support mural sur un mur solide et perpendiculaire au plancher. Pour le fixer à d’autres matériaux, veuillez communiquer avec votre détaillant.
¦ Utilisation du verrou antivol Kensington N La couleur et la forme du produit peuvent varier en fonction du modèle. Le verrou Kensington est un dispositif permettant de fixer physiquement un système utilisé un endroit public. L’apparence et le mode de verrouillage peuvent être différents de ceux illustrés, selon le fabricant. Veuillez consulter le manuel fourni avec le verrou Kensington pour sa bonne utilisation. N Le verrou doit être acheté séparément.
¦ Stabilisation du téléviseur par rapport au mur ou une armoire N La couleur et la forme du produit peuvent varier en fonction du modèle. [ Attention : Le téléviseur pourrait tomber si vous le tirez ou le poussez ou si vous y grimpez. Assurez-vous que les enfants ne se pendent pas au-dessus du téléviseur ou qu'ils ne le déstabilisent pas; le téléviseur pourrait basculer et causer des blessures graves ou la mort. Suivez les consignes de sécurité fournies dans le prospectus de sécurité inclus.
¦ Spécifications Modèle LN40B610 Taille de l’écran (diagonale) 40 pouces (40.0 pouces en diagonale) Résolution PC (Optimale) 1920 x 1080 @ 60 Hz Son (Sortie) Dimensions (L x P x H) Sans support Avec support 10W x 2 39.3 x 3.1 x 25.1 (po) / 998.0 x 79.3 x 638.0 (mm) 39.3 x 10.0 x 27.5 (po) / 998.0 x 255.0 x 699.0 (mm) Poids Sans support Avec support 32.6 lb / 14.8 Kg 44.1 lb / 20.
Modèle LN52B610 Taille de l’écran (diagonale) 52 pouces (52.0 pouces en diagonale) Résolution PC (Optimale) 1920 x 1080 @ 60 Hz Son (Sortie) Dimensions (L x P x H) Sans support Avec support 10W x 2 50.2 x 3.2 x 31.7 (po) / 1276.0 x 80.6 x 805.7 (mm) 50.2 x 12.0 x 34.1 (po) / 1276.0 x 305.5 x 866.7 (mm) Poids Sans support Avec support 57.3 lb / 26.0 Kg 68.8 lb / 31.
¦ Dimensions LN40B610 VUE DE DESSUS DÉTAILS DU PANNEAU DE PRISES 3.1 39.3 34.8 25.1 19.6 27.5 10.0 20.4 VUE AVANT / VUE LATÉRALE 7.9 (200 mm) 7.9 (200 mm) VUE ARRIÈRE REMARQUE: Tous les dessins ne sont pas nécessairement des représentations à l’échelle. Certaines dimensions peuvent avoir été changées sans avis. Mesurez les dimensions avant d'installer votre téléviseur. Nous n’assumons aucune responsabilité pour les erreurs typographiques ou d’impression. © 2009 Samsung Electronics America, Inc.
LN46B610 VUE DE DESSUS DÉTAILS DU PANNEAU DE PRISES 3.1 44.5 40.0 28.1 22.5 30.6 10.8 21.7 VUE AVANT / VUE LATÉRALE 15.7 (400 mm) 15.7 (400 mm) VUE ARRIÈRE REMARQUE: Tous les dessins ne sont pas nécessairement des représentations à l’échelle. Certaines dimensions peuvent avoir été changées sans avis. Mesurez les dimensions avant d'installer votre téléviseur. Nous n’assumons aucune responsabilité pour les erreurs typographiques ou d’impression. © 2009 Samsung Electronics America, Inc.
LN52B610 VUE DE DESSUS DÉTAILS DU PANNEAU DE PRISES 3.2 50.2 45.5 31.7 25.7 34.1 12.0 21.7 VUE AVANT / VUE LATÉRALE 15.7 (400 mm) 15.7 (400 mm) VUE ARRIÈRE REMARQUE: Tous les dessins ne sont pas nécessairement des représentations à l’échelle. Certaines dimensions peuvent avoir été changées sans avis. Mesurez les dimensions avant d'installer votre téléviseur. Nous n’assumons aucune responsabilité pour les erreurs typographiques ou d’impression. © 2009 Samsung Electronics America, Inc.
LN32B640 VUE DE DESSUS DÉTAILS DU PANNEAU DE PRISES 3.1 32.5 27.5 20.9 15.5 23.3 9.4 17.5 VUE AVANT / VUE LATÉRALE 7.9 (200 mm) 7.9 (200 mm) VUE ARRIÈRE REMARQUE: Tous les dessins ne sont pas nécessairement des représentations à l’échelle. Certaines dimensions peuvent avoir été changées sans avis. Mesurez les dimensions avant d'installer votre téléviseur. Nous n’assumons aucune responsabilité pour les erreurs typographiques ou d’impression. © 2009 Samsung Electronics America, Inc.