SyncMaster T200HD/T220HD/T240HD/T260HD LCD Monitor User Manual
Safety Instructions Notational Note These safety instructions must be followed to ensure your safety and prevent property damage. Make sure to read the instructions carefully and use the product in the correct manner. Warning / Caution Otherwise, it may result in death or personal injury. Otherwise, it may result in personal injury or property damage.
Safety Instructions Ensure that the power plug is plugged into the power outlet firmly and correctly. • Otherwise, this may result in fire. Do not forcefully bend or pull the power plug and do not place any heavy material on it. • Otherwise, this may result in fire. Do not connect multiple appliances to the same power outlet. • Otherwise, this may cause fire due to overheating. Do not disconnect the power cord while using the product.
Safety Instructions Keep heating appliances as far away from the power cord or the product as possible. • Otherwise, this may result in electric shock or fire. Do not install it in a badly ventilated location such as a bookcase or closet. • Otherwise, this may result in fire due to an increase in the internal temperature. Put down the monitor carefully. • Failing to do so may damage the monitor. Do not place the front of the product on the floor.
Safety Instructions Do not spray cleaner directly onto the surface of the product. • Otherwise, this may result in the discoloration and distortion of the structure and the screen surface may peel off. Clean the product using a soft cloth with a monitor cleaner only. If you must use a cleaner other than the monitor cleaner, dilute it with water at a ratio of 1:10. When cleaning the power plug pins or dusting the power outlet, clean it with a dry cloth. • Otherwise, it may result in fire.
Safety Instructions Do not place this product in a location exposed to moisture, dust, smoke, water, or in a car. • Otherwise, this may result in electric shock or fire. When you drop the product or the case is broken, turn the power off and disconnect the power cord. Contact a Service Center. • Otherwise, this may result in electric shock or fire. If thunder or lightening is occurring, do not touch the power cord or antenna cable. • Otherwise, this may result in electric shock or fire.
Safety Instructions Set a resolution and frequency appropriate to the product. • Otherwise, your eyesight may be damaged. When using headphones or earphones, do not turn the volume too high. • Having the sound too loud may damage your hearing. If you continually move closer to the product screen, your eyesight may be failing. To ease eye strain, take at least a five-minute break after every hour of using the monitor.
Safety Instructions When replacing the battery, insert it with right polarity (+, -). • Otherwise, the battery may become damaged or it may cause fire, personal injury or damage due to leakage of the internal liquid. Use only specified standard batteries. Do not use new and used batteries together. • This may cause a battery to break or leak and may cause fire, injury, or contamination (damage).
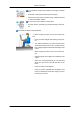
Safety Instructions Do not install the product in a location low enough for children to reach. • Otherwise, it may fall and result in personal injury. • Since the front part of the product is heavy, install the product on a level and stable surface. Do not put any heavy objects on the product. • This may result in personal injury and/or damage to the product. Good Postures When Using the Monitor When using the product, use it in the correct position.
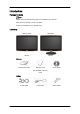
Introduction Package Contents Note Please make sure the following items are included with your monitor. If any items are missing, contact your dealer. Contact a local dealer to buy optional items.
Introduction Others Remote Control Batteries (AAA X 2) Cleaning Cloth (Not available in all locations) Cable holding ring Stand Body Stand Base Note Cleaning Cloth is only provided for highly polished black products as a product feature. Note The Wall Mount of this model is only supported as below. - WMT1900T for 20" ~ 22" - WMB2400T for 24" ~ 25.5" If you want to purchase this Wall Mount, contact an authorized dealer.
Introduction Sold separately Audio cable Digital audio optic output cable Your Monitor Front Activates a highlighted menu item. Push the ' ', button to change the input signal source. Changing the source is only allowed for external devices connected to the product at the time. To switch Screen modes: [PC] → [TV] → [Ext.] → [DVI] → [Component] → [HDMI1] → [HDMI2] MENU Use this button to open the on-screen menu and to exit from the on-screen menu or to close the screen adjustment menu.
Introduction Moves from one menu item to another vertically or adjusts selected menu values. Press to change the channel. Power button [ ] Use this button for turning the product on and off. Note The button to the right of the monitor are touch-sensitive buttons. Touch a button lightly with your finger. Power indicator This light is lit when operating normally, and blinks once when your adjustments are saved.
Introduction POWER Connect the power cord for your monitor to the POWER port on the back of the product. PC PC Connect the PC terminal at the back of your monitor to your computer. HDMI/DVI-D AUDIO IN / DIGITAL AUDIO OUT(OPTICAL) / EX-LINK HDMI/PC/DVI-D AUDIO IN Connect the [ HDMI/PC/DVI-D AUDIO IN ] terminal at the back of your product to your computer’s sound card.
Introduction DVI-D Connect the DVI cable to the DVI-D port on the back of your product. Kensington Lock The Kensington Lock is a device used to physically fix the system when using it in a public place. The locking device has to be purchased separately. The appearance and locking method may differ from the illustration depending on the manufacturer. Refer to the manual provided with the Kensington Lock for proper use. The locking device has to be purchased separately.
Introduction R - AUDIO - L Connect the port of the DVD, VCR (DVD / DTV Set-Top Box) to the [ R - AUDIO - L] port of the product. PR, PB,Y Connect the VIDEO OUT port of the DVD / DTV Set-Top Box to the [ PR, PB,Y ] input ports using a component video cable ( PR, PB,Y ). ANT IN Connect the CATV cable or TV antenna cable to the "ANT IN" port on the rear side of the product. Make sure to use a TV antenna cable (sold separately) as the antenna cable.
Introduction Cable holding ring • Fix the cables using the holding ring, as shown in the figure. Remote Control POWER Number Buttons ENTER CH LIST MENU TOOLS Up-Down Left-Right buttons ENTER INFO COLOUR BUTTONS TTX/MIX TV PRE-CH MUTE P SOURCE FAV.CH RETURN EXIT SUBTITLE GUIDE 1. POWER 2. Number buttons Turns the product On/Off. Press to change the channel.
Introduction 3. ENTER Activates a highlighted menu item. 4. Adjusts the audio volume. 5. CH LIST It displays "Channel List" on the screen. 6. MENU Opens the on-screen menu and exits from the menu or closes the adjustment menu. 7. TOOLS Use to quickly select frequently used functions. Up-Down Left8. Right buttons Moves from one menu item to another horizontally, vertically or adjusts selected menu values. 9. Current picture information is displayed on the upper left corner of the screen.
Introduction 2. Install two AAA size batteries. Note Make sure to match the +and - ends of the batteries with the diagram inside the compartment. 3. Close the cover. Note Remove the batteries and store them in a cool, dry place if you won‘t be using the remote control for a long time.
Connections Connecting to PC Connecting to a Computer Connect the power cord for your monitor to the POWER port on the back of the monitor. Plug the power cord for the monitor into a nearby outlet. Use a connection appropriate for your computer. Using the D-sub (Analog) connector on the video card. • Connect the signal cable to the [PC] port on the back of your monitor. [PC] Using the DVI (Digital) connector on the video card. • Connect the DVI Cable to the [DVI-D] Port on the back of your Monitor.
Connections • If you connect properly your monitor using the DVI connector but get a blank or fuzzy screen, check to see if the monitor status is set to analogue. Press 'SOURCE [ ]' button to have the monitor double-check the input signal source. Connecting an Antenna Note You may view television programs on the monitor if it is connected to an antenna or CATV cable without installing any separate TV reception hardware or software on your computer. 1.
Connections 3. Select the appropriate language by pressing the or button. Press the ENTER to confirm your choice 4. Press the or button to select Store Demo or Home Use, then the ENTER button button. Note We recommend setting the TV to Home Use mode for the best picture in your home environment. Store Demo mode is only intended for use in retail environments. If the unit is accidentally set to Store Demo mode and you want to return to Home Use (Standard): Press the volume button on the TV.
Connections Connecting to other devices Note • This monitor allows the user to connect it to such input devices as a DVD player, a VCR or camcorder or a DTV or TV without disconnecting the PC. • The configuration at the back of the monitor may vary from product to product. Connecting a HDMI cable Note You can connect digital output devices to your monitor. You can enjoy better screen and sound quality. 1. Connecting Using a HDMI Cable a.
Connections 3. When all the connections are completed, connect the power cords for the monitor and DVD (or the device connected to the digital output terminal). 4. Select "HDMI" using the 'SOURCE [ ]' button. Note If you just connect using the DVI to HDMI cable without connecting to the sound source, you cannot hear sound. Connecting the audio output terminal of a digital device to the [R-AUDIO-L] of [COMPONENT IN] of the monitor using an audio cable will not give you sound.
Connections Connecting a Scart cable Note Connect to the DVD Devices input if the device has a EXT (RGB) jack. You can watch DVD simply by hooking up the DVD player with the monitor as long as the power is on. 1. Connect the EXT (RGB) port of the monitor to the DVD Player using a SCART jack. 2. When a Scart device is connected to your monitor, the Source automatically changes to Ext.
Connections Connecting COMMON INTERFACE Note You can install the CAM anytime whether the TV is ON or OFF. Purchase the CI CAM module by visiting your nearest dealer or by phone. 1. Insert the CI CARD into the CAM in the direction of the arrow until it fits. 2. Insert the CAM with the CI CARD installed into the common interface slot. (Insert the CAM in the direction of the arrow, right up to the end so that it is parallel with the slot.) 3. Check if you can see a picture on a scrambled signal channel.
Connections Using the Stand Monitor Assembly Monitor and Bottom Tilt angle You can adjust the tilt angle within a range of -1° forward to 21° backward for the most comfortable viewing angle.
Using the Software Monitor Driver Note When prompted by the operating system for the monitor driver, insert the CDROM included with this monitor. Driver installation is slightly different from one operating system to another. Follow the directions appropriate for the operating system you have. Prepare a blank disk and download the driver program file at the Internet web site shown here. Internet web site : http://www.samsung.com/ (Worldwide) Installing the Monitor Driver (Automatic) 1.
Using the Software Note This monitor driver is under certifying MS logo, and this installation doesn't damage your system. The certified driver will be posted on Samsung Monitor homepage. http://www.samsung.com/ Installing the Monitor Driver (Manual) Microsoft® Windows Vista™‚ Operating System 1. Insert your Manual CD into your CD-ROM drive. 2. Click (Start) and "Control Panel". Then, double-click on "Appearance and Personalization". 3. Click "Personalization" and then "Display Settings". 4.
Using the Software If the message "Windows needs..." is displayed, as shown in the figure below, click "Continue". Note This monitor driver is under certifying MS logo, and this installation doesn't damage your system. The certified driver will be posted on Samsung Monitor homepage. 6. Click "Update Driver..." in the "Driver" tab. 7. Check the "Browse my computer for driver software" checkbox and click "Let me pick from a list of device drivers on my computer". 8. Click "Have Disk...
Using the Software 9. Select the model that matches your monitor from the list of monitor models on the screen, and click "Next". 10. Click "Close" → "Close" → "OK" → "OK" on the following screens displayed in sequence.
Using the Software 1. Insert CD into the CD-ROM drive. 2. Click "Start" → "Control Panel" then click the "Appearance and Themes" icon. 3. Click "Display" icon and choose the "Settings" tab then click "Advanced...". 4. Click the "Properties" button on the "Monitor" tab and select "Driver" tab. 5. Click "Update Driver..." and select "Install from a list or..." then click "Next" button. 6. Select "Don't search, I will..." then click "Next" and then click "Have disk".
Using the Software 7. Click the "Browse" button then choose A:(D:\Driver) and choose your monitor model in the model list and click the "Next" button. 8. If you can see following message window, then click the "Continue Anyway" button. Then click "OK" button. Note This monitor driver is under certifying MS logo, and this installation doesn't damage your system. The certified driver will be posted on Samsung Monitor homepage. http://www.samsung.com/ 9.
Using the Software 10. Monitor driver installation is completed. Microsoft® Windows® 2000 Operating System When you can see "Digital Signature Not Found" on your monitor, follow these steps. 1. Choose "OK" button on the "Insert disk" window. 2. Click the "Browse" button on the "File Needed" window. 3. Choose A:(D:\Driver) then click the "Open" button and then click "OK" button. How to install 1. Click "Start", "Setting", "Control Panel". 2. Double click the "Display" icon. 3.
Using the Software 4. Select the "Monitor" tab. 5. Click the "Change" button in the "Monitor Type" area. 6. Choose "Specify the location of the driver". 7. Choose "Display a list of all the driver in a specific location..." then click "Next" button. 8. Click the "Have Disk" button. 9. Specify A:\(D:\driver) then click "OK" button. 10. Select "Show all devices" and choose the monitor that corresponds to the one you connected to your computer and click "OK". 11.
Using the Software 10. You have finished setting up your monitor. Execute X-Window after setting other requested hardware. Natural Color Natural Color Software Program One of the recent problems in using a computer is that the color of the images printed out by a printer or other images scanned by a scanner or a digital camera are not the same as those shown on the monitor. The Natural Color S/W is the very solution for this problem.
Using the Software MultiScreen Installation 1. Insert the installation CD into the CD-ROM drive. 2. Click the MultiScreen installation file. Note If the popup window to install the software for the main screen is not displayed, proceed with the installation using the MultiScreen executable file on the CD. 3. When the Installation Shield Wizard window appears, click "Next". 4. Select "I agree to the terms of the license agreement" to accept the terms of use. 5.
Using the Software Hardware • 32 MB Memory above • 60 MB Hard disk space above Uninstall The Multiscreen program can be removed only by using the "Add or Remove Programs" option of the Windows® Control Panel. Perform the following steps remove Multiscreen. Select "Setting/Control Panel" on the "Start" menu and then double-click "Add/Delete a program". Select Multiscreen from the list and then click the "Add/Delete" button.
Adjusting the LCD Display Viewing the Menus Button MENU Description Opens the on-screen menu and exits from the menu or closes the adjustment menu. Up-Down Left-Right buttons - Moves from one menu item to another horizontally, vertically or adjusts selected menu values. ENTER Activates a highlighted menu item. RETURN Returns to the previous menu. EXIT TOOLS Exits from the menu screen. Use to quickly select frequently used functions.
Adjusting the LCD Display Press the TOOLS button to display the Tools menu. You can also set the MagicBright by selecting Tools → MagicBright. • Entertain High Brightness For watching motion pictures such as a DVD or VCD • Internet For working with a mixture of images such as texts and graphics. • Text For documents or works involving heavy text. • Dynamic Contrast Dynamic Contrast automatically detects the distribution of the visual signal and adjusts to create an optimum contrast.
Adjusting the LCD Display Auto Adjustment The values of Fine, Coarse, Position are adjusted automatically. By changing the resolution in the control panel, auto function is performed. The direct button on the remote control is the 'AUTO' button. Press the TOOLS button to display the Tools menu. You can also set the Auto Adjustment by selecting Tools → Auto Adjustment. (Available in PC Mode Only) Screen (Available in PC mode only) • Coarse Removes noise such as vertical stripes.
Adjusting the LCD Display Adjusts the screen location horizontally and vertically. • Image Reset Image parameters are replaced with the factory default values. Picture Options • Colour Tone The tone of the color can be changed. Cool / Normal / Warm / Custom • R-Gain , G-Gain , B-Gain Adjusts the individual R, G, B color controls. (Available in PC / DVI mode only) • Size You can switch the Size. Wide / 4:3 Picture Reset Picture parameters are replaced with the factory default values.
Adjusting the LCD Display Input Mode : TV ,DTV ,Ext. ,Component or HDMI Mode The Monitor has three automatic picture settings ("Dynamic", "Standard", and "Movie") that are preset at the factory. You can activate either Dynamic, Standard, or Movie. You can select the type of picture which best corresponds to your viewing requirements. Press the TOOLS button to display the Tools menu. You can also set the Picture Mode by selecting Tools → Picture Mode.
Adjusting the LCD Display • Brightness : Adjusts the brightness level of the picture. • Sharpness : Adjusts the edge definition of the picture. • Colour : Adjusts colour saturation of the picture. • Tint(G/R) : Adjusts the colour tint of the picture. (It is activated when the signal is NTSC.) Advanced Settings Samsung‘s new TVs allow you to make even more precise picture settings than previous models. See below to adjust detailed picture settings.
Adjusting the LCD Display • R-Offset : Adjusts the red colour darkness. • G-Offset : Adjusts the green colour darkness. • B-Offset : Adjusts the blue colour darkness. • R-Gain : Adjusts the red colour brightness. • G-Gain : Adjusts the green colour brightness. • B-Gain : Adjusts the blue colour brightness. • Reset : The previously adjusted white balance will be reset to the factory defaults. Flesh Tone You can emphasize the pink Flesh Tone in the picture.
Adjusting the LCD Display Press the TOOLS button to display the Tools menu. You can also set the size by selecting Tools → Picture Size. • Auto Wide - Automatically adjusts the picture size to the "16:9" aspect ratio. • Wide - A full screen is displayed regardless of the screen aspect ratio of the input signals. • 16:9 - Adjusts the picture size to 16:9 appropriate for DVDs or wide broadcasting. • Wide Zoom - Magnify the size of the picture more than 4:3.
Adjusting the LCD Display Note Picture Size is available in Auto Wide mode This function is not available in PC or Component,Ext., HDMI mode. Digital NR Digital Noise Reduction. If the broadcast signal received by your TV is weak, you can activate the Digital Noise Reduction feature to help reduce any static and ghosting that may appear on the screen. • Off : Turns the screen noise reduction function off. • Low : Reduces screen noise at a low level. • Medium : Reduces screen noise at a medium level.
Adjusting the LCD Display Resets all picture settings to the default values. • Reset Picture Mode : Current picture values return to default settings. • Cancel Note Select a picture mode to be reset. The reset is performed for each picture mode. Sound Note The default setting may be different depending on the selected Input Mode (input signal source selected in External Input List) and the selected resolution. Mode You can select a sound mode to suit your personal preferences.
Adjusting the LCD Display Equalizer You can adjust the left and right sound balance and the low or high volume as you want. The sound settings can be adjusted to suit your personal preference. Mode Selects the sound mode among the predefined settings. Balance Adjusts the balance between the right and left speaker. 100Hz / 300Hz / 1kHz / 3kHz / 10kHz To adjust the level of different bandwidth frequencies. Reset Resets the equalizer settings to the default values.
Adjusting the LCD Display Press the TOOLS button to display the Tools menu. You can also configure the sound mode by selecting Tools → SRS TruSurround XT • Off / On Audio Language You can change the default value for audio languages. Displays the language information for the incoming stream. Note While viewing a digital channel, this function can be selected. You can only select the language among the actual languages being broadcast.
Adjusting the LCD Display Audio Description This is an auxiliary audio function that provides an additional audio track for visually challenged persons. This function handles the Audio Stream for the AD (Audio Description), when it is sent along with the Main audio from the broadcaster. Users can turn the Audio Description On or Off and control the volume. Audio Description Turn the audio description function on or off. Volume You can adjust the audio description volume.
Adjusting the LCD Display Speaker Select When you watch TV with it connecting to a Home theater, turn the TV speakers off so you can listen to sound from the Home theater‘s (external) speakers. • External Speaker : Used to listen to the sound of the external (Home Theater) speakers. • TV Speaker : Used to listen to the sound of the TV Speakers. Note If you select External Speaker in the Speaker Select menu, the sound settings will be limited.
Adjusting the LCD Display Audio Type Dual 1 / 2 Stereo STEREO Dual DUAL 1 Mono NICAM Stereo Stereo Dual MONO Automatic change DUAL 2 MONO MONO Dual 1 / 2 DUAL 1 Automatic change STEREO Automatic change MONO DUAL 1 DUAL 1 DUAL 2 Note If the stereo signal is weak and an automatic switching occurs, then switch to the mono. This function is only activated in stereo sound signal. It is deactivated in mono sound signal. This function is only available in TV mode.
Adjusting the LCD Display Auto Store You can scan for the frequency ranges available to you (and availability depends on your country). Automatically allocated programme numbers may not correspond to actual or desired programme numbers. Note If a channel is locked using the Child Lock function, the PIN input window appears. Air / Cable Antenna source to memorize. • Digital & Analogue : Digital and Analogue channels. • Digital : Digital channels. • Analogue : Digital channels.
Adjusting the LCD Display Manual Store You can scan the frequency ranges available on your television in your area and store all the channels found manually. Digital Channel Manual store for digital channels. • Channel : Set the Channel number using the • Frequency : Set the frequency using the number buttons. • Bandwidth : Set the bandwidth using the , , or number (0~9) buttons or number (0~9) buttons. Note Digital Channel is only available in DTV mode.
Adjusting the LCD Display You can store television channels, including those received via cable networks. When storing channels manually, you can choose: Whether or not to store each of the channels found. The Programme number of each stored channel which you wish to identify - C (Air channel mode): You can select a channel by entering the assigned number to each air broadcasting station in this mode.
Adjusting the LCD Display The EPG (Electronic Programme Guide) information is provided by the broadcasters. Programme entries may appear blank or out of date as a result of the information broadcast on a given channel. The display will dynamically update as soon as new information becomes available Note You can also display the guide menu simply by pressing the GUIDE button. (To configure the Default Guide, refer to the descriptions.).
Adjusting the LCD Display To... Then... Toggle between the Now & Next Guide Press the red button repeatedly. or Full Guide Scrolls backwards quickly (24 hours) Press the green button repeatedly. Scrolls forward quickly (24 hours) Press the yellow button repeatedly. Exit the guide Press the EXIT button. Note The programme title is on the upper part of the screen center. Please click on INFO button for the detailed information.
Adjusting the LCD Display Added Channels Shows all added channels. Favourites Shows all favourite channels. Note To select the favourites channels you have set up, press the FAV.CH button on the remote control. When it has finished, channels are updated in the channel list Programmed Shows all current reserved programmes. Note Select a channel in the All Channels, Added Channels or Favourites screen by pressing the , buttons, and pressing the ENTER button. Then you can watch the selected channel.
Adjusting the LCD Display • : A programme currently being broadcast. • : A locked channel. • : A reserved programme. Channel List Option Menu (in All Channels / Added Channels / Favourites) Add / Delete You can delete or add a channel to display the channels you want. Note All deleted channels will be shown on All Channels menu. A gray-coloured channel indicates the channel has been deleted. The Add menu only appears for deleted channels.
Adjusting the LCD Display Timer Viewing If you reserve a programme you want to watch, the channel is automatically switched to the reserved channel in the Channel List; even when you are watching another channel. To reserve a programme, set the current time first. Note Only memorized channels can be reserved. You can set the channel, day, month, year, hour and minute directly by pressing the number buttons on the remote control. Reserving a programme will be shown in the Programmed menu.
Adjusting the LCD Display Note Press the TOOLS button to use the option menu. Change Info Select to change a viewing reservation. Cancel Schedules Select to cancel a viewing reservation. Information Select to view a viewing reservation. (You can also change the reservation information.) Select All Select all reserved programmes. Channel Mode When press the P button, Channels will be switched within the selected channel list. • Added Ch : Channels will be switched within the memorized channel list.
Adjusting the LCD Display Fine Tune If the reception is clear, you do not have to fine tune the channel, as this is done automatically during the search and store operation. If the signal is weak or distorted, you may have to fine tune the channel manually. Note Fine tuned channels that have been saved are marked with an asterisk “ * ” on the right-hand side of the channel number in the channel banner. To reset the fine-tuning, select Reset by pressing the or button and then press the ENTER button.
Adjusting the LCD Display Language You can set the menu language. The language chosen affects only the language of the OSD. Time Clock Setting the clock is necessary in order to use the various timer features of the TV. The current time will appear every time you press the INFO button. If you disconnect the power cord, you have to set the clock again. Clock Mode You can set up the current time manually or automatically.
Adjusting the LCD Display Note This function is only available when Clock Mode is set to manual. You can set the day, month, year,hour and minute directly by pressing the number buttons on the remote control. Sleep Timer Use to set the Monitor to be turned off automatically in certain minutes. Press the TOOLS button to display the Tools menu. You can also set the sleep timer by selecting Tools → Sleep Timer.
Adjusting the LCD Display Auto Power Off - When you set the timer On, the television will eventually turn off, if no controls are operated for 3 hours after the TV was turned on by the timer. This function is only available in timer On mode and prevents overheating, which may occur if a TV is on for too long time Game Mode When connecting to a game console such as PlayStation™ or Xbox™, you can enjoy a more realistic gaming experience by selecting game menu.
Adjusting the LCD Display This feature allows you to prevent unauthorized users, such as children, from watching unsuitable programme by muting out video and audio. • Off / On Note Before the setup screen appears, the PIN number input screen appears. Enter your 4 digit PIN number. The default PIN number of a new TV set is 0-0-0-0. You can change the PIN by selecting Change PIN from the menu. You can lock some channels in Channel List. Child Lock is available only in TV mode.
Adjusting the LCD Display This feature allows you to prevent unauthorized users, such as children, from watching unsuitable programme by a 4-digit PIN (Personal Identification Number) code that is defined by the user. • Allow All : Press to unlock all TV ratings. • Block All : Press to lock all TV ratings. Note Before the setup screen appears, the PIN number input screen appears. Enter your 4 digit PIN number. The default PIN number of a new TV set is 0-0-0-0.
Adjusting the LCD Display You can select these options simply by pressing the SUBT. button on the remote control. Teletext Language You can set the Teletext language by selecting the language type. Note English is the default in cases where the selected language is unavailable in the broadcast. Preference Primary Audio Language / Secondary Audio Language / Primary Subtitle Language /Secondary Subtit Using this feature, users can select one of the languages.
Adjusting the LCD Display Digital Text If the programme is broadcast with digital text, this feature is enabled. • Disable / Enable (UK only) Note MHEG (Multimedia and Hypermedia Information Coding Experts Group) An International standard for data encoding systems used in multimedia and hypermedia. This is at a higher level than the MPEG system which includes data-linking hypermedia such as still images, character service, animation, graphic and video files as well as multimedia data.
Adjusting the LCD Display A melody sound can be set to come on when the monitor is powered On or Off. • Off : Turns off the melody function. • Low : Sets the melody volume to low. • Medium : Sets the melody volume to medium. • High : Sets the melody volume to high. Note The Melody does not play - When no sound is output from the TV because the MUTE button has been pressed. - When no sound is output from the TV because the volume has been reduced to minimum with the volum (-) button.
Adjusting the LCD Display Common Interface CI Menu This enables the user to select from the CAM-provided menu. Select the CI Menu based on the menu PC Card. Application Info. This contains information on CAM inserted in the CI slot and displays it. The Application Info inserting is about the CI CARD. You can install the CAM anytime whether the TV is ON or OFF.
Adjusting the LCD Display Note You can choose only those external devices that are connected to the TV. In the Source List, connected inputs will be highlighted and sorted to the top. Inputs that are not connected will be sorted to the bottom. Using the colour buttons on the remote with the Source List. • Red ( Refresh ) : Refreshes the connecting external devices. • TOOLS ( Tools ) : Displays the Edit Name and Information menus.
Adjusting the LCD Display 1. Connect the HDMI IN (1 or 2) jack on the TV and the HDMI OUT jack of the corresponding Anynet+ device using an HDMI cable. 2. Connect the HDMI IN jack of the home theatre and the HDMI OUT jack of the corresponding Anynet+ device using an HDMI cable. Note Connect the Optical cable between the DIGITAL AUDIO OUT (OPTICAL) jack on your TV and the Digital Audio Input on the Home Theatre. When following the connection above, the Optical jack only outputs 2 channel audio.
Adjusting the LCD Display Anynet+ (HDMI-CEC) To use the Anynet+ Function, Anynet+ (HDMI-CEC) must be set to On. Note When the Anynet+ (HDMI-CEC) function is disabled, all the Anynet+ related operations are deactivated. Auto Turn Off Setting an Anynet+ Device to turn Off automatically when the TV is Turned Off and setting a TV to turn off automatically when a HDMI-CEC device requestes tv to turn off. Note The active source on the TV remote must be set to TV to use the Anynet+ function.
Adjusting the LCD Display If you have selected external input mode by pressing the SOURCE button, you cannot use the Anynet+ function. Make sure to switch to an Anynet+ device by using the Device List. Support Self Diagnosis Picture Test If you think you have a picture problem, perform the picture test. Check the colour pattern on the screen to see if the problem still exists. • Yes : If the test pattern does not appear or there is noise in the test pattern, select Yes.
Adjusting the LCD Display Note If the signal strength meter indicates that the signal is weak, physically adjust your antenna to increase the signal strength. Continue to adjust the antenna until you find the best position with the strongest signal. Software Upgrade Samsung may offer upgrades for TV‘s firmware in the future. BY Channel Upgrades the software using the broadcasting signal. Standby Mode Upgrade To continue software upgrade with master power on, select on by pressing the or button.
Adjusting the LCD Display Contact Samsung View this information when your TV does not work properly or when you want to upgrade the software. You can view the information regarding the call centre, product and software file download method.newer the software version. Installing the latest version is.
Troubleshooting Self-Test Feature Check Note • Check the following items yourself before calling for service. Contact the service center for problems that you cannot solve by yourself. • Your monitor provides a self test feature that allows you to check whether your monitor is functioning properly. Self-Test Feature Check 1. Turn off both your computer and the monitor. 2. Unplug the video cable from the back of the computer. 3. Turn on the monitor.
Troubleshooting • Do not use benzene, thinner or other flammable substances, or a wet cloth. • We recommend a Samsung cleansing agent is used to prevent damage to the screen. 2. Maintaining the Flat Panel Display Screen. Clean with a soft cloth (cotton flannel) smoothly. • Never use acetone, benzene or thinner. (They may cause flaws or deformation of the screen surface.) • The user will be required to pay costs and related expenses for repair of damages caused by him/her.
Troubleshooting PC Mode Q: It appears the PC does not function normally. A: Check if the Display Adapter Driver (VGA Driver) is properly installed. (Refer to Installing Driver) Q: The monitor screen flickers. A: Check if the signal cable between the computer and the monitor is securely connected and tightened.(Refer to Connecting the monitor) TV Mode Q: TV screen is blurred or shows noise signals. A: Check if the TV antenna connector is securely connected to the external antenna.
Troubleshooting A: Check if the resolution and frequency set for the computer video card falls in the range supported by the monitor. If not, reset them referring to the current Information under the monitor menu and Preset Timing Modes. Q: The image is too light or too dark A: Adjusts the Brightness and Contrast. Q: The Power Indicator blinks. A: The monitor is currently saving the changes made in the settings to the OSD memory.
Troubleshooting 5. You may see small particles if you look closely at the edge of the bezel surrounding the screen. This is part of the product’s design and is not a defect. Q&A Q: How can I change the frequency? A: The frequency can be changed by reconfiguring the video card. A: Note that video card support can vary, depending on the version of the driver used. (Refer to the computer or the video card manual for details.
Troubleshooting or drama or you can buy home shopping products such as an accessory currently on TV. Digital TV broadcasting allows you to easily access various information services in your home creating a more information-oriented home. Q: Can I watch digital TV broadcasting with an analog TV? A: No. A: The analog TV cannot interpret digital signals. Therefore, a digital TV is required to watch digital TV broadcasting.
Specifications General Model Name SyncMaster T200HD / SyncMaster T220HD / SyncMaster T240HD / SyncMaster T260HD LCD Panel Size 20 inch (51 cm) Display area 433.44 mm (H) x 270.90 mm (V) Pixel Pitch 0.258 mm (H) x 0.258 mm (V) Display Color 16.7M Maximum Pixel Clock T200HD 146.250 MHz (Analog, Digital) Resolution Optimum resolution 1680 x 1050 @ 60 Hz Maximum resolution 1680 x 1050 @ 60 Hz Dimensions (W x H x D) / Weight 486 x 350 x 75 mm / 19.1 x 13.8 x 3.4 inch (Without Stand) 486 x 417.
Specifications Maximum Pixel Clock 162.000 MHz (Analog, Digital) Resolution Optimum resolution 1920 x 1200 @ 60 Hz Maximum resolution 1920 x 1200 @ 60 Hz Dimensions (W x H x D) / Weight 573 x 409 x 87 mm / 22.6 x 16.1 x 3.4 inch (Without Stand) 573 x 477 x 245 mm / 22.6 x 18.8 x 9.6 inch (With Stand) / 7.3 kg / 16.1 Ibs LCD Panel Size 25.5 inch (64 cm) Display area 550.08 mm (H) x 343.8 mm (V) Pixel Pitch 0.2865 mm (H) x 0.2865 mm (V) Display Color 16.7M Maximum Pixel Clock T260HD 162.
Specifications Environmental considerations Operating Temperature : 50 °F ~ 104 °F (10 °C ~ 40 °C) Humidity : 10 % ~ 80 %, non-condensing Storage Temperature : -4 °F ~ 113 °F (-20 °C ~ 45 °C) Humidity : 5 % ~ 95 %, non-condensing Plug and Play Capability This monitor can be installed on any Plug & Play compatible system. The interaction of the monitor and the computer systems will provide the best operating conditions and monitor settings.
Specifications State Normal Operation Power saving mode Power off (Power button) EPA/ENERGY 2000 Power Indicator On Blinking Off Power Consumption 50 watts Less than 2 watts Less than 1 watts State Normal Operation Power saving mode Power off (Power button) EPA/ENERGY 2000 Power Indicator On Blinking Off Power Consumption 55 watts Less than 2 watts Less than 1 watts State Normal Operation Power saving mode Power off (Power button) EPA/ENERGY 2000 Power Indicator On Blinking Of
Specifications Display Mode Horizontal Frequency (kHz) Vertical Fre- Pixel Clock quency (Hz) (MHz) Sync Polarity (H/V) VESA, 800 x 600 37.879 60.317 40.000 +/+ VESA, 800 x 600 48.077 72.188 50.000 +/+ VESA, 800 x 600 46.875 75.000 49.500 +/+ VESA, 1024 x 768 48.363 60.004 65.000 -/- VESA, 1024 x 768 56.476 70.069 75.000 -/- VESA, 1024 x 768 60.023 75.029 78.750 +/+ VESA, 1152 x 864 67.500 75.000 108.000 +/+ VESA, 1280 x 960 60.000 60.000 108.
Specifications Horizontal Frequency The time to scan one line connecting the right edge to the left edge of the screen horizontally is called the Horizontal Cycle and the inverse number of the Horizontal Cycle is called the Horizontal Frequency. Unit: kHz Vertical Frequency Like a fluorescent lamp, the screen has to repeat the same image many times per second to display an image to the user. The frequency of this repetition is called the Vertical Frequency or Refresh Rate.
Information For Better Display Adjust the computer resolution and screen injection rate (refresh rate) on the computer as described below to enjoy the best picture quality. You can have an uneven picture quality on screen if the best picture quality is not provided for TFTLCD.
Information Warranty Warranty does not cover any damage caused by image retention. Burn-in is not covered by the warranty. What is Image retention ? During normal operation of a LCD panel, pixel image retention doesn't occur. However, if the same image is displayed for a long time, a slight difference in electric charge accumulates between the two electrodes which encase the liquid crystal. This may cause the liquid crystal to build up in a certain areas of the display.
Information • Avoid: Colors with big difference in luminance (Black & White, Grey) Ex) • Recommended settings: Bright colors with little difference in luminance • Change the characters color and background color every 30 minutes Ex) • Every 30 minutes, change the characters with movement. Ex) The best way to protect your monitor from Image retention is to set your PC or System to operate a Screen Saver program when you are not using it.
Information Our LCD Monitor satisfies ISO13406-2 Pixel fault Class II
Appendix Contact SAMSUNG WORLDWIDE Note If you have any questions or comments relating to Samsung products, please contact the SAMSUNG customer care center. North America U.S.A 1-800-SAMSUNG(726-7864) http://www.samsung.com/us CANADA 1-800-SAMSUNG(726-7864) http://www.samsung.com/ca MEXICO 01-800-SAMSUNG (726-7864) http://www.samsung.com/mx Latin America ARGENTINE 0800-333-3733 http://www.samsung.com/ar BRAZIL 0800-124-421 http://www.samsung.
Appendix Europe BELGIUM 02 201 2418 http://www.samsung.com/be (Dutch) http://www.samsung.com/ be_fr (French) CZECH REPUBLIC 800 (800-726786) SAMSUNG http://www.samsung.com/cz DENMARK 8 - SAMSUNG (7267864) http://www.samsung.com/dk EIRE 0818 717 100 http://www.samsung.com/ie FINLAND 30 - 6227 515 http://www.samsung.com/fi FRANCE 01 4863 0000 http://www.samsung.com/fr GERMANY 01805 SAMSUNG http://www.samsung.de (7267864, € 0.14/Min) HUNGARY 06-80-SAMSUNG (726-7864) http://www.samsung.
Appendix Asia Pacific AUSTRALIA 1300 362 603 http://www.samsung.com/au CHINA 800-810-5858 http://www.samsung.com/cn 400-810-5858 010-6475 1880 INDIA HONG KONG:3698 - 4698 http://www.samsung.com/hk 3030 8282 http://www.samsung.com/in 1-800-3000-8282 1800 110011 INDONESIA 0800-112-8888 http://www.samsung.com/id JAPAN 0120-327-527 http://www.samsung.com/jp MALAYSIA 1800-88-9999 http://www.samsung.com/my NEW ZEALAND 0800 SAMSUNG(0800 726 http://www.samsung.
Appendix it to the monitor. The monitor displays the color signals by separating the composite signal into original color signals. Dot Pitch The image on a monitor is composed of red, green and blue dots. The closer the dots, the higher the resolution. The distance between two dots of the same color is called the 'Dot Pitch'. Unit: mm Vertical Frequency The screen must be redrawn several times per second in order to create and display an image for the user.
Appendix broadcasters. The CATV programs may include movies, entertainment and educational programs. (Different from cable TV.) CATV can be viewed only within the area in which the CATV service is offered. VHF/UHF VHF indicates TV channels 2 to 13, and UHF indicates channels 14 through 69. Channel Fine Tuning This feature allows the viewer to fine-tune the TV channel to obtain the best viewing conditions.
Appendix HDMI(High Definition Multimedia Interface) This is an interface that connects both quality video signals and digital audio signals with a cable without any compression. • HD (High Definition) In HD, 1080-line, 2x density beaming (1080i) is used. HD provides a five times clearer screen quality than the existing analog method and has a wide 16:9 aspect ratio. • SD (Standard Definition) In SD, 480-line, double beaming (480i) is used.
Appendix Correct disposal of batteries in this product - Europe only (Applicable in the European Union and other European countries with separate battery return systems.) This marking on the battery, manual or packaging indicates that the batteries in this product should not be disposed of with other household waste at the end of their working life. Where marked, the chemical symbols Hg, Cd or Pb indicate that the battery contains mercury, cadmium or lead above the reference levels in EC Directive 2006/66.