User Manual S24C230BL S24C230JL S24C230JY S27C230B S27C230J The color and the appearance may differ depending on the product, and the specifications are subject to change without prior notice to improve the performance.
Table Of Contents BEFORE USING THE PRODUCT PREPARATIONS CONNECTING AND USING A SOURCE DEVICE 6 Copyright 6 Icons used in this manual 7 Cleaning 7 7 8 8 Cleaning Precautions for Storage Securing the Installation Space Precautions for storage 9 Safety Precautions 9 10 11 13 Symbols Electricity and Safety Installation and Safety Operation and Safety 17 Correct posture to use the product 18 Checking the Contents 18 19 Removing the Packaging Checking the Components 21 Parts 21 22 Frontal
Table Of Contents 29 Connecting and Using a PC 29 31 32 Connecting a Computer to S24C230BL and S27C230B.
Table Of Contents USING THE OSD MENU ON S24C230JL, S24C230JY AND S27C230J TROUBLESHOOTING GUIDE SPECIFICATIONS 47 SAMSUNG MAGIC Bright 47 Configuring SAMSUNG MAGIC Bright 48 Brightness 48 Configuring Brightness 49 Contrast 49 Configuring Contrast 50 SAMSUNG MAGIC Upscale 50 Configuring SAMSUNG MAGIC Upscale 51 Gamma 51 Configuring Gamma 52 PC/AV Mode 52 Configuring PC/AV Mode 53 Image Size 53 Changing the Image Size 55 Language 55 Configuring Language 56 Exit 56 56 Vie
Table Of Contents APPENDIX 67 Contact SAMSUNG WORLD WIDE 73 Responsibility for the Pay Service (Cost to Customers) 73 73 73 Not a product defect A Product damage caused by customer's fault Others 74 Correct Disposal 74 Correct Disposal of This Product (Waste Electrical & Electronic Equipment) 75 Terminology INDEX Table Of Contents 5
Before Using the Product Copyright The contents of this manual are subject to change without notice to improve quality. © 2013 Samsung Electronics Samsung Electronics owns the copyright for this manual. Use or reproduction of this manual in parts or entirety without the authorization of Samsung Electronics is prohibited. Microsoft and Windows are registered trademarks of Microsoft Corporation. VESA, DPM and DDC are registered trademarks of the Video Electronics Standards Association.
Before Using the Product Cleaning Cleaning Exercise care when cleaning as the panel and exterior of advanced LCDs are easily scratched. Take the following steps when cleaning. 1. Power off the monitor and computer. 2. Disconnect the power cord from the monitor. Hold the power cable by the plug and do not touch the cable with wet hands. Otherwise, an electric shock may result. 3. Wipe the monitor screen using a clean, soft and dry cloth.
Before Using the Product Securing the Installation Space Ensure some space around the product for ventilation. An internal temperature rise may cause fire and damage the product. Be sure to allow the amount of space as shown below or greater when installing the product. The exterior may differ depending on the product. 10 cm 10 cm 10 cm 10 cm 10 cm Precautions for storage Be sure to contact Samsung Customer Service Center (page 67) if the inside of the monitor needs cleaning.
Before Using the Product Safety Precautions Caution RISK OF ELECTRIC SHOCK DO NOT OPEN Caution: TO REDUCE THE RISK OF ELECTRIC SHOCK, DO NOT REMOVE COVER (OR BACK). THERE ARE NO USER SERVICEABLE PARTS INSIDE. REFER ALL SERVICING TO QUALIFIED PERSONNEL. This symbol indicates that high voltage is present inside. It is dangerous to make any kind of contact with any internal part of this product.
Before Using the Product Electricity and Safety The following images are for reference only. Real-life situations may differ from what is shown in the images. Warning Do not use a damaged power cord or plug, or a loose power socket. An electric shock or fire may result. Do not plug many products into the same power socket. Otherwise, the socket may overheat and cause a fire. Do not touch the power plug with wet hands. Otherwise, an electric shock may result.
Before Using the Product Caution Do not unplug the power cord when the product is in use. The product may become damaged by an electric shock. Do not use the power cord for products other than authorized products supplied by Samsung. ! An electric shock or fire may result. Keep the power socket where the power cord is connected unobstructed. If any problem occurs in the product, unplug the power cable to completely cut the power to the product.
Before Using the Product Do not install the product on an unstable or vibrating surface (insecure shelf, sloped surface, etc.). The product may fall and break or cause a personal injury. Using the product in an area with excess vibration may damage the product or cause a fire. Do not install the product in a vehicle or a place exposed to dust, moisture (water drips, etc.), oil, or smoke. ! An electric shock or fire may result.
Before Using the Product Put down the product carefully. The product may fall and break or cause a personal injury. ! SAMSUNG ! Installing the product in an unusual place (a place exposed to a lot of fine particles, chemical substances or extreme temperatures, or an airport or train station where the product should operate continuously for an extended period of time) may seriously affect its performance.
Before Using the Product If there is a thunderstorm or lightning strike, turn off the power and disconnect the power cable. ! An electric shock or fire may result. Do not drop objects on the product or apply impact. An electric shock or fire may result. ! Do not move the product by pulling the power cord or any cable. Otherwise, the cable may be damaged and product failure, an electric shock or fire may result. If a gas leakage is found, do not touch the product or power plug.
Before Using the Product Caution Leaving the screen fixed on a stationary image for an extended period of time may cause afterimage burn-in or defective pixels. ! If you are not going to use the product for an extended period of time, activate power-saving mode or a moving-picture screen saver. -_! Disconnect the power cord from the power socket if you do not plan on using the product for an extended period of time (vacation, etc.).
Before Using the Product Do not hold the monitor upside-down or move it by holding the stand. The product may fall and break or cause a personal injury. Do not use humidifiers or stoves around the product. An electric shock or fire may result. Rest your eyes for more than 5 minutes for every 1 hour of product use. Eye fatigue will be relieved. ! Do not touch the screen when the product has been turned on for an extended period of time as it will become hot.
Before Using the Product Correct posture to use the product Use the product in the correct posture as follows: Straighten your back. Allow a distance of 45 to 50cm between your eye and the screen, and look slightly downward at the screen. Keep your eyes directly in front of the screen. Adjust the angle so light does not reflect on the screen. Keep your forearms perpendicular to your upper arms and level with the back of your hands. Keep your elbows at about a right angle.
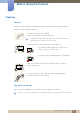
1 1.1 Preparations Checking the Contents 1.1.1 Removing the Packaging 1 Open the packaging box. Be careful not to damage the product when you open the packaging with a sharp instrument. 2 Remove the styrofoam from the product. 3 Check the components and remove the styrofoam and plastic bag. This image is for reference only. 4 Store the box in a dry area so that it can be used when moving the product in the future.
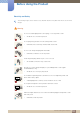
1 Preparations 1.1.2 Checking the Components Contact the dealer from whom you purchased the product if any item is missing. The appearance of the components and items sold separately may differ from the image shown.
1 Preparations Components - S24C230JL, S24C230JY, S27C230J Quick setup guide Warranty card User manual (Not available in some locations) Power cable DC power adapter DVI cable (optional) Stand Stand Connector headphone holder (optional) screws (optional) Components may vary depending on the country.
1 1.2 Preparations Parts 1.2.1 Frontal Buttons The color and shape of parts may differ from what is shown. Specifications are subject to change without notice to improve quality. Icons Description Press this button to display the On Screen Display (OSD). When in the menu, press this button to move down to the option below, or adjust values in the OSD. OSD control lock: Maintain the current settings, or lock the OSD control to prevent unintended changes to settings.
1 Preparations 1.2.2 Reverse Side The color and shape of parts may differ from what is shown. Specifications are subject to change without notice to improve quality. S24C230JL, S24C230JY, S27C230J Port S24C230BL, S27C230B About ports DC 14V Connects to the DC power adapter. DVI IN Connect to a source device using an DVI cable. RGB IN Connect to a PC using the D-SUB cable.
1 1.3 Preparations Installation 1.3.1 Attaching the Stand Before assembling the product, place the product down on a flat and stable surface so that the screen is facing downwards. Insert the stand neck into the stand base in the direction shown in the figure. Check that the stand neck is firmly connected. Tightly fasten the connecting screw at the bottom of the stand base.
1 Preparations Hold the main body of the - Caution product with your hand as shown Do not hold the product upside by the figure. down only by the stand. Push the assembled stand into the main body in the direction of the arrow as shown in the figure. The color and shape of parts may differ from what is shown. Specifications are subject to change without notice to improve quality.
1 Preparations 1.3.2 Removing the Stand Disassembly is the reverse order of assembly. The color and shape of parts may differ from what is shown. Specifications are subject to change without notice to improve quality. Place a soft cloth over the table to protect the product and place the product onto the cloth so that the front of the product faces downwards. While holding the top of the monitor with one hand, grasp and detach the stand with the other hand. Remove the headphone holder.
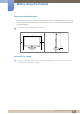
1 Preparations 1.3.3 Adjusting the Product Tilt and Height The color and shape of parts may differ from what is shown. Specifications are subject to change without notice to improve quality. -1.0°(±2.0°) ~20.0°(±2.0°) You can adjust the tilt of your monitor. Hold the lower part of the product and adjust the tilt carefully.
1 Preparations 1.3.4 Anti-theft Lock An anti-theft lock allows you to use the product securely even in public places. The locking device shape and locking method depend on the manufacturer. Refer to the user guide provided with your anti-theft locking device for details. The lock device is sold separately. The color and shape of parts may differ from what is shown. Specifications are subject to change without notice to improve quality.
2 2.1 Connecting and Using a Source Device Before Connecting 2.1.1 Pre-connection Checkpoints Before connecting a source device, read the user manual provided with it. The number and locations of ports on source devices may differ from device to device. Do not connect the power cable until all connections are completed. Connecting the power cable during connection may damage the product. 2.2 Check the types of ports at the back of the product you want to connect.
2 2.3 Connecting and Using a Source Device Connecting and Using a PC 2.3.1 Connecting a Computer to S24C230BL and S27C230B. Select a connection method suitable for your PC. Connecting parts may differ in different products. Connection Using the DVI Cable Do not connect the power cable before connecting all other cables. Ensure you connect a source device first before connecting the power cable.
2 Connecting and Using a Source Device Connection Using the HDMI-DVI Cable Do not connect the power cable before connecting all other cables. Ensure you connect a source device first before connecting the power cable. DVI IN DC 14V 1 DVI IN RGB IN Connect the HDMI-DVI cable to the [DVI IN] port on the back of the product and the HDMI port on the PC. 2 Connect the DC power adapter to the product and a power socket. Next, turn on the power switch on the PC. (For details, refer to "2.
2 Connecting and Using a Source Device 2.3.3 Driver Installation You can set the optimum resolution and frequency for this product by installing the corresponding drivers. An installation driver is contained on the CD supplied with the product. If the file provided is faulty, visit the Samsung homepage (http://www.samsung.com/) and download the file. 1 2 3 4 Insert the user manual CD provided with the product into the CD-ROM drive.
2 Connecting and Using a Source Device 2.3.4 Changing the Resolution Using a PC Adjust the resolution and refresh rate in Control Panel on your PC to obtain optimum picture quality. The picture quality of TFT-LCDs may degrade if the optimum resolution is not selected. Changing the Resolution on Windows XP Go to Control Panel 1 Display Settings and change the resolution.
2 Connecting and Using a Source Device Changing the Resolution on Windows Vista Go to Control Panel Personalization Display Settings and change the resolution.
2 Connecting and Using a Source Device Changing the Resolution on Windows 7 Go to Control Panel Display Screen Resolution and change the resolution.
2 Connecting and Using a Source Device Changing the Resolution on Windows 8 Go to Settings Control Panel Display Screen Resolution and change the resolution.
3 3.1 Using the OSD Menu on S24C230BL and S27C230B SAMSUNG MAGIC Bright This menu provides an optimum picture quality suitable for the environment where the product will be used. You can customize the brightness to suit your preferences. 3.1.1 Configuring SAMSUNG MAGIC Bright 1 2 Press [ MENU ] on the product. SAMSUNG Press [ ] to move to MAGIC Bright and press [ ] on the product. The following screen will appear.
3 3.2 Using the OSD Menu on S24C230BL and S27C230B Brightness You can adjust the general brightness of the picture. (Range: 0~100) A higher value will make the picture appear brighter. SAMSUNG This menu is not available when MAGIC Bright is set to Dynamic Contrast mode. 3.2.1 Configuring Brightness 1 2 Press [ MENU ] on the product. Press [ ] to move to Brightness and press [ ] on the product. The following screen will appear.
3 3.3 Using the OSD Menu on S24C230BL and S27C230B Contrast Adjust the contrast between the objects and background. (Range: 0~100) A higher value will increase the contrast to make the object appear clearer. SAMSUNG This option is not available when MAGIC Bright is in Cinema or Dynamic Contrast mode. 3.3.1 Configuring Contrast 1 2 Press [ MENU ] on the product. Press [ ] to move to Contrast and press [ ] on the product. The following screen will appear.
3 3.4 Using the OSD Menu on S24C230BL and S27C230B Gamma Adjust the mid-range brightness (Gamma) of the picture. SAMSUNG This option is not available when MAGIC Bright is in Cinema or Dynamic Contrast mode. 3.4.1 Configuring Gamma 1 2 Press [ MENU ] on the product. Press [ ] to move to Gamma and press [ ] on the product. The following screen will appear.
3 3.5 Using the OSD Menu on S24C230BL and S27C230B Auto Adjustment You can adjust the screen settings automatically. This function is only available in Analog mode. 3.5.1 Using Auto Adjustment 1 2 Press [ MENU ] on the product. Press [ ] to move to Auto Adjustment and press [ ] on the product. The following screen will appear.
3 3.6 Using the OSD Menu on S24C230BL and S27C230B PC/AV Mode Set PC/AV Mode to AV. The picture size will be enlarged. This option is useful when you view a movie. This function does not support Analog mode. Supplied for the wide models only such as 16:9 or 16:10. 3.6.1 Configuring PC/AV Mode 1 2 Press [ MENU ] on the product. Press [ ] to move to PC/AV Mode and press [ ] on the product. The following screen will appear.
3 3.7 Using the OSD Menu on S24C230BL and S27C230B Image Size Change the picture size. 3.7.1 Changing the Image Size 1 2 Press [ MENU ] on the product. Press [ ] to move to Image Size and press [ ] on the product. The following screen will appear. In PC mode SAMSUNG MAGIC Bright &XVWRP Brightness Contrast Gamma 0RGH Auto Adjustment PC/AV Mode Image Size $XWR $XWR :LGH Auto: Display the picture according to the aspect ratio of the input source.
3 Using the OSD Menu on S24C230BL and S27C230B 3 4 The input signal is 480p, 576p, 720p, or 1080p and monitor can display normally (Not every model can support all of these signals). This can only be set when the external input is connected through DVI and PC/AV Mode is set to AV. Press [ ] to move to the option you want and press [ ]. The selected option will be applied.
3 3.8 Using the OSD Menu on S24C230BL and S27C230B Language Set the menu language. A change to the language setting will only be applied to the onscreen menu display. It will not be applied to other functions on your PC. 3.8.1 Configuring Language 1 2 Press [ MENU ] on the product. Press [ ] to move to Language and press [ ] on the product. The following screen will appear.
3 3.9 Using the OSD Menu on S24C230BL and S27C230B Source Using this menu, you can change the input signal (Analog/DVI). If the monitor is in power saving mode or is displaying the message Check Signal Cable, press [ MENU ] and [ MENU ] to display the OSD.In this OSD press [ ] to change the input signal (Analog/DVI). 3.9.1 Configuring Souce 1 2 Press [ MENU ] on the product. Press [ ] to move to Source and press [ ] on the product. The following screen will appear.
3 Using the OSD Menu on S24C230BL and S27C230B 3.10 Exit You can exit the OSD. View the current input source, frequency and resolution. Language Source Analog **kHz **Hz NP **** x **** Exit Optimal Mode **** x **** **Hz 3.10.1 Viewing the Product Information 1 2 Press [ MENU ] on the product. Press [ ] to move to Exit. The following screen will appear. The displayed menu items may vary depending on the model. 3.10.2 Exiting from the OSD Menu 1 2 3 Press [ MENU ] on the product.
4 4.1 Using the OSD Menu on S24C230JL, S24C230JY and S27C230J SAMSUNG MAGIC Bright This menu provides an optimum picture quality suitable for the environment where the product will be used. You can customize the brightness to suit your preferences. 4.1.1 Configuring SAMSUNG MAGIC Bright 1 2 Press [ MENU ] on the product. SAMSUNG Press [ ] to move to MAGIC Bright and press [ ] on the product. The following screen will appear.
4 4.2 Using the OSD Menu on S24C230JL, S24C230JY and S27C230J Brightness You can adjust the general brightness of the picture. (Range: 0~100) A higher value will make the picture appear brighter. SAMSUNG This menu is not available when MAGIC Bright is set to Dynamic Contrast mode. 4.2.1 Configuring Brightness 1 2 Press [ MENU ] on the product. Press [ ] to move to Brightness and press [ ] on the product. The following screen will appear.
4 4.3 Using the OSD Menu on S24C230JL, S24C230JY and S27C230J Contrast Adjust the contrast between the objects and background. (Range: 0~100) A higher value will increase the contrast to make the object appear clearer. SAMSUNG This option is not available when MAGIC Bright is in Cinema or Dynamic Contrast mode. 4.3.1 Configuring Contrast 1 2 Press [ MENU ] on the product. Press [ ] to move to Contrast and press [ ] on the product. The following screen will appear.
4 4.4 Using the OSD Menu on S24C230JL, S24C230JY and S27C230J SAMSUNG MAGIC Upscale SAMSUNG MAGICUpscale function can enhance the layers of the picture details and the vividness of the picture. The function has more obvious effects on low-resolution pictures. 4.4.1 Configuring SAMSUNG MAGIC Upscale 1 2 Press [ MENU ] on the product. SAMSUNG Press [ ] to move to MAGIC Upscale and press [ ] on the product. The following screen will appear.
4 4.5 Using the OSD Menu on S24C230JL, S24C230JY and S27C230J Gamma Adjust the mid-range brightness (Gamma) of the picture. SAMSUNG This option is not available when MAGIC Bright is in Cinema or Dynamic Contrast mode. 4.5.1 Configuring Gamma 1 2 Press [ MENU ] on the product. Press [ ] to move to Gamma and press [ ] on the product. The following screen will appear.
4 4.6 Using the OSD Menu on S24C230JL, S24C230JY and S27C230J PC/AV Mode Set PC/AV Mode to AV. The picture size will be enlarged. This option is useful when you view a movie. Supplied for the wide models only such as 16:9 or 16:10. 4.6.1 Configuring PC/AV Mode 1 2 Press [ MENU ] on the product. Press [ ] to move to PC/AV Mode and press [ ] on the product. The following screen will appear.
4 4.7 Using the OSD Menu on S24C230JL, S24C230JY and S27C230J Image Size Change the picture size. 4.7.1 Changing the Image Size 1 2 Press [ MENU ] on the product. Press [ ] to move to Image Size and press [ ] on the product. The following screen will appear. In PC mode SAMSUNG MAGIC Bright : Custom Brightness : 100 Contrast : 52 SAMSUNG MAGIC Upscale : Off Gamma : Mode1 PC/AV Mode Image Size Auto : Wide Auto: Display the picture according to the aspect ratio of the input source.
4 Using the OSD Menu on S24C230JL, S24C230JY and S27C230J 3 4 The input signal is 480p, 576p, 720p, or 1080p and monitor can display normally (Not every model can support all of these signals). This can only be set when the external input is connected through DVI and PC/AV Mode is set to AV. Press [ ] to move to the option you want and press [ ]. The selected option will be applied.
4 4.8 Using the OSD Menu on S24C230JL, S24C230JY and S27C230J Language Set the menu language. A change to the language setting will only be applied to the onscreen menu display. It will not be applied to other functions on your PC. 4.8.1 Configuring Language 1 2 Press [ MENU ] on the product. Press [ ] to move to Language and press [ ] on the product. The following screen will appear.
4 4.9 Using the OSD Menu on S24C230JL, S24C230JY and S27C230J Exit You can exit the OSD. View the current input source, frequency and resolution. Language : Custom Exit DVI **kHz **Hz NP **** x **** Optimal Mode **** x **** **Hz 4.9.1 Viewing the Product Information 1 2 Press [ MENU ] on the product. Press [ ] to move to Exit. The following screen will appear. The displayed menu items may vary depending on the model. 4.9.2 Exiting from the OSD Menu 1 2 3 Press [ MENU ] on the product.
5 5.1 Troubleshooting Guide Requirements Before Contacting Samsung Customer Service Center 5.1.1 Testing the Product Before calling Samsung Customer Service Center, test your product as follows. If the problem persists, contact Samsung Customer Service Center. Check if your product is operating normally by using the product test function. If the screen is turned off and the power indicator blinks even though the product is properly connected to a PC, perform a self-diagnosis test.
5 Troubleshooting Guide Screen issue Not Optimum Mode is displayed. This message appears when the signal from the graphics card exceeds the maximum resolution or frequency for the product. Change the maximum resolution and frequency to suit the product performance, referring to Standard Signal Mode Table (page 65). The images on the screen look distorted. Check the cable connection to the product (Refer to "2.3 Connecting and Using a PC") The screen is not clear. The screen is blurry.
5 5.2 Troubleshooting Guide Q&A Question How can I change the frequency? Answer Set the frequency on your graphics card. Windows XP: Go to Control Panel Themes Display Settings Appearance and Advanced Monitor, and adjust Refresh rate under Monitor settings. Windows ME/2000: Go to Control Panel Settings Advanced Display Monitor, and adjust Refresh rate under Monitor settings.
5 Troubleshooting Guide Question How can I change the resolution? Answer Windows XP: Go to Control Panel Themes Display Appearance and Settings, and adjust the resolution. Windows ME/2000: Go to Control Panel Display Settings, and adjust the resolution. Windows Vista: Go to Control Panel Personalization Personalize Appearance and Display Settings, and adjust the resolution.
6 6.1 Specifications General Model Name Panel S24C230BL Size 59 cm Display area 521.28 mm x 293.22 mm S24C230JL S24C230JY (H x V) Pixel Pitch 0.2715 x 0.
6 Specifications Model Name S27C230B Input Signal, Terminated S27C230J RGB Analog, DVI(Digital Visual Interface) Compliant Digital RGB 0.7 Vp-p ± 5% Separate H/V sync, Composite, SOG TTL level (V high ≥ 2.0V, V low ≤ 0.8V) Dimensions (WxHxD) / Weight DVI(Digital Visual Interface) Compliant Digital RGB 0.7 Vp-p ± 5% Separate H/V sync, Composite, SOG TTL level (V high ≥ 2.0V, V low ≤ 0.8V) Without Stand 644.8 × 414.2 × 50.7 mm / 4.05 Kg 644.8 × 414.2 × 50.7 mm / 4.15 Kg With Stand 644.8 × 485.
6 Specifications S24C230BL / S24C230JL / S24C230JY / S27C230B / S27C230J Plug-and-Play This monitor can be installed and used with any Plug-and-Play compatible systems. Twoway data exchange between the monitor and PC system optimizes the monitor settings. Monitor installation takes place automatically. However, you can customize the installation settings if desired.
6 6.2 Specifications PowerSaver The power-saving function of this product reduces power consumption by switching off the screen and changing the color of the power LED if the product is not used for a specified period of time. The power is not turned off in power-saving mode. To switch the screen back on, press any key on the keyboard or move the mouse. Power-saving mode functions only when the product is connected to a PC that has a power-saving function.
6 6.3 Specifications Standard Signal Mode Table This product can be set to only one resolution for each screen size to obtain the optimum picture quality due to the nature of the panel. Therefore, a resolution other than the specified resolution may degrade the picture quality. To avoid this, it is recommended that you select the optimum resolution specified for the screen size of your product. Check the frequency when you exchange a CDT monitor (connected to a PC) for an LCD monitor.
6 Specifications Resolution Horizontal Frequency (kHz) Vertical Frequency (Hz) Pixel Clock (MHz) Sync Polarity (H/V) VESA, 1440 x 900 55.935 59.887 106.500 -/+ VESA, 1600 x 900RB 60.000 60.000 108.000 +/+ VESA, 1680 x 1050 65.290 59.954 146.250 -/+ VESA, 1920 x 1080 67.500 60.000 148.500 +/+ Horizontal Frequency The time required to scan a single line from the left to the right side of the screen is called a horizontal cycle.
Appendix Contact SAMSUNG WORLD WIDE If you have any questions or comments relating to Samsung products, please contact the SAMSUNG customer care center. NORTH AMERICA U.S.A 1-800-SAMSUNG (726-7864) http://www.samsung.com CANADA 1-800-SAMSUNG (726-7864) http://www.samsung.com/ca (English) http://www.samsung.com/ca_fr (French) MEXICO 01-800-SAMSUNG (726-7864) http://www.samsung.com LATIN AMERICA ARGENTINE 0800-333-3733 http://www.samsung.com BOLIVIA 800-10-7260 http://www.samsung.
Appendix LATIN AMERICA GUATEMALA 1-800-299-0013 http://www.samsung.com/latin (Spanish) http://www.samsung.com/latin_en (English) HONDURAS 800-27919267 http://www.samsung.com/latin (Spanish) http://www.samsung.com/latin_en (English) JAMAICA 1-800-234-7267 http://www.samsung.com NICARAGUA 00-1800-5077267 http://www.samsung.com/latin (Spanish) http://www.samsung.com/latin_en (English) PANAMA 800-7267 http://www.samsung.com/latin (Spanish) http://www.samsung.
Appendix EUROPE CYPRUS 8009 4000 only from landline http://www.samsung.com (+30) 210 6897691 from mobile and land line CZECH 800 - SAMSUNG (800-726786) http://www.samsung.com Samsung Electronics Czech and Slovak, s.r.o., Oasis Florenc, Sokolovská 394/17, 180 00, Praha 8 till 8.2.2013 . From 8.2.2013: Samsung Electronics Czech and Slovak, s.r.o. V Parku 2343/24, 148 00 - Praha 4 DENMARK 70 70 19 70 http://www.samsung.com EIRE 0818 717100 http://www.samsung.com ESTONIA 800-7267 http://www.
Appendix EUROPE PORTUGAL 808 20 - SAMSUNG (808 20 7267) http://www.samsung.com ROMANIA 08008 SAMSUNG (08008 726 7864) http://www.samsung.com TOLL FREE No. SERBIA +381 11 321 6899 http://www.samsung.com (old number still active 0700 7267864) SLOVAKIA 0800 - SAMSUNG (0800-726 786) http://www.samsung.com SPAIN 902 - 1 - SAMSUNG (902 172 678) http://www.samsung.com SWEDEN 0771 726 7864 (SAMSUNG) http://www.samsung.com SWITZERLAND 0848-SAMSUNG (7267864, CHF 0.08/min) http://www.samsung.
Appendix ASIA PACIFIC AUSTRALIA 1300 362 603 http://www.samsung.com CHINA 400-810-5858 http://www.samsung.com HONG KONG (852) 3698 - 4698 http://www.samsung.com/hk (Chinese) http://www.samsung.com/hk_en (English) INDIA 1800 3000 8282 1800 266 8282 http://www.samsung.com/in INDONESIA 0800-112-8888 021-5699-7777 http://www.samsung.com/id JAPAN 0120-327-527 http://www.samsung.com MALAYSIA 1800-88-9999 http://www.samsung.com/my NEW ZEALAND 0800 SAMSUNG (0800 726 786) http://www.samsung.
Appendix MENA KUWAIT 183-2255 (183-CALL) http://www.samsung.com/ae (English) http://www.samsung.com/ae_ar (Arabic) MOROCCO 080 100 2255 http://www.samsung.com OMAN 800-SAMSUNG (726-7864) http://www.samsung.com/ae (English) http://www.samsung.com/ae_ar (Arabic) QATAR 800-2255 (800-CALL) http://www.samsung.com/ae (English) http://www.samsung.com/ae_ar (Arabic) SAUDI ARABIA 9200-21230 http://www.samsung.com/sa (Arabic) SYRIA 18252273 http://www.samsung.
Appendix Responsibility for the Pay Service (Cost to Customers) When the service is requested, in spite of in warranty, we may charge you for a visit from a service technician in the following cases. Not a product defect Cleaning of the product, Adjustment, Explanation, Re-installation and etc. If a service technician gives instructions on how to use product or simply adjusts options without disassembling product. If a defect is caused by external environmental factors.
Appendix Correct Disposal Correct Disposal of This Product (Waste Electrical & Electronic Equipment) (Applicable in countries with separate collection systems) This marking on the product, accessories or literature indicates that the product and its electronic accessories (e.g. charger, headset, USB cable) should not be disposed of with other household waste at the end of their working life.
Appendix Terminology OSD (On Screen Display) On screen display (OSD) allows you to customize on-screen settings to optimize the picture quality as required. You can change the screen brightness, tint, size and many other settings using menus displayed on the screen. Gamma The Gamma menu adjusts the grey scale that represents middle tones on the screen. Adjusting the brightness brightens the whole screen, but adjusting Gamma only brightens the medium brightness.
Appendix Resolution Resolution is the number of horizontal pixels and vertical pixels that form a screen. It represents the level of display detail. A higher resolution displays a greater amount of information on the screen and is suitable for performing multiple tasks at the same time. E.g. A resolution of 1920 x 1080 consists of 1920 horizontal pixels (horizontal resolution) and 1080 vertical lines (vertical resolution).
Index A PowerSaver 64 Auto Adjustment 40 Q B Q & A 59 Before Connecting 28 Brightness 37, 48 C Checking the Contents 18 R Requirements Before Contacting Samsung Customer Service Center 57 Responsibility for the Pay Service (Cost to Customers) 73 Cleaning 7 Connecting and Using a PC 29 Contact SAMSUNG WORLD WIDE 67 Contrast 38, 49 Copyright 6 Correct Disposal 74 Correct posture to use the product 17 S Safety Precautions 9 SAMSUNG MAGIC Bright 36, 47 SAMSUNG MAGIC Upscale 50 Source 45 Standard Signa