THREE-CD CHANGER MINI-COMPACT SYSTEM DVD / VIDEO-CD / CD MAX-DN85/DN87 Instruction Manual Downloaded From Disc-Player.
Safety Warnings GB CLASS 1 LASER PRODUCT KLASSE 1 LASER PRODUKT LUOKAN 1 LASER LAITE KLASS 1 LASER APPARAT PRODUCTO LASER CLASE 1 CAUTION RISK OF ELECTRIC SHOCK. DO NOT OPEN CAUTION: TO REDUCE THE RISK OF ELECTRIC SHOCK, DO NOT Use of controls, adjustments or performance of procedures other than those specified herein may result in hazardous radiation exposure. CAUTION-INVISIBLE LASER RADIATION WHEN OPEN AND INTERLOCKS DEFEATED, AVOID EXPOSURE TO BEAM.
Thank you for buying this SAMSUNG mini-compact system. Contents Please take time to read these instructions. They will allow you to operate your system with ease and take full advantage of its features. SAFETY WARNINGS ................................................................................. 2 TUNER INSTALLING YOUR MINI-COMPACT SYSTEM Searching for and Storing the Radio Stations ....................................... 24 Front Panel View .......................................................
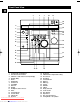
Front Panel View GB 3 2 1 32 31 Disc1 Disc2 Open/Close Disc3 Disc Change 30 29 4 28 5 Dolby Power Surround Sound Demo On/Standby 6 Timer/ Clock DSP/EQ S.Bass Display 7 R RDS 8 PTY Mono/ST. 9 10 Band Dolby Digital TUNER DVD/CD Down Tuning Mode Up Counter Reset Memory REV.Mode TAPE AUX 27 26 25 Volume Multi Jog 24 Display Enter Deck 1/2 Dubbing 23 Phones 11 CD Synchro Normal High REC/Pause Record Lock 22 12 21 13 14 20 15 16 17 18 1. 2. 3. 4. 5. 6. 7.
Remote Control GB On/Standby 1 1 2 3 2 4 5 6 3 7 8 9 Disc Skip 10/0 Clear Open/Close Mute DSP/EQ Dolby Surround S.Bass Power Sound Program Repeat 4 DVD/CD 5 38 37 36 35 34 33 32 31 30 DECK 29 Deck 1/2 Band 6 28 + Volume 27 Tuning Mode 7 26 8 9 10 11 12 13 14 15 16 17 Volume – 25 Zoom Timer On/Off 1. On/Standby 2. Numeric Buttons 3. Disc Number Skip 4. Two-Digit Track, Selection/+10 (Tuner) 5. DVD/CD Function Selection Buttons 6. Deck 1/2 7. Volume 8. Speaker Mode 9.
Rear Panel View GB 1 SUB WOOFER PRE OUT FM 75‰ 2 3 AM ANT. DIGITAL OUT OPTICAL S-VIDEO OUT 4 VIDEO OUT LINE OUT 5 CENTER SPEAKER (6‰) AUX IN L SURROUND SPEAKER (6‰) 6 R FRONT SPEAKERS (6‰) 7 11 10 9 8 1. SUB WOOFER PRE OUT 7. LOUDSPEAKER CONNECTOR TERMINALS 2. FM AERIAL CONNECTOR TERMINAL 8. CENTER SPEAKER 3. AM AERIAL CONNECTOR TERMINAL 9. SURROUND SPEAKERS 4. DVD/CD DIGITAL OUT JACK 10. VIDEO OUT 5. LINE OUT 11. S-VIDEO OUT 6. AUX INPUT Downloaded From Disc-Player.
Where to Install Your Mini-Compact System Inserting Remote Control Batteries GB To take full advantage of your new mini-compact system, follow these installation instructions before connecting the unit. Install the system on a flat, stable surface. Never place this unit on carpeting. Never place this unit in an outdoor area. Maintain an open space of approximately 6 inches (15 cm) on the sides and rear of the system, for ventilation purposes.
Connecting the Loudspeakers GB The loudspeaker connector terminals are located on the rear of the system. There are four terminals on the system: Two for the left speaker (marked L) Two for the right speaker (marked R) SUB WOOFER PRE OUT FM 75Ω AM ANT.
Connection of the subwoofer (optional) GB The subwoofer generates low-pitched tones. (Ex. Explosion, the sound of spacecraft flying, the sound of pondering, etc.) Connect the subwoofer Connect the subwoofer cord to the SUBWOOFER IN and SUB WOOFER PRE OUT terminal. Plug the AC Cord on the rear of the SUBWOOFER into an appropriate socket. PS W100E SUB WOOFER PRE OUT Power 1 SUB WOOFER PRE OUT FM 75Ω AM ANT.
Connection of the Scart Jack (optional) GB If the TV input is the Scart Jack type, please connect it as shown below. Scart Input Jack TV monitor LINE OUT SUB WOOFER PRE OUT FM 75Ω AM ANT.
Connecting the AM (MW) Aerial The AM aerial (for long and medium waves) can be: Placed on a stable surface Fixed to the wall (you must first remove the base) The AM aerial connector terminals are located on the rear of the system and are marked AM . GB To avoid noise interference, check that the loudspeaker wires do not run close to the aerial wires. Always keep them at least 2 inches (5 cm) away. AUX IN FRONT SPEAKERS (6‰) Connecting the FM Aerial How to connect a COAXIAL TYPE aerial.
Viewing the Various Functions on Your System Setting the Clock GB You can view the various functions available on your system. 1 Press the Demo button. Result: The various functions available are listed in turn on the display. Your system is equipped with a clock which allows you to turn your system on and off automatically.
Loading and Changing Compact Discs Playing a Disc GB Playback The CD disc changer can contain up to three 12 cm or 8 cm compact discs without using an adapter. Never force the compact disc carrousel when opening and closing the compartment. Never press down or place objects on the carrousel. Always treat your compact discs with care; refer, if necessary, to the section entitled “Precautions When Using Compact Discs” on page 35. 1 2 3 4 5 3 Press the Open/Close( ) button. Insert a DVD disc.
Forward/Reverse Searching DVD Playback GB Using the On-Screen Display During playback, you can search quickly through a chapter or track for a specific scene or tune. Press the Display button on the remote. T1/2 VIDEO High-Speed Playback Press the C 1/8 Each time the DVD indicator CHAPTER indicator TITLE indicator ENG VIDEO and button.
Forward/Reverse Searching Using Disc Menu/Title (Cont’d) GB To move directly to a title, chapter, or time 1 To Select the Disc Menu You can use the menus for the audio language, subtitle language, profile, etc. DVD menu contents differ from disc to disc. Press the Go To button. 1 T1/2 VIDEO The Menu Screen appears. C 1/8 00:00:00 VIDEO TITLE C 1/8 T1/2 00:00:00 VIDEO CHAPTER TIME T1/2 C 1/8 : 00:00:00 Press Number(0~9) button or the Left/Right ( / When playing a VCD version 2.
Program Playback GB Use this function with video and music CDs to play the tracks in a particular order. To Program Tracks in a particular order On/Standby 1 Press the Program button.
Program Playback (Cont’d) Selecting the Audio Language/Subtitle Language GB Selecting the Audio Language To Change the Program 1 2 Press the Up/Down ( changed. / ) button to select the track number to be Press the Enter button to select the title or chapter to be changed. The cursor moves to the next number when the Enter button is pressed again. 3 Depending on the number of languages recorded on a DVD disc, a different audio language (ENGLISH, SPANISH, FRENCH etc.
Various DVD Functions System Setup GB To enlarge an image You can use the DVD player's Setup function to select the TV screen ratio, rating limit, or digital output mode. Press the Zoom button. To Set up the System Images can be enlarged 2x and 4x. During DVD playback, press the Zoom button to zoom in 2X/4X/normal, in that order. Press ( / / / 1 From the stop mode, press the Setup button. ) to move the enlarged portion you want to watch.
System Setup (Cont’d) Setting up the Language Features GB TV SCREEN(TV SCREEN RATIO) Using the DVD player's Setup function, you can customize the Menu Language, Subtitle Language, and Disc Menu Language. Select when you want to watch a 16:9 screen ratio DVD movie on a TV with a 4:3 ratio screen. LANGUAGES SYSTEM TV SCREEN 1 4:3 LB OFF BITSTREAM RATING LEVEL DIGITAL OUTPUT : Move To set up the language feature Press the Setup button from the stop mode.
MP3 Playback GB This system is incorporated with an MP3 decoder. You can play back MP3 tracks (files)recorded on CD-Rs,CD-RWs,and CD-ROMs. Starting Playback It is recommended to turn on your TV when playing back an MP3 disc. 1 2 Press the Open/Close( ) button to load a disc. Press the Play/Pause( ) button. After detecting the disc, playback starts. The on-screen bar and the contents recorded on the MP3 disc will be shown on the TV if it is turned on.
MP3 Playback (Cont’d) MP3 Playback (Cont’d) GB Operations Using the On-Screen Display It is recommended to turn on your TV when playing back an MP3 disc. When the loaded MP3 disc is recognized, the following on-screen display appears on the TV screen. (The contents of this on-screen display varies according to the disc —the way MP3 tracks were recorded on the disc.) Repeating Playback On an MP3 disc, Repeat A↔B cannot be used. You can enjoy only repeat play. Press the Repeat button.
Dolby Surround Dolby Surround GB Adjusting Speaker Level Balance Dolby Surround modes Press the Dolby Surround button. PRO-Logic is selected, and the playback sound has the Dolby Surround effect. To cancel Dolby Surround mode Press the Dolby Surround button repeatedly until OFF is displayed. The unit is equipped with a built-in test signal generator called a noise sequencer which outputs a noise signal that ‘travels’ from channel to chanel.
Dolby Surround (Cont’d) Dolby Surround (Cont’d) GB To set the delay time Speaker Setting Methods When 5.1 Channel Surround Sound is played, you can enjoy the best sound if the distance between you and each speaker is the same. You can set Delay Time in the Center/Rear Speaker to customize the sound to the acoustics of your room. Setting Center Speaker If the distance of Dc is equal to or longer than the distance of Df in the figure, set the mode as 0ms.
Searching for and Storing the Radio Stations Searching for and Storing the Radio Stations GB You can store up to: 15 FM stations 8 MW stations 7 LW stations Timer/ Clock 1 4 5 Switch the system on by pressing On/Standby. 7 8 2,3 Band R PTY Mono/ST. TUNER 5,8 4 7 AUX 5,8 Tuning Mode Up Counter Reset Memory REV.Mode Volume Multi Jog 5 Enter Select the required frequency band by pressing TUNER (Band) again on the front panel or Tuner (Band) on the remote control.
Selecting a Stored Station You can listen to a stored radio station as follows: 1 2 3 4 5 Switch the system on by pressing On/Standby. Select the TUNER function by pressing Band on remote control. Select the required frequency band by pressing Band on the remote control or TUNER (Band) again on the front panel. Press the Tuning Mode button on the front panel of the unit, or the Tuning Mode button on the remote control until “PRESET” is displayed.
About RDS broadcasting About RDS DISPLAY function GB This unit has the RDS (Radio Data System) function, which enables for the various information such as broadcasting station, radio text, time and 30 types of programs (News, Rock, Classic, etc.) to be received from the FM RDS station together with normal radio signal. 1 2 3 About "PS NAME" MODE Displays the name of broadcasting station. Press the RDS Display button to select the PS NAME. "PS NAME" appears on the display.
PTY (Program Type) indication and PTY-SEARCH function GB The PTY information is composed of an identification symbol, which helps the FM radio to recognize the program type of each FM station. The 30 PTY modes are shown in the display by pressing the PTY button. About PTY-SEARCH 1 Tuned to an FM station broadcasting a PTY MODE. See the FM receiving method on the page 24. If the received station is transmitting the RDS information, "RDS" lights up. 2 Press the PTY button.
Listening to a Cassette CD Synchro Record Feature GB Always treat your cassettes with care; refer, if necessary, to the section entitled “Precautions When Using Audio Cassettes” on page 35. 1 2 3 4 5 This feature enables you to synchronize the start of the recording with the start of the disc or track of your choice. Select the TAPE function by pressing TAPE on the front panel. Open either cassette deck 1 or 2 by pushing and releasing the deck cover where PUSH EJECT ( ) is written.
Recording a Compact Disc Recording a Radio Program GB The direct recording mode enables you to start recording with any track on the compact disc. You can record a radio program of your choice. You can only record on cassettes in Deck 2. You can only record on cassettes in Deck 2. You do not need to adjust the volume, as it has no effect on the recording. 1 2 3 4 5 6 Switch your system on by pressing On/Standby. 7 Press the REC/Pause. Result: REC flashes. 8 Press the to start playing the track.
Selecting the Cassette Playback Mode (Deck 2 Only) Copying a Cassette (Dubbing) GB You can copy a cassette from Deck 1 to Deck 2. Two options are available: Normal speed dubbing High-speed dubbing Your mini-compact system has three cassette playback modes which enable you to listen to both sides of a cassette automatically. Press REV. Mode until the appropriate symbol is displayed. You do not need to adjust the volume, as it has no effect on the recording.
Timer Function GB The timer enables you to switch the system on or off at specific times. Example: You wish to wake up to music every morning. Timer/ Clock If you no longer want the system to be switched on or off automatically, you must cancel the timer. 1,9 Before setting the timer, check that the current time is correct. For each step, you have a few seconds to set the required options. If you exceed this time, you must start again. 1 2 3 4 5 6 7 Band R PTY Mono/ST.
Mute Function Power Sound Function GB You can turn the sound off temporarily on your system. Example: You wish to answer a telephone call. 1 2 Press Mute. This system is equipped with the Power Sound feature, which makes the sound more powerful and full-bodied. 1 To switch the sound back on (at the same volume as before), press Mute again or the Volume buttons. Press Power Sound button on the front panel. Result: The Power Sound button on the front panel lights up red. P.
Setting the System to Switch off Automatically Connecting Headphones GB You can set the system to switch off automatically. Example: You wish to go to sleep to music. 1 You can connect a set of headphones to your mini-compact system so that you can listen to music or radio programmers without disturbing other people in the room. The earphones must have a 3.5 ø jack or an appropriate adapter. Press Sleep.
Connecting to an External Source Safety Precautions GB The auxiliary input can be used to take advantage of the sound quality of your mini-compact system when listening to other sources. Examples: A television A video disc player A DAT cassette player A Hi-Fi stereo video cassette recorder The following diagrams illustrate the precautions to be taken when using or moving your mini-compact system.
Cleaning Your Mini-Compact System Precautions When Using Compact Discs GB To obtain the best possible results from your mini-compact system, you must clean the following elements regularly: The outer casing The compact disc player The cassette players (heads, rollers and drive capstans) Always unplug the system from the wall outlet: Before cleaning it If you are not going to be using it for a long time Handle your compact discs with care.
Disc type and characteristics GB This DVD player is capable of playing the following types of discs, having the corresponding logos: Disc Types Logos Recording Disc Size Types Audio + Video 12 cm Single-sided 2 layers 240 min. Double-sided 2 layers 480 min. Characteristics • DVD contains excellent sound and video due to Dolby Digital and MPEG2 system. • Various screen and audio functions can be easily selected Double-sided 2 layers 160 min. through the on-screen menu. Single-sided 2 layers 80 min.
Before Contacting the After-Sales Service GB It always takes a little time to become familiar with a new appliance. If you have any of the problems listed below, try the solutions given. They may save you the time and inconvenience of an unnecessary service call. PROBLEM G E N E R A L C D / D V D C A S S E T T E S • The main lead is not correctly plugged into a wall socket or the wall socket is not switched on. • The remote control batteries need replacing or the polarity has not been respected.
Technical Specifications GB SAMSUNG strives to improve its products at all times. Both the design specifications and these user instructions are thus subject to change without notice. RADIO LW Usable sensitivity AM (MW) Signal/noise ratio Usable sensitivity Total harmonic distortion FM Signal/noise ratio Usable sensitivity Total harmonic distortion 60 dB 40 dB 54 dB 2% 60 dB 10 dB 0.
THIS APPLIANCE IS MANUFACTURED BY: ELECTRONICS Downloaded From Disc-Player.