ME16H702SE Microwave Oven user manual This manual is made with 100 % recycled paper. imagine the possibilities Thank you for purchasing this Samsung product. ME16H702SE_AA_AC_EN.
safety information IMPORTANT SAFETY SYMBOLS AND PRECAUTIONS What the icons and signs in this user manual mean: Congratulations on your new Samsung microwave oven. This manual contains important information on the installation, use and care of your appliance. Please take time to read this manual to take full advantage of your microwave oven’s many benefits and features.
IMPORTANT SAFETY INSTRUCTIONS When using any electrical appliance, basic safety precautions should be followed, including the following: WARNING WARNING To reduce risk of burns, electric shock, fire, personal injury or exposure to excessive microwave energy: 1. Read all safety instructions before using the appliance. 2. Read and follow the specific “Precautions to avoid possible exposure to excessive microwave energy” on this page. 3. This appliance must be grounded.
GROUNDING INSTRUCTIONS This appliance must be grounded. In the event of an electrical short circuit, grounding reduces the risk of electric shock by providing an escape wire for the electrical current. This appliance is equipped with a cord that includes a grounding wire and a grounding plug. The plug must be plugged into an outlet that is properly installed and grounded. WARNING WARNING Improper use of the grounding plug can result in a risk of electric shock. • Plug into a grounded 3 prong outlet.
INSTALLATION CAUTIONS Position the oven so that the plug is easily accessible. • Failing to do so may result in electric shock or fire due to electric leakage. Do not attempt to repair, disassemble, or modify the appliance yourself. • Because a high voltage current enters the product chassis during operation, opening the chassis can result in electric shock or fire. • You may be exposed to electromagnetic waves. • When the oven requires repair, contact your nearest service center.
CAUTION USAGE CAUTIONS If the surface of the microwave is cracked, turn it off. • Failing to do so may result in electric shock. Dishes and containers can become hot. Handle with care. Hot foods and steam can cause burns. Carefully remove container coverings, directing steam away from your hands and face. Remove lids from baby food before heating. After heating baby food, stir well to distribute the heat evenly. Always test the temperature by tasting before feeding the baby.
contents SETTING UP YOUR MICROWAVE OVEN 8 8 8 8 9 9 10 10 Checking the parts Warranty and service information Setting up your microwave oven Features Checking the control panel Setting the time Child lock CLEANING AND MAINTAINING YOUR MICROWAVE OVEN 19 19 19 19 20 20 USING YOUR MICROWAVE OVEN 10 10 10 10 10 10 11 12 13 14 14 Kitchen timer button Add 30 sec button Vent buttons (2 speed & on/off) Light hi/lo/off button Cooking presets buttons Reheat button Auto defrost button Soften/melt button Micr
setting up your microwave oven Be sure to follow these instructions closely so that your new microwave oven works properly. CHECKING THE PARTS Carefully unpack your microwave oven, and make sure you’ve received all the parts shown below. If your microwave oven was damaged during shipping, or if you do not have all the parts, contact Samsung Customer Service. (Refer to the “Warranty and service information” on page 8.
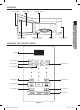
FEATURES Door Handle Window with Metal Shield Model and Serial Number Plate Glass Turntable Oven Control Panel CHECKING THE CONTROL PANEL 01 SETTING UP YOUR MICROWAVE OVEN Door Safety Lock System Cooking Guide Display See page 11 See page 12 See page 11 See page 13 See page 14 See page 10 See page 10 See page 14 See page 10 See page 10 English - 9 ME16H702SE_AA_AC_EN.
SETTING THE TIME Your microwave oven is equipped with a built-in clock. Set the clock when first installing your microwave oven and after a power failure. The time is displayed whenever the microwave oven is not being used. 1. Press the Clock button. 2. Use the number buttons to enter the current time. 3. Press the ENTER/START button. CHILD LOCK The Child Lock function allows you to lock the buttons so that the microwave oven cannot be operated accidentally. The oven can be locked at any time.
Auto cook table Cooking Preset Button Popcorn Veggies Number of Times to Press 3.5 oz. 1 package once 3.0-3.5 oz. 1 package twice Beverage Display: Ac-1 once Bacon Display: Ac-2 twice Place 2 paper towels on a plate and arrange bacon on towels. Do not overlap. Cover with additional paper towel. Remove the paper towels immediately after cooking. Amount : 2 to 6 slices. Frozen Dinner Display: Ac-3 Remove food from outer wrapping and follow box instructions for covering three times and standing.
Reheating table Follow the instructions below when reheating different types of food. Category Amount Directions Use only pre-cooked, refrigerated foods. Cover the plate with a vented plastic wrap or waxed paper tucked under the plate. If the food is not as hot as you would like after using the reheat function, continue heating using additional time and power. Plate of food 1 serving (1 plate) Contents: 3-4 oz. meat, poultry, or fish (up to 6 oz. with bone) ½ cup starch (potatoes, pasta, rice, etc.
Auto defrosting table Follow the instructions below when defrosting different types of food. Standard amount category Procedure Start with the food placed fat side down. After each stage, turn the food over and shield any warm portions with narrow strips of aluminum foil. Steaks, Chops, Fish 0.5-3.0 lbs. After each stage, rearrange the food. If there are any warm or thawed portions of food, shield them with narrow, flat pieces of aluminum foil. Remove any pieces of food that are nearly defrosted.
MICROWAVE COOKING TIMES & POWER LEVELS Power Levels The power level lets you control the heating intensity from Warm (1) to High (10). Cooking at high power levels The 10 power levels allow you to choose the optimal power level for your cooking needs. Power level Microwave output 10 (High) 100 % Boiling water. Cooking ground beef. Making candy. Cooking fresh fruit and vegetables. Cooking fish and poultry. Preheating browning dish. Reheating beverages. Bacon slices.
cookware guide Comments Oven-to-table ware Can be used, unless decorated with a metal trim. Fine glassware Can be used to warm foods or liquids. Delicate glass may break or crack if heated suddenly. Glass jars Regular glass is too thin to be used in a microwave, and can shatter. Metal Dishes, Utensils May cause arcing or fire. Freezer bag twist ties May cause arcing or fire. Paper MICROWAVE-SAFE UTENSILS Plates, cups, napkins, and kitchen paper For short cooking times and warming.
cooking guide Turning Microwave energy actually penetrates food, attracted and absorbed by the water, fat, and sugar in the food. The microwaves cause the molecules in the food to move rapidly. The rapid movement of these molecules creates friction and the resulting heat cooks the food. GENERAL MICROWAVE TIPS Dense foods, such as potatoes, take longer to heat than lighter foods. Foods with a delicate texture should be heated at a low power level to avoid becoming tough.
After standing (10 MIN.) Beef Rare 135 °F 145 °F Medium 150 °F 160 °F Well Done 160 °F 170 °F Pork Medium 150 °F 160 °F Well Done 160 °F 170 °F Poultry Dark meat 170 °F 180 °F Light meat 160 °F 170 °F Cooking time/ Power level Tuna steaks Cooking and salmon Time: steaks 7-11 min./lb. Up to 1.5 Power Level: lbs. Medium-High (7). Place the poultry on a microwave-safe roasting rack in a microwave-safe dish and cover with wax paper to prevent spattering.
the tips toward the center. When cooking cut vegetables, always cover the dish with a lid or vented microwavable plastic wrap. Whole, unpeeled vegetables such as potatoes, squash, eggplant, etc., should have their skins pierced in several spots before cooking to prevent them from bursting. For a more even cooking result, stir or rearrange whole vegetables halfway through the cook time. Generally, the denser the food, the longer the standing time.
cleaning and maintaining your microwave oven CLEANING THE EXTERIOR It’s best to clean spills on the outside of your microwave oven as they occur. Use a soft cloth and warm, soapy water. Rinse and dry. CAUTION Clean the roller rings periodically and wash the turntable as required. You can wash the turntable safely in your dishwasher. STORING AND REPAIRING YOUR MICROWAVE OVEN If you need to store your microwave oven for a short or extended period of time, choose a dust-free, dry location.
6. Remove the cover by pushing the hook and pulling up the lever. 7. Remove the bulb by turning it gently. 8. Replace the bulb with a 40 watt appliance bulb. 9. Replace the bulb holder. 10. Replace the vent grille and the 3 screws. 11. Turn the power back on. 1. Push 2. Pull up REPLACING THE CHARCOAL FILTER If your oven is vented to the inside, the charcoal filter should be replaced every 6 to 12 months and more often if necessary. The charcoal filter cannot be cleaned.
troubleshooting Check these solutions if you have a problem with your microwave: Solution The display and/or the oven is not working. Make sure the plug is properly connected to a grounded outlet. If the wall outlet is controlled by a wall switch, make sure the wall switch is turned on. Remove the plug from the outlet, wait ten seconds, and plug it in again. Reset the circuit breaker or replace any blown fuses. Plug a different appliance into the outlet.
warranty (USA) SAMSUNG OVER-THE-RANGE (OTR) MICROWAVE OVEN Limited warranty to original purchaser This SAMSUNG brand product, as supplied and distributed by Samsung Electronics America, Inc.
warranty (Canada) SAMSUNG OVER-THE-RANGE (OTR) MICROWAVE OVEN Limited warranty to original purchaser ONE (1) YEAR PARTS AND LABOR, FIVE (5) YEARS PARTS WARRANTY FOR MAGNETRON Samsung will charge a repair fee for replacing an accessory or repairing a cosmetic defect if the damage to the unit and/or damage to or loss of the accessory was caused by the customer.
Please be advised that the Samsung warranty does NOT cover service calls to explain product operation, correct improper installation, or perform normal cleaning or maintenance. CANADA 1-800-SAMSUNG(726-7864) www.samsung.com/ca/support (English) www.samsung.com/ca_fr/support (French) U.S.A Consumer Electronics 1-800-SAMSUNG(726-7864) www.samsung.com/us/support U.S.A Mobile Phones 1-800-SAMSUNG(726-7864) www.samsung.com/us/support ME16H702SE_AA_AC_EN.
ME16H702SE Four micro-ondes Manuel d'utilisation Ce manuel est en papier recyclé à 100 %. un monde de possibilités Nous vous remercions d'avoir choisi ce produit Samsung. ME16H702SE_AA_AC_CFR.
consignes de sécurité Symboles de sécurité IMPORTANTS et précautions Félicitations pour l'acquisition de votre nouveau four à microondes Samsung. Ce manuel contient des informations importantes concernant l'installation, l'utilisation et l'entretien de votre appareil. Veuillez le lire attentivement afin de profiter pleinement des nombreux avantages et fonctions qu'offre votre four micro-ondes.
CONSIGNES DE SÉCURITÉ IMPORTANTES Lorsque vous utilisez des appareils électriques, respectez les consignes de sécurité de base suivantes : AVERTISSEMENT 1. 2. 3. 4. 5. 6. 7. 8. 9. 10. 11. 12. 13. 14. 15. 16. AVERTISSEMENT Consignes visant à réduire les risques de brûlure, d'électrocution, d'incendie, de blessure ou d'exposition excessive aux microondes : Lisez attentivement toutes les consignes de sécurité avant d'utiliser l'appareil.
INSTRUCTIONS DE MISE À LA TERRE Cet appareil doit être relié à la terre. La mise à la terre réduit le risque de choc électrique, car elle fournit au courant un chemin de fuite en cas de court-circuit. Ce four est équipé d’un cordon d'alimentation disposant d’une fiche de mise à la terre. La fiche doit être branchée sur une prise secteur posée et mise à la terre conformément à la législation en vigueur.
ATTENTION SYMBOLES D'AVERTISSEMENT RELATIFS À L'INSTALLATION Installez le four de telle façon que la fiche reste facilement accessible. • Le non-respect de cette consigne peut entraîner un risque d'électrocution ou d'incendie suite à une fuite électrique. Débranchez la prise d'alimentation si l'appareil doit rester inutilisé pendant une période prolongée ou en cas d'orage. • Le non-respect de cette consigne peut entraîner un risque d'électrocution ou d'incendie.
ATTENTION AVERTISSEMENTS RELATIFS À L'UTILISATION Si des fissures apparaissent à la surface du four micro-ondes, éteignez ce dernier. • Le non-respect de cette consigne risque d'entraîner une électrocution. Les plats et récipients peuvent devenir extrêmement chauds. Manipulez-les avec précaution. Les plats chauds et la vapeur peuvent provoquer des brûlures.
sommaire réglage de votre four micro-ondes 8 8 8 8 9 9 10 10 nettoyage et entretien de votre four micro-ondes Contrôle du contenu Informations concernant la garantie et l'assistance Préparation de votre four micro-ondes Fonctions Boutons du tableau de commande Réglage de l'horloge Sécurité enfants 19 19 19 19 20 20 utilisation du four micro-ondes 10 10 10 10 10 10 11 12 13 14 14 Bouton minuterie Bouton add ajouter 30 s.
réglage de votre four micro-ondes Respectez scrupuleusement les instructions suivantes afin d'assurer le fonctionnement correct de votre nouveau four micro-ondes. Contrôle du contenu Sortez le four micro-ondes de son emballage avec précaution et vérifiez que vous disposez bien de toutes les pièces mentionnées ci-dessous.
Fonctions Poignée de la porte Fenêtre avec écran métallique Plaque des numéros de modèle et de série Plateau tournant en verre Tableau de commande du four Boutons du tableau de commande 01 Préparation de votre four micro-ondes Système de verrouillage de sécurité de la porte Guide de cuisson Affichage Reportez-vous à la page 11 Reportez-vous à la page 12 Reportez-vous à la page 11 Reportez-vous aux page 13 Reportez-vous à la page 14 Reportez-vous à la page 10 Reportez-vous aux page 10 Reportez
Réglage de l'horloge Votre four micro-ondes est équipé d'une horloge intégrée. L'horloge doit être réglée lors de l'installation initiale du four ou après une coupure de courant. L'heure s'affiche lorsque le four micro-ondes n'est pas en cours de fonctionnement. 1. Appuyez sur le bouton Clock (Horloge). 2. Utilisez le pavé numérique pour régler l’heure actuelle. 3. Appuyez sur le bouton ENTER/START(ENTRÉE/DÉPART).
Tableau de cuisson automatique Bouton Programmes de cuisson Pop-corn Quantité ou type d'aliment Nombre de pressions 3,5 oz. 1 sachet une 3,0 à 3,5 oz. 1 sachet deux trois Retirez l’aliment de son emballage et suivez les instructions figurant sur ce dernier pour connaître la méthode de couverture du plat et le temps de repos. Laissez le four refroidir pendant au moins 5 minutes avant toute nouvelle utilisation. Quantité : 8 à 14 oz.
Tableau de réchauffage Respectez les instructions suivantes lorsque vous faites réchauffer différentes catégories d'aliments. Catégorie Assiette garnie Plat mijoté Pâtes Quantité 1 portion (1 assiette) Instructions Utilisez uniquement des aliments précuits et conservés au frais. Couvrez le plat avec un film plastique perforé ou du papier sulfurisé que vous prendrez soin de replier sous le plat.
Tableau de décongélation automatique Respectez les instructions suivantes lorsque vous faites décongeler différentes catégories d'aliments. Catégorie Quantité standard Instructions Placez la viande dans le four, côté gras vers le bas. Une fois la 1ère phase de décongélation terminée, retournez les aliments et recouvrez toutes les parties chaudes de fines bandelettes d'aluminium.
Temps de cuisson au four microondes et niveaux de puissance Le bouton de puissance vous permet de régler la chaleur de Warm (Chaud) (1) à High (Élevé) (10). Cuisson à des puissances élevées Niveaux de puissance Les 10 niveaux de puissance vous permettent de choisir le niveau le plus adapté aux aliments que vous cuisinez. Niveau de puissance Rendement du four micro-ondes 10 (Élevée) 100 % Faire bouillir de l’eau. Cuire du bœuf haché. Faire des bonbons. Cuire des fruits et des légumes frais.
guide des récipients Ustensiles adaptés à la cuisson au four micro-ondes Si vous ne savez pas si un récipient est adapté à une utilisation dans un micro-ondes, effectuez le test simple suivant : 1. Placez une tasse d'eau (dans un verre mesureur) dans votre four à côté du récipient à tester. 2. Appuyez deux fois sur le bouton Add 30 sec. (Ajouter 30 s) pour les chauffer à puissance élevée pendant une minute. Une fois la minute écoulée, l'eau doit être chaude et le récipient que vous testez doit être froid.
guide de cuisson Les micro-ondes sont d'abord attirées puis absorbées par l'eau, la graisse et le sucre contenus dans les aliments. En pénétrant dans les aliments, les micro-ondes provoquent une excitation des molécules. Cette agitation crée des mouvements de friction qui génèrent la chaleur nécessaire à la cuisson des aliments. Conseils généraux d’utilisation du micro-ondes Les aliments denses, comme les pommes de terre, chauffent plus lentement que les autres aliments.
Les températures suivantes sont les températures lors du retrait du four. La température des aliments augmente durant le temps de repos. Attendez-vous à ce que la température s’élève de 10 °F pendant le temps de repos.
Avant la cuisson, percez la peau des légumes entiers non pelés (ex : pommes de terre, courges, aubergines, etc.) afin d’éviter qu’ils n’éclatent. Pour une cuisson plus uniforme, remuez les légumes entiers ou changez leur disposition à mi-cuisson. Généralement, plus l’aliment est dense, plus le temps de repos est long (le temps de repos correspond au temps nécessaire aux aliments denses et volumineux pour terminer leur cuisson une fois sortis du four).
nettoyage et entretien de votre four micro-ondes Nettoyage de la partie extérieure Il est préférable de nettoyer immédiatement les traces de projections à l'extérieur du four. Utilisez un chiffon doux et de l'eau chaude savonneuse. Rincez et séchez. Évitez de mouiller les orifices de ventilation. N'utilisez jamais de ATTENTION produits abrasifs ou de solvants chimiques tels que l’ammoniac ou l’alcool, qui risqueraient d'altérer l'apparence de votre microondes.
Remplacement du filtre à charbon 11. Remettez sous tension. Si la ventilation fonctionne à l’intérieur du four, le filtre à charbon doit être remplacé tous les 6 à 12 mois ou plus si nécessaire. Le filtre à charbon ne doit pas être nettoyé. Pour commander un nouveau filtre à charbon, contactez le Service des pièces détachées au 1-800-627-4368 ou le revendeur Samsung le plus proche de chez vous. Vous pouvez également commander en ligne sur www.samsungparts.com 1.
dépannage Problème Consultez cette section si vous rencontrez un problème de fonctionnement : Problème L’affichage fonctionne mais l’appareil ne s’allume pas. L'appareil s'éteint-il avant la fin du temps programmé ? La cuisson des aliments est trop lente. Formation d'étincelles ou d'arcs électriques. Assurez-vous que la fiche est branchée sur une prise correctement mise à la terre. Si la prise murale est commandée par un interrupteur mural, assurez-vous que celui-ci est en position ouverte.
garantie (États-Unis) FOUR MICRO-ONDES À HOTTE INTÉGRÉE DE SAMSUNG Garantie limitée à l'acquéreur d'origine Ce produit de la marque SAMSUNG, fourni et distribué par Samsung Electronics America, Inc.
garantie (Canada) FOUR MICRO-ONDES À HOTTE INTÉGRÉE DE SAMSUNG Garantie limitée à l'acquéreur d'origine UN (1) AN POUR LES PIÈCES ET LA MAIN D'ŒUVRE, CINQ (5) ANS POUR LES PIÈCES DU MAGNÉTRON Samsung facturera les travaux de réparation lorsqu'un accessoire doit être réparé ou un défaut esthétique corrigé, si l'endommagement de l'appareil et/ou l'endommagement ou la perte de l'accessoire a été occasionné(e) par le client.
Veuillez noter que la garantie Samsung n'inclut pas les déplacements du service après-vente pour expliquer le fonctionnement de l'appareil, corriger une installation non correcte ou exécuter des travaux de nettoyage ou d'entretien réguliers. CANADA 1-800-SAMSUNG(726-7864) www.samsung.com/ca/support (English) www.samsung.com/ca_fr/support (French) U.S.A Consumer Electronics 1-800-SAMSUNG(726-7864) www.samsung.com/us/support U.S.A Mobile Phones 1-800-SAMSUNG(726-7864) www.samsung.