ME21F707MJT Microwave Oven user manual This manual is made with 100 % recycled paper. imagine the possibilities ENGLISH Thank you for purchasing this Samsung product. Please register your product at www.samsung.com/register 1-800-SAMSUNG (726-7864) ME21F707MJT_AA_EN+MES_130507.
safety information Congratulations on your new Samsung microwave oven. This manual contains important information on the installation, use and care of your appliance. Please take time to read this manual to take full advantage of your microwave oven’s many benefits and features. WHAT YOU NEED TO KNOW ABOUT SAFETY INSTRUCTIONS Warnings and Important Safety Instructions in this manual do not cover all possible conditions and situations that may occur.
IMPORTANT SAFETY INSTRUCTIONS To reduce risk of burns, electric shock, fire, personal injury or exposure to excessive microwave energy, abide by all the warnings and cautions listed below. WARNING WARNING To reduce risk of burns, electric shock, fire, personal injury or exposure to excessive microwave energy: 1. Read all safety instructions before using the appliance. 2. Read and follow the specific “Precautions to avoid possible exposure to excessive microwave energy” on the previous page. 3.
GROUNDING INSTRUCTIONS This appliance must be grounded. In the event of an electrical short circuit, grounding reduces the risk of electric shock by providing an escape wire for the electrical current. This appliance is equipped with a cord that includes a grounding wire and a grounding plug. The plug must be plugged into an outlet that is properly installed and grounded. WARNING WARNING Improper use of the grounding plug can result in a risk of electric shock. • Plug into a grounded 3 prong outlet.
If the power plug or power cord is damaged, contact your nearest service center for a replacement or repair. CAUTION INSTALLATION CAUTIONS Do not attempt to repair, disassemble, or modify the appliance yourself. • Because a high voltage current enters the product chassis during operation, opening the chassis can result in electric shock or fire. • You may be exposed to electromagnetic waves. • When the oven requires repair, contact your nearest service center.
CAUTION USAGE CAUTIONS If the surface of the microwave is cracked, turn it off. • Failing to do so may result in electric shock. Dishes and containers can become hot. Handle with care. Hot foods and steam can cause burns. Carefully remove container coverings, directing steam away from your hands and face. Remove lids from baby food before heating. After heating baby food, stir well to distribute the heat evenly. Always test the temperature by tasting before feeding the baby.
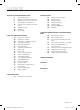
contents SETTING UP YOUR MICROWAVE OVEN 8 8 8 8 9 10 10 10 10 Checking the parts Warranty and service information Setting up your microwave oven Checking the control panel Turning on the power for the first time Setting the time Child lock My settings USING YOUR MICROWAVE OVEN 10 10 10 10 10 10 11 11 11 11 12 12 13 13 14 14 15 15 16 16 Kitchen timer button Add 30 sec.
setting up your microwave oven Be sure to follow these instructions closely so that your new microwave oven works properly. CHECKING THE PARTS Carefully unpack your microwave oven, and make sure you’ve received all the parts shown below. If your microwave oven was damaged during shipping, or if you do not have all the parts, contact Samsung Customer Service. (Refer to the “Warranty and service information” on page 8.
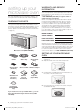
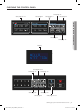
CHECKING THE CONTROL PANEL See page 10-11 See page 12 See page 14 See page 15 See page 14 See page 16 Display SETTING UP YOUR MICROWAVE OVEN See page 13 See page 10-11 See page 15 See page 10 See page 16 See page 10 See page 10 See page 10-11 setting up your new microwave oven _9 ME21F707MJT_AA_EN+MES_130507.
TURNING ON THE POWER FOR THE FIRST TIME The first time you plug the power cord into an outlet, the display turns on after four seconds with: PLEASE PRESS CLOCK AND SET TIME OF DAY. This will also occur after a power interruption. SETTING THE TIME Your microwave oven is equipped with a built-in clock. Set the clock when first installing your microwave oven and after a power failure. The time is displayed whenever the microwave oven is not being used. 1. Press the Clock button. 2.
SET TIMER BUTTON Press the Set Timer button and “0” button to cancel the Set Timer. TURNTABLE ON/OFF BUTTON For best cooking results, leave the turntable on. However, for large dishes it can be turned off. Press the Turntable On/Off button to turn the turntable on or off. CAUTION The turntable may become too hot to touch. Use pot holders to touch the turntable during and after cooking. Reheating food To reheat food on 2 levels or to reheat food on the lower level: • Multiply the reheating time by 1½.
SENSOR COOKING BUTTONS The Sensor Cooking buttons let you cook favorite foods using preset power levels and times at the touch of a button. If the food is not thoroughly cooked or reheated when you use the auto cook feature, complete the cooking process by selecting a power level and cooking the food for an additional amount of time. CAUTION Do not use the Sensor Cooking buttons continuously. The oven must cool for 5 minutes between uses or the food will overcook.
Sensor reheating table Follow the instructions below when reheating different types of food. Food Dinner plate Procedure 1 serving (1 plate) Use only precooked, refrigerated foods. Cover the plate with vented plastic wrap or waxed paper tucked under the plate. If the food is not as hot as you would like after using the Sensor Reheat function, continue heating using additional time and power. Contents: 3-4 oz. meat, poultry or fish (up to 6 oz. with bone) ½ cup starch (potatoes, pasta, rice, etc.
SOFTEN/MELT BUTTON 1. Press the Soften/Melt button. The display will show: SELECT 1 TO 4. (Refer to the Soften/Melt table below.) Press the number button from 1 to 4 buttons to select the menu. 2. Press the number 1 or 2 buttons to select the amount. Only number 1 (serving) is available for the Melt Chocolate, Soften Butter and Soften Cream Cheese options. (Refer to the Soften/Melt table for the serving size). 3. Press the Enter/Start button to begin cooking.
SNACKS BUTTON 1. Press the Snacks button. The display will show SELECT 1 TO 4. (Refer to the snack bar table below.) Press the number button from 1 to 4 buttons to select the menu. 2. Press the number 1 or 2 buttons to select the serving size. Only number 1 (serving) is available for Nachos. (Refer to the snack bar table for the serving size). 3. Press the Enter/Start button to begin cooking. Snack bar table 1 Cheese Sticks (frozen) No. / Amount 1 5-6 pcs 2 7-10 pcs 1 5-6 oz. 2 Chicken Wings 2 7-8 oz.
Power Levels The 10 power levels allow you to choose the optimal power level for your cooking needs. 1 Warm 6 Simmer 2 Low 7 Medium high 3 Defrost 8 Reheat 4 Medium low 9 Sauté 5 Medium 10 High CUSTOM COOK BUTTON cookware guide For food to cook in the microwave oven, the microwaves must be able to penetrate the food without being reflected or absorbed by the dish. It is important to choose the correct cookware, therefore, look for cookware that is marked microwave-safe.
Cookware Comments Glassware Can be used, unless decorated with a metal trim. Fine glassware Can be used to warm foods or liquids. Delicate glass may break or crack if heated suddenly. Glass jars Regular glass is too thin to be used in a microwave, and can shatter. Metal Dishes, Utensils May cause arcing or fire. Freezer bag twist ties May cause arcing or fire. Paper Plates, cups, napkins and kitchen paper For short cooking times and warming. Also to absorb excess moisture.
Turning Turn foods over midway through the cooking cycle to expose all parts to the microwave energy. This is especially important with large items such as roasts. Beef Standing Foods cooked in the microwave build up internal heat and continue to cook for a few minutes after the oven stops. Let foods stand to complete the cooking process, especially foods such as roasts and whole vegetables. Roasts need this time to complete cooking in the center without overcooking the outer areas.
COOKING SEAFOOD Place the fish on a microwave-safe roasting rack in a microwave-safe dish. Use a tight cover to steam the fish. A lighter cover of wax paper or paper towel will decrease steaming. Cook the fish until it flakes easily with a fork. Do not over cook fish. Check it after the minimum cooking time. Fillets Up to 1.5 lbs. Cooking Time: 4-8 min. / lb. Power Level: Medium-High (7). Shrimp Up to 1.5 lbs. Cooking Time: 4-6 min. / lb. Power Level: Medium-High (7).
Warm potato salad 2 lbs. small red potatoes, cut into ½-inch pieces 4 slices bacon (uncooked), cut into ½-inch pieces ¼ cup chopped onion 2 tsp. sugar 1 tsp. salt 1 tsp. flour ½ tsp. celery seed ⅛ tsp. pepper 2½ Tbs. apple cider vinegar 1. In a 2-quart casserole, combine the potatoes and ¼ cup water. Cover with lid. Cook at High until the potatoes are tender (7-10 minutes); stir twice. Drain and set aside to cool slightly. 2. In a medium bowl, cook the bacon at High until crisp (2½-3½ minutes); stir once.
CLEANING THE TURNTABLE AND ROLLER RINGS STORING AND REPAIRING YOUR MICROWAVE OVEN Clean the roller rings periodically and wash the turntable as required. You can wash the turntable safely in your dishwasher. If you need to store your microwave oven for a short or extended period of time, choose a dust-free, dry location. Dust and dampness may adversely affect the microwave parts. CLEANING THE STIRRER FAN ASSEMBLY • Do not repair, replace or service any part of your microwave oven yourself.
REPLACING THE OVEN LIGHT When replacing the oven light, make sure that you are wearing gloves to avoid injury from the heat of the bulb. 1. Unplug the oven or turn off the power at the main power supply. 2. Open the door. 3. Remove the vent cover mounting screws (2 middle screws). 4. Slide the vent grille to the left, then pull it straight out. 5. Remove the charcoal filter, if present. 6. Remove the screw securing the lamp cover. 7. Remove the bulb by pulling it out gently. 8.
REPLACING THE CHARCOAL FILTER troubleshooting Check these solutions if you have a problem with your microwave: Problem Solution The display and/or the oven is not working. Make sure the plug is properly connected to a grounded outlet. If the wall outlet is controlled by a wall switch, make sure the wall switch is turned on. Remove the plug from the outlet, wait ten seconds, and plug it in again. Reset the circuit breaker or replace any blown fuses. Plug a different appliance into the outlet.
Solution Problem Vent Motor suction force is too weak. Set the vent mode to high. The Vent Fan will only operate in low speed mode while the microwave is working. Operating noise is too loud. The MWO makes noise during operation. This is normal. If you hear an abnormal sound continuously, please contact the Samsung Call Center (1-800-7267864). Cook top lamp is too dim. Set the lamp brightness level to high. Difficult to replace Charcoal Filter.
or authorized by SAMSUNG which damage this product or result in service problems; incorrect electrical line voltage, fluctuations and surges; customer adjustments and failure to follow operating instructions, cleaning, maintenance and environmental instructions that are covered and prescribed in the instruction book; problems caused by pest infestations, and overheating or overcooking by user; glass tray or turntable; reduced magnetron power output related to normal aging.
Please be advised that the Samsung warranty does NOT cover service calls to explain product operation, correct improper installation, or perform normal cleaning or maintenance. CANADA 1-800-SAMSUNG (726-7864) MEXICO 01-800-SAMSUNG (726-7864) U.S.A Consumer Electronics U.S.A Mobile Phones ME21F707MJT_AA_EN+MES_130507.indb 26 1-800-SAMSUNG (726-7864) www.samsung.com/ca (English) www.samsung.com/ca_fr (French) www.samsung.
ME21F707MJT Horno de microondas manual del usuario Este manual está impreso en papel 100 % reciclado. imagine las posibilidades ESPAÑOL Gracias por haber escogido este producto Samsung. Por favor, registre su producto en www.samsung.com/register 1-800-SAMSUNG (726-7864) ME21F707MJT_AA_EN+MES_130507.
información sobre seguridad Felicitaciones por haber adquirido su nuevo horno de microondas Samsung. Este manual contiene información importante acerca de la instalación, el uso y el cuidado de su electrodoméstico. Lea detenidamente el manual y podrá así aprovechar todas las ventajas y las funciones del horno de microondas.
INSTRUCCIONES DE SEGURIDAD IMPORTANTES Para reducir el riesgo de quemaduras, descargas eléctricas, incendio, lesiones o exposición a energía de microondas excesiva, respete las advertencias y precauciones que se indican a continuación. ADVERTENCIA 1. 2. 3. 4. 5. 6. 7. 8. 9. 10. 11. 12. 13. 14. 15. 16.
INSTRUCCIONES DE CONEXIÓN A TIERRA Este electrodoméstico debe conectarse a tierra. En caso de cortocircuito, la conexión a tierra reduce el riesgo de descarga eléctrica ya que ofrece un cable de escape para la corriente eléctrica. Este electrodoméstico está equipado con un cable que incluye un cable y un enchufe de conexión a tierra. El enchufe debe conectarse a un tomacorriente que esté correctamente instalado y conectado a tierra.
Si se daña el enchufe o el cable de alimentación, comuníquese con el centro de servicio técnico más cercano para solicitar un repuesto o una reparación. PRECAUCIÓN PRECAUCIONES PARA LA INSTALACIÓN Coloque el horno de manera tal que se pueda acceder al enchufe fácilmente. • No hacerlo puede provocar descarga eléctrica o incendio debido a fugas eléctricas. Desenchufe el horno cuando no se utilice por períodos prolongados o durante una tormenta eléctrica.
PRECAUCIÓN PRECAUCIONES PARA EL USO Si la superficie del microondas está rajada, apague el electrodoméstico. • No hacerlo puede provocar descarga eléctrica. La vajilla y los envases pueden calentarse. Manipúlelos con cuidado. Los alimentos calientes y el vapor pueden provocar quemaduras. Retire cuidadosamente las tapas de los envases, dirigiendo el vapor lejos de las manos y la cara. Retire las tapas de los alimentos para bebé antes de calentarlos.
contenido INSTALACIÓN DE SU HORNO DE MICROONDAS 8 8 8 8 9 10 10 10 10 Control de las piezas Información sobre garantía y servicio técnico Instalación de su horno de microondas Verificar el panel de control Conectar el horno por primera vez Configurar la hora Seguro para niños Mis configuraciones GUÍA DE RECIPIENTES Y UTENSILIOS DE COCINA 16 10 10 10 10 11 11 11 11 11 12 12 13 13 14 14 15 15 16 16 Botón kitchen timer (Temporizador de la cocina) Botón add 30 sec. (Agregar 30 seg.
instalación de su horno de microondas Asegúrese de seguir estas instrucciones atentamente para que su nuevo horno de microondas funcione de manera adecuada. CONTROL DE LAS PIEZAS Desembale su horno de microondas con cuidado y asegúrese de haber recibido todas las piezas que se indican a continuación. Si su horno de microondas ha sido dañado durante el envío, o si no ha recibido todas las piezas, comuníquese con el Servicio al Cliente de Samsung.
VERIFICAR EL PANEL DE CONTROL Consulte la página 12 Consulte la página 10-11 Consulte la página 15 Consulte la página 14 Consulte la página 14 Pantalla INSTALACIÓN DE SU HORNO DE MICROONDAS Consulte la página 13 Consulte la página 16 Consulte la página 10-11 Consulte la página 15 Consulte la página 16 Consulte la página 10 Consulte la página 10 Consulte la página 10 Consulte la página 10-11 instalación de su horno de microondas _9 ME21F707MJT_AA_EN+MES_130507.
CONECTAR EL HORNO POR PRIMERA VEZ La primera vez que enchufe el cable de alimentación en un tomacorriente, la pantalla se encenderá después de cuatro segundos con el siguiente mensaje: PLEASE PRESS CLOCK AND SET TIME OF DAY (POR FAVOR OPRIMA CLOCK (RELOJ) Y CONFIGURE LA HORA DEL DÍA). Esto también sucederá después de una interrupción en el suministro de energía. CONFIGURAR LA HORA Su horno de microondas cuenta con un reloj incorporado.
BOTÓN LED HI/LO/OFF (LED ALTA/BAJA/ APAGADA) El botón LED le permite seleccionar un ajuste de brillo para la luz de su horno de microondas. Presionar (veces) 1 2 3 LED Alto Bajo Desactivado BOTÓN DE AJUSTE DEL TEMPORIZADOR El estante le ofrece la opción de recalentar más de un plato al mismo tiempo. USO DEL HORNO DE MICROONDAS Puede programar el horno de microondas para que la LED se encienda y se apague automáticamente a la hora predeterminada.
BOTONES DE SENSOR COOKING (COCCIÓN CON SENSOR) Los botones Sensor Cooking (Cocción con sensor) comprenden configuraciones que se emplean frecuentemente, permitiéndole seleccionarlas rápida y cómodamente. Si los alimentos no se cocinan bien o se recalientan cuando usa la función de cocción automática, complete el proceso de cocción seleccionando un nivel de potencia y tiempo de cocción.  PRECAUCIÓN No utilice los botones de Sensor Cooking (Cocción con sensor) de manera continua.
Tabla de recalentamiento con sensor Siga las instrucciones a continuación cuando recaliente distintos tipos de alimentos. Tipo de alimento Platos preparados Pastas 1 porción (1 plato) Procedimiento Utilice sólo alimentos precocidos, refrigerados. Cubra el plato con un envoltorio de plástico ventilado o papel encerado debajo del plato. Si la comida no está tan caliente como quisiera después de usar la función de recalentamiento con sensor, continúe calentándola con más tiempo y potencia.
BOTÓN SOFTEN/MELT (ABLANDAR/DERRETIR) 1. Presione el botón Soften/Melt (Ablandar/Derretir). La pantalla mostrará: SELECT 1 TO 4 (SELECCIONAR 1 A 4). (Consulte la tabla Soften/Melt (Ablandar/Derretir) a continuación.) Presione los botones numéricos del 1 al 4 para seleccionar el menú. 2. Presione los botones 1 o 2 para seleccionar la cantidad. Sólo el número 1 (porción) se encuentra disponible para las opciones Derretir chocolate, Ablandar manteca y Ablandar queso crema.
BOTÓN SNACKS (BOTANAS) 1. Presione el botón Snacks (Botanas). En la pantalla se verá SELECT 1 TO 4 (SELECCIONAR 1 A 4). (Consulte la tabla de Botanas a continuación.) Presione los botones numéricos del 1 al 4 para seleccionar el menú. 2. Presione los botones 1 ó 2 para seleccionar el tamaño de la porción. Solo el número 1 (porción) está disponible para los nachos. (Consulte la tabla de Botanas para obtener información acerca del tamaño de las porciones). 3.
Niveles de potencia Los 10 niveles le permiten escoger el mejor nivel de potencia para sus necesidades a la hora de cocinar.
Utensilio de cocina Comentarios Recipientes de vidrio Puede utilizarse, a menos que esté decorada con un ribete de metal. Cristalería fina Puede utilizarse para calentar alimentos o líquidos. La cristalería delicada puede romperse o agrietarse si se calienta repentinamente. Frascos de vidrio El vidrio normal es demasiado delgado para usar en un microondas y puede romperse. Metal Recipientes, utensilios Pueden provocar un arco eléctrico o un incendio.
Dar vuelta Dé vuelta los alimentos en la etapa intermedia del ciclo de cocción para exponer todas las partes a la energía de microondas. Esto es de especial importancia para productos grandes como, por ejemplo, carnes asadas. Dejar reposar Los alimentos cocidos en el microondas acumulan calor interno y continúan cocinándose durante algunos minutos después de que el horno se detiene.
COCINAR MARISCOS Coloque el pescado sobre una asadera para microondas en una fuente para microondas. Utilice una cubierta ceñida para cocinar el pescado al vapor. Una cubierta más liviana de papel encerado o toalla de papel disminuirá el vapor. Cocine el pescado hasta que se pueda desmenuzar fácilmente con un tenedor. No cocine el pescado en exceso. Verifique el nivel de cocción después del tiempo mínimo.
Ensalada tibia de patatas 2 lb. de pequeñas patatas rojas, cortadas en trozos de ½ pulg. 4 rodajas de panceta (sin cocinar), cortadas en trozos de ½ pulg. ¼ taza de cebolla picada 2 cucharadas de azúcar 1 cucharada de sal 1 cucharada de harina ½ cucharada de semillas de apio ⅛ cucharada de pimienta 2½ cucharadas de vinagre de manzana 1. En una fuente de 2 cuartos de galón, mezcle las patatas y ¼ taza de agua. Cubra con una tapa.
LIMPIEZA DEL ANILLO Y EL PLATO GIRATORIO ALMACENAMIENTO Y REPARACIÓN DE SU HORNO DE MICROONDAS Limpie los anillos giratorios periódicamente y lave el plato giratorio tanto como sea necesario. El plato giratorio puede lavarse perfectamente en el lavavajillas. Si debe guardar su horno de microondas durante un período corto o prolongado, escoja un lugar seco y sin polvo. El polvo y la humedad pueden afectar las piezas del horno de microondas.
REEMPLAZO DE LA LUZ DEL HORNO Al reemplazar la luz del horno, asegúrese de usar guantes para evitar lesiones por el calor del foco. 1. Desenchufe el horno o corte la electricidad de la fuente de alimentación principal. 2. Abra la puerta. 3. Retire los tornillos de montaje de la cubierta de ventilación (2 tornillos del medio). 4. Corra la rejilla de ventilación hacia la izquierda y retírela directamente. 5. Retire el filtro de carbón, si lo hubiere. 6. Retire el tornillo que sujeta la cubierta de la lámpara.
REEMPLAZO DEL FILTRO DE CARBÓN guía de solución de problemas Verifique estas soluciones si tiene algún problema con su microondas: Problema Solución La pantalla y/o el horno no funciona. Asegúrese de que el enchufe esté conectado adecuadamente a un tomacorriente con conexión a tierra. Si el tomacorriente está controlado por un interruptor de pared, asegúrese de que el interruptor de pared esté encendido. Retire el enchufe del tomacorriente, espere diez segundos y vuelva a enchufarlo.
Problema Solución Provoca interferencias con la televisión o la radio. Esto es similar a la interferencia causada por otros artefactos pequeños, como, por ejemplo, los secadores de cabello. Aleje más su microondas (o electrodoméstico) de otros aparatos, como su TV o radio. La fuerza de succión del motor del ventilador es demasiado débil. Establezca el modo del ventilador en un nivel alto. El ventilador sólo funcionará en el modo de velocidad baja mientras el microondas esté en funcionamiento.
GARANTÍA productos, equipo, sistemas, utilidades, servicios, piezas, suministros, accesorios, aplicaciones, instalaciones, reparaciones, cableado externo o conectores no provistos ni autorizados por SAMSUNG que dañen este producto o que acarreen problemas en el servicio; voltaje de la línea eléctrica incorrecto, fluctuaciones y sobretensión; ajustes del cliente e incumplimiento de lo establecido en el manual de instrucciones, instrucciones de limpieza, mantenimiento y ambientales que están cubiertas y reco
Tenga en cuenta que la garantía de Samsung NO cubre las llamadas de servicio para explicar el funcionamiento del producto, corregir una instalación inadecuada o realizar tareas de limpieza o mantenimiento. CANADA 1-800-SAMSUNG (726-7864) MEXICO 01-800-SAMSUNG (726-7864) U.S.A Consumer Electronics U.S.A Mobile Phones ME21F707MJT_AA_EN+MES_130507.indb 26 1-800-SAMSUNG (726-7864) www.samsung.com/ca (English) www.samsung.com/ca_fr (French) www.samsung.