ME21R7051S* Microwave Oven user manual imagine the possibilities Thank you for purchasing this Samsung product.
safety information IMPORTANT SAFETY SYMBOLS AND PRECAUTIONS What the icons and signs in this user manual mean: Congratulations on your new Samsung microwave oven. This manual contains important information on the installation, use and care of your appliance. Please take time to read this manual to take full advantage of your microwave oven’s many benefits and features.
IMPORTANT SAFETY INSTRUCTIONS When using any electrical appliance, basic safety precautions should be followed, including the following: WARNING WARNING To reduce risk of burns, electric shock, fire, personal injury or exposure to excessive microwave energy: 1. Read all safety instructions before using the appliance. 2. Read and follow the specific “Precautions to avoid possible exposure to excessive microwave energy” on this page. 3. This appliance must be grounded.
GROUNDING INSTRUCTIONS This appliance must be grounded. In the event of an electrical short circuit, grounding reduces the risk of electric shock by providing an escape wire for the electrical current. This appliance is equipped with a cord that includes a grounding wire and a grounding plug. The plug must be plugged into an outlet that is properly installed and grounded. WARNING WARNING Improper use of the grounding plug can result in a risk of electric shock. • Plug into a grounded 3 prong outlet.
When the power plug or power cord is damaged, contact your nearest service center for a replacement or repair. CAUTION Do not attempt to repair, disassemble, or modify the appliance yourself. • Because a high voltage current enters the product chassis during operation, opening the chassis can result in electric shock or fire. • You may be exposed to electromagnetic waves. • When the oven requires repair, contact your nearest service center.
CAUTION USAGE CAUTIONS If the surface of the microwave is cracked, turn it off. • Failing to do so may result in electric shock. Dishes and containers can become hot. Handle with care. Hot foods and steam can cause burns. Carefully remove container coverings, directing steam away from your hands and face. Remove lids from baby food before heating. After heating baby food, stir well to distribute the heat evenly. Always test the temperature by tasting before feeding the baby.
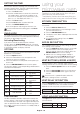
contents SETTING UP YOUR MICROWAVE OVEN 8 8 8 8 9 9 10 10 10 USING YOUR MICROWAVE OVEN 10 10 10 10 10 10 11 11 11 11 12 12 13 14 14 15 15 16 16 17 17 COOKING GUIDE 18 Checking the parts Warranty and service information Setting up your microwave oven Features The control panel Setting the time Child lock Options Kitchen timer button Add 30 sec button Vent buttons (4 speed & on/off) Vent delay off button Light hi/lo/off button Set timer button Turntable on/off button Metal shelf Eco mode Sensor cooki
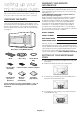
setting up your microwave oven Be sure to follow these instructions closely so that your new microwave oven works properly. CHECKING THE PARTS Carefully unpack your microwave oven, and make sure you’ve received all the parts shown below. If your microwave oven was damaged during shipping, or if you do not have all the parts, contact Samsung Customer Service. (Refer to the “Warranty and service information” on page 8.
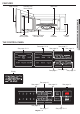
FEATURES Door Handle Wire Rack Window with Metal Shield Model and Serial Number Plate Glass Turntable Cooking Guide See page 14 See page 15 See page 16 See page 17 See page 13 See page 14 THE CONTROL PANEL See page 12-13 See page 10-11 Display See page 10 See page 17 See page 10 See page 10 See page 15 See page 17 English - 9 See page 10-11 01 SETTING UP YOUR MICROWAVE OVEN Door Safety Lock System
SETTING THE TIME Your microwave oven is equipped with a built-in clock. Set the clock when first installing your microwave oven and after a power failure. The time is displayed whenever the microwave oven is not being used. 1. Press the Clock button. 2. Use the number buttons to enter the current time. You need to press at least three numbers to set the clock. For example, if the current time is 5:00, press 5, 0, 0. The display will show: 500. 3. Press the Clock button. 4.
SET TIMER BUTTON The shelf gives you the option to reheat more than one dish at the same time. TURNTABLE ON/OFF BUTTON For best cooking results, leave the turntable on. However, for large dishes it can be turned off. Press the Turntable On/Off button to turn the turntable on or off. CAUTION The turntable may become too hot to touch. Use pot holders to touch the turntable during and after cooking. METAL SHELF Use the metal shelf to cook more than one item at the same time.
SENSOR COOKING BUTTONS The Sensor Cooking buttons let you cook favorite foods using preset power levels and times at the touch of a button. If the food is not thoroughly cooked or reheated when you use the auto cook feature, complete the cooking process by selecting a power level and cooking the food for an additional amount of time. CAUTION Do not use the Sensor Cooking buttons continuously. The oven must cool for 5 minutes between uses or the food will overcook.
Reheating table Follow the instructions below when reheating different types of food. Food Dinner plate (rh-2) Pasta (rh-3) Procedure 1 serving (1 plate) Use only precooked, refrigerated foods. Cover the plate with vented plastic wrap or waxed paper tucked under the plate. If the food is not as hot as you would like after using the Sensor Reheat function, continue heating using additional time and power. Contents: 3-4 oz. meat, poultry, or fish (up to to 6 oz.
FIT CHOICE BUTTON 1. Press the Fit Choice button. Press the button repeatedly to cycle through the available items. (Refer to the Fit Choice table below for a list of the items.) 2. Press the 1, 2, 3, or 4 button to select the amount. 3. Press the ENTER/START button to begin cooking. Fit Choice table Menu / item No. / Amount Remarks 1 1 serving FC-1 Spinach 2 2 servings 3 3 servings Wash and clean the spinach. Place the spinach in a microwave safe bowl.
SOFTEN/MELT BUTTON 1. Press the Soften/Melt button. Press the button repeatedly to cycle through the available items. (Refer to the Soften/Melt table below for a list of the items.) 2. Press the number 1 or 2 button to select the amount. You can cook only 1 serving using the Melt Chocolate, Soften Butter, and Soften Cream Cheese options. (Refer to the Soften/Melt table for the serving size.) 3. Press the ENTER/START button to begin cooking. Soften / Melt table St-1 Melt butter No.
SNACKS BUTTON 1. Press the Snacks button. Press the button repeatedly to cycle through the available items. (Refer to the Snacks table below for a list of the items.) 2. Press the number 1 or 2 button to select the serving size. You can cook only 1 serving for Nachos. (Refer to the Snacks table for the serving size.) 3. Press the ENTER/START button to begin cooking. Snacks table Menu / item Sn-1 Cheese sticks (frozen) No. / Amount 1 5 - 6 pcs (1 Sr) 2 7 - 10 pcs (2 Sr) 1 5 - 6 oz.
cookware guide Power Levels The 10 power levels allow you to choose the optimal power level for your cooking needs. 1 Warm 6 Simmer 2 Low 7 Medium high 3 Defrost 8 Reheat 4 Medium low 9 Sauté 5 Medium 10 High KEEP WARM You can keep cooked food warm in your microwave oven for up to 99 minutes 99 seconds. 1. Press the Keep Warm button. 2. Enter the warming time. 3. Press the ENTER/START button. Keep Warm operates for up to 99 minutes 99 seconds.
Cookware cooking guide Comments Glassware Oven-to-table ware Can be used, unless decorated with a metal trim. Fine glassware Can be used to warm foods or liquids. Delicate glass may break or crack if heated suddenly. Glass jars Regular glass is too thin to be used in a microwave, and can shatter. GENERAL MICROWAVE TIPS Metal Dishes, Utensils May cause arcing or fire. Freezer bag twist ties May cause arcing or fire.
Turning Beef Standing Adding moisture Microwave energy is attracted to water molecules. Food that is uneven in moisture content should be covered or allowed to stand so that the heat disperses evenly. Add a small amount of water to dry food to help it cook. Venting After covering a dish with plastic wrap, vent the plastic wrap by turning back one corner to let excess steam escape. COOKING MEAT Place the meat fat side down on a microwave-safe roasting rack in a microwave-safe dish.
COOKING SEAFOOD Place the fish on a microwave-safe roasting rack in a microwave-safe dish. Use a tight cover to steam the fish. A lighter cover of wax paper or paper towel will decrease steaming. Cook the fish until it flakes easily with a fork. Do not over cook fish. Check it after the minimum cooking time. Cooking time/ power level Tuna steaks Cooking and salmon Time: steaks 6-10 min. / lb. Up to 1.5 Power Level: lbs. Medium-High (7). Food Fillets Up to 1.5 lbs. Cooking Time: 4-8 min. / lb.
Warm potato salad Makes 6 servings. cleaning and maintaining your microwave oven Keeping your microwave oven clean improves its performance, wards off unnecessary repairs, and lengthens its life. CLEANING THE EXTERIOR It’s best to clean spills on the outside of your microwave oven as they occur. Use a soft cloth and warm, soapy water. Rinse and dry. CAUTION Do not get water into the vents.
CLEANING THE TURNTABLE AND ROLLER RINGS Clean the roller rings periodically and wash the turntable as required. You can wash the turntable safely in your dishwasher. 7. Remove the bulb by turning it gently. 8. Replace the bulb with a 40 watt appliance bulb. 9. Replace the bulb holder. 10. Replace the vent grille and the 2 screws. 11. Turn the power back on.
REPLACING THE CHARCOAL FILTER troubleshooting Check these solutions if you have a problem with your microwave: Problem Solution The display and/or the oven is not working. Make sure the plug is properly connected to a grounded outlet. If the wall outlet is controlled by a wall switch, make sure the wall switch is turned on. Remove the plug from the outlet, wait ten seconds, and plug it in again. Reset the circuit breaker or replace any blown fuses. Plug a different appliance into the outlet.
Problem Operating noise is too loud. Solution The MWO makes noise during operation. This is normal. If you hear an abnormal sound continuously, please contact the Samsung Call Center (1-800-7267864). appendix Specifications Model number ME21R7051SS,G/AA Timer : 99 minutes, 99 seconds Cook top lamp is too dim. Set the lamp brightness level to high. Oven Cavity : 2.1 cu ft Difficult to replace Charcoal Filter. Please refer to the instructions for replacing the charcoal filter in the user’s manual.
warranty (USA) SAMSUNG OVER-THE-RANGE (OTR) MICROWAVE OVEN LIMITED WARRANTY TO ORIGINAL PURCHASER WITH PROOF OF PURCHASE One (1) Year Parts and Labor Ten (10) Years Magnetron Part (Part Only) This limited warranty is valid only on products purchased and used in the United States that have been installed, operated, and maintained according to the instructions attached to or furnished with the product.
warranty (Canada) SAMSUNG OVER-THE-RANGE (OTR) MICROWAVE OVEN Limited warranty to original purchaser This SAMSUNG brand product, as supplied and distributed by Samsung Electronics Canada, Inc.
memo memo
Please be advised that the Samsung warranty does NOT cover service calls to explain product operation, correct improper installation, or perform normal cleaning or maintenance. QUESTIONS OR COMMENTS? COUNTRY CALL OR VISIT US ONLINE AT U.S.A Consumer Electronics 1-800-SAMSUNG (726-7864) www.samsung.com/us/support CANADA 1-800-SAMSUNG (726-7864) www.samsung.com/ca/support (English) www.samsung.
ME21R7051S* Four micro-ondes manuel d'utilisation un monde de possibilités Nous vous remercions d'avoir choisi ce produit Samsung.
consignes de sécurité Félicitations pour l'acquisition de votre nouveau four à micro-ondes Samsung. Ce manuel contient des informations importantes concernant l'installation, l'utilisation et l'entretien de votre appareil. Veuillez le lire attentivement afin de profiter pleinement des nombreux avantages et fonctions qu'offre votre four micro-ondes.
CONSIGNES DE SÉCURITÉ IMPORTANTES Lorsque vous utilisez des appareils électriques, respectez les consignes de sécurité de base suivantes : AVERTISSEMENT AVERTISSEMENT Consignes visant à réduire les risques de brûlure, d'électrocution, d'incendie, de blessure ou d'exposition excessive aux micro-ondes : 1. Lisez attentivement toutes les consignes de sécurité avant d'utiliser l'appareil. 2.
INSTRUCTIONS DE MISE À LA TERRE Cet appareil doit être relié à la terre. La mise à la terre réduit le risque de choc électrique, car elle fournit au courant un chemin de fuite en cas de court-circuit. Ce four est équipé d’un cordon d'alimentation disposant d’une fiche de mise à la terre. La fiche doit être branchée sur une prise secteur posée et mise à la terre conformément à la législation en vigueur.
Si la fiche ou le cordon d'alimentation est endommagé(e), contactez le centre de dépannage le plus proche pour demander à ce qu'elle soit remplacée ou réparée. ATTENTION SYMBOLES D'AVERTISSEMENT RELATIFS À L'INSTALLATION Installez le four de telle façon que la fiche reste facilement accessible. • Le non-respect de cette consigne peut entraîner un risque d'électrocution ou d'incendie suite à une fuite électrique.
ATTENTION AVERTISSEMENTS RELATIFS À L'UTILISATION Si des fissures apparaissent à la surface du four micro-ondes, éteignez ce dernier. • Le non-respect de cette consigne risque d'entraîner une électrocution. Les plats et récipients peuvent devenir extrêmement chauds. Manipulez-les avec précaution. Les plats chauds et la vapeur peuvent provoquer des brûlures.
sommaire RÉGLAGE DE VOTRE FOUR MICRO-ONDES 8 8 8 8 9 9 10 10 10 Contrôle du contenu Informations concernant la garantie et l'assistance Préparation de votre four microondes Fonctions Panneau de configuration Réglage de l'horloge Sécurité enfants Options UTILISATION DU FOUR MICRO-ONDES 10 10 10 10 10 10 11 11 11 11 12 12 13 14 14 15 15 16 16 17 17 Bouton minuterie Bouton ajouter 30 s Boutons ventilation (4 vitesses et marche/arrêt) Bouton arrêt retardé de la ventilation Bouton éclairage élevé/faible/
réglage de votre four micro-ondes Respectez scrupuleusement les instructions suivantes afin d'assurer le fonctionnement correct de votre nouveau four micro-ondes. CONTRÔLE DU CONTENU Sortez le four micro-ondes de son emballage avec précaution et vérifiez que vous disposez bien de toutes les pièces mentionnées ci-dessous.
FONCTIONS Poignée de la porte Grille métallique Fenêtre avec écran métallique Plaque des numéros de modèle et de série Plateau tournant Guide de cuisson en verre PANNEAU DE CONFIGURATION Reportez-vous aux pp. 12 et 13 Reportez-vous aux pp.
RÉGLAGE DE L'HORLOGE Votre four micro-ondes est équipé d'une horloge intégrée. L'horloge doit être réglée lors de l'installation initiale du four ou après une coupure de courant. L'heure s'affiche lorsque le four micro-ondes n'est pas en cours de fonctionnement. 1. Appuyez sur le bouton Clock (Horloge). 2. Utilisez le pavé numérique pour régler l’heure actuelle. Vous devez appuyer sur au moins trois chiffres pour régler l’horloge. Par exemple, s’il est 5h00, saisissez 5, 0, 0.
BOUTON RÉGLAGE DE LA MINUTERIE La grille vous permet de faire réchauffer plusieurs plats simultanément. BOUTON MARCHE/ARRÊT DU PLATEAU Pour de meilleurs résultats de cuisson, laissez le plateau tournant activé. En revanche, désactivez-le pour les plats de grande taille. Appuyez sur le bouton Turntable On/Off (Marche/Arrêt du plateau) pour activer ou désactiver le plateau tournant. ATTENTION Le plateau tournant peut devenir extrêmement chaud.
BOUTONS CUISSON PAR CAPTEUR Les boutons Sensor cooking (Cuisson par capteur) vous permettent de faire cuire vos plats préférés à l'aide d'une seule pression. Si les aliments ne sont pas assez cuits ou pas assez chauds après un programme de cuisson automatique, terminez la cuisson en sélectionnant manuellement une puissance et un temps de cuisson. ATTENTION N'utilisez pas la fonction Sensor Cooking (Cuisson par capteur) plusieurs fois d'affilée.
Tableau de réchauffage Respectez les instructions suivantes lorsque vous faites réchauffer différentes catégories d'aliments. Aliment Assiette repas (rh-2) Pâtes (rh-3) 1 portion (1 assiette) Instructions Utilisez uniquement des aliments précuits et conservés au frais. Couvrez le plat avec un film plastique perforé ou du papier sulfurisé que vous prendrez soin de replier sous le plat.
BOUTON SELON SES PRÉFÉRENCES 1. Appuyez sur le bouton Fit Choice (Selon ses préférences). Appuyez plusieurs fois sur le bouton pour faire défiler les aliments disponibles. (Reportez-vous au tableau Selon ses préférences ci-dessous pour consulter une liste des aliments.) 2. Appuyez sur le bouton 1, 2, 3 ou 4 pour sélectionner le nombre de portions. 3. Appuyez sur le bouton ENTER/START (ENTRÉE/DÉPART) pour démarrer la cuisson.
BOUTON RAMOLLIR/FAIRE FONDRE 1. Appuyez sur le bouton Soften/Melt (Ramollir/Faire fondre). Appuyez plusieurs fois sur le bouton pour faire défiler les aliments disponibles. (Reportez-vous au tableau Ramollir/Faire fondre ci-dessous pour consulter une liste des aliments.) 2. Appuyez sur le bouton 1 ou 2 pour sélectionner le nombre de portions. Vous ne pouvez faire cuire que 1 portion avec les options Faire fondre du chocolat, Faire ramollir du beurre et Faire ramollir du fromage à la crème.
BOUTON EN-CAS 1. Appuyez sur le bouton Snacks (En-cas). Appuyez plusieurs fois sur le bouton pour faire défiler les aliments disponibles. (Reportez-vous au tableau des snacks ci-dessous pour consulter une liste des aliments.) 2. Appuyez sur les boutons 1 ou 2 pour sélectionner le nombre de portions. Vous ne pouvez faire cuire que 1 portion de Nachos. (Reportez-vous au tableau des snacks pour la quantité.) 3. Appuyez sur le bouton ENTER/START (ENTRÉE/DÉPART) pour démarrer la cuisson.
Niveaux de puissance Les 10 niveaux de puissance vous permettent de choisir le niveau le plus adapté aux aliments que vous cuisinez. 1 Chaud 6 Mijotage 2 Faible 7 Moyennement élevé 3 Décongélation 8 Réchauffage 4 Moyennement faible 9 Sauté 5 À point 10 Élevé Vous pouvez maintenir les aliments au chaud dans votre four pendant une période pouvant aller jusqu'à 99 minutes et 99 secondes. 1. Appuyez sur le bouton Keep Warm (Maintien au chaud). 2. Entrez le temps de chauffe. 3.
Récipient guide de cuisson Remarques Plats en verre Plats de service adaptés à la cuisson au four Peuvent être utilisés sauf s'ils sont ornés de décorations métalliques. Plats en cristal Peuvent être utilisés pour faire réchauffer des aliments ou des liquides. Les objets fragiles peuvent se briser ou se fendre s'ils sont brusquement soumis à une chaleur excessive. Pots en verre Le verre ordinaire est trop fin pour pouvoir être utilisé dans un micro-ondes et risque de se briser.
Protection Recouvrez les aliments de bandelettes de papier aluminium pour éviter la surcuisson. Les extrémités des ailes ou des cuisses de volaille ainsi que les coins des plats carrés sont par exemple des zones particulièrement sensibles. Utilisez uniquement de petites quantités de papier aluminium. De grandes quantités risquent d’endommager votre four. Les températures suivantes sont les températures lors du retrait du four. La température des aliments augmente durant le temps de repos.
CUISSON DES FRUITS DE MER Placez le poisson sur une grille à rôtir adaptée à la cuisson aux micro-ondes et dans un plat du même type. Utilisez un couvercle hermétique pour cuire le poisson à l’étuvée. L'utilisation de papier sulfurisé ou d'une serviette en papier comme couvercle produit moins de vapeur. Faites cuire le poisson jusqu’à ce qu’il s’émiette facilement à la fourchette. Attention à ne pas faire trop cuire le poisson. Privilégiez le temps de cuisson minimum et vérifiez la cuisson juste après.
nettoyage et entretien de votre four microondes Salade de pommes de terre chaude 1. Dans un faitout d'une contenance de 2 litres, incorporez les pommes de terre avec le ¼ de tasse d’eau. Couvrez. Faites cuire à puissance élevée jusqu’à ce que les pommes de terre soient tendres (7 à 10 min.), en mélangeant deux fois. Égouttez et laissez refroidir le tout quelques instants. 2.
NETTOYAGE DU PLATEAU TOURNANT ET DE L'ANNEAU DE GUIDAGE Nettoyez régulièrement l'anneau de guidage et lavez le plateau tournant dès que nécessaire. Le plateau tournant peut être lavé en toute sécurité au lave-vaisselle. 6. 7. 8. 9. 10. 11. Retirez la protection en poussant le crochet et en levant le levier. Retirez l’ampoule en la dévissant doucement. Installez une ampoule neuve de 40 W. Remontez le support de l’ampoule. Replacez la grille du ventilateur et les 2 vis. Remettez sous tension.
REMPLACEMENT DU FILTRE À CHARBON Si la ventilation fonctionne à l’intérieur du four, le filtre à charbon doit être remplacé tous les 6 à 12 mois ou plus si nécessaire. Le filtre à charbon ne doit pas être nettoyé. Pour commander un nouveau filtre à charbon, contactez le Service des pièces détachées au 1-800-627-4368 ou le revendeur Samsung le plus proche de chez vous. Vous pouvez également commander en ligne sur www.samsungparts.
Problème Formation d'étincelles ou d'arcs électriques. Solution Retirez du four les éventuels ustensiles, plats ou attaches en métal. Si vous utilisez du papier aluminium, découpez uniquement de petites bandelettes et ménagez un espace d'au moins un pouce entre l'aluminium et les parois internes du four. Le plateau tournant est bruyant ou ne tourne pas. Nettoyez le plateau tournant, son anneau et la sole du four. Assurez-vous que le plateau tournant et son anneau sont placés correctement.
garantie (États-Unis) FOUR MICRO-ONDES À HOTTE INTÉGRÉE DE SAMSUNG GARANTIE LIMITÉE POUR L’ACHETEUR INITIAL AVEC PREUVE D’ACHAT Un (1) an (pièces et main d’œuvre) Dix (10) ans (pièces du magnétron uniquement) La présente garantie limitée ne s’applique qu’aux produits achetés et utilisés au sein des États-Unis et ayant été installés, utilisés et entretenus conformément aux instructions jointes ou fournies avec le produit.
garantie (Canada) FOUR MICRO-ONDES À HOTTE INTÉGRÉE DE SAMSUNG Garantie limitée à l'acquéreur d'origine Ce produit de la marque SAMSUNG, fourni et distribué par Samsung Electronics Canada, Inc.
notes notes
Veuillez noter que la garantie Samsung n'inclut pas les déplacements du service après-vente pour expliquer le fonctionnement de l'appareil, corriger une installation non correcte ou exécuter des travaux de nettoyage ou d'entretien réguliers. UNE QUESTION ? UN COMMENTAIRE ? PAYS N° DE TÉLÉPHONE SITE INTERNET U.S.A Consumer Electronics 1-800-SAMSUNG (726-7864) www.samsung.com/us/support CANADA 1-800-SAMSUNG (726-7864) www.samsung.com/ca/support (English) www.samsung.